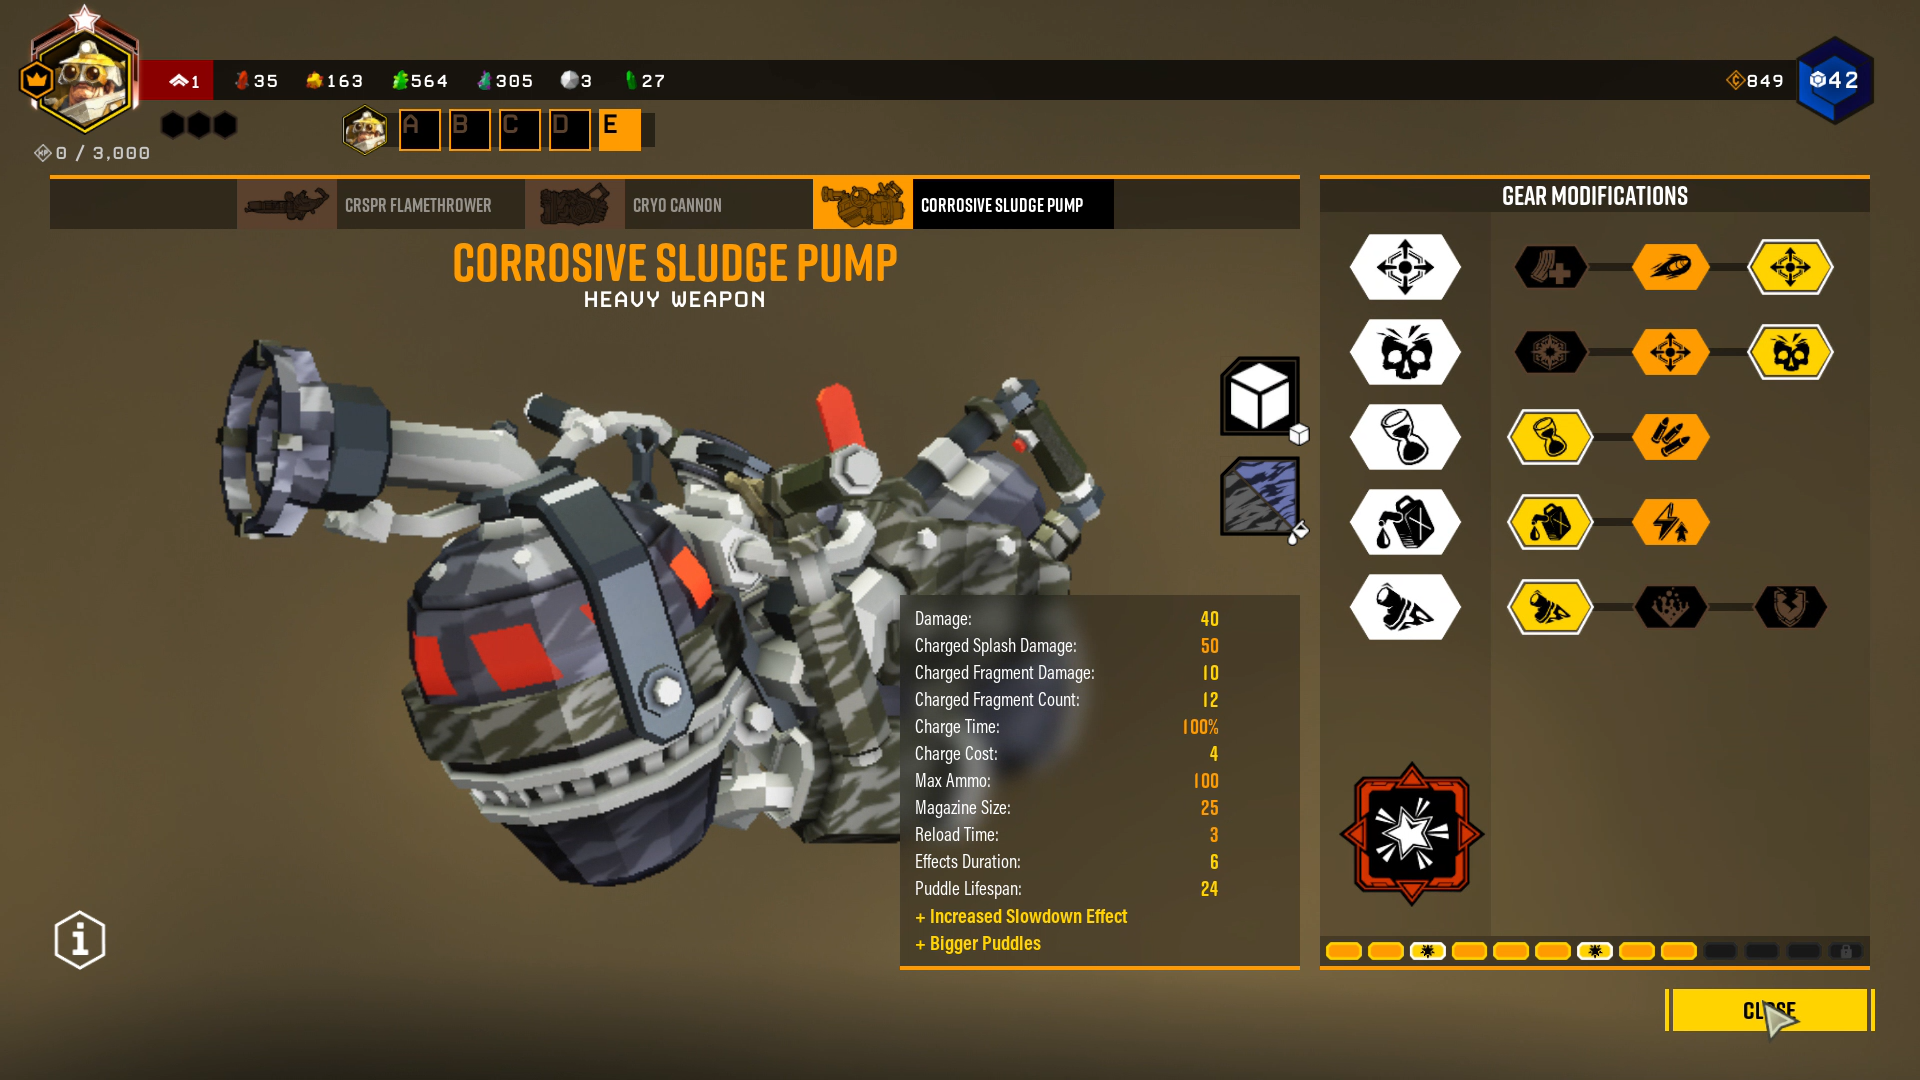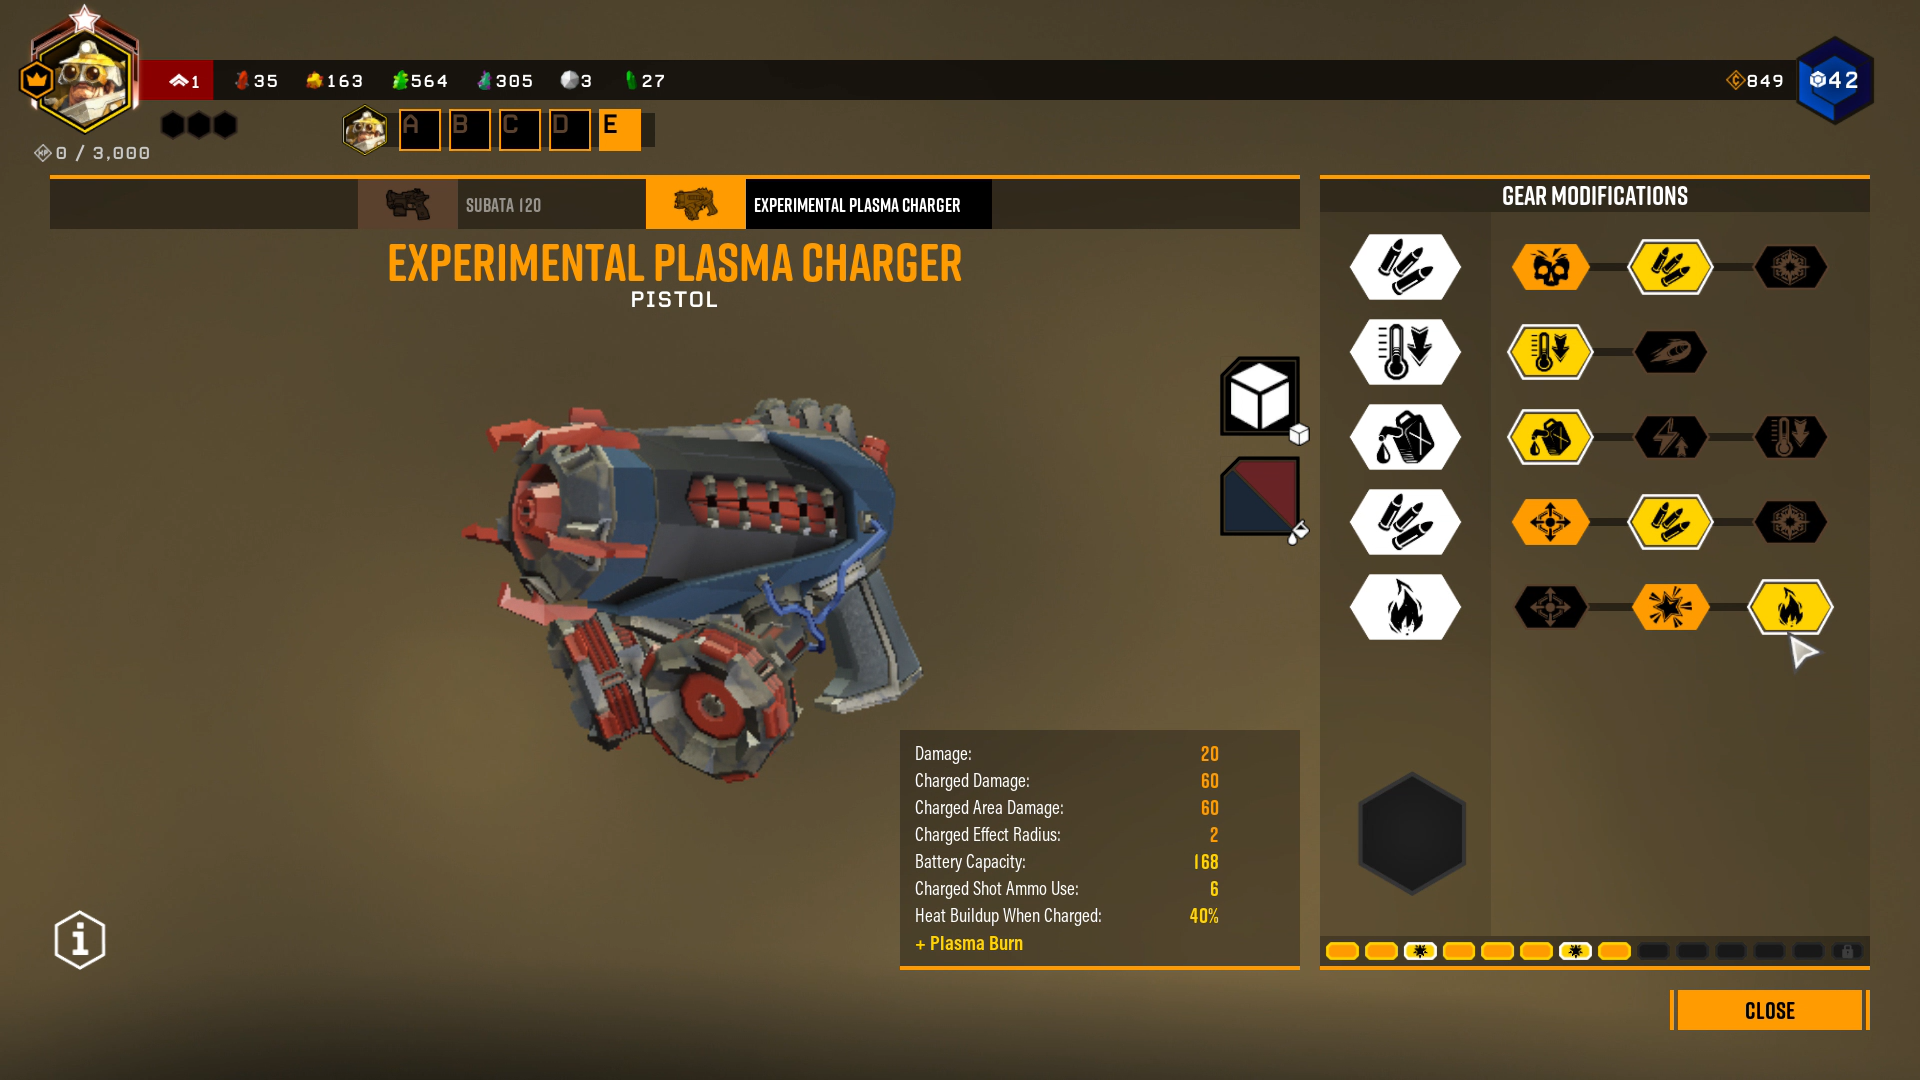
This guide is to help you build the perfect driller loadout for mass crowd control, and flaming damage. really solid build in my opinion, . good for co-op and singleplayer but can get a little ammo hungry sometimes.
REQUIREMENTS:
1. EPC
2. Sludge Pump
3. Goo bomber special OC for the sludge pump
The Sludge Pump Build
This build is all about making sure the puddle stays on the ground for as long as possible.
Tier 1:
we go with the expanded radius so that the puddles take up as much room as possible, this is so we can increase the amount of time the bugs are in the puddles, maximizing the damage they take.
Tier 2:
There isnt a great deal of mods to help this build in tier 2 so its pretty much personal choice for this one. I chose a damage mod to increase the damage the bugs take, because i don’t normally like expanded magazine capacity
**dont go for the effect radius mod because that takes effect when the charged shot hits a surface and explodes, and this overclock takes that away**
Tier 3:
This, agian, is just to increase puddle lifetime so you don’t have to keep using ammo to replace the diminishing puddles, you can go with expanded ammo bags if you want, you’ll just have to make sure your puddles don’t fizzle out/
Tier 4:
Tier 4 is used so when you do a charged shot, it dos’nt take up heaps of ammo, this is crucial because of the playstyle, you are only using charged shots.
Tier 5:
Lastly tier 5 is used to slow down the bugs, so they don’t crowd you, and so they take more corrosive and fire damage.
EPC Build (the Igniter)
The EPC is the backbone of this build. this is primary only used to ignite the goo that you splatter on the ground. tier 1-4 is really just personal preferance, I’m going through mine to show you how i play this build but tier 5 plasma burn, is a MUST.
Tier 1:
I run expanded ammo bags so i can use this as somewhat of a secondary, i normally find it runs out of ammo so i use it to kill of any other bugs that get through my goo.
Tier 2:
Cooling is just helpful because sometimes when your setting up a site, and you want it to be up and running as fast as you can, I use a lot of EPC shots, and sometimes it gets overheated and stops me. so i just run this because theres not a whole heap else in this tier, and so i don’t have to deal with it overheating on me.
Tier 3:
in tier 3, I run a less ammo consumed per charged shot because its useful agianst big enimies (like opressers) that I will use my EPC to help kill if my gunners busy.
Tier 4:
I run expanded ammo bags so i can use this as somewhat of a secondary, i normally find it runs out of ammo so i use it to kill of any other bugs that get through my goo.
Tier 5:
**PLASMA BURN IS A MUST**
this is so it can ignite the goo on the floor.
Perks to run
Most of these perks are personal preferance but I’ll tell you what I normally run.
Passive Perk 1: Vampire
Vampire is just a great all round perk for every dwarf, this is because with the drillers pickaxe and drills, you can rack up heaps of free health from just drilling bugs coming your way and picking off any bugs that are on low health, and have made it through your flaming goo.
Passive Perk 2: Thorns
Thorns is just a great all round perk for every dwarf, this is because it can pick off any low health target that creeps up on you, and prevents swarmmers from nibbling away at your shield without you knowing. (although there should’nt be any swammers when you play this build)
Passive Perk 3: Deep pockets/ elemental insulation **MUST**
I have deep pockets equipped here because i just did a mining mission but normally i would go for elemental insulation. it is a must for this build because of its ability to stop 25% of elememtal damage effecting you (at tier 3) this is great because when you light your goo on fire, you are susceptible to that fire damage.
Active Perk 1: Dash **MUST**
Dash is a required perk for this build because of how caught up you can get spreading your goo around the place, its too easy for high priority targets to creep up on you, this will be your downfall if your not carefull because its hard to run through your goo without getting attacked by bugs in it. that is why if you run dash, you can dash through hoards of bugs unnoticed and untouched.
Active Perk 2: (optional if not promoted yet) Field Medic
I run field medic just because of the people I play with always getting downed, this is completly optional this one and dosn’t hurt the build, feel free the change it to suit your needs.
How To Play The Build
(Sorry for not being able to upload a video)
pretty easy to pickup, super hard to master – you have to more than likely change your play-style for the driller completely.
This build is more support orientated. this is because it helps with crowd control heaps but dosn’t instantly down huge targets (Oppressors/ dreadnaughts) like the gunner does.
with the goo bomber special try to fire it at a 45 degree angle in the air, and let the puddle fly as far as you can. once the puddle is on the ground light it will your EPC.
Once its burning, try to keep it alight and alive by branching off it with different strands of goo. this is why we chose the mods to keep the puddle alive for the longest time, so when your playing a drill-dozer mission, and its at the heart stone, you can play your goo all around it, stopping the bugs from getting to it, and not having to constantly monitor weather your goo is still there or not.
Hanging back and not rushing into hoards (I have found) has been the most effective way to stay alive and help the team out.
And that’s pretty much it, enjoy!
Notes
– Unfortunately, I could’nt upload any kind of video (sorry) but once you start playing the build, its pretty self explanitory what to do.
– You will have to change your play-style around a bit, so it might be a bit hard for some people in that sense, but once you got the hang of it its pretty OP
– Not reccommend for elimination missions but HIGHLY reccommended for driller dozer, salvage operations, and extraction missions.
– Open to criticism
– If your confused on ANYTHING please message me and ill try to explain it better, fix/ improve the guide, or even hop into a game with you to show you/ help you out.
– Thanks for reading my guide! Enjoy.
Hope you enjoy the Guide about Deep Rock Galactic – Sludge Pump Build + Experimental Plasma Charger Build, if you think we should add extra information or forget something, please let us know via comment below, and we will do our best to fix or update as soon as possible!
- All Deep Rock Galactic Posts List


Leave a Reply