Two builds I use for Hazard 5+ for the Driller, with my choices explained. Includes TLDR if you just want to get on with it.
Introduction
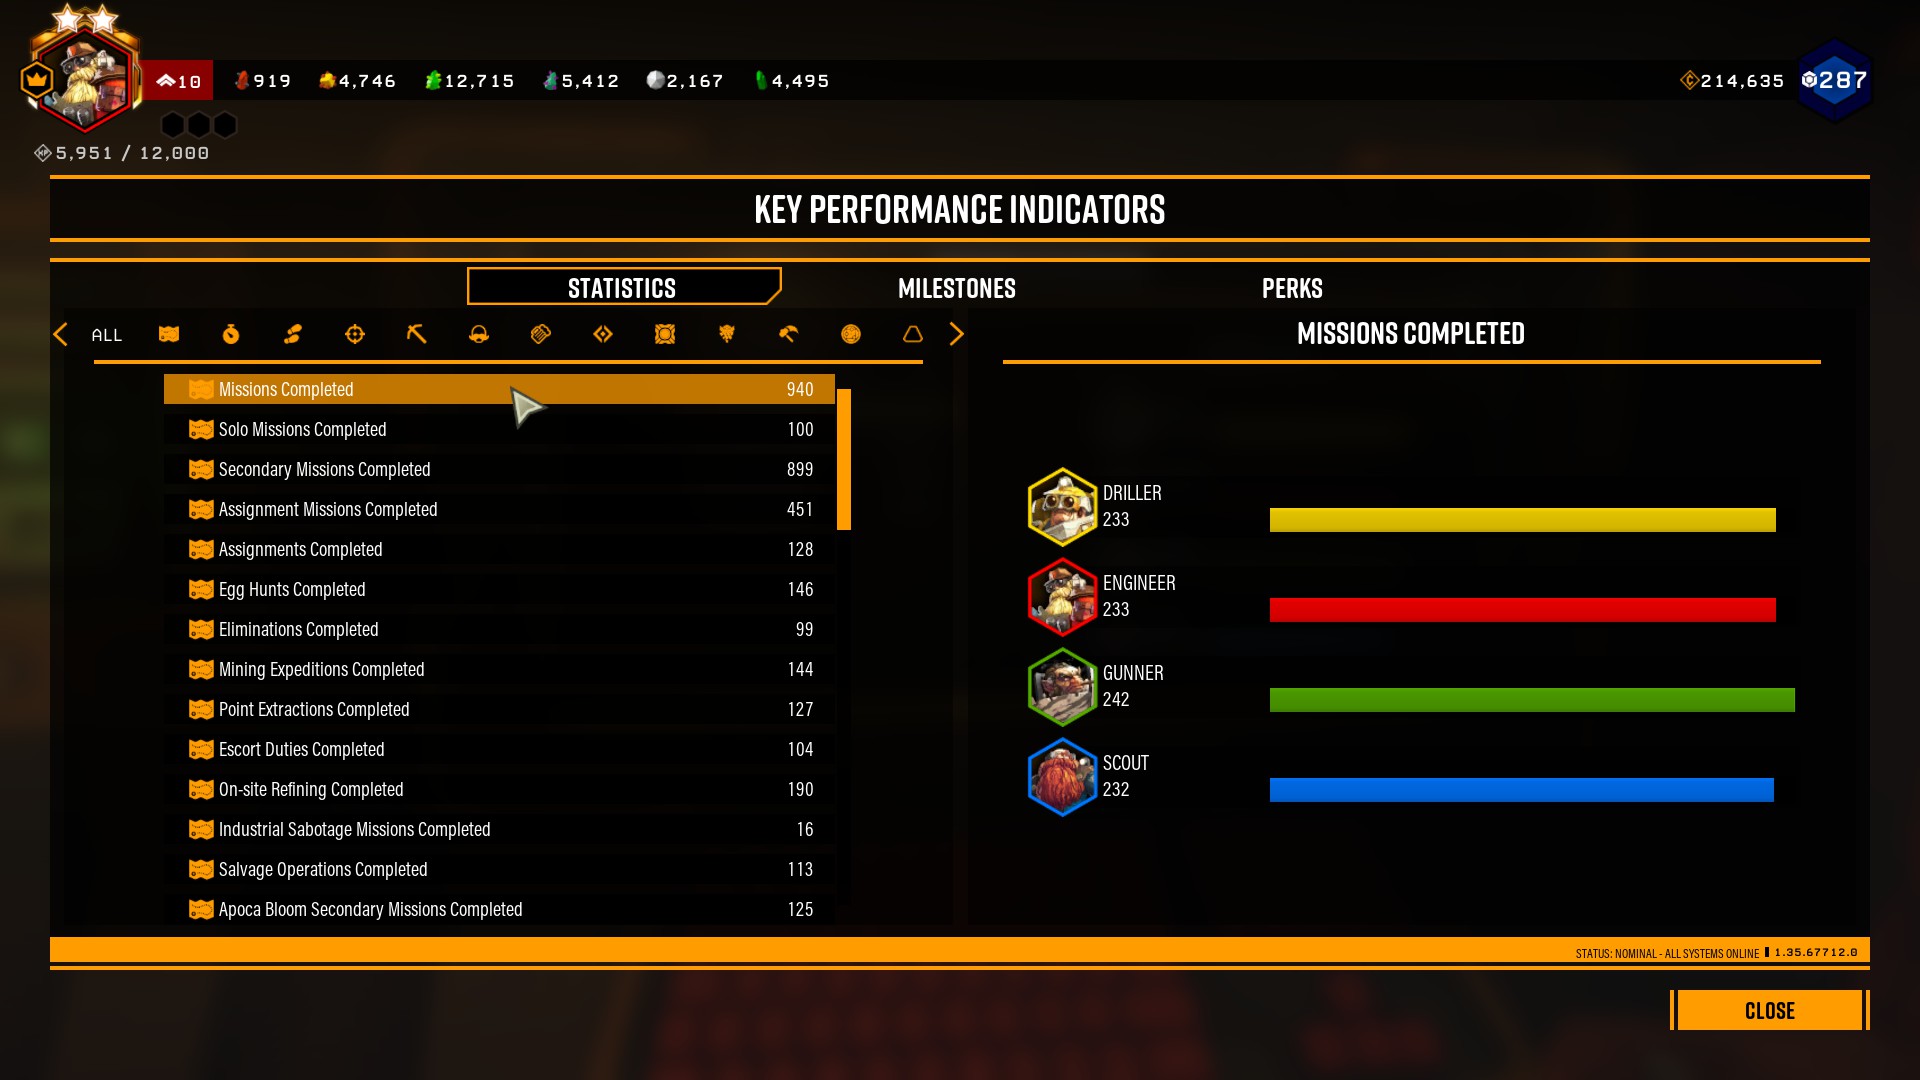
The above screenshot was taken when I got all the achievements in the game, about 507 hours in.
I’ve played the game a fair bit, and I’d like to pass some of the things I’ve learned down to greenbeards and greybeards alike.
In this guide, I present two driller builds I use at Hazard 5 and Elite Deep Dives, with a description of their playstyles.
This guide was released 13 March, 2022.
Cryo Cannon Build: Freezer Burn
Description
My favourite build for the driller.
You basically freeze enemies really quickly with your Cryo Cannon.
Frozen enemies take triple damage from all non-AoE sources.
Once frozen, if there are a lot of enemies, while backpedalling, switch to your Experimental Plasma Cannon and use it to inflict Temperature Shock – [fandom.com] . (If you heat a frozen enemy, or freeze an enemy that is on fire, you instantly do 200 damage) This one shots all grunts.
Otherwise, you use your pickaxe, drills and power axes to melee.
In this build, killing enemies with melee heals you up.
This melee focussed playstyle also ensures you don’t go through ammo as quickly as other builds.
To tune this build for solo, I change the perks to Beast Master and Dash instead of Field Medic and Iron Will. I also change the Armor’s Breathing Room to Static Discharge.
Downsides
You lack reliable, safe single target burst damage outside your axes, so you will need to depend on your teammates for Dreadnaughts.
Passive Perks
1. Vampire: You heal by 5 whenever you melee kill a medium+ sized enemy.
Your drills, power axes and pick axe all count as melee. This ensures you stay topped off.
2. Second Wind: After 4s of sprinting, you move 12% faster.
This skill lets you make distance when you’re being chased by ANGRY ENEMIES.
3. Veteran Depositor: Ignore the 50% deposit speed. This skill also gives you a 30% damage reduction when you’re near Molly, drop pod and mine head. You will often need to defend a point, and this extra tankiness is honestly, very very worth it.
You could also run Thorns here, if you’re having trouble with swarmers. (The Cryo Cannon has Cold Radiance, so this shouldn’t be a problem).
Active Perks
1. Field Medic: The instant revive often turns the tides in tough spots. No Dwarf Left Behind!
2. Iron WIll: Sometimes your whole team goes down, and this gives you a second chance. If you get even a little bit of healing in Iron WIll, you revive. (Whether from Red Sugar, using a Resupply, or even Meleeing an enemy!)
Cryo Cannon Build: TLDR
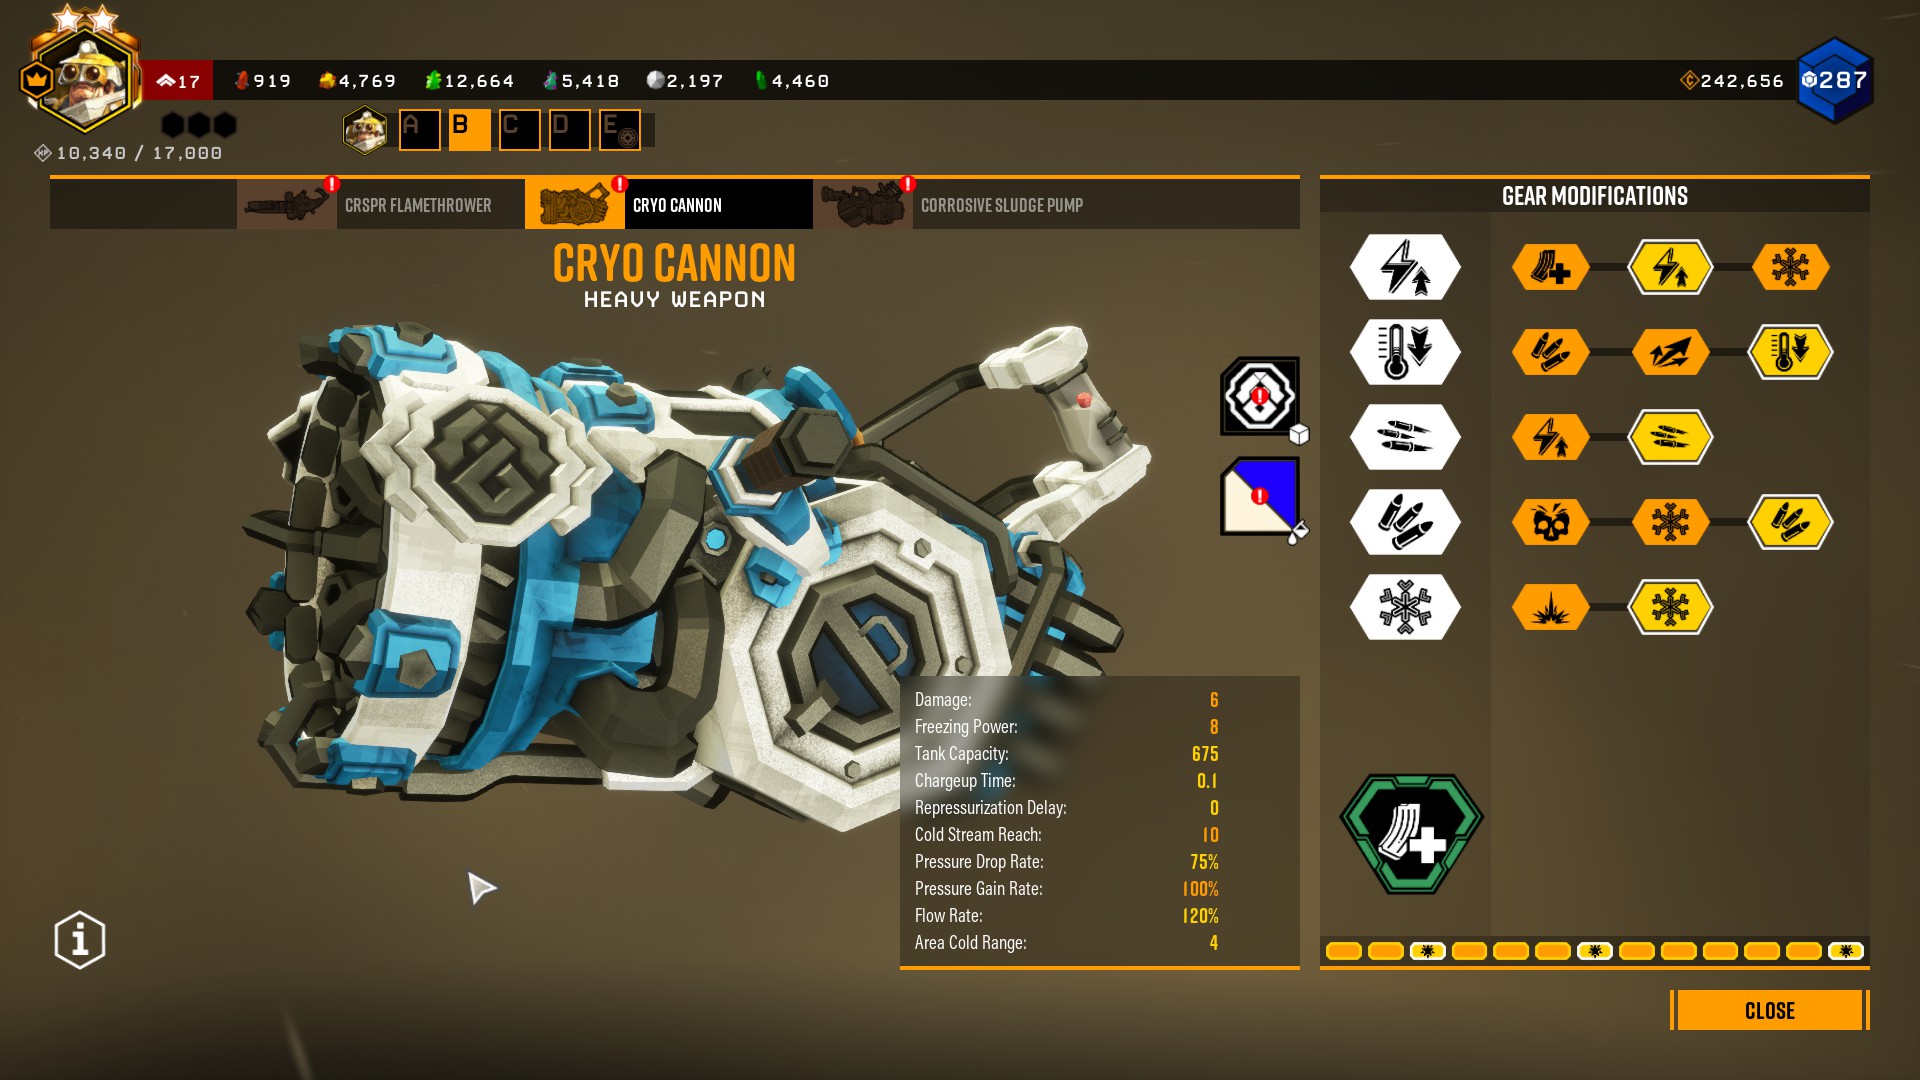
Cryo Cannon: Faster Turbine Spinup, Bypassed Integrity Check, Increased Flow Volume, Larger Reserve Tank, Cold Radiance, Improved Thermal Efficiency (OC)
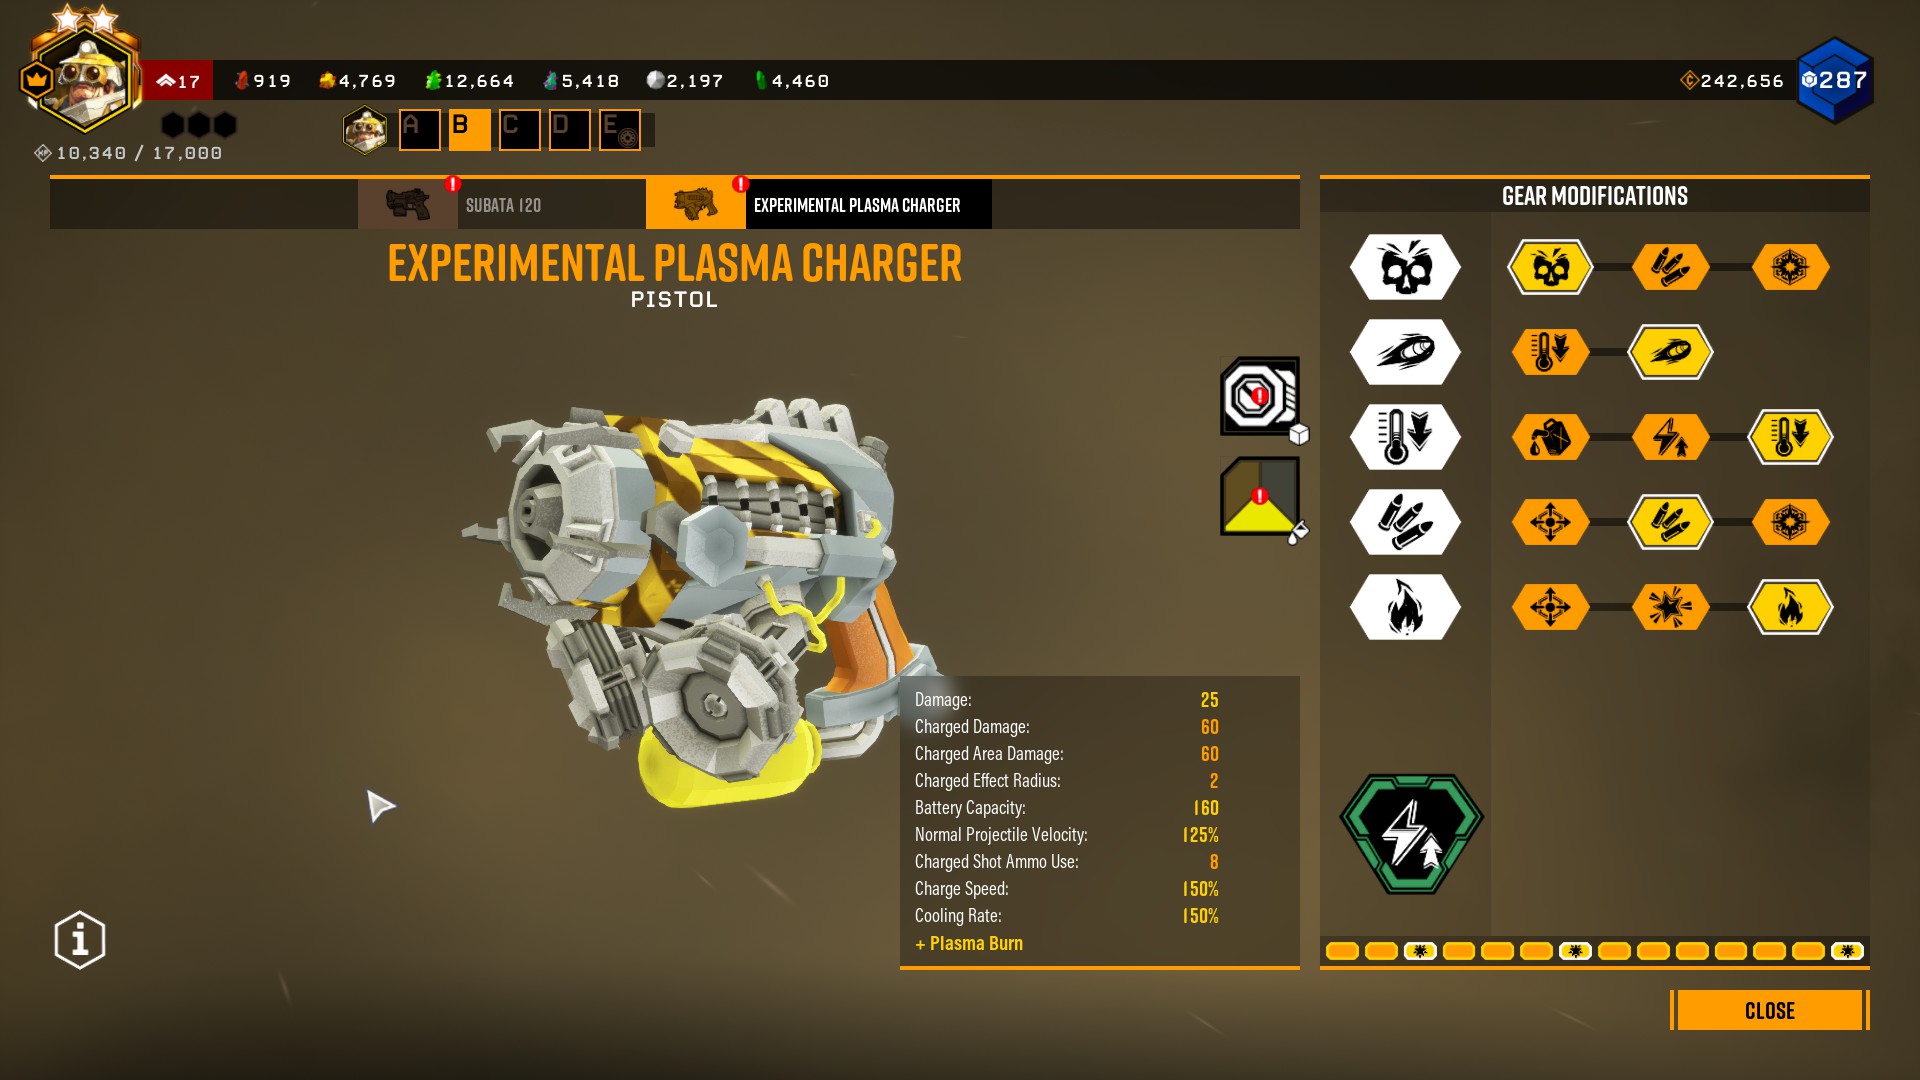
Experimental Plasma Charger: Increased Particle Density, Overcharged Plasma Accelerator, Tweaked Radiator, High Density Battery, Plasma Burn, Energy Rerouting (OC)
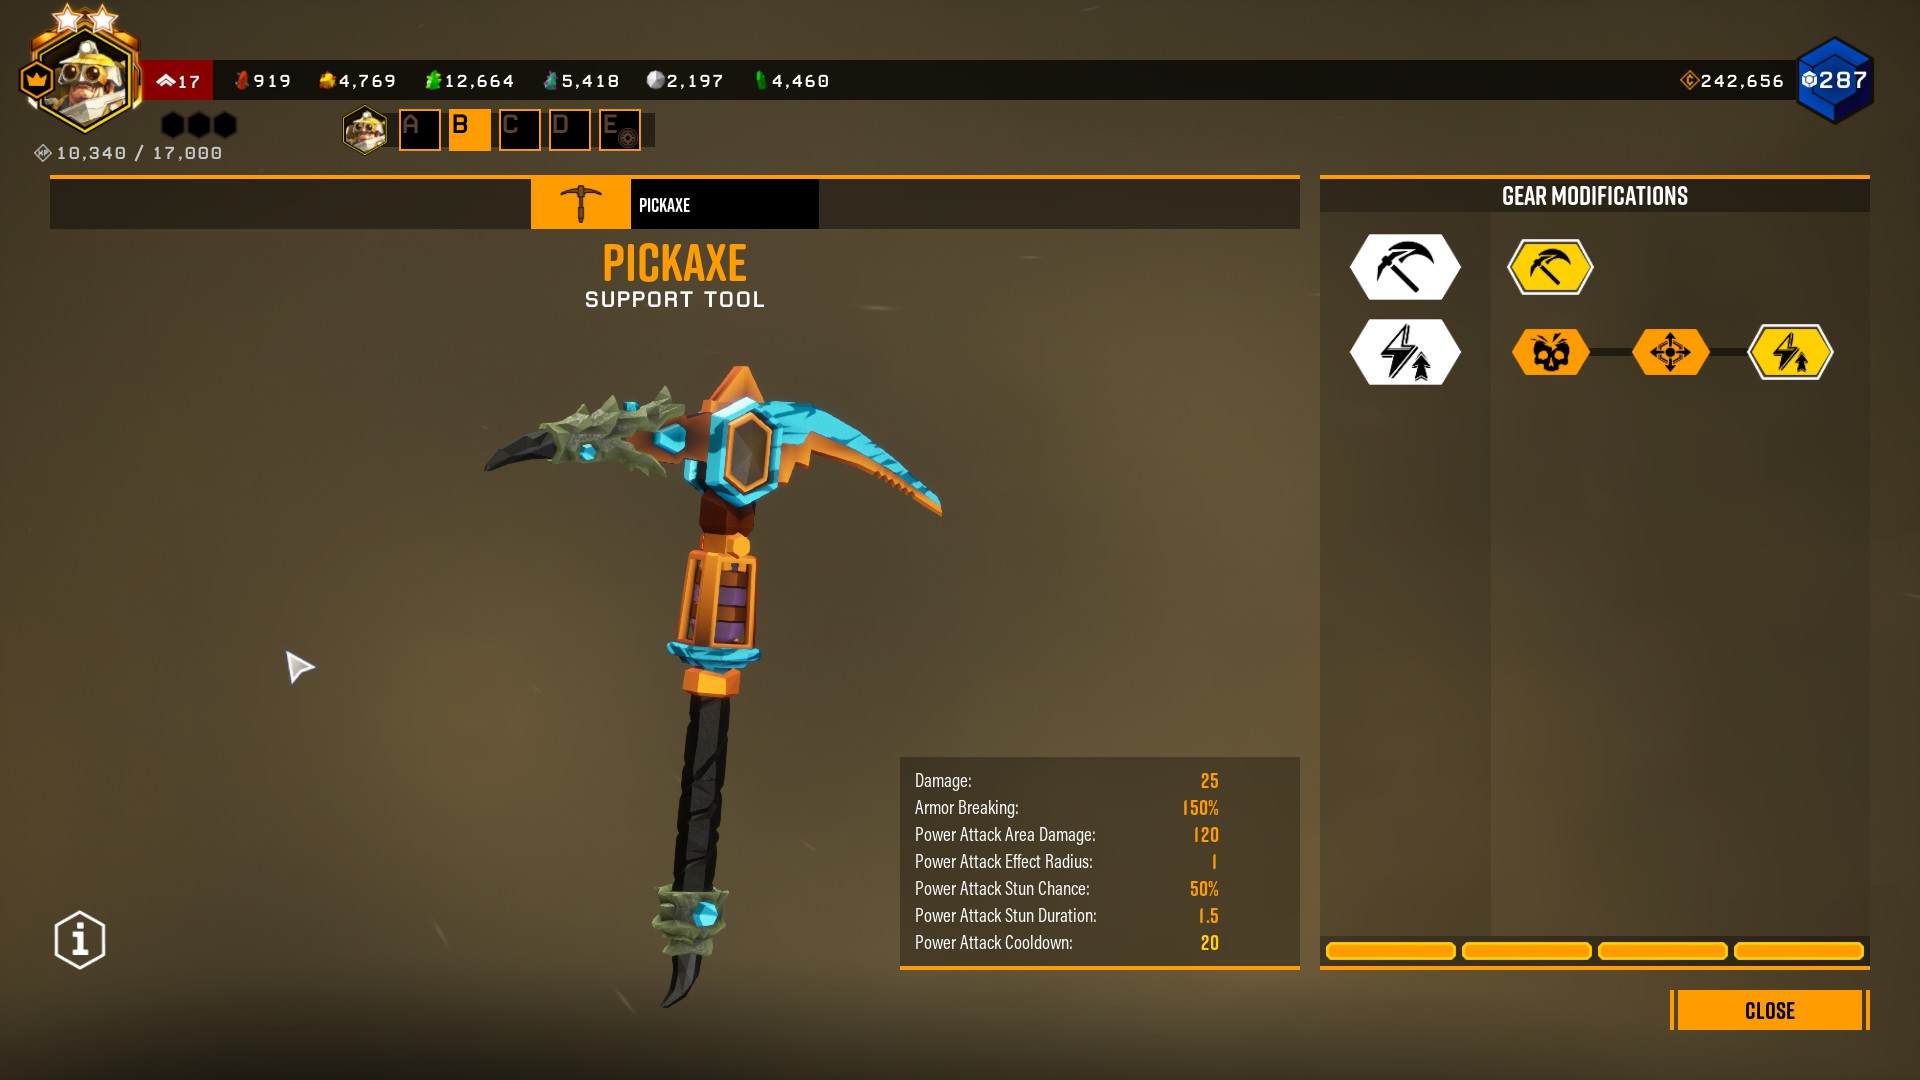
Pickaxe: Better Weight Balance
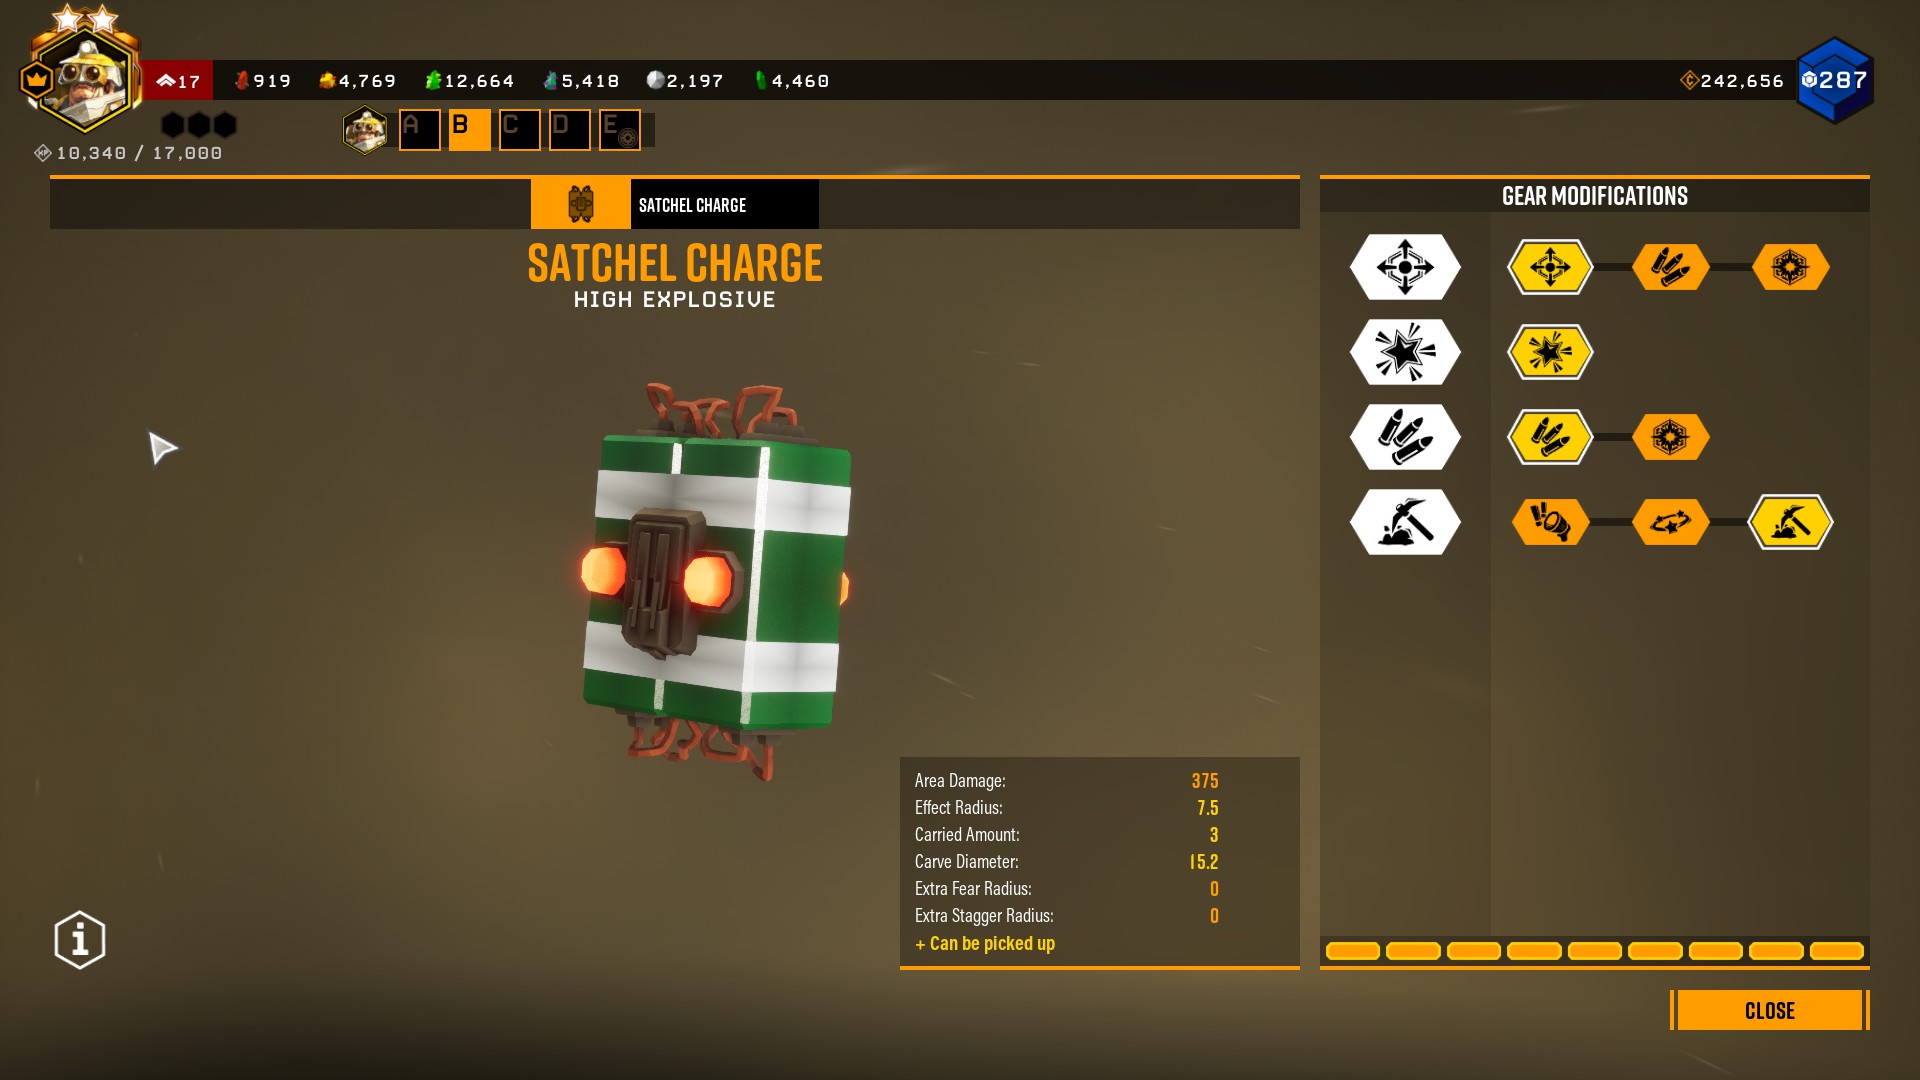
Satchel Charge: Fragmentary Shell, Kill Switch, Extra Satchel Charge, Rock Mover
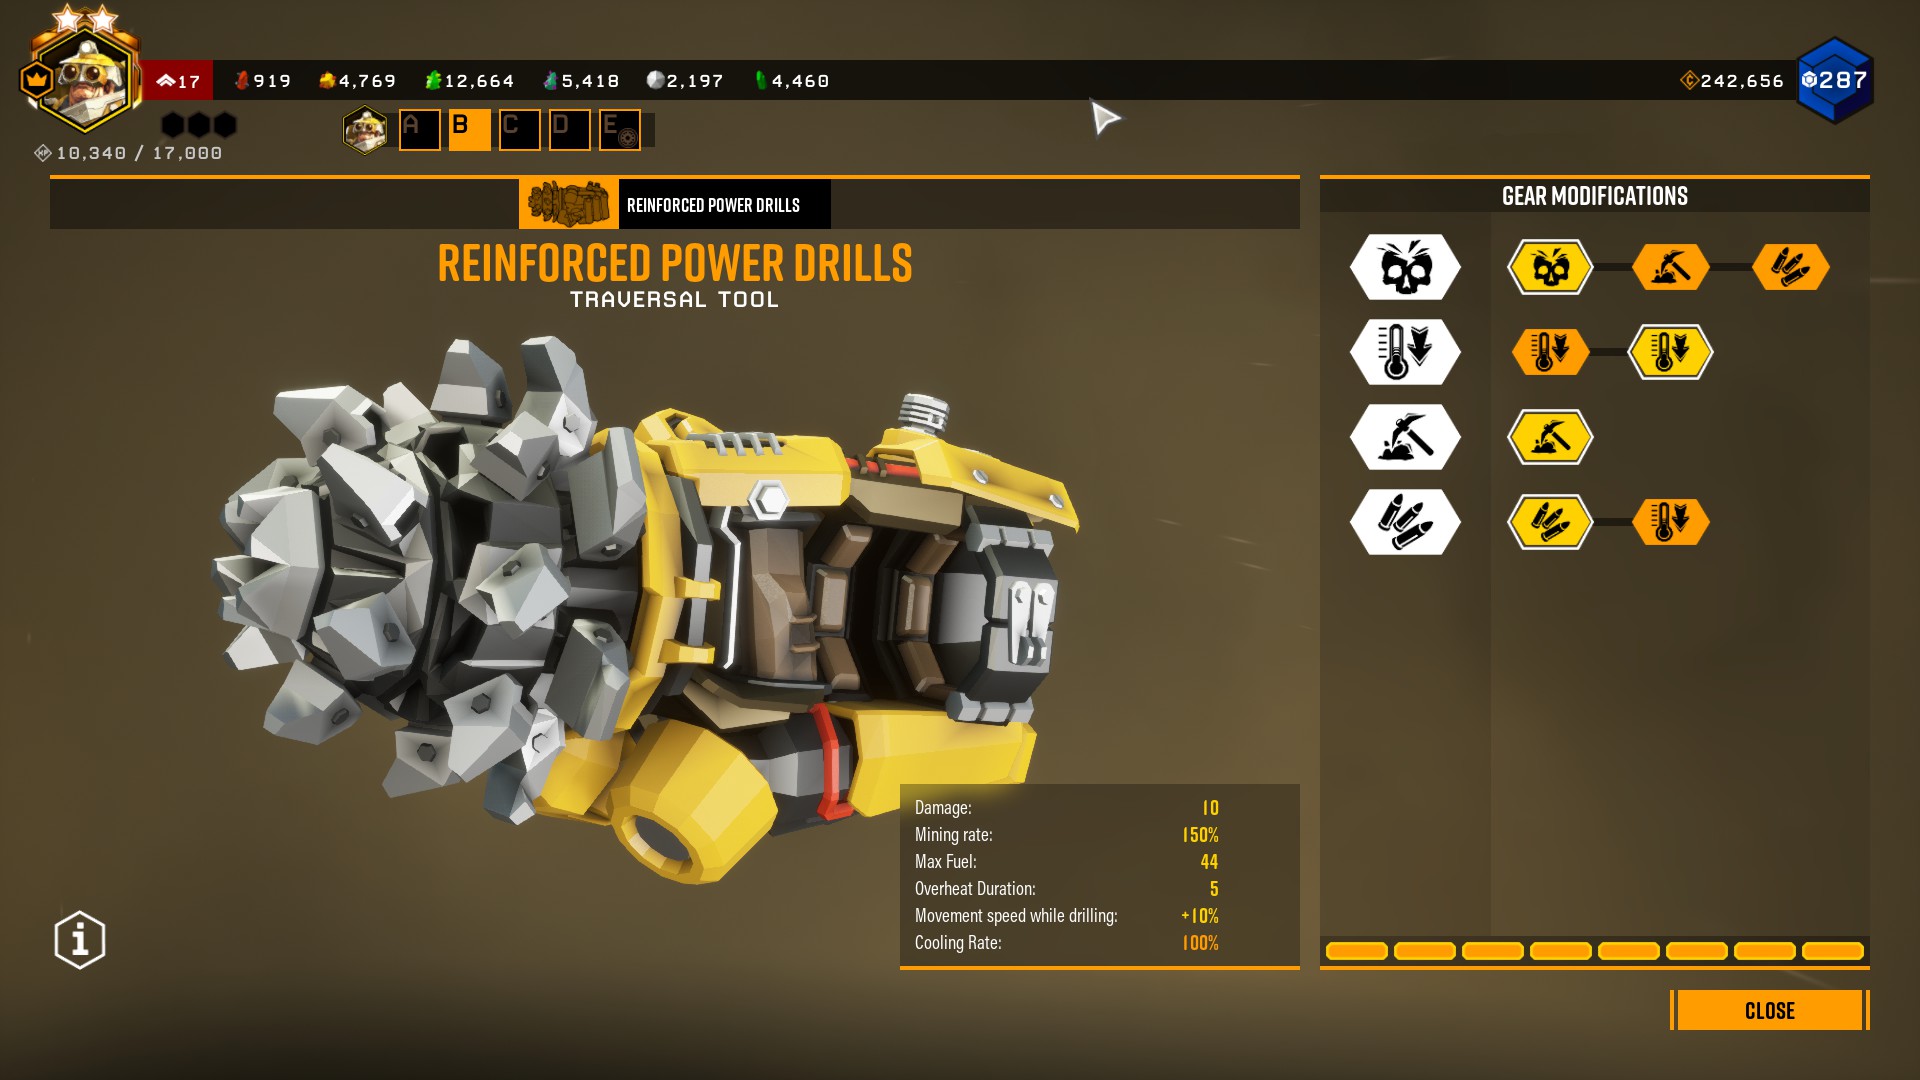
Reinforced Power Drills: Barbed Drills, Magnetic Refrigeration, Supercharged Motor, Increased Tank Pressure
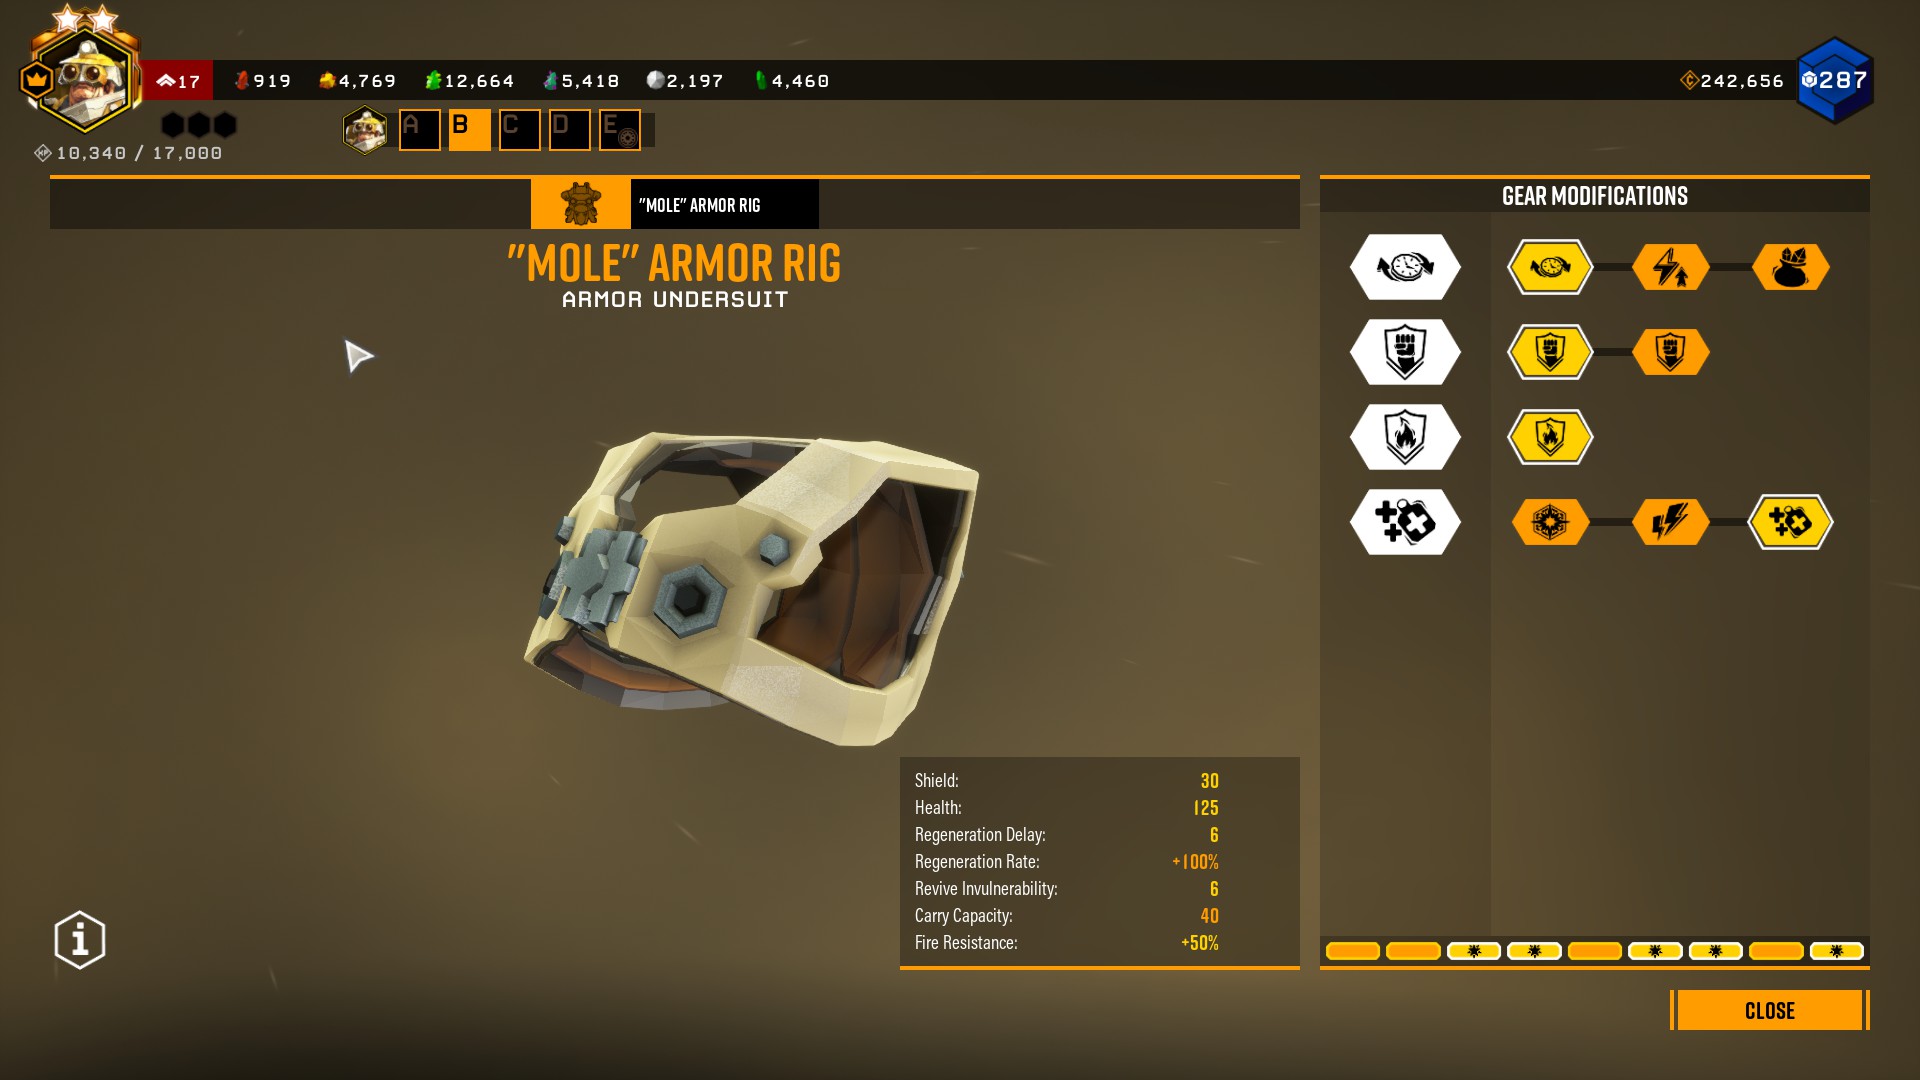
“Mole” Armor Rig: Improved Generator, Overcharger, Temperature Insulation, Breathing Room
Cryo Cannon Build: Cryo Cannon
Your bread and butter. Pretend you’re Elsa, and freeze your enemies.
Tier 1
Faster Turbine Spinup: You start shooting as soon as you click.
I take it over Larger Pressure Chamber (Shoot Longer) or Stronger Cooling Unit (Freeze Faster).
Consider; you’ll be up in the enemies’ faces all the time, this 0.4s faster shooting will be the difference between life and death.
Tier 2
Bypassed Integrity Check: Your gun starts repressurising instantly. (No reload time)
I take it over Larger Reserve Tank (More Ammo) and Overclocked Ejection Turbine (Longer Range).
The “instant reload” is very important against Glyphid Dreadnaughts and high hazard swarms. In addition, the quicker reload allows us to bust out our drills for some damage, then quickly switch back in a jiffy, and have a reloaded cannon.
Normally, you need 1s before the “reload” starts after you run out of pressure. If you don’t take this skill, you will find yourself needing 2 reloads against Glyphid Dreadnaughts instead of 1.
This build is already fairly close range, and the extra range doesn’t make too much of a difference.
Tier 3
Increased Flow Volume: You fire 20% faster.
Essentially, instead of 8 damage ticks per second, you do 9.6 damage ticks per second. Thus, you can freeze enemies faster.
I take it over Improved Pump, which increases the reload rate.
Tier 4
Larger Reserve Tank: You have 150 more ammo.
‘Nuff said. 😉
I take it over Hard Mixture (More damage) and Supercooling Mixture (Faster Freezing). At higher hazards, a little extra ammo goes a long way.
We aren’t using our Cryo Cannon for damage, so Hard Mixture is out.
Super Cooling Mixture increases our freezing rate by 12.5%. Essentially, you do 9 “Freeze” instead of 8. We’ve already taken the better 20% buff in Tier 3, and this is overkill. I find the extra ammo more useful.
Tier 5
Cold Radiance: You freeze enemies 4m around you.
You will be swarmed from all directions. Freezing enemies who’re above or behind you while you’re focussing in front of you is basically a godsend.
I take it over Fragile, which has a chance for frozen targets to instantly die.
Overclock
Improved Thermal Efficiency
This gives us +25 ammo in our tank, and makes our pressure drop by .525 per second instead of 0.7. Thus, we can fire for longer.
Compare with:
- Tuned Cooler: This has a horrible refill rate once you empty your mag / pressure chamber.
- Flow Rate Expansion : You need to reload 2.25x earlier. We aren’t playing reload simulator.
- Ice Spear : We want to freeze hordes, not do damage to single targers.
- Ice Storm: We want to use melee, EPC and our allies to deal damage. We don’t exactly want to hold left click down.
- Snowball: No. Just no.
Cryo Cannon Build: Experimental Plasma Charger
You will use the Experimental Plasma Cannon (EPC) to nuke frozen enemies, and to shoot distant targets like Macteras, Lootbugs and Leeches.
This is not a charged shot build.
Tier 1
Increased Particle Density: Your normal shots do 25% more damage
Your normal shots do 25 damage instead of 20 damage. This is a significant increase vs targets you can’t freeze easily (Macteras, Leeches, Lootbugs).
I take it over Larger Battery (More Ammo) or Higher Charged Plasma Energy (More Charge Shot Damage).
Tier 2
Overcharged Plasma Accelerator: Your shots fly 25% faster
This is the only non-charge shot tier 2 upgrade, and the faster projectile speed makes it easier to use.
I take it over Heat Shield (You can hold a charge shot longer)
Tier 3
Tweaked Radiator: Your gun cools 50% faster.
Again, this is the only non-charge shot tier 3 upgrade. In addition, your gun cooling down faster lets you put more projectiles downrange.
I take it over Crystal Capacitors (You charge 2.5x faster), and Improved Charge Efficiency (Charged shot uses 6 ammo instead of 8)..
Tier 4
High Density Battery: You have 20% more ammo. (+24 shots)
‘Nuff said. 😉
Once Again, this is the only non-charge shot tier 4 upgrade. More ammo is always welcome.
I take it over Expanded Plasma Splash (Bigger charge shot radius) and Reactive Shockwave (More charge shot damage).
Tier 5
Plasma Burn: Apply 11.25 heat per shot to enemies,
This is what makes the build sing.
Let’s take a Grunt Guard on Hazard 5. It has 324 HP. You freeze it with 10 damage instances of the Cryo Cannon, which is you firing it for 1.04 seconds! This deals 60 damage, leaving it at 264 HP. You pull out your EPC and shoot it. This does 25 * 3 (triple damage vs frozen enemies) = 75 damage, leaving it at 189 HP. Now, Plasma Burn triggers Thermal Shock, which does 200 damage… Which kills the enemy.
Thus, you can 1-tap frozen grunts!
You could fire 3 shots at a lootbug and watch it burn. Similarly, you can burn down Macteras, etc.
Compare this with Thin Containment Field which basically is what you need for EPC mining. >__>. Just leave mining to the scouts, haha.
Overclock
Energy Rerouting
This gives us +16 ammo, and a faster charge rate. But I’m just using it for the extra ammo.
Compare with:
- Magnetic Cooling Unit: Your gun cools faster, and you can hold a charge longer.
- Heat Pipe : Your charged shots charge faster and use less ammo.
- Heavy Hitter : You do 60% more damage, but you have -32 ammo (!). This is honestly overkill, and the lack of ammo hurts a lot. As explained above, you just need to freeze and EPC to kill even the most tanky grunt.
- Overcharger: Use more ammo while charging, but your charged shots do more damage and is bigger.
- Persistent Plasma: Charged shots leave a plasma trail, but deal less damage.
Cryo Cannon Build: The Rest
Pickaxe
As this is a melee focussed build, and you basically do triple damage to frozen targets,
I find it important to take Better Weight Balance (20s Power Attack Cooldown)
I take it over Serrated Edge (Power Attack does AoE damage, but has a 30s(!) cooldown) and Shockwave (Power Attack’s AoE is 2m radius instead of 1m).
Satchel Charge
I use satchel charges for both terraforming and the occasional swarm nuke.
If you want to change the build to a more damage focussed one, be my guest.
Tier 1
Fragmentary Shell: +3m damage radius
Tier 2
Kill Switch: Pick up unexploded satchels
Tier 3
Extra Satchel Charge: +1 ammo
Tier 4
Rock Mover: +9m radius for carving rocks
Reinforced Power Drills
While you won’t win awards for drilling through rocks quickly, you will be able to use your drills in melee against frozen enemies (great for taking down Praetorians). In addition, you can actually drill a longer distance than going for a faster drill speed with this build!
Tier 1
Barbed Drills: Double Melee Damage. +5 Damage
Our Drills will be used against frozen foes. This literally doubles our melee damage to 10 from 5.
I use it over Hardened Drill Tips (+50% mining rate) and Expanded Fuel Tanks (+5 fuel)
Tier 2
Magnetic Refrigeration: +50% faster cooling
Our drills will cool at 3/s instead of 2/s. This allows us to use our drills, then switch to the cryo, then switch back and always have each weapon fuelled and ready to go.
I take it over Streamlined Integrity Check (5s overheat duration over 8s). If you’re swapping between your drill and cannon appropriately, you will never overheat. In addition, while drilling, just stop before you hit 100% and you will be able to keep drilling at a steady clip.
Tier 3
Supercharged Motor: +50% mining rate
Tier 4
Increased Tank Pressure: 16% more fuel
More ammo is good. I take it over Bloody Cold Drills (Drills can be used indefinitely against enemies) because I find it.
“Mole” Armor Rig
My armor rig is built for bigger and faster shields. I basically flee, go to cover whenever my shields break, before I reengage. You can change the build to your tastes.
Tier 1
Improved Generator: Shields start recharging in 4.5s
I take it over Boosted Converter (Shields recharge twice as fast, but after 7.5s) and Bigger Mineral Bag (You carry 5 more minerals).
Tier 2
Overcharger: This increases your shields by 20%. +5 shields.
I take it over Healthy (18% more HP), as I want to use shields to mitigate damage over Health.
Tier 3
Temperature Insulation: +50% Fire Resist
Tier 4
Breathing Room: 3s of invulnerability after being revived
That 3s is often the window you need to get out of really hairy situations.
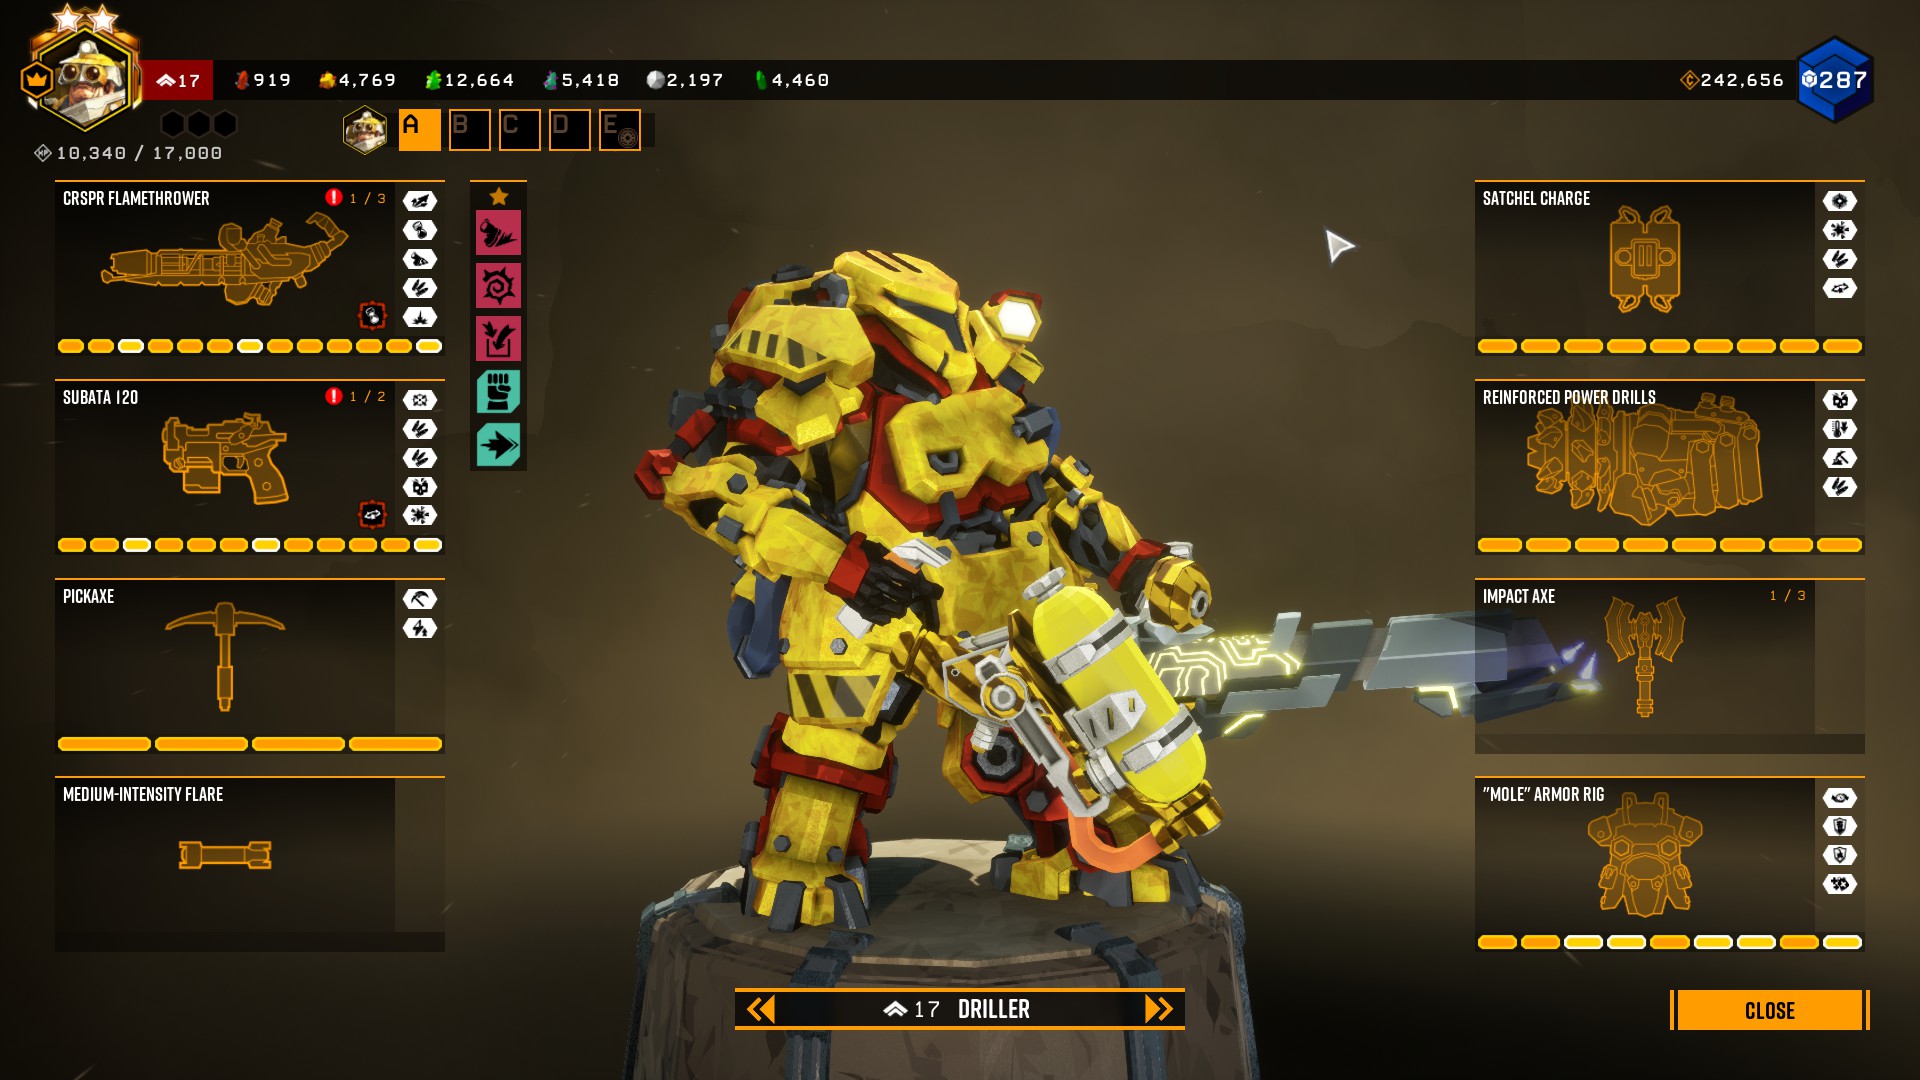
Flamethrower Build: Burn and Turn
Description
My first build for the driller that I was confident to take on Hazard 5.
You basically burn enemies from far away with your Crispr Flamethrower while kiting them. You stun high HP targets with your Subata so they stay in your flames and burn down.
You need to fight your instinct to hold down the left mouse button. Just douse the ground the enemy is walking on, and move on. You will be killing them with burn damage rather than with direct damage.
This ranged focussed playstyle needs you to be constantly on the move and to mind your spacing.
To tune this build for solo, I change the perks to Beast Master instead of Iron Will. I also change the Armor’s Breathing Room to Static Discharge.
Downsides
While you can slow enemies and stun a couple, you need to depend on your teammates to take down high HP targets in defense scenarios.
Passive Perks
1. Thorns: You might get ambushed by swarmers and you might not want to use your important flamethrower ammo on them. This gives you a buffer.
2. Second Wind: After 4s of sprinting, you move 12% faster.
This skill lets you make distance when you’re being chased by ANGRY ENEMIES.
3. Veteran Depositor: Ignore the 50% deposit speed. This skill also gives you a 30% damage reduction when you’re near Molly, drop pod and mine head. You will often need to defend a point, and this extra tankiness is honestly, very very worth it.
You could also run Thorns here, if you’re having trouble with swarmers. (The Cryo Cannon has Cold Radiance, so this shouldn’t be a problem).
Active Perks
1. Dash: This build is all about setting enemies alight, then making space while waiting for them to burn down. If you’re ever cornered, or need to make distance, this will give you a quick and easy way to do so.
2. Iron WIll: Sometimes your whole team goes down, and this gives you a second chance. If you get even a little bit of healing in Iron WIll, you revive. (Whether from Red Sugar, using a Resupply, or even Meleeing an enemy!)
Flamethrower Build: TLDR
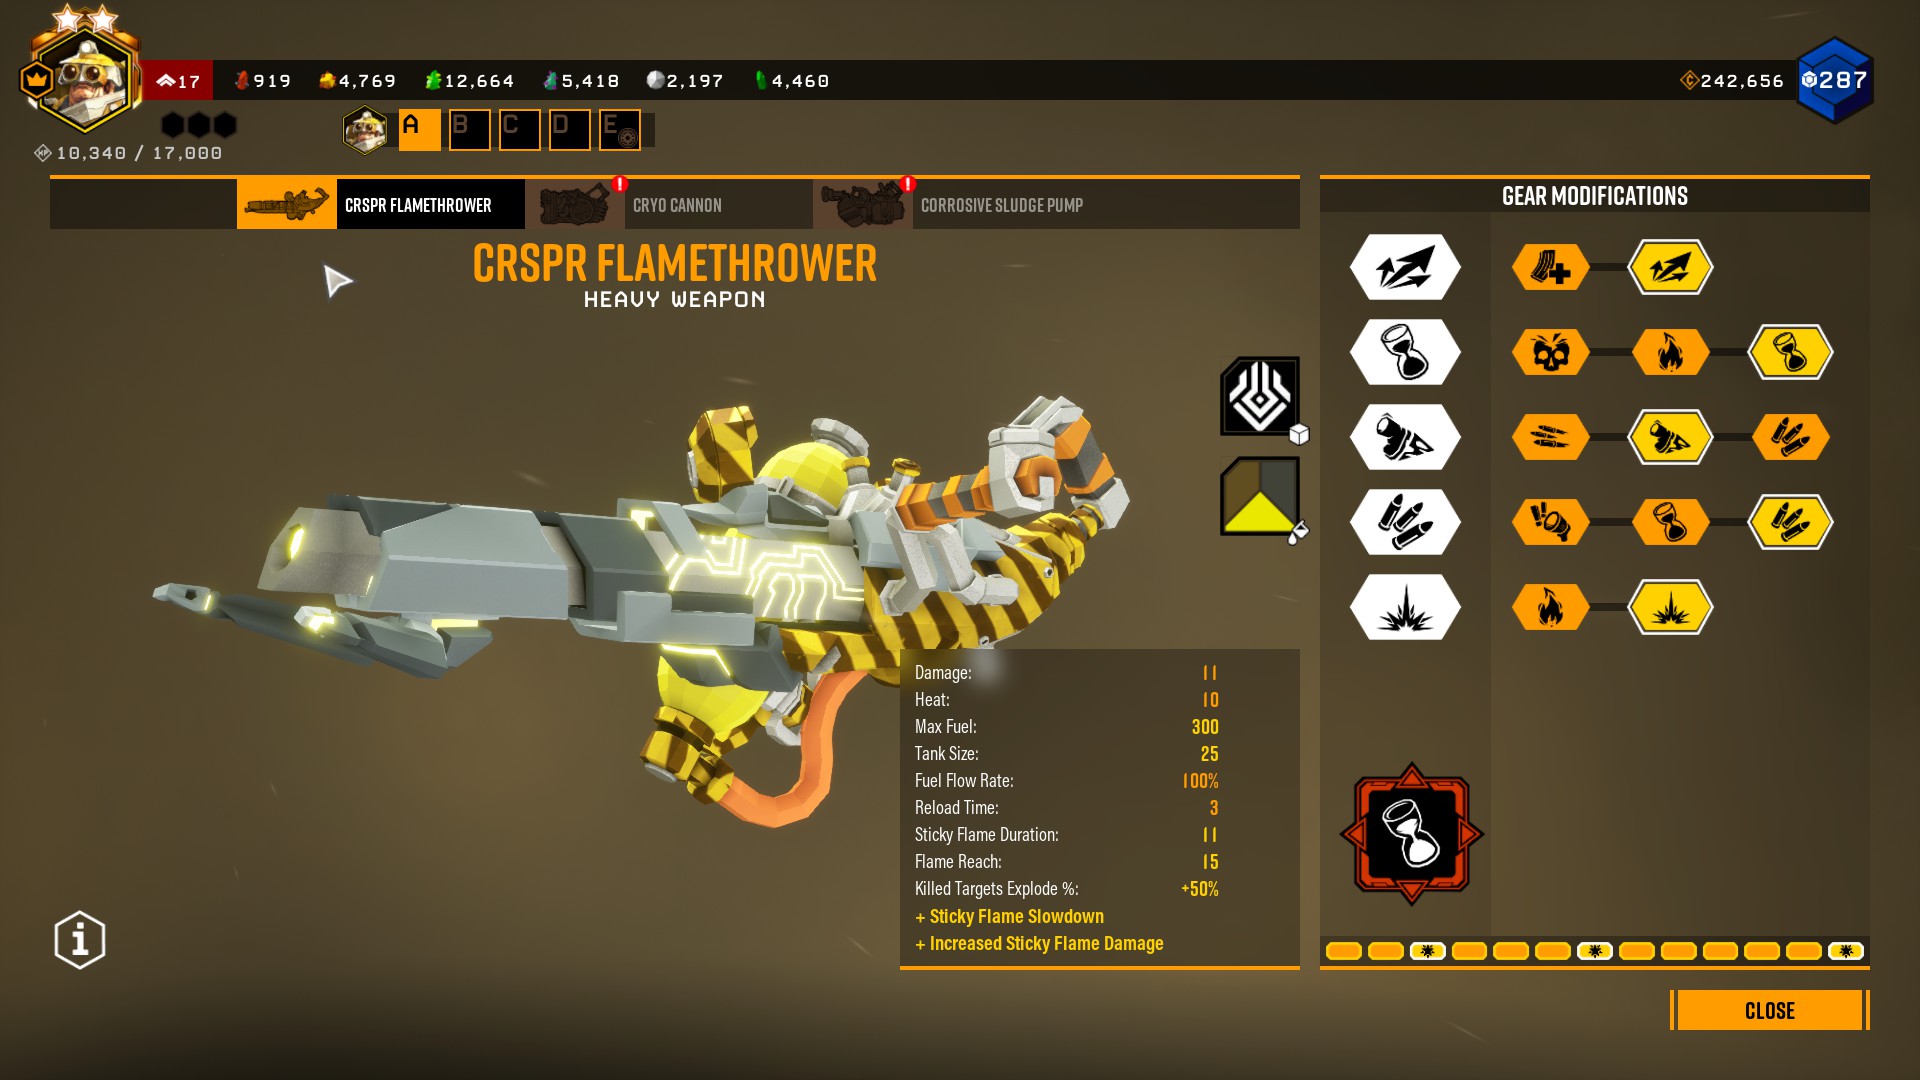
CRSPR Flamethrower: High Pressure Ejector, Sticky Flame Duration, Sticky Flame Slowdown, More Fuel, Targets Explode, Sticky Fuel (OC)
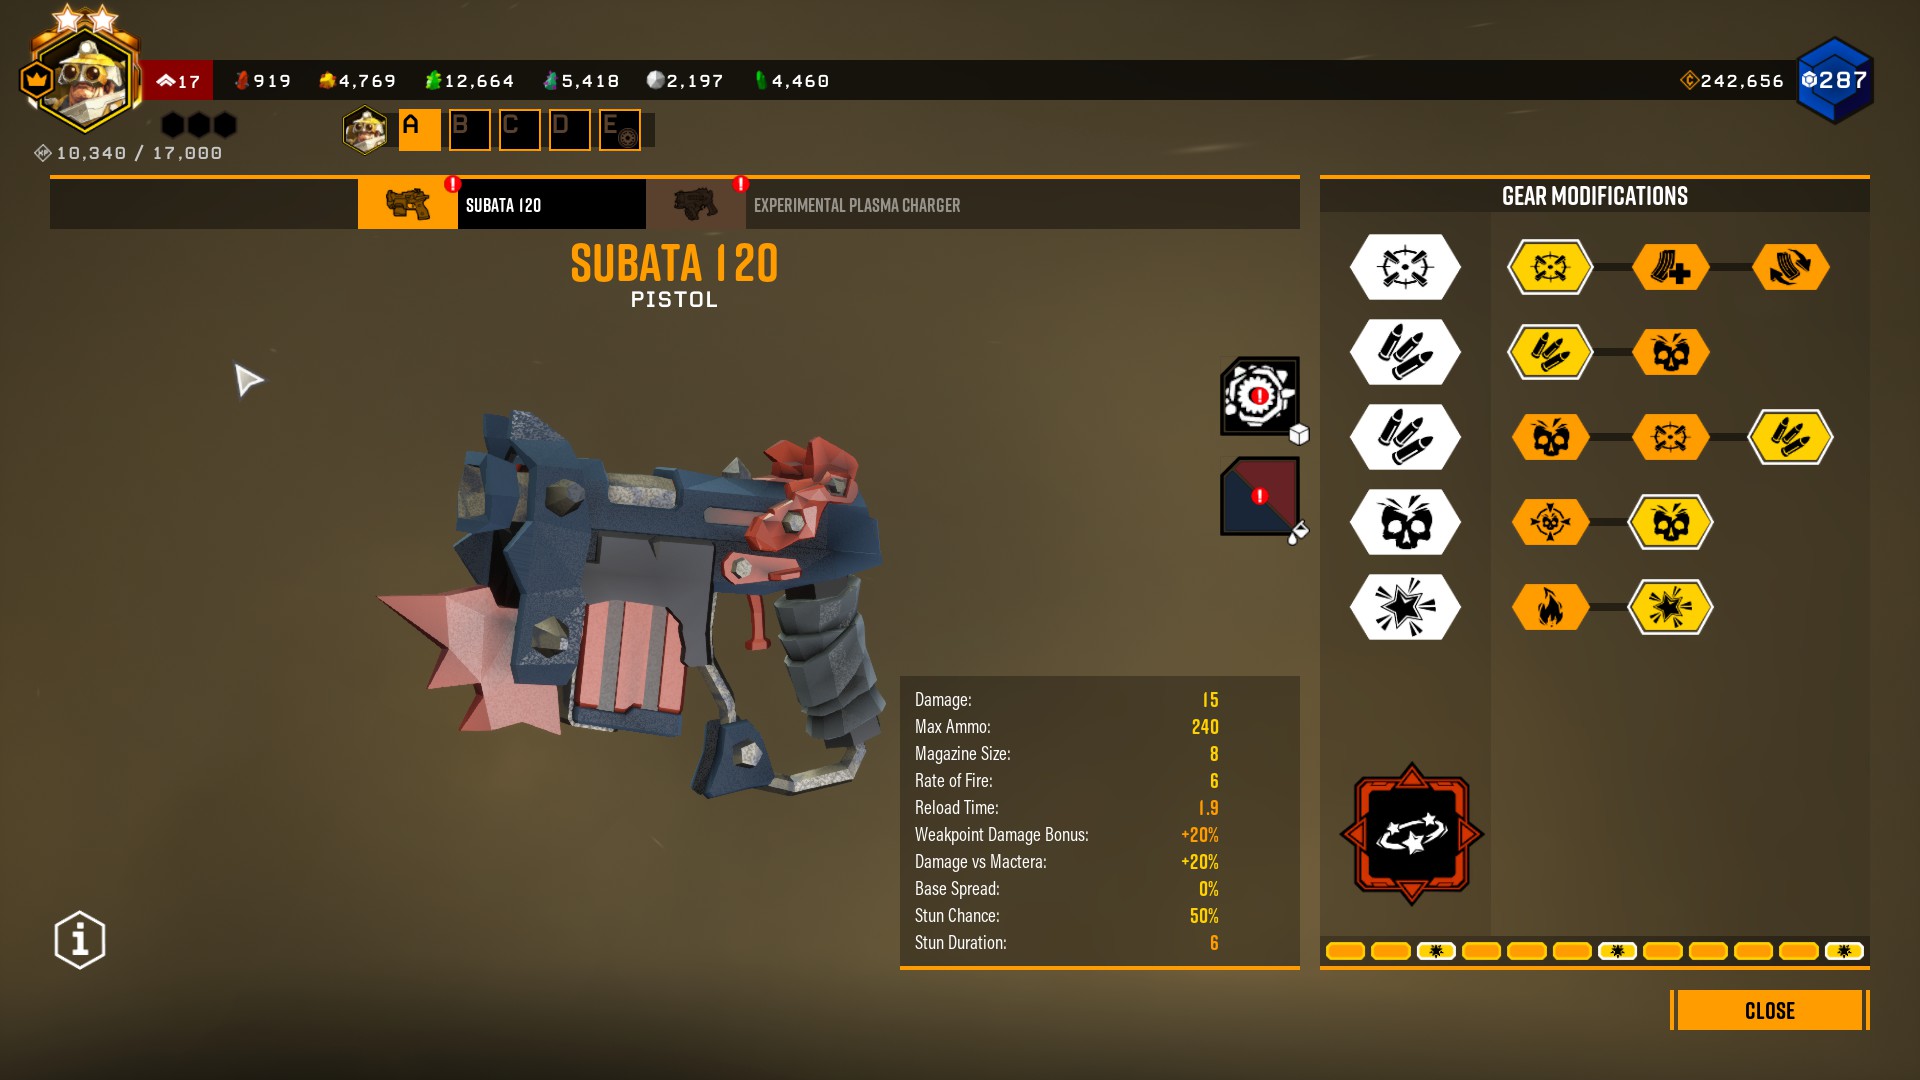
Subata 120: Improved Alignment, Expanded Ammo Bags, Expanded Ammo Bags, High Velocity Rounds, Mactera Toxin-coating, Tranquilizer Rounds (OC)
Pickaxe: Better Weight Balance
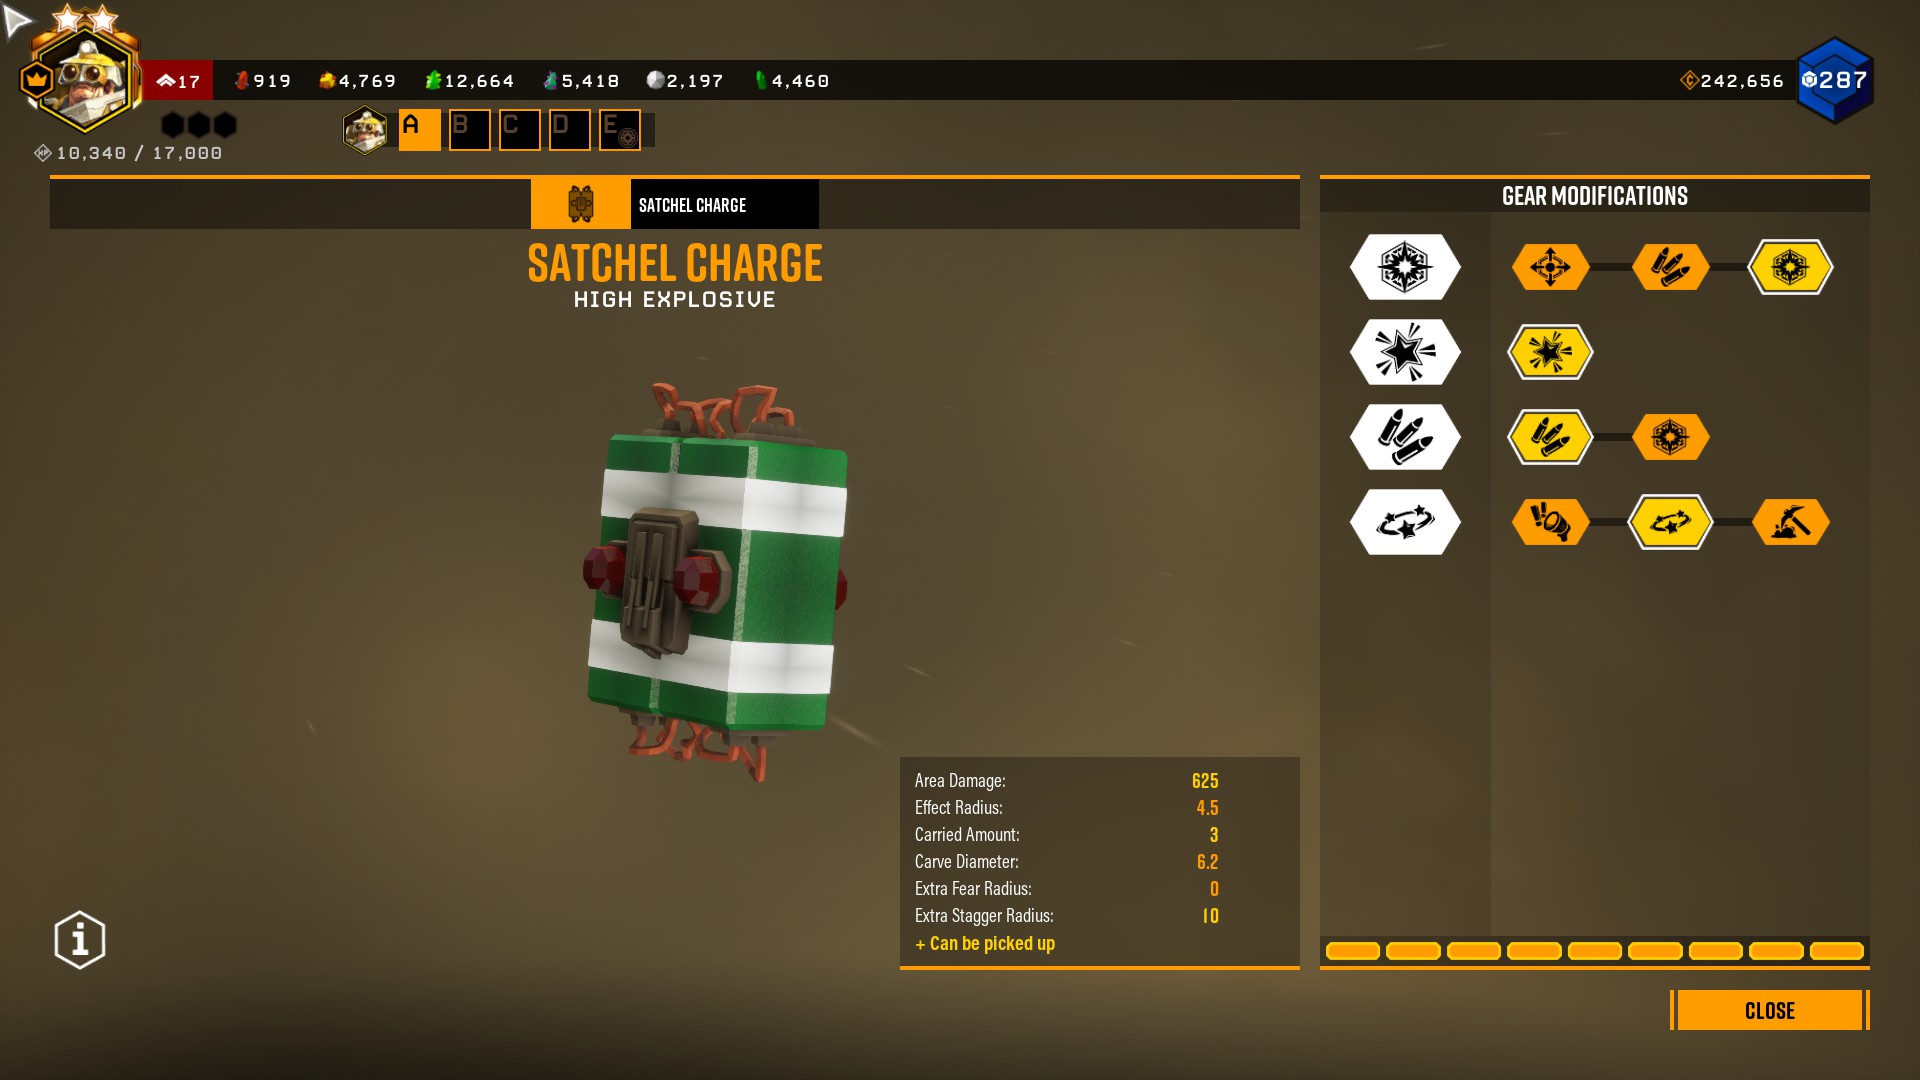
Satchel Charge: Bigger Charge, Kill Switch, Extra Satchel Charge, Concussive Blast
Reinforced Power Drills: Barbed Drills, Magnetic Refrigeration, Supercharged Motor, Increased Tank Pressure
“Mole” Armor Rig: Improved Generator, Overcharger, Temperature Insulation, Breathing Room
Flamethrower Build: CRSPR Flamethrower
Your main source of damage. You will fire a lil’ bit on the ground you expect enemies to walk on, and you’ll watch them burn to death as they do so.
Your sticky flames last 11 seconds, deal 20 damage per second and slow enemies by 55% on this build.
In addition, enemies who are on fire take an additional 6 damage per second, which will happen pretty soon.
You will compliment this by running around, making enemies stay in the flames, constantly burning down; while occasionally stunning them with your Subata.
Tier 1
High Pressure Ejector: Your flamethrower has 50% more range (15m).
I take it over High Capacity Tanks (+25 tank size). (This doubles tank size on this build)
This is because you want to set enemies alight from a safe distance and still have enough space to maneuver. I found 10m to be far too short for my liking.
Tier 2
Sticky Flame Duration: +3s Sticky Flame Duration. (Total sticky flame: 11s)
I take it over Unfiltered Fuel (+4 direct damage) and Triple Filtered Fuel (+10 heat on direct damage). This is because we won’t be doing much direct damage to enemies. Most of the damage will come from the sticky flames.
In addition, the extra 3 seconds makes your fuel go a greater distance. Totally worth it.
Tier 3
Sticky Flame Slowdown: Slows enemies in sticky flames (55% slowdown)
This is a must have for all Sticky Flame builds.
I take it over Oversized Valves (Fire 30% faster) and More Fuel (+75 more fuel). The slow down is integral to the build, and even though I’d love more fuel, this is a compromise we must make.
Tier 4
More Fuel: You have 75 more ammo.
This gets rid of our Overclock’s weakness of 75 less ammo.
I take it over It Burns! (+20% fear per fuel spent) and Sticky Flame Duration (+3s sticky flame duration).
While 14s of Sticky Flames sound awesome, I found it overkill, and I found myself wanting the 75 more fuel more.
Tier 5
Targets Explode: Half the targets killed do 55 AoE damage.
This AoE damage provides you with additional damage, and allows you to take down clumps of enemies surprisingly quickly
In addition, as you will be keeping distance from your enemies, you won’t be able to take full advantage of Heat Radiance, (Which Burn enemies within 4m for 80 damage while firing). 4m is far too close for any bug to be with this build!
Overclock
Sticky Fuel
This makes your sticky fuel do 20 damage / s over 15 /s.
It gives your sticky fuel +6s duration (base +2, for a total of 11s with all perks).
It reduces tank size by 50%, to just 25. But you’ll be firing sparingly, making distance and reloading, so this isn’t a problem.
And it reduces your max fuel by 25%, (-75). This is a big penalty, hence I needed to take a perk to shore this up.
Compare with:
- Lighter Tanks: You get +75 more fuel. (+25% base)
- Sticky Additive : Your sticky fuel does +1 damage (16/s) and lasts 1s longer. (9s with all perks). This will give you 375 fuel and a 50 tank size, but I found that the 25% more damage and 2s longer duration to be more worthwhile.
- Compact Feed Valves : This gives you +25 tank size (+50%), +75 max fuel (+25%), but reduces your range to 8m range, and increases reload time +0.2s. These are all great stats for a direct damage build… Which we aren’t.
- Fuel Stream Diffuser: +50% Flame Reach (+5m), -20% Fire Rate (4.8 ticks / s). This will give you upto a 20m flame. This can be fun, but our main source of damage is sticky flames.
- Face Melter: This increases direct damage by +4 to 15. Increases Flow Rate by 30% (+1.8), which basically increases our direct damage to 117/s over 66/s base.The negatives are a -3m range (7m) and -15 tank size (35 ammo). This is a great overclock for direct damage builds.
Flamethrower Build: Subata 120
You will use the Subata 120 to shoot distant targets like Macteras, Lootbugs and Leeches.
You will also use it to stun big targets (like Praetorians) so they stay burning on your sticky flames.
Tier 1
Improved Alignment: Your first shot is pin point accurate.
When sniping targets across the map, like Leeches and Lootbugs, I do not want to miss. You can fire, wait for the gun to re-center, before firing again to basically have your pocket sniper BB gun. :p
I take it over High Capacity Magazine (+5 Mag Size) and Quickfire Ejector (-0.6s reload (1.3s)).
High Capacity Magazine is a good alternate choice. I just prefer accuracy over bigger mags.
Tier 2
Expanded Ammo Bags: +40 ammo (Base: 160, Build Total: 240).
We take extra ammo for the utility. We aren’t depending on our Subata for damage per se. More rounds are more things we can stun.
I take it over Increased Caliber Rounds (+1 damage, Base: 12)
Tier 3
Expanded Ammo Bags: +40 ammo (for a total of 240)
Once again, more shots downrange = more enemies stunned on your sticky flames.
I take it over Improved Propellant (+1 damage), and Recoil Compensator (50% recoil, 33% spread). We won’t be spamming the pistol except versus close to medium range Macteras, and at that distance the recoil and spread are managable.
Tier 4
High Velocity Rounds: You do +3 damage. (15 in total)
I find the extra damage more useful against Lootbugs and Leeches over Hollow-Point Bullets (+60% weakpoint damage: 17.6 weakpoint damage).
You can’t always hit weakpoints, so I prefer the base damage increase.
Tier 5
Mactera Toxin-coating: 20% more damage vs Mactera..
Mactera are your bane. Your Subata is your the tool of choice against them. This extra damage is absolutely vital.
While it might be more fun to think of Volatile Bullets (+50% damage to burning enemies), your Subata honestly just does piddling damage, and your sticky flames and burn damage are more than enough to take enemies down.
Overclock
Tranquilizer Rounds
Each shot has a 50% chance to stun.
You have -4 magazine size (8, instead of 12) and a -2 Rate of fire (down to 6 shots per second).
The stun is integral to the build, letting you freeze tanky enemies on your sticky flames.
Compare with:
- Chain Hit: 75% of shots to weak points hit another enemy within 10m.
- Homebrew Powder : Each shot does a random x0.8 to x1.4 damage (for an average 10% damage increase)
- Oversized Magazine : +10 Magazine Size, but a longer +0.5s reload.
- Automatic Fire: You autofire 10 shots per second, holding down the trigger. However, you have 350% recoil (!) and 200% spread (!).
- Explosive Reload: Each shot embedded in an enemy does 42 damage when you reload. Your max ammo and magazine size is halved (50%).
Flamethrower Build: The Rest
Note: This section is the same as the Cryo Cannon Build EXCEPT for the Satchel Charge.
Pickaxe
I enjoy taking down grunts whenever I have Power Attack ready. Hence my preference for Better Weight Balance (20s Power Attack Cooldown).
I take it over Serrated Edge (Power Attack does AoE damage, but has a 30s(!) cooldown) and Shockwave (Power Attack’s AoE is 2m radius instead of 1m).
Satchel Charge
I use satchel charges for damage and stun, to complement my sticky flames.
Tier 1
Bigger Charge: +250 damage
Tier 2
Kill Switch: Pick up unexploded satchels
Tier 3
Extra Satchel Charge: +1 ammo
Tier 4
Concussive Blast: Stun enemies in 14.5m radius for 5s
Reinforced Power Drills
You can drill a longer distance than going for a faster drill speed! It’s just slower, is all.
Tier 1
Barbed Drills: Double Melee Damage. +5 Damage
This literally doubles our melee damage vs enemies to 10 from 5.
I use it over Hardened Drill Tips (+50% mining rate) and Expanded Fuel Tanks (+5 fuel)
Tier 2
Magnetic Refrigeration: +50% faster cooling
While drilling, just wait 2 seconds before overheating, and you will be at 0% heat. As long as you stop before overheating, you will be able to keep drilling at a steady clip.
Tier 3
Supercharged Motor: +50% mining rate
Tier 4
Increased Tank Pressure: 16% more fuel
More ammo is good. I take it over Bloody Cold Drills (Drills can be used indefinitely against enemies) because I find it.
“Mole” Armor Rig
My armor rig is built for bigger and faster shields. I basically flee, go to cover whenever my shields break, before I reengage. You can change the build to your tastes.
Tier 1
Improved Generator: Shields start recharging in 4.5s
I take it over Boosted Converter (Shields recharge twice as fast, but after 7.5s) and Bigger Mineral Bag (You carry 5 more minerals).
Tier 2
Overcharger: This increases your shields by 20%. +5 shields.
I take it over Healthy (18% more HP), as I want to use shields to mitigate damage over Health.
Tier 3
Temperature Insulation: +50% Fire Resist
Tier 4
Breathing Room: 3s of invulnerability after being revived
That 3s is often the window you need to get out of really hairy situations.
I hope you enjoy the Guide we share about Deep Rock Galactic – Hazard 5+ Driller Builds; if you think we forget to add or we should add more information, please let us know via commenting below! See you soon!
- All Deep Rock Galactic Posts List



Leave a Reply