
Yet Another Mall Layout – Made it just for fun.
Lacks efficiency (VERY SLOW) / Still large in size / Not Tested so much.
TL; DR
Written at version EA 0.8.19.7863. Probably will not update this.
If someone feels offended in any way by this guide, it’s not intended, I apologize beforehand.
This guide includes some secrets of the game, turn back now if you don’t want to know.
* icons of everything you can produce, how to produce, and so on.
Conclusion: Use another person’s greater mall/starting base system rather than this.
Just an another mall system for someone who maybe interested (like me) in:
- Can a create-(almost)-everything mall in DSP be built fully aligned ?
- If so, how compact will that be ? What will be the size of it ?
- Is it possible to omit most belts from blueprints (so we can use it early) using MemoItem function ?
- If so, how hard will it be to actually use it ?
If you not interested in the above, you should turn back and use another person’s smarter mall system.
THIS MALL IS SLOW, since main reason of creation is as above, efficiency is IGNORED. It may not be good for real-game-usage.
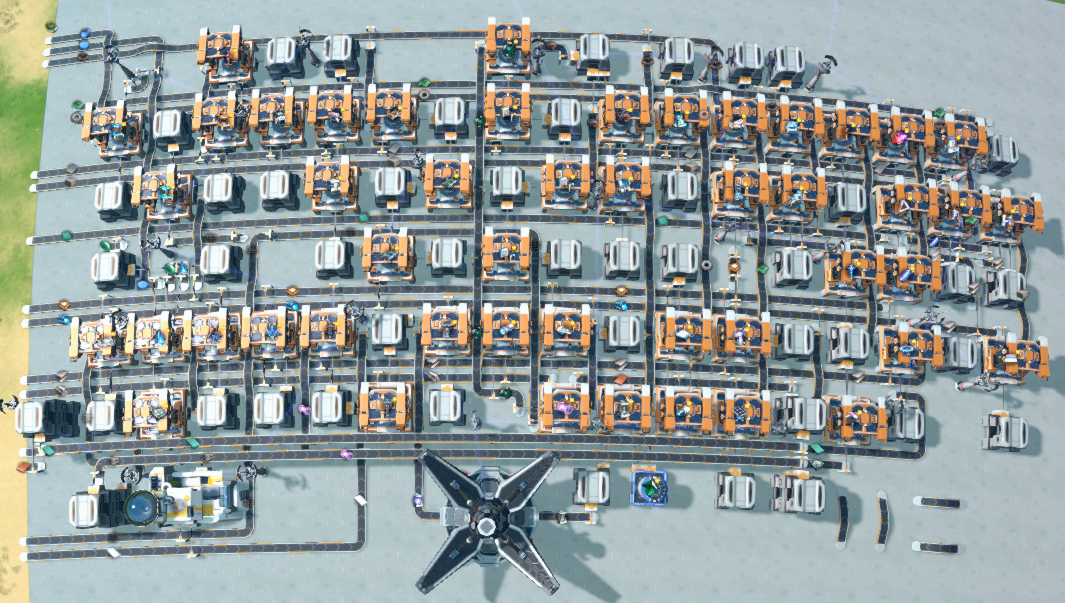
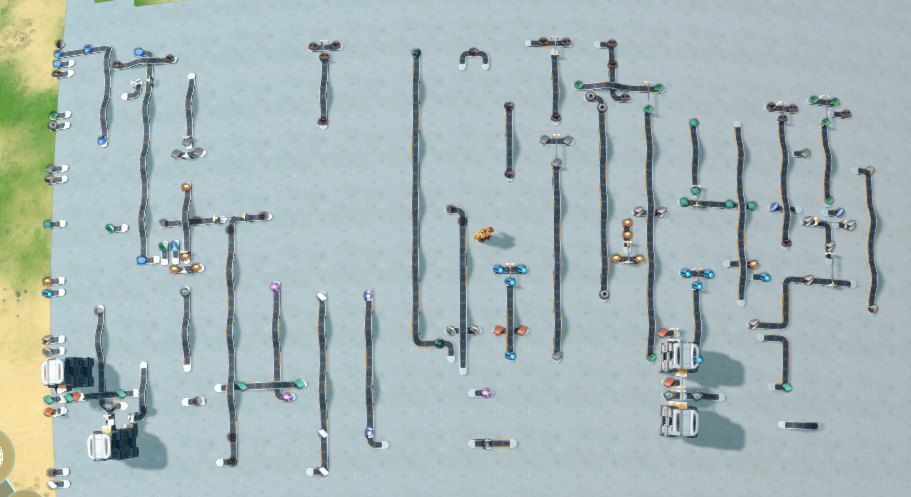
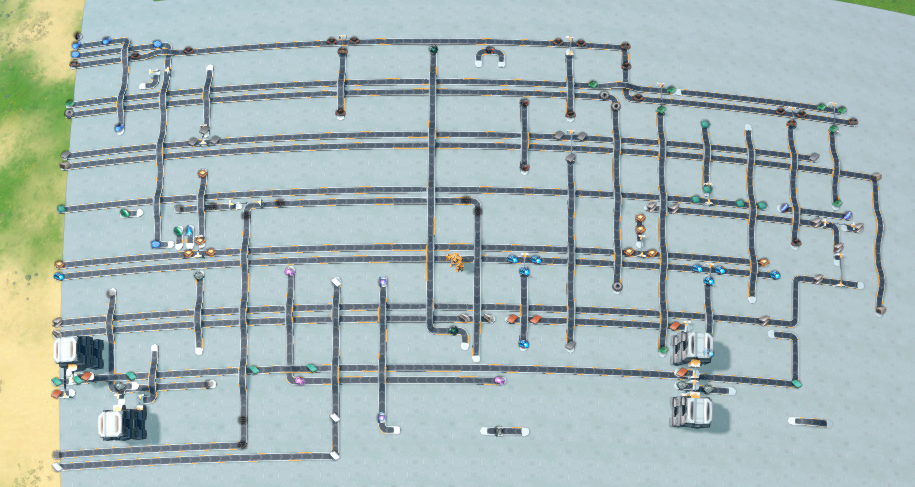
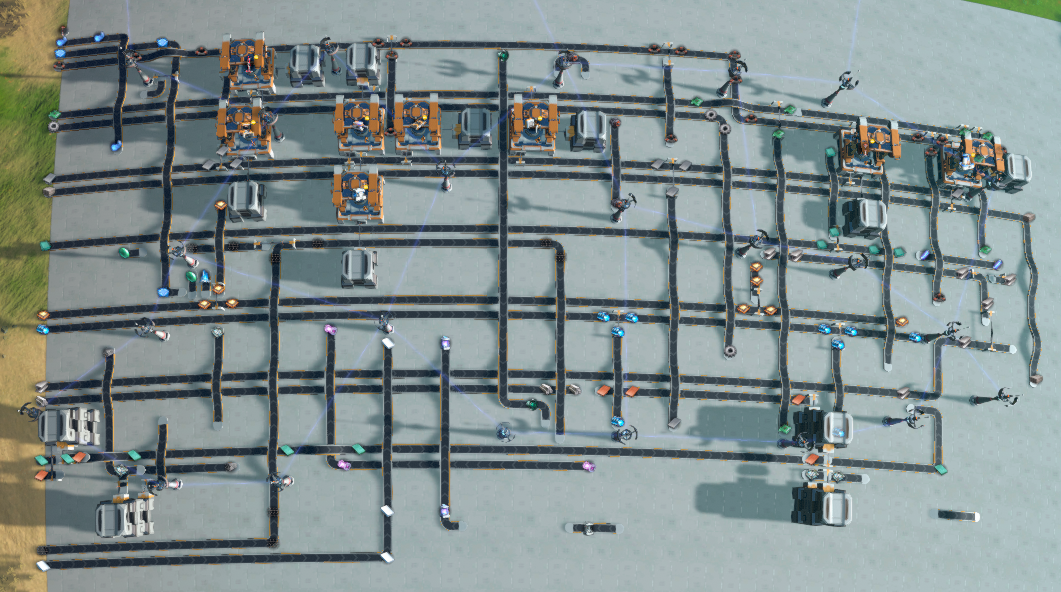
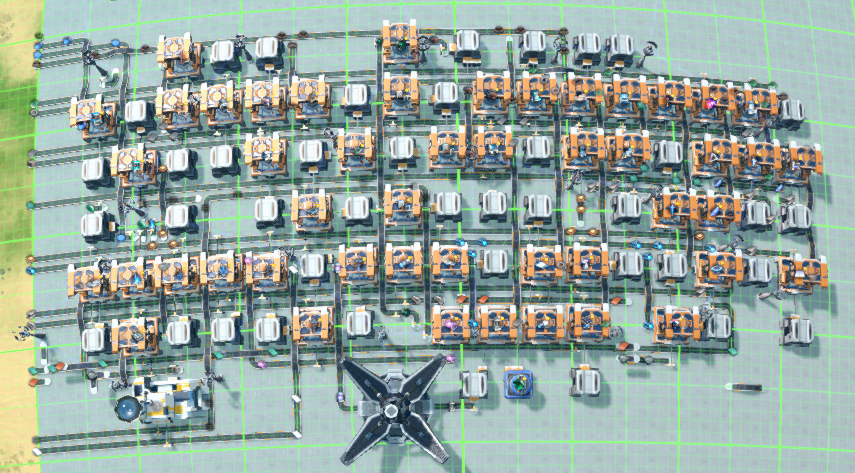
Full view of mall :
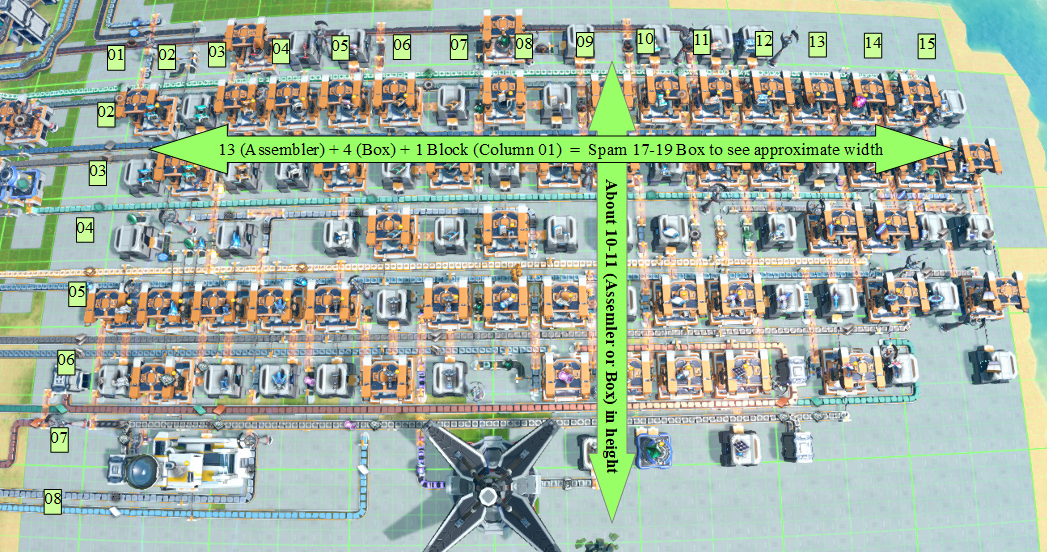
Full view of mall with size indicators :
Line-It-Yourself Mall Specs
This section explains the blueprint “LIY-Mall”, standing for “Link-It-Yourself” Mall.
On “How to use the blueprint”, skip to next section.
Disclaimer
This blueprint may not be working in future version of DSP, because it’s :
- too edged. I’m pretty sure it won’t bare against almost any kind of recipe changes.
- using “line-between-assemblers/boxes can have 1 belt line” trick.
- using 4 belt type 2-Line-Jump-Bridge, which looks like a not-intended-to-be-that function.
- using “Box Elevators” which also might be a not-intended-to-be-that.
- using Memo Icons like crazy. Ain’t sure if there will be limit in future.
- using “Memo Icons can be seen before that research is done”. Tested using “new game”, it seems to work like that now, which IS needed to create belts properly (with out seeing design).
- using “Size 1 belt can be overwritten”. Calling it as indicator belt (explained in how-to-use section).
Spec
| Input | Output |  icons marked with red cross is not made in this mall |
|---|---|
| Size | Width: 75 (15 blocks) Height: 40 (8 blocks) |
| Should also provide for speed |
Types of LIY-Mall
| Type Name | Stands for | Num of BluePrint | Short Note |
|---|---|---|---|
| B-3000 | Bridge Type for Blue Print 3000 Limit | 1 | Builds everything |
| S-3000 | Sorter Type for Blue Print 3000 Limit | 1 | DON’T USE THIS |
| B-600 | Bridge Type for Blue Print 600 Limit | 1 Belt Parts+1 Factory Parts | Line It Yourself ! |
| B-150 | Bridge Type for Blue Print 150 Limit | 7 Belt Parts+10 Factory Parts | Line It Yourself ! |
| Type Name | Intended for |
|---|---|
| B-3000 | Check if this really produces all |
| S-3000 | Free from most disclaimers above. For reference |
| B-600 | Main Blueprint. Try the “Memo Icon-based-belt omit” way |
| B-150 | Extreme example to show how many blueprint it took in 150 limit |
Note 1:
B-150 ‘s Factories are not divided on 150 limits but by research level, just because I wanted to use it that way to test this mall myself. So it could be lowered to like 3-4 Blueprints. See the “Tips for tweak” section of this guide for a list of what is included in which.
Note 2:
All blueprint set ends up having 2-line-jump-bridge example at Bottom-Right. It’s for accidentally erasing some bridges (and of course testing sorter at some parts), and you need to repair it. Erase it if you don’t need it.
How to use LIY-Mall Blueprint
Explanation on how to use B-600/B-150. Based on B-150. B-600 can skip to “Link It Yourself” part, after reading next “Indicator Belt” explanation.
Indicator belt
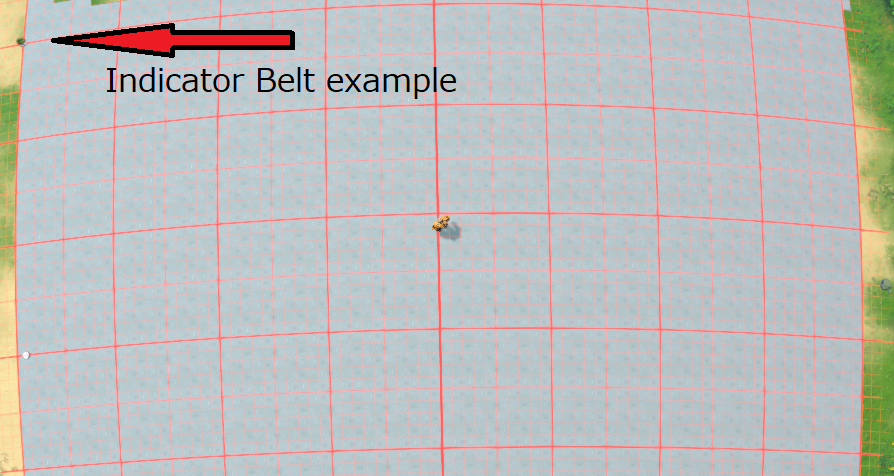
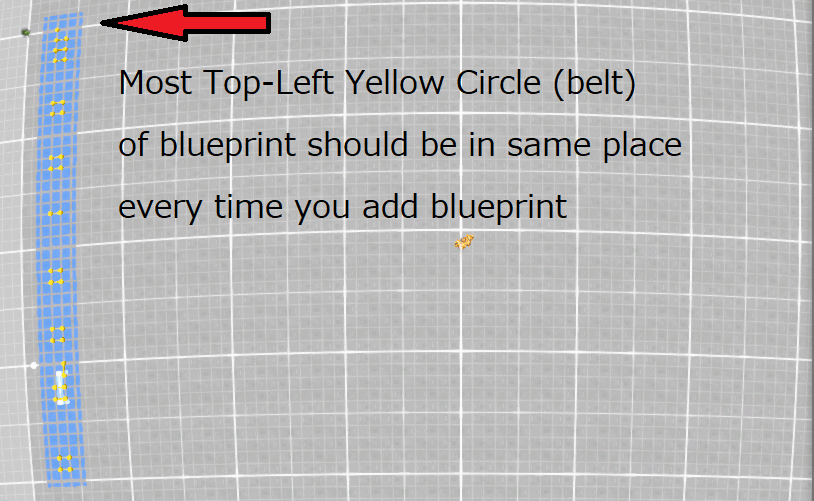
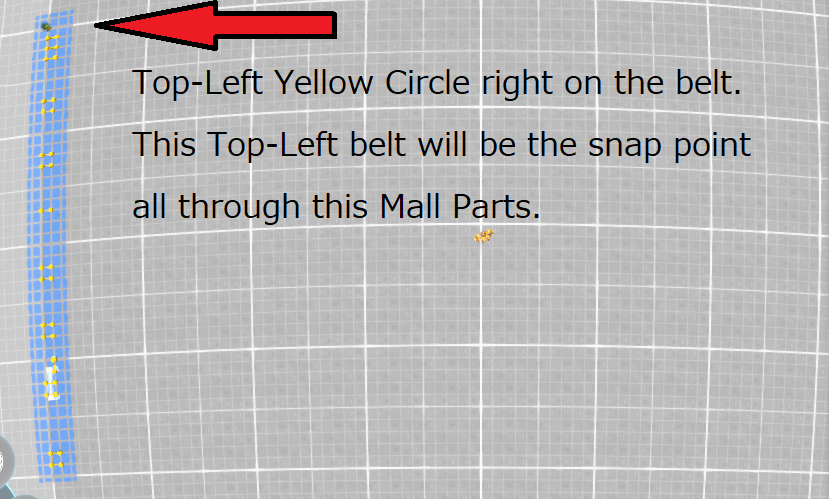
LIY-Mall uses top-left “size-1 belt with Memo Icon” (I call it indicator belt) to “snap” other parts.
Showing how it goes using “B-150 Belt 01” and 1 belt I placed to explain things. It’s very hard to see at glance, but watch out for that “small size 1 belt” in front of the red arrow of the following pictures.
Showing where the “indicator icon” is before using blueprint.
With blueprint.
Snapped !
How it looks like after snap and build (Memo Icon is BrozeOre for B-150 Belts 01).
“Snapping” the next parts to indicator belt
Note: “B-150 Belt 01” is the first parts, so it doesn’t need to “snap”. This is just for example.
Find location
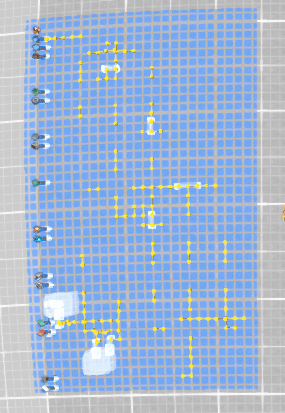
First but important. Size will be Approximately 75 (15 blocks) wide, 40 (8 blocks) high.
LIY-Mall inputs things from left-side, so you will need some space on the left. Some space for top and bottom would also be nice, to additionally provide stuff for speed-up.
Tips: Use “B-150 Belt 01” parts for height check in 150 limit. Use “B-150 Belt 04” for width.
Apply all belt parts
Using “indicator belt”, snap all 7 belts blueprint. For B-600, this is done by 1 blueprint.
How it will look after all 7 belts applied.
Note For Researchers: B-150 Belt 06 / 07 is the vertical 2-bridge-jumper set. Just use to Belt 05 to check how hard it will be to line all vertical lines by hand (has enough indicators I think, but still … ). Belt 05 has a 2-bridge-jumper example on Bottom-Right, copy-create blueprint by yourself for bridge type-test. Just put sorters for sorter type-test.
Link It Yourself
All vertical lines are done by this point (B-600 too).
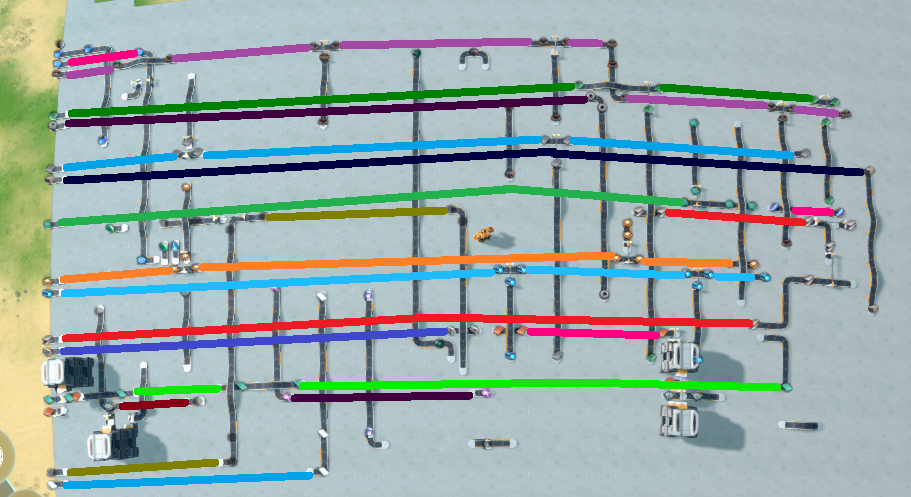
Now, link the Horizontal Main Bus Belts YOURSELF!
Find the icon on “main bus” lines, and connect the same ones horizontally only.
| Needed belts num from here | About 700 |
|---|
* Subtract from full to B-600 Belts parts is 687, but B-150 needs little more, so about 700.
Below shows the lines you should connect. (excluding 2nd-floor-lines of copper/frame material).
The ones I think is tricky are listed as below
| Plasma Exciter | Left to Right ( -> ) short line on top-right part of mall |
|---|---|
| Graphene | It IS a short line. Don’t look around, it’s OK. Middle of mall |
| Steel | Main part goes left to right ( -> ) but after moving up 2 line, goes right to left ( <- ). |
| Copper Ingot | Goes right to left ( <- ). T.Alloy ends right in front. It’s OK. |
| Particle Container | Goes right to left ( <- ). |
| Carbon Nano Tube | Hard to locate since it’s under the Copper/Frame Material providing line at floor 3. right to left. Since too hard, B-600 has this lined already |
After all is connected (except floor 3 Copper/Frame Material line since you can’t see with that).
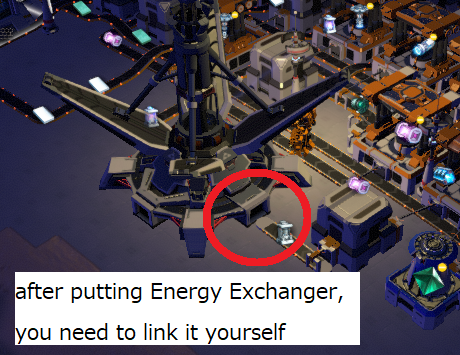
Note: Energy Exchanger line needs to be connected “after” you put them.
Build Factories
Just apply B-150 Factory 01 and others using top-left indicator belt.
Should be easy if you got to here. You don’t have to put all in once, but has to be applied in order.
Applying B-150 Factory 01 (before snap. notice the size-1 belt indicator at left-top)
How it looks after applying B-150 Factory 01
Link Energy Exchanger line after applying B-150 Factory 09 as shown
Done!
Now, feel the efficiency of other smarter malls from the slowness of this one !
Floor 3 lines (Copper Ingot/Frame Material) omitted but done version:
Tips for tweak
Just some points you may want to try to tweak on use.
Upgrading Assembler/Belt/Sorter
This mall is using only MK1 of these, so it’s up to you to upgrade where ever you want.
Just keep in mind that sorters used for “bus” part tends to become choke points of efficiency,
so even if you upgrade assemblers, they may become the bottleneck.
Multiple output Assemblers
Mainly, Prism / Plasma Exciter / E.Motor / Reinforced Thruster / Frame Meterial is the ones.
They are outputted / taken from multiple assemblers / lines, but it seems that they only ship out things multiple way only when 1 is filled up. So you have to dismantle the other output sorters to let the one you want working. Don’t forget to re-connect it when you have enough of what you wanted !
Providing E.Turbine
Most efficient part. Provide it from the top of mall, straight to the E.Turbine output belt.
May need to jump over the line, but should have enough place to put splitters there.
Providing Particle Container
Second efficient tweak. Provide it from bottom of mall, straight to the Particle Container line.
Note that if you provide it “before” ILS, ILS will take Particle Container before PLS does.
Adding Storage MK2
Add it to Bottom-Right if you need one, things are near-by. It’s not in the blueprint just because it may cause B-150 to be divided more, and also I forgot about it !
Removing floor 3 lines (Copper Ingot / Frame Material)
Simply add Copper Ingot from right side of mall or let them go all the way around.
For Frame Material, just simply bring some by hand. Satellite Substations don’t consume so much.
Factory Parts
| Num | Includes |
| 1 | |
| 2 | |
| 3 | |
| 4 | |
| 5 | |
| 6 | |
| 7 | |
| 8 | |
| 9 | |
| 10 |
Creating your own factory set
- Build all belts
- Remove all sorters on belts. It shows where they are by “need-power” indicators.
- Place the full factory blue print (B-600 Factory should do, but can place B-150 all)
- Remove the un-needed assemblers / boxes by directly dismantling them. Don’t manual dismantle the sorters. They will be removed smartly ! Be aware not to remove boxes / assemblers that pulls out things as materials ! (example: don’t remove Prism assembler when you want Plasma Exciter in your set).
- If you have a assembler that is “pulled” by an assembler you want, but don’t want to put it in, remove input sorters of that assembler. (example: remove input sorter (glass) of Prism assembler)
- Select the entire mall, remove belts and Tesla towers from blueprint statistics by right-clicking the mouse over them.
- Re-Select the indicator belt by directly left-clicking it. Statistics should show 1 belt now.
- Remove the boxes / assemblers that depends on, by selecting them with right-click of mouse. (example: right click Prism assembler)
- Save it and test it !
Note: I had a problem when making a factory set with those “pull things out from existing box/assembler” sorters (Photon Combiner / Assembler MK2 / Belt MK3 set, maybe). As a result, I divided that factory set (06/07). Maybe I just missed something else, but just for your information.
Mall Design and other small things
Just showing what and where things are, just in favor for someone’s curiosity.
READ NO FURTHER if your just trying to use this.
From here, it’s just a explanation of the mall , why xx is that way, and so on.
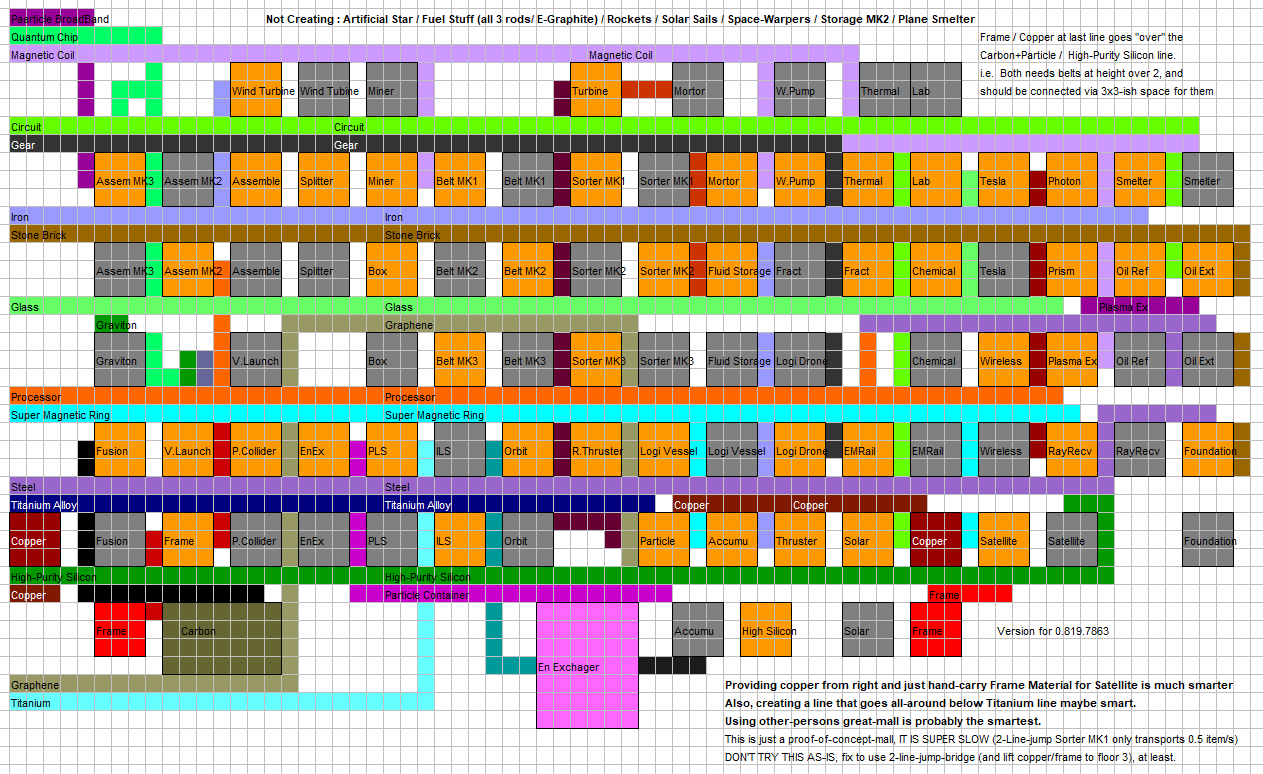
Mall Design
I do have comments even in the design pictures, just in case someone just sends these pictures, and someone else may try to use it as-is (never do that, lol).
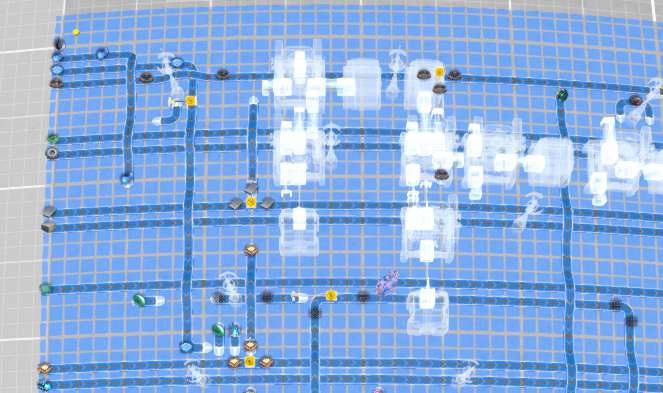
Design only (no sorter indicators for good view)
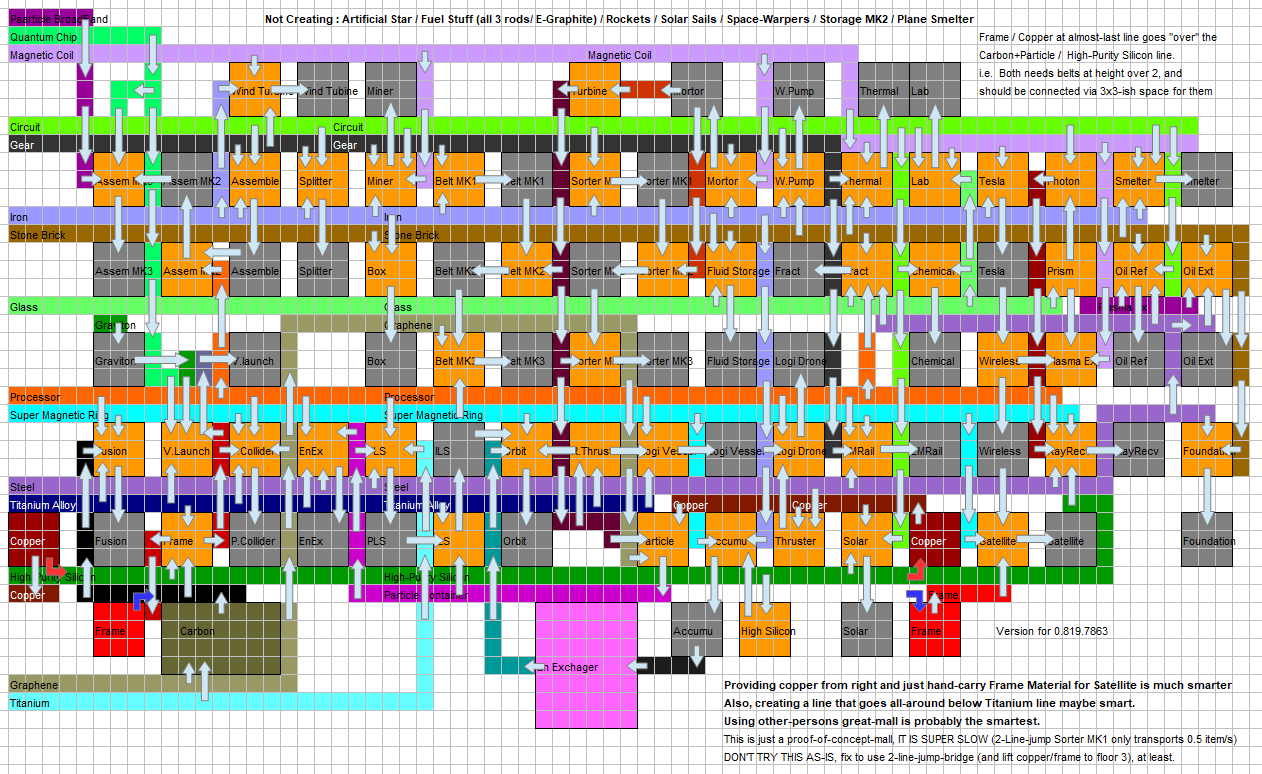
With sorters written. Arrows show which way they connect. 2-Line-Jump is all sorters as for design.
As you can see from the design, Electric Turbines (middle vertical reddish-brown-line) is a nightmare. Even on overflowing that line, belt mk2 and sorter mk3 are getting the E.Turbines first, and after that, Reinforced Thrusters take them, and finally, Particle Container (used LOTS in PLS/ILS/EnEx) is made. Which makes this mall EXTREMELY SLOW on PLS/ILS/Orbits Collectors, even slow on Logistic Vessels / Belts MK2&MK3 / Sorter MK3, which are all the essentials of DSP ! VERY CRITICAL.
Even after you tweak the E.Turbine problem (maybe before), you might suffer on multiple output assemblers, naming in “Prism”, “Plasma Exciter”, “Reinforced Thruster” and “Frame Material”.
Maybe “Electric Motors” too, if you use WaterPump much. They do output multi-ways, but it seems that one side takes as much as they can before other side starts working. Example: Plasma Exciter outputs to “Oil Extractor / Oil Refinery provide line” until both Oil stuff overflow in storage box, even before creating 1 Wireless Tower ! You CAN “fix” the output by dismantling the output sorter, or just pickup and feed by hand, but I’m pretty sure you will forget to connect it again, and find out you have so small amount when you need lots of it !
As for last, DO NEVER create this sorter version. If you create this with Sorter MK1, it’s like hell, since Sorter MK1 can only send 0.5 item per sec at max length … i.e.”when jumping 2 line” which is EVERYWHERE. At least use the 2-line-jump-bridge version even on test. I WARNED YOU !
Small things you might want to know
Can this be applied to Tropic lines ?
I don’t know, haven’t tested. Not so interested in that. Someone will, I believe !
Why do we have to belt first ?
Great question. It’s because Sorters connected to the Factory that’s picking up from belts, will be omitted if you do NOT have the belts beforehand. I think it’s a effect of Smart-Copy function (i.e. so that you can copy-paste and use factories more easily, and re-connect sorters to fit-in), and so, it is a design. But since omitting belts and let people Link-It-Yourself, it was a little trap. So I decided to let people belt first, and just simply divide the blueprints.
Why is this so slow ?
Mainly because there is only 1 assembler for E.Turbine. E.Turbine is needed at high-consuming parts (i.e. Belt MK2 / Sorter MK3 / Logic Vessels / PLS / ILS / Orbit Collector), but since there is only 1 assembler doing that job, it’s slow.
For Sorter version, if you use Sorter MK1 to jump 2 lines (i.e. length=3), it only transfers 0.5 item per second, and that also makes things super slow. I do recall first time I tried this with Sorter MK1, and E.Turbine line was just hell !
Why is Storage MK2 not created ?
Mainly because I forgot about it ! Tried to fix it to fit at Bottom-Right part, but that seems to cause fix to B-150 Belts blueprints, with the need to divide once more(seems to go over 150 on Belt parts 05), so I just simply gave up. It needs to turn Stone Brick line, but that will be too short to omit for “link-it-yourself” (or cause un-needed difficulty), with sorter picking up steel (and divide steel AGAIN !).
Why is the Motor to Turbine parts bended even though design isn’t ?
It is because when that belt is filled-up, straight belts seems to cause conflict (i.e. when filled up, you can’t place assembler next to it. clear the belt and now you can). I noticed this when I was testing this mall. It might be a rare case, since you put Turbine right after the Motor (which means in most cases it’s not filled-up), but bug-is-a-bug. So I fixed that. But as a design, it’s not fixed.
Why did you try to make it under 150 ? Looks so messy !
Just wanted to make a try, since I thought devs intended to put this function in for this kind of usage. It may be messy, but I think no one will use this (except to test belting-by-Memo Icon) anyway ! So it shouldn’t be a problem at all.
Why is this using 4 belt 2-line-jumper instead of 6 belt version ?
Because that was the only way to show which way vertical lines go, on 2-bridge-connecting parts (like E.Turbine line). Yes, I could make that part in not “3-belt showing connection”, but with 1 belt, but since that belt loses which way to connect to, I needed to use this. Also, by using this, I still can have things compatible with sorter version of the mall.
Why is this using “Box Elevator” instead of vertical splitters ?
In sorter version, I do use splitters, since there is nothing that goes higher then floor 1 (the ground level). But in bridge version, since the bridge is higher then ground level, I didn’t want to use floor 2 (vertical splitter higher output level), in case I don’t need to use 4 belt 2-line-jumper anymore and (someone can) replace it with 6 belt 2-line-jumper. I did have enough space to put splitters to just level to floor 3, but that made things so messy. To keep things simple, I thought it better to use it. If this part needs to be fixed, just replace with many splitters to level to floor 3, or more simply, move Copper Ingot / Frame Material line all the way around (which will make this mall pretty larger).
Why is this using “size 1 belt can be overwritten” ?
It’s the indicator belts. Also showing “to where you have applied the blueprint”. Notice that right-bottom icon for blueprints is the icon that will overwrite that indicator belt (except when it’s done. when it’s done, it will be plant icon). It really doesn’t need to overwrite the Memo Icon, since it’s real use is to show where to snap to. If this parts needs to be fixed, just remove that indicator belt manually every time you apply the blueprint, or (someone will) just simply fix the snapping way.
Why is this so “edged” ?
For my fun !
As for last
Thanks to all who created guides / wikis / blueprints. I referred so many of them to play and to come up with this blueprint (though it’s not useful lol).
And thanks for reading this far and/or try to use my blueprint !
Change Log
2021/08/10 – First Post
I hope you enjoy the Guide we share about Dyson Sphere Program – Another Mall Layout Tips Guide; if you think we forget to add or we should add more information, please let us know via commenting below! See you soon!
- All Dyson Sphere Program Posts List



Leave a Reply