
Introduction
This guide does two things:
- Provides a proven and reliable path to get 100% of all items in a reasonable time span
- Gives tips and tricks for avoiding death in tricky and dangerous areas.
Some notes about this guide:
- The images and path taken are based on the video below
- The difficulty used was NORMAL. It should work just as easily on EASY difficulty. While I have used this path on HARD I have only done so once, during which I died several times.
- Motay does NOT count deaths that occur during chase sequences. I do not know whether dying in a chase sequence nullifies the Immortal achievement as I got the achievement during a run without any chase sequence deaths. The video is the second playthrough with zero reported deaths, during which I died once during Kwolok’s chase sequence.
Inkwater Marsh
The Path
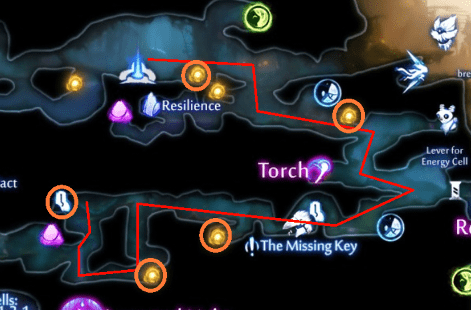

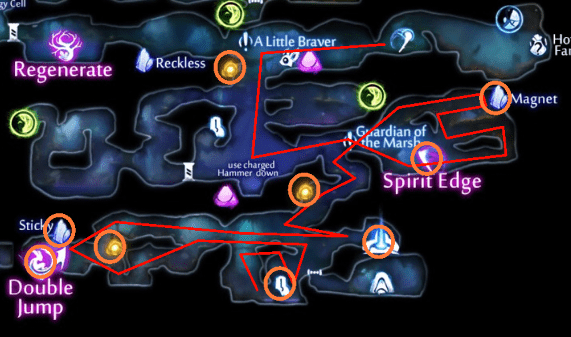
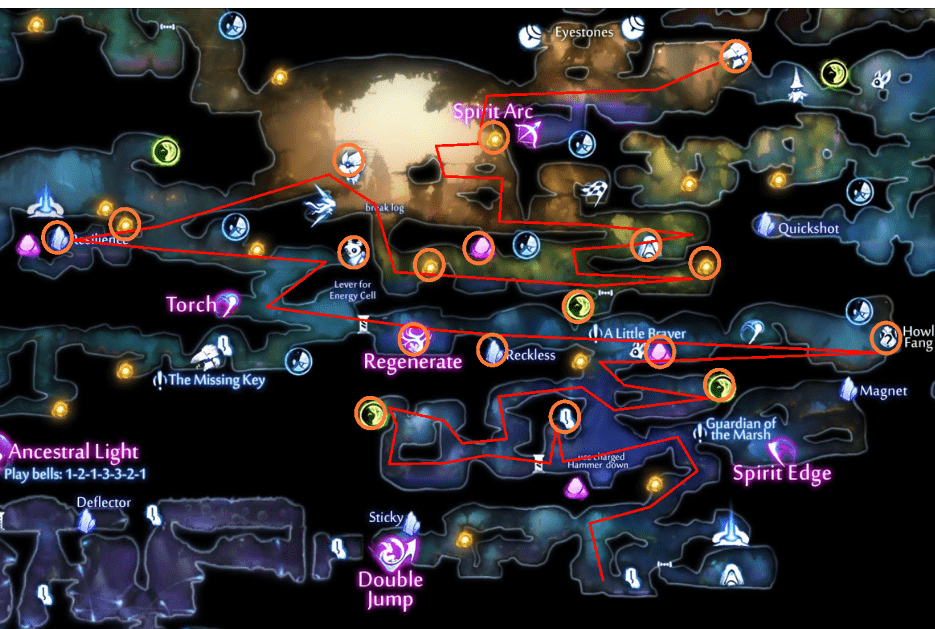
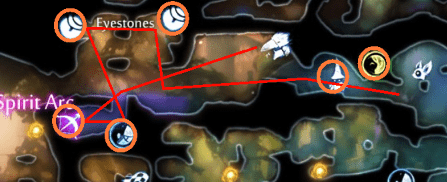
Tips and Tricks
Inkwater Marsh is mostly unthreatening with the exception of two parts:
- The fights with the first Snapper / Howler boss fight
- The area where you get the bow
The first snapper can be particularly tricky due to the short reach of the torch and the lack of platforming tech available. There are two tricks that can help:
- Jump over the enemy and try to hit them while you’re still in the air. This works wonders with the Spirit Edge but has less of an impact with the torch due to its small hit radius
- Wait for the enemy to pause. This is risky since they only pause for a short time, but if you get the timing down it’s possible to defeat them without taking a hit and without having to leave the ground.
The howler is relatively easy if you stay back and time your hit when they leap forward. The only hard part is judging how far forward to jump. It’s important to strike them twice before they have a chance to attack.
If you purchase the hammer from Opher, you can get an extra life cell fragment by breaking the barrier near the combat shrine.
There’s a spirit light near the Eyes of Kwolok area that requires you to fling upwards. If you’re directly under it, you’ll always hit the spikes. Instead, fling past the spikes and double-jump to get it.
Dealing with Skeetos
Skeetos can be particularly nasty when they’re near the ground as they only become stunned when they hit something. You run into your first real challenge near the Spirit Arc area where one of them roams near a spike-covered ground. This is a nasty trap as you can easily find yourself with little room to maneuver around a fast and agile enemy.
If you can, try quickly getting to an area where there’s a wall to lure them into. If there’s no wall nearby, you can try luring them into a more open area where there’s more room to reach them after they’ve stopped. And, if all else fails, you can always run away and abandon the fight.
Kwolok’s Hollow
The Path
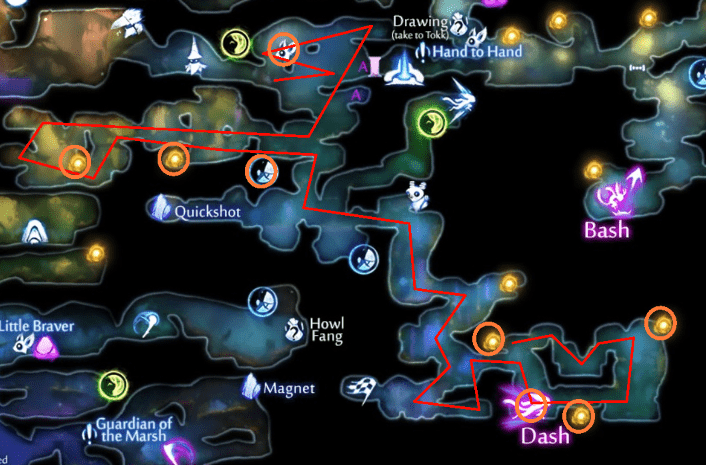
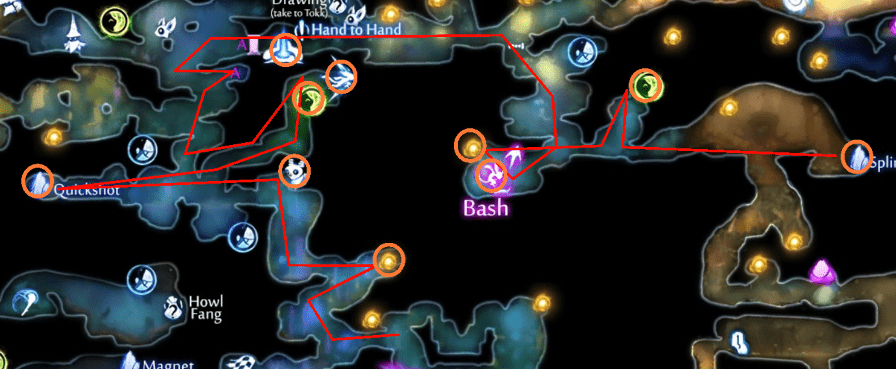
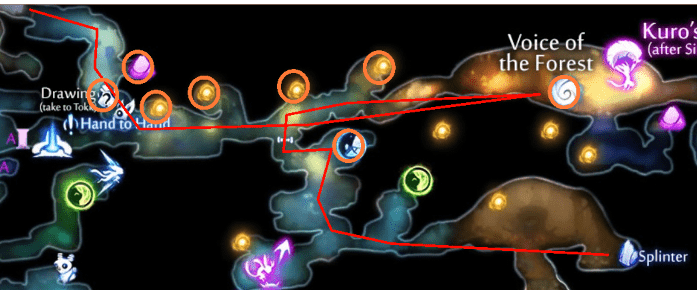
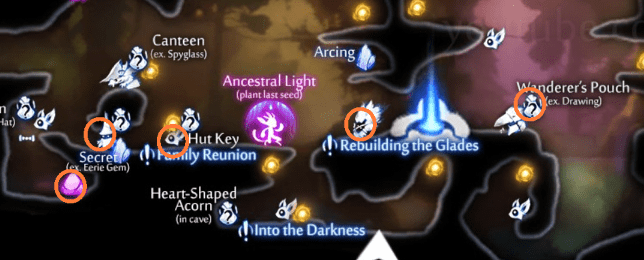
A note about BASH
While Ori is very talented at getting horizontal distance in the air they are poor at travelling vertically. When bashing, veer towards higher angles.
Also, when basing enemies or projectiles, watch their arc. If you’re aiming at something specific, you may have to aim high to compensate.
Tips and Tricks
The most dangerous thing you’ll have to face in Kwolok’s Hollow is the water. Watch your footing, and the majority of things in Kwolok’s Hollow shouldn’t cause you any issues.
This smasher won’t cause you any issues if you don’t stop running. Climbing the side will earn you another Life Cell fragment. Sticky makes this trivial.
This shard can be troublesome if you don’t know about the crusher glitch. You MUST dash BEFORE double-jumping, otherwise the crusher will pull you down into the water even if you’re not directly under it.
Skeetos Again
There is one particularly nasty area around a jump pad where TWO skeetos will attack at the same time. The terrain is small and it’s easy to be overrun.
The trick is to either run to the right where there’s more room, or use the bouncepad and cling to the wall up top. Either one should give you opportunities to lure them into the ground / wall to stun them. Both places should also provide opportunities to ditch the fight and run into a corner to heal.
The Wellspring
The Path
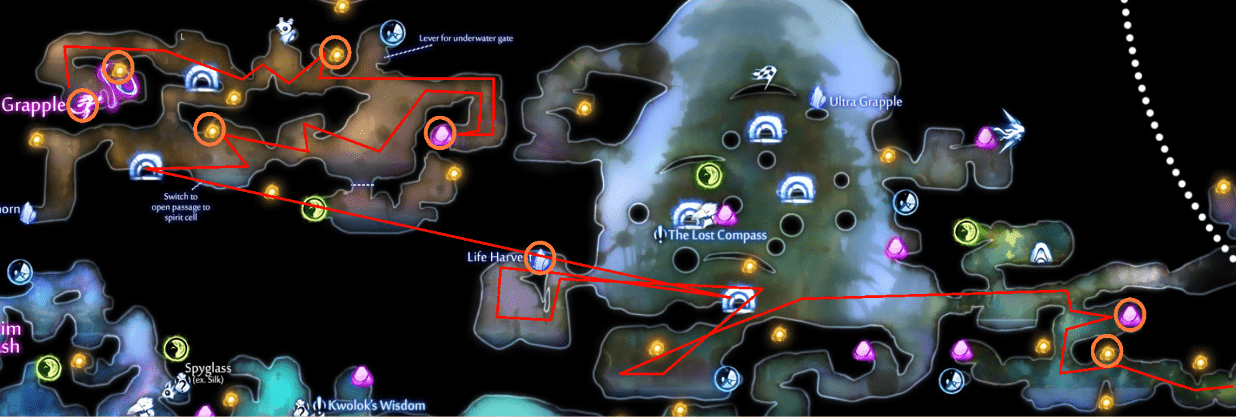
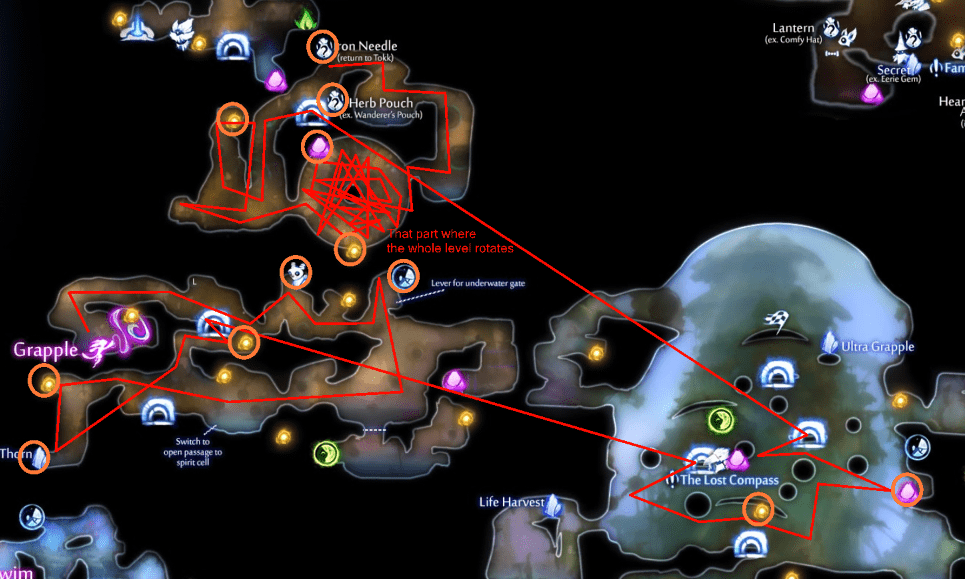
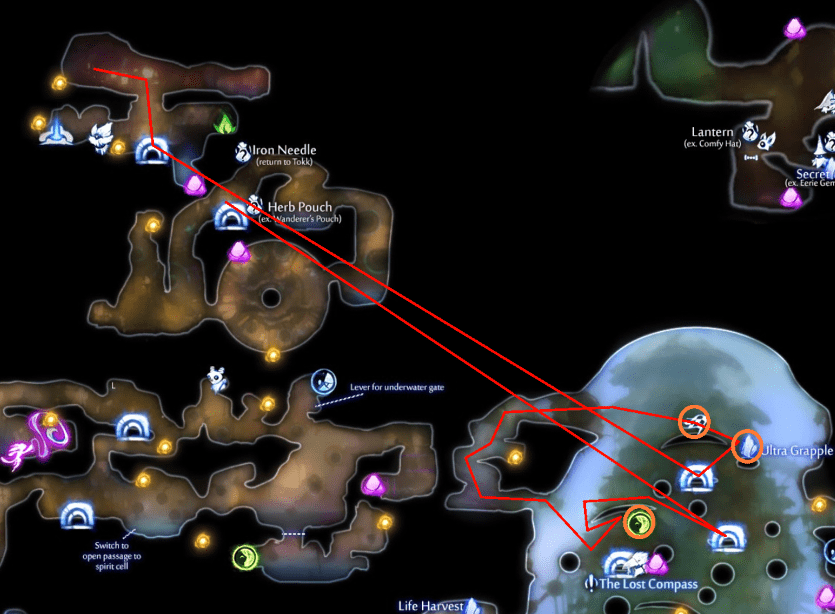
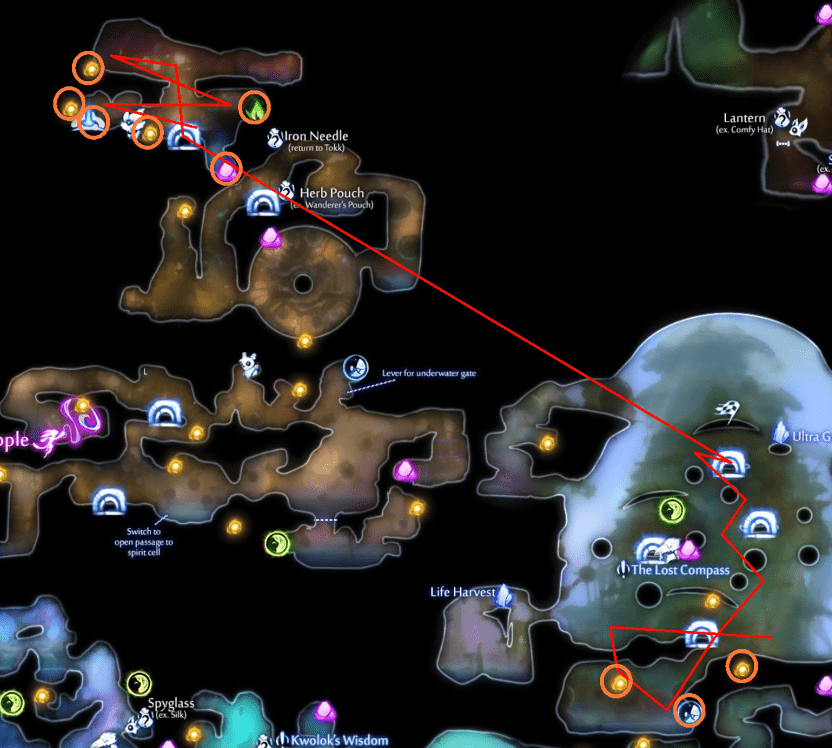
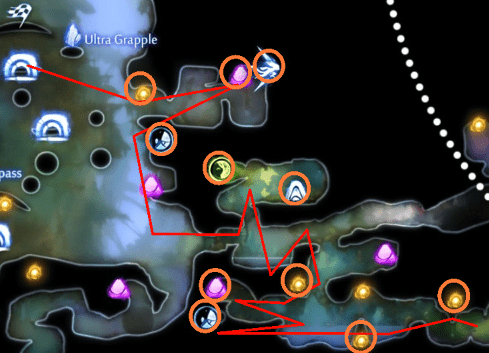

A note about GRAPPLE
Grapple is an ability that should be used carefully. Spamming will cause some strange behavior, and you can quickly find yourself places you don’t want to be.
Imagine exactly where you want to be and picture a line going from there through the grapple point. You want to be as close to the exact other side of of the grapple point from your destination as possible. Since you’ll usually be trying to go higher, you’ll want to try being as low as possible before grappling. It can take some practice to get used to, but it’s worth becoming skilled at it before attempting any kind of low-death or no-death challenge.
Tips and Tricks
This light requires grappling at a specific angle. It’s best approached from underneath this wheel.
Watch the angle on this life cell. The trick is to fall for a bit before grappling. Triple-jump helps but is not required.
After climbing back to the top to collect the post-chase-sequence items, you can fall to the right to get to the spirit trial area. If you judge it right, you can even get the spirit light at the top.
DANGER AREA
There’s a trap door in the first area that requires you to flip a hidden switch up top to drain the water. The area below, while having a few nice items (including a health fragment), is VERY DANGEROUS. There’s a hive that can easily overwhelm you amidst the little ground you have to stand on. The best thing to do is to WAIT and come back later after you’re fixed the water and have more health / maneuverability. Besides, you have to come back anyway after getting Swim Dash to push a button nearby to get the last item.
Backtracking
The Path
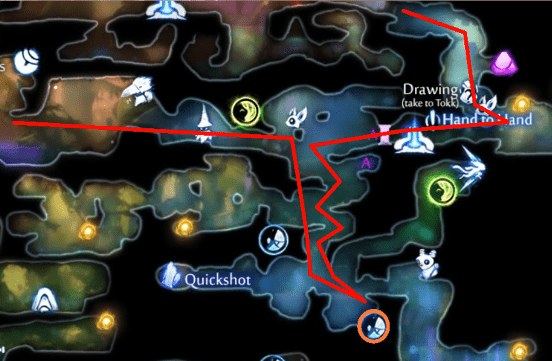
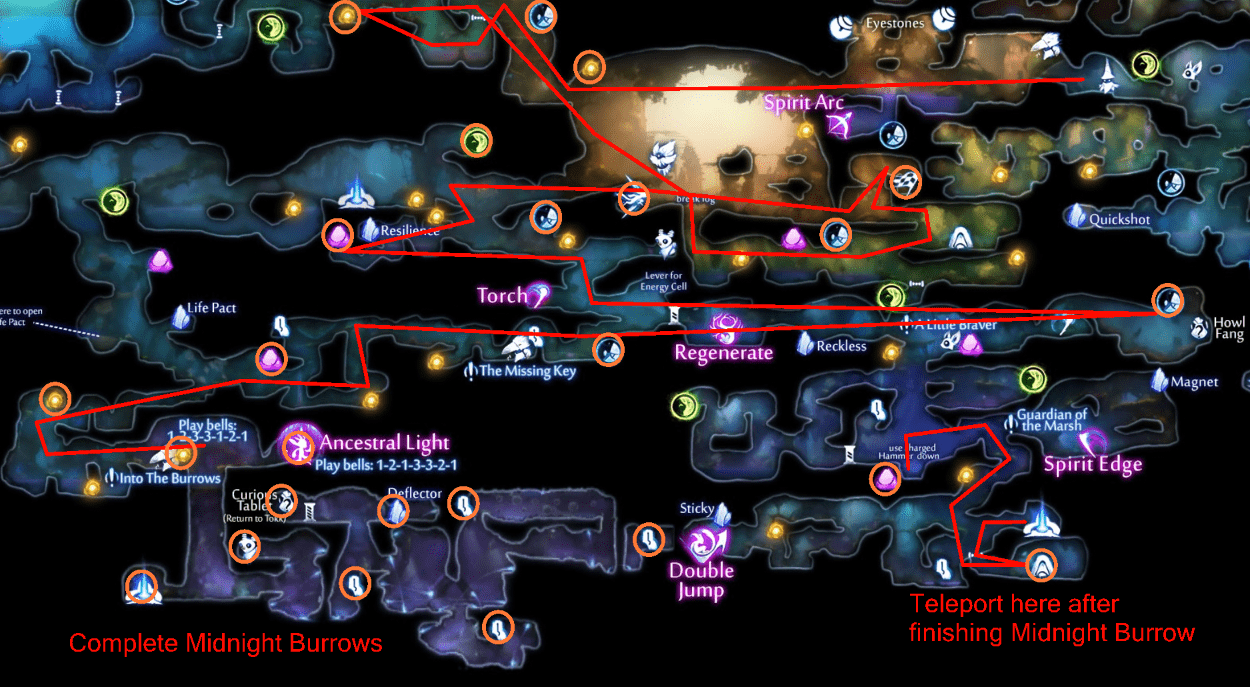
Tips and Tricks
These bats can be relentless, and I give a full strategy for dealing with them in the Mouldwood Depths where they’re most prolific. For now, though, you’ll want to keep this one alive to bash off of.
DANGER AREA
The place in Inkwater Marsh where Opher sold you your first weapon is EXTREMELY DANGEROUS when returning. It has two Singer Flys, one Skeeter, and (most dangerously) a Red Snapper that can roll into a ball and charge into you while you’re distracted with other enemies. It may be best to teleport to the spirit well where you started the game rather than walk back.
Silent Woods
The Path

Tips and Tricks
Not too much to say here. Watch your water meter when underwater, watch the spikes when flying around on Ku, and don’t jump the gun when timing a bubble bounce. Other than that, Silent Woods is one of the less deadly areas.
It’s also recommended that you take this time to get the 25% bonus damage from Kii’s seed. It will do wonders when going after the Wisps.
Luma Pools
The Path
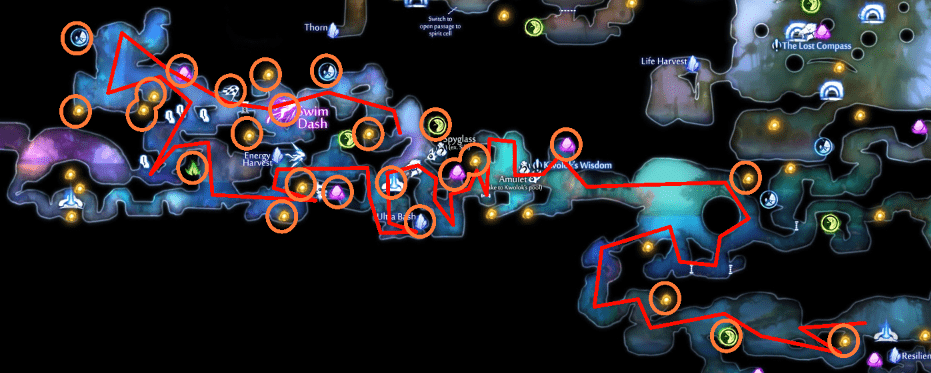
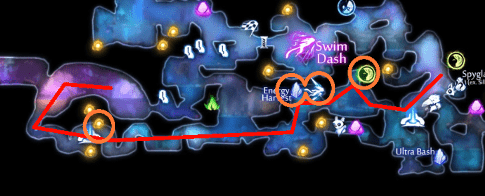

A note about WATER DASH
If you’re using KB&M, it may seem like you can only dash in 8 directions. This is not true! Ori does not instantly turn when pushing a direction, but rather rotates quickly in place. If you dash while Ori is turning, they will dash in whatever direction they’re currently facing, regardless of what direction key you’re pressing. You can use this to you’re advantage by "swerving" in a different direction just before you dash.
For example, when coming up out of the water, you can swerve to the left or right just before dashing up and you’ll jump out at a slight angle rather than straight up.
Also, Ori can dash into the water just as well as they dash out of it. It works just like Burrow. Keep this in mind when fighting enemies near the surface.
A note about BOMB SLUGS
The exploding slimes in the Luma Pools go off on a timer after getting hit. Strike them once, then stand back and wait.
Tips and Tricks
The trick with the first Gorlek Ore is to stand back away from the bubble. Your feather will have less wind and will push the bubble by a lesser amount.
This second Gorlek Ore can be tricky. You’ll have to grapple without colliding with the bubble. Stay in the air as long as possible before hitting the bubble for maximum height.
This is the most dangerous area in the Luma Pools. You’ll want to trigger the smasher towards the top so you don’t waste time swimming upwards after it’s dropped. Then, you’ll want to stay slightly low as you grab the light so you don’t get caught on anything on the ceiling.
This is a neat trick if you can pull it off. These things can be troublesome if left unattended since, well, they explode. If you can reuse them or bash them far away after pushing them back in the water, you won’t have to worry about them swimming around in the water with you after the fact.
Remember that you can dash into the water. This is a great way to gain some extra speed when getting that final timer.
Using the Water Dash trick explained above, it’s possible to get this spirit light even with KB&M. Just press "right" a split second before dashing.
Mouldwood Depths
The Path
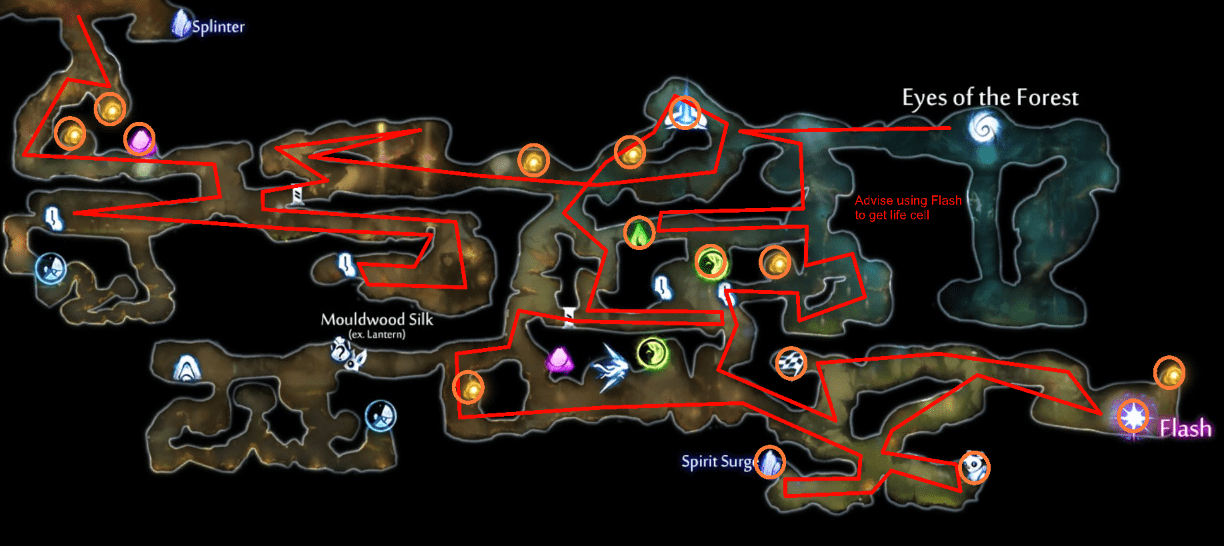
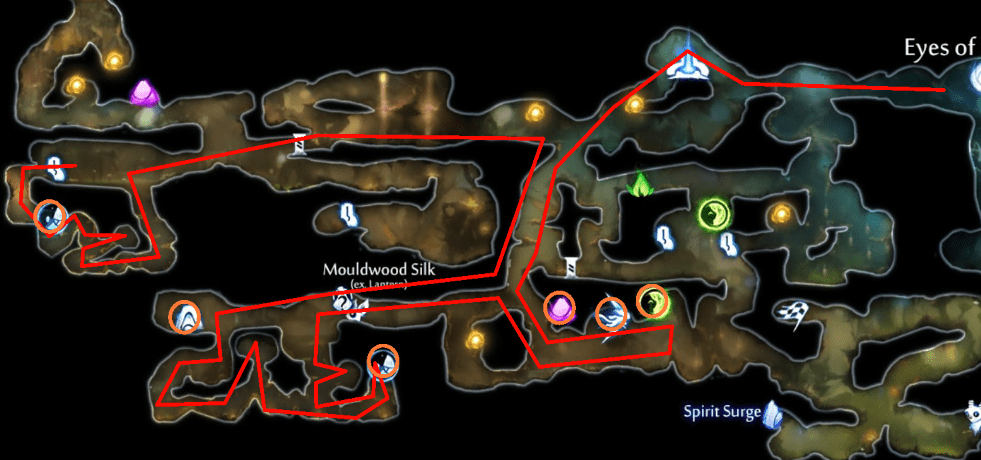
BASH EVERYTHING
Mouldwood depths has a TON of projectiles, whether it’s a Caterpillar or a Bat, you’ll be dealing with a lot of projectile spam. Bash everything that comes your way, whether you can hit your target or not. Also, if it’s a ground enemy like a spider or caterpillar, or a water enemy like a Piranha, bash them into some nearby spikes for an easy kill.
Wobbly Platforms
One issue in the Mouldwood Depths is the stick platforms you yank out with your grapple ability. They can wobble so much it can be tough to stick to them. The best trick I’ve found is to grab or stand near the root of the stick until it starts to settle out. It’s tempting to grab the end since that’s where the light is, but you’ll usually have plenty of time to let the stick calm down before you’ll need to replenish your light.
Tips and Tricks
This is the most challenging item to get. If you use the trick discussed above for dealing with wobbling platforms, you shouldn’t have too much trouble. That said, if you feel you aren’t practiced enough to do this on a final run, it may be best to return here after getting Flash or defeating Mora.
These bats litter the area after defeating Mora. The best approach, aside from outright avoiding them, is to "circle" them in a swing-like fashion. I.E. jump over the first set of projectiles, strike, then run under them during the second attack, jump, and hit them on the other side. The only time this won’t work is when there’s spikes or some other hazard underneath them, in which case you’ll have to use a different strategy like the one in the video.
Baur’s Reach
The Path
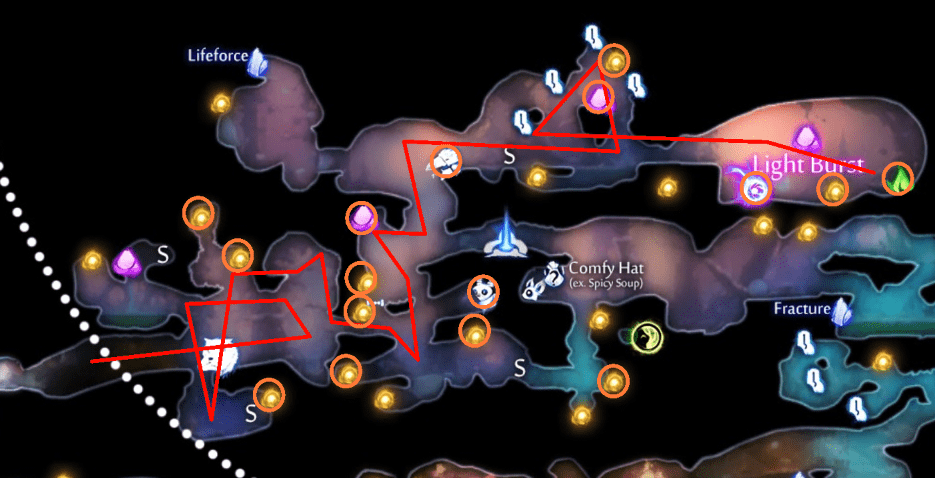
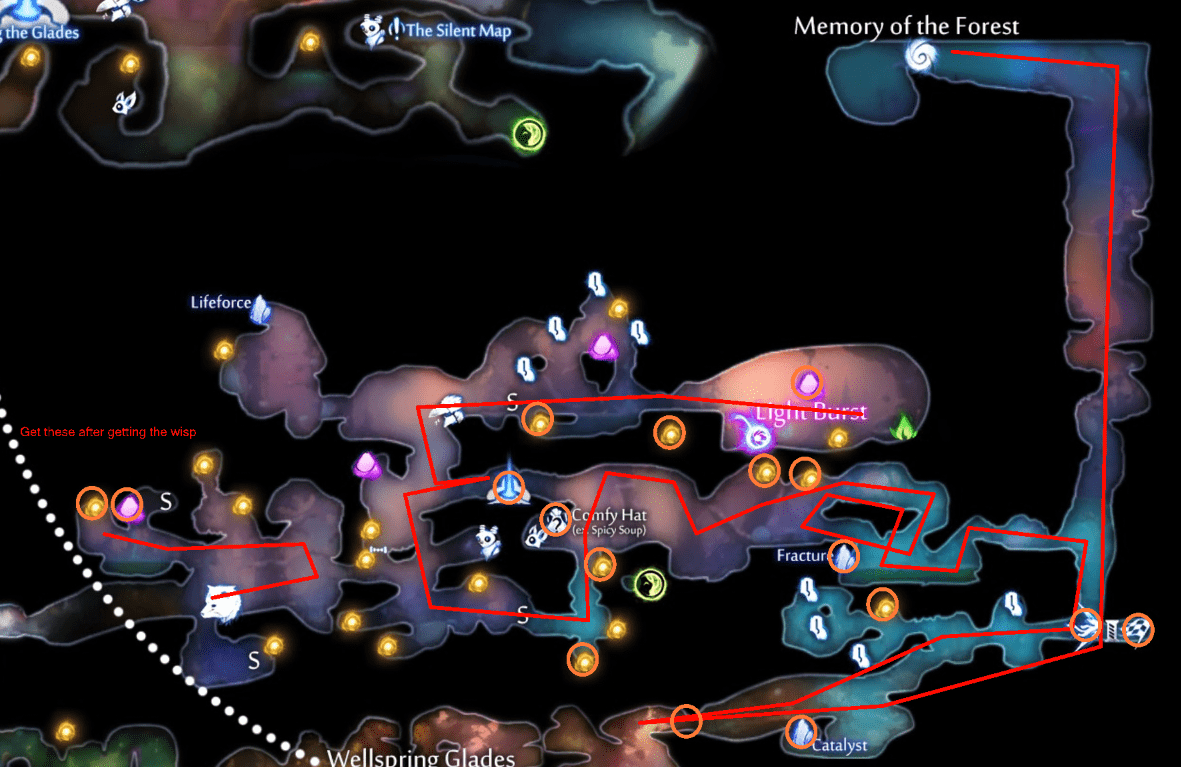
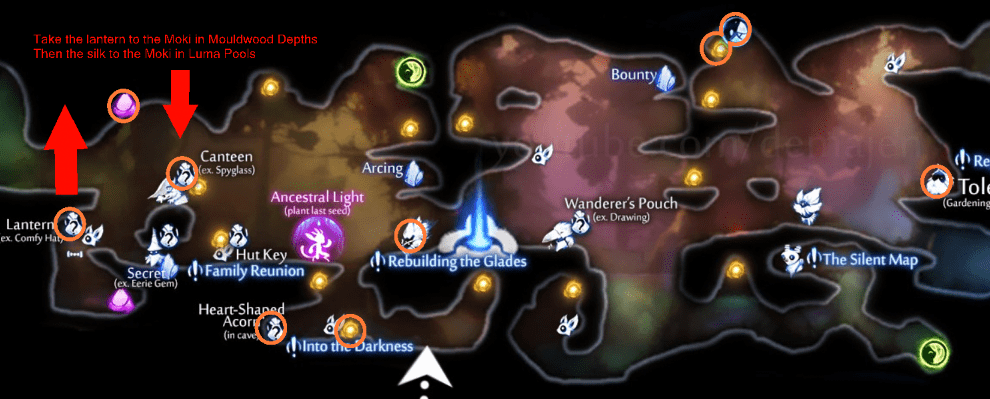
Tips and Tricks
Instead of juggling this light, you can cling to the side of the cauldron and grab it as soon as it pops out.
This is a particularly nasty light to get, and I’m not entirely sure whether this is the "intended" way to get this either. You have to be very fast and very precise when using Light Burst here. If it proves to be too difficult, there’s no shame in coming back once you have launch.
Windswept Wastes
The Path

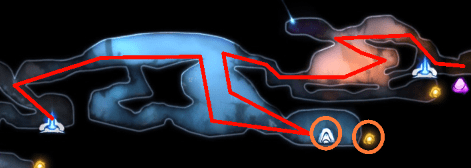
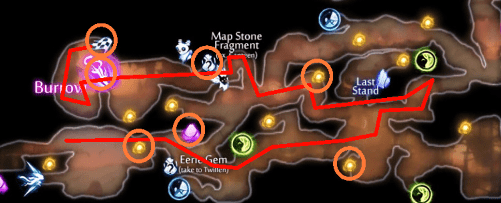
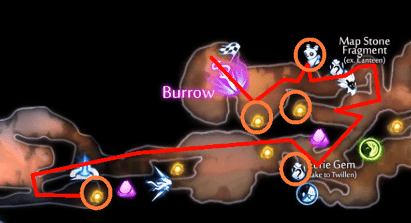
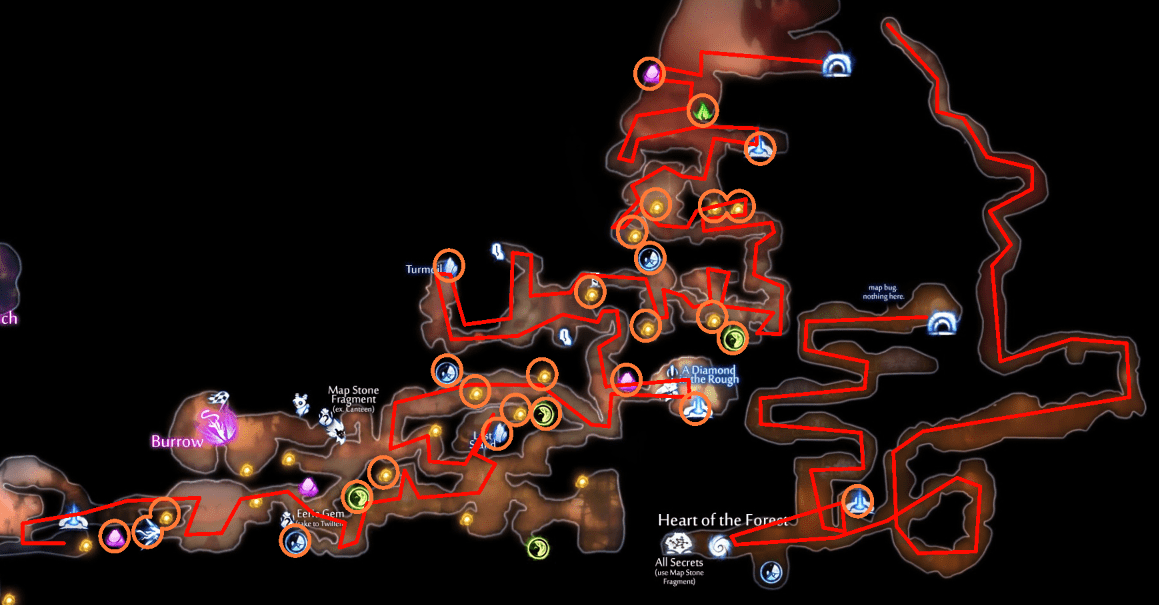
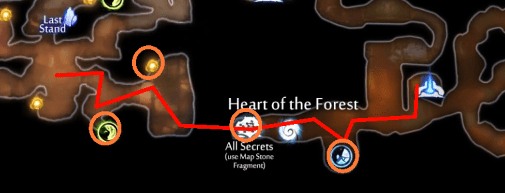
A note about BURROW
Many people have described burrow as being a frustrating mechanic, with some even calling it broken. This is only true to a certain extent.
What’s broken:
The HUD indicator that shows up on the sand is, at the time of writing this, severely broken. It will show up when Ori is too far away, as well as when you’re not entirely facing the sand. It simply cannot be trusted. The best course of action is to ignore it until the developers fix it.
What isn’t broken:
The burrow ability itself, both traversal and dashing. In order to succeed at a sand dash, two things need to be satisfied:
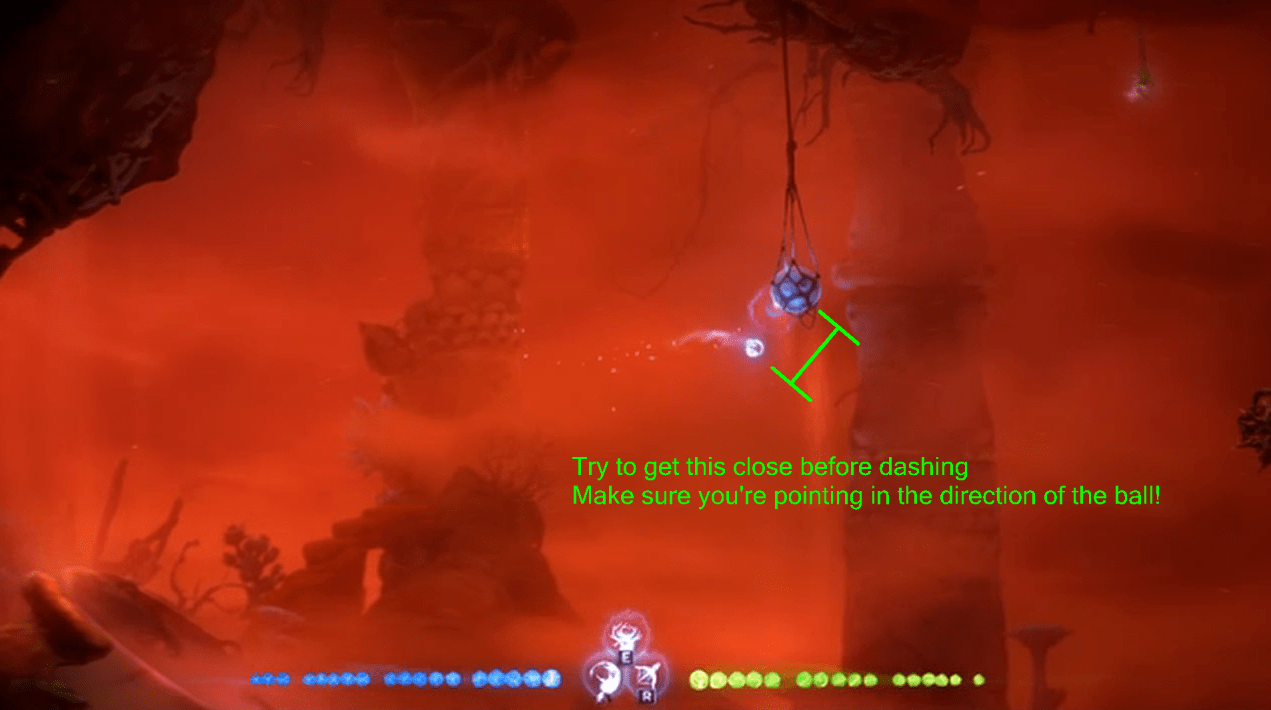
- Ori needs to be close enough to the sand. This is MUCH closer than many people think. Use the picture above to get an indication of how close you should try to be.
- The movement joystick / buttons need to be pointing in the direction of the sand. If you’re on keyboard and shooting for a sand clump, it may be easiest to position Ori 45 degrees relative to it. Sand platforms, on the other hand, seem to be relatively straight forward so long as you’re close enough. Just don’t touch them or they will disintegrate.
A note about SAND PLATFORMS
Sand platforms will disintegrate upon being touched, but will automatically reappear after touching the ground. You can use this to your advantage in several areas. For example, if you have to remove platforms for some reason, you can try staying in the air as long as possible. If you’re attempting a platforming challenge and accidentally remove one, you can land on the ground (even if it has spikes) to make the platform reappear. ALL platforms will reappear regardless of how far away they are, so you can reset entire platforming challenges by touching the ground anywhere.
Tips and Tricks
This light is easy to miss. Take not of how close Ori is to the platform before dashing. Note that this area will be BLOCKED after acquiring the Heart of the Forest to force you to watch the cutscene of Shriek. It should reopen after watching the cutscene and re-entering the area.
This is one of the trickiest platforming challenges. You may want to practice this one several times before attempting a full one-life run. Again, if you touch the ground, even on spikes, it will reset all the sand platforms.
This area has a nook to the left that’s difficult to notice. Since this nook is a safe spot, it means it’s possible to jump from safety to safety all the way clockwise around the laser without needing to take a hit.
Final Cleanup
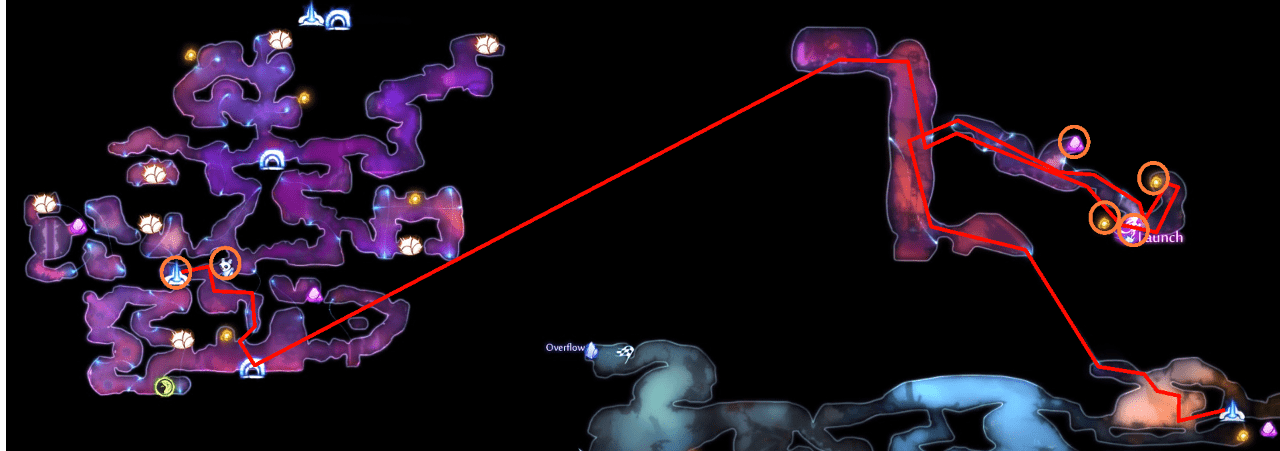
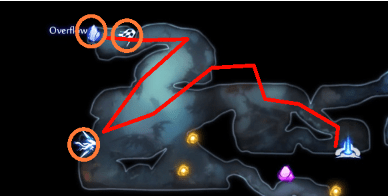
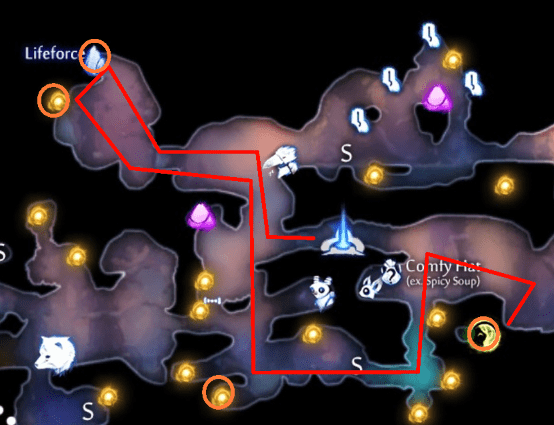
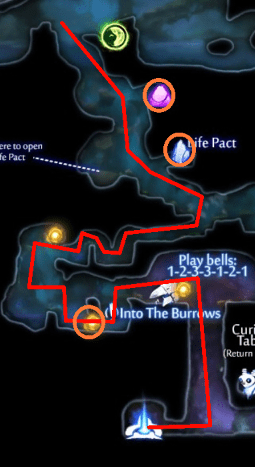
The Path

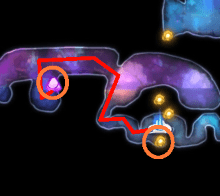
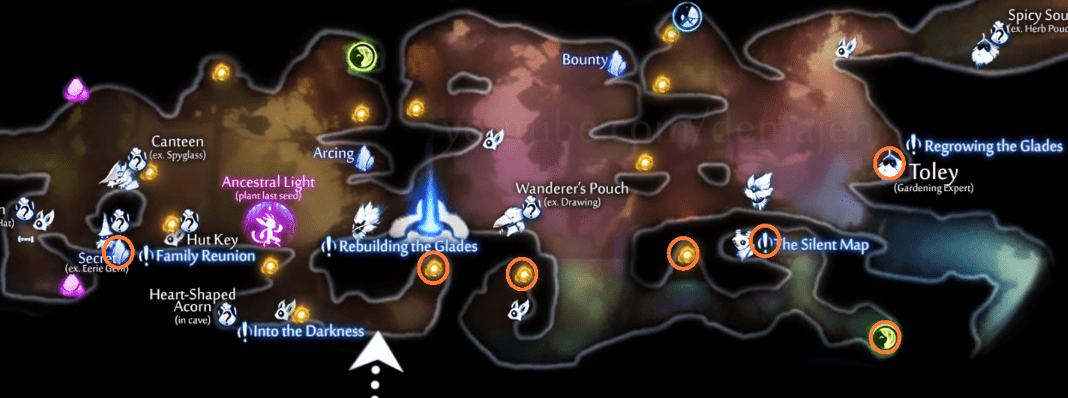
Tips and Tricks
NOTE: Getting Launch before the final cleanup makes everything WAY easier. Since you should have all secrets on your map by now, it should be trivial to clean up anything you may have missed.
This is the only way I know of to get this. I have no idea if it’s the developer-intended way. Either way, it makes getting this light trivial
Similar to Turmoil, Lifeforce is also a very challenging platforming section. Since you have Launch, you can use that to your advantage if you get stuck. Always remember that landing on the ground, even on spikes, will reset all platforms.
Once you finish the platforming part, Launch makes it much easier to exit through the top.
Willoh’s End
The Path
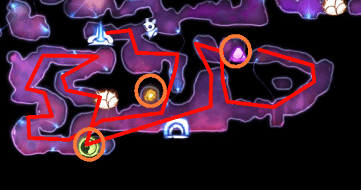
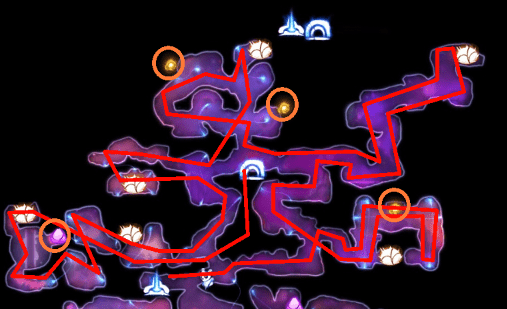
A note about LAUNCH
Launch should be your primary mechanic in this area. It’s more a puzzle section than a platforming area.
The thing to note about Launch is that it will reset under all the same conditions as your double-jump / dash, these being:
- When you touch the ground
- When you touch a wall
- When you bash
- When you grapple
- When you dash through sand
As a result, try to aim for projectiles and walls when you launch. If you watching your surroundings, you should never have any issues running out of abilities mid-air.
A note about MINES
These small bombs hanging around the ground and walls can be troublesome as they can push you away and into more trouble. They have to be handled carefully, and some times they aren’t entirely obvious. The best approach is to use a portion of your platforming arsenal to get within their triggering radius, and use your remaining tricks to either dodge the explosions or retreat to the previous area.
Tips and Tricks
Since this entire area is tricky, I will refer the reader to the video at the top for any specific areas they are having trouble with. Willoh’s End starts at 4:52:50
Theoretically you need to dash through the portal to get this light, but the wheel is easily bypassed using Launch.
The boss is easily cheesed by using Spirit Arc and its three shards.
Let me know in the comments if there’s anything I missed that needs to be specifically addressed.
Also let me know if there’s anything in this guide you found particularly confusing and I will try to make it clearer if I can.
This is all about Ori and the Will of the Wisps – 100% Immortal Guide; I hope you enjoy reading the Guide! If you feel like we should add more information or we forget/mistake, please let us know via commenting below, and thanks! See you soon!
- All Ori and the Will of the Wisps Posts List


Leave a Reply