The semi-complete guide to replacing assets.
◄—INFO—►
Hey hey! This guide is being worked on when I have time.
Currently the Models are an enigma that won’t load into the game sadly.
Ask in the comments if you need help with anything, or have figured out something xoxo.
Thanks to May – [steamcommunity.com] once again,
if they didn’t direct me to start looking for a sound mod solution,
I would’ve never found a Texture/Mesh solution.
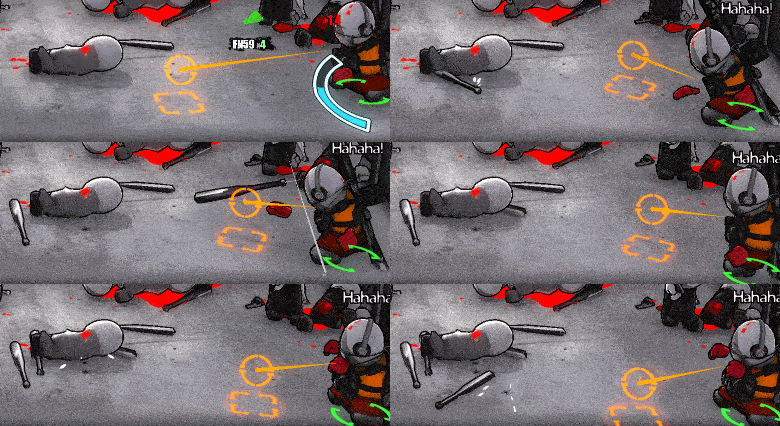
This will let you do stupid things like
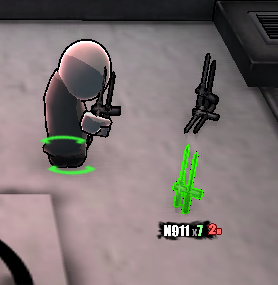
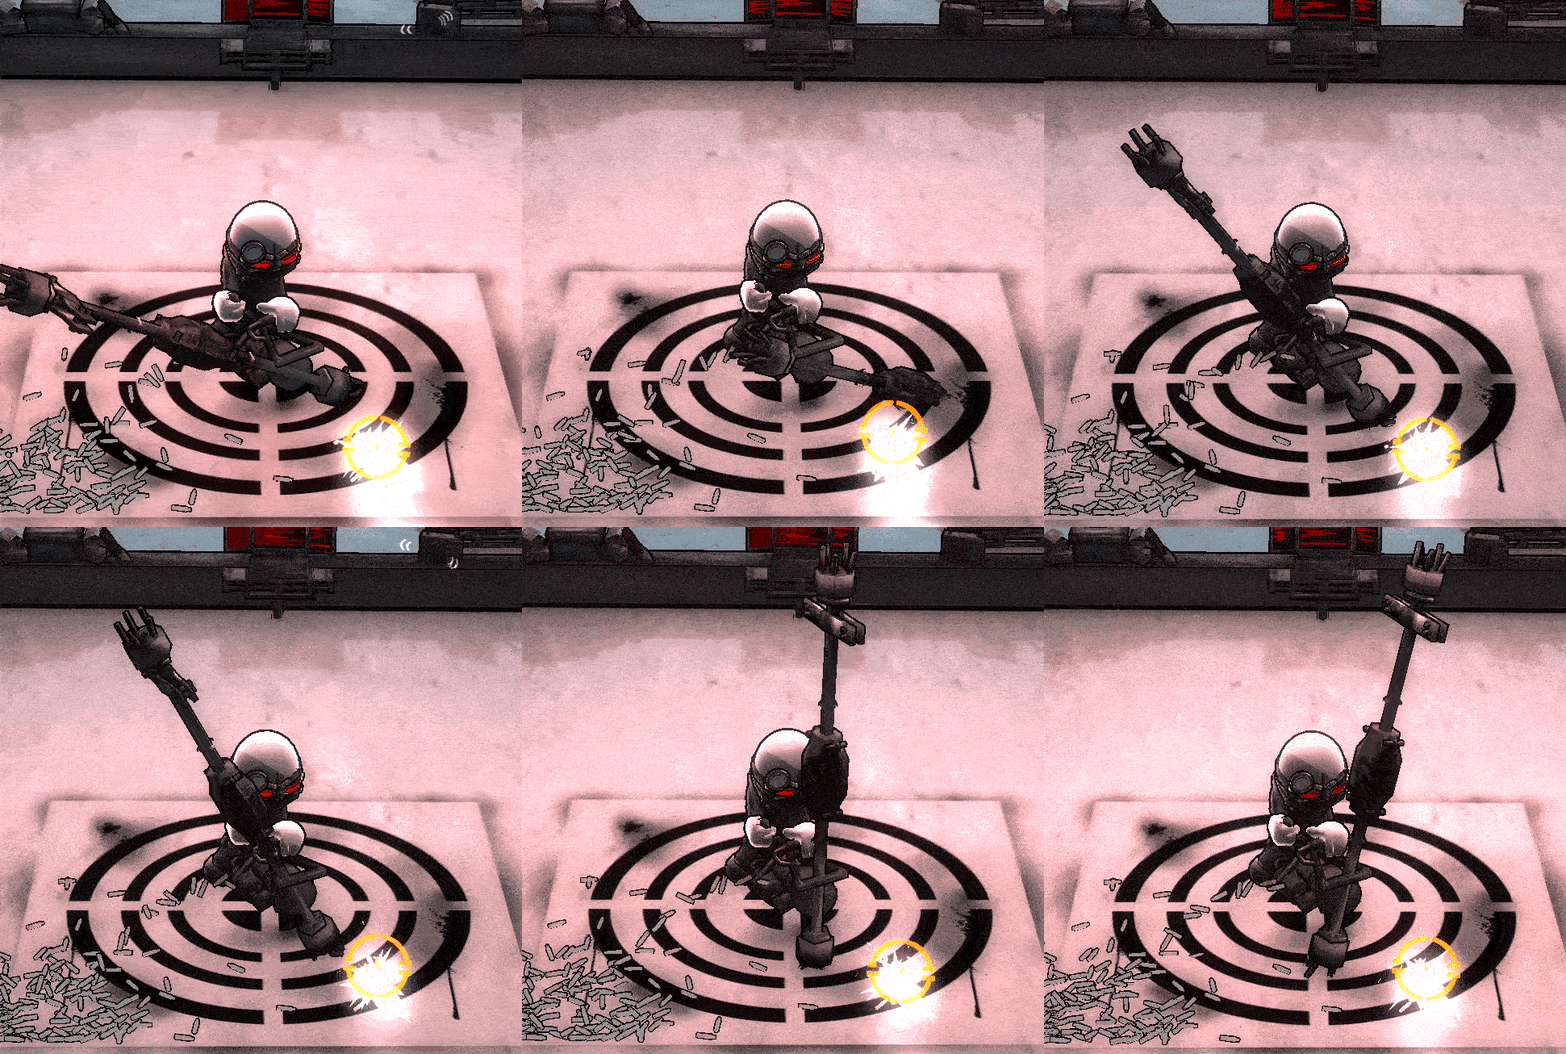
Replacing guns with screwdrivers
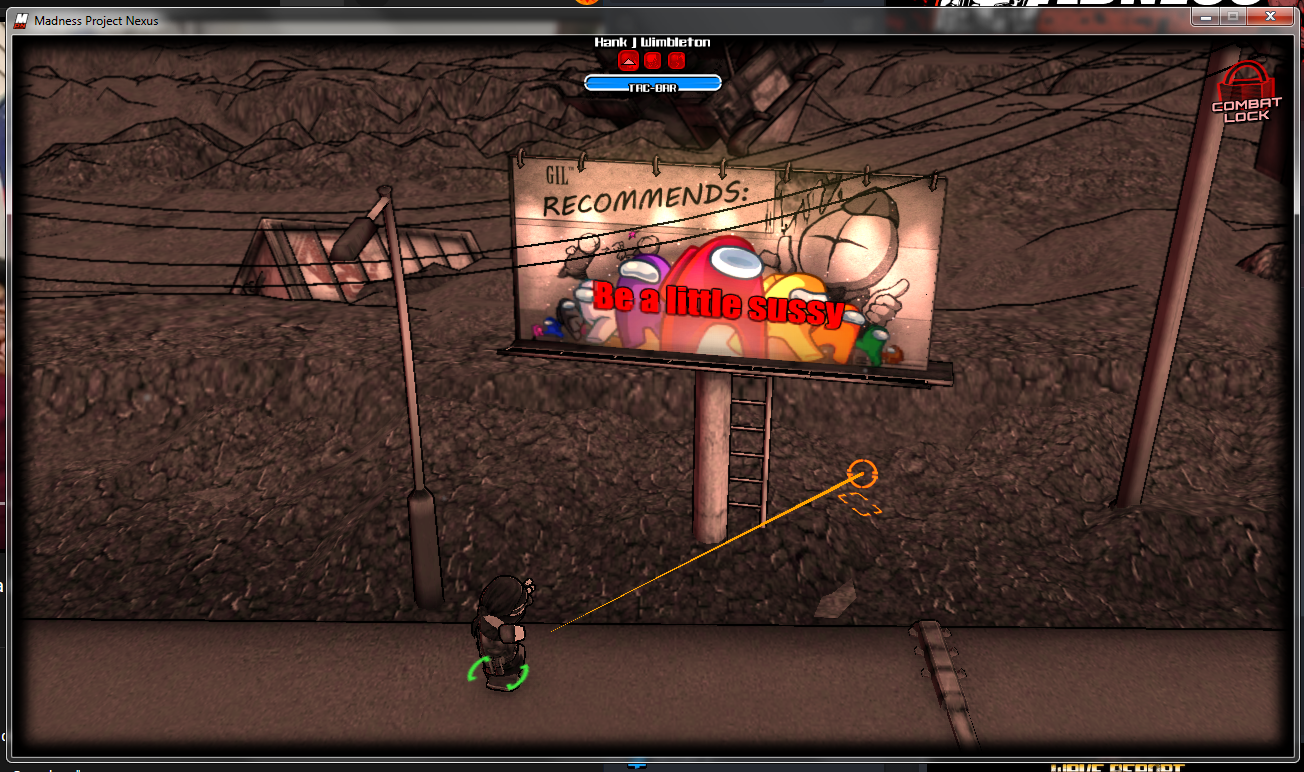
And the texture of anything with
literally anything.
Important Note:
Your mods WILL break when the game is updated,
and will need to be remade.
HOWEVER, your save files shouldn’t be affected no matter what you do.
This only changes the assets of the game, and doesn’t touch the code at all.
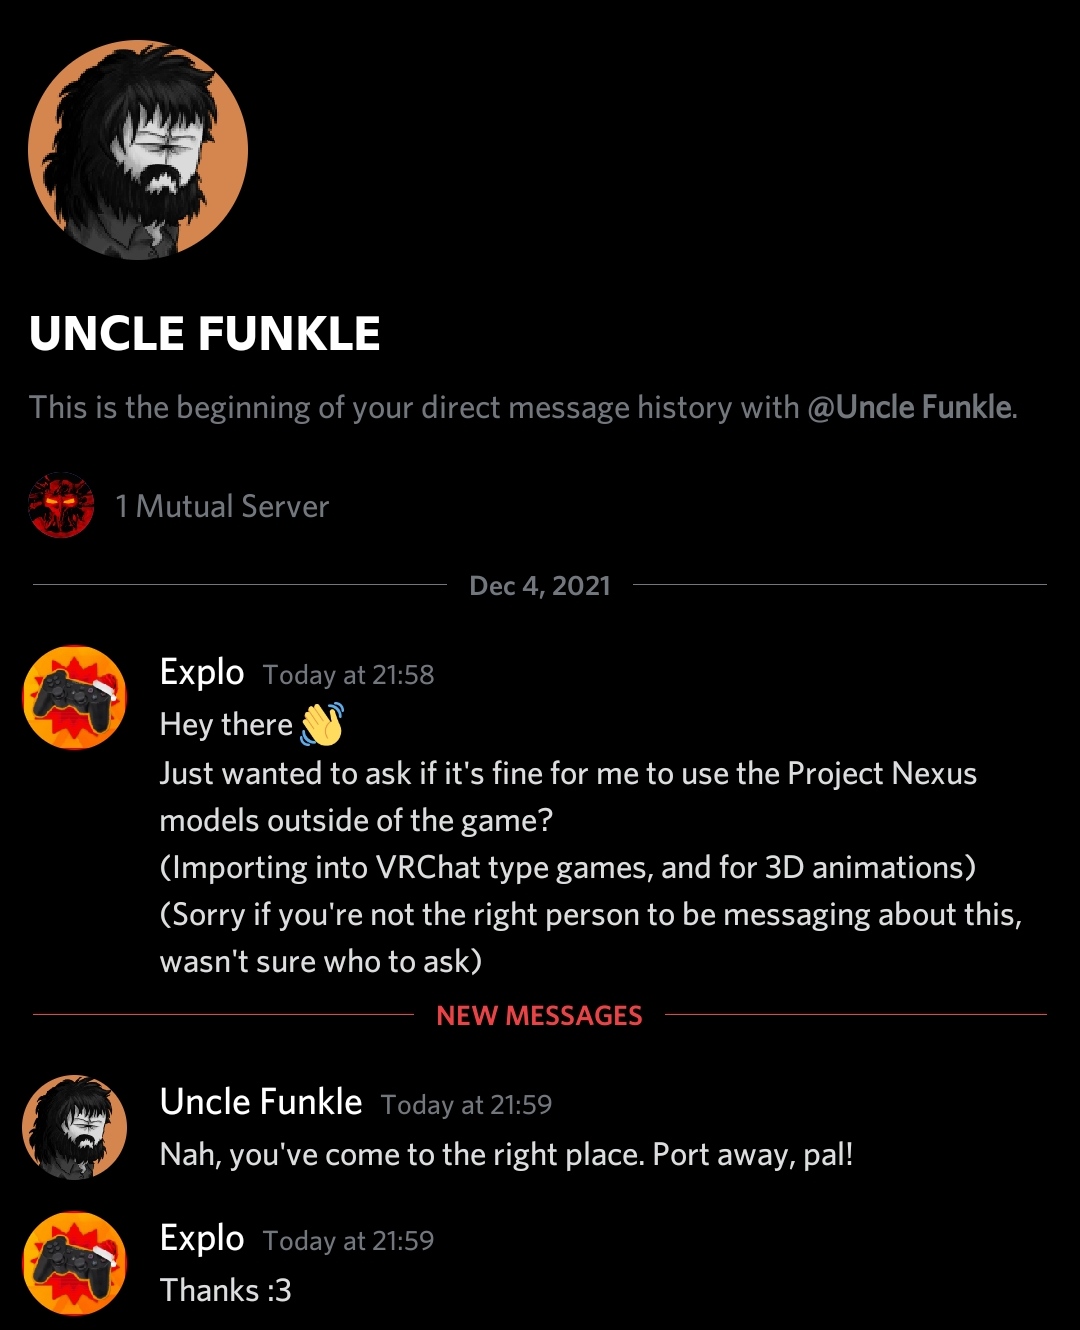
Regarding usage of models outside the game
For those intrested; Yes, you can use models from Project Nexus for other things,
as long as you give credit to the Dev team, along with a link to the game’s steam page.
Setup for Textures/Models
The tools you will need are
[Unity Asset Bundle Extractor] – [github.com]” rel=”nofollow noopener”>[Unity Asset Bundle Extractor] – [github.com]
To extract, and replace assets. [MANDATORY]
[Asset Studio] – [github.com]” rel=”nofollow noopener”>[Asset Studio] – [github.com]
To view models, textures, and export into .OBJ format. [Optional, but helps a ton.]
STEP 1.
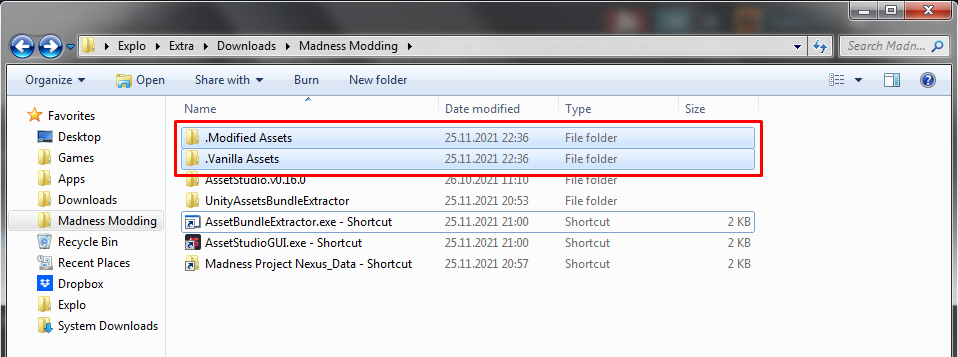
Create two new folders anywhere on your computer,
one for unmodified files, and a second for modified files.
STEP 2.
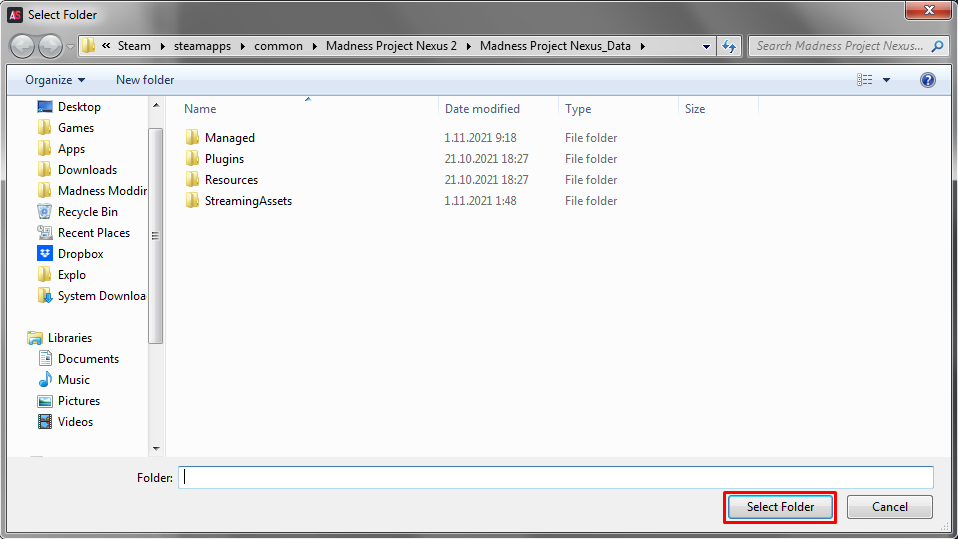
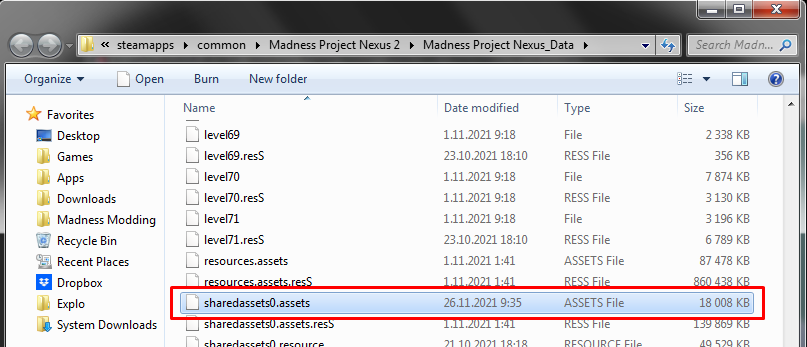
Navigate to the Madness: Project Nexus folder
C:\Program Files (x86)\Steam\steamapps\common\Madness Project Nexus 2\Madness Project Nexus_Data
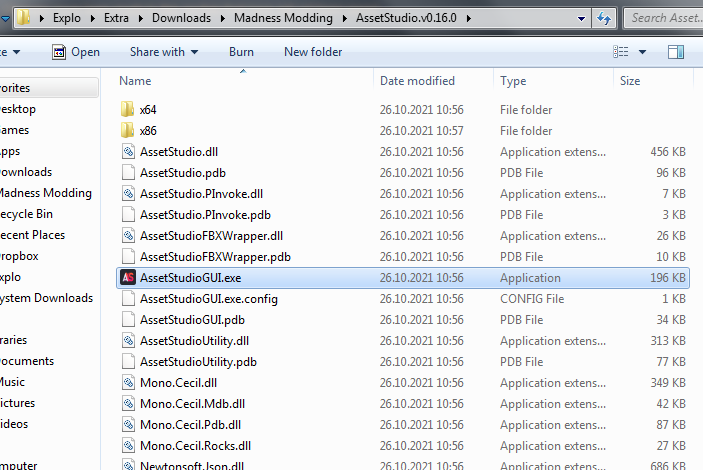
Step 3.
Open AssetStudioGUI.exe
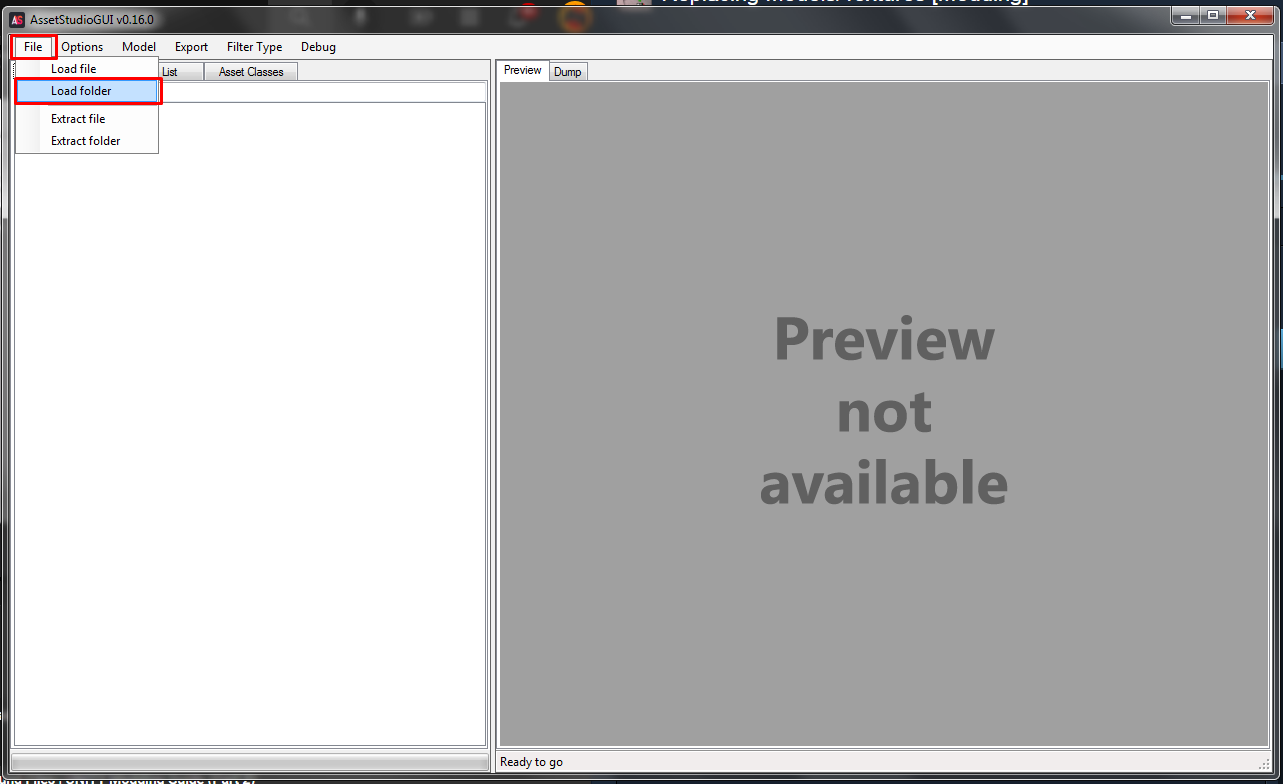
Step 4.
Open the Madness: Project Nexus folder inside Asset Studio
<File Names>
I’ve made a seperate guide which lists the most common files you may want to edit.
https://steamcommunity.com/sharedfiles/filedetails/?id=2718634676 – [steamcommunity.com]
<—Textures—>
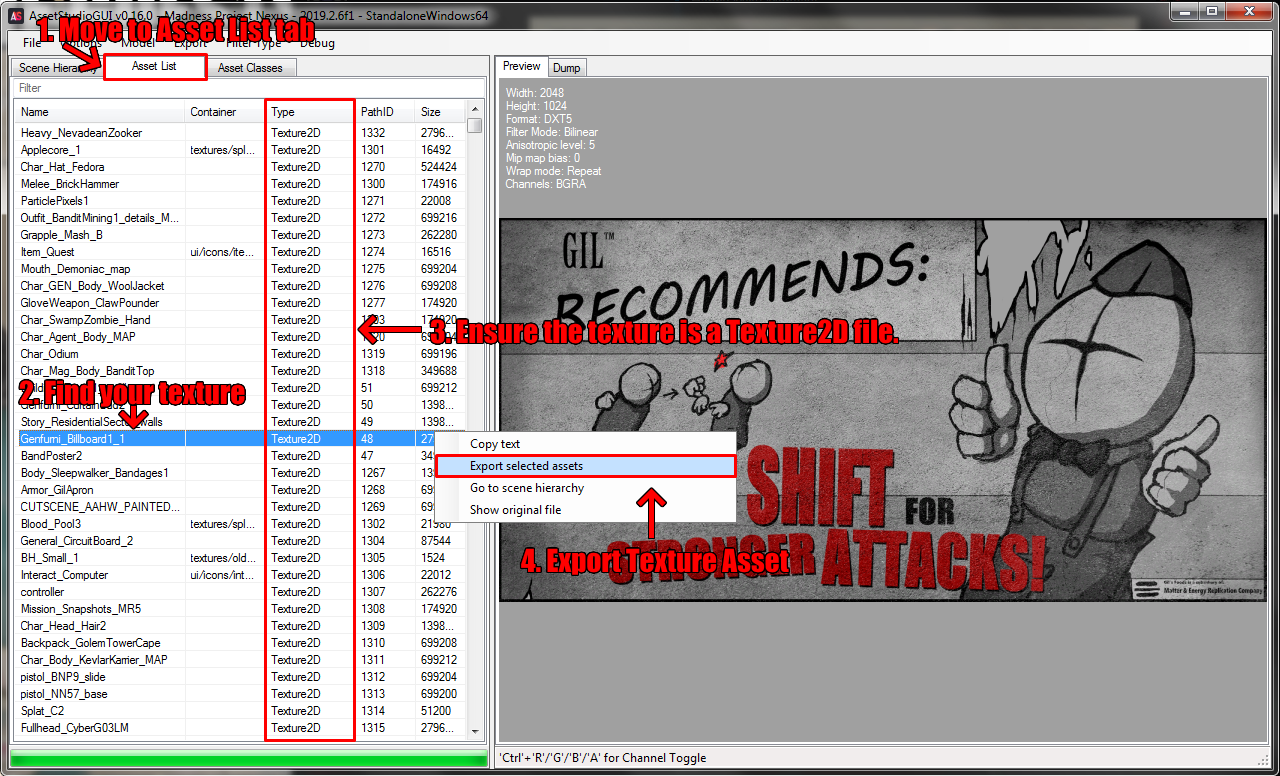
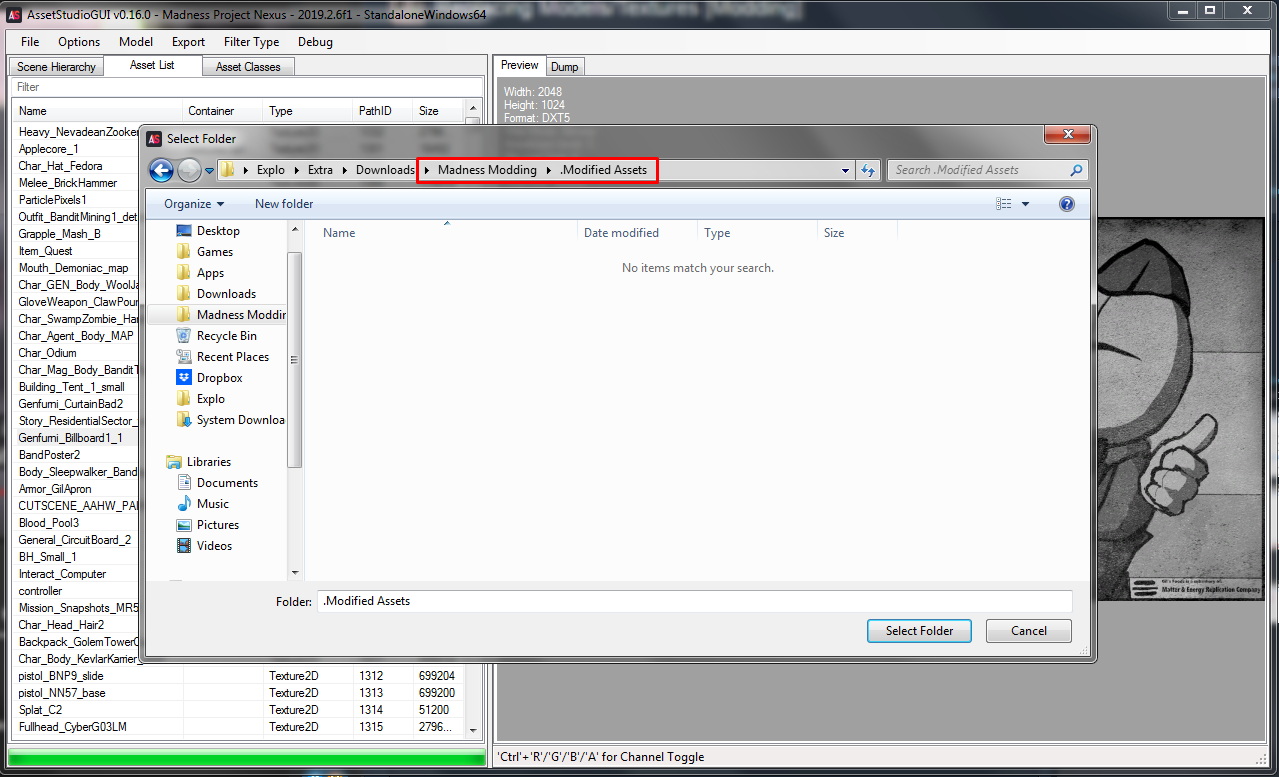
Step 1. Find your texture, and extract it into “modified” folder. (Make sure it is a Texture2D)
Step 2.
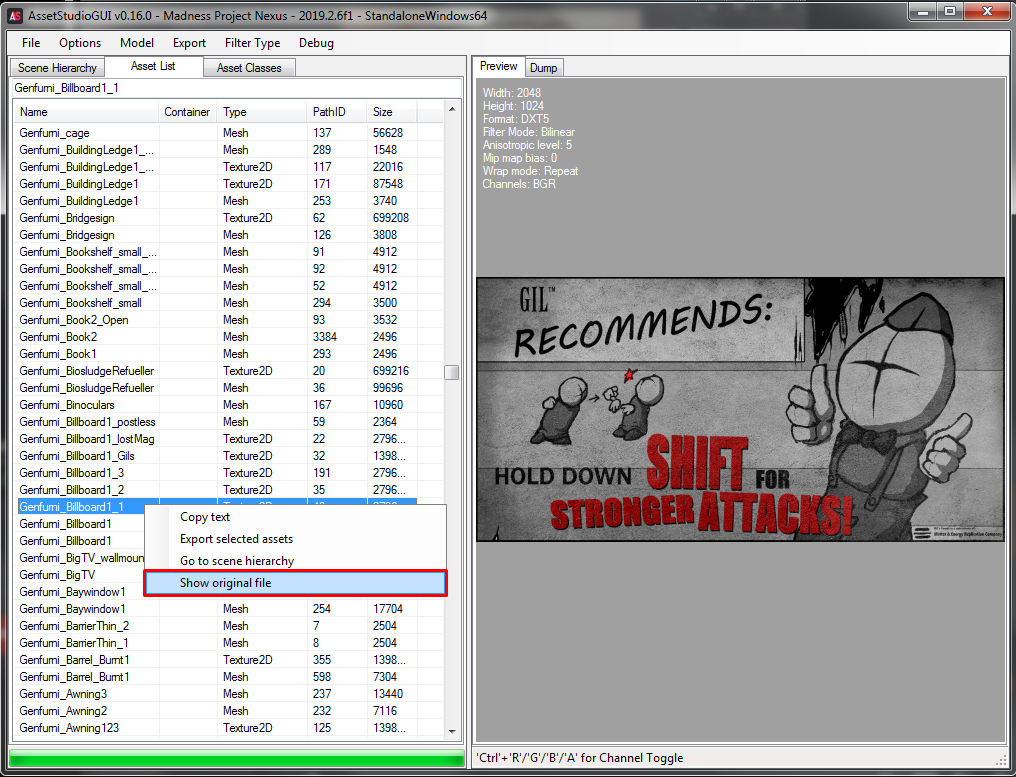
Open the original file, this is necessary for importing stage.
]
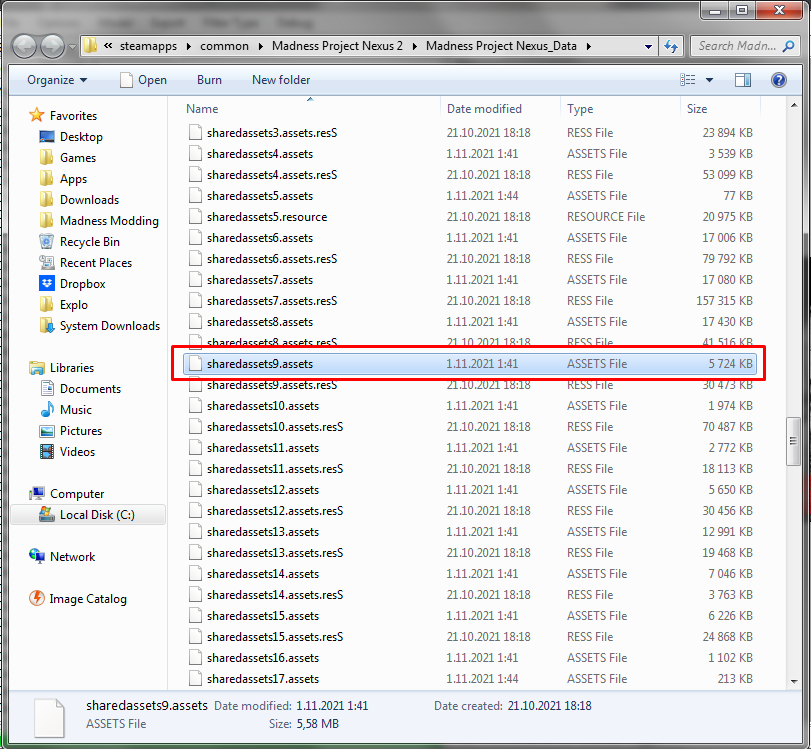
Make note of what this file is.
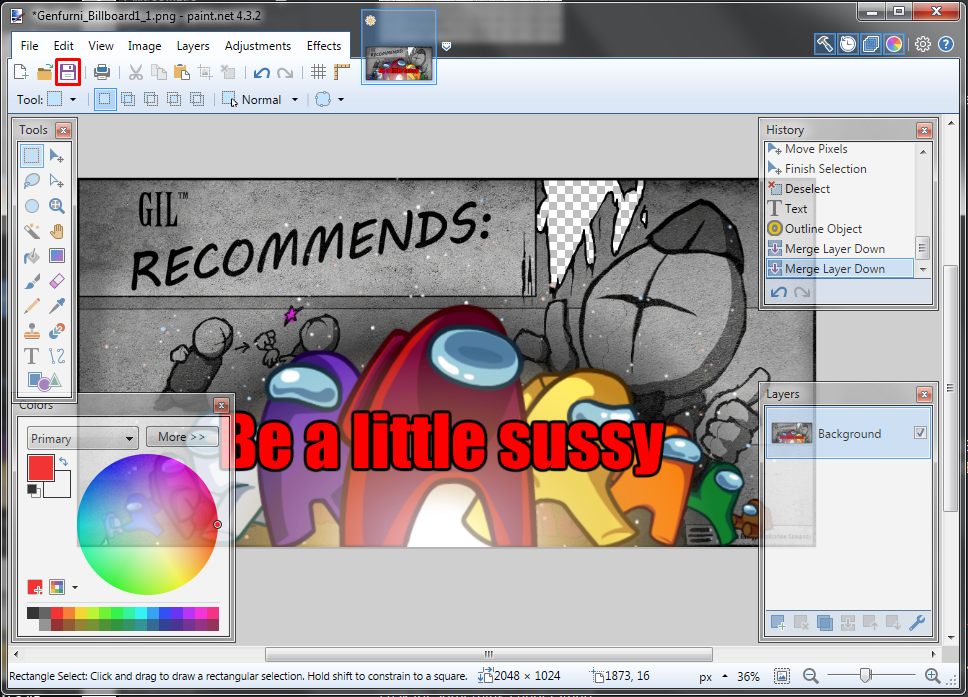
Step 3.Open and modify your texture, then save it.
Continue to “Importing” section
Importing Texture
Step 1.
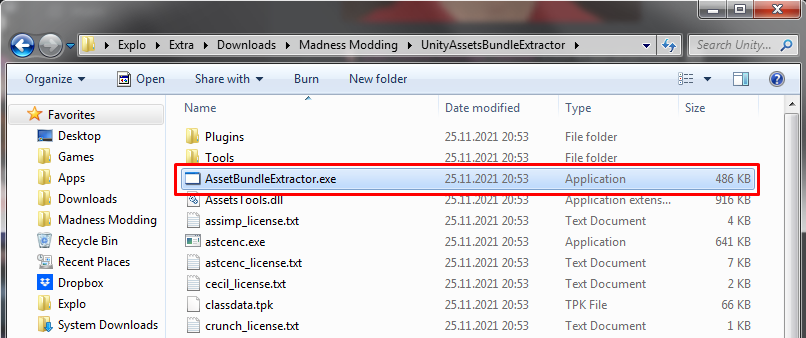
Open Asset Bundle Extractor. (From now on referred to as UABE.)
Step 2.
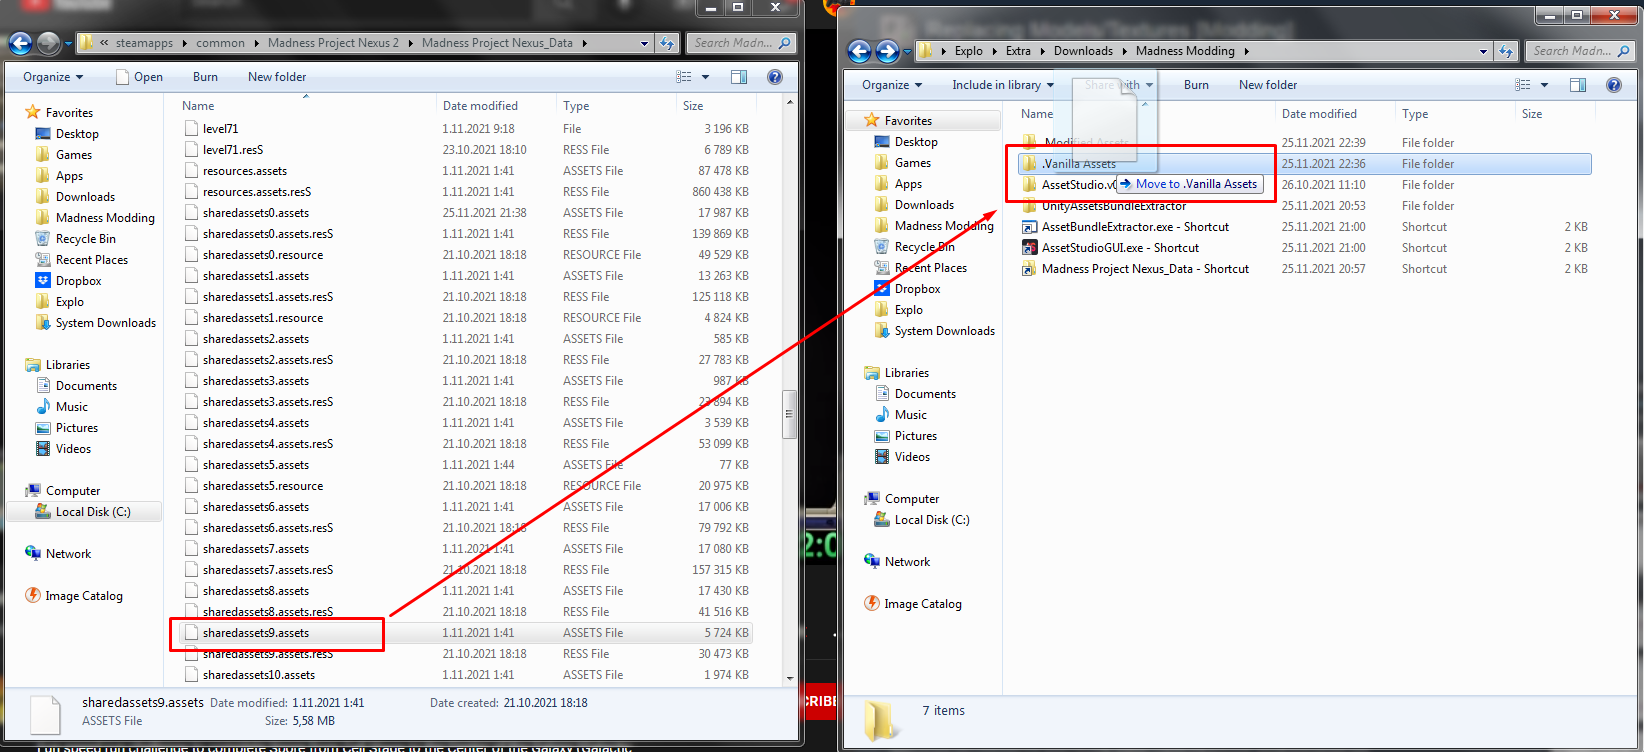
Make a BACKUP of the Original asset, and place it in your “Vanilla” folder.
(That’s the one I told you to make note of.)
Step 3.
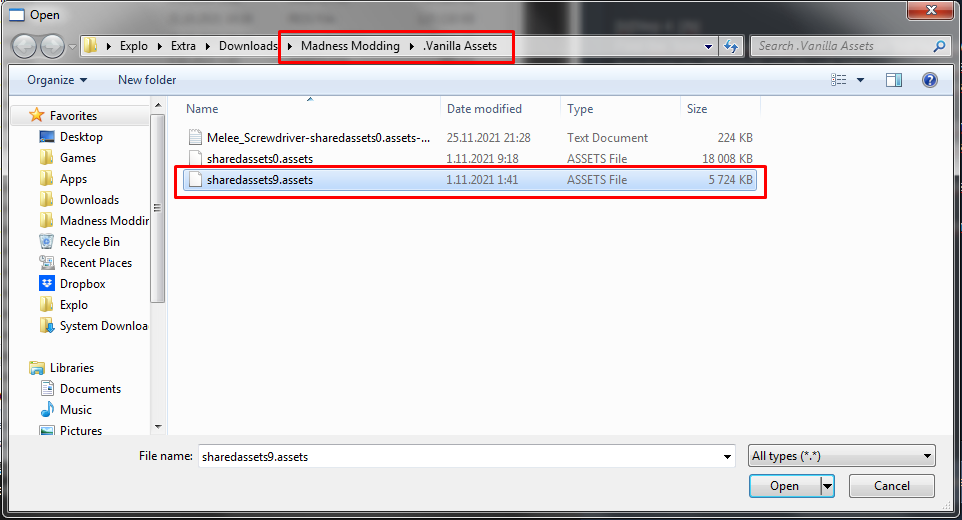
Open the BACKUP file.
Step 4.
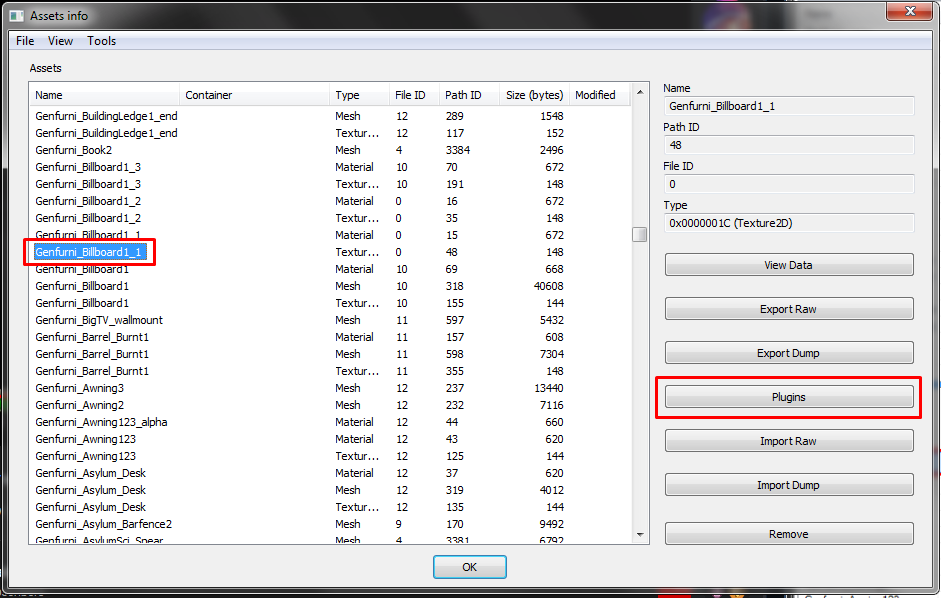
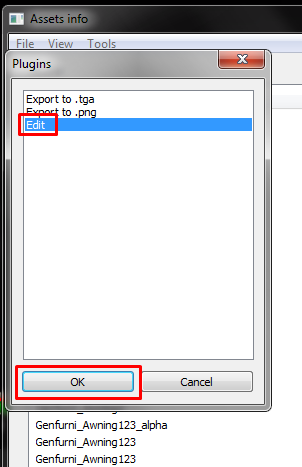
Find the Texture you changed, then click on “Plugins“, and under plugins on “Edit“.
Step 5.
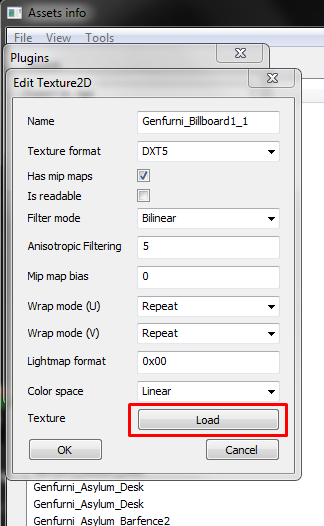
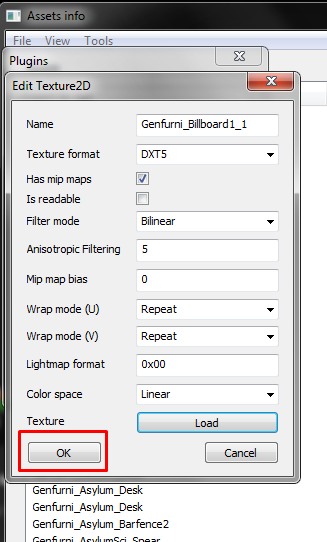
Click on “Load” next to Texture option. Don’t touch anything else.
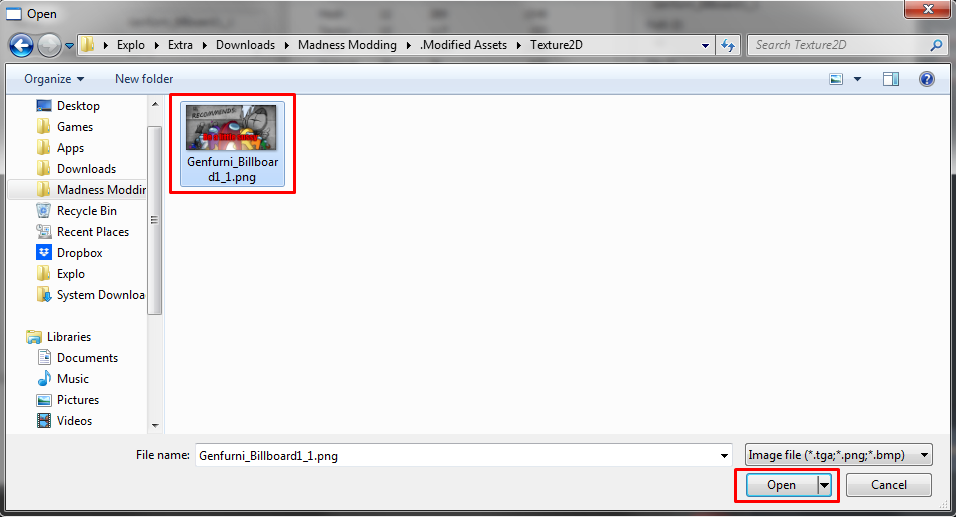
Then find your modified texture, and open it.
Then confirm the editing.
Continue to Applying ingame.
Applying Ingame
Step 1.
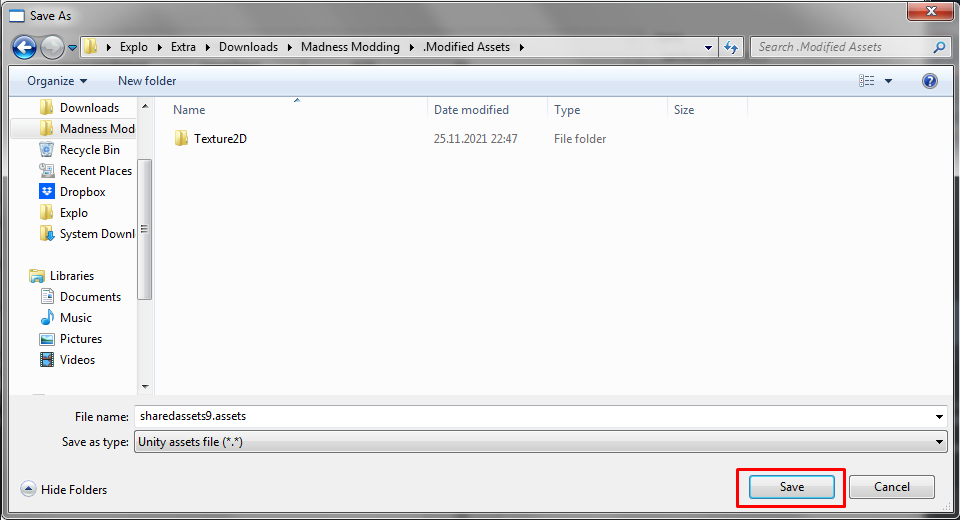
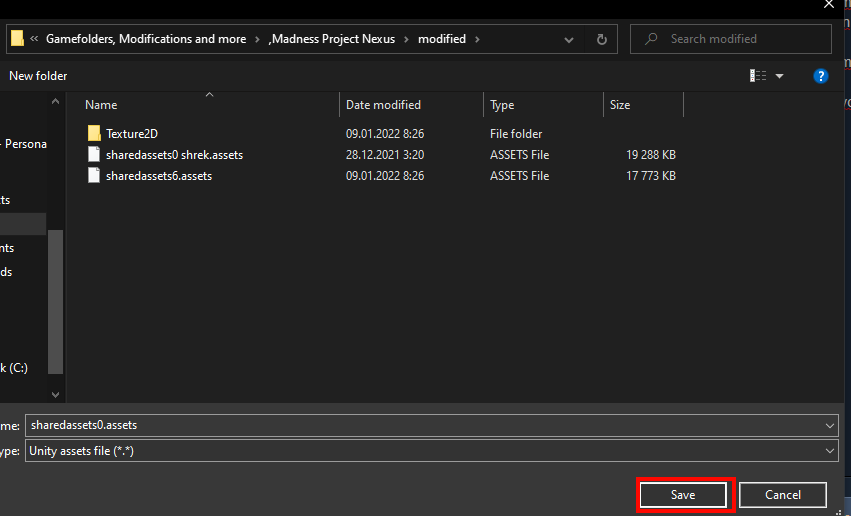
Save the modified file into your modded folder.
Step 2.
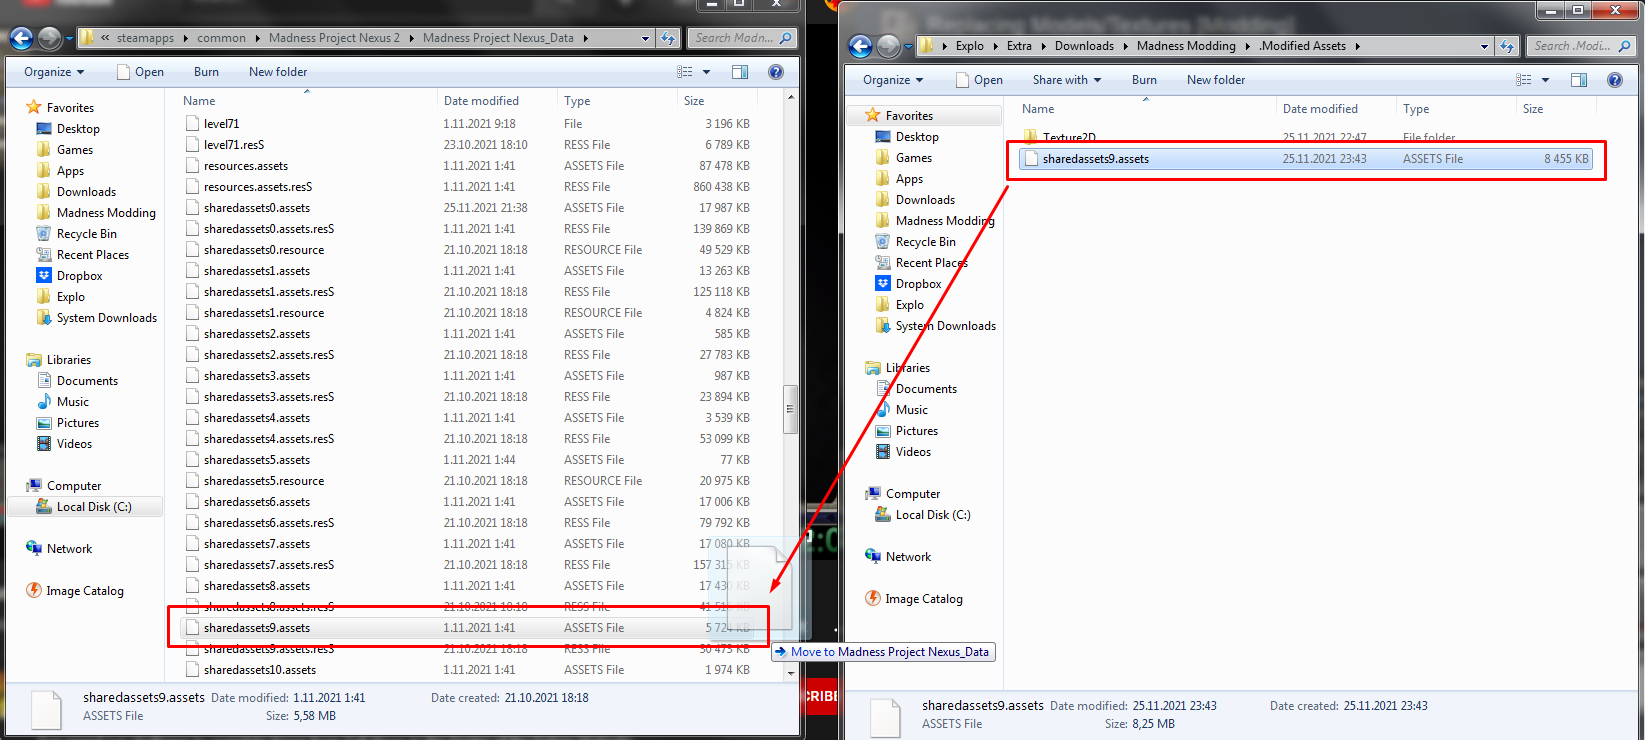
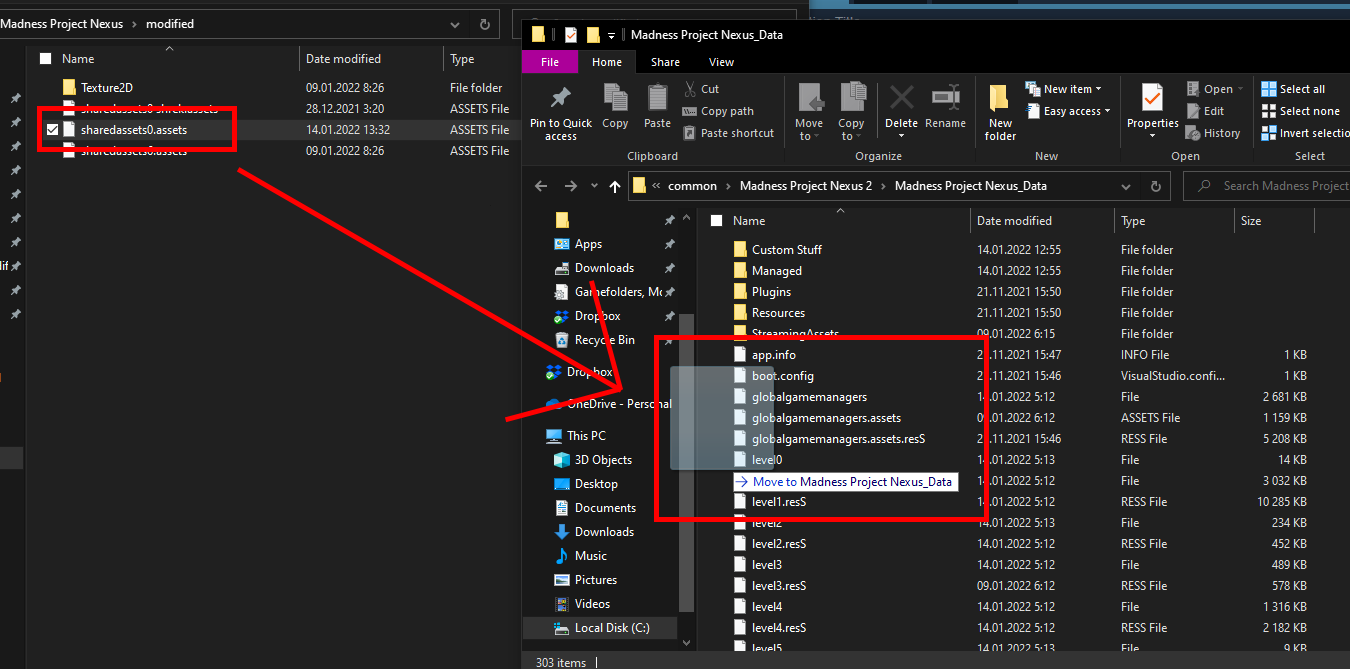
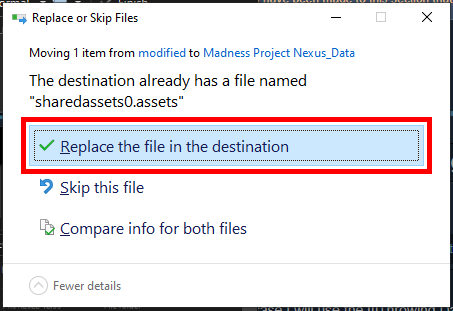
Replace the sharedassets file in the game directory.
You’re done!
◄—⚠️ MODELS | DISCLAIMER ⚠️—►
Currently, this section isn’t finished.
For now,
You can only replace models from the game with the models from the game.
I’ve been trying to crack this for the past few months,
but haven’t been able to succesfully import a model into the game properly.
So far I’ve collected that:
Unity 2019.2.6 is the version the game runs on
Blender 2.79 is the version Krinkels uses.
UABE is able to import the model, but it doesn’t show up correctly.
If anyone wants to take a shot at it, please do.
If you manage to figure it out please contact me.
<—Models—>
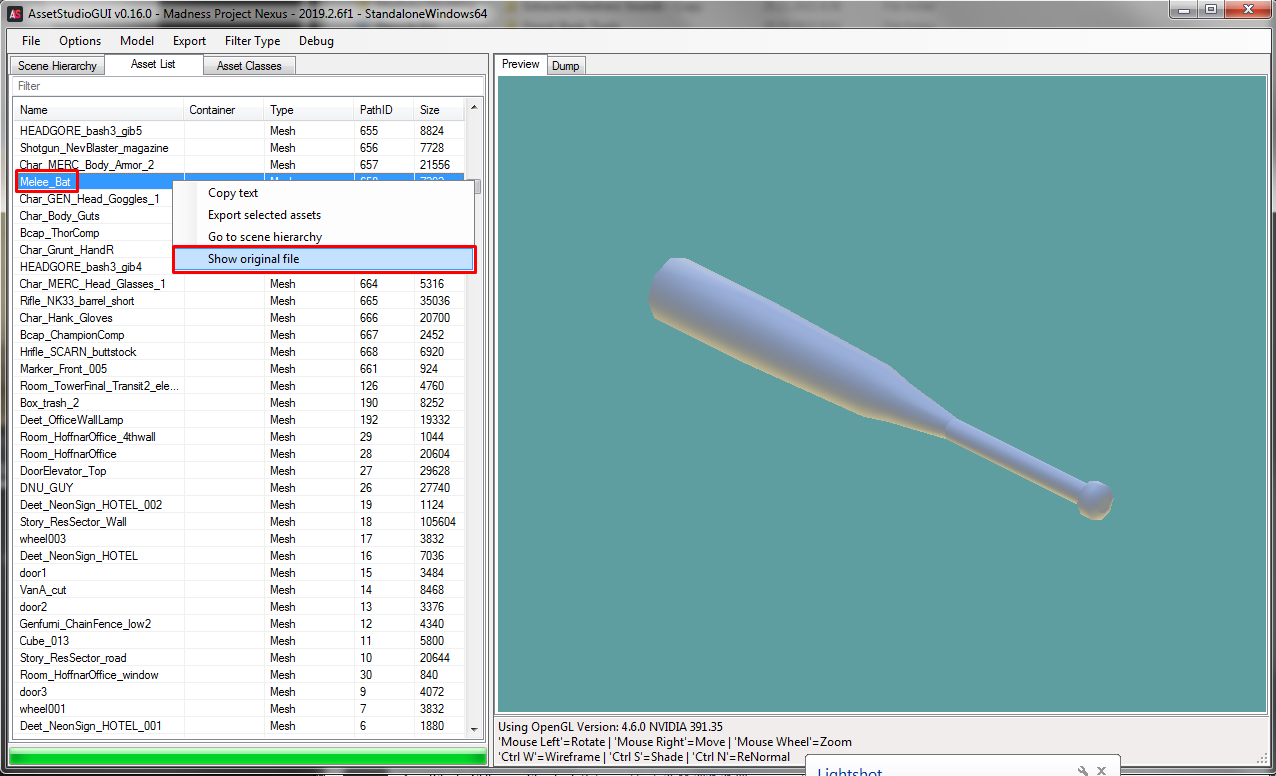
Step 1. Find your model, and open the Original file.
Make note of what this file is.
Step 2.
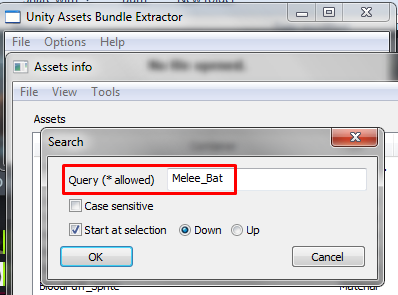
Now launch UABE and open the file in which your model was located.
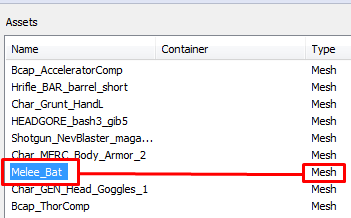
Then search for your model.
( press F3 until you reach the “Mesh” section. )
Step 3.
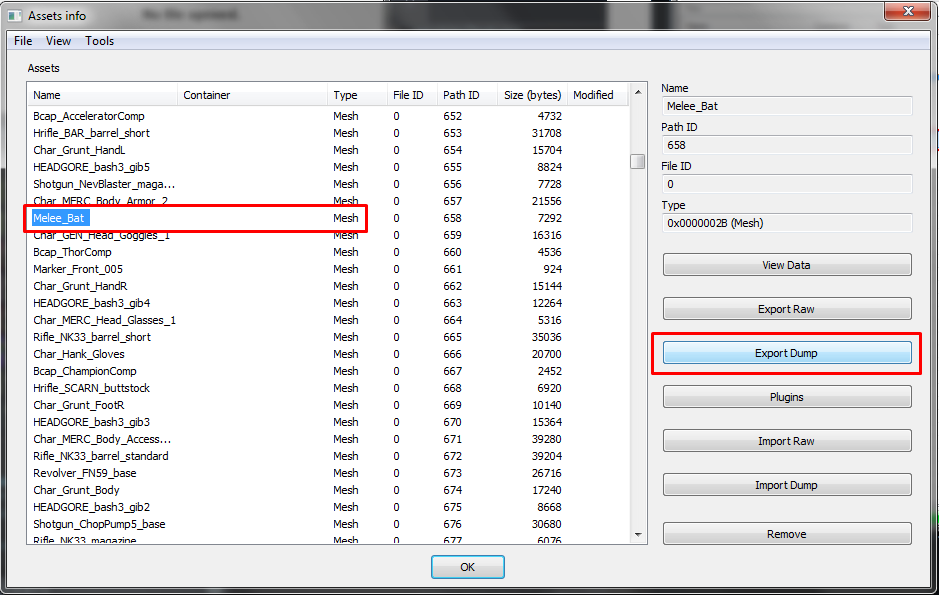
Once you find the MESH of your model, click on “Export Dump“.
Let the program save the file somewhere on your PC.
Continue to “Unity and Converting” section
Unity and Converting [PLACEHOLDER]
IGNORE THIS WHOLE CHUNK.
ITS UNFINISHED AND WILL NOT WORK
CONSIDER A PLACEHOLDER
If you want to import Custom Models you will need unity version 2019.2.6
I cannot stress this enough.
If you use a different version UABE will not be able to open your file,
so don’t go asking in the comments like a bozo and just read alright?
After modifying your model/replacing it with another, export it as a .OBJ type file.
This is where things get complicated.
First, you will want to install version 2019.2.6 of unity.
Then create a new 3D project, and drag your .OBJ model into Unity.
Make absolutely sure the model shows up under the scene hiearchy
Save the project, and Build it with the Windows/Linux/Mac standalone setting.
Replacing models in the game
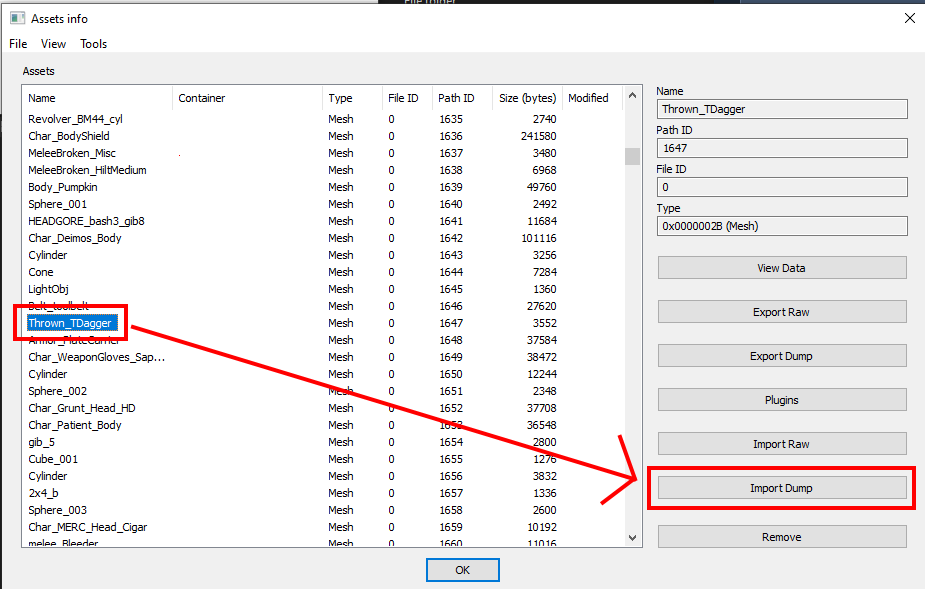
1. Find the model you wish to replace.
In this case I will use the Throwing Daggers.
And click on Import Dump
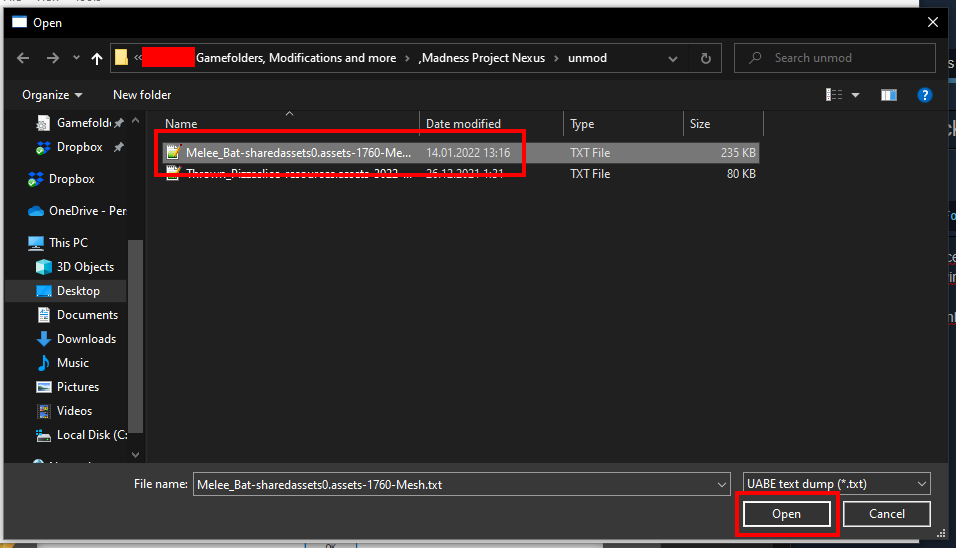
2. Select the model we exported earlier.
In this case it is the baseball bat model.
And open it.
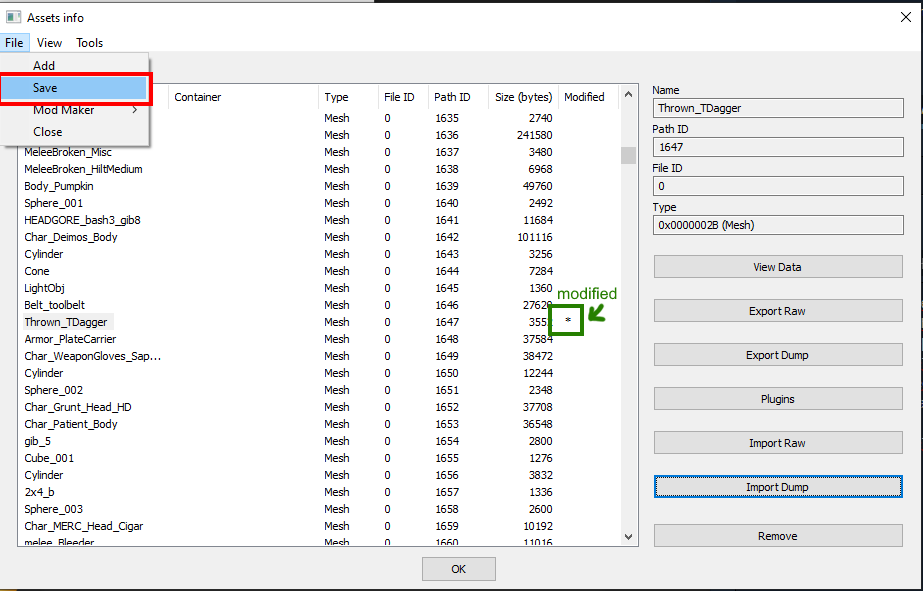
You can see that the file has been succesfully replaced by the little star next to it’s name
(marked in green in this image)
3. Now just save the file outside of your main Project Nexus folder.
Make sure you DO NOT rename the file.
4. Now finally, take your new .assets file, and drag it directly into your M:PN directory.
Replace the files when asked, and you’re done!
Good job!
◄—Setup for Sounds—►
DISCLAIMER
Sound editing is very buggy, and may break your sounds.
If this happens, delete the StreamingAssets in your game’s folder.
And make steam check integrity of game files.
You will need FMOD Bank Tools – [dropbox.com]
We will be needing it to compile and decompile the .Bank files.
And a sound editing program of your choice with .WAV support.
I’ll be using AudaCity – [audacityteam.org] .
Sound Extracting
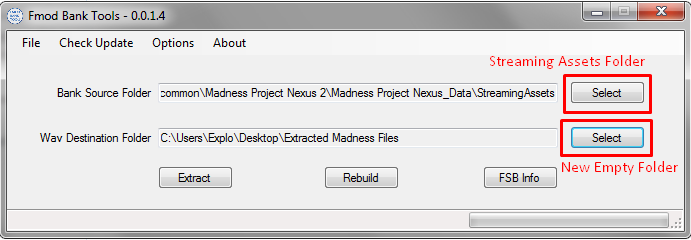
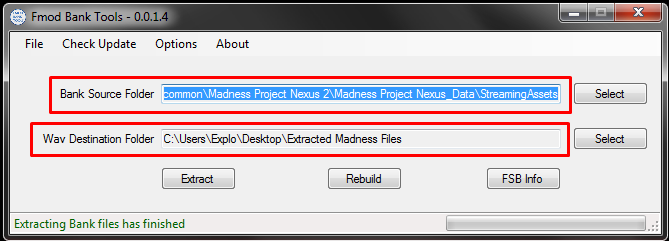
Launch FMOD, then select “Bank Source Folder” and set it to
C:\Program Files (x86)\Steam\steamapps\common\Madness Project Nexus 2\Madness Project Nexus_Data\StreamingAssets
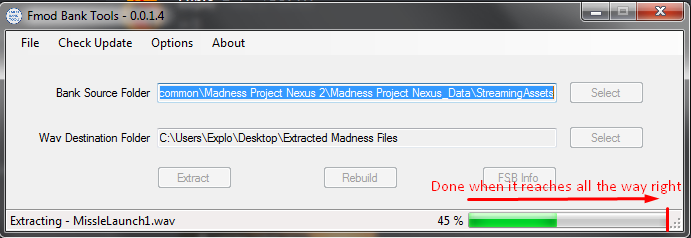
Now wait.
This will take a while (more than 30 minutes),
because the game has many high quality sounds, and many variations.
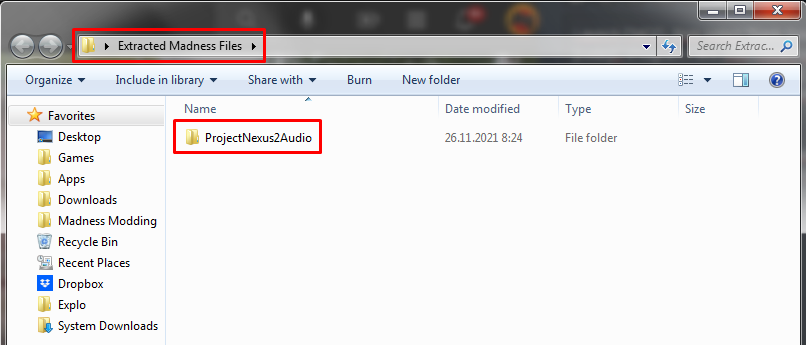
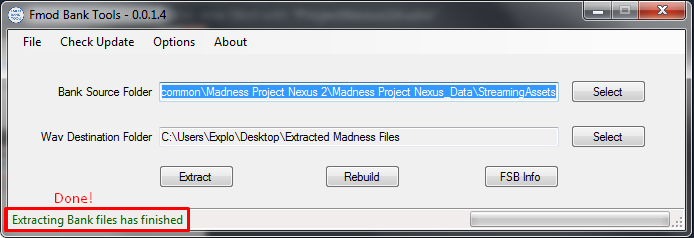
Once the progress bar is done, open your folder, now filled with “ProjectNexus2Audio“.
I recommend you make a backup of the extracted files.
To avoid having to re-extract everything.
Once it is done, continue to the next section.
Sound Editing
Step 1.
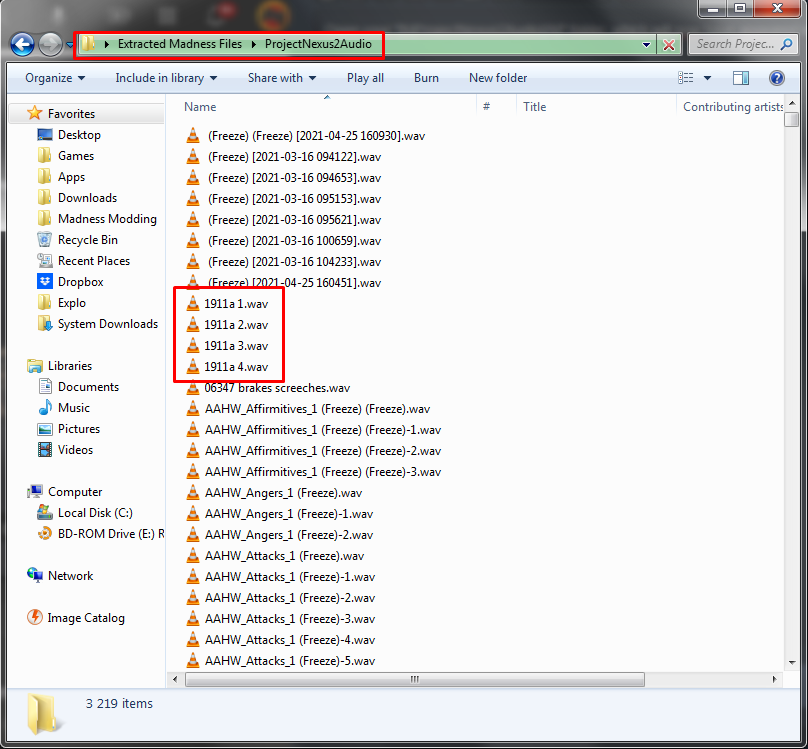
Open your “ProjectNexus2Audio” folder, which will now have appeared in your empty folder.
And pick the sounds you will be editing or replacing.
I will be changing the N911 firing sounds.
Step 2.
Open AudaCity, or a sound editing program of your choice.
(With .WAV filetype Support.)
And load the sounds you will be editing.
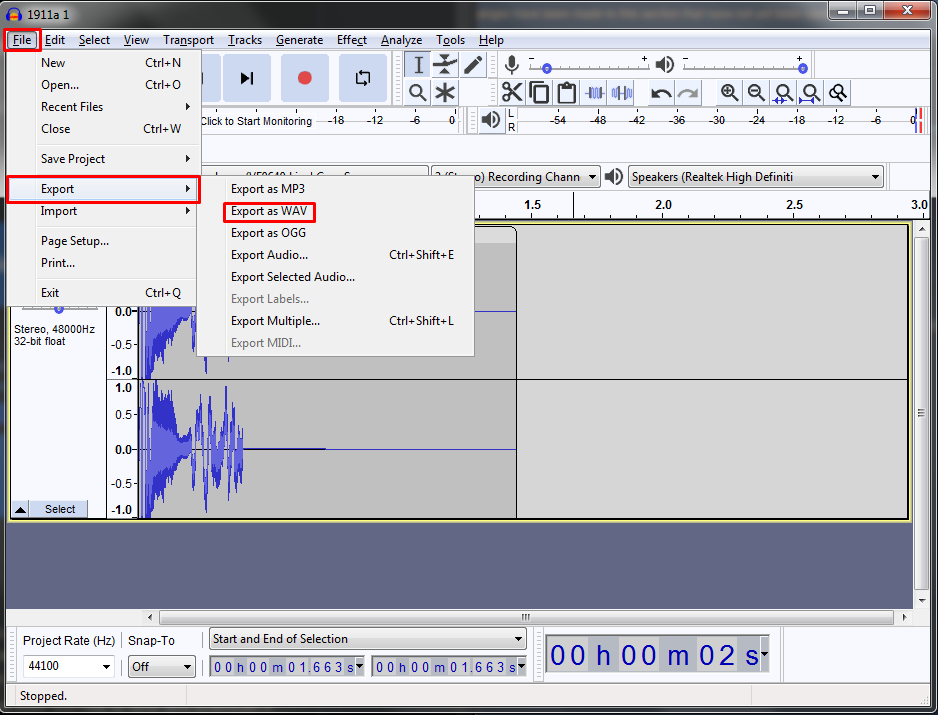
Step 3.
Replace the sound inside AudaCity, or your preferred program.
Then Export it as a .WAV
Make sure not to accidentally rename your files!
Sound Importing
Step 1.
Return back to FMOD Bank Tools.
And make sure WAV DESTINATION FOLDER is still the same.
But change where BANK SOUCE FOLDER goes, to make sure you don’t overwrite the wrong files.
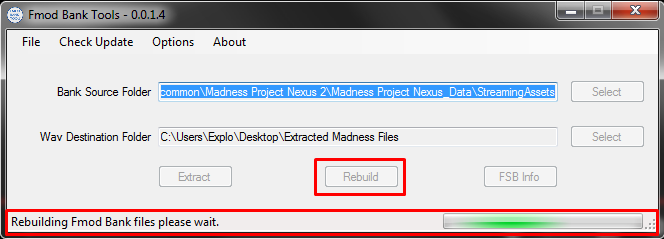
Step 2.
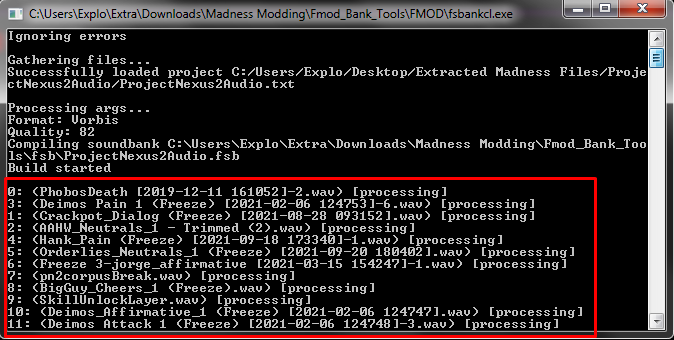
Click on “Rebuild“, and wait for the program to repackage all the files.
You can keep a track of the progress by looking at the CMD output.
There are 3219 files in total.
This will take a while.
If your CMD gets stuck, and doesn’t show any text,
close the program, and redo the previous steps from this section.
Don’t worry, the things that were already finished will stay finished.
Notes:
Make sure to NEVER replace “ProjectNexus2Audio.strings.bank”
◄—Final Words—►
Thank you for reading, hope this guide helps you with your escapades.
If you have any questions, leave a comment and I’ll try to get back to you.
Have fun, and don’t overwork yourselves!
-Explo ☄
Oh-
And here’s a link to May’s guide, that is focused on cheating.
https://steamcommunity.com/sharedfiles/filedetails/?id=2673078513 – [steamcommunity.com]
Hope you enjoy the Guide about MADNESS: Project Nexus – Modding Tutorial Replacing Models/Textures, if you think we should add extra information or forget something, please let us know via comment below, and we will do our best to fix or update as soon as possible!
- All MADNESS: Project Nexus Posts List



![MADNESS: Project Nexus - Modding Tutorial Replacing Models/Textures - Unity and Converting [PLACEHOLDER] - 3BD6102 MADNESS: Project Nexus - Modding Tutorial Replacing Models/Textures - Unity and Converting [PLACEHOLDER] - 3BD6102](https://steamlists.com/wp-content/uploads/2022/01/MADNESS-Project-Nexus-Modding-Tutorial-Replacing-ModelsTextures-Unity-and-Converting-PLACEHOLDER-3BD6102-steamlists-com.png)
![MADNESS: Project Nexus - Modding Tutorial Replacing Models/Textures - Unity and Converting [PLACEHOLDER] - 3BD2756 MADNESS: Project Nexus - Modding Tutorial Replacing Models/Textures - Unity and Converting [PLACEHOLDER] - 3BD2756](https://steamlists.com/wp-content/uploads/2022/01/MADNESS-Project-Nexus-Modding-Tutorial-Replacing-ModelsTextures-Unity-and-Converting-PLACEHOLDER-3BD2756-steamlists-com.png)
![MADNESS: Project Nexus - Modding Tutorial Replacing Models/Textures - Unity and Converting [PLACEHOLDER] - EAF00B9 MADNESS: Project Nexus - Modding Tutorial Replacing Models/Textures - Unity and Converting [PLACEHOLDER] - EAF00B9](https://steamlists.com/wp-content/uploads/2022/01/MADNESS-Project-Nexus-Modding-Tutorial-Replacing-ModelsTextures-Unity-and-Converting-PLACEHOLDER-EAF00B9-steamlists-com.png)
![MADNESS: Project Nexus - Modding Tutorial Replacing Models/Textures - Unity and Converting [PLACEHOLDER] - 41324F1 MADNESS: Project Nexus - Modding Tutorial Replacing Models/Textures - Unity and Converting [PLACEHOLDER] - 41324F1](https://steamlists.com/wp-content/uploads/2022/01/MADNESS-Project-Nexus-Modding-Tutorial-Replacing-ModelsTextures-Unity-and-Converting-PLACEHOLDER-41324F1-steamlists-com.png)
![MADNESS: Project Nexus - Modding Tutorial Replacing Models/Textures - Unity and Converting [PLACEHOLDER] - 9AD0E25 MADNESS: Project Nexus - Modding Tutorial Replacing Models/Textures - Unity and Converting [PLACEHOLDER] - 9AD0E25](https://steamlists.com/wp-content/uploads/2022/01/MADNESS-Project-Nexus-Modding-Tutorial-Replacing-ModelsTextures-Unity-and-Converting-PLACEHOLDER-9AD0E25-steamlists-com.png)
![MADNESS: Project Nexus - Modding Tutorial Replacing Models/Textures - Unity and Converting [PLACEHOLDER] - 9E570D5 MADNESS: Project Nexus - Modding Tutorial Replacing Models/Textures - Unity and Converting [PLACEHOLDER] - 9E570D5](https://steamlists.com/wp-content/uploads/2022/01/MADNESS-Project-Nexus-Modding-Tutorial-Replacing-ModelsTextures-Unity-and-Converting-PLACEHOLDER-9E570D5-steamlists-com.png)
![MADNESS: Project Nexus - Modding Tutorial Replacing Models/Textures - Unity and Converting [PLACEHOLDER] - 52CCADF MADNESS: Project Nexus - Modding Tutorial Replacing Models/Textures - Unity and Converting [PLACEHOLDER] - 52CCADF](https://steamlists.com/wp-content/uploads/2022/01/MADNESS-Project-Nexus-Modding-Tutorial-Replacing-ModelsTextures-Unity-and-Converting-PLACEHOLDER-52CCADF-steamlists-com.png)
![MADNESS: Project Nexus - Modding Tutorial Replacing Models/Textures - Unity and Converting [PLACEHOLDER] - 1280E2E MADNESS: Project Nexus - Modding Tutorial Replacing Models/Textures - Unity and Converting [PLACEHOLDER] - 1280E2E](https://steamlists.com/wp-content/uploads/2022/01/MADNESS-Project-Nexus-Modding-Tutorial-Replacing-ModelsTextures-Unity-and-Converting-PLACEHOLDER-1280E2E-steamlists-com.png)
![MADNESS: Project Nexus - Modding Tutorial Replacing Models/Textures - Unity and Converting [PLACEHOLDER] - E723F9C MADNESS: Project Nexus - Modding Tutorial Replacing Models/Textures - Unity and Converting [PLACEHOLDER] - E723F9C](https://steamlists.com/wp-content/uploads/2022/01/MADNESS-Project-Nexus-Modding-Tutorial-Replacing-ModelsTextures-Unity-and-Converting-PLACEHOLDER-E723F9C-steamlists-com.png)
![MADNESS: Project Nexus - Modding Tutorial Replacing Models/Textures - Unity and Converting [PLACEHOLDER] - DDE4344 MADNESS: Project Nexus - Modding Tutorial Replacing Models/Textures - Unity and Converting [PLACEHOLDER] - DDE4344](https://steamlists.com/wp-content/uploads/2022/01/MADNESS-Project-Nexus-Modding-Tutorial-Replacing-ModelsTextures-Unity-and-Converting-PLACEHOLDER-DDE4344-steamlists-com.png)
Leave a Reply