Feel free to translate to other languages, no permission needed.
Note to Beginners
If you aren’t comfortable with learning strict timing on super cancels and links, it is highly recommended to start off playing in Speed mode.
Speed is a lot more lenient and easier to understand, giving you more time to learn the game mechanics instead of struggling with controlling your own character.
For example, Amano’s BnB in speed does almost as much damage as doing 3 one frame links in a row for one combo in Power.
However, personal recommendations to start learning are:
Speed Setsuna
Speed Kojiroh
Speed Moriya
Speed Lee
And special mention to Power Mukuro. He has the easiest links in the game off of his 4A (into its self, into 5A, and 6C), and his high damage and simple buttons allow and easier time thinking about situations creatively instead of worrying about what tool to use in what situation.
Also if you play Mukuro; disable Flash in Game Options. His super will actually hurt your eyes and could realistically cause epilepsy.
Notation
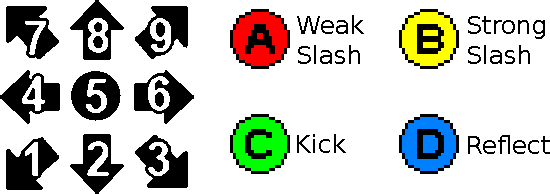
This guide will use numpad notation and SNK inputs when written. But will use motion guides in images for readability.
Example:
623C/623 Kick
denotes jumping
Basics
Directional Normals
Punch
Long range attack, only good for counter poking a slow whiffed move that’s really long range (Hibiki 236A/B for example). Most characters worst attack.
Wall bounce kick (Except Kagami)
Sweep
Exclusive to Moriya, Akari, Amano, Shigen.
Repel / Deflect
Pressing D again causes a knockdown on a successful repel, but taking a combo is always preferred.
You must repel overheads standing and lows crouching.
You can repel in the air to beat anti-airs and air-to-airs.
You can repel most attacks and some supers, but not fireballs.
when blocking to spend your entire meter for a repel, similar to how Alpha Counters or SFV’s V-Reversal works.
Unblockable / Overhead
Power: Unblockable
Amano, Washizuka, Kojiroh, Zantetsu, and Kagami all take a step back during the start up, giving it slight evasive properties.
Kagami leans so far back he actually takes his hitbox off screen in corner, but it’s only good against properly spaced out attacks; making it only a gimmick at best.
Speed/EX: Overhead
Overheads cause stagger vs crouch blocking opponents, giving you a free dash in combo
They launch standing and not crouch-blocking opponents, allowing for flip out combos.
Special mention to Moriya and Hibiki’s overheads for having so long of range they effectively can jump in without jumping.
Run/Dash
All characters except Shigen (he can’t run indefinitely but is incredibly fast)
Running in LB2 is incredibly fast compared to other fighting games, paired with how strong jumping attacks are, most people when grounded will be looking to anti air; meaning running is just as viable to close distance
You can run through opponents if they roll or ukemi on wakeup but you will be facing the opposite direction.
gets you a mid attack, only good to pick up off long range repels or overhead staggers
gets you a sweep
Throw
Throws are very short range, but dashing is so fast and jumps are so strong that most opponents will look for anti-airs instead, making it hard to react to run up throws.
Forward and Back throws are reversed on:
Kaede, Moriya, Yuki, Juzoh, Amano, Hibiki, Washizuka, Kojiroh, and Zantetsu.
Amano gets a juggle in corner.
Air Block / Chicken Guard
You can not air block:
Grounded normals
Certain special attacks (ie; all of Mukuro’s moves except 41236A/B, Akari’s fireball, Moriya’s 214A/B)
Air throws
Anti-air throws (Setsuna 623C)
You can only air block when neutral or back jumping.
Command Grabs
All characters can combo into command grabs except for Kaede, Speed Setsuna and Speed Shigen
Shigen has Tekken style chain grabs that must be broken with either A or B.
Short Hop / Low Jump
LB2 short hops are the hardest out of SNK games, but they are very strong.
There is no lag when starting a jump or landing, letting you chain multiple jumps together. Combined with most characters having strong jumping attacks, being able to chain short hops together helps shut down the neutral game.
Amano’s j.C for example is active for 12 frames, giving him a constantly active hitbox when short hop chaining.
Air Recovery / Air Tech
Recover after getting hit mid-air. Some attacks are untechable.
Ground Recovery / Ukemi / Tech Roll
Press when landing to instantly recover. Not invulnerable but fast.
when grounded rolls.
On The Ground attack / Chase attack
Everyone except:
Lee – 8C
Mukuro – 8B and mash 4/6
Shigen – C+D , 3C
Juzoh – 8B, 623A/B, dash over
Amano and Akari can delay their 3B by holding B
with everyone
Desperation Moves
When at 25% life (flashing bar), you gain access to unlimited but weaker supers.
Proximity Guard
All attacks can trigger proximity guard, forcing you to block even out of range.
Can be avoided with backdashing or jumping
Advanced
Stagger escape
Mash 4 and 6 to escape being staggered faster. The only stagger you can’t escape from is Amano’s 63214C counter.
Guard Cancel
Cancels blockstun, allowing you to punish some otherwise safe attacks.
Guard canceling isn’t enough to let you punish everything, but it allows you to escape almost all frame trap set ups and escape pressure. This technique is almost as impactful as 3rd Strike’s parrying to planning offense.
Neutral Guard
If you trigger proximity guard while standing, you can release back to maintain your guard. Useful against obvious jump ins or Mukuro’s projectiles to make buffering reversal faster
Can be canceled with crouching, backdashing, or moving forward
Jump Cancel
You can jump cancel your dash at any point, but if you run under a jumping opponent, input a jump, then do a crouching normal; you will now be facing your opponent. This allows you to take advantage of flip outs, bad air recoveries, or full neutral jumps with a fast crossup attack.
Akari’s fireball causes a flip out vs airborne opponents, letting you turn every 6C into a full mixup with dash 4B 236A where you can jump cancel your run for an ambiguous cross up with j.C (even in corner).
Zantetsu 236A is jump cancelable for full air juggles into his j.63214C
Power
Increased Damage and Meter Gain
Power is focused around smaller combos, 2-in-1s, and basic links. However every stray poke you get does considerably more damage than Speed.
Power also builds meter the fastest out of every mode.
Amano’s basic meter build combo 2A 646B 3B 63214B~D builds almost a full bar
Weapon Normal Chip
Any attack performed with your weapon causes 1 point of chip damage.
Increased Blockstun
Paired with chip damage from normals, characters with fast 5As can build up a ton of free damage with very little commitment.
Kaede for example can be oppressive with how fast and long range his 5A is when in power.
6C Cancels
You can cancel 6C into any special or super when in power.
Kaede and Mukuro can link 4A into 6C, and Akari can link from 4B.
Super Cancels
You can cancel certain special moves into a super. Certain characters have incredibly mediocre ones (Okina, Mukuro), while some characters almost break the game with how good theirs is (Amano)
Kaede: 214A/B (First Hit)
Moriya: 236A/B (Any hit before last)
Yuki: 214A/B (First hit only to combo)
Setsuna: 236A/B (A version is stronger)
Akari: 28C (first hit)
Juzoh: 623A/B
Amano: 646A/B
Hibiki: 623B
Washizuka: [4]6C
Kojiroh: 214B (first hit)
Okina: 63214A/B (B version on final hit is only way it will combo)
Mukuro: j.214B
Lee: 63214A/B (B version whiffs)
Zantetsu: 214B (first hit, last hit causes it to whiff)
Kagami: 623A/B
Shigen: 214A/B
Super Desperation Moves
You gain access to SDMs when you are at 25% life (flashing bar). They require full meter and very few characters have ways to use theirs outside of landing a repel.
Lee can use A+B~A to cancel into his
Akari and Kaede can link 6C to easy combo into theirs. Kaede cancels, Akari does dash 4C SDM
Kaede can also command grab into his.
Zantetsu and Hibiki’s are command grabs.
Zantetsu can’t combo into his, Hibiki can only combo point blank
Washizuka and Kojiroh can charge theirs into an unblockable by holding B.
Speed
Speed has lower damage per hit and worse advantage on block compared to power, but it has access to chain combos and altered attack properties.
Chain Combos
All characters have access to a unique knock down chain
As well as the ability to chain in order of priority.
4. is lowest priority.
Crouching has higher priority
B has exclusive priority
4B, 6B, 6C, 3C, B+C and specials have highest priority (ending the chain)
A few example universal combos are:
Special cancel
Furious Fandango Ougi / “Enigma Frenzy Attack” / Super Speed Combo
A starts with an overhead, B starts with a low.
This input is infamously easy to accidentally input, while also having entirely opaque uses. There is no way to set up for this attack outside of Amano’s counter (63214C), considering you can wiggle out of being staggered otherwise.
The next closest set up is parrying a jump in at a height you won’t immediately run under the opponent as they’re flipping out, and hoping they guess wrong on their block.
The universal combo is:
Altered attack property examples
Universal change:
2. is special cancelable, giving most characters access to a meaningful low poke.
Moriya:
623. chains into 623B
Akari:
j2C no longer knocks down except against airborne opponents
Amano:
6. is faster and slides forward further
Hibiki:
2. and 2B are special cancelable
Washizuka and Kojiroh:
Linking from 5A to 4A leads back into a full combo, giving them above average combo damage
6. is considerably faster
Lee:
Chaining into 2C gives you a low/overhead mixup with 2C 2C or 2C 6C, as well as extended combos.
Can link 5A into 6B; 5A recovers faster, 6B starts up faster.
EX
Code to access:
Highlight and input
x6
x3
x4
EX mode is the middle ground between Speed and Power. Individual hits are stronger, but combo scaling makes overall combo damage about the same.
You take 150% damage, and build meter slower.
To compensate, you gain access to both chain combos and super cancels/SDMs, but the meter gain is so heavily gutted only a few characters can realistically use EX mode effectively.
Yuki is probably the most improved character in EX because she gains very powerful set ups into her SDM since she can more easily set up the meaty command grab with speed combos. But with the 150% damage taken, she’s going to be constantly relying on it.
This is all about THE LAST BLADE 2 – System Mechanics; I hope you enjoy reading the Guide! If you feel like we should add more information or we forget/mistake, please let us know via commenting below, and thanks! See you soon!
- All THE LAST BLADE 2 Posts List


Leave a Reply