How to Optimize Reshade Settings in Diablo 4
Hey there, game lovers! Ready to give Diablo 4 a visual boost? First things first – let’s get Reshade on your computer. This nifty tool is gonna up your game with some seriously cool visual effects. Just follow Reshade’s setup guide to get rolling.
Step 1: Installing Reshade

Step 2: Launching Your Game
All set with the install? Sweet! Now, fire up your game and wait for the magic to load. You’re about to step into an epic, visually stunning world.
Step 3: Accessing the Reshade Panel
Ready to unlock Reshade’s power? With your game running, hit the “Home” key to bring up the Reshade panel. This is where the fun begins!
Step 4: Exploring the Possibilities
Now, dive into the Reshade panel and explore. Tweak the brightness, slap on some filters, and play around to make your game look awesome. The sky’s the limit!
Step 5: Saving Your Customizations
Got your game looking just how you like? Don’t forget to save those settings! Reshade lets you keep your custom look for every game launch.
Step 6: Enjoying the Enhanced Experience
With Reshade in your toolkit, get ready for an immersive, visually stunning gaming experience. You’re not just playing now; you’re on a whole new level of awesome.
Follow these easy steps to get Reshade up and running, and open up a world of amazing visuals for your gaming sessions. Get ready to game like never before!
Customizing Reshade Settings
Want to fine-tune your Reshade settings? Here’s the lowdown:
Accessing the Settings Tab
First up, head over to the “Settings” tab in the Reshade panel. This is your control center for cranking up those visuals.
Adjusting Visual Settings
In the Settings tab, you’ll find a bunch of options to play with. Mess around with brightness, contrast, saturation, and more to get that perfect game look.
Enabling and Disabling the Panel
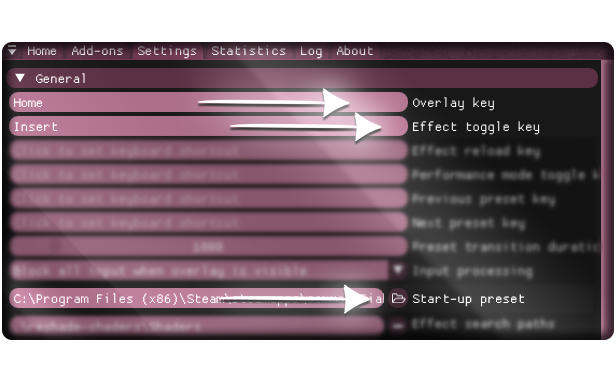
Need to flip the Reshade panel on or off while gaming? Use the “Overlay key” for quick access. It’s super handy for quick tweaks or to turn off Reshade when you want.
Toggling Presets
Reshade has some cool presets to change up your game’s look in a snap. Use the “Effect toggle key” to switch between them and see what works best for you.
Setting the Start-up Preset
Got a favorite preset? Set it as your “Start-up preset” so it’s always there when you start your game. Just copy and paste the file location, and you’re golden.
With these steps, you can totally personalize your Reshade experience and elevate your game’s visuals. Go ahead, make it your own!
Customizing Screenshot Preferences

Capturing those epic game moments? Let’s make sure your screenshot settings are spot on.
Step 1: Navigating to the Settings
First, hit up the settings menu and scroll to the “Screenshots” section. This is where you’ll tweak your screenshot game.
Step 2: Assigning a Key for Saving Screenshots

Pick a key for snapping those screens. Make it something easy to remember and hit, so you never miss a moment.
Step 3: Specifying the Folder Location
Decide where you want those screenshots to go. Choose a folder that’s easy for you to find, so you can relive those gaming highlights anytime.
Follow these steps to ace your screenshot setup. Get ready to snap and save those epic gaming moments with ease!
Personalizing Reshade
– Want to make Reshade truly yours? Dive deeper into the settings and adjust until it’s just right for your gaming style.
Gear Up Your Screenshots!
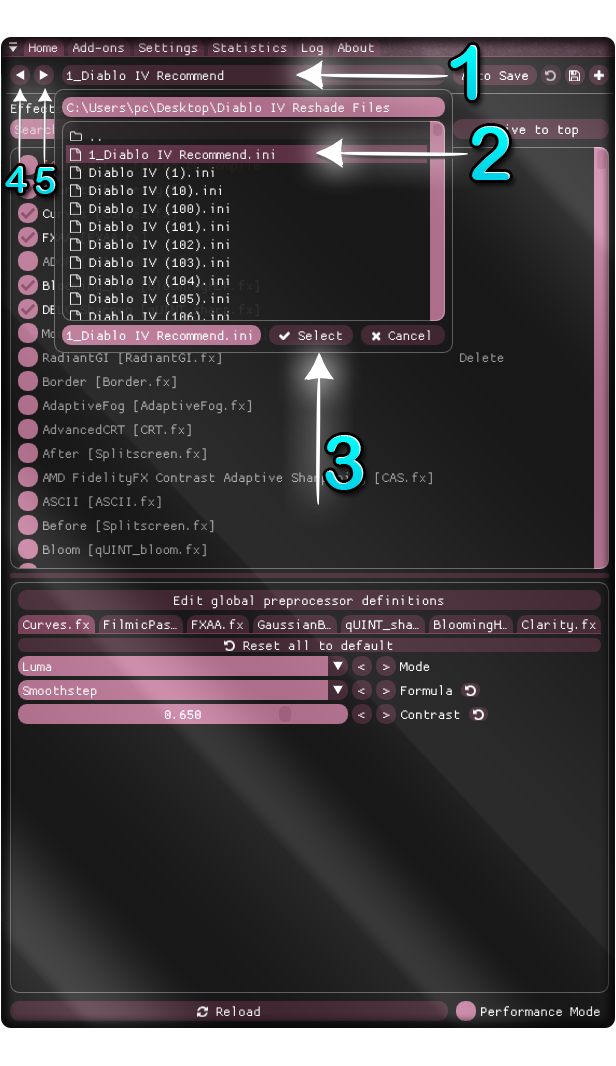
First up, head over to the “Home” tab on the Reshade panel. Spot the number “1” in the image? That’s where you pop in your preset extension. Then, hit up number “2” to peep the “.ini” files and snag the preset you’re digging. Lock it down by clicking the “Select” button (yeah, that’s number “3“). Wanna browse more? Use the left and right buttons (numbers “4” and “5“) to flip through the options like a pro.
Apps That’ll Make Your Screenshots Pop!
Ready to amp up your screenshots? Check out these killer apps that’ll take your game to the next level:
Get Glowy with Oniric Glow
Oniric Glow is your go-to for adding some slick Glow effect to your shots. A few clicks and bam! Your screenshots go from meh to wow!
Filter Fun with Nik Collection
Dive into Nik Collection for a treasure trove of filters. Tweak ’em to your heart’s content. Vintage, dramatic – you name it, they’ve got it.
Photoshop: The Big Kahuna
No shoutout is complete without Photoshop. This beast has all the tools you need to morph your screenshots into sheer masterpieces.
Level Up with Topaz Gigapixel
Topaz Gigapixel is a game-changer. Upscale your shots while keeping those details crisp. It’s like giving your screenshots a superpower.
Lightroom for the Win
Lightroom is your buddy for tweaking and organizing your shots. Color, tone, vibe – adjust them all and get your screenshots looking just right.
Raw Power with Camera Raw
If raw files are your jam, Camera Raw is your tool. This Photoshop add-on lets you finesse your screenshots to perfection.
Armed with these apps, you’re set to elevate your screenshots from good to mind-blowing. Dive in, play around, and watch as your shots transform into something epic.
Credits to Divoras
- All Diablo 4 Posts List

Leave a Reply