Introduction
In Vitra is an immersive RPG experience that focuses around completing quests, exploration, and fighting enemies to advance the story. This guide covers what needs to be done and in what order things should be done, as well as some pointers for boss battles. Plot spoilers are unavoidable but have been kept to a minimum, and such parts have mostly been marked as spoiler text. Overall, I don’t think it is too hard to beat In Vitra without the use of a guide, so if you are used to RPGs, you may only need this guide if you get stuck.
Basic Controls
WASD or Arrow Keys: Move around, move between menu options
Space: Interact, select menu option
F4: Fullscreen
Shift: Run
Escape: Open menu, go back
Steam Overlay: NOT SUPPORTED (so if you want to use this guide while in game, you may have to open it in Steam manually or open it through a web browser).
-You can walk around if you like, but running is definitely useful.
-The game can get a bit pixellated in fullscreen, but it can also can be more immersive. Your choice.
-When navigating some menus (especially player inventory and shops), you have to use right and left arrows to see additional pages of items.
Basic Fight Mechanics
These are pretty standard for an RPG, but here are the basics.
Attack
Melee attack with weapon. Usually a safe option, and the default near the beginning of the game, or if the character has no good spells to cast or items to use.
Guard
Reduces incoming damage, almost never useful (the one exception is outlined in the walkthrough).
Skills
Special abilities of the character with a variety of effects. These consume MP after being cast, and cannot be cast without sufficient MP. MP can only be restored via rest, potion, or herb. Some skills can be cast anytime from the menu, which can save you money and resources.
Items
Use potions or herbs while in battle. The main useful item after you get to Umbilica is the Full Potion, which completely restores HP and MP, or the Antidote Herb to remove poison.
Escape
Flee the battle. This works for most battles besides boss fights. However, you don’t want to skip too many battles, otherwise you will not be strong enough to beat the bosses, which must be beaten to progress the story.
Order of combat
I am not entirely sure how order is determined, but it seems that, with two party members, the order is always Luke then Noa. When it is all four party members, it is Luke, Billa, Noa, then Lee-Belle. Basically, right to left rather than the order you selected actions in.
Reviving an Ally
Reviving an ally mid-battle can be tricky given the order of combat; you really need to know what order your party members will go in to select the options appropriately. Always use Noa’s spell when possible, as Revive Feathers are expensive. You’ll want to use a full potion immediately to avoid the character dying again.
Between Battles
You definitely want to cure poison between battles, but also heal up allies if their health is below half, or restore MP if their MP is below half. Using skills to heal out of combat is more efficient once you have healing skills. Also, redbushes are only an effective for healing out of combat.
Saving
You can save anytime you aren’t in a battle, and I suggest saving often. There are also plenty of different save slots, so you can use a new one frequently if you like.
Walkthrough Intro
This game doesn’t have clear-cut chapters or sections, so I broke the game down into chunks based on areas of the map and/or the quests that are being completed. These are in an attempt to make this long walkthrough more accessible. Where possible, I have tried to use the place names used in the game (which can be seen from the menu), but others have gone unnamed, in part because the given names for some places are long or not that helpful. I have also clearly outlined where bosses in the game are, because some of them are rather unexpected, and you can game over if you aren’t prepared.
Porta Nova
-Go outside and talk to your father, then bring the vegetables inside to your mother.
-Head outside and go east (right) Once at Crossroads, head straight up and a bit left to grab some redbush leaves, then head straight back to your house. You shouldn’t encounter any boars, but if you do, be sure to rest in your bed afterwards.
-Now is a good time to explore the town. Houses you can enter will always have visible doors. There are items in the two accessible houses in both wardrobes, and in the pot by the pier. Talk to the bartender to start the quest for collecting 10 boar hides. You can ignore the church for now.
-Talk to Luke, who is standing outside by the path on the right.
-Head to the clearing and fight boars until you are at least level 3 and have 10 boar hides. If you get low on health, just return to your house to rest in your bed. If you enter a new area by accident, go back. The enemies in the other areas are too powerful right now.
-Head back to the bar and hand over the 10 hides to collect 20 DUC and 20 EXP, rest in your bed and SAVE.
-Walk to the beach (past the sign and then down), and interact with the pile of bricks and wood.
BOSS – Sand Worm – Suggested level: 3
Pretty reasonable at level 3. Use Luke’s Massive Punch until he runs out of MP, and just attack otherwise, healing as necessary.
-Take the Bronze Ring you found to the man at the pier in Porta Nova.
-Rest and SAVE.
Getting to Umbilica
-Head to the Northern Woods and fight snails until you’re at least level 4 (if you get 3 snails at once, I suggest escaping).
-Go home, rest, and SAVE.
-Head to the Northern Woods, then head west.
-This next clearing has skeletons. I suggest escaping if you get 2 at once. Continue west and talk to the man in shining armor, then head back to Porta Nova and talk with Bilbo the priest.
-Rest at home and SAVE.
-Head back to the knight and give him the letter.
Exploring Umbilica
-You now have access to shops in Umbilica, but we’ll deal with those a bit later.
-Check wardrobes and pots inside houses for items now (small, non-shop buildings only). Grab all the bandit’s knives from the pots around town for a quest later (top right [left of benches], top left, left side by a bench, and bottom right near some trees).
-Stop by Falus’ shop in the top left, sell the bronze ring, buy 3 bottles of wine, and grab an herb from the lower right wardrobe.
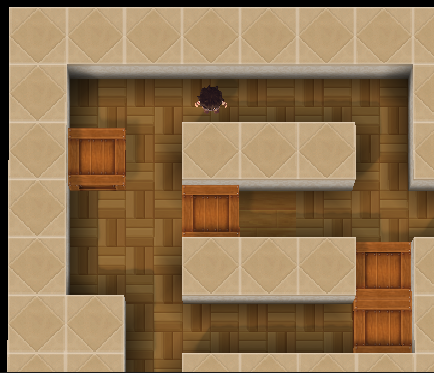
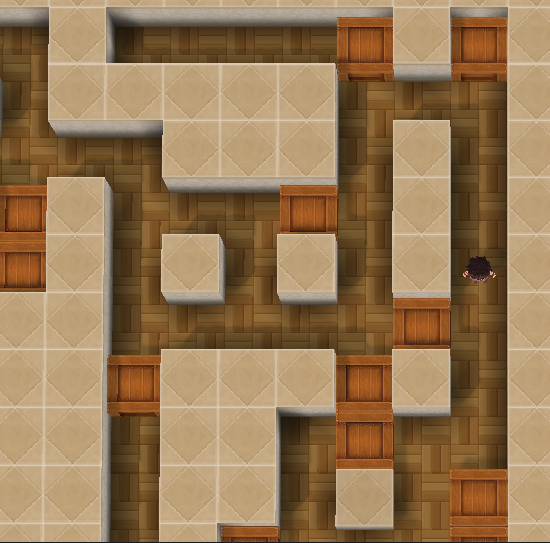
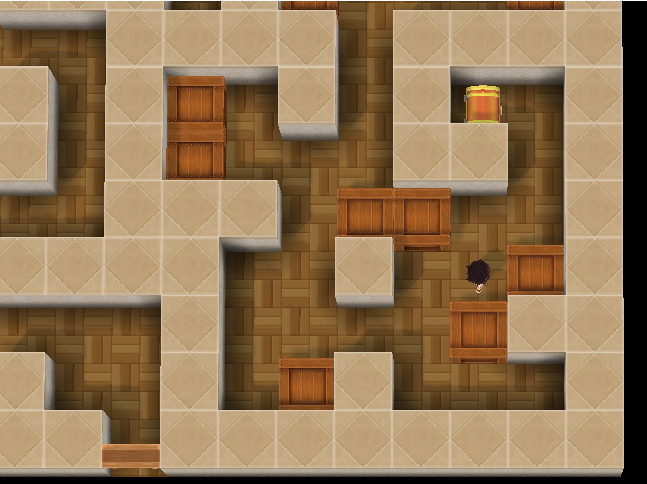
-SAVE, then enter the building to the right of Falus’ shop. Move the boxes to access the two chests (see screenshots below), exiting the game without saving and reloading your save if you mess it up. SAVE after you get both items.
-Talk to the lady inside the house that has the drunk man outside, talk to the drunk man, talk to the woman again and select NO, then talk to the drunk man again to collect 20 DUC.
-Stop by the potion shop and grab a Full Potion from the left wardrobe (first floor).
-Talk to the old lady in the house in the lower right, then head up to the church to grab the cat. Bring it back to the old lady to get 50 EXP.
-Go to the church (center of town) and ask about skeletons to grab the Tomb Key for later.
-Head right and into the castle, take the left corridor and head up to the kitchen. Push the box aside to grab several items from the blocked room.
-Head right and into the inn, and talk with the man by the counter to unlock a side quest. Head to the lower left room of the Inn to grab a Potion, Magic Potion, and 50g.
-SAVE, then head back to Porta Nova, fighting monsters along the way.
-Give the 3 bottles of wine to the man on the pier to earn 100 EXP.
-Rest and SAVE.
-Head back to Umbilica, making sure to fight monsters until you are level 5.
-Rest in the Inn and SAVE.
Stocking Up
-Now it’s time to head over to the shops to get infinite money. This exploit works when you aren’t on the mushroom quest (only in Umbilica). Head to the potion shop and DON’T ASK ABOUT DISEASE; click Shop. Buy as many Full Potions as you can for 10 DUC each (normally 30, you can press down twice to select the max number). Then, sell all your Full Potions back to him for 15 DUC each. Rinse and repeat this process until you have some 2,000-2,500 DUC AND a stack of Full Potions.
-Stock up on potions while you’re here, I suggest around 10-15 Potions, 40 Magic Potions, 10 Antidote Herbs, 5 Dispell Herbs, and 95 Full Potions.
-Head to Falus’ shop if you want to have more than 1 Revival Feather.
-Head over to the blacksmith and grab 1 Bandanna, 3 Crest Helms, 1 Chain Mail, 2 Crest Mails, and 2 Crest Shields. Equip battle axes and full Crest armor on Luke and Noa, and give the Rainbow Amulet to one of them. If you are selling old equipment, DO NOT sell the leather bracers. SAVE.
Dispelling the Skeletons
-Head to the east and down into the graveyard to explore the tomb. Check all the open coffins in the central and upper rooms (the right room is empty). Heal up with items, then SAVE before heading into the left room.
BOSS – Shadow Figure – Suggested level: 6
Very reasonable at level 6. Have Luke use Massive Punch every turn. Have Noa use Evasion on himself and Luke in the first couple turns, then have Noa healing or restoring MP with potions in later turns. Neither Luke or Noa should die, especially if you use full potions.
-Head back to the church to get the Divine Sword. Equip it on Luke, and equip the Mysterious Amulet on one of them.
-Head to the Inn, and talk to the man by the counter to receive the Magical Necklace and 100 EXP. You can equip it on Luke or Noa now, but it won’t help much. Rest, and SAVE.
Lost Boy Side Quest
-Head east again, and head up to the farm. Talk to the man to start the quest, and head directly east. Talk to the man on the ground, then continue east until you find a building. Heal up, cure poison, SAVE, then interact with the well.
BOSS – Cave Spider – Suggested Level: 7
Strategy is fairly similar to the previous fight. Have Luke use Degrade, then have him use Massive Punch every turn after. Have Noa use Evasion on both party members, then have him heal, restore MP, or cure poison with Antidote Herbs. The spider does critical attacks frequently, so be sure to heal immediately if any member’s health drops below half.
-SAVE, talk to the man at the farm to get a Full Potion, then walk back to Umbilica.
Trolls and Mushrooms
-Stop at the Inn, rest, and SAVE.
-Stop by the Potion Shop and ask about Mushrooms.
-Head to the west, head north (don’t cross the bridge), and grab the mushroom. Walk south towards the bridge, heal up with items, and SAVE. Walk onto the bridge. Choose to fight.
BOSS – Troll – Suggested Level: 7-8
Similar to before. Have Noa use Evasion on himself and Luke, then alternate using Full Potions on himself and Luke. Have Luke use Degrade, then use Massive Punch every turn after. You need to always be healing because the Troll can put out serious damage, but it is reasonable even at level 7 with this strategy.
-Head back to the potion shop and give the man the mushroom. Stock up on potions.
-After exiting the shop, equip the Sword of Gandor, Leather Bracers, Crest Helm, and Chain Mail on Lee-Belle.
-Stop at the inn, rest, and SAVE.
Dispelling the Bandits
-Head west and follow the path. Be sure to have Lee-Belle use Guard for every action until she gains a few levels, and heal her with items after every fight to avoid her getting knocked out.
-Enter the door and talk to the holy man about Disease.
-Head back to Umbilica and talk with Latus in the castle.
-Rest at the Inn and SAVE.
-Head to the cave entrance in the lower left corner of Umbilica (Lee-Belle will probably still have to use Guard for every action through this cave).
-Head to the upper right of the cave to trade the Bandit’s knives for 100 DUC and 100 EXP.
– Hug the right wall and head to the lower right corner to find the cave exit.
-Head right, take the first path down, head right, go down and then immediately left, follow the trail left, then go down until you are near a clearing (see screenshot below). Heal up with items and SAVE before entering the clearing.
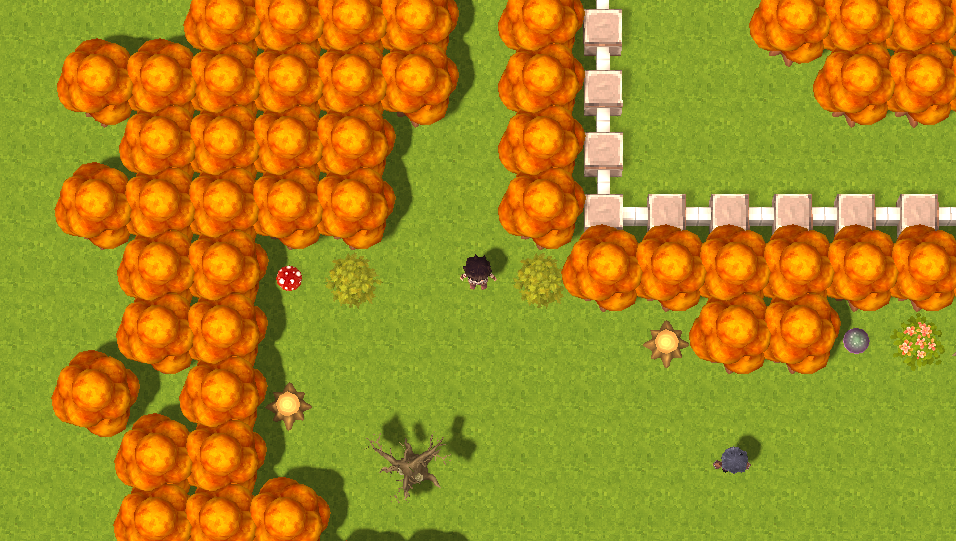
BOSS – Bandit Leader and 2 Bandits – Suggested Level: 9-10 (Luke/Noa), 7+ (Lee-Belle)
A bit tricky but manageable. You have a lot more options in this fight with the addition of Lee-Belle, but she is so hard to keep alive that it’s almost not worth keeping her alive. Have Noa use Party Power Boost, and after that alternate between attacks and healing with potions. Have Luke use Degrade on the bandit leader (press up when selecting an enemy), have Luke use Knockout on one of the bandits, and then use Massive Punch whoever is left. Have Lee-Belle cast Poison Shot on the Bandit Leader, and then the other bandits. If she’s still alive after that, she can focus on healing; otherwise, let her stay dead.
-Once the battle is over, SAVE, heal with items, take the left path up, and head to the upper right. You should find a path up that will take you to the area east of Umbilica.
-Stop at the castle to talk with Latus.
-Rest at the Inn and SAVE. Equip the Malicious Beast onto someone (personally, by now I had Luke with the Malicious Beast, Noa with the Divine Sword, and Lee-Belle with the Sword of Gandor).
Inspecting the Water Source
-Head west along the path, get to the Holy City, and give the holy man Latus’s letter.
-Talk to Brother Pius in the cathedral to continue the quest. There isn’t really anything around town besides a shop with normal prices and a 50 DUC Inn (the Inn does have a fun secret).
-Head east and Billa will join your party. Equip her with the Acolyte’s Rod, Leather Bracers, Bandanna, Leather Tunic, and the Magical Necklace. SAVE.
-Follow the path, which will have many goblins along the way. Be sure to cast the magic of your choice with Billa, everyone else can just attack, although Knockout is good here too.
-Once you pass the stone bridge, take the stairs up, head left, then down. There is a cave entrance through some trees.
-Once in the cave, head up and left to find a place to rest. Then, head up and right, then up and left. Be sure to heal up and SAVE before entering the room in the top left with a chest (see screenshot below).
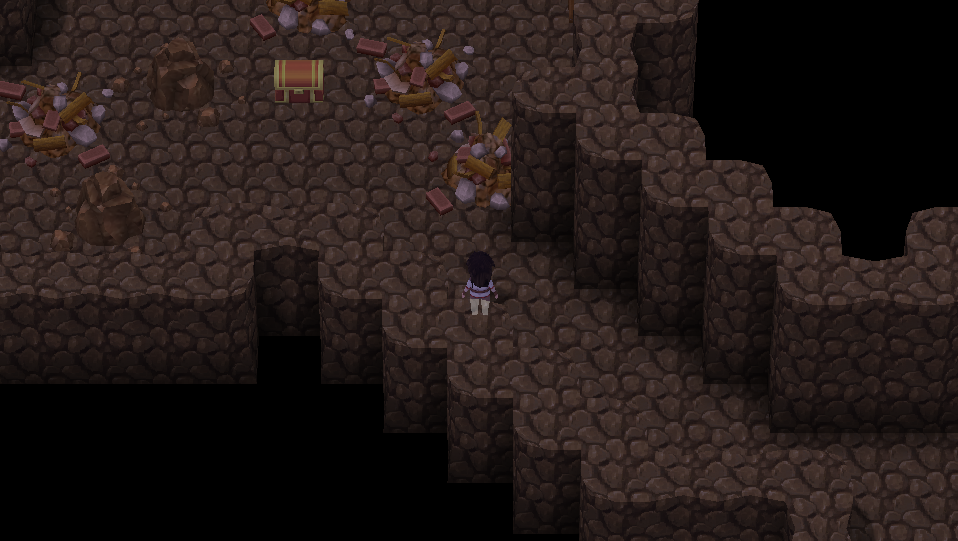
BOSS – 6 Goblins – Suggested Level: 9-11
This battle starts out difficult but quickly becomes easy. Have Noa cast Party Evasion, then just attack a goblin not targeted by Luke. Have Luke use Knockout on the goblins one at a time. Have Lee-Belle cast Blind All until all the goblins are affected, then attack or use Poison Shot (don’t use Charm). Billa should be casting Fire Storm or Ice Storm every turn. If any healing is needed, have Lee-Belle use Full Potions.
-Grab the Golden Axe and 250 DUC from the chest, then head back as there is nothing else in the cave. The Golden Axe has higher damage with lower accuracy, so you can equip it on Luke or Noa if you want, but it’s not objectively better than anything you have.
-Head out of the cave and up to the top of the mountain. Make sure to heal up and SAVE before climbing the last set of stairs, which goes to the left.
BOSS – Troll – Suggested Level: 9-11
Not particularly hard. Use a similar strategy to what was used for the first troll. Noa should use Party Evasion, Luke should be using Ruthless Slash or Massive Punch, and Lee-Belle should cast Blind. Aside from that, attack and heal as necessary.
-Head back to the Holy City and talk with Brother Pius.
-Stock up on potions now; this is the only place you can get them for awhile.
-Heal up or stay at the Inn and SAVE.
-Head back to Umbilica and speak with Latus to receive 150 DUC.
-Head to the Potion Shop, head upstairs, and read the letter.
The Madswamps
-Head to the Northern Woods (east) and SAVE.
– Knockout is almost 100% effective for Lizard Men, and Poison Shot usually misses. Magic is so ineffective against frogs that Billa should use the Attack action.
-Walk mostly due east through the swamp to reach a clearing.
-Follow the path around the clearing. You will fight 3 lizard men near the end. After this battle, heal up and SAVE. Continue on.
BOSS – Lizard Man and 2 Forest Guardians – Suggested Level: 11-12
This boss isn’t really any harder than the trio of Lizard men from earlier. The main thing is to have Luke using Knockout every turn; besides that, it really doesn’t matter.
-Grab the Sapphire Rod and 300g from the chests. Equip the Sapphire Rod on Billa. Heal any major damage, SAVE, then head back into the Madswamps
-The entrance to Mountainside is up and to the left from the clearing, just skirt around the edge of the swamp.
Mountainside, Poltan, and the Old Mine
-Once you reach Mountainside, follow the path all the way due east, grab the Full Potion in the chest, and talk with Poltan in the cottage just north of there. Grab 5 Full Potions from the wardrobe, rest, and SAVE.
-Head west from the cottage and follow the path up the mountain. Grab a Revival Feather from one chest, and a Full Potion from another chest to the right of the stairs. The bones trigger an optional fight.
-Heal up and SAVE before entering the Old Mine.
-Ignore the initial paths up and left, instead head right. Inspect the rock pile to get some valuable armor that you will want to sell later.
-Overall, escape most of the fights in this area and just explore. There are several good items, especially in the top right area, but this cave can get a bit confusing. The next area is to the top left, but you have to go to the top right first. Once you are done exploring, head into the new area, heal up, and SAVE.
BOSS – Beholder – Suggested Level: 13-14
Overall manageable. The Beholder is a heavy hitter that can be beaten in a few rounds. Start out with Party Evasion and Party Power Boost, Degrade, and Blind. Keep Luke’s MP up so he can keep using Ruthless Slash. Heal as necessary, otherwise just attack as normal.
-Continue on until you reach the end of the path, then head back to Poltan’s cottage, healing as necessary (again, you can safely escape most of the fights).
-Talk with Poltan to receive the Wall Gate Key. Rest and SAVE.
-Make your way back to Umbilica.
-Rest at the Umbilica Inn and SAVE.
The Orc Village
– Head west and use the Wall Gate Key to open the gate just past the bridge. Head into the next area.
-Take the path that goes directly left, then take it down, then right. Enter the next area, and keep heading down to reach the village. You can escape most the orc fights safely.
-After speaking with the lead Orc, head east. The path in the first area is somewhat linear, you go back and forth, then up. The next area is similar to the Old Mine; you kind of have to get to the top right before heading to the top left. Be sure to heal up and SAVE before getting too close to the area with the bones.
BOSS – Landworm – Suggested Level: 14-15
This boss isn’t at all difficult. Use similar strategies to ones used above for a single-enemy boss. Weaken All is the main spell of Lee-Belle’s that seems to work, so just attack or heal with her after you use it. One or two uses of Ruthless Slash will have it down in short order.
-Head back to the Orc Village to tell the lead Orc you killed the snake. Now you can buy or trade.
-The Orc Plate and Orc Shield are definite buys for Noa and Luke. As far as the weapons, they are similar to the Golden Axe but worse as far as damage; it’s up to you if you want them. Make sure to equip new items, and be sure to equip the Spirit Bracelet you got from the Landworm (I suggest Billa because she has the lowest health). Sell the plate armor you got in the Old Mine. Now is a decent time to sell any other odd armors or weapons as well. Buy any potions you need from the shop to the right.
-Rest at the Inn to the north and SAVE.
The Forbidden Realm
-Head east from the Orc Village, taking a right just before you walk up to the area where the Landsnake was.
-Head down once you enter the next area, and follow the path until you get to a cave (escape fights from here to the next boss if you want).
-Follow the left edge to make it to the bottom right. Heal up and SAVE before entering the room (seen in the screenshot below, don’t walk as far as I did before saving).
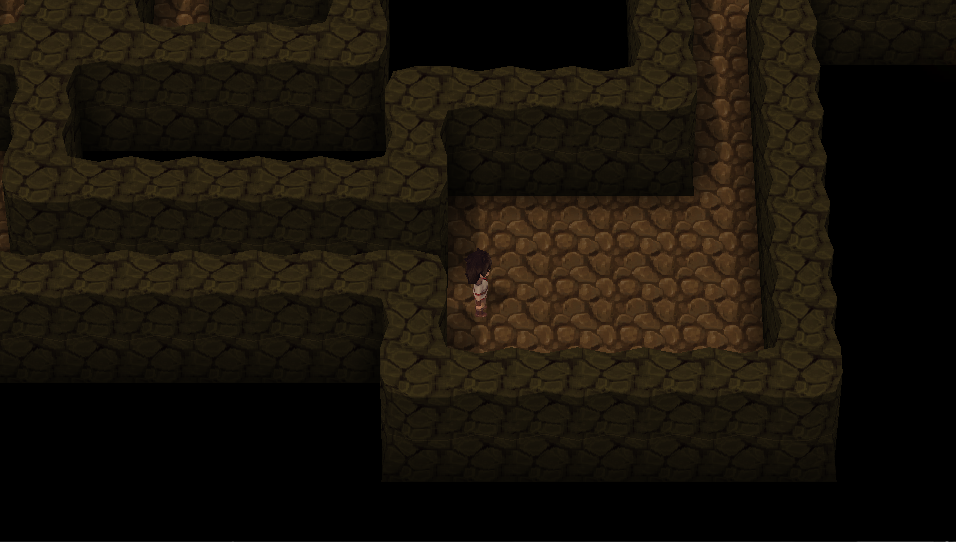
BOSS – Golem – Suggested Level: 15-16
Again, nothing worse than what you’ve seen. The main difference is that magic seems to be ineffective, but a few Ruthless Slashes plus everyone else attacking will defeat it.
-Head up and to the right, then follow the linear tree path to a stone building. Heal up and SAVE.
-You face ghosts and Golems in the next area. You often can’t escape the ghosts, but Knockout works most of the time (also only fire and ice magic are effective). I suggest escaping the Golems, because you will do a fair amount of walking. The area is mostly linear; you need to hit a series of buttons on the floor to remove boxes in your way. You will reach a second floor with no boxes, and you can tell that are near the end of it when you see red carpet. Make sure Lee-Belle has learned Poison Flood, heal up, and SAVE before going down.
FINAL BOSS – Latus and 2 Devourers – Suggested Level: 16-17
This is not an easy fight, but by no means too hard. Start with the typical openers: Party Evasion and Party Power Boost from Noa, Ruthless Slashes from Luke, Weaken All from Lee-Belle and then spam Poison Flood (it does a lot of damage to all enemies), and Windstorm from Billa. Noa will be the main healer, with Billa filling in if the party gets hit hard. For single-target attacks, focus Latus, as he has less health, then take out the Devourers one at a time.
-After the fight, head down and exit the building. At this point, you can free roam and do pretty much whatever you want, although no new quests open up.
Conclusion
This guide took quite a bit of time to make, so if you find it helpful, I would really appreciate it if you could leave a like and a favorite. This is a fun game, and I want to make sure it is accessible and not frustrating for people. I know I almost gave up on the game myself because I tried to do some things out of order. Thank you for playing, I hope you enjoyed. Please do not spoil anything for other players!
I hope you enjoy the Guide we share about In Vitra – Full Game Walkthrough; if you think we forget to add or we should add more information, please let us know via commenting below! See you soon!
- All In Vitra Posts List


Leave a Reply