The following guide provides a list, as well as thorough descriptions of easiest ways to complete all Weapon Assignments related to Maître d’Armes, Filled the Stockpile, Naval Weapons Collection and Weapons of the Apocalypse achievements.
How It Works
Battlefield 1 has received 4 multiplayer expansions over time – They Shall Not Pass, In the Name of the Tsar, Turning Tides and Apocalypse. All include new maps, armies, game modes and, most importantly, weapons.
Each expansion comes with an achievement to get a single kill with every weapon from their respective expansion. There are 2 primary methods that can be followed. The slower method is about completing Weapon Assignments tied to individual weapons. Every Weapon Assignment is comprised of 2 objectives that vary in difficulty. Most objectives task you with killing “x” number of enemies with a particular weapon. When that’s the case, jump in to Team Deathmatch or Frontline game modes, as those modes have a higher enemy encounter rate. Some objectives are grindy, some are skill-based, some luck-based. Even if you have friends at your side, it’s going to take some time.
However, you do not actually need to unlock each weapon. As the achievements clearly state, you only have to get a kill with them. The faster method is to find a player, who already has the desired weapon unlocked, follow them until they die and drop their loadout for you to pick up. It’s certainly faster, only encountering a player, who already has all weapons unlocked, can be quite rare.
They Shall Not Pass
Assault Class:
Sjögren Inertial Factory
- Perform 50 kills with the Model 10-A Slug
- In a round, perform 15 kills with the M97 Trench Gun Hunter
One of the easiest weapon assignments. Both objectives require kills with rather powerful shotguns, so prefer combat at close quarters (such as Fort De Vaux or Argonne Forest).
Ribeyrolles 1918 Factory
- Perform 50 kills with the Automatico M1918 Factory
- Perform 20 headshots with the MP 18 Optical
As a starter weapon, MP 18 is an all-around versatile SMG while Automatico M1918 is more suited in mid to close range.
Medic Class
RSC 1917 Factory
- Perform 50 kills with the M1907 SL Sweeper
- Perform 50 revives
RSC 1917 Optical
- In a round, perform 15 kills with the Autoloading 8 .35 Factory
- Perform 75 heals
To get more heals in a single match, use a Medical Crate rather than Bandage Pouches since crates heal multiple players at once.
Support Class
Chauchat Low Weight
- Perform 50 kills with the Lewis Gun Suppressive
- Perform 75 resupplies
Similiarly to Medic, use Ammo Crates to Ammo Pouches.
Chauchat Telescopic
- In a round, perform 15 kills with the M1909 Benet-Mercie Telescopic
- Perform 10 kills with the mortar
Support Class has access to 2 types of mortars – AIR and HE. AIR Mortars deliver moderate damage to a big area, while HE Mortars deliver huge damage to a small area. HE Mortars are also effective against armored vehicles.
Once you deploy a mortar, you have 5 mortar shells available. After a brief cooldown, you may set up another mortar with 5 new mortar shells. Be aware that when firing a mortar, you are visible to enemy players on the minimap.
Scout Class
Lebel Model 1886 Sniper
- In a round, perform 5 headshots with the Russian 1895 Sniper
- Perform 10 periscope spot assists
A Trench Periscope is a gadget exclusive to Scout Class. It needs to be bought with War Bonds and it highlights enemy players for a few seconds. A periscope spot assist is awarded when an enemy you have marked with your Trench Periscope is killed shortly afterwards by your teammate.
The default key for tagging enemies on PC is “Q”.
Lebel Model 1886 Infantry
- Perform 50 kills with the Gewehr M.95 Infantry
- Perform 20 spot flare assists
A Flare Gun is another gadget exclusive to Scout Class. Scouts have access to 2 types of Flare Gun – Spot and Flash. In order to complete the second objective, Flare Gun – Spot variant is required.
Fire the Flare Gun in the general vicinity of a group of enemies. Search for enemy spawns and/or Conquest Objectives. A spot flare assist is awarded when an enemy you have marked with your Flare Gun – Spot is killed shortly afterwards by your teammate.
In the Name of the Tsar
Assault Class
Model 1900 Factory
- Perform 40 kills with the M97 Trench Gun Backbored
- In a round, perform 5 kills with the AT Rocket Gun
AT Rocket Gun is a standard anti-tank rifle. To complete the second objective, shooting infantry usually results in a one-shot kill. Alternatively, try searching for damaged enemy tanks or vehicles with light armor as you only have 5 AT bullets, which is usually not enough to destroy a tank at full health.
Model 1900 Slug
- Perform 50 kills with the 12G Automatic Extended
- Perform 20 kills with the Gasser M1870 Pistol
SMG 08/18 Factory
- Perform 15 kills with the MP 18 Trench
- Perform 10 kills with the Anti-Tank Grenade
SMG 08/18 Optical
- Perform 50 Kills with the Automatico M1918 Trench
- Destroy 5 tanks with the Anti-Tank Mine
The second objective of this Weapon Assignment is tremendously luck-based. Chances of an enemy Tanker driving over your mines are slim, as mines can be easily spotted, tagged on minimap, destroyed or avoided. The objective also only counts eliminating enemy tanks – i.e. Artillery Trucks or Armored Cars do not count for the progression.
If that wasn’t enough, a tank must be fully destroyed. Not disabled, destroyed. Thankfully, a tank at full health can usually withstand only about 2 AT mines, so I’d recommend placing them in tight clusters. But where?
Choosing at random won’t work, especially when you’re playing on an open map such as Caporetto or Passchendaele. However, there are certain maps where an enemy vehicle is guaranteed to pass through. I’ve outlined a few hotspots where I had the most luck.
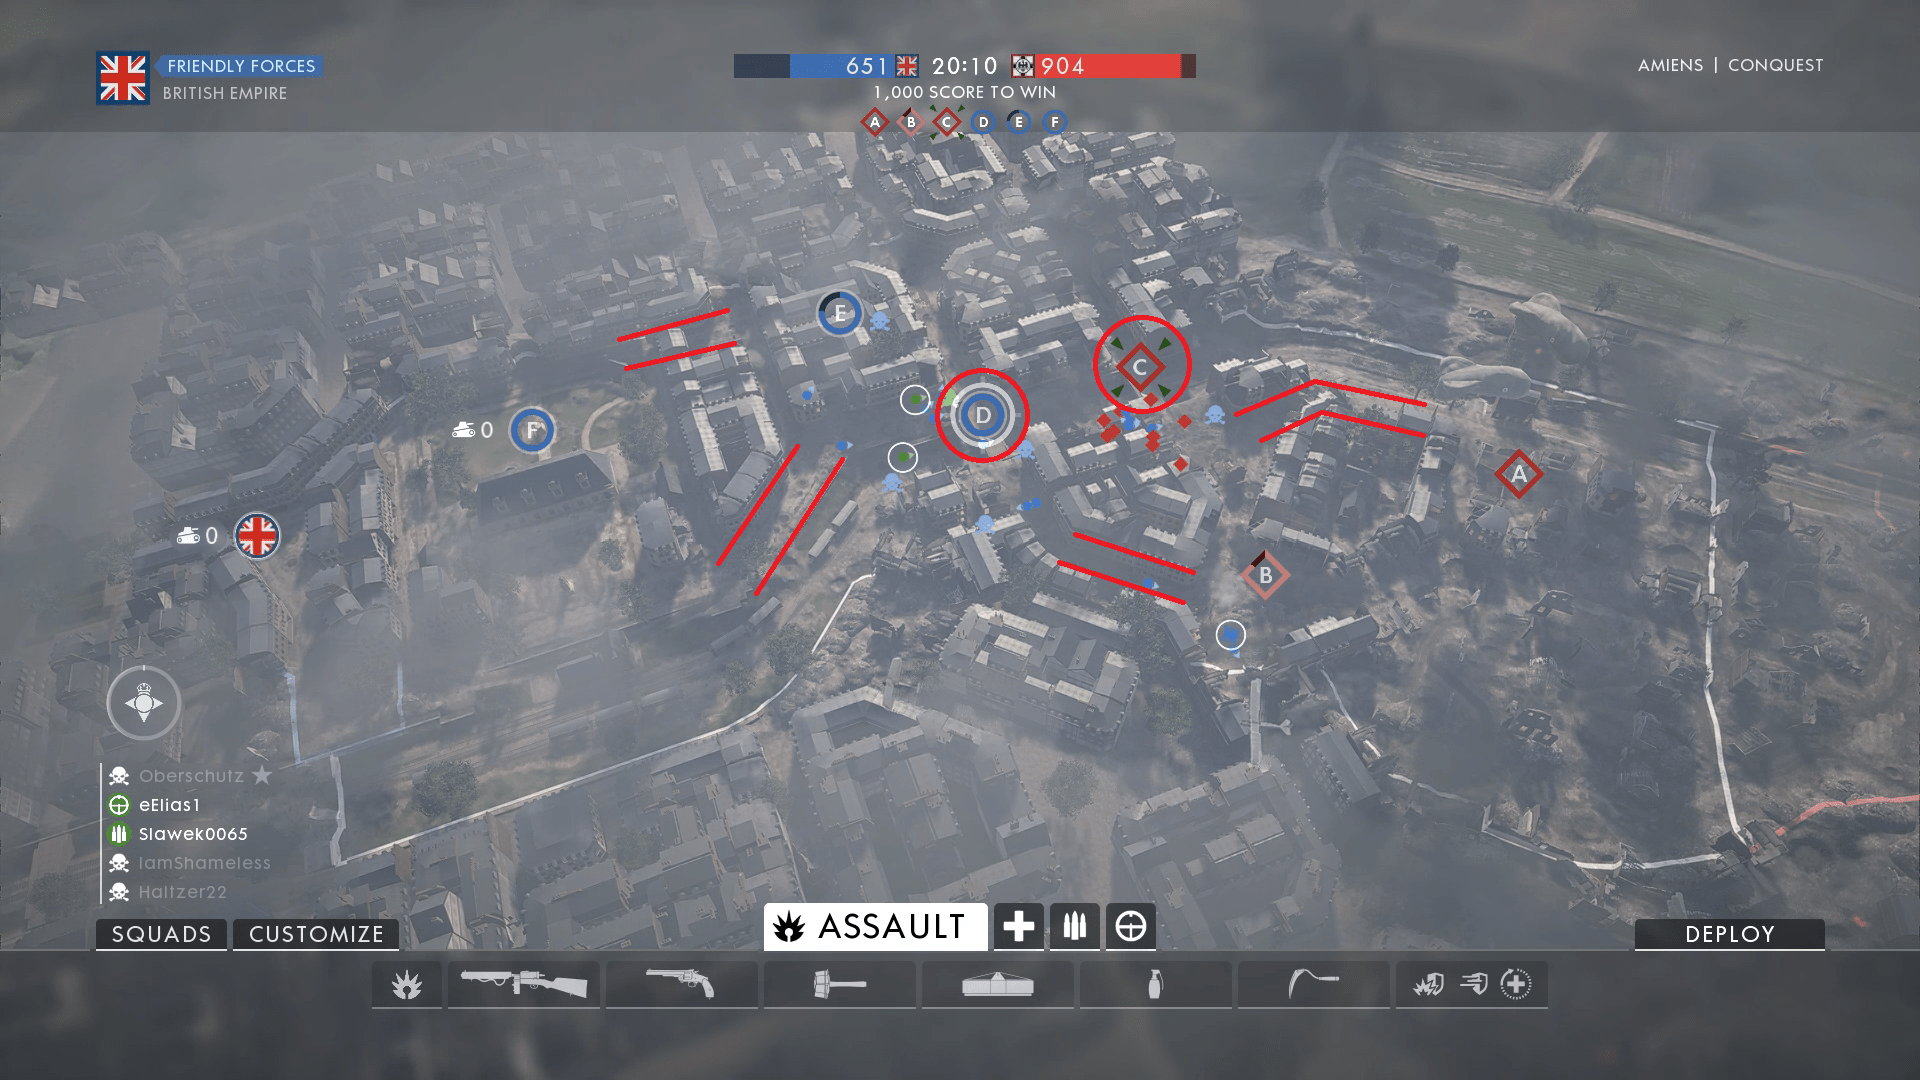
Amiens: Disregarding which side are you on, the central bridges on C and D are always a good spot for AT mines.
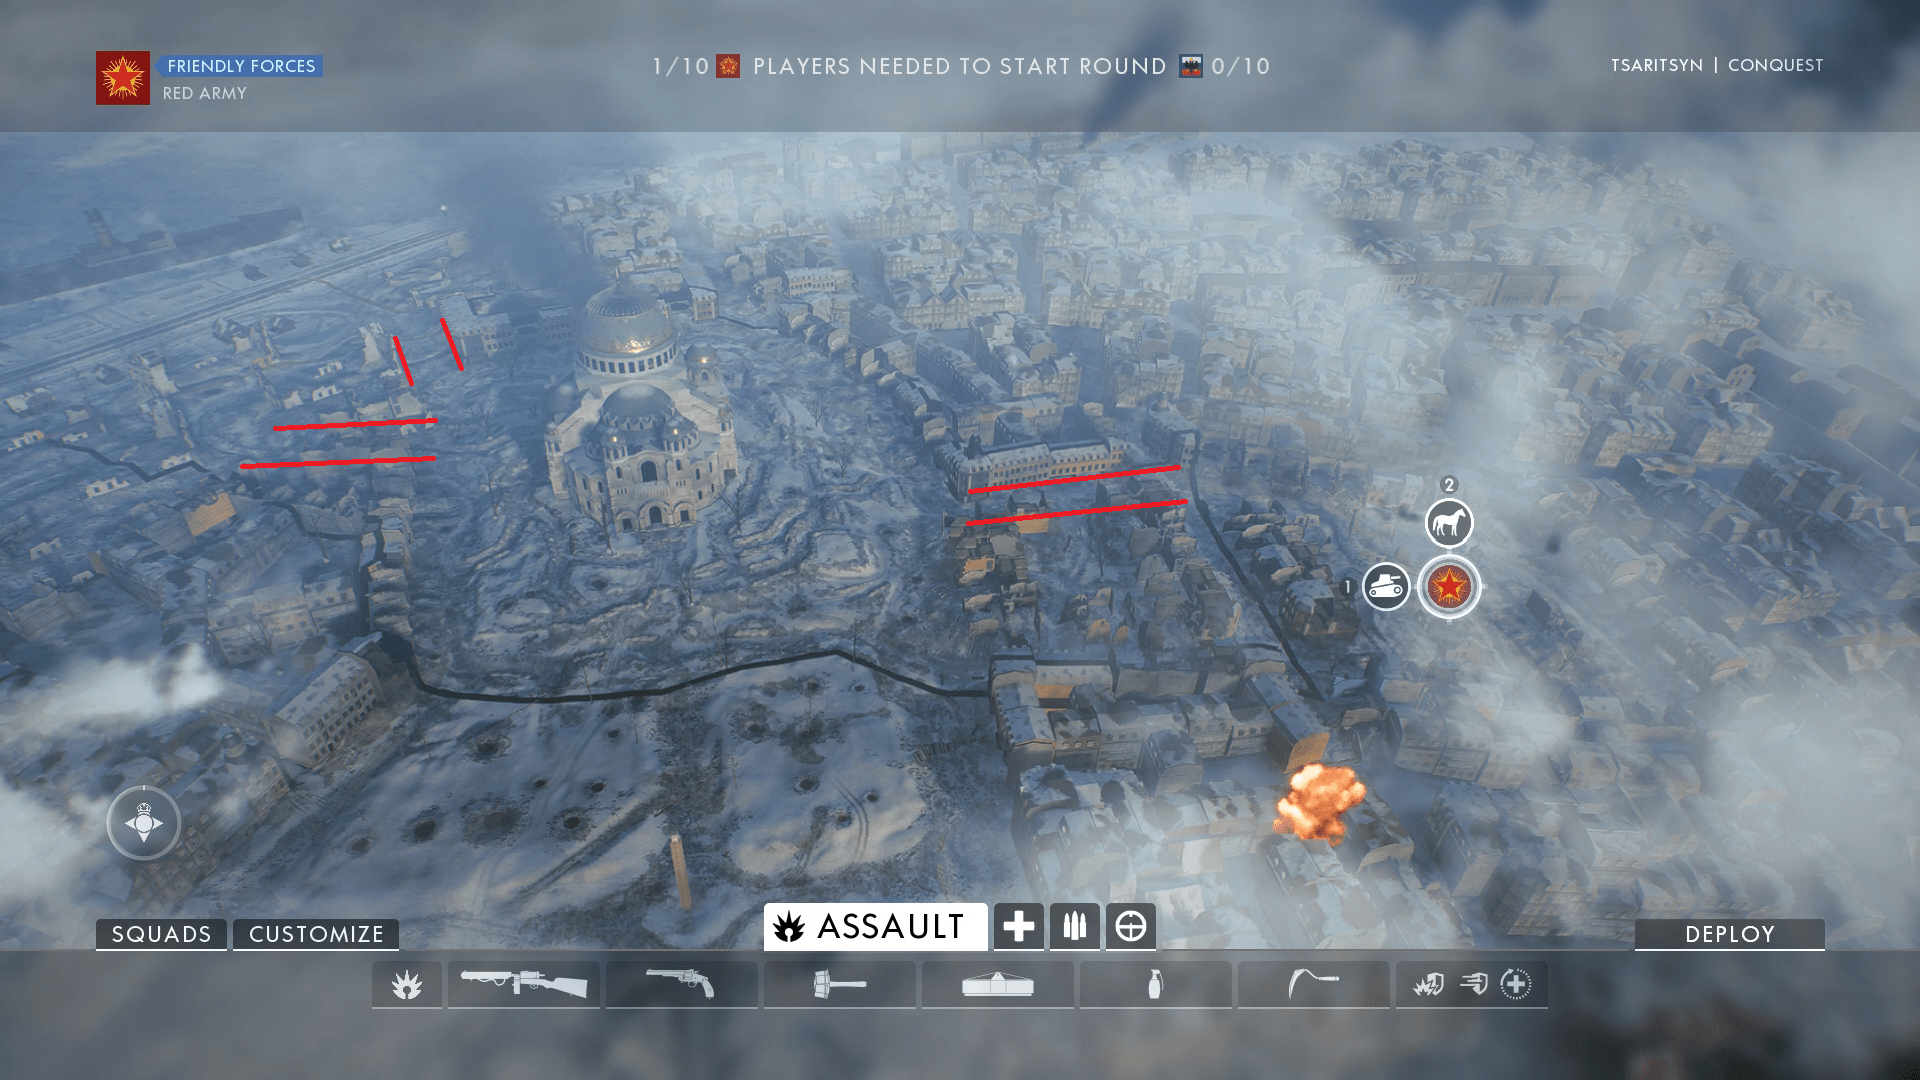
Tsaristyn: You have a much better chance in tight streets near A and C than the open space around B.
Medic Class
Fedorov Avtomat Optical
- Perform 50 kills with the Selbastlader M1916 Optical
- Perform 20 Kills with the C96 Pistol
Fedorov Avtomat Trench
- Perform 40 Kills with the Cei-Rigotti Trench
- Perform 40 squad heals
A squad heal is performed when you heal a player in your squad.
General Liu Rifle Factory
- Perform 40 kills with the Mondragon Storm
- Perform 30 squad revives
A squad revive is performed when you revive a player in your squad using the syringe.
General Liu Rifle Storm
- Perform 50 kills with the Autoloading 8 .35 Marksman
- Perform 30 kills with the Rifle Grenade FRG
Support Class
Parabellum MG14/17 Low Weight
- Destroy 2 airplanes with LMGs
- Perform 20 killes with the Mortar Airburst
Many players seem to have problems accomplishing the first objective. Start by equiping an LMG with a large magazine, e.g. The Lewis Gun. Then, gather other Supports and concentrate your fire at enemy bombarders. They are slow and can’t maneuver very well.
Parabellum MG14/17 Suppresive
- Perform 40 kills with the Lewis Gun Low Weight
- Perform 50 vehicle repairs
Perino Model 1908 Defensive
- Perform 50 kills with the Bar M1918 Storm
- Perform 20 kills with the Repetierpistole M1912 Pistol
Perino Model 1908 Low Weight
- Perform 40 kills with the MG15 n.A. Low Weight
- In a round, perform 10 squad resupplies
Scout Class
Mosin-Nagant M91 Infantry
- In a round, perform 3 headshot kills with the SMLE MkIII Infantry
- Perform 20 kills with the Mars Automatic Pistol
Mosin-Nagant M91 Marksman
- Perform 50 kills with the Gewehr 98 Marksman
- Perform 15 kills with the Tripwire Bomb HE
Vetterli-Vitali M1870/87 Carbine
- Perform 50 kills with the SMLE MkIII Carbine
- Destroy 1 vehice with K bullets
K bullets are most effective against Armored Cars.
Vetterli-Vitali M1870/87 Infantry
- Perform 15 kills with the M1903 Experimental
- Perform 20 periscope spot assists
Sidearms
Nagant Revolver
- Perform 20 kills with the Luger P08 pistol
Obrez Pistol
- In a round, perform 5 kills with the MLE 1903 Pistol
Pilot/Tanker
C93 Carbine
- Perform 40 kills with the FT Light Tank
Turning Tides
Assault Class
Maschinenpistole M1912
- Perform 50 kills with Automatico M1918 Storm
- Destroy 5 boats with the AT Rocket Gun
At first glance, destroying boats with the AT Rocket Gun seems to be almost impossible as AT projectiles travel very slow. Luckily, this objective can be completed in a matter of minutes.
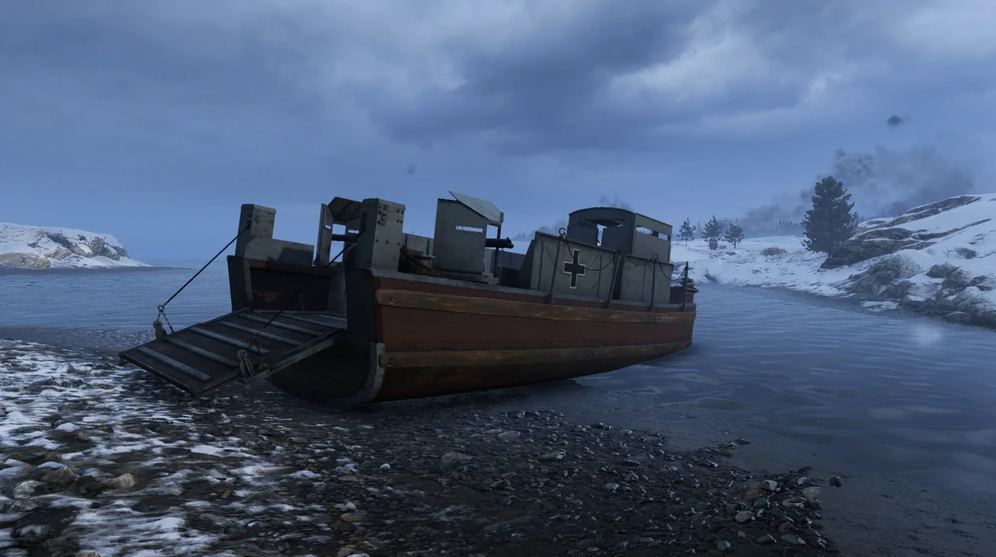
Search for a match of Operations on Cape Helles and spawn as the defenders (Ottoman Empire). Try looking for a match that’s just about to start. Select Assualt Class and equip the AT Rocket Gun. Next, take cover overlooking the beach. The attackers (The British Empire) use small, low-HP landing crafts as spawn points. They can only take about 3 AT shots and count towards the completion of the objective.
A picture of a landing craft. You can also encounter them on maps Albion and Heligoland Bight.
Source: battlefield.fandom.com – [fandom.com]
M1917 Trench Carbine
- Perform 15 kills with sidearms
- Perform 5 multikills
To perform a multikill, kill 4 or more enemies in quick succession. Try targeting tanks, armored cars or boats with full crews or lob a grenade at areas with high concentration of enemies.
Medic Class
Farquhar-Hill Storm
- Perform 25 kills with the M1907 SL Trench
- In a round, perform 10 revives
Farquhar-Hill Optical
- Perform 25 headshots with the Farquhar-Hill Storm
- Complete 20 squad orders
Upon entering a new match, join any Squad or create a new one. A Squad Leader has the ability to give orders to everyone in their Squad to either Attack or Defend an objective. Completing orders rewards bonus XP.
As a Squad Leader, give out orders by holding “Q”.
Support Class
M1917 MG Low Weight
- Perform 25 kills with the BAR M1918 Trench
- Perform 250 vehicle damage using explosives
M1927 MG Telescopic
- Perform 50 kills with the M1917 MG Low Weight
- Perform 1500 points of suppression with any LMG
Suppression points are awarded when shooting near enemies. Becoming suppressed temporarily blurres your vision. You should complete this objective naturally as you play the game.
Scout Class
Type 38 Arisaka Infantry
- Perform 25 counter sniping kills
- As a scout, perform 3 multikills
A counter-sniping kill is perfomed by killing an enemy Scout as a Scout yourself.
Getting 3 multikills as a Scout can be quite inconvenient. I’d recommend playing on servers with 200% bullet damage as this makes any shot from a sniper rifle a one-hit-kill. Also, try using K-bullets as they can easily destroy light-armored vehicles.
Carcano M91 Carbine
- Perform 25 kills with the Gewehr M.95 Carbine
- Destroy 5 explosives
Be on a lookout for enemy land mines or tripwire bombs and shoot at them from a safe distance.
Melee
Naval Cutlass
- Capture 20 flags while in a boat
- Perform 15 kills on swimming enemies
Capturing flags while in a boat might be the hardest objective in the game. Not only very few flags are capturable by boat, you become very exposed and quite defenseless to enemy fire. Fortunately, there is a very easy workaround.
Go to Server Browser and select Full Filter on the right. Then, enable the following filters:
- Game Modes – Conquest
- Maps – Albion, Zeebrugge, Heligoland Bight
- Advanced – Disable Pre-round ON
- Slots – ALL
Now, look for an empty server. Since you are playing on a server with pre-rounds disabled, you are able to start a match on your own, without having to wait for the minimal required number of players.
If this wasn’t enough, the second objective requires 15 kills on swimming enemies. Not to mention you must be extremely lucky to encounter a swimming enemy and get a good shot on them. The best chance you got is Operations on Zeebrugge as the defenders. If your team is doing very poorly, you will eventually reach the last line of defense on land. There is a section of a broken down bridge where the attackers have no choice but to swim across, giving you plenty of opportunities for quick and easy kills.
NOTE: the Ottoman Kilij was added in a later update and thus does not count towards the achievement.
Apocalypse
Assault Class
RSC SMG Factory
- Perform 50 kills as an Assault
RSC SMG Optical
- Perform 50 kills with the RSC SMG Factory
- In a round, perform 300 Vehicle Damage using explosives
Medic Class
Howell Automatic Factory
- Perform 50 kills as a Medic
Howell Automatic Sniper
- Perform 50 kills with the Howell Automatic Factory
- In a round, perform 600 points of healing
Support Class
IMG 08/18 Low Weight
- Perform 50 kills as a Support
IMG 08/18 Suppressive
- Perform 50 kills with the IMG 08/18 Low Weight
- In a round, perform 100 resupplies
Scout Class
Ross MkIII Marksman
- Perform 50 kills as a Scout
M1917 Enfield Infantry
- Perform 50 kills with the Ross MkIII Marksman
- Accumulate 2,500 metres of headshots using Single-Action rifles
Sidearm
Revolver MkVI
- Kill 25 different enemies using Revolvers
I hope you enjoy the Guide we share about Battlefield 1 ™ – How to complete all Weapon Assignments ; if you think we forget to add or we should add more information, please let us know via commenting below! See you soon!
- All Battlefield 1 ™ Posts List


Leave a Reply