
Welcome to X4: Foundations – How to use your own Logos on GeForceNOW
This tutorial guide will show you how to use your logos in X4 Foundations when using GeForceNOW.
GeForceNOW allows you to use your logos
This Guide is for all who play X4 Foundations on GeForceNOW.
GFN Instances run only on closed systems. GFN cannot store your logos in the game’s user folder.
But this guide will show how easy it is to use your logos in GFN.
Great! But how do we do it?
We will create our workshop mod to keep it short. Steam Workshop Mods are available on GFN. This allows us to create our own logos for the game.
But will this flood the Workshop?
No. You can keep the Workshop Item “Private” at least. This will prevent flooding the Workshop, and you can still use the Workshop Item in your own game without spamming it.
That sounds great! How do I start?
The whole process is easy!
You don’t require any programming skills or knowledge. Simply copy and paste the entire Guide to your mod. Even a potato can make their own logos for X4 with this guide!
Checklist
– Your Logo as .tga file
– (My Logo is
.jpeg/.jpg/.png/other – []
Format)
No Problem! You can find the next chapter in this Guide “Create .tga file”
– X Tools
X Tools can be purchased directly from Steam! If you already own X4, then go to your Library.
To view all your tools, go to the “Tools” section. There is the X Tools App.
It’s free and available to you when you purchase the game. Simply download the game to your computer.
– Text Editor (Notepad++ is a free and open-source text editor that I highly recommend. You can also use it.
Windows editor, but I cannot guarantee that it will work)
You have everything? Go to “Create the Mod”
Create .tga file
You can skip this step if you already have a.tga file with your Logo.
First, choose a logo that you like.
The resolution should be 1:1. This means that the heightt and width should match!
This Guide will use 256×256 resolution.
You have found a Logo that is not.tga? Let’s continue!
Now, you need to convert your image file
(.jpeg/.png/.jpg/other) – []
To a.tga File!
This can be done in many ways:
– Use GIMP (, free, open source) software or PhotoShop (premium software from Adobe)
– I won’t provide any links to the Online Image Converter Tool (, so use at your own risk)
– Use a converter software on your computer
Google is a great resource for information if you don’t know how create or export an image file to a.tga.
You should now have a.tga file with your Logo. Next, you can move on to the next step.
Modify the Mod
Step 1: Create the folders
You can create a folder anywhere on your computer. I recommend using your Desktop.
You can name the new folder anything you want. It should be unique to avoid conflicts with other mods that are named the exact same.
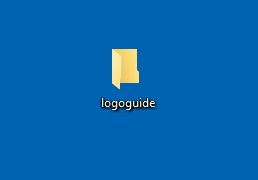
In this Example, we create a Folder called “logoguide”
Now, the result should look like this
Now, we need to create subfolders.
To do this, I need to open the “logoguide” folder that I just created.
We create a new folder inside the folder, MUST to be renamed “assets”
Now, create more folders. The result is the following:
“..\logoguide\assets\fx\gui\textures\player_logos\”
This is what the result should look like now:
Now, we will go back to the “logoguide” folder. Create a second folder called “libraries”
This is what the result should look like now:
All is well? It’s great, let’s move on to the next step.
Step 2: Insert the file(s.tga
Now, we’ll go into the “player_logos” folder that you created under the path
“..\logoguide\assets\fx\gui\textures\player_logos\”
Drag your.tga file(to) into this folder. It should look like this:
(The Icon of the.tga file can be ignored. It depends on the software you used to create that file. This can vary from one user to another)
Step 3: Multiple.tga files (This step is only necessary if you want multiple logos in your mod)
You can repeat Step 2, but you should name the following.tga files as follows:
Logoguide01 (We just created)
logoguide02
logoguide03
And so on…
(You can substitute >logoguide for any other name, but all.tga file names should be the same.
Numbered like 01,02 and 03…)
Step 3: Create icons.xml
Open your Text Editing Tool.
Notepad++ will be used in this Guide.
Create a new file.
You can copy and paste the following code:
<?xml version="1.0" encoding="UTF-8"?>
<icons>
 <icon name="logo_logoguide_01" texture="extensions\logoguide\assets\fx\gui\textures\player_logos\logoguide.tga" tags="playerlogo" height="256" width="256"/>
</icons>
Notepad++: Click in the Top Bar on Code and select XML
Now, color the Syntax and Code.
REPLACE EVERY “logoguide” in this Code with the name and location of your Folders and/or.tga files
And at “<icon name=”logo_logoguide_01” ONLY change the “logoguide” to your .tga file name without the number that it looks excactly like this:
“<icon name=”logo_FILENAME_01”
Now, the result should look exactly like this:
Now save the file as icons.xml in the path: “..\logoguide\libraries\icons.xml”
It should look this way now:
Congrats! Congratulations!
Step 4: Use the Catalog Tool
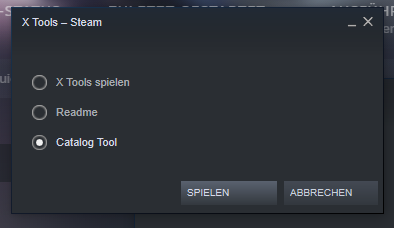
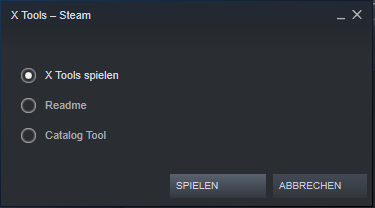
Go to Steam Library and open X Tool.
You will be presented with a Pop-Up window and can then choose the Catalog Tool.
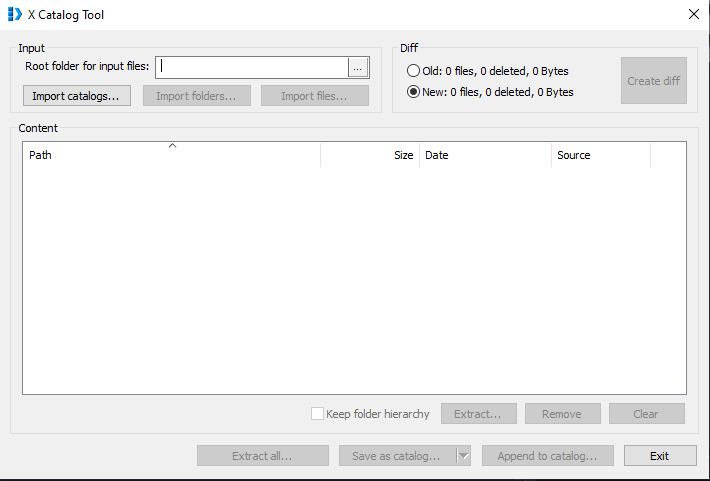
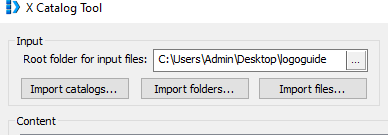
This Window is now available:
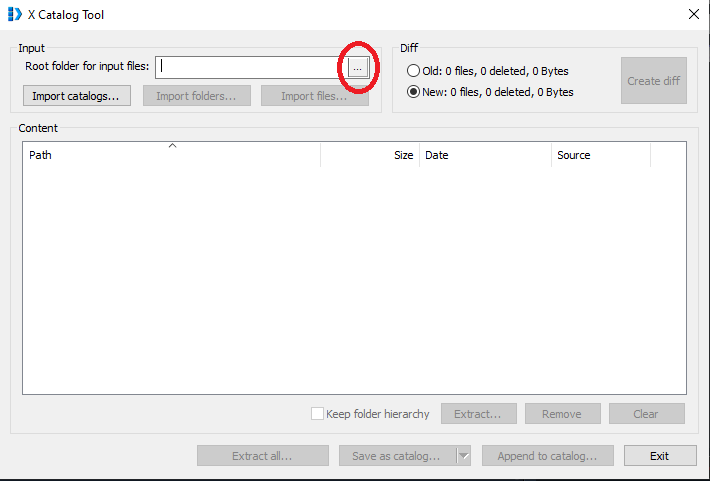
Click on the (button marked with a red circle).
Select the logoguide folder you created and click confirm. Now, the resulting file should look something like this:
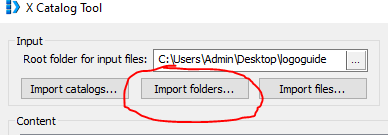
Click on “Import folders …”” as shown in the red circle.
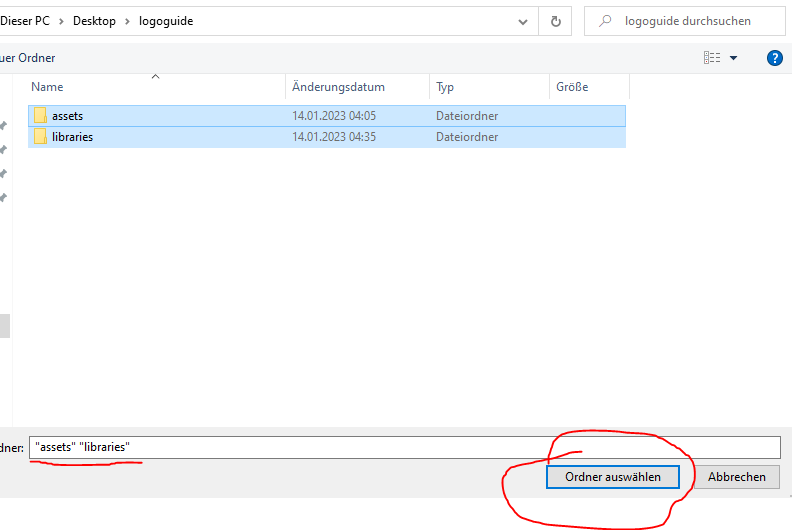
Select the libraries and assets folders. As follows:
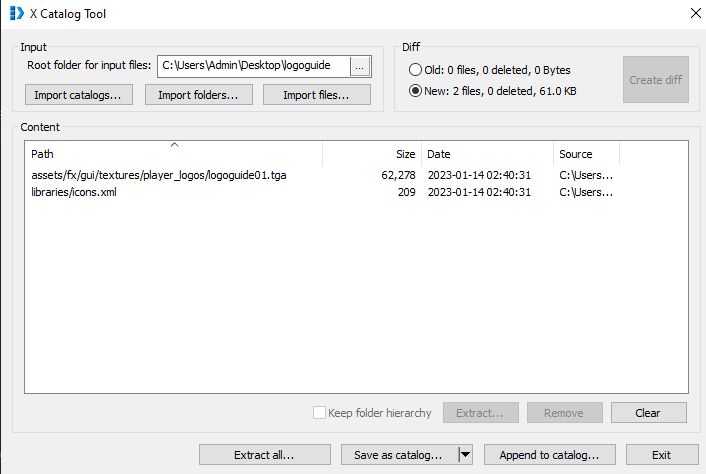
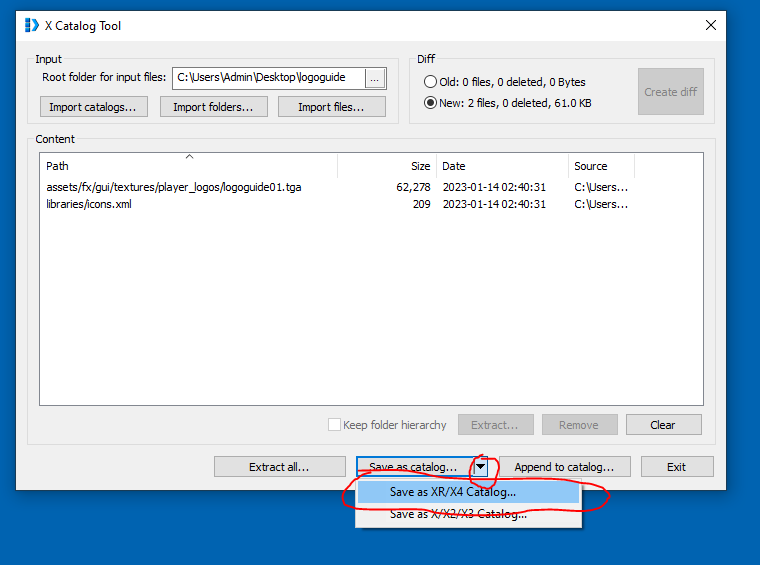
After you have imported the folders, your X Catalog tool should look like this:
Click on the Arrow Down to Save as Catalog, as shown below in red boxes.
Save it as XR/X4 catalog.
I recommend saving them on your Desktop in the logoguide folder.
Give it a name: logoguide (Replace logoguide with a name you choose for your files.)
It should look like this:
Drag the “assets”, and “libraries”, folders from the logoguide folder. To any Place similar to your Desktop. This is how your Folder should look now:
Step 5: Create the content.xml
It’s all there! Great! It’s almost over. Just a few steps and we’re done!
Open Notepad++ once more, and create a new document and set it to XML Code.
You can also copy and paste the code.
<?xml version="1.0" encoding="utf-8"?>
<content name="Choose a Name" description="Choose a Description" author="" version="100" date="" save="0" lastupdate="" id="">
</content>
Only edit “Choose a Name” and “Choose a Description”. This will allow you to add or remove any information.
They can be edited later in the Workshop.
The Result should look like this:
You don’t have to modify any of these parameters. You can leave them as they are.
Now save the content.xml folder to your logoguide folder. It should look like this:
We now have everything we need to upload our mods to the Workshop.
Close the X Catalog Tool.
Upload to the Workshop
Now upload your Mod to the Workshop.
To do this right and make it usable, we need to restart X Tool. However, we now choose “Play X-Tools”.
Now, the cmd Console () appears on your screen.
Just type (to upload the Mod. Make sure you check for Upper and Lower case and include all the Symbols I use)
Steam must be logged in while the X Tool runs.
WorkshopTool publishx4 -path "COMPLETE PATH OF logoguide FOLDER" -preview "COMPLETE PATH OF THE PREVIEW IMAGE"
This could look like this:
WorkshopTool publishx4 -path "C:\Users\Admin\Desktop\logoguide\" -preview "C:\Users\Admin\Desktop\preview.jpg"
Steam also accepts jpg/png images.
You can choose any image that you like. Remember to follow the Steam Guidelines and Rules.
A good image is required to publish your Logo Mod on the Public Steam Workshop. You can choose what you want to make the Mod private and only use it for your own purposes.
After entering the Command, press ENTER
The Console will ask you if you wish to upload. Next, press “y“.
Your Workshop Mod will now be uploaded and available in your Steam Workshop.
Keep in mind that new Workshop Items are available Automatically set to Private
You must make it public if you wish to publish it in the public workshop.
Please don’t spam this Workshop with useless things you wouldn’t use.
Keep them happier in private.
DO NOT FORGET TO SUBSCRIBE to YOUR OWN MOD to USE IT in GFN!
Congrats!
It was possible! You have created your own Logo Mod in Workshop. Now you can play with your logo(or) in GeForceNOW.
If you found this Guide helpful, please leave a comment and a like.
You can ask questions in the comments.
Send me a message on Discord to Norxic8438 for assistance with Errors.
If I have the time, I’ll help.
Additional Information
You can create a Mod that has more than one Image. You must extend icons.xml like this:
This is about X4: Foundations – How to use your Logos on GeForceNOW; I hope you enjoy reading the Guide! If you feel like we should add more information or we forget/mistake, please let us know via commenting below, and thanks! See you soon!
- All X4: Foundations Posts List







Leave a Reply