Welcome to the Volcanoids Modding Guide! These steps will teach you how to make your own basic mod using the official Volcanoids Modding SDK, and how to publish it to the Volcanoids Steam Workshop. Let’s get started!
1. Setting up Unity
First of all you have to download the correct version of Unity. Go to: https://unity3d.com/get-unity/download/archive – [unity3d.com] and download Unity version: Unity 2021.1.20. We strongly recommend installing it with Unity Hub. The Unity version the SDK uses can change without notice from any update and the Hub makes dealing with this easy
1.1. Unity Hub Guide:
- Click on the green Unity Hub button and open in Unity Hub.
- If you have Visual Studio installed, leave it unchecked, otherwise install it.
- If you already have VS installed, be sure to go into the Visual Studio Installer and make sure the “Visual Studio Tools for Unity” component is installed. (Under “Individual Components”.)
- Check Windows Build Support(mono) (On your windows it might not be present, because it is already contained in Unity install.)
- Check Linux Build Support(mono)
- Click Install and Wait for the installation to complete.
Note: Sometimes Unity can struggle with downloading. If there’s a problem with downloading, try restarting unity or your computer.
1.2. Unity Installer Guide
- Run UnityDownloadAssistant
- Click next and accept the license
- Mark Unity as checked
- Mark Windows Build Support(mono) as checked (On your windows it might not be present, because it is already contained in Unity install.)
- Mark Linux Build Support(mono) as checked
- Click next and specify install folders
- Click next and let Unity install
Note: Unity may ask you to install some dependencies during the download like Visual Studio. If you have them installed, you can skip that, otherwise install them. (See 2a just above.)
Everything should be done now.
2. Getting the SDK
In this step we will set up the SDK. You have to have the correct version of Unity installed to make it work properly.
Installing:
- Log in to your Steam account that you own Volcanoids on.
- Go to your Library and click on GAMES tab and check TOOLS
- Find Volcanoids SDK and click Install. Don’t forget to remember the Install Location.
The default is:
Steam/steamapps/common/VolcanoidsModSDK
Running:
- Open Unity Hub, click the Add button
- Navigate to the Volcanoids Mod SDK folder location and select the folder.
- Select your Unity version and run the project
- Wait for Unity to reimport and you should be running the Volcanoids Mod SDK
You can find more info in the Welcome Screen that will pop up.
3. SDK Structure
Before beginning with mod creation, we will take a look at how the project is organized.
3.1. Project Structure
The Mod SDK Structure project is organized into two important folders:
- Asset folder – the folder where all your mods and sample mods will be contained.
- Packages – here lays all the references from Volcanoids itself, that you can explore, copy and use as you wish within your mods. You will also reference them when replacing character skin, weapons sounds, etc…
3.2. Mod Folders Structure
In the mod there’s a structure that you have to maintain. You can try to organize things differently, but it may not work. For the best, and tested, results follow this guide’s structure.
Mod structure:
- All your mods have to be within the Assets folder. Within, there will be one folder for each mod. (Sample mods do not count)
- All your Texts, Materials, Icons, Meshes and .asset files have to be within the Data folder.
- All scripts have to be in the Mod folder, doesn’t matter where, but it’s better to avoid the Data folder.
Your Root folder must contain the following files:
- Data folder
- Mod.asset file – file that connects all your data and scripts together.
- When you are using scripts, you have to add an Assembly Definition file.
4a. Creating your first mod
In this section we will create your first mod.
4.1. Mods window
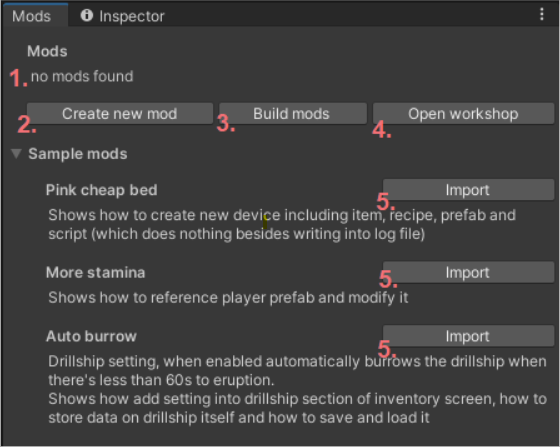
In the mods window you will manage all your mods. If you open the SDK for the first time, the Mods window will already be opened. If the window is not present, navigate to top menu and select:
Window -> Mods.
- Mods– You have currently created no mods, they will appear here as you create them.
- Create new mod – Button to create a new mod.
- Build mods – Button that will build all mods that you have created, and are currently in the project.
- Open workshop – This will open the Volcanoids Workshop.
- Import – Will import the sample mod of your selection. You can re-use them, or recreate them as you wish.
To create your first mod:
- Click: Create new mod. It will bring you to the inspector and create a new mod for you.
- Name the folder as you wish and it will highlight the inspector.
Yay! Your first mod is created!
4.2. Creating Ammo for a Revolver Mod
For demonstrational purposes, we will create a new ammo type for the revolver. Follow these steps:
Let’s create a new Ammo Type:
- Go to: Packages/VolcanoidsAssets/Game/Items/Ammo
- Drag and drop the RevolverAmmo.asset file to your mod Data folder.
- Change the name of the file to RevolverSuperAmmo.
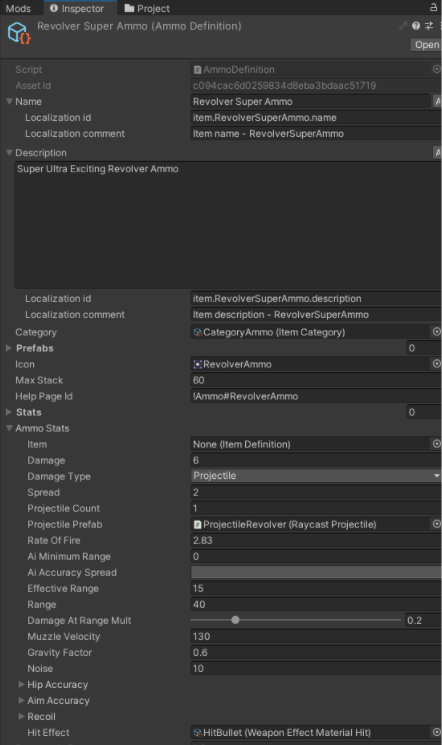
- Click on the file and set the Name to Revolver Super Ammo, expand it and click the A button next to it.
- Expand the description, and write: Super Ultra Exciting Revolver Ammo and click the A button next to it.
- The Item Category should be: CategoryAmmo
- Drag and drop your ammo Icon file into the Mod/Data folder
- Change the item icon in the Icon field by either selecting the circle, or drag and drop icon from the Data folder.
- Note: Your icon has to be TextureType: Sprite (Set it on icon and Apply)
- Expand Ammo Stats and set it up as you wish
- The Projectile Prefab should not be null and should be ProjectileRevolver!
- When you are done it should look like this:
Now let’s create a recipe for your ammo:
- Go to your mods Data folder
- Right click and select Create/Game/Recipe
- Name your file RevolverSuperAmmoRecipe and open it.
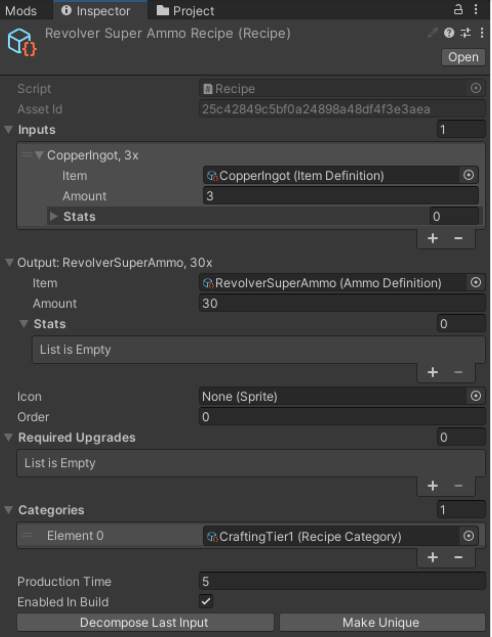
- Expand the inputs field and click the plus. These are items and their amounts that you need to craft your ammo. Select CopperIngot and set the amount to 3.
- Expand the Output window and set Item to RevolverSuperAmmo and set the amount to 30
- Expand the Categories window and add as many categories as you want. It defines where this item is craftable.
- You can also change the production time, this defines how fast your ammo will be crafted in game.
- When you are done it should look like this:
4.3. Mod Asset
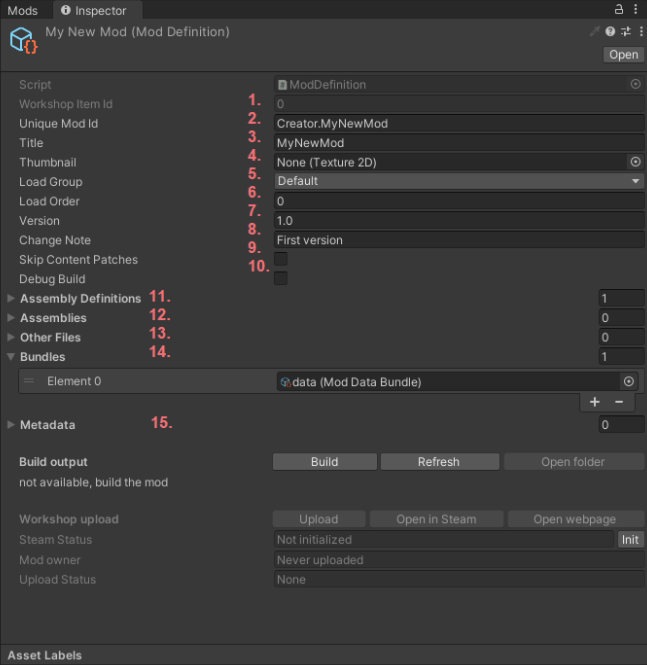
- Workshop Item ID – This is your mod’s ID on Steam
- Unique Mod ID – This is your mod ID in the format: CreatorName.ModName (Has to be unique)
- Title – Name of the mod, that will be displayed in the workshop, game and in all lists. You can use spaces
- Thumbnail – The Icon of your mod that will be uploaded on the Steam Workshop
- Load Group – When your mod will be loaded. (Optional)
- Load order – The order that mods will be loaded. (Optional)
- Version – This is the version number set by you, it is displayed on Steam
- Change Note – What has been changed since the last upload. It will be displayed on Steam.
- Skip Content Patches – Whether to skip the automatic application of *.patch files after your mod is loaded.
- Debug Build – Whether the Mod is debuggable in Visual Studio.
- Assembly Definitions – Here you add All Assembly definitions that are inside the Mod folder. You can use multiple definitions for each mod.
- Assemblies – If you are using 3rd party assemblies or dlls, add them here.
- Other Files – You can attach text files and so on here.
- Bundles – All the bundles that your mod uses. They are children of the Mod.asset file.
We will cover the rest in the building and uploading your mod section.
We will cover the rest in building and uploading your mod section.
4b. Scripting
4.4.Assembly Definitions and handling scripts
You will use Assembly Definitions in case you want to add new scripts.
4.4.1. Creating Assembly Definition
If you add the first script and you don’t have an assembly definition, there will be a button to add one in your Mod.asset.
Go to your mod folder and right click on an empty space.
- Navigate to Create -> Assembly Definition and click
- Name your file. It’s good to name it this way: CreatorName.ModName, since it will be used for scripting.
4.4.2. Setting up Assembly Definition
This will allow you to create scripts next to this definition or in any subfolder. We still recommend not using the Data folder for these definitions and Scripts.
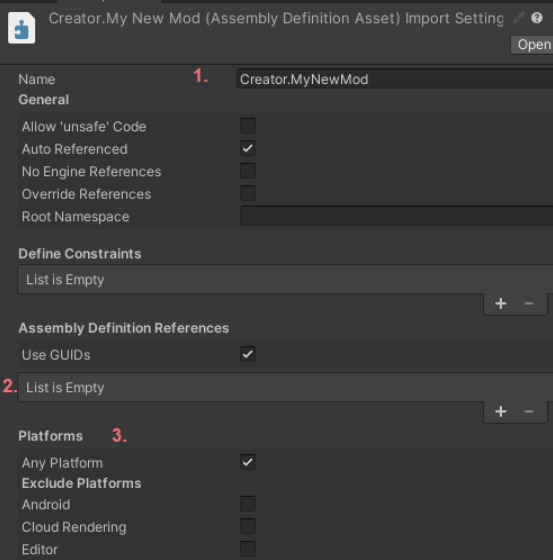
- Name – This is the name of the assembly, it’s better to match it with the file name.
- Assembly Definition References List – Add all assemblies that you will use within your mod assembly. List of most used Assembly Definitions:
- Volcanoids – All game scripts
- Rock.Base – Framework import
- Rock.Unity – Framework import
- Unity.Multiplayer.HLAPI.Runtime – good for networking mods.
- Platforms – You can specify which platform this assembly will be used. (You can also create Editor scripts for you to help with editing your mod, but for the game leave it as Any Platform)
Everything else about Assembly Definitions can be found in the Official Unity Documentation.
4.5 Scripting Ammo
For making your custom Ammo mod work, you have to create a custom script. The thing is, that you need to add your ammo type into an existing RevolverReloader, because now, the revolver does not know your ammo and cannot use it. Follow these steps:
- Create your first script by right click/Create/C# Script and name it RevolverAmmoMod.
- Wait for Unity to finish the compilation and double click the file. It will open up Visual Studio. (If not, navigate the top left menu in Unity -> Edit/Preferences/ExternalTools and select External Script Editor as Visual Studio. If you don’t have it, then you have to install it or use other IDE)
- Then copy and paste the following code into script:
using System;
using System.Collections;
using System.Collections.Generic;
using System.Linq;
using UnityEngine;

//Sample Ammo Mod
//Works with these Assemblies in you mor AssemblyDefinition: Volcanoids, Rock.Base

//This will create asset, that you can add by right click in your data folder and then Create/Mods/RevolverAmmoAsset
[CreateAssetMenu(menuName = "Mods/RevolverAmmoAsset")]
public class RevolverAmmoMod : ModCallbackAsset
{
 //This will update existing weapon reloader of your revolver, reference it from Volcanoids game
 public WeaponReloaderAmmoDefinition weaponReloader;
 //This will be your new ammo type
 public AmmoDefinition ammo;
 //This will backup previous ammo, so after you enter another game, it won't broke
 AmmoDefinition[] backup;


 //This happens on init mod
 public override void Init() {
 //We backup ammunition
 backup = weaponReloader.Ammunition;
 //We register event for reverting changes the mod will make
 ContentPatch.Push(OnRevert);
 //Gets ammunition to list
 List<AmmoDefinition> list = weaponReloader.Ammunition.ToList();
 //Adds new ammo
 list.Add(ammo);
 //Replaces weapon ammunition with old ones with added new one.
 weaponReloader.Ammunition = list.ToArray();
 }

 //Function created by you to revert all changes after you stop the game
 private void OnRevert() {
 //Sets ammunition back to backuped one
 weaponReloader.Ammunition = backup;
 }
}
- Wait for it to compile
- Navigate to your Data folder and right click follow: Create/Mods/RevolverAmmoAsset
- Into RevolverAmmoAsset add reference RevolverReloader from Volcanoids game
- Into RevolverAmmoAsset add reference of Your ammo from your mod.
You are done with Custom Ammo Mod.
4.6 Bundles
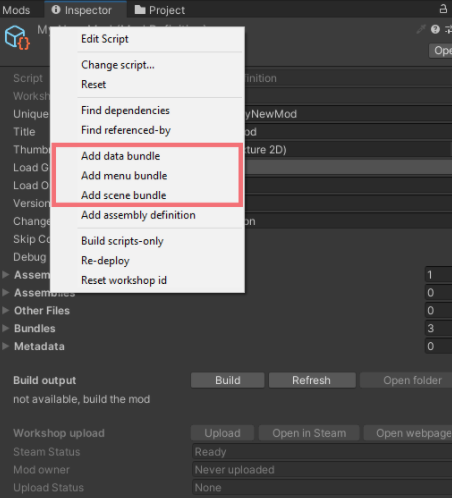
In Volcanoids, there are 3 types of bundles.
You can create bundles by right clicking on the mod name.
Right click context menu
Hierarchy of MyNewMod.asset
- Data Bundle – All data from the data folder or other folders like materials, models, textures, .asset files etc…
- Menu Bundle – Contains assets required for modding the main menu, it cannot contain recipes, module prefabs etc…
- Scenes Bundle – Contains only scenes, for example when loading scenes additively, or loading scene as main scene.
4.7. Set up everything correctly
To build and upload your mod correctly you have to follow these steps:
- Create a mod
- Go to the Mod and change the Unique Mod ID to: CreatorName.ModName
- Set a Title
- Set a thumbnail (The Icon has to be type Texture2D or Sprite and has to be within the mod folder, also better in .png format.)
- There has to be default Data bundle set up
- If you have scripts, you have to add an Assembly Definition and add it to the AssemblyDefinitions List
- Optionally,
5. Building your first mod
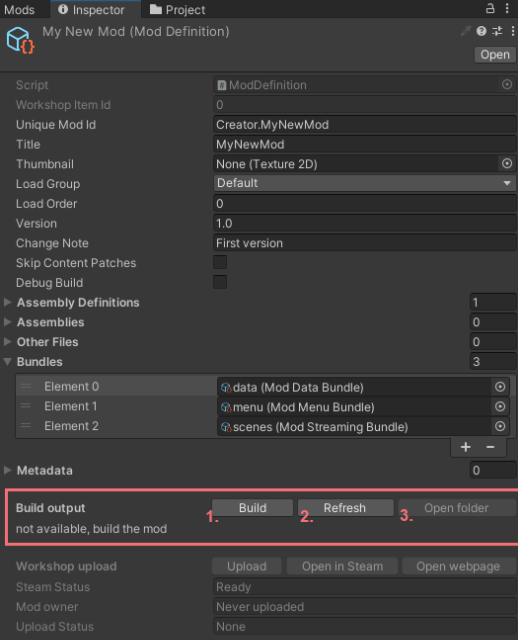
So if you have everything setup correctly, you can hit the Build button in the mod file.
Mod building section
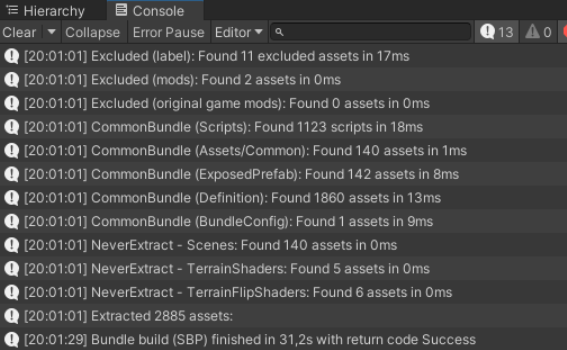
Wait for it to complete and take a look in the Console for the errors. If there are none, your mod is successfully built.
Image Description:
- Build– Builds the mod
- Refresh – Refreshes build data
- Open folder – Opens folder with your mod built.
Note: Build time depends on how strong your machine is, as well as how many objects and scripts you have inside. It may take a while, no need to panic. An Empty mod takes about 2 minutes on an average machine.
A successfully built mod should look like this.
Also Inside the building info there should be the contents of your mod and manifest.json
6. Uploading your first mod to the Steam Workshop
Now that you have successfully built your mod, we can move to uploading it to Steam. To make publishing to Steam Workshop work properly, you have to have spent more than $5 on Steam, and you have to have Steam Guard enabled in your Account settings.
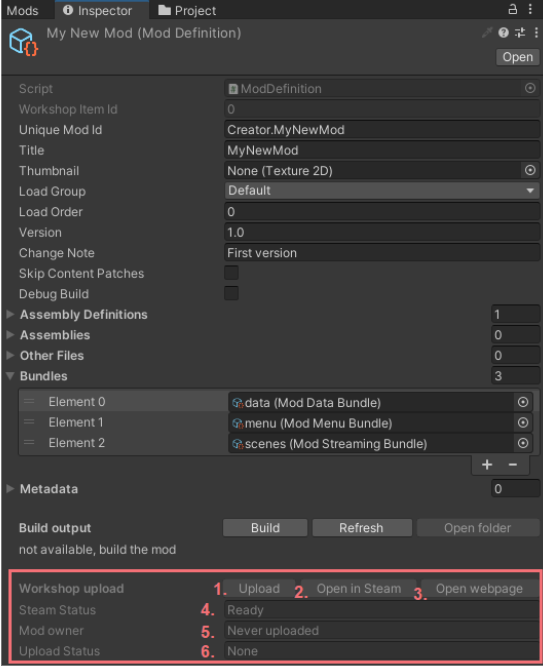
Steam Workshop uploading section
- Upload – Hit to upload your built mod to the Steam Workshop.
- Open in Steam – Opens Steam to your mod page.
- Open Webpage – Opens a web browser to your mod page.
- Steam Status – Shows Steam’s status. When Ready, Steam is initialized correctly.
- Mod owner – Displays who uploaded the mod.
- Never uploaded – mod has never been on steam workshop.
- You – you are the owner
- Unknown – owner is someone else
- Upload Status – When uploading it will show status. Firstly preparing and then uploading.
Tada! Your mod is now on Steam!
7. Steam Workshop Mod Settings
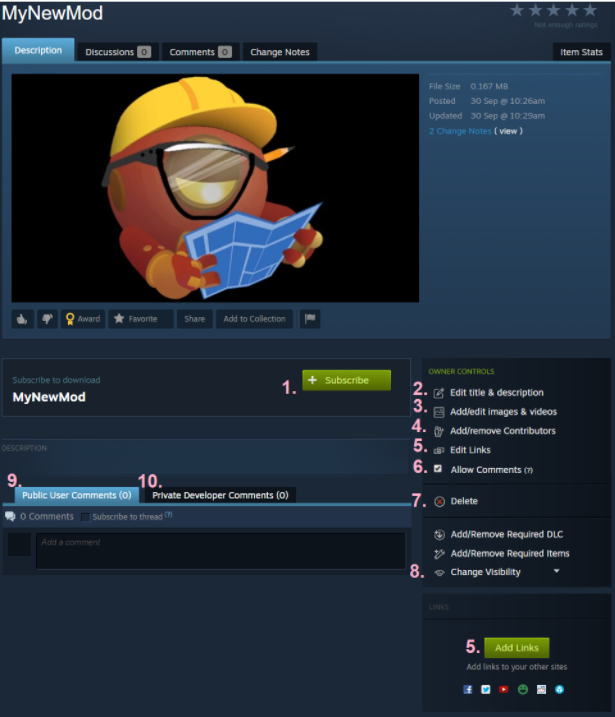
In this section we will take a look at settings for your mod. It’s necessary for uploading the mod. Click on the Open in Steam, or Open webpage button in the Inspector with your mod selected to open the Workshop.
- Subscribe – Everyone who would like to download your mod and play it, will have to subscribe to the mod.
- Edit title & description – Edits the title of the mod and it’s description. Here you can say something about your mod.
- Add/edit images & videos – You can add images and videos to your mod to describe it more.
- Add/remove Contributors – More players can contribute to the same mod.
- Edit Links/Add Links – You can manage your mods social media links
- Allow comments – Will enable the comment section for all users.
- Delete – Here you can remove your mod
- Visibility – A Mod can be:
- Public – Available to anyone within the workshop
- Friends-only – Only you and your friends can subscribe and view the mod
- Hidden – Visible only to you
- Unlisted – Only people with the link can edit
Public Friends-only Hidden Unlisted
- Public comments – Anyone can comment your mod
- Private dev comments – Developers can comment your mod
For More Information, Check out Steam’s Documentation.
8. Testing the mod
So we have built our mod, now let’s test it.
8.1. Testing a local mod
Testing locally without uploading to the workshop is simple. Just follow these steps:
- Build your mod (Section: 5. Building your first mod)
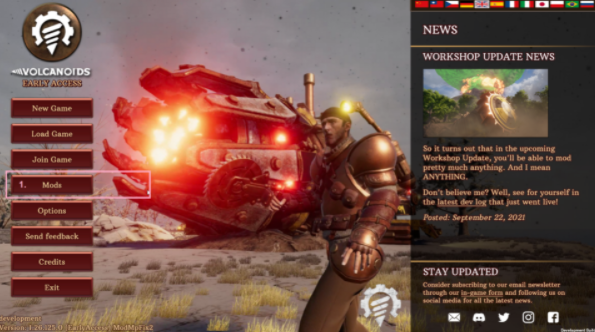
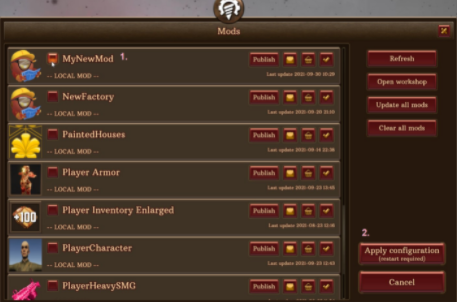
- Run the Volcanoids game
- Click on the Mods Button (1.)
- Click the checkbox (1)
- Click Apply configuration (2)
After you click Apply Configuration, your game will be force restarted. Then all your selected mods are applied and you can run the game normally.
8.2. Testing through the workshop
Testing with steam is as simple as testing without it. You just need to follow almost the same steps:
- Build your mod (Section: 5. Building your first mod)
- Upload your mod to Steam
(Section: 6. Uploading your first mod to the STEAM Workshop) - Run the Volcanoids game
- Click on the Mods Button
- In the mods folder click the checkbox next to your mod
- Click Apply configuration.
(Images are in Section: 8.1. Testing a_local_mod)
9. Updating the mod
Updating your mod is easy. It’s the same process as building and uploading mods. Just a few steps:
- Change whatever you want in your mod
- Don’t forget to change the version and change note in the Mod Asset.
- Build your mod (Section: 5. Building your first mod)
- Upload your mod to Steam
(Section: 6. Uploading your first mod to the STEAM Workshop)
You are done and the mod is updated.
10. Republishing the mod
If you have accidentally or intentionally deleted your mod, don’t worry, you can reupload it. Follow these steps:
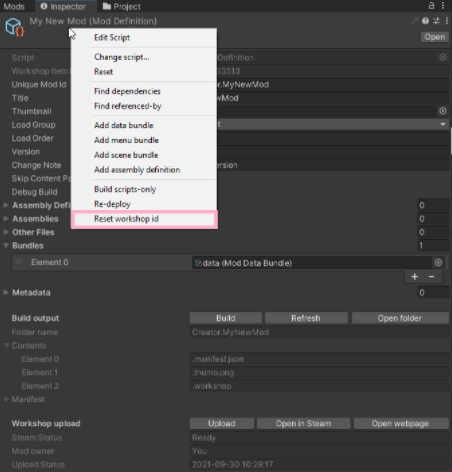
- Right click on the mod name
- Click the Reset workshop id button
- Build your mod (Section: 5. Building your first mod)
- Upload your mod to Steam
(Section: 6. Uploading your first mod to the STEAM Workshop)
Reset workshop id button
Hope you enjoy the Guide about Volcanoids – How to Make Mods – Tutorial Guide, if you think we should add extra information or forget something, please let us know via comment below, and we will do our best to fix or update as soon as possible!
- All Volcanoids Posts List



Leave a Reply