This game is hard, and going in with experience from games such as Kingdoms you expect a very different experience. I hope that through this guide I can rebuild any lost confidence after a spectacular defeat and reduce the stress of realising you need to manage so much more than similar games.
I’ll be adding to this guide over time as I work through the missions.
Please feel free to give any feedback or your own findings in the game.
Introduction
Some of the things that set this game apart from it’s competitors that you need to keep in mind:
Micromanaging
Your people are brain dead, I can only assume this is a side effect of the pink gas but they have no ability to think for themselves. You as the player need to run between the two fronts and ensure your people are doing things, they can stand near a lootable crate and they won’t even think of touching it unless they are told to.
Slightly less micromanaging, but not much
One thing you don’t need to worry about is that your people at least have some self preservation instinct and will run back to the closest wall if outside at night, and retreat to the next layer of wall when it’s destroyed.
Death and Destruction
Most important to keep in mind is that you will die, you’ll die after spending an hour micromanaging your people, slowly building up your base and carefully controlling your spending; and that’s okay.
When you die you get some upgrades and access to new buildings.
Gameplay tips:
Night:
The night lasts just shy of 2 minute on normal and seasoned, around 1:30 on Nightmare
Every night you get attacked by ever stronger waves of enemies. You’ll know the attacks are done when the pink fog starts to dissipate. Thus, even if it’s still night time so long as the Fogs gone you can send your people out to do jobs at night, once finished they will run back to the walls because it’s still night though.
Exploring the Fog:
Don’t, unlike Kingdoms where all enemies come in one wave and spawn at the farthest point of the map, in this game they spawn about 50ft out from your walls and will double back to attack you.
Bonfires:
Stopping for the few seconds to rebuild your stamina works out quicker than just walking on, so spare a second to catch your breath.
Mushrooms:
While it doesn’t save much time, if you build a wall then any mushrooms now in your area area immediately dug up and become food for collection, same doesn’t happen to scraps i’m afraid.
Buildings:
Annoyingly you lose a unit to man the station, but this removes them from your total population at least.
Character Selection
When starting up the game before selecting a level you can select your character.
Ivan
I’d suggest the best starting character, every 5th shot is explosive dealing more damage to enemies. In your first game your people are weak and your walls are a pile of pallet boards so you will need to be backing up one wall each night, if not both; extra damage makes this easier.
Anna
She gets a stamina boost when picking up food but her gun is single shot; having stamina is a huge boost in this game but the amount you gain is pitiful, her gun is fairly powerful though and can kill standard mutants quickly.
Units
Your units
In the game you have access to 5 units, I’ve included a short description of each and guidance on them.
Dwellers
These are the base class of your units; they can gather, build and repair any walls they are assigned too but other classes do each of these jobs better, so your going to want to change most of these to the other classes asap, as they don’t get any upgrades themselves and are pretty weak.
To return a unit with a class to a dweller (you may have too many engineers and want another worker) head to the workstation just left of the generator and they will trade in their class returning to the base dweller class.
Engineers
These are vital for your survival so as soon as you can get one researching. These units research, repair walls and build faster than the rest, but cannot do combat.
As the game progress they unlock the following abilities:
- Open doors – they bash open doors in the side of the tunnel leading to special rooms full of loot.
- Auto turret – Added defence to your walls, while an engineer is deployed they shoot oncoming enemies.
- Shields – When you get to shields you can use an engineer as a personal bodyguard to carry a shield for you. He stays in front of you and cannot be placed on a wall to help defend with his shield. These are the only viable way to kill of the mortar type enemies.
Diggers
Far better in combat than your dwellers, they also get upgrades to gather faster, trade off is they cannot repair walls and build very slowly.
These guys are used to clear rubble away in the tunnels which open building slots, also they can dig up grabs for food later on, and destroy the eggs.
At a certain point they start levelling up in accordance with how long they’ve been around (1 rank every 5 days)
Stalkers
Tool tip states they excel at protecting walls and can gather but slowly. Still testing these
Snipers
Tool tip states they do alot of damage but have a low rate of fire. They are great at protecting walls from large mutants
NPC’s
Trader
He is your lifeline early game for scrap, research vials and new recruits, but be aware he is on a timer so the longer you take before sending him back down the tracks the longer it will be before you get this much needed support. Be advised the unit he drops off doesn’t stop if your at the population cap which is great.
Once you build the recycler he drops off some extra scrap each visit.
Tip: Between his visits make a point to gather up the food you need ready for him.
Tip 2: As soon as he arrives send the new worker to collect up the scrap so you can send him back down the tracks asap.
Tramps
These are unclaimed dwellers, give them an order to claim them, note you need to have enough population space to take them in, so be sure to build enough tents.
Technology
These are flat out bonuses you get with no choice like bonuses, they occur at certain points in the game.
Diggers
Diggers gather supplies faster
Durable walls
You can now build more durable walls
Durable walls 2
You can now build more durable walls
Warehouse
You can build a warehouse. The merchant will leave more scrap. The speed of looting scrap near the warehouse is doubled.
Doors:
Engineers can break open doors.
These doors unlock rooms with loads of loot but a big monster to fight too, note you can loot them first.
Auto Turrets
Auto turret – an imposing weapon against creatures. Auto turrets are automatically deployed while engineers are deployed to a wall.
Bonuses
Triggers:
- Starting up the Generator
- Expanding to 6 walls total
- Building the warehouse
- Upgrading the generator
Bonuses
Agitator
For the next two trips the merchant brings an additional follower. For each dwelling at the 4th level one tramp will come to base.
Comment: don’t go for this one, it’s a small boost for a far off payout. You only get 2 extra characters in the first few days, you really don’t need them and by the point your at tier 4 housing.
Engineering approach
The merchant will bring an additional engineer next time. Engineers will build faster and place two turrets instead of one after researching the appropriate tech.
Comment: This one is great, the double turret is a powerful buff and a big help.
Flash-Bang Traps
A flash-bang trap will be placed at each wall. The trap will be triggered when the wall’s health falls below 30%. Once triggered, the trap stuns enemies for a short time.
Comment: Really powerful, especially if you are defending a wall and the flash-bang goes off, shoot a few rounds then retreat back behind the next walls.
The Last Stand
Mutants attacking the generator will be blown up by a mine.
Comment: This one’s a push, it’s certainly handy but is probably only going to delay defeat by a few seconds if your walls are broken and your people dead the closest enemies to the generator blowing up won’t save you.
Sorting
The warehouse is replenished with 1 scrap for every second shield, mine or Molotov cocktail produced.
Comment: This is a pitiful trickle that isn’t enough scrap often enough to take. I can’t think of a situation you’d take this as the alternative bonus will always be better.
Barricades
The outer walls will be reinforced with a tire barricade before each nightfall. Barricade Durability will be equal to 50% of the wall durability. Barricades will reduce explosion damage.
Comment: Get this, it’s amazing. It’s auto replenishing, guaranteed to be used every night, reduces explosive damage done to walls. Probably best bonus in the game.
Scientific Approach
The cost of all future technologies will be reduced by 1 blue flask. Walls will become 5% stronger for each technology
Comment: Powerful if you’ve been keeping up with tech, an immediate 20% boost to wall strength is great. further testing required to see if it’s 20% of total health or base health (i.e. do the barricades increase this)
Industry
Tools, Shields, Molotov cocktails and mines will be produced 30% faster. When full, the workshop will generate scrap.
Comment: Not bad, I’d pick this over Sorting but not great. Your workshop won’t be full as often as you think, and it takes a full cycle of production to make any scrap.
Leader
Followers work faster when close to the commander and gain significant resistance to all types of damage.
Combat Training
The merchant will bring an additional digger next time. New diggers get veteran status immediately. Diggers clear rubble faster. Dash will consume less energy (thanks @Rodri964 for detailing)
Comment: This one’s pretty good, but if you’re caught between this and ‘Engineer approach’ I’d go engineer. Your workers will get to Veteran eventually anyway.
These two appear to be triggered by the stalkers first journey to the surface:
Civilian supplies
Gain several blue flasks and medicine. When near death, the commander will throw a flash-bang grenade to stun mutants and will heal himself. This ability can be used once.
Comment: This ability would be great if not for it’s one usage. Some extra resources are nice but this is really weak.
Army Cache
Gain several mines and 4 Molotov-cocktails. The mines will be placed both sides of the generator.
Comment: great, if you haven’t got mines earlier then this is a good opportunity to.
Scenario -Electrozavodskaya

Difficulty levels:
Normal:
no modifiers
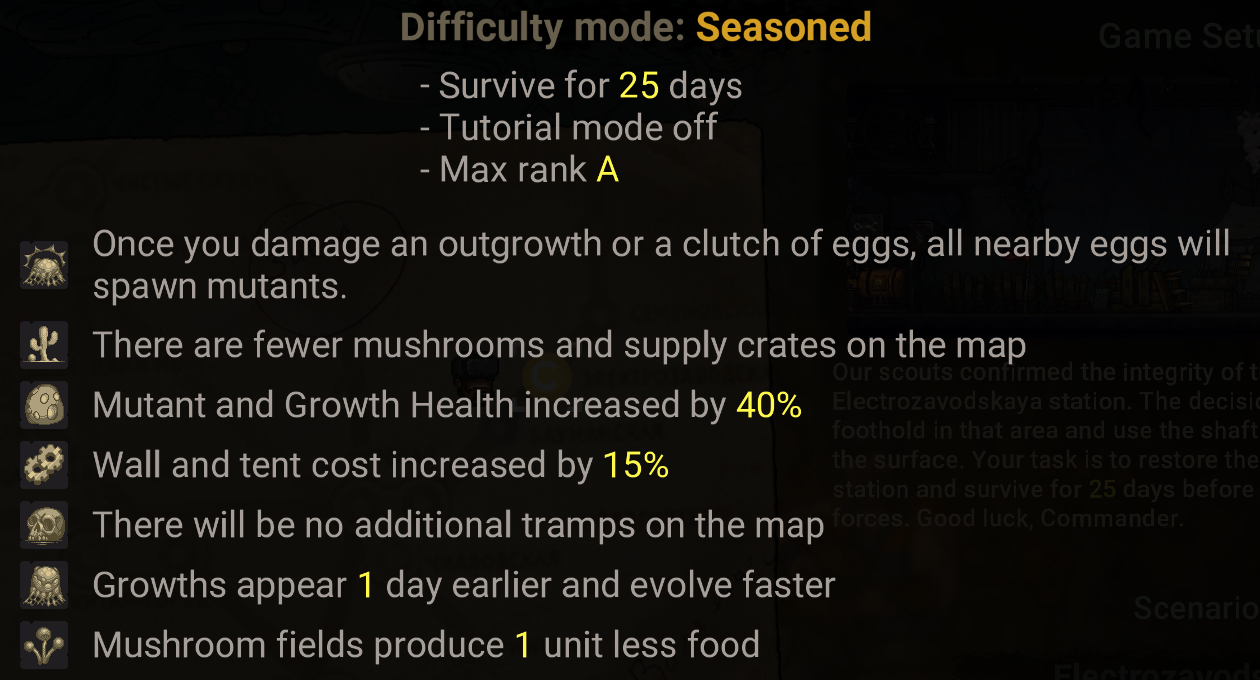
Seasoned:

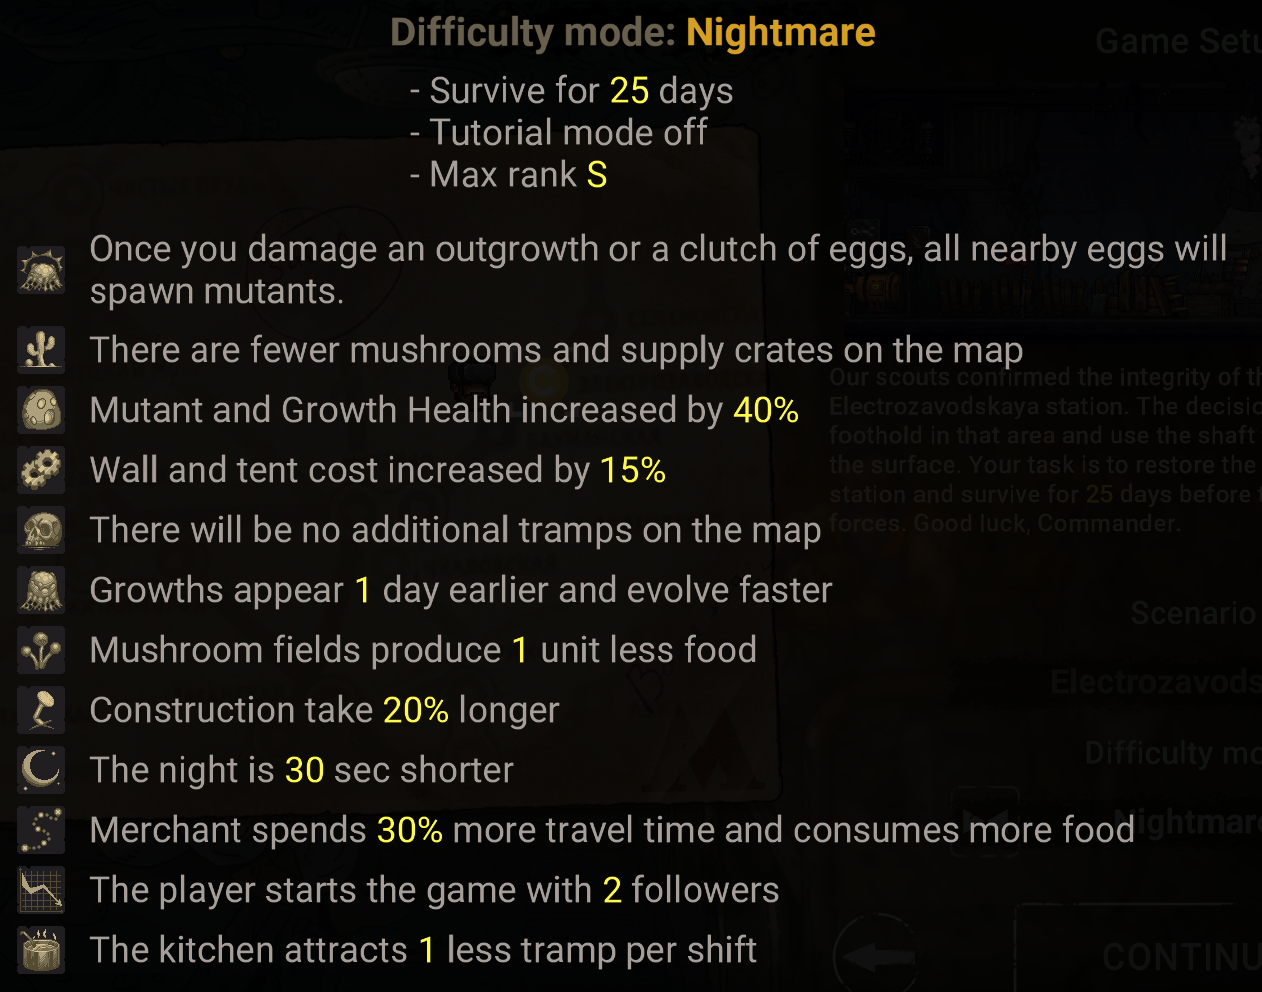
Nightmare:

As you can see at nightmare there are slight trade offs, you get a slightly shorter night but overall it’s all stuff that’s going to make the game harder.
Mission Goal:
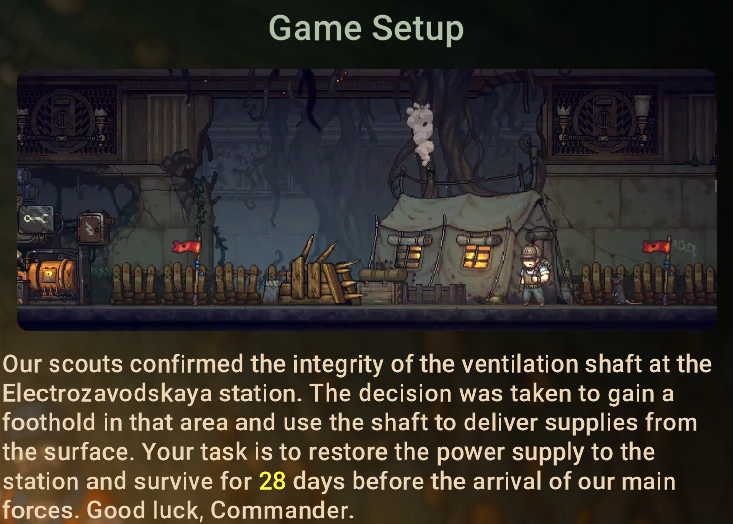
Survive 28 days
Sub goals:
Survive 7 days (there is a wave from the right on day 6)
Survive 18 days (there is always a big wave of enemies from both sides at day 17, but there are ways to reduce it)
Things to note about the level:
Headed right are two doors (quite far apart), once you unlock the engineer tech you can open these. Also outside the first is a cowering Dweller that will join if you have the population capacity.
This first door has a pile of loot, dweller and a big enemy to fight beyond that. Use your workers to dig it up, as per the tool-tip methodically pull them back when he goes to attack, then send them back in, just before it dies a wave of enemies drop down to attack you.
Once defeated you’ve got more crates to loot and open up a shaft to the surface where for a huge cost of food they get you scrap and on the second visit fuel.
The second just has loot and a dweller, potential Easter egg one of the dead guys in here looks like Marco from Metal Slug in zombie form.
Once you venture so far into the level a bridge is formed of tentacles / vines on the far right side, quickly go to it for a free stalker unit.
Far off either side of the tunnel is an opening, for a small mountain of scrap you can have an engineer close it up, doing this before day 17’s raid will make it a lot easier.
First play through
Rolling in on a burning mining cart this is your first mission and includes the tutorial; you can skip the tutorial by holding ‘s’ at the start of the game. As Plantszaza points out time is stopped during the tutorial, so when playing on normal that puts you in a better position sooner.
Following the tutorial you want to gather as much food and scrap in the surrounding area, don’t worry about leaving your people unattended as they will return to the walls at night.
Each time the merchant returns he will bring you another dweller as long as you’ve got population capacity for them.
Keep one person as an engineer to research, have at least one digger at each wall with a view to upgrade your dwellers soon to diggers too.
Keep exploring further out, mushrooms pop up every day in the early areas close to yours base, but later you will be relying on the worms / grubs.
Build your walls, make sure to build the bonfires and houses between them too.
Trader
He is your lifeline early game for scrap and new recruits, but be aware he is on a timer so the longer you take before sending him back down the tracks the longer it will be before you get this much needed support.
Tip: Between his visits make a point to gather up the food you need ready for him.
Tip 2: As soon as he arrives send the new worker to collect up the scrap so you can send him back down the tracks asap.
People:
You’ve got a few types of people, early game you will only have 3, but this expands further on.
Generally you are going to want your population split as such:
- 1 Engineer – to do constant research
- 2 Engineers – one at each front
- 2 Diggers or more – at least one at each front
- 2 Dwellers – less important and probably want to swap for workers at the earliest chance.
Later in the game your going to want to replace your dwellers and diggers with Stalkers, and just keep a few diggers on hand to do the digging and foraging. Once you unlock snipers, one or two on each wall help get rid of the bigger enemies.
I’d advise as the different workstation open up to put an engineer on them, Note these are unlocked on your second play through.
Achievements
Here is a list of all in game achievements, where possible I’ve added a comment on how to get them.
First start
Build a generator
Comment: You get this at the beginning of the game.
First blood
Kill one mutant
Comment: On the first night just shoot one of the mutants attack, unsure if a kill by one of your units count.
Skirmish
Kill 50 mutants
Comment: Pick a wall to defend each night and over time you’ll get this.
Battle
Kill 100 mutants
Comment: Pick a wall to defend each night and over time you’ll get this.
Settlement
Upgrade the generator to the second level
Comment: As you play the game once your several days in the upgrade opens up.
Gardener
Kill the flower
Comment: It’s in the first room to the right, you need the engineer tech to open doors and workers to actually do damage.
He’s lost!
Survive the first wave
This comes on day … and is always from the left so when warned of pool your resources that front leaving a token force the other side.
Note: The waves only come at night, but the icon will be there for a full day before hand.
Fully Armed
Build all workshops
Comment: This gets pricey for the final two workshops but should be achievable in normal play.
Marathon runner
Walk 42,195 meters
Comment: this should come through regular gameplay
Survivor
Pick up the stalkers on the other side of the bridge.
Comment: Once you reach far enough down either tunnel the bridge is formed, travel over it and a stalker joins your ranks.
Fuel
Get fuel
Comment: Once you unlock the first door on the right side, send up stalkers, wait a day or more and send them again when they return they bring fuel. (thanks to Platszaza for the info!)
Fortress
Upgrade your generator to the third level
Comment: Combines with fuel and costs alot.
Carnage
Kill 1000 mutants:
Comment: Just keep killing them every occasion, will trigger soon enough.
Bad luck (secret achievement)
Comment: unsure
Let’s go!
Take a ride on a trolley
Armoured train
fully arm the trolley
Well done!
Survive the second wave
Comment: Comes on day 17, still working on guide
Survived!
Survive the third wave
Comment Comes on day 27, still working on guide.
At any cost (secret achievement)
Comment: When you unlock the first door on the right, defeat the plant and send up Stalkers, they say they need to wait as mutants are up there. Send them back up immediately, causing 2 to die. (thanks to Обрез for the info, I didn’t pick up on that dialog!)
Bagel (secret achievement)
Comment: Have a ‘score’ of 0, this is the opposite of the rank achievements, you lost points when your people die etc.
(thanks to Plantszaza)
Try again!
Die from a flower
Comment: first room on the right has the flower, just stand next to it until it kills you.
No losses!
Win without losing a single follower
Rank B
Get rank B or higher
Rank S
Get rank S or higher
Rank A
Get rank A or higher
Slayer
Kill 10,00 mutants
Comment: As with the other kill achievements, just keep killing and killing until it trips.
Scoleciphobia
Kill 25 slugs as a hero
Comment: When you find a grub / worm farm, after having workers kill the initial fat warm come back the next day and shoot all the smaller ones (note this doesn’t give you meat so is wasting them) keep it up until you’ve done 25.
The historian
Find all notes
Hope you enjoy the Guide about Until We Die – General game Guide, if you think we should add extra information or forget something, please let us know via comment below, and we will do our best to fix or update as soon as possible!
- All Until We Die Posts List


Leave a Reply