
What is this guide about?
Total War Three Kingdoms has been out for a little less than 2 years. A quick research will yield a good amount of information in the form of written and video guides at a basic level that will help you familiarize yourself with the core gameplay. Surprisingly, there is very little information and material about more advanced gameplay on how to min-max and speed-run your campaign. On top of that, that meagre amount of advanced tips is scattered in so many different places, be it old threads in official forums or Steam discussions, bulletin boards and lengthy videos, which is not practical.
This guide here incorporates advanced gameplay elements to help you speed run your legendary campaigns in order to achieve victory in as few turns as possible. I will be sharing tips, army builds, commandery builds and more that I have discovered over time and extensively used in my campaigns to achieve quick victories. I will break down this guide in sections that I consider them to be the most important building blocks to further improve your gameplay.
If you are not familiar with certain basic aspects of the game or not confident in your gameplay to beat your campaign consistently in legendary difficiulty, the guide is still going to offer you plenty of insight, but when it comes to manual fight battles, general gameplay decisions and utilising campaign mechanics to the maximum, that is something you will have to exercise on your own. Nevertheless, I am planning to include gameplay videos at some point in the future illustrating how I utilise all the aspects included on this guide and also provide battle footage of some hard-fought victories with very bad odds.
Finally, I want to point out that I will not be discussing game breaking cheese that nullifies gameplay. Things like diplomacy abuse on how to steal every ancillary from the map on turn 1, or how to annex territories and factions on turn 1 will not be discussed as they are unintended game behaviours that have nothing to do with skill.
Prestige:
Prestige is the metric used to determine how fast you increase the rank of your faction. There are limited ways in which you gain prestige and as such, it is imperative that you incorporate a specific playstyle that allows faster accumulation of prestige: that is an aggressive expansion playstyle. On top of that, achieving higher ranks quicker results in unlocking the perks of that rank faster (e.g. extra trade agreement, extra administrators, council positions etc). In addition, it is vital to rank up faster in order to be able to change taxes from normal to very high (more on that later).
The first source of prestige comes from the level of your settlement. You can simply hover over the various levels and see in the tooltip how much prestige you get.
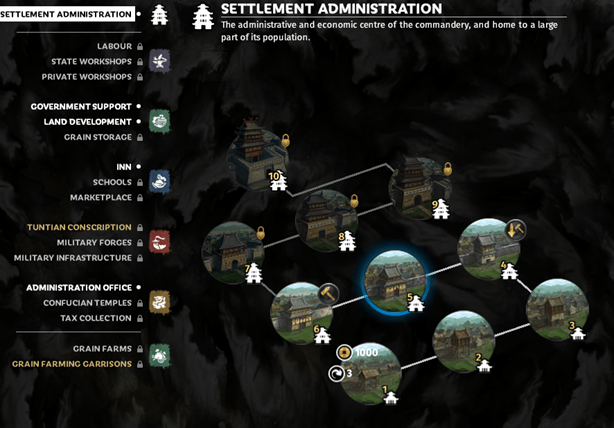
You will notice that prestige does not increase linearly. In addition, building higher level settlements requires a lot of upfront money, in other words, that is money that does not go to army spending and expanding. As a result, it is advised that you only manually upgrade a settlement to a small city (level 4) maximum. A small city gives you 3 construction slots, 12 prestige and it only costs 2 food to maintain. By following the guidelines in the next section about how to build your commandery, you can secure good income and focus on expanding instead. Playing tall has never been an effective option in any Total War and that does not change in TW:Three Kingdoms. The bottom line is that the more commanderies you capture, the more prestige you get from the settlement level. If you are lucky, in some cases the AI will have advanced their settlements to level 5 and beyond, which means that you will get more prestige once you capture it, assuming that you can support the food requirements. If you can do that, then, by all means, do not downgrade the settlement. If not, then simply downgrade.
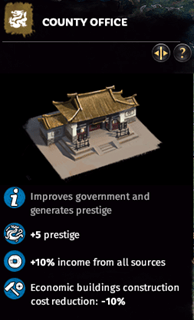
The second way of gaining prestige is through another building chain, the “Administration Office”. It is a much more cost-effective option of gaining prestige than leveling up your settlement, so it is advised that you dedicate 1 slot in each and every commandery you have to construct this building. Level 1 administration office gives 5 prestige and +10% income from all sources, level 2 administration office gives 10 prestige and +15% income from all sources. For level 3 you need to upgrade your settlement to small regional city (level 7) which is not advised at all unless you conquer such a settlement from the AI. I will provide a more detailed description on commandery builds in the next section. For now, keep in mind that administration office is a must to progress faster in your campaign.
Lastly, there is a 3rd way of getting prestige and that is by holding the “Imperial Jade Seal” ancillary. This item provides 25 prestige, which is a huge amount. To put this into perspective, consider that the equivalent of 25 prestige is a small regional city (level 7 settlement) which costs 22000 gold from level 1 to level 7 (before any cost reduction) or 14500 from level 4 (small city) to level 7 (again before any cost reduction). Not only that, upgrading settlements takes a lot of time and has certain penalties (e.g., food requirements). As such, it is very important to get your hands on that item if you can. In 190 start it is Sun Jian that has the item, and on 194 start it is Sun Ce. In 194 you have vision of everyone in diplomacy menu, ergo it is not difficult to exchange it for ancillaries/gold per turn/food. On 190 start, however, if your faction starts far away from Sun Jian chances are slim. Sometimes when you do diplomacy with other factions, they tend to reveal their lands momentarily to you, hence, their neighbors. By abusing that you can theoretically get to reveal Sun Jian on the map. It is not very consistent, however, and it is a problematic method if you are planning to attack a faction you just signed a diplomacy agreement with. Whether it is worth to take this risk or not will depend on your proximity to Sun Jian’s faction. The Imperial Jade Seal’s value is really that high where you might have to consider such tricks to get your hands on it.
Commandery build / Taxes / Rebellions: (part 1/2)
A big part of this playstyle I am about to present you revolves around the concept of triggering constant rebellions and dealing with them easily in order to passively generate gold. There are a few problems associated with that playstyle. First, you need a consistent way to lower public order in your settlement to constantly trigger rebellions. The second issue is associated with how you are going to deal with them.
First things first, there are two consistent ways of lowering the public order in your commanderies: The first way is by building the “Tax Collection Office” building. This structure is key to this strategy because it not only achieves the goal of diminishing public order, but it also costs zero gold to construct. In a way, this is the most cost-effective building in the game as it takes no resources to build and it instantly generates a hefty amount of peasant income. Unfortunately, only the first 2 levels are available by default and to further upgrade it you need to unlock reforms, but this branch of the reform tree is readily accessible should you wish to unlock the higher levels of this building chain. A building that requires zero investment and instantly yields profits cannot be overlooked.
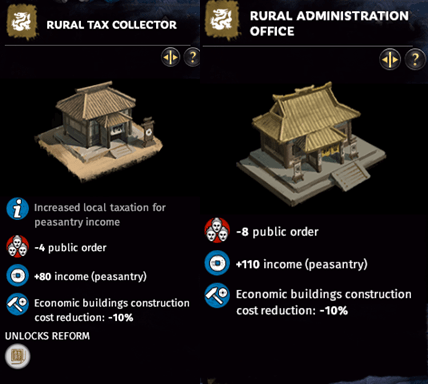
The subsequent concern then becomes: “How do I deal with the public order penalties and upcoming rebellions?” Under normal circumstances, and assuming you are playing “romance mode” campaign, you could simply deploy 2 generals with no units in their retinues, hence zero gold deployment cost, and simply crash the rebellion the very turn it appears on the map. This approach, however, comes with a few issues. First of all, it assumes you are playing romance and not records mode. While it is not impossible to deal with a small rebellion even in records mode by simply using your generals, this line of thinking leads to the next problem; This assumes that you actually have two or three available generals ready to be deployed. If that is the case, then there are more issues. First of all, it means that you are actually stashing idle generals in your faction who are getting paid 150 gold each turn waiting to be occasionally deployed to crash a rebellion. The amount of gold you have to pay on their salaries relative to the gold you would make out of a rebellion would render this playstyle subpar. Ideally, you should never have idle generals in your faction. They either need to be used in administrative work / assignments or on the field, not on the bench.
Moreover, there is an additional problem associated with using your generals to crush rebellions: that is the problem of seasonal deployment allowance. Each season you are allowed to deploy a specific number of generals (usually 3 by default). Increasing that number is not an easy task as it requires specific reforms/buildings, that take time and time is something you do not have in a speed-run. Assume that there are 2 or 3 rebellions in the map at the same time, then how exactly do you deal with this situation? On top of that, assume that on the same turn you need to redeploy one of your main armies to a different front, what would you do in that case? Would you delay redeploying your army by a turn in order to deploy first the generals that will deal with rebellions? Regardless of how you look at it, this is a problematic situation.
However, there is an alternative and that takes us to addressing the second issue. The answer is constructing the “Military Infrastructure” building category. At first glance, its purpose appears to be that of simply adding more units to the garrison of the commandery’s capital. That much is true. That building constitutes a cheap way of dealing with rebellions in an easy way without ever having to worry about them. An auto-resolve is all that it takes to deal with a rebellion in that case.
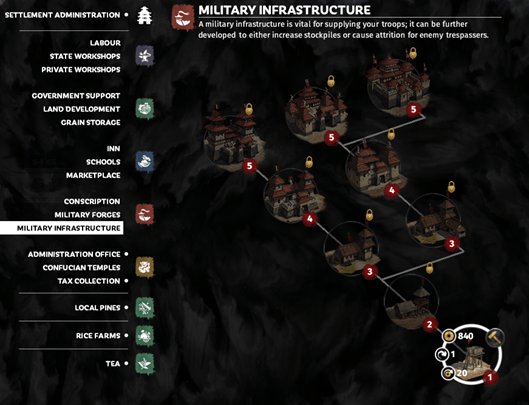
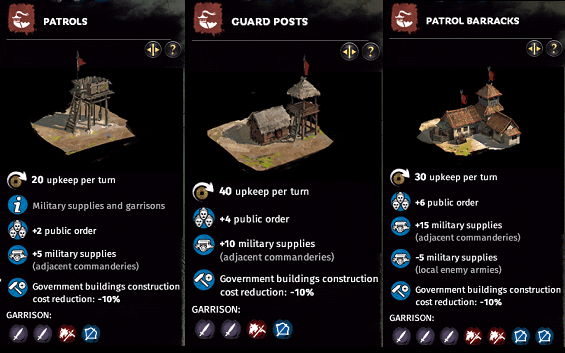
Let’s take a deeper look at this line of buildings and why they are a superior choice. In order to consistently deal with any rebellion regardless of size, the most secure and painless way is by advancing the patrols building all the way to level 3. As it can be seen in the following pictures, at level 3 you unlock more garrison units. From experience, I can tell that even if a full stack of rebellion gathers up, fully masters and attacks your settlement, you will still easily win with very good odds by auto-resolving. In some cases, it has also been observed that even a level 1 patrols building can deal with a full stack rebellion. The odds will be slightly worse, but auto-resolve will work 9 out of 10 times. There are, however, some odd cases where the rebels recruit better units and, in that case, you may end up having to play the battle manually with a level 1 building. The only prerequisite for constructing the Patrols building is having a small city (i.e., a level 4 settlement) which is the bare minimum that you would have used one way or another to unlock the 3rd construction slot in the commandery for low cost in order to maximise your profits.
The price for level 1 (Patrols) is 840 gold, level 2 (Guard Posts) is 1400 gold and level 3 (Patrol Barracks) is 1260. At level 3 you have two options available, but Patrol Barracks will always be the superior option because it has lower upkeep cost plus the fact that the negative military supplies will be detrimental to enemy armies in the province, including rebels. The downside of the level 3 building is that it provides +6 public order compared to the +2 of level 1. This is a bit unwanted because it can delay the time it takes to a rebellion to spawn. The overall price for going all the way to level 3 is 3500 gold. However, this price can be considerably decreased in the following two ways: You can send a sentinel in an assignment to decrease construction cost and time (or have a sentinel as administrator in that province, or both cases at same time). The second way is through a red reform that you will naturally unlock if you follow this guide. The reform is called “Garrison Conscripts” and is a prerequisite for unlocking the 10% replenishment red reform. 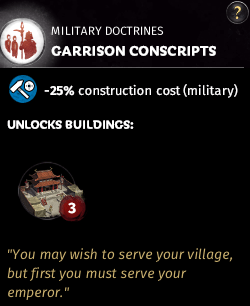
This reform alone decreases the cost from 3500 gold to 2625 gold. As it becomes apparent, adding the further reduction from sending a sentinel on assignment before building all 3 levels will bring the price to below 2000 gold. Compare that to how much gold you would normally spend to recruiting and deploying a simple vanguard general for instance: 1000 gold to recruit and then about 1600-2000 to deploy him depending on the value of the retinue he comes with, which you will disband right after, and that doesn’t count his 150 salary every turn. In other words, recruiting a few generals and deploying them to deal with rebellions will cost you way more gold than constructing this extra garrison units building no matter how you look at it.
Commandery build / Taxes / Rebellions: (part 2/2)
Deciding between keeping the garrison building to level 1 or take it up to level 3 is a decision that will be based on the circumstances. And that takes us to the second point and that is enemy AI. After sufficient testing I have observed that in most cases the AI is way more hesitant to attack these capital commanderies with the extra garrison units. Instead, the AI will opt to attack minor resource settlements first due to being easier targets to beat. What that means effectively is that you buy time to redeploy an army there and deal with the AI. The more important takeaway, however, is that the AI is more reluctant to attack you. Say for instance that you are bordering with an aggressive AI but you are still at peace with each other. Under normal circumstances, once you expanded further and your armies were far away, the aggressive AI would evaluate that weakness and declare war on you to specifically attack that one capital commandery that is undermanned, and you have left exposed. On the other hand, if that capital commandery had more garrison units, the AI would take that into consideration in its calculations and not backstab you. Nevertheless, even if it did backstab you, it would not opt to attack the capital settlement right away, it would go for minor settlement. Similar behaviour is observed in TW:WH from my testing.
Whether the AI will attack your main settlement will depend of course on the quality of their army. With good quality units they will not hesitate to attack your main settlement. But even in that case, with the extra garrison units, with the help of deployables (that, again, you will naturally unlock as your first reforms if you follow this guide) and with smart deployment in a manual fight, you can easily beat a full stack of high-quality units just because you have these extra garrison units. There is also the case where the AI sieges you but does not trigger the siege because it estimates that it would lose without siege weapons. In that case, the negative modifier for enemy supplies would slowly drain the AI from its supplies to the point it would have to retreat. In fact, I have had this scenario happen many times in my campaigns where the AI breaks off the siege and leaves as their army has run out of supplies. As a result, a level 3 (Patrol Barracks) is advised not just to easily deal with any sort of rebel army by auto-resolving, but also to deter AI from attacking you. Or even if it does, to give you higher chances of survival without halting your expansion for the sake of redeploying your main army elsewhere and playing whac-a-mole with the AI and pointlessly losing precious time. The only case in which I would advise to only build a level 1 Patrols is for commanderies that are very safe and are not bordering with AI factions. In those cases, you will only have to worry about rebels and that is something you can easily deal with even with level 1 Patrols.
The tax collection and patrols building take 2 out of 3 possible construction slots in the commandery. So, what building should we construct for the final slot? There are two ways: If food is an issue because you are not getting enough of it from minor settlements, then go for the land development building that produces food. It is a relatively expensive option but if you are in danger of falling below zero food, then you must do it. But if a minor settlement also provides you with food, then consider upgrading that minor settlement first. If food is not an issue, then there is only one option left which was also discussed previously in the “Prestige” section and that is the administration office that yields bonus prestige. It is the cheapest available option you have to boost your prestige and rank up faster. Upgrading your settlement beyond small city is usually not recommended as it is very costly for the amount of prestige you are gaining, plus it requires extra food to maintain. It is preferable to just conquer high level commanderies instead of constructing them yourself so long that you can fulfill the food requirements.
Finally, it should be pointed out that when capturing a new settlement, the first course of action should always be to demolish all of its buildings that are not tax collection office, garrison building or administration office. This way you get rid of all useless building that deviate from the strategy discussed earlier, and you make a considerable amount of profit out of demolishing what is not needed. Keeping that level 3 inn (or any other money-making building in newly acquired commanderies) in a settlement that you are not planning to further upgrade is pointless because once corruption financial debuff kicks in, that settlement is going to generate pennies. At that point, the only consistent way of generating gold will be rebellions.
The reason why this strategy works is because everything compliments each other extremely well to achieve your goal. At first sight, this may look like low profit build, but considering how low the investment is and how quickly it generates profit, its value can be quickly observed. There is no easy way of evaluating the amount of gold you generate from crushing rebellions in this setting, but I can assure you it is way more profitable than anything else you could achieve in the same amount of time and money spent. Generating rebellions and crashing them has another benefit: You very often get ancillaries from rebels which you can either use or sell for gold per turn. Furthermore, when you auto-resolve the fight, you have a chance of capturing a rebel general. In that case the only two options available are to execute them or release them. When you release them, you s*rip them from gold (usually 200 gold, but can go higher) so you should always choose that option when it happens.
On paper, things like commerce/industry building combinations can yield the highest income over time, but the amount of gold you need to invest, the amount of time it takes to unlock the necessary reforms and, also, the amount of time before you get your return on your investment, it will be too slow for speed-running and it will take too long before it catches up with my build. The only exception to that rule is your starting province. Since you almost always start with a commandery that includes a capital which you can instantly start upgrading, you can actually make an argument that even with a high upfront investment, you would still see a return on investment by the middle to late stage of your campaign. It is definitely something you can consider, more so for factions that start in very lucrative provinces, but regardless of how you decide to build your starting province, you need to remember that high taxes will apply to every province regardless, hence, constructing a garrison will be a must. Excluding your money-making starting province from taxes is not an option as it nullifies the money-making nature of it should you go down that path.
As a final note, I would like to point out some irregularities with certain factions. Ma Teng is the first irregularity because his special building replaces the garrison building. As such, you will not have access to extra garrison units and as such, the build described above will not work. That alone renders Ma Teng a very slow faction to play on top of being a governor which means you need extra time to capture a seat first once realm divide occurs. The second irregularity is Yellow Turbans. The garrison building for Yellow Turbans is not as strong as the Han factions’ version of it even at level 3. As such you will either have to compromise on playing some rebellion fights manually, or you will have to upgrade it to level 4 if you want to consistently auto-resolve rebellion fights. It is a small nuisance you will have to cope with.
Army builds: (part 1/2)
Effective army builds are a complex topic that needs consideration of various parameters. A very important parameter is what generals do you have at your disposal? Are you playing romance or records mode? By any chance, do you have a unique legendary character that is very strong?
In order to establish a baseline, I will assume that we are playing records mode. I am choosing records because army templates can be rendered pointless in romance mode due to how powerful characters are. Nonetheless, all the things that will be discussed below and the templates that will be illustrated will also apply in romance mode. I am simply doing that to avoid an argument of “let’s recruit more lords instead of units since they are better”, which holds true to some extent and is something that can be abused.
The best starting point for creating an army template is by first deciding the leading general out of the 3 in the army. When it comes to that, the choice is straight forward. The only effective leading generals are Champions and Vanguards. The reason for that is because both have two very powerful skills in their arsenal, the +25% campaign movement range (Reach) and the +5% replenishment rate. Choosing between a Champion or a Vanguard as leading generals comes down to which one of the two at your disposal has these two skills unlocked or is closer to unlocking them. The impact and importance of these two skills is very high and paramount to speed running. Each and every single one of your armies should have one of the two classes leading the army. If for some reason there is none of the 2 available at your disposal, then choosing a strategist with the campaign movement range (Reach) unlocked is an alternative temporary measure, but this situation should be avoided by all means.
Now we get to the difficult part of deciding the other two generals and retinues for each one of them. There are different ways to go about it. Always keep in mind that our goal is aggressive expansion and that entails using as many cheap armies as possible without going bankrupt. As such, elite units that are locked behind many reforms with very expensive upkeep are instantly out of the question.
Build 1: Champion + Vanguard / Sentinel + Commander + 4 or 5 mounted sabre militia

This is a high skill cap build that requires very good micro management but if it is managed properly, it can beat a full army stack. The strength in this build lies in the speed of the units and the extremely high block chance of arrows by the mounted sabre militia units. By default, the ranged block chance is 65%, but after unlocking the appropriate commander skill that boost that stat by 20%, they can get an impressive 85% ranged block chance. If you use them properly, these horsemen can essentially soak all enemy arrows before you engage the army with minimal losses. Keep in mind that units can only block projectiles in the direction they are facing, not from their flanks or behind them, so correct positioning is a must. The idea behind this build is to kite enemies around, split them and use hammer and anvil to crash them. The correct way to use hammer and anvil with horsemen against any unit, but especially spearmen, is to distract the unit from both sides. You can press control and drag a line on top of an enemy unit so that your unit walks slowly towards them without charging (pay attention to that detail of dragging a line on top of the enemy unit and not right clicking on them). Even they do not charge, then no mass casualties. When your units reach the enemy and engage them in melee combat, then you use another horsemen unit to charge from behind and crash them. This whole process must happen in mere seconds. When your horsemen are tired, you can find a place with a few trees to hide them, while kiting all other units in the map with the rest of your horsemen/generals. Once they are rested, repeat the process. Any direct confrontation with the enemy should be short and you should avoid being flanked. Use the high speed of these units to your advantage. The vanguard can be replaced with a good sentinel. It depends on what generals you have available at your disposal.
Another advantage of this build is that the AI believes that you are weak, especially when you siege a settlement, minor or major, and the AI fields some spearmen. Very often and depending on the settlement level the AI units will come out of the safety of the settlement and chase you around the map. In that case, the best practice is to kite them around and find opportunities to destroy the easy targets, that is ranged units and sabre units. For spearmen you will have to execute the hammer and anvil trick with your horsemen as I explained above. Use your generals to crash enemy horsemen. If available, choose to position your troops up a small hill for extra charge speed.
Build 2: Champion/Sentinel + Vanguard + 5x Mounted Lancer Militia + Commander/Sentinel
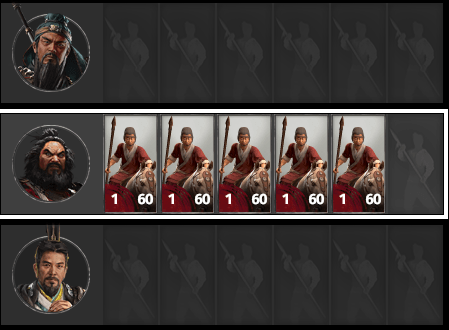
This build follows the same vein as build 1, but it is riskier, more squishy and needs excellent micromanagement. There is no room for error in this build because the red horsemen do not block arrows. The idea is to force the enemy army to constantly move around without firing at you or engaging you. The AI by default is using skirmish mode on their ranged units. What that means effectively is that when you get close to them, they will try to retreat. The principle here is to abuse that by getting to their ranged units from different sides so that they start moving to a safe spot and wait until you find a good opportunity to charge at them when there are no spearmen in-between your horses and the AI’s archers. This build is more unforgiving, but it has its merits, considering that red horsemen have higher charge stat overall than yellow horsemen. It is a good build to use when you have a good Vanguard that you can use as commanding general. Either the champion or the commander can be replaced with a sentinel depending on what you have available.
Army builds: (part 2/2)
Build 3: Champion + 2x strategist + 4x spearguards + 11x crossbowmen/archers
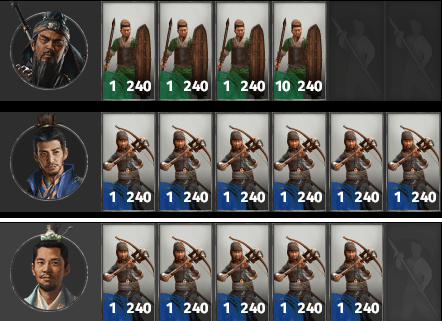
This is most likely going to be your bread-and-butter army template. This build is one of the strongest and easiest builds to play around. All you need to do is deploy your 4 spearmen in front in turtle or spear wall formation, and then create 2 lines of crossbowmen. After the buffs crossbowmen got to their range again (now 220, was 200) they are the most cost effective ranged units. Their very high armor piercing damage means that they will have very easy time beating not only elite units but also generals. There is only one alternative to them and that is “Archers” (the unit that is unlocked by the first blue reform). The only benefit of archers over crossbowmen is that they can use flaming arrows as well as fire arrows at a bigger curvature. If you happen to play one of the faction that starts with that blue reform unlocked that allows you to build Archers (e.g. Kong Rong, Shi Xie etc), then by all means you can use them instead of crossbowmen. My mathematical analysis and custom battle tests for these two units has shown that they are very close in terms of performance. Their price and upkeep is also very similar. But crossbowmen will always have a small edge over archers due to their high armor penetration which makes killing generals easier. On the other hand, if you were playing Shi Xie and you were planning to fight Nanman, then Archers would perform better because Nanman have low armor units, hence armor penetration stat would be overkill.
Furthermore, you will probably notice that I have chosen 11x crossbowmen/archers instead of 12. The one free spot in the strategist’s retinue is saved for an artillery unit. The reason I don’t include it in the picture is because you do not need an artillery unit at all times. Artillery units are the slowest and that makes them decrease slightly the maximum campaign map movement range. This is unwanted. You only need to recruit 1 artillery unit on the turn you attack a walled settlement in order to trigger the siege battle right away. After you win the siege fight, then instantly delete the artillery unit to make sure that on next turn you don’t get your campaign movement range crippled, plus not having to pay the expensive upkeep for it.
In offensive siege fights, all you have to do is put the spearmen in turtle formation in front, so that all enemy towers will focus them with barely killing anything (due to 100% ranged block chance, but be careful of tower arrows on the flanks), and then use your crossbowmen/archers to deplete units inside walls.
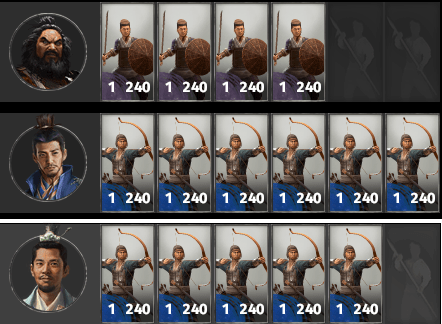
Lastly, the champion and the 4 spearmen units can be replaced with a vanguard and 4 sabre militia. Sabre Militia are naturally much weaker than spear guards, but they are expandable units and a decent meatshield that buys time for your archers/crossbowmen to wipe the field.
Build 4: Vanguard + 2x Sentinels + 11x Crossbowmen/Archers + 3 or 4 Raider Cavalry
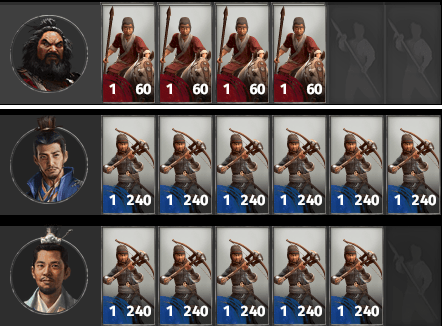
This is a bit more unorthodox template for cases when you don’t have any spare champion with the appropriate skills unlocked and for some reason you need the extra speed of horsemen. The idea is same as before but this time you use horsemen instead as front line to distract enemy melee infantry to follow you around until you find good opportunities to flank. This is the build I would advise the least, but it can get the job done. It will naturally struggle more during sieges due to lack of melee units, but do not forget that you can dismount your horsemen and use them as melee units instead.
Deploying:
When deploying ranged heavy armies, avoid fighting in trees due to the penalties. Try to deploy your units in open areas. In case you have Archers and fire arrows unlocked, try to place your units in such a way so that when they fire the fire arrow, they blaze the forest through which the enemy units are coming from. If it a plain map where you are wide open, positioning yourself in the very corner of the map is a good option. This way you have the borders of the map forming an obstacle and, as such, you do not have to worry about being flanked.
Recruitment:
A very important parameter that improves unit performance is unit ranks. The higher the unit rank, the better their stats get. Something to consider is that when you recruit your units, if possible, make sure that level 1 conscription building is constructed even for 1 turn. Especially for your first army when you still haven’t constructed any other building yet. A level 1 conscription building increases the recruitment rank of your units by 2, hence you recruit level 3 units right away. If you are fortunate to have a faction leader and/or heir with the “+1 rank for all unit” skill unlocked, then you can get up to level 5 units right away. That sort of unit rank advantage can be immense and game changing. Do not neglect it!
Reforms:
There are two primary constraints in an aggressive expansion. The first one is campaign movement range, which determines how far you can travel. The second factor replenishment rate which determines how fast your army recovers its casualties (caps at 50%).
The way to address both issues is by focusing almost exclusively on the red reforms. The 6 reforms show below are your bread and butter. Regional levy grants you the much needed 10% replenishment which is huge. The other 5 reforms required to unlock the 10% replenishment reform are also very valuable. You unlock deployables (which are really overpowered in defensive sieges), you unlock caltrops, you decrease the recruitment cost, reduce mustering time (compliments well replenishment rate), you decrease cost of red buildings by -25% (vital for the commandery build discussed earlier).
One exception to the above recommendation for red reforms is Shi Xie’s faction. Shi Xie’s special mechanic allows him to get some special ancillaries that grant 15% replenishment. Assuming that 2 out of 3 of your generals in an army have those special ancillaries equipped, b-lining for Regional Levy is not particularly required. Instead, you should aim to get the extra campaign movement range and trade agreements, which compliment a lot his faction mechanic of having vassals.
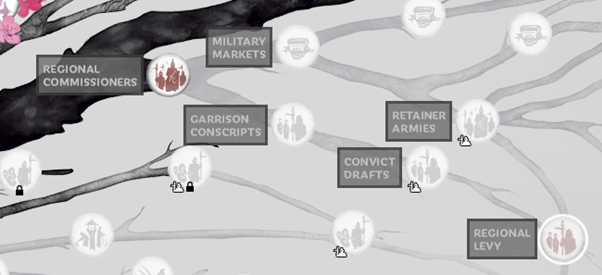
After unlocking Regional Levy reform, the other most important reforms to unlock are the following: “Swiftness is the key” and “green dragon supply ships”. Both of these grant you more campaign movement range, the former 15% and the latter 5%.


These are 11 red reforms you must unlock in total. Depending on your starting faction and starting date the total number might be less than 11. For instance, Lu Bu and Sun Ce factions have already some of those unlocked so it will take you less time to unlock the remaining reforms. By the time you are done unlocking those, you will probably be at the middle to late stage of your campaign. After that what you unlock is up to you. Here are my suggestion: The two trade agreement reforms are very strong options especially later on when their value increases further with the more special resources you own.

Another option is to unlock the 3 reforms that allow you building higher levels of the tax collection building chain. Not only they cost zero gold to construct, but they also help a lot by lowering public order. Less public order means more frequent rebellions, more frequent rebellions mean more gold / ancillary generation.

In the same line of thought, for Yellow Turbans any reform that yields campaign movement range and replenishment rate are top priority. I am planning to write a Yellow Turban specific guide at some point with more details.
Court positions / administration:
TBA – Pending changes in new DLC.
Vassals:
TBA
Diplomacy:
TBA
Other tricks:
TBA
Conclusion:
This is a summarised overview for several gameplay aspects and the logic behind them. It is certainly plenty of information and putting it all together might be challenging at first. The best way is practising by applying one thing at a time.
I hope that after reading this lengthy guide you have gotten a glimpse and basic idea to an elaborate playstyle and thought process. Given that there is no leaderboard for speed-running, I will be looking forward to hear your results in the comments.
Moving forward, at some point I am planning to record a campaign that incorporates all the principles discussed in previous sections. For the visual type of person it might be better to learn via watching how it is done than reading a lengthy text.
That is all for now…
============================================================================
This is all about Total War: THREE KINGDOMS – Advanced Legendary Speed-Running Guide; I hope you enjoy reading the Guide! If you feel like we should add more information or we forget/mistake, please let us know via commenting below, and thanks! See you soon!
- All Total War: THREE KINGDOMS Posts List


Leave a Reply