
Hi, welcome to this post, We hope you find the following page, in which we detail the Torches of Fate – Full Walkthrough and Achievements Guide, informative.
This guide contains the following:
- Full walkthrough
- Main Quest
- Skill Tree
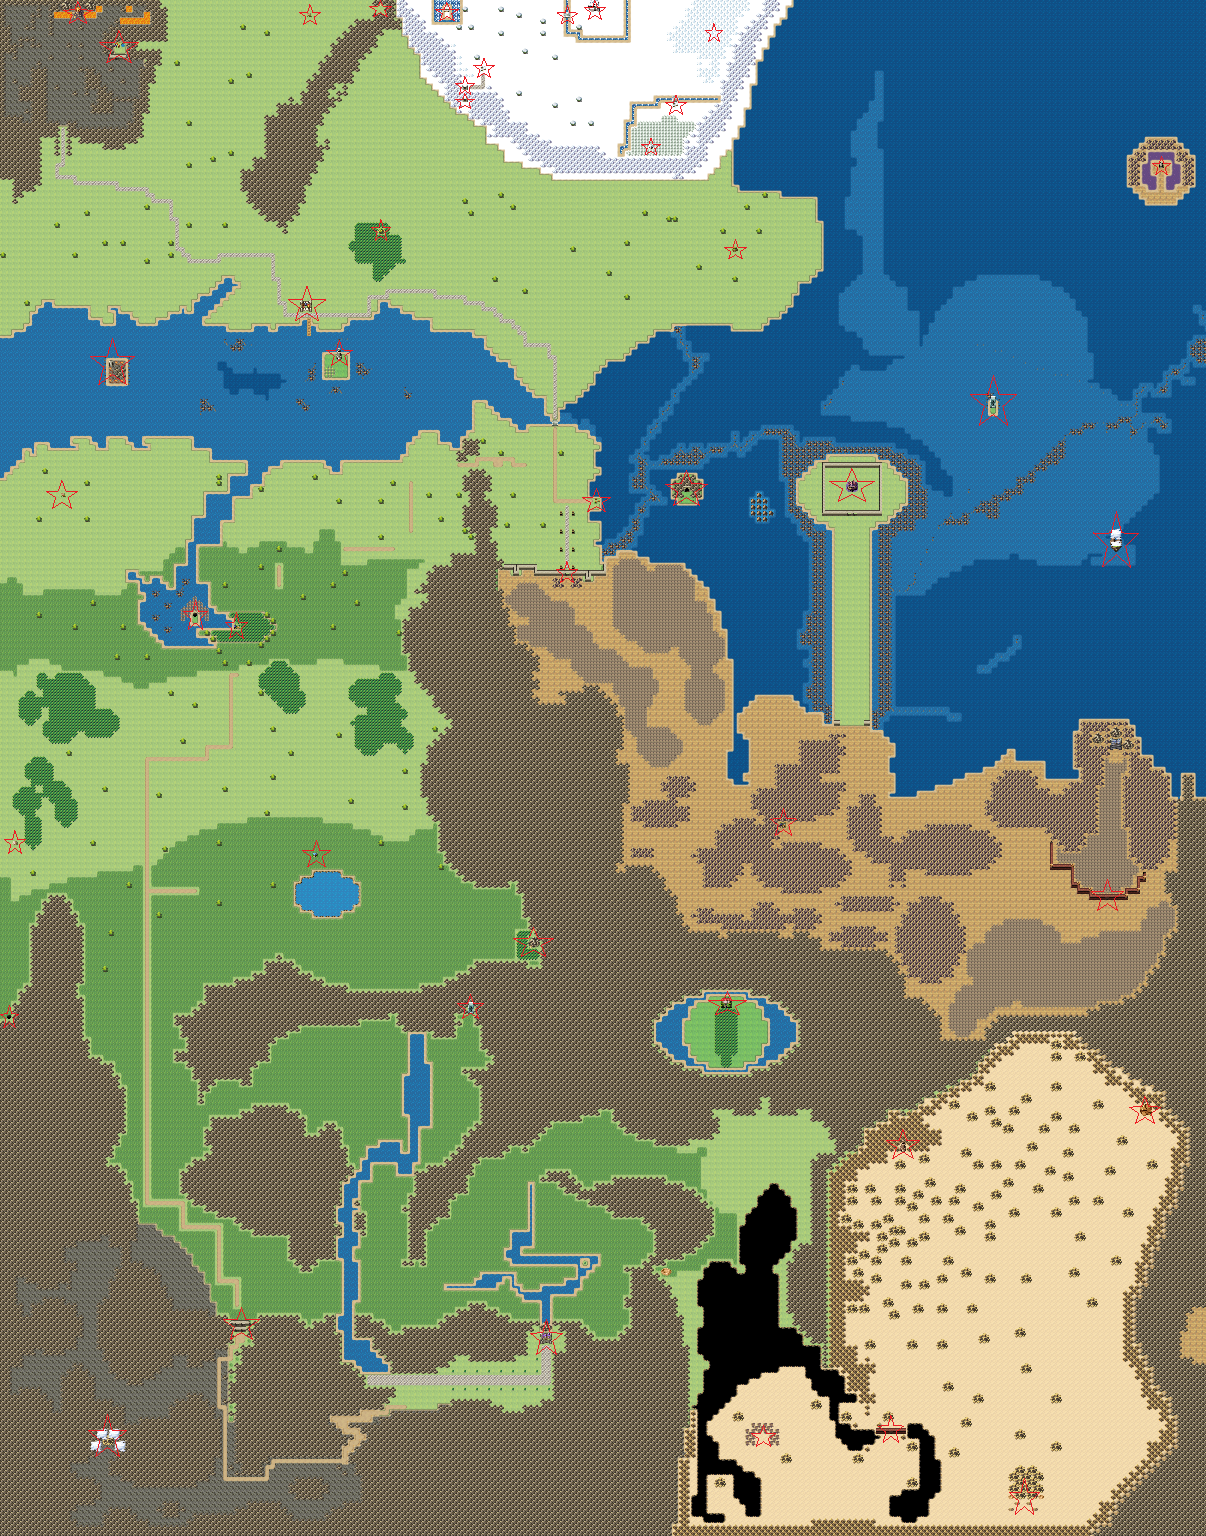
- World Map
- Characters Informations
Fullscreen
The game starts in Window Mode by default.
You can either press the fullscreen button of the window, but then you still have the Task-Explorer and the window still visible.
Or you press F4 to change to true fullscreen.
Restarting the Game when stuck
When you find yourself stuck and cannot even use the little tricks or a particular item to get out of that situation, you can press F5 and reload your last save.
That might disable the fullscreen.
Missing Resources
Hopefully, all reported missing resources are already fixed, but just in case it happens:
Missing audio or graphic files have mostly a “Retry” button underneath.
That means you can open the game folder like D:\Steam\steamapps\common\Torches of Fate\www, follow the mentioned folder/path, copy/paste a similar named file and rename it as the missing file.
Also, please report missing resources or other bugs in the game discussions.
Main Quest: Save the King!
Gaiden
Dimitri’s House
Items: Iron Revolver & Iron Claws, Wayward Stone: Gaiden
You take control of the Level 5 Hunter Dimitri.
You can now save the game.
Note 1: Investigate everything, not only when has a marker!
Note 2: Have multiple save files!
Front Yard
Items: 100 G x2
Gaiden Market
Items: Moon Stone, Moon Stone (Weapon Shop), 500 G (inn)
Before you follow the King, investigate the area.
Best buy one Magic Ring and some potions with the remaining money.
Rumours & Tips:
- Hero’s Hair in a Dark Cave.
- Skills can only prepared in save areas.
- Upgrate equipment and restock in healing items before heading out.
- The sewers have turned from a treasure trove of thieves to a monster nest.
The Thieves are still trying to regain their treasures (inn).
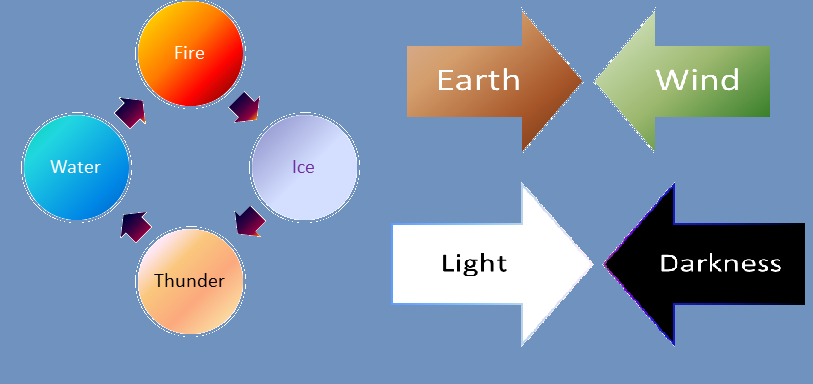
- Fire>Ice>Thunder>Water>Fire (“>” better than or beats)
- Earth <-> Wind, Light <-> Darkness
- A certain Cat-Hunter desires a perfect round gem.
- Animal village to the south (how do they accept currency without tumbs). Found in the Library.
- Recipe for Magic Water: water, twilight spice, green slime jelly, chopped up toadstool. Found in the library.
- Only Royalty can access the forbidden tome in the library.
- Improved Steel in Ednevar (Weapon Shop)
- Element Stones can be use to enchance weapons or armor.
- Bronze gear is Common (yellow), Blue is Rare, Red is Legendary, and Purple is Mythic.
- Fighting Spirit can be collected via standard attack or receiving damage. Some skills can only be used with the correct weapon and the needed FS/MP.
- A night in the inn costs 20 G.
- The old crew is exploring in the East(Dan’s Brewery).
- In the Mage’s College is an extremely expensive armor that protects against magic. (armor shop)
- Same rings can have different attributes.
- You can only equip one Magic Ring, but as many others as you want.
- Check all shops for equipment.
Back Alley
Defeat the Hell Bat.
You can follow the King directly or first explore the alley.
The entry to the sewers and the other houses are locked.
Gaiden Market
The soldiers aren’t blocking the pathes to the south and east anymore.
Gaiden Plaza
Items (even in houses): Moon Stone, 100 G (NPC), 200 G,
Locked houses: 3
In Engoro’s House you cannot do anything yet.
But you can enter the sewers.
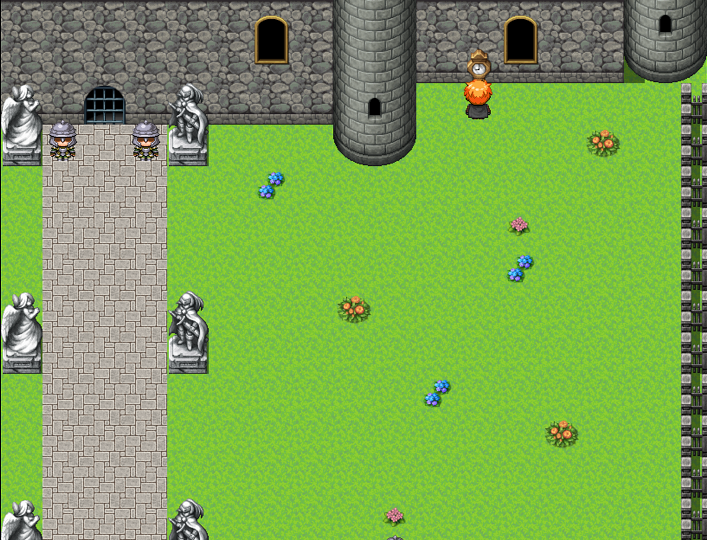
Castle Grounds
Find Glitch #1.
Gaiden Sewer System (optional)
Items: Chained Helmet x2, Steel Axe, Force Cloak x2, Chain Shirt x2,
Mobs: Rat, Plaque Rat
Defeat the Plaque Rats ASAP.
Once you have found the Chain gear, you won’t get damaged by the rats anymore.
Boss King Rat x2 & Carrion Ooze: Defeat the Rats ASAP and keep your HP over 20. The Ooze will poison you!
You won’t die of poison directly.
Behind the Boss find Steel Blade, Ring of Health, Frozen Sword.
You cannot reach the door yet.
Castle Gaiden
Talk to the King.
Main Quest: Eruptions at Taran Part 1
Castle Gaiden
Ramona joins your party (the one from the library).
Gaiden Plaza
Meet Riley and Engore.
Note: The Sewer Boss is much easier with a full party.
Castle Gaiden
Talk to the King again.
World Map of Alga
You have to take the road west of Gaian to reach Taranm but you should first explore.
To the east is Ednevar.
Mobs (Around Gaiden, level 5-10) Hell Bat, Serpent, Bullet Stinger, Flame Spitter (weak to water)
Mobs (Around Animal Village, level 10-15): Venomous Spider (weak to fire, drops Spider Venom), Armor Slime (immune to wind, strong physical defense, drops Slime Sample), Sonic Screecher (weak to ice)
Mobs (Around the Southern Canyon, level 15-20): Cursed Spirit (weak to light), Venom (weak to fire and ice), Skelly (weak to light), Blood Wolf, Corrupt Mage
The mobs drop a fair amount of money you need to buy the Master’s Rings for the party (10% more EXP!).
Note: Burn doesn’t heal after battle like poison.
Note: Some skills like the Cyclone should attack all enemies, but attack only one group of enemies. Others only hit one.
Note: There is a chance to encounter a legendary mob.
Milk Cafe (Optional)
Items: Moon Stone
Found east of Gaiden
You need a Membership Card to enter.
Forest of Twilight (optional, level 10)
Items: Moon Stone, 700 G
Mobs: Serpent, Bullet Stinger, Hell Bat
Found in the forest next to Gaiden (the fruit tree).
Boss Twilight Minotaur: Can be burned but there is a chance of Counterattack when attacked physically.
Enter the Shack, collect Moon Stone, 5x Red Twilight Fruit, 3x Blue Twilight Fruit, 2x Green Twilight Fruit and read the Research Log.
There might be a chance the big tree at the clearing will grow more fruits later.
Mabel (Optional)
Items: Waywardstone: Taran, Moon Stone x2, Milch Shake Lager.
Between the Mountain Ranges NW of Gaiden.
Rumours and tips:
- The Ogre Snargtooth lives at the mountain path nearby and attacks Mabel Ranch.
- A night costs 200 Gold there.
Mountain Pass (Optional, level 5)
Mobs: Hell Bats.
East of Mabel.
You cannot proceed yet.
Frozen Path (optional)
Snowy Area north of Gaiden.
The cave entrance is currently blocked.
Then next areas are found across the southern bridge.
Ednevar (optional)
Items: Water Stone, Beautiful Seashell, Moon Stone (NPC), Moon Stone (Tree NPC mentioned)
Rumours and tips:
- A night in the Pending Inn is 15 G.
- A rare item merchant wanted to rest in the new inn (still in work). Currency are Moon Stones.
Abandoned Checkpoint (optional)
Items: 2000 G
South of Ednevar.
You cannot proceed yet.
Animal Village (optional)
Items: Moon Stone (tree), Repellent (NPC), Moon Stone (Pecking Order)
Found west of Ednevar.
Visit Rika to the east and start the Character Quest of Riley.
Rumours and tips:
- Inventing of Snowboarding.
- Planning an animal parade all in black.
- Powerful Gloves help break down certain walls.
- The creator of Repellents was from Taran.
- Origin of the Guardians in an old temple near this village.
- Strange man visiting, rebirthing the forest, new state of being, but got angry as they said no (Rika).
Riley’s Nickname is bunny.
Strange man does experiments in an crater in the sea near Animal Village.
Blood Path (optional, level 15)
Items: Moon Stone (log), Attack Orb
Mobs: Blood Wolf, Corrupt Mage (immune to wind)
At the south-western side of the mountain range between Ednevar and Animal Village.
The mobs are stronger than the ones on the world map.
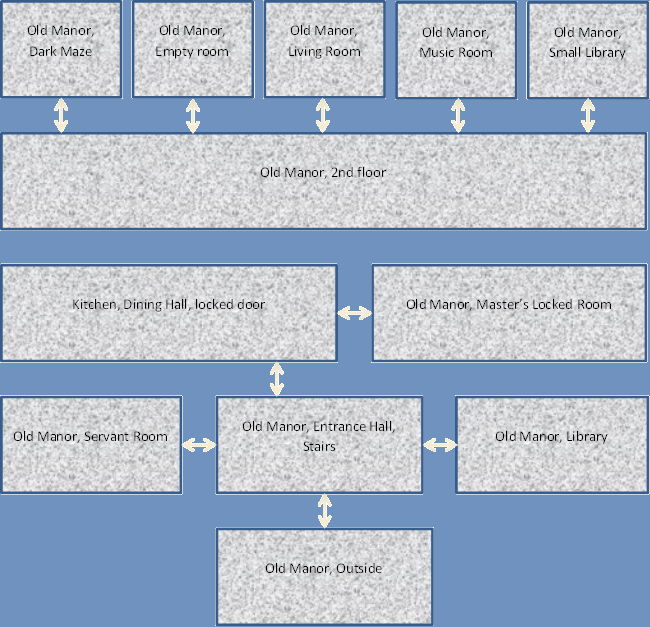
Old Manor ??? (optional, level 10 Riley)
Items: Mansion Key
Mobs: Cursed Spirit (weak to light)
Near a lake south of Animal Village.
When you leave the Animal Village, walk east to the next tree and then south.
Unlock the Old Manor and the shelf in the Servant Room (one down).
You cannot solve the Dark Maze and the Master’s Locked Room yet.
Notes to find:
- Library: Mistress Vol, likes yellow Daffodils, trinkets
- Servant Room: Master Vol is in war, young master wants the blue books.
- Master’s Lock Room: need to pull after the correct swiches are pulled.
- Music Room: Lucky Color is Red.
- Pans of Oil: 5
Inn Tent at the west border of the world map (optional)
There is a dirt road to the south south-west of the Animal village, at the intersection to the west.
In there is a merchant and a night costs 500 G.
Further south begins the area of the South Canyon.
Graveyard (optional, level 15)
North of the Inn Tent.
Investigate all graves, at some (6 in total) Fallen Knights will rise (no elemental weakness).
Enter the old church and investigate the altar.
Prepare before you open the chest.
Boss Fallen Captain: Same as his Knights, a bit stronger and heals more per round.
You obtain the Attack Orb
Underground Cave (optional)
Directly south of the Inn Tent.
Currently too dark to explore.
Collapsed Path (optional)
At the end of the South Canyon.
You cannot cross there yet.
Main Quest: Eruptions at Taran Part 2
Mobs around Taran: Hellfire (weak to water)
Mount Taran (optional, level 5)
You cannot enter yet.
Taran
Items: Moon Stone (sack of grain), Moon Stone (pot),
The Dark NPC is the Moon Stone Dealer.
| Number of Moon Stones in total | Reward |
|---|---|
| 10 | Fighter’s Ring +1 |
| 20 | Master’s Ring +1 |
| 30 | Moon Helm |
| 40 | God Ring |
| 50 | Moon Blade |
| 60 | Robes of the Moon, Strange Stone |
The residential district is currently blocked.
Enter the Castle to proceed.
Castle Taran
Items: Ring of Regeneration
You can rest for free when you talk to the nun next to the throne.
Talk to the Lord of Taran to proceed.
Before you leave, check your skills (like water spells).
Mount Taran (level 10)
Items: Water Stone (behind pillar), Steel Blade (behind a pillar at camp), Moon Stone (grey stone),
Mobs: Serpent, Hell Bat, Flame Striker, Flame Spitter
The path is linear until you reach the camp.
A rest there costs 200 G or you can buy some items.
You cannot reach the chest there yet, so proceed to the SE.
The boulder puzzle is easy, just push the one left or right of the chest (lowest row) fully up and the one in front of the chest to the side to earn the 500 G.
Peak
Items: Moon Stone
First, push the lowest row’s boulders to both sides and those behind them to the back.
Now push the middle one to the side and enter.
Taran Temple
Mobs: Gold Miner (rare, drop 750 G, Gold Brick and Mid Potion, can counter), Flame Spitter, Hellfire, Flame Slime, Titan Flame Spitter, Titan Flame Slime, Titan Hellfire
Floor 1
First, turn west, collect 500 G (pot), and notice the looked gate (#1).
In the next room wait until the fire geyser is not erupting to reach Fire Stone, Taran Temple Key and another locked gate (#2).
When you touch the fire geyser, the party gets 5 damage and starts burning.
The tiles with more contrast deal floor damage of 10 point to the party.
In the cavern behind you can collect Ice Cold Water (you can only carry one).
You need that Ice Cold Water to go east from the entrance!
The stairs lead to floor 2.
Return to the entrance, save and run with the Ice Cold Water through the east passage.
Keep to the lower path.
You won’t die but you got teleported outside with 1 HP left.
Trink the Ice Cold Water in such rooms and you can collect Gold Brick and 400 G.
Catch the orb and touch it until the ladder to floor 2 is unlocked.
Floor 2
Via stairs.
Ignore the locked gate (#3) and pull the lever.
This should unlock another chest with a Taran Temple Key in the fire geyser room of floor 1.
The next room is a hot room, so cross it with the Ice Cold Water.
Push the boulder into the hole up the stairs!
Jump into the hole and get new Ice Cold Water.
Via the Ladder (floor 1 east): pull both levers before the timer is out (countdown doesn’t stop during battles) to reach the Fire Stone.
In the south room read the note about the 5 Giants: You have to defeat 5 Titan Mobs in that room.
Reward: Moon Stone, Moonstone (rock), Low Magic Water, 500 G.
At the next intersection turn south and push the boulders on the magic circles to unlock a chest with another Taran Temple Key.
Further west is another hot room.
The timer is shorter, so trink your water ASAP, or you can’t push the boulder out of the way.
Push the boulder into the hole and pull the lever.
That opens a shortcut to the Ice Water Well of Locked Gate #4.
Locked Gates:
- Push the correct boulders and gain Taran Temple Key, 2200 G and the Taran Temple Save Room.
You can rest for free and check your skills.
- Ice Cold Water well.
- Save and touch the omnious whirlpool.
Boss Kolii: weak to water and light. Its Berserker Claw can on shot a weak character. Drops Gold Brick.
Now push the boulder into the hole and follow it.
- Ice Cold Water well, fire geyser room with Drake Hat, 144 G, 187 G.
Cross the Hot Room with Ice Cold Water and push the boulder into the hole (western path is possible).
Jump down the hole.
After all boulders are pushed, rest in the resting area before you proceed downstairs.
Basement Floor 1
Collect the Dark Leather Robes and save!
Boss Pyralis: weak to water and light! Has an AoE, so watch your HP. Best debuff its ATK after it has buffed itself.
You obtain an Essence of Power.
Main Quest: Eruptions at Taran Part 3
Taran
Items (Taran Tunnels): 900 G, Moon Stone (empty chest)
In that shelter is a shop, the Hunter Guild and Treasure Chest Gambling.
Treasure Chest Gambling
Costs 500 G to play for each room.
There are 2 chests and you have to open one.
Is it correct, you can enter the next room, when not game over (for that mini game).
You cannot save during the mini game.
The notes in brackets are for the first game.
| Room | Reward |
|---|---|
| #1 | 1000 G |
| #2 | 2000 G |
| #3 | 3000 G |
| #4 | 4000 G |
| #5 | 5000 G
First Clear: Ring of Holy Protection, Ring of Palemoon Next Clears: 1000 G extra |
In the Hunter’s Guild, investigate the Mirror.
A red haired NPC is interested in the Beautiful Seashell from Ednevar and trades it for a Golden Hourglass.
Castle Taran
Report to Lord Taran and obtain the Spring Boots.
Time to put those Spring Boots to use.
Castle Gaiden
Talk to the King.
Spring Boots Part 1
Mount Taran (optional)
Get the Moon Stone in the camp and travel the Off Beaten Path.
Find the Stimulant, but you need the same amount of Money as you have Luck (how do do it will be found out later).
You need exactly 777 Gold, what will be easier once you got the bank account in the Mage College Town.
Boss Boss Miner: like the Gold Miners, he has no weakness, but can be paralyzed. Beware its counters. Drops Mid Potion and Gold Brick.
Pilfer the treasure aka Gold Brick x 10 and 10.000 Gold.
Mountain Path (optional, level 15)
Items: Moon Stone, 600 G
items (Maze): Moon Stone (pot), Dark Stone
Items (Winding Path): 1000 G, Moon Stone (grey rock), Thunder Stone, 333 Gold, Ring of Force, Moon Stone, Light Stone, 1234 G
Items (Hidden Cave): Ancient Lantern
Items (Snargtooth): 600 G, Mass Stimulant, 400 G, Plate Armor, 500 G
Mobs: Hell Bat, Snake, Sonic Screecher (weak to ice), Flame Spitter, Venom (weak to fire and ice), Gold Miner, Corrupt Mage, Venomous Spider (weak to fire), Ogre
Jump up near the river.
Before you enter Snargtooth cave, explore the rest of the area.
Boss Snargtooth: No visible weakness, so cover him in debuffs.
Mabel
Report your victory over Snargtooth and obtain Ventus.
Gaiden Sewer System
Find the Arcane Cloak.
Ancient Lantern Part 1
Old Manor ???
Enter the Dark Room and collect Moon Stone and Manson Key.
Return to the Servant Room and unlock the shelf again.
Time to solve the Master’s riddle: Only the green switch is up, the others are down.
You obtain the Backyard Key.
Unlock the door in the Dining Hall, find the Military Vest, Manson Key,
There are even Venom mobs.
Unlock the shelf in the Servant Room again to obtain the Mansion Lighter.
Use it to light up all the Pans of Oil (5).
Enter the little library and climb down the secret rope.
Find the Critical Ammo.
Underground Cave (level 15)
Items: Mass Stimulants, 800 G x5, Moon Stone x3, Hero Hair.
Mobs: Cursed Spirit, Venom, Cavern Rat, Blood Wolf
Gaiden
Bring the Hero Hair to the Cat NPC next to the inn to trade it for a Demon Scroll.
As a Demon Scroll can increase the Party’s Level, wait until late game before you use it.
Main Quest: Magic College Lock Down Part 1
Your destination at the end of the Southern Canyon.
Collapsed Path
Jump down and pull the switch to build a ladder back up.
Boss Fara: She is weak to ice and thunder. Her AoE is harmless, if you have followed my guide.
Leave to the south.
Thunder Plains (level 20, optional)
Items: Thunder Stone x3, 1000 G x2, Moon Stone, Shock Scale Vest, 500 G, Chromaticsphere, Moon Stone (grey rock), Volt Blade
Mobs: Sonic Screecher, Thunder Spitter
A rest at the Tent costs 1000 G.
This area is easy, just don’t jump into a Stalagmite… (you can still use your Ward Stones).
Mage College Town
Items (Market): 154 G, Moon Stone (Golden Helm), 240 G
Roumors and tips:
- Rose Quarts has healing properties.
- A Black Flower is worth alot.
- Master Potion Brewer in a flying house.
- A night in the inn costs 400 G.
- Treasure Hunters have style.
At the Archaeologist’s Dig you can buy rare items.
All items cost 50.000 G.
In the Teastore an Cat-NPC named Blue is interested in the Chromaticsphere from the Thunderplains and trades it against Chromatic Circlet.
You can make a bank account.
| Bank Rank | Balance | Reward |
|---|---|---|
| Bronze | 10.000 G | Potion of God’s Vigor |
| Silver | 100.000 G | Magic Orb |
| Gold | 500.000 G | ??? |
| Platinum | 1.000.000 G | ??? |
| Diamond | 9.000.000 G | ??? |
Professor Delvin needs founds and gifts you the Delvin Tablet.
The more money you spend on it, the better.
A student in the NE corner of the market sells a Moon Stone for 5000 G.
At the NW corner is the entrance to the sewers, but you cannot proceed there yet.
Items (Residental Hall Prims): Ice Stone x2, Low Magic Water, Moon Stone, Magic Water, 1000 G x2,
Find Glitch #2.
Investigate a certain chest on the 3rd floor and promise to play a game when the adventurer is over (Post Game relevant, Romana’s Character Quest).
In Ramona’s room on the same floor you can rest for free.
Head to the campus(north).
Stele NW: Knight missing a Shield.
Stele NE: Knight missing a Sword.
Enter the College.
The room in the Main Hall is locked and some suspicious guards block the wings.
Head upstairs to the Archmage once you are prepared, as you cannot return for a while.
Main Quest: Magic College Lock Down Part 2
Mage College
Ramona wakes up in a cell of the 3rd floor.
All items and gear are confiscated, your magic is low.
You could rest in the bed as a last resort.
You can make Magic Water. You know the recipe from the library of Gaiden.
Recipe for Magic Water: water, twilight spice, green slime jelly, chopped up toadstool.
You have 3 tries.
If you are successful, burn the guard down.
You can fight the next Magican Guards and Cursed Spirits will appear at random.
Don’t forget to use Charge Up to restore our MP.
The big room and the south are locked.
To the north collect 450 G and Witches Hat.
To the west don’t get caught until you activate all magic circles (the moving one last)!!!
Read the book above the ladder about the Shell Tablet and the melody “E C A E C A F A“.
Further south:
A Sea Shell is missing on the Mural.
From there first head NE, take the Reflect Shirt and play the piano with the melody you just found and obtain the Stone Tablet: Shell.
Insert that Shell into the Mural and you can reach the chest in the room west of the Mural.
Get the Sleep Satchel and Mage College Balcony Key.
To the SE is a mirror you cannot use yet.
Head SW, find another Sleep Satchel, Reflect Robes and read the scrolls about a suspicious woman.
Return to the Hall of the beginning and unlock the balcony to the south.
Enter the stairs to floor 2.
First go down to floor 1 to collect Reflect Helm and Ring of Armor.
Return to floor 2.
Enter the first room from the east and change the settings for the floor 2 locations you can use to her room, Storage unit and lift.
But the terminal needs more power. The yellow switch will power up Generator 2 (1).
2nd room: Read about the Archmage’s Tunnel, the teleporter lock down, the Shield Plate for the basement.
Check the shelves to find a Low Magic Water and the mentioned Shield Emblem.
3rd room: locked.
Head further west, where you can even find a air vent.
First collect the Moon Stone and pull the yellow switch at Generator 1 (1) further west.
The teleporter there has not enough power yet.
Enter the Air Vent, find a hidden room to the west with 1000 G x4, Moon Stone, Sleep Satchel and Mid Potion, before you leave to the NE.
Learn about the suspicious woman (Romana’s classmate Charlotte) Magic, to which Engore and herself are immune, Project Samruna, the inner sanctum and their connection to Xera.
The vent leads outside of the college (at night).
The direct paths to the College and town are blocked by a flame barrier.
Insert the Shield Emblem to the NW stele.
Cross the maze and enter the basement.
Read the warning about floor damage and monsters and activate Generator 3.
Return to Generator Room 1 (aka Classroom) and touch the teleporter.
Storage: Get Moon Stone, Classroom Key and Low Potion.
Ramona’s Room: free rest.
Lift: all floors are locked.
Use the Classroom Key to unlock the last room on floor 2 (you can discard the key).
Engore joins, but Dimitri and Riley act strange.
Boss Dimitri and Riley: Sleep Satchel will only put them to sleep, but not knock them out. Defeat them with Riley first.
In the chest is your equipment and items.
Note: The reflect gear seems to be good against mages, but it will reflects your own healing spells, too.
Take the Lift Key and unlock the lift on each floor.
Rest at the Dorm.
1st floor:
West is the lab you have witnessed the experiment.
Take the Sword Emblem and Steel Katana +1.
To the east find the Relect Robes.
Once you are prepared, enter the teleporter in the Archmage’s Room.
Inner Sanctum
Defeat the Magican Guards.
Boss Charlotte: She shouldn’t be a strong opponent.
Boss Dark Charlotte: Weak to light but has a strong Dark AoE.
Ramona learns Annihilation and obtains Essense of Magic.
Main Quest: Into the North Part 1
Mage College Town
You can fast travel to gaiden, but I don’t recommend it (you still have your Ward Stone).
You can still rest for free in Ramona’s Room or the makeshift prison in the college floor 3.
The formerly closed Gem shop near the sewers are now open.
There you can play the game Gem Grab (you need more key items to get all).
Rules: In 1 Minute grab as many gems as possible.
Green = 1 Point; Blue = 5 Points, Red = 20 Points and White = 100 Points.
Yellow resets the clock.
Costs 5000 G.
Lowest Reward at 400 Points.
| Points | Reward |
|---|---|
| 400 | MAttack Orb |
| 800 | MDefense Orb |
| 1600 | Soul Axe |
| 1700 | Potion of God’s Vigor (repeatable) |
Mage College (optional)
Items (floor 2): Book of Focus (NPC)
Items (basement (W): Aura Gloves (NPC)
There are new NPCs at the prison, the Generator 1 Classroom, on floor 1, the campus and the generator 3 (basement).
Use the Sword emblem at the other stele, cross the maze, take the Moon Stone and enter the basement (E).
Activate the Statue Maintenance.
Now you can collect Ring of Vampirism, Magic Water, Mass Stimulant, 4000 G and another Moon Stone on the Campus.
Castle Gaiden
Talk to the King and obtain Ward Stone: Oasis Town.
Main Quest: Obsidian Gauntlet from the Giants
Oasis Town (level 30)
Items: Moon Stone (bucket),
There is even a teleporter back to Gaiden (Crystal).
Rumours and tips:
- Rest in the inn for 300 G.
- Former Research outpost, still has fresh water.
World Map
Mobs: Desert Sprite, Desert Scout, Desert Scorpion, Land Shark, Death Rattler
Change to Wind-Enchantments when possible (you should have Ventus).
Those mobs drop a fair amount of gold to get all those rewards at the Mage College Town and more equipment.
Enter the Rest Stop to proceed.
Rest Stop
Clues: Giant Capital (NE of Desert), got attacked by a Sandstorm and the Order of the White Dragon.
Engore leaves the party and Veles joins instead with level 16.
Tower ??? (optional)
Items: Moon Stone
The tower is sealed.
Giant City
Items: Moon Stone x2
Items (path without riddle): Giant Capital Small Key x3, Earth Stone x2, 500 G, 2000 G
Mobs: Same as in Desert, Order Alcolyte, Order Guard
Enter through both gates to witness an event.
Riddle 1: All sun tiles will change to pure gold when step onto. Once all are gold, the gate to the left will open.
Reward: Steel Revolver +1 and Moon Stone.
Pull lever #1.
Path without the riddle: pull lever #2, #3, #4 and find the stairs.
Also some of the middle gates will open when pulling the levers.
Once all levers are pulled, a chest will appear behind the locked gate.
Use the 3 Small Keys to open the locked gate to reach a Moon Stone and the Phyton Claws.
Preare and save before you enter the basement.
Boss Megaton Golem: weak to wind and ice.
Encore will defeat it at last and you obtain the Obsidian Gauntlets.
Obsidian Gauntlets Part 1
Giant Capital
Right after Encore has rejoined the party, jump on the wall at the north and destroy the wall.
Find the Nimble Ring.
On your way out, destroy the walls between the pillars east of the stairs to the basement.
Find Potion of God’s Vigor.
Oasis Town
Destroy the wooden crate in the inn to reach the Demon Scroll.
Taran
In the Taran Tunnels, at the north wall destroy the wall between to grey rocks.
Find the Health Orb.
Mountain Path
At the Winding Path destroy the wall between two grey rocks.
Find a Health Orb.
Main Quest: Into the North Part 2
Frozen Path (level 30)
In case you wonder, but all party members, even those in reserve, earn EXP.
Destroy the snow boulder and enter the cave.
Have Fire related Skills and Enchancements ready for this area.
Mobs: Blue Flame, Tundra Barbarian, Frozen Imp, Tundra Beast, Snow Bee
Note: Frozen damages the MP, so heal it ASAP.
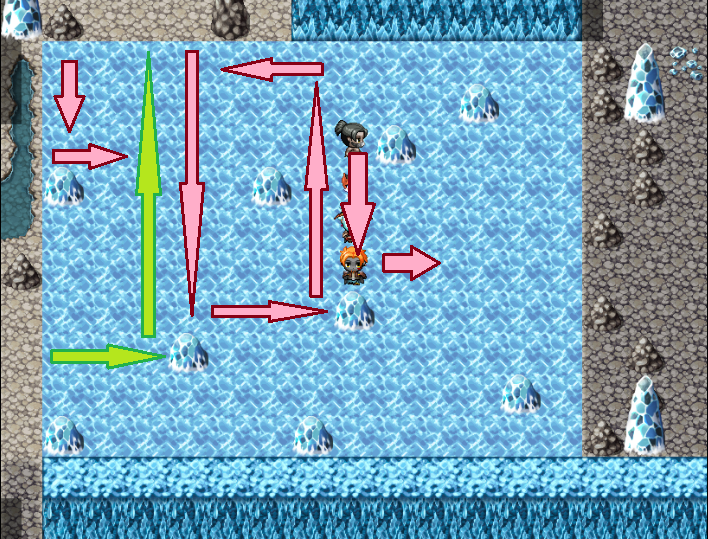
Frozen Field 1:
Follow the green path to obtain an Ice Stone and then the red one to reach the other side.
Gather 1500 G and Steel Claws +3 before you jump up to the next map.
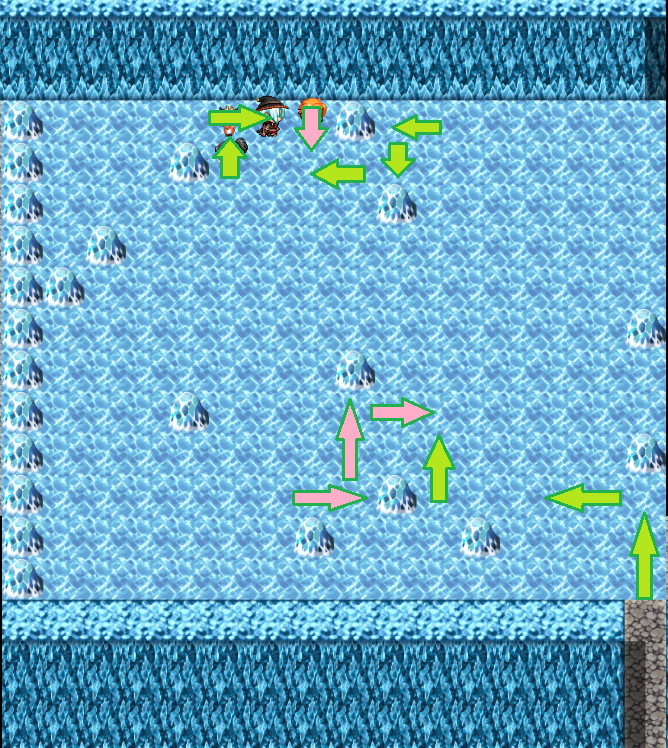
Frozen Field 2:
Follow the arrows (farb changed for better visibility).
Jump up to the former map and drop onto the button.
That unlocks a bridge and a chest with MAttack Orb.
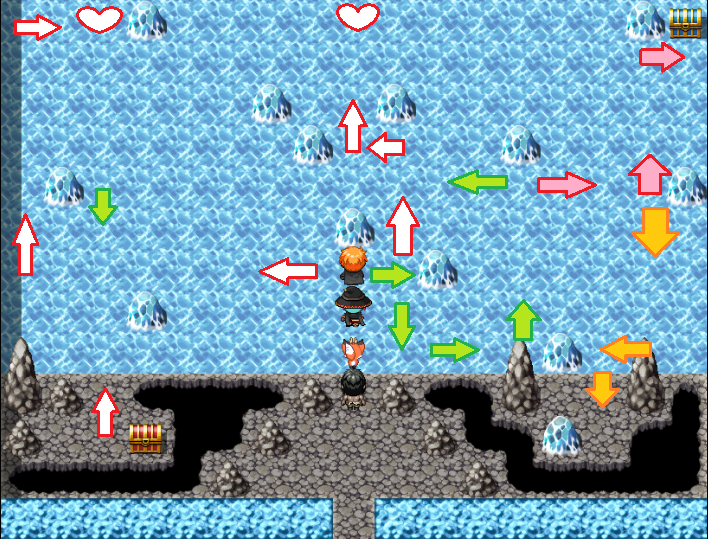
Return to the Frozen Field 2 and proceed to Frozen Field 3:
Green and red show the path to the chests with Health Orb and 5000 G, yellow to a Moon Stone and the white ones the direct paths to the exits (marked with hearts).
Those arrows are only one possible solution.
In the maze collect 1000 G x3, Ring of Frost.
Once you leave the maze, the cutscene you are seeing will depend on the Key Item Ancient Lantern.
The scene will change if you haven’t found the Ancient Lantern yet.
The lever will turn the light back on then.
Boss Rory the Stylish: Debuffing skills are your best hope to break his barriers. Best are Dimitri’s Gun and Engore’s Axe.
??? Lonely Hut (optional)
Items: Moon Stone
Enter the hut to start Engore’s Character Quest.
Gingertown (optional)
Items: Moon Stone, Steel Gloves +3
Rumours and tips:
- Baba Yaga has killed many citizens.
- Another Green Dragon offers a free rest in the tent.
You cannot proceed into the Iron Woods yet.
Ice Temple Bridge (optional)
You cannot cross yet.
Tyler
Items: Steel Blade +3, 2000 G x2, Mass Stimulant, Moon Stone (under bed in inn), Wounding Ammo (NPC), Moon Stone (Scarecrow), Moon Stone (well), Moon Stone (Spearholder)
Village right at the entrance of this area.
Rumours and tips:
- Steel makes you weak to ice.
- There is another Hero Tyler in a location with much less snow.
- A night in the inn costs 450 G.
- Don’t forget to upgrade your gear.
- There are still places where the old ones where revered to.
You cannot reach the blue chest in the Storage Shed yet.
Come back after the blizzard ends.
Another Green Dragon NPC is interested in the Golden Hourglass and gives you Silver Feather.
There is a merchant in the dead forest to the east who is interested in them.
Talk to the Leader of the Green Dragons and he sends you to the woods in the east to meet a witch called Baba Yaga.
Gingertown
You can now proceed.
Iron Woods
Walk around until it got dark, then go south?
You arrive at a hut.
Take the Moon Stone and enter.
The menu is locked, so talk to the others and search each nook and granny of the hut.
You can either confirm or ignore Riley’s fears (you can do both).
After you have investigated the 2nd floor, return to the 1st floor.
Save at a different slot.
Head north of the hut.
Items: Stimulant +, Earth Stone, Moon Stone, 1000 G, Dragon Scale Helm, Attack Orb, Steel Axe + 3, Steel Shield +1, 3000 G,
Mobs: Snow Bee, Blue Flame, Tundra Barbarian, Frozen Imp
The Path of the first map is very confusing, but you can get all items without walking over water (what should be shortcuts later) while exploring clockwise.
The exit is to the NE.
Prepare before you enter the cave.
Boss Dark Pillager x3: weak to fire and light.
You obtain the Beast Fang and return automatically to Baba Yaga.
Return to her once the blizzard is gone.
The cave is blocked but the illusion is gone.
Don’t forget to rest in Gingertown.
Tyler
Report to the commander of the Green Dragons and the Ice Temple Bridge gets unblocked.
Main Quest: Into the North Part 3
Ice Temple Bridge
You can cross now.
Ice Temple
Items: Moon Stone
Mobs: Snow Bee, Blue Flame, Tundra Barbarian, Frozen Imp, Tundra Beast
You can destroy the snowballs, sometimes chests are hidden in them.
Touching the blue flames will apply Frost to party.
Floor 1
Items (west): Ice Stone (snowball), 1000 G
Items (east): 1000 G, 1000 G (ice crystal), Luck Orb (ice crystal)
Items (NW): Ice Stone, 3000 Gold
NW: Pull all levers and head east to pull a switch.
Enter the other lower room and pull the lever.
Climb the northern stairs.
Floor 2
Items: Potion of God’s Vigor, Frozen Round Shield (ice crystal), Moon Stone (ice crystal)
Go downstairs to the east.
Floor 1
Items: 1000 G
Items (south): Steel Spear +3
Pull the switch in the south room (yep, it’s the NE room from before) and bridges will appear in the same room.
Fall down the hole and touch the whirl!
Boss Akull: weak to fire and light.
You obtain the Ice Crystal.
Now you can walk over water.
Pull both levers and climb up again.
Before you now return to exploring the Ice Temple, revisit old places…
Once you are ready, pull the last lever at Floor 1, NW room and climb the ladder to proceed.
Floor 2
Items (room 1): Potent Magic Water (snowball)
Items (west): Magic Water (snowball)
Items (east): Steel Greatsword +3, Gold Brick x15, Dual Ammo
To the west is a Resting Room.
To the east, light up the oil pans to open up the treasure room behind.
Read the stone tablets and remember “N:23”.
To the north is
Floor 3
Riley learns Solar Blast.
Boss Zomok: weak to fire and light but immune to Wind. Use Rileys Ultimate to its fullest!
You obtain the Essence of Defense.
You can fast travel to Gaiden or rest and do some character quests.
Don’t try the other Rifts yet, only take the Moon Stones at the Entrances.
Taran (optional)
Items: Attack Orb
Report to the commander of the Green Dragon to obtain the Blade of the Green Dragon.
Iron Woods (optional)
Report to Baba Yaga to start Dimitri’s Character Quest.
Castle Gaiden
Report to the King.
Ice Crystal Part 1
Tyler
Items: Dragon Scale Cape
Mountain Path
Items: Magic Orb
Items (Hidden Caves): Magic Orb x2, Health Orb x2
Taran
Item (tunnels): Health Orb
Mage College Sewers
Items: 2000 G, Moon Stone, Magic Water, Gold Brick, Mid Potion, Pandorium Mirror
Mobs: Cursed Spirit
World Map
You can walk over the ocean and reach new locations.
??? Ice Rift (level 55)
Items: Moon Stone,
Mobs: Ice Shade, Frost Wulf
West of the Ice Temple.
All mobs are weak to fire.
Note: all mobs in the Rifts are strong, so only get the Moon Stone at the Entrance.
Muscle Tower (level ??)
Items: Moon Stone
South of Gaiden.
Don’t enter yet, only get the Moon Stone.
??? Dark Rift (level ??)
Items: Moon Stone
Island at the NE corner of the World Map.
??? Fire Rift (level ??)
Items:
Small Island west of the Muscle Tower or south of Taran.
You cannot reach more locations yet.
Thunder Rift ??? (level ??)
Items: Moon Stone
Found over the ocean at the east border of the World Map, east of the Death Land.
Pandorium Mirror Part 1
Mage’s College
Items (3rd floor): Attack Orb, MAttack Orb, Moon Stone x3, 5000 G x2
Items (inn): Health Orb
Taran
Items (Hunter’s Guild): Health Orb
You cannot leave the mirror room.
Find Glitch #3:
The Guild Shop sells rare Potions like Potent Magic Water, Potion of God’s Vigor and Powerful Potion.
You cannot leave the mirror guild.
Main Quest: Guardian of the Land of Death Part 1
Castle Gaiden
Your next destination is the Abandoned Checkpoint south of Ednevar.
Abandoned Check Point
Items: 2000 G x2, Attack Orb
Now you can cross over the water.
World Map
Mobs: Razor Claw, Eyegore, Nightshade (weak to fire), Death Naga
The mobs in the Land of Death should be weak to light.
Necroviicus
Items: Moon Stone (well), Moon Stone (pot), Moon Stone (inn), Moon Stone
A town in the middle of the mountain ranges.
Rumours and tips:
- A night in the inn costs 500 G.
- The poisonous water in this area deals floor damage and applies Plague to the party.
Cave (optional)
Items: 5000 G, Potent Magic Water, Powerful Potion, Demon Scroll, Steel Blade +5
An old Hunter base in the sea right next to the checkpoint.
Save before you enter the inner room and meet Axel.
That starts another Character Quest for Ramona.
Forest of Demise
Items: none
Mobs: Razor Claw, Eyegore, Nightshade (weak to fire), Death Naga, Vengeful Spirit
First head east and then southeast (you can ignore the NE).
The Merchant trades your Silver Feather for a Red Ball and sells potions afterwards.
Return to the entrance and proceed to the north.
Death Castle
Items (1st floor): Moon Stone x3, Magic Water, Stimulant + x2, 1000 G x8, 2000 G x2, Coffin Key (coffin), Book of the Blood Moon, Health Orb, Magic Orb,
Mobs: Razor Claw, Eyegore, Nightshade (weak to fire), Death Naga, Vengeful Spirit
Best you start going west and make certain you search each room.
You will encounter red orbs that turn blue when touched.
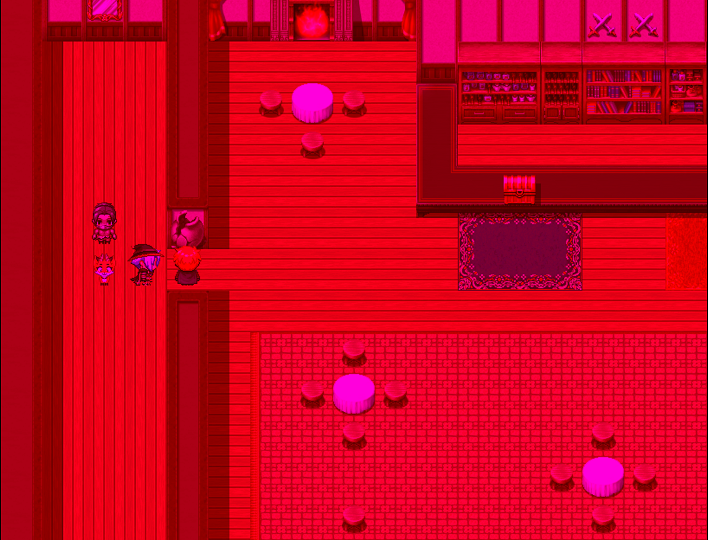
After all orbs are blue, return to the one marked with a blue star to find a chest with Divine Ammo.
One of the coffins houses a Cursed Warrior, which is like mini boss and drops Ring of Magical Evasion.
Another one houses a Cursed Mage (no drops).
The Coffin Key can be used at either the locked chest with fire-stones around or the one with ice-stones around near the entrance.
The fire one contains Ring of Burning Flame.
The ice one contains Ring of Crystal Ice.
Gaiden (optional)
Deliver the Red Ball to the Wolf-NPC near the jeweller to obtain the Milk Cafe Membership Card.
Milk Cafe (optional)
Items: Moon Stone x2
Enter with your Milk Cafe Membership Card you can buy the best milk there is.
Character Quest Ramona
Family Reunion
Start: Cave next to the Abandoned Check Point.
1st stop: Mountain Path
2nd stop: Forest of Twilight, near the hut.
You obtain the Bahamut Slasher and Chaos Magican’s Hat.
Return here after in the Post Game.
Playing Games
Start: Mage College Prism Hall (Dorms), talk to a certain NPC on the 3rd floor.
Post Game Content.
Character Quest: Riley
Animal Experiments
Start: Talk to Rika in Animal Village
Once you have the Ice Crystal, you can walk to the small island next to the village.
??? Water Rift (level 45)
Items: Moon Stone, Steel Axe +5, Water Stone x3, Demon Scroll
Mobs: Lacus Spawn Hatchling, Lacus Spawn Teen
Don’t enter yet but you can get the Moon Stone.
All mobs are weak to thunder.
You can cross the poisonous water, but get floor damage.
Meet up with Daro.
Boss Aspect of Lacus: weak to thunder.
You return automatically to Rika and both of them get engaged (Post Game content).
At the place Daro was, you can challenge the old one now.
Boss Lacus: weak to thunder. Recommended level ??.
Character Quest: Engore
Revenge
Start: Lonely Hut ??? at the snowy area, NE of Tyler.
Engore’s adoptive mother, Alys the Dragon Slayer, sends you to a cave of the desert south of the Giant Capital.
Old White Dragon Base
Items: 800 G, 1810 G, Moon Stone
Mobs: Order Acolyte, Order Guard
Boss Order Elite and 3 Acolytes and 3 Guards: Take out the minions with AoE from Ramona and Riley, the others will focus on the boss. Beware of the state Plague!
Use the Fast Travel to return to Alys.
Alys’ House (Lonely Hut ???)
First rest for free in Gingertown.
Talk to Alys.
Now the Tower ??? west of the Giant Capital will be unsealed.
Earth Rift (Tower ???, level 40)
Items: Earth Stone x3, Steel Revolver +5, Steel Gloves +5, Demon Scroll, Steel Spear +5
Mobs: Order Acolyte
First head NE.
The lore isn’t moving.
Talk to Alys before talking to the boss, as she will heal you for free.
Boss Aspect of Terra: weak to wind and ice but immune to thunder. He is very strong, so debuff his MAT. Romana’s Ultimate Annihilation is helpful, too.
Alys’ House (Lonely Hut ???)
You return to Alys’ House automatically.
Some Giants seems to have fled to a foreign land (Post Game Content).
From now on you can rest here for free.
Earth Rift (Tower ???, level ??)
When you touch the crystal, you can challenge the optional boss.
Boss Terra: Same tactic as versus the Aspect of Terra.
Reward???
Character Quest Dimitri
Dragoni Plant
Start: Report to Baba Yaga in the Iron Woods after the Ice Temple.
Gust Tower (level 45)
Unlocked after you have reported to Baba Yaga after the Ice Temple.
Found in the Eastern Sea behind the reef.
Items: Moon Stone, 9000 G, Potent Magic Potion, Demon Scroll, Wind Stone x3, Steel Sword +5,
Mobs (all weak to earth): Wanderer, Gust Guardian
Climb up the ladders and meet Accord on the top.
Boss Aspect of Eurus: weak to Earth. Romana should cast Annihilation.
You return automatically to Baba Yaga and promise to return (Post Game content) to look for her lost love and help her on the chicken farm.
Note: On the top floor you can now challenge the old one
Boss Eurus: weak to wind. Recommended Level ??
Moon Stone Rift (level ??)
The Moon Stone merchant in Taran will drop a Strange Stone when he leaves.
Once you use the Strange Stone in the menu, you will teleported to the Moon Stone Rift.
Legendary Mobs
As those legendary mobs appear at random, you can be lucky or unlucky with your party/equipment.
Gaiden Area
Animal Village Area
Titanic Hill: weak to ice and water, resists fire, earth and blades, immune to thunder. Drops Earth Gem.
South Canyon & Mage College Area
Desert
Desert Titan: weak to wind and ice, immune to thunder and earth. Drops Earth Gem.
Augmenting Equipment
Weapons
Choose a weapon from the item menu and then a gem you want to attach.
You can change/detach the gems anytime.
Gems are Water Stone, Fire Stone…
Armor & Accessory
Choose an armor or accessory from the item menu and then the jewel you want to attack.
Dimitri
First character you can control.
A retired and undead level 5 Hunter.
Weapons: Blade, Claws, Guns
Armor: Shields, Light Armor
At level 15, 30 earns Skill Slot.
Skills-Tree
| Level | Skill | Weapon |
|---|---|---|
| Minor Heal | 5 | |
| X-Blade | 5 | Blade |
| Hypersonic | 5 | |
| Cyclone | 6 | |
| Fan the Hammer | 8 | Guns |
| Blood Draw | 9 | Claws |
| Resurgance | 12 | Claws |
| Feint Slash | 14 | Blade |
| Mid Heal | 15 | |
| Counter State | 18 | Claws |
| Tracking Shot | 20 | Guns |
| Rally | 25 | |
| Tornado | 31 | |
| True Heal | 32 | |
| Berserker Slash | 34 | Claws |
| Wind Shot | 37 | Guns |
| Detonating Slash | 39 | Blade |
Romana
Second character you can control.
A level 5 Magic College Wizard Student.
Weapons: Staff
Armor: Books, Magic Armor
New Skills Slot at level 10, 20.
Romana learns her Ultimate aber defeating the 2nd Dark Beast at the Mage’s College.
Skills-Tree
| Level | Skill | Weapon |
|---|---|---|
| Flameshot | 5 | |
| Ice Crystal | 5 | |
| Bolt Strike | 5 | |
| Bubble | 5 | |
| Charge Up 1 | 5 | |
| Spark | 9 | |
| Blade of Ice | 11 | |
| Hydro Bomb | 12 | |
| Napalm | 14 | |
| Storm of Fury | 16 | |
| Explosion | 17 | |
| Metamagic: Infect | 18 | |
| Blizzard | 19 | |
| Geysers | 20 | |
| Resurgence | 20 | |
| Charge 2 | 22 | |
| Hellfire | 25 | |
| Frozen Swords | 29 | |
| Titanic Flood | 34 | |
| Charge Up 3 | 37 | |
| Galvanism | 40 |
Riley
The 3rd character comes from the Animal Village and joins together with Engore.
He is a level 5 Druid.
Weapons: Sword
Armor: Collars, Magic Armor, Magical Herbs
New Skills Slot at level 10, 15, 20.
Riley learns his Ultimate during the battle with the 3rd Dark Beast in the Ice Temple.
Skills-Tree
| Level | Skill | Weapon |
|---|---|---|
| Minor Heal | 5 | |
| Mend | 5 | |
| Resurgance | 5 | |
| Charge Up 1 | 5 | |
| Vampiric Drain | 7 | |
| Tempo Up! | 8 | |
| Refresh | 9 | |
| Holy Flash | 10 | |
| Mid Heal | 11 | |
| Dark Bomb | 13 | |
| Toxic Spore | 15 | |
| Healing Melody | 17 | |
| Rejuvenate | 18 | |
| Dance of Defense | 19 | |
| Charge Up 2 | 20 | |
| Stunning Dance | 21 | |
| Dance of Bewilderment | 24 | |
| Remedy | 25 | |
| Healing Ballad | 28 | |
| True Heal | 30 | |
| Pillars of Light | 33 | |
| Dark Flame | 34 | |
| Healing Epic | 35 | |
| Charge Up 3 | 37 | |
| Resurrection | 39 | |
| Miracle | 42 |
Engore
The 4rd character joins together with Riley.
He is a level 5 Barbarian Giant.
Rumours tell he can play the piano.
Weapons: Fists, Katana, Axe
Armor: Light, Medium and Heavy Armor
At level 15, 30 earns Skill Slot.
Skills-Tree
| Level | Skill | Weapon |
|---|---|---|
| Meditate | 5 | |
| War Cry | 5 | |
| Intimitating Crush | 5 | Fists |
| Cleave | 7 | Katana |
| Earth Throw | 8 | |
| Power Attack | 10 | Axe |
| Vigor | 12 | |
| Aura Punch | 14 | Fists |
| Stoneskin | 18 | |
| Crushing Blow | 20 | Axe |
| Counter State | 21 | Katana |
| Intimidate | 25 | |
| Sweeping | 29 | Fists |
| Fury Cutter | 31 | Katana |
| Brutal Rush | 34 | Axe |
Veles
The 5th character joins at the Rest Stop in the Desert.
He is a level 16 Warlord from Oasis Town.
Weapons: Greatsword, Spear
Armor: Heavy Shields, Medium and Heavy Armor
At level 15, 30 earns Skill Slot.
Skills-Tree
| Skill | Level | Weapon |
|---|---|---|
| Shield Bash | 16 | Shield |
| Improved Guard | 16 | Shield |
| Launch | 16 | Greatsword |
| Illusion Stab | 16 | Spear |
| Minor Heal | 16 | |
| Ice Crystal | 16 | |
| Mid Heal | 19 | |
| Barrier | 22 | |
| Blade of Ice | ?? | |
| Eliminate | 29 | Spear |
| Whirling Blade | 30 | Greatsword |
| Morale | 32 | |
| Truie Heal | 35 | |
| Icy Death | 39 | Spear |
| Fury Cutter | 31 | Katana |
| Brutal Rush | 34 | Axe |
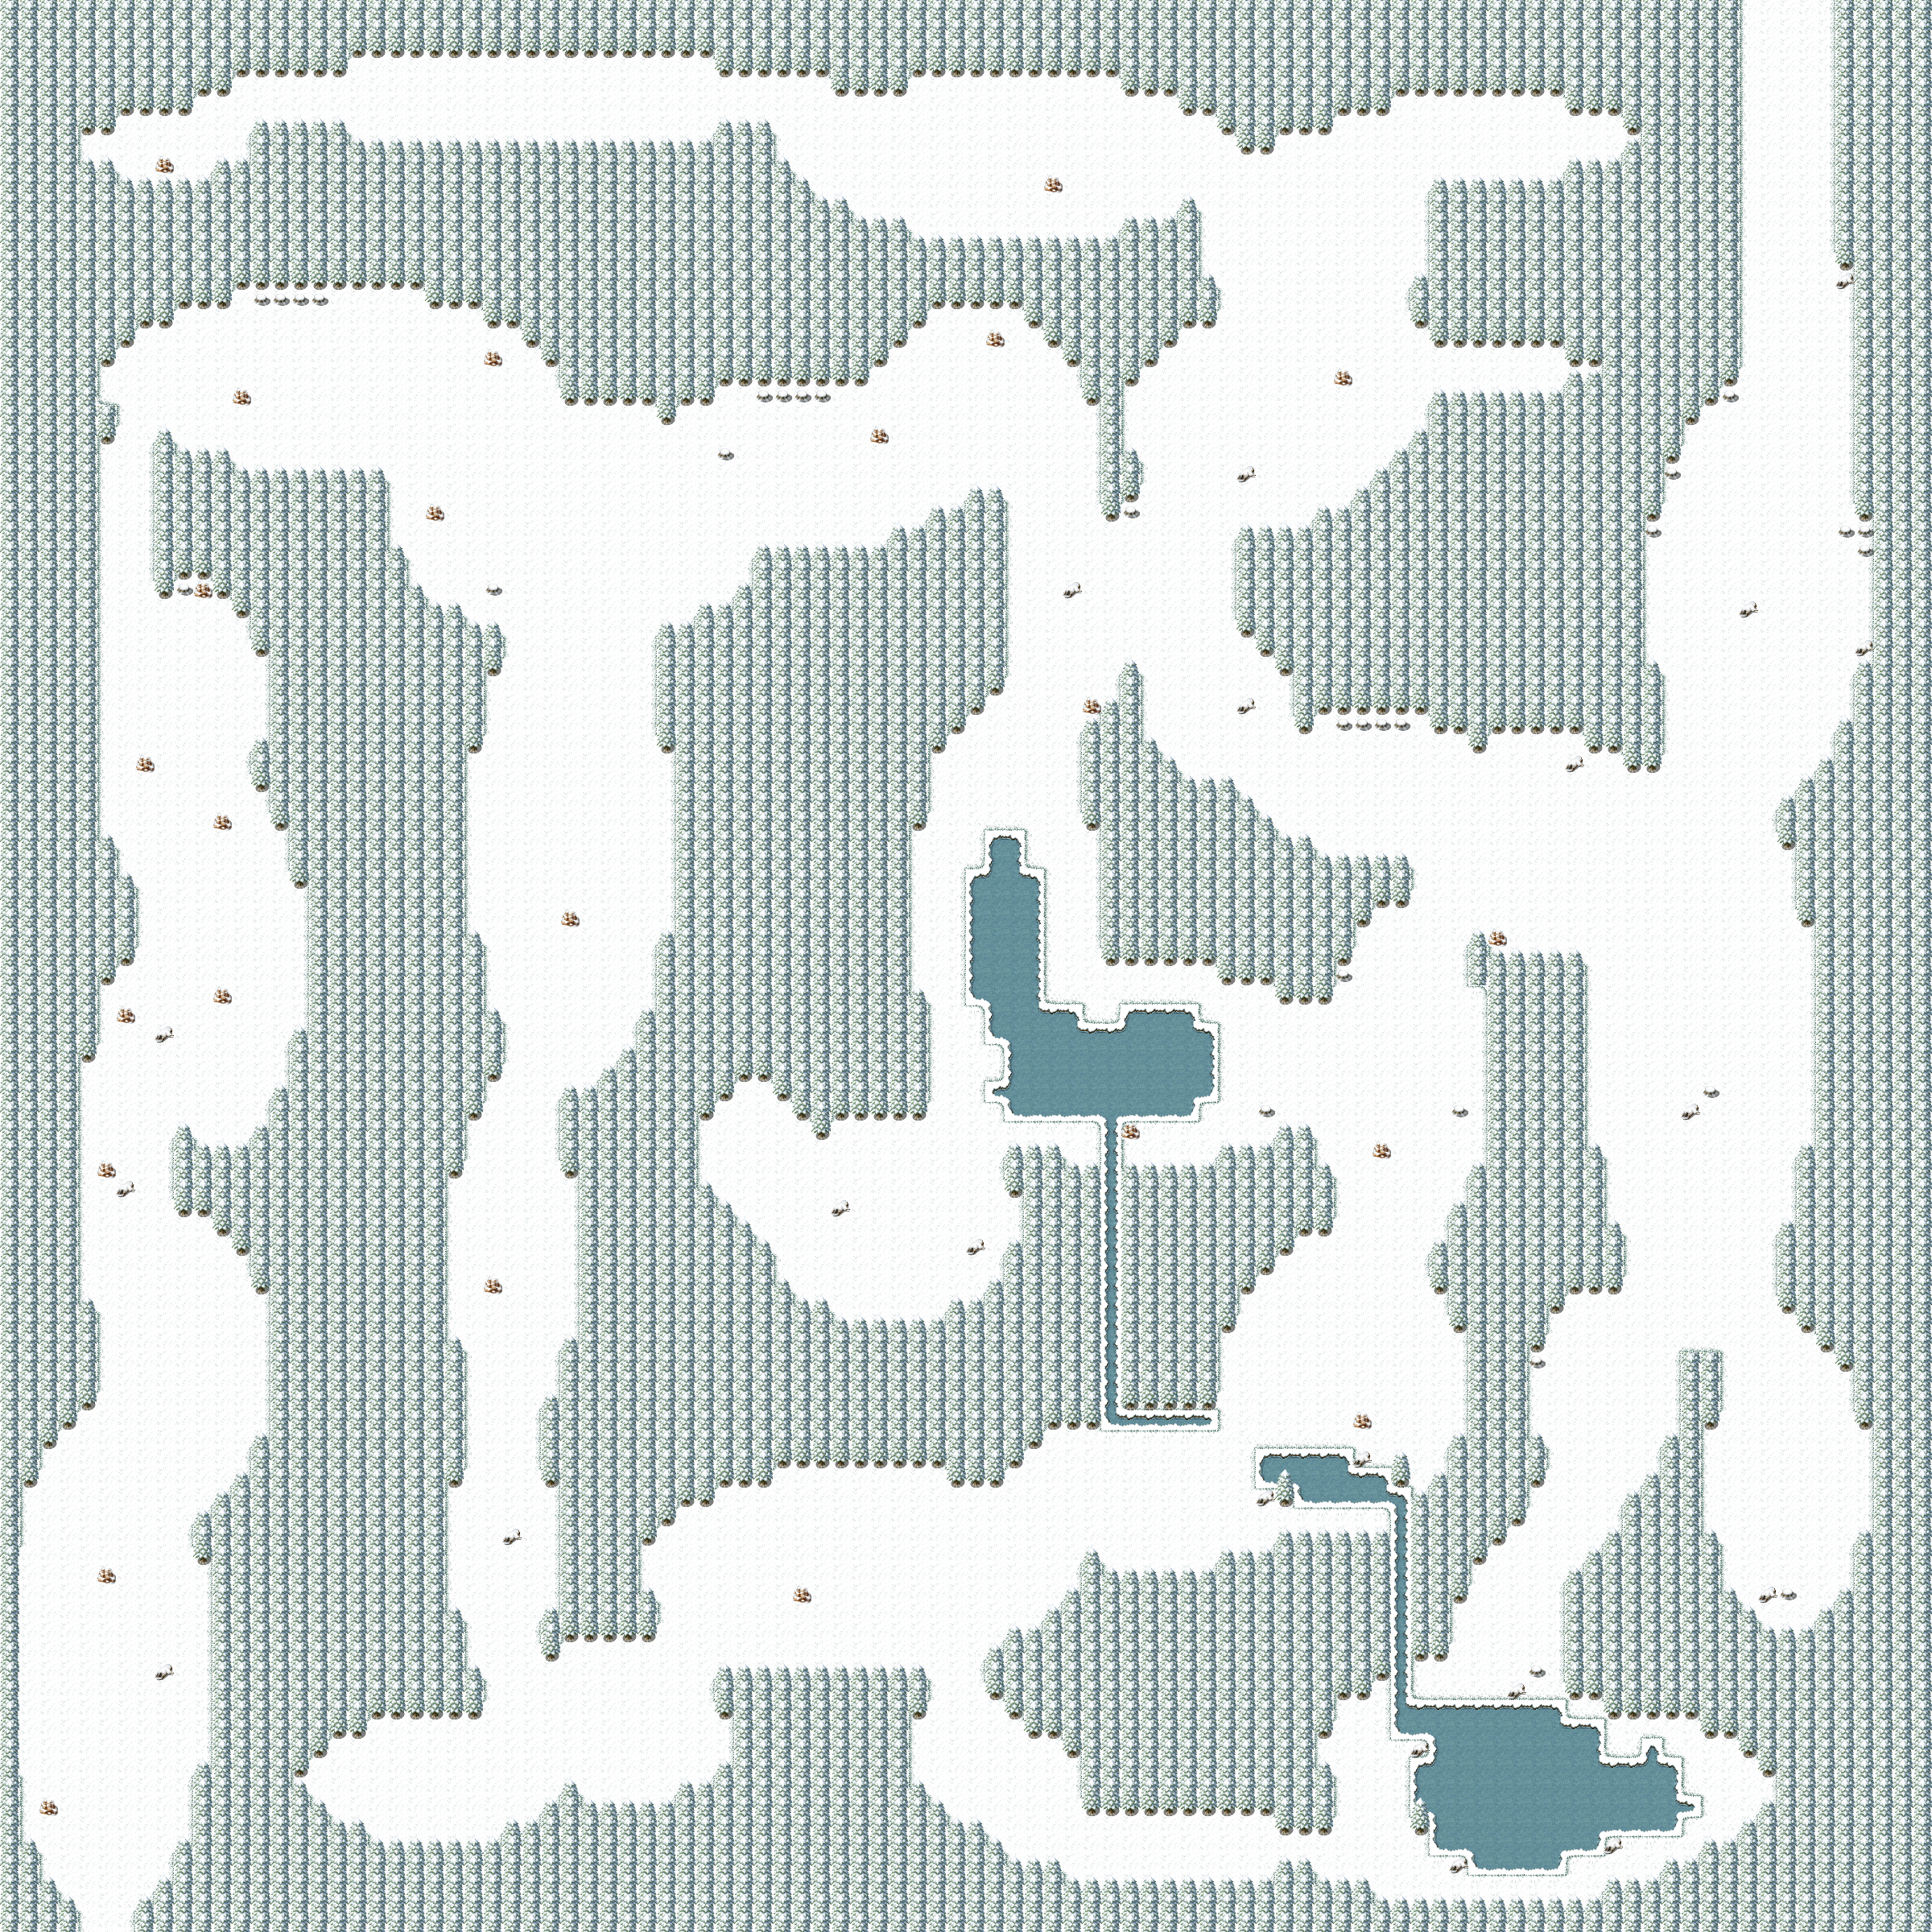
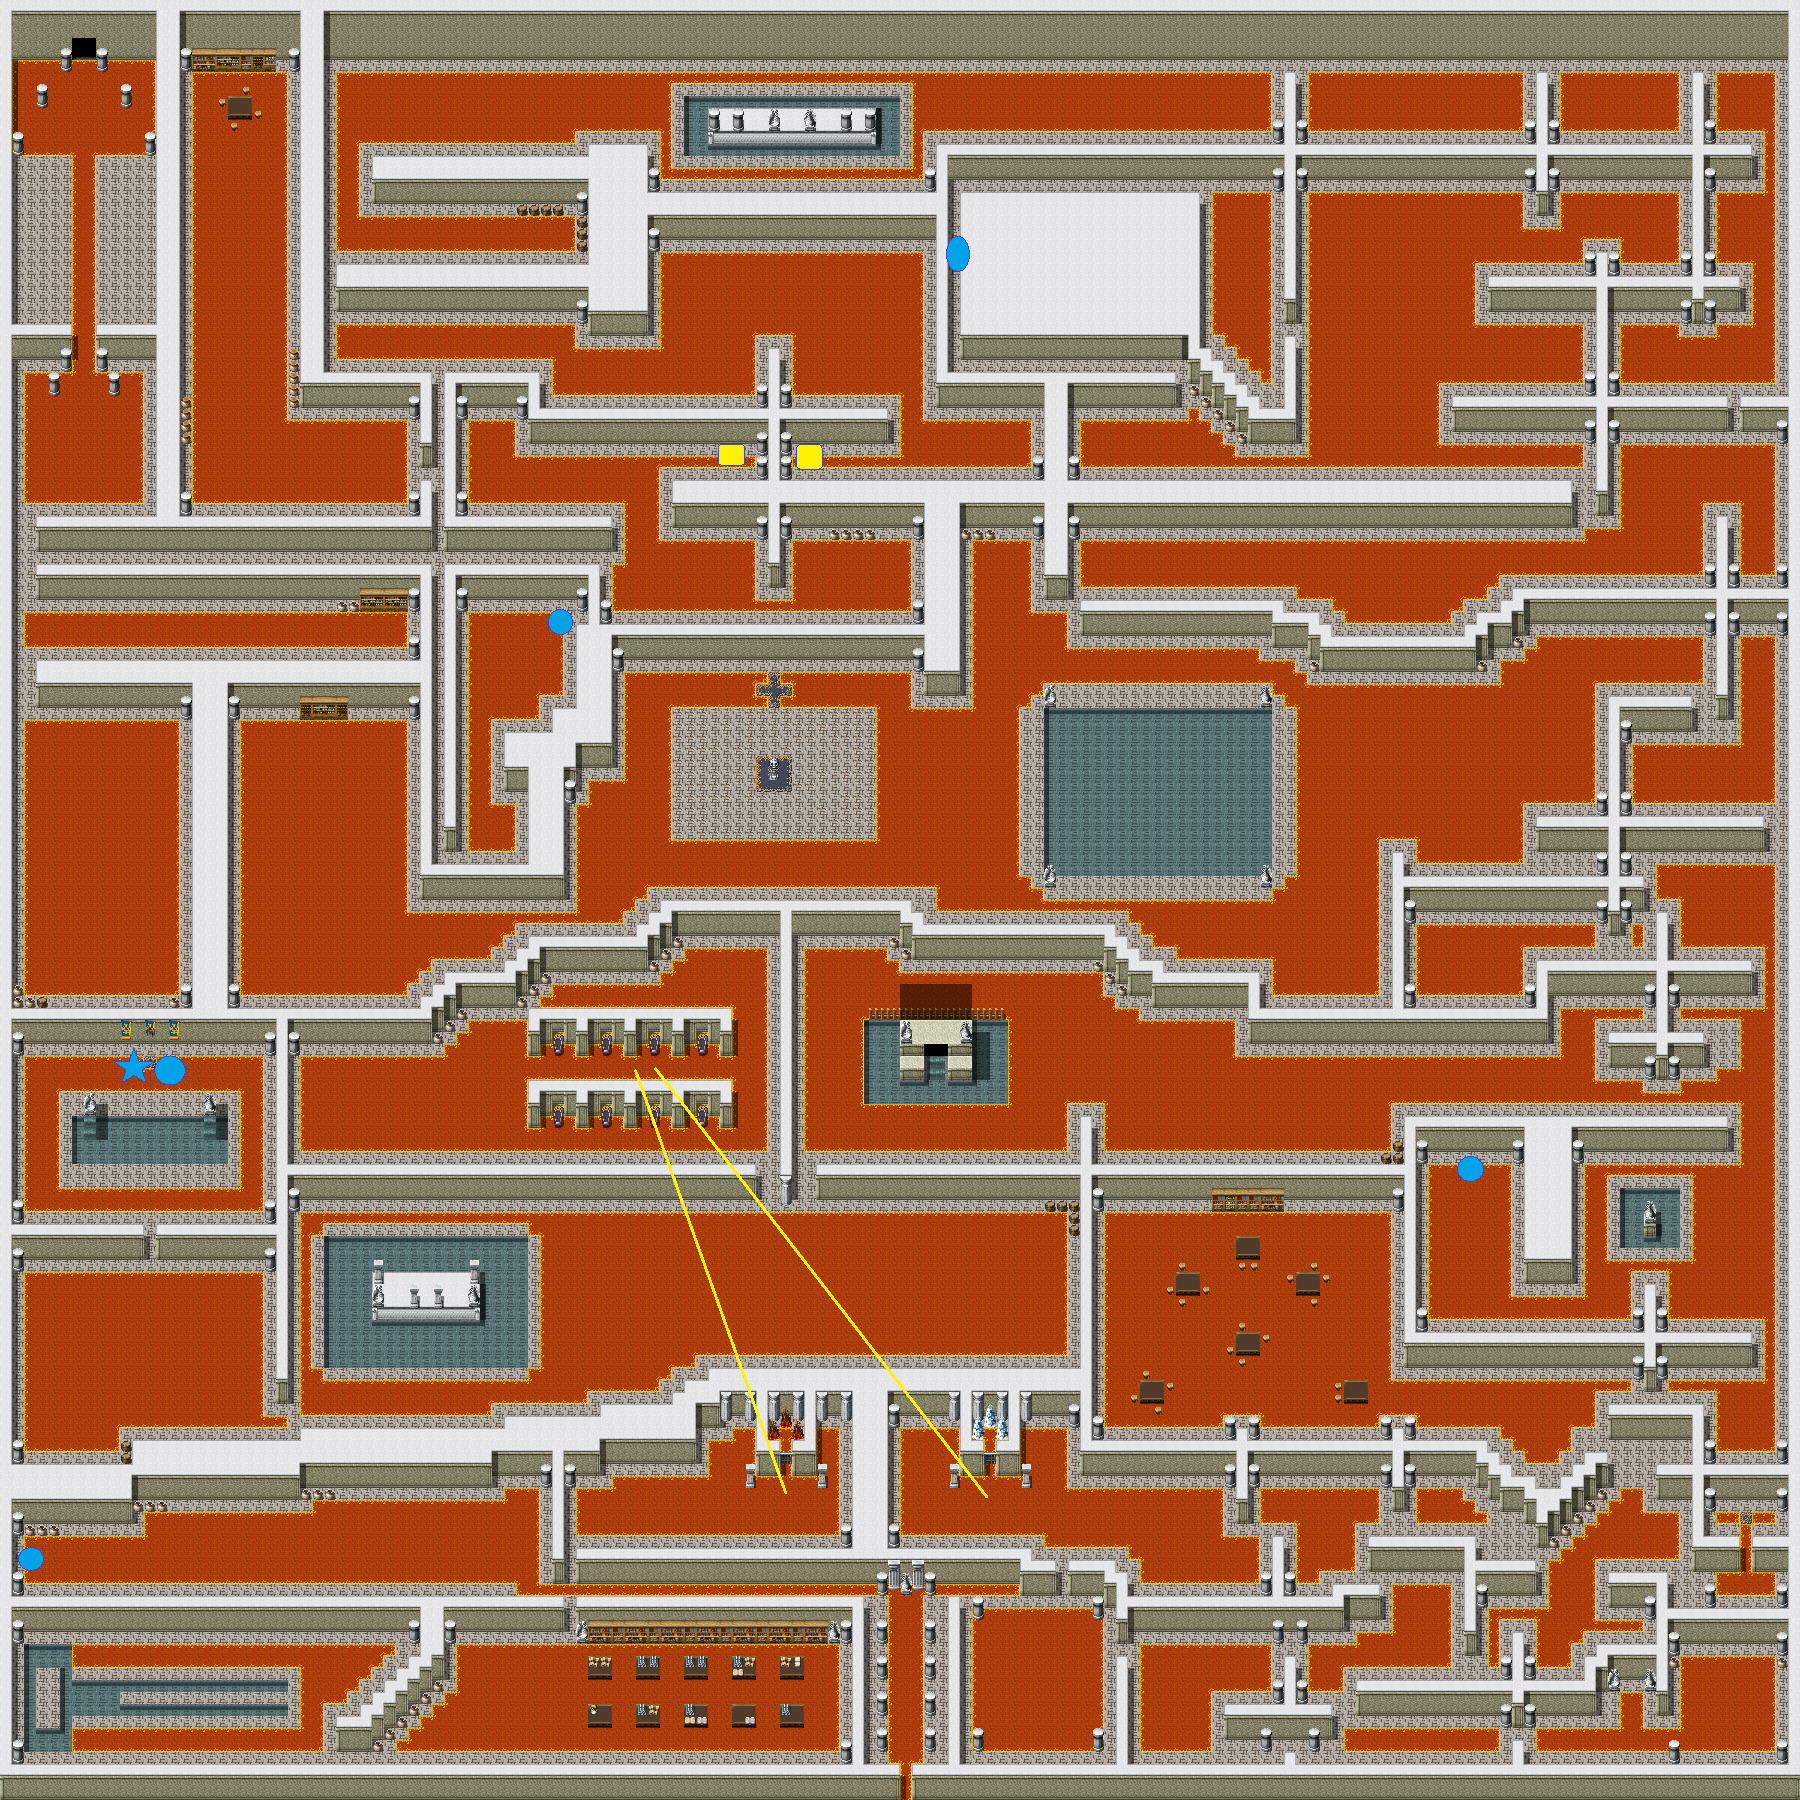
World Map
I have tried to make the location more visible with red stars.
Torches of Fate – Full Walkthrough and Achievements is described in this guide. If you notice anything that needs to be fixed or updated, please let us know in the comments, and we’ll correct it as quickly as possible. Today, may it be a good day for you. The author and creator Firefly130984 inspired this post. Also, don’t forget to add us to your bookmarks if you like the post; we publish new posts every day with additional material, so visit us frequently for more posts.
- All Torches of Fate Posts List




Leave a Reply