Full text walkthrough with pictures where appropriate, no achievement help
Misc
Raxa, like Dooley, has something to say on every single screen
Case 1: Missing, Presumed Darkside
TV Studio
Go right
TV Station Hallway
Talk to Mystic Lady
Take the STAR STAR out of the bin
Enter the Dressing Room
Dressing Room
Take the Crystal, get MELLITE
Take the DIDGERIDOO
Look at Fan Posters, talk to Psychic
(Try to take the Key)
Leave room
TV Station Hallway
Go right
TV Station Reception
Take DELIVERY BOX
Open DELIVERY BOX with STAR STAR, get GLASS BOWLS
Go outside
TV Station Parking Lot
Give GLASS BOWLS to any one of the kids
Pick up BAG OF NUTS
Go back inside
TV Station Reception
Go left
TV Station Hallway
Enter the Dressing Room
Take the LOCKBOX KEY
Go back out
TV Station Hallway
Go left
TV Studio
Combine DIDGERIDOO with BAG OF NUTS, get NUT CANNON
Use NUT CANNON on Squirrel
Go through the door
TV Station Storage Room
Open the Lockbox with the LOCKBOX KEY, get GO BAG
Go all the way to the parking lot
TV Station Parking Lot
Give GO BAG to Psychic
Switchboard Building Exterior
Get CRIME SCENE TAPE from the car
Use CRIME SCENE TAPE on entrance
Enter the building
Switchboard Building Interior
Examine the Switchboard
Go upstairs
Switchboard Building Roof
Search the toolbox, get SKETCHY ADDRESS
Go back outside, enter the construction worker office
Construction Worker Office
Talk to Tyrese, get MANIFEST
Combine SKETCHY ADDRESS with MANIFEST
Leave the office, drive off with the car
Go to the Auction House
Auction House Exterior
Examine the stall, get STALE PIZZA
Enter the building
Auction House Showroom
Take the Faberge Acorn from the bin
Leave the building, drive off
Pier 13
Give MELLITE to the bear, get ROBOTIC BIRDS
Examine SOVIET TECH, get VHS
Go through curtain
Black Market
Look at Transceiver
Talk to Wang, “I need that transceiver”
Go back to the car, drive off
Junkyard Exterior
Enter
Junkyard
Take OLD TUBE OF SOLVENT
Go right
Machinery
Throw STALE PIZZA on crusher/conveyor
Go left
Junkyard
Take broken console, get BROKEN JOYCHILD™
Leave, drive off
Pier 13
Give the BROKEN JOYCHILD™ to Mark, get FIXED JOYCHILD™
Enter the Black Market and go all the way right
Alleyway
Give the FIXED JOYCHILD™ to Man In Big Coat
Go through the vent
Cookie Bakery
Take SEA HAG COOKIES from the box
Leave the room, go left
Cookie Shop Exterior
Give SEA HAG COOKIES to Man With Tiny Hammer, get AUCTION GAVEL
Go back to the car, drive off
TV Station
Go all the way to the Dressing Room
Dressing Room
Use make up on the ROBOTIC BIRDS, get PAINTED BIRDS
Go back to the car, drive off
Pier 13
Go all the way to the bakery
Cookie Bakery
Switch PAINTED BIRDS with the real ones
Go back to Wang
Black Market
Talk to Wang, “I did the thing”, get TRANSCEIVER
Go to the car, drive off
Auction House
Go to all the way right
Bidding Room
Show AUCTION GAVEL to guard
Go through door
Backstage
Take SOVIET MANUAL and LOOM
Go back to the car, drive off
TV Statiion Reception
Give VHS to receptionist
Go outside to the parking lot
Go to the hallway, enter the left door
Edititing Room
Use OLD TUBE OF SOLVENT on the FAKE FABERGE ACORN, get REAL FABERGE ACORN
Give REAL FABERGE ACORN to Marv
Look at tape
Go to the car, drive off
Pier 13
Talk to Mark, get SOVIET TECH
Drive off
Junkyard
Go all the way right
Machinery
Interact with the door
Office
Get TANGLED WIRES
Take art from the fridge, get GREMLIN ART
Go back to the car, drive off
Switchboard Building Exterior
Enter construction worker office
Use mug of tea on GREMLIN ART, get REPLACEMENT PAGES
Go to the car, drive off
Auction House
Go to the Bidding Room
Bidding Room
Use REPLACEMENT PAGES on podium, get PHONEBOOK PAGES
Go back to the car, drive off
Switchboard Building Exterior
Enter the building
Switchboard Building Interior
Use TRANSCEIVER and PHONEBOOK PAGES on Switchboard
Combine TANGLED WIRES with LOOM
Yellow (uppermost left) one up, blue (bottom left) down, yellow all the way up, green(second from bottom) down, red (second from top) up
Get UNTANGLED WIRES
Use UNTANGLED WIRES on Switchboard
Use Switchboard
Set the wires the the last shape (screenshot coming), then hit dial
Get DOOLEY’S CLUES
Go to the car, drive off
Apartment Exterior
Enter the building
Apartment Interior
Take GYM BAG, search the coat to get CHALK, take CANDLES
Use DOOLEY’S clues on Conspiracy Board
Unselect (turn grey) all locations besides Laundromat, then click the green circular button
Leave Apartment
Apartment Roof
Use CANDLES, CHALK, and GYM BAG on the raised block
CASE CLOSED
Case 2: Twilight Years

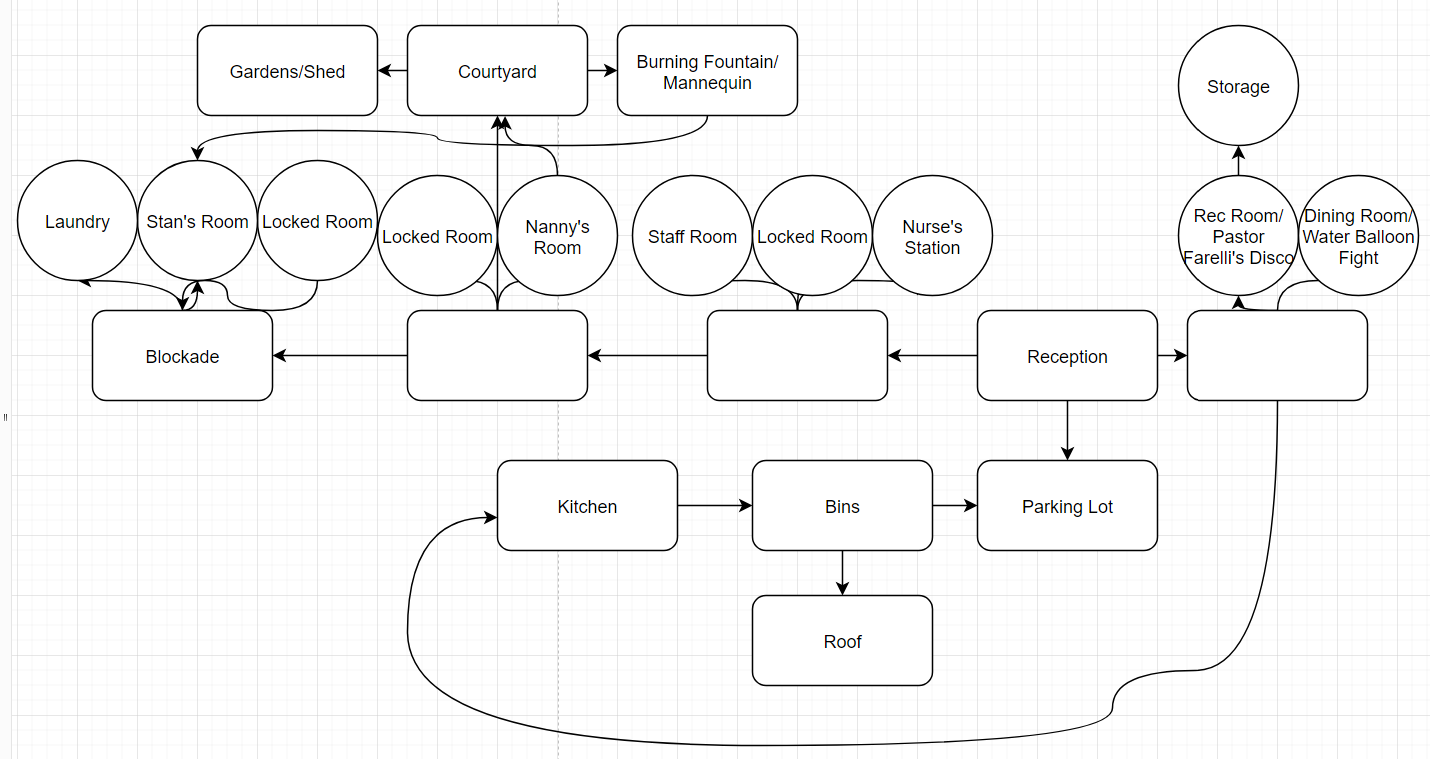
(Click to enlarge)
No “go there” this time due to having a map and location headlines
Parking Lot
Go inside
Reception
Go to Nanny’s Room in the West Wing
Reception
Talk to Receptionist, exhaust all options
Bins
Pick up box, get MEDICAL STICKERS
Climb Ladder
Roof
Grab a BROOM from the collection of brooms
(Talk to the Fair Maiden)
Kitchen
Grab the POTS AND PANS
Take the SCISSORS
Courtyard
Go left, enter the shed
Take the HAMMER
Go right to the fountain
Use the BROOM on the burning mannequin
Put POTS AND PANS on the mannequin
Hammer the POTS AND PANS
Take the armour off of the mannequin, get MAKESHIFT ARMOUR
Grab the fountain topping, get BROKEN FOUNTAIN ORNAMENT
Laundry
Grab TEDDYBEAR
Reception
Use SCISSORS on stack of magazines, get MAGAZINE CLIPPINGS
Rec Room
Give BROKEN FOUNTAIN ORNAMENT to Pastor Farrelly, get SUPER SOAKER
Dining Room
Use SUPER SOAKER on either old person
Take balloons, get WATER BALLOONS
Nurse’s Station
Combine MEDICAL STICKERS and MAGAZINE CLIPPINGS, get DOCTORED (HAHA!) CLIPPINGS
Give DOCTORED (HAHA!) CLIPPINGS to nurse
Take DICTAPHONE
Use WATER BALLOONS on vat of denture gum, get GUM BALLOONS
Parking Lot
Throw GUM BALLOONS at squad car
Grab discarded banner, get BANNER
Roof
Give MAKESHIFT ARMOUR to Fair Maiden
Dining Room
Press the switch
Put DICTAPHONE in TEDDYBEAR, get POSSESSED TEDDY
Combine POSSESSED TEDDY with BANNER, get POSSESSED TEDDY WITH ROPE ATTACHMENT
Put POSSESSED TEDDY WITH ROPE ATTACHMENT on fan
Press the switch again
Rec Room
Use the storage door
Storage
Take the PAPER and the SELF-ASSEMBLY TABLE
Nanny’s Room
Get CUPS OF TEA and SANDWICHES
Take the CREDIT CARD from the shelf
Open the closet
Grab the knitting needles and twine, get KNITTING NEEDLES
Talk to Upsidedown Man In Closet, exhaust options
Leave the room through either door
Burning Fountain
Use CREDIT CARD on lit-up door
Take RED SHIRT
Laundry
Put PAPER in gap under door
Use KNITTING NEEDLES on closet, get CLOSET KEY
Use CLOSET KEY on closet
Grab GARLIC
Grab photo, get CLASS PHOTO
Search dresser, get SMELLY KEYS
Bins
Use SMELLY KEYS on bins
Search the third bin, get FILM PREVIEWS
Nanny’s Room
Combine CLASS PHOTO with FILM PREVIEWS, get EVIDENCE
Show EVIDENCE to Upsidedown Man In Closet
Leave the room and go right once
Staff Room
Take the keys, get HEX KEY
Search the toolbox, get SCREWDRIVER
Take the animal throw, get WHITE THROW
Laundry
Put RED SHIRT and WHITE THROW in the washing machine
Use the washing machine, get DYED THROW
Rec Room
Use SCREWDRIVER on lights, get DISCO LIGHTS
Roof
Put DISCO LIGHTS on lightning rod
Courtyard
Go left
Put DYED THROW in bandstand
Put SELF-ASSEMBLY TABLE in carpeted bandstand
Assemble the SELF-ASSEMBLY TABLE by putting the parts in the right spots on the left, get BÖRKED TABLE
Combine GARLIC and SANDWICHES, get GARLIC SANDWICHES
Put CUPS OF TEA and GARLIC SANDWICHES on BÖRKED TABLE
CASE CLOSED
Case 3: Druid’s Delight
To be continued…
I hope you enjoy the Guide we share about The Darkside Detective: A Fumble in the Dark – walkthrough; if you think we forget to add or we should add more information, please let us know via commenting below! See you soon!
- All The Darkside Detective: A Fumble in the Dark Posts List


Leave a Reply