Character Creation Basics
There are three methods of character creation:
Pick a class
Pre-built characters with stats and skills distributed based on a predefined archetype. (Soldier, Rogue, Summoner, etc)
Random Character
Distributes all stat points and skill points at random. Tends to start out somewhat unspecialized, but random characters get 3 additional stat points that the other options don’t.
Custom Creation
You get to distribute all of your skill and stat points yourself to make a custom-built character.
Character Creation strategy
If you’re playing a game on the “standard” game mode, starting on level 1 of the dungeon, it really doesn’t matter what option you pick, because you’ll have more than enough opportunity to shape your character as you play the game. Random characters probably have a tiny edge long-term due to the additional +3 stat points.
If you’re playing on an alternate game mode or starting on a deep level of the dungeon, the calculus changes. In this case you’ll probably want to build a custom character to help you get over the initial hump at the beginning of the game when you’re greatly outclassed by all the enemies. What you’ll want to put your points in will depend a lot on what kind of perks you’re transferring over from previous builds, but here are some general tips:
- Stat-wise, invest heavily in Speed to get your Initiative and Reflex save up. Body and Mind are useful to get your Fitness and Willpower up too. For offense, Intelligence works best as magic is the best way to kill enemies that outclass you.
- Pharmacology is one skill you’ll want to spend a number of skill points on to increase the strength of your Health and Mana medicines, which you’ll rely on heavily early on.
- Putting points in Elemental Magic as your primary killing skill is worth considering. A little investment will get you access to Fire Bomb, Ice Barrier, and Blizzard, all useful spells.
- Enough Conjuration to get Concealing Mist (LV 10) is nice, but you probably won’t have the skill points to afford it unless you’ve put a lot of Blood Drops into the Skills pillar.
Attributes
Strength
Each point gives: Melee damage +5%, Max Stamina +50
Comment: Important stat for anyone relying on melee damage, but even “pure” casters will want to invest in Strength in order to get their Stamina up.
Intellect
Each point gives: Magic damage +10%, Surprise chance +2%, Spell duration +.5 rounds (+1 round every 2 points)
Comment: Why magic is better than melee in this game. Scales up magic damage dramatically (also affects healing spells), gives you better spell duration and surprise chance–next to Speed, probably the most useful stat to invest in.
Body
Each point gives: HP +200, Fitness save +2%
Comment: The HP bonus is not really that useful, but you’ll want to get your Fitness save up early in the game. Once you get your Fitness save high enough you’ll want to stop (or slow down) your investment in Body.
MInd
Each point gives:SP +150, Willpower save +2%, SP Regeneration +1
Comment: Similar to Body. The SP bonus isn’t fantastic, but you want your Willpower save up early on, and the SP regeneration is nice too. Like Body, once your Willpower save is high enough you’ll want to focus on other stats.
Speed
Each point gives: Initiative +50, Reflex save +2%
Comment: Best stat in the game. Initiative keeps enemies from overwhelming you, Reflex save prevents them from hitting you in the first place. While your effective Reflex save tops out at 90% it’s worth putting points into Speed even past then, as it allows you to use heavier equipment while still maintaining a high dodge rate.
Luck:
Each point gives: Crit Chance +0.3%, Loot chance +0.5%, Item Rarity +0.2%. Willpower/Fitness save +.5% (1% every 2 points)
Comment: The effect for each additional point is barely noticeable, but it pays dividends over time. Especially important for anyone that uses melee as Luck will affect your critical chance much more than weapon skill or type.
Fitness
Effect: A secondary stat; your effective “Saving Throw” against physical status ailments (Poison, Crippled, Bleeding, etc)
Comment:Not that far into the game status ailments become a non-issue, and you’ll probably eventually get over 100% in this stat, but until then, your Fitness save is important. Especially critical when starting runs deep in the dungeon as high-level monsters poisoning you will kill you very quickly.
Willpower
Effect: A secondary stat; your effective “Saving Throw” against mental status effects (Curse, Scared, Confused, etc)
Comment:Less important than Fitness as mental status effects tend to be less deadly than physical ones, but otherwise the same advice regarding your Fitness status appies.
Reflex
Effect: A secondary stat; effectively your chance to dodge attacks from enemies, though the percentage isn’t exact as enemies can make to-hit rolls over 100. (and so can you) The weight of your equipment will reduce this value. While your innate Reflex value can go well above 100%, the effective rate caps out at 90% no matter how you go. The reverse is true as well; while your adjusted Reflex can go very low by equipping heavy equipment (you’ll labeled “Overburdened”) the effective minimum Reflex rate is 10%. Monsters similarly have a min/max Reflex of 10%/90% as well.
Comment: Most important save–and arguably, stat value–in the game. If enemies can’t hit you they can’t kill you. A high Reflex also effectively increases your Fitness and Willpower saves too, as enemies can’t affect you with status ailments if they can’t hit you in the first place.
Stamina
Effect: Secondary stat that affects attack order in battle, along with Initiative. It appears that your Stamina relative to the enemy gives you a bonus or malus to your chance to attack next. If you have 0 Stamina there’s a really good chance your opponent will get a lot of strikes in a row. Stamina is reduced in battle by moving, (costs a percentage of your total equipment weight) attacking with a melee weapon, (costs the weight of your weapon) casting a spell (costs a flat 100) or using a throwing weapon (costs a flat 50).
Comment: Important stat to keep an eye on in combat. Your bonus relative to the enemy appears to be absolute relative to the enemy; e.g. if your max stamina is 1000 and your enemy’s is 2000 and you’re both at maximum, the enemy will have more of a chance to act next. Very important for a melee character; less important for pure casters.
Initiative
Effect: Secondary stat that affects attack order in battle, along with Stamina. Like Stamina It appears that your Initiative relative to the enemy gives you a bonus or malus to your chance to attack next. Reduced by 1 point for each point of Weight you’re equipping.
Comment: Keep Initiative as high as possible. If you run out of Stamina but have good Initiative you’ll eventually get a turn as your opponent’s Stamina drains, but if you have low Stamina and low Initiative your enemy can rack up huge combos without you being able to react.
Armor Value
Effect: Secondary stat that reduces any incoming damage by .1% for each point. Caps out at 900 (i.e. 90% damage reduction)
Comment: Important for everyone. You want it as high as possible, so long as the weight you’re equipping doesn’t tank your Reflex and Initiative.
Weight
Effect: The total weight of your equipment. Negatively affects your Reflex save and Initiative, influences the amount of Stamina used in combat.
Comment: Keep it as low as possible, especially in the early game. As your Reflex score, Stamina and Initiative increases, you can afford to use heavier equipment without much detriment. Until the penalties for using heavy equipment usually outweigh the benefits.
Weapons Skills
Bladed Weapons
Each point gives:To-hit +2%, Critical +.03%, Critical multiplier +0.05x
Perks:
- Special Attack (5): Blinds enemy (if they don’t make their save)
- Cutthroat (15): Gain blood drops when landing a critical hit
- Master (25): Special Attack meter raises twice as fast
Trained by: Hitting enemies with bladed weapons
Comment:Moderate-to-low damage, relatively light weapons with frequent, high-quality criticals. Special attack is OK. Perks are only so-so.
Training advice: As with all weapon skills, if you do a significant amount of melee and choose this as your primary weapon type you’ll probably max it on your own.
Blunt Weapons
Each point gives:To-hit +2%, Critical +.02%, Critical multiplier +0.07x
Perks:
- Special Attack (5): Confuses enemy (if they don’t make their save)
- Shove (10): Unbalances enemy on a Critical strike (if they don’t make their save)
- Master (25): Special Attack meter raises twice as fast
Trained by: Hitting enemies with blunt weapons
Comment: High damage, relatively heavy weapons with very infrequent, low-quality criticals. Special attack is decent. Perks are mediocre. Most damaging Blunt Weapons are also the heaviest weapons in the game.
Training advice: As with all weapon skills, if you do a significant amount of melee and choose this as your primary weapon type you’ll probably max it on your own.
Pole Weapons
Each point gives:To-hit +3%, Critical +.02%, Critical multiplier +0.05x
Perks:
- Special Attack (5): Pushes back enemy 1 space (if they don’t make their save)
- Extra Defense (10): Adds 15% Reflex when defending
- Knight’s Run (20): Attacks performed immediately after advancing do extra damage
- Master (25): Special Attack meter raises twice as fast
Trained by: Hitting enemies with pole weapons weapons
Comment: Relatively high-damage, heavy weapons with fairly frequent, high-quality criticals. Has a reach of two spaces. More accurate than other weapons. Special attack is mediocre. Perks are excellent. Top weapons are not as heavy as Blunt weapons but heavier than Bladed weapons
Training advice: As with all weapon skills, if you do a significant amount of melee and choose this as your primary weapon type you’ll probably max it on your own.
Unarmed
Each point gives:To-hit +2.5x, Critical +0.2%, Critical multiplier +0.05x, +5 Damage
Perks:
- Special Attack (5): Attacks many times in quick succession
- Deadly Blows (15): Adds 50 damage to unarmed strikes
- High Kick (20): Unarmed attack can reach two spaces instead of one
- Master (25): Special Attack meter raises twice as fast
- Body Control (30): Adds 15% to all saves when unarmed and unarmored
Trained by: Hitting enemies with your fists.
Comment: Very low-damage, with infrequent, low-quality criticals. Can reach two spaces at higher levels. Takes a flat 50 Stamina to attack. More accurate than most weapons. Special attack is excellent. Perks are excellent.
Training advice: As with all weapon skills, if you do a significant amount of melee and choose this as your primary weapon type you’ll probably max it on your own.
Twin Weapons
Each point gives:To hit +1.5%, Critical +0.15%, Critical multiplier +0.02x
Perks:
- Special Attack (5): Causes Bleeding (if the enemy doesn’t make their save)
- Perserverant (10): Second attack always does max damage if the first one connects
- Master (25): Special Attack meter raises twice as fast
Trained by: Hitting enemies with twin weapons.
Comment: Low damage, with very infrequent, very low quality criticals. Inaccurate weapons. Has an innate double attack. Special attack is OK. Perks are OK.
Training advice: ] As with all weapon skills, if you do a significant amount of melee and choose this as your primary weapon type you’ll probably max it on your own.
Throwing Weapons
Each point gives:To hit +3%, Damage +5%
Perks:
- Ninja (5): Causes Bleeding if all 3 Shuriken connect
- Boomerang Knife (10): 20% chance not to use up a throwing knife if you miss
- Heavy Hammer (15): Knocks enemy back 2 spaces instead of 1
- Bullseye (30): Throwing weapons always do max damage
Trained by: Hitting enemies with thrown weapons.
Comment: Mostly an auxiliary attack type; uses ammunition and damage is quite low except at the highest levels. Perks are pretty great though, especially Bullseye.
Training advice: Very hard to max. You’ll likely need to consume thousands or tens of thousands of metal scraps crafting ammo as you run out. Invest a lot of skill points during character creation in this skill if you want to max it.
Armor Skills
Light Armor
Each point gives:Light Armor value +2%, Light Armor Encumbrance -3%
Perks:
- Still Standing (10): Immune to Unbalanced when wearing Light boots
- Winterproof (25): Immune to Chilled when wearing Light torso armor
- Light Gear (30): When wearing a full set of Light Armor, +10% Reflex
Trained by: Getting hit while wearing Light armor
Comment: It’s easy to max out your Armor Value with either type of armor. Slightly better than Heavy Armor because it’s lighter but the difference is negligible. You can train both armor skills at the same time by wearing mixed armor types.
Training advice: Along with Heavy Armor, the hardest skill in the game to max. Past a certain point your Reflex will be high enough to dodge most enemy attacks, and improving your armor skills makes it easier to dodge by reducing weight, making each skill level progressively more difficult to get.
Heavy Armor
Each point gives:Heavy Armor value +3%, Heavy Armor Encumbrance -2%
Perks:
- Iron Leg (20) Immune to Crippled when wearing Heavy leg armor
- Iron Head (25) Immune to Dumb when wearing Heavy head armor
- Heavy Gear (30) When wearing a full set of Heavy Armor, +150 Armor value
Trained by: Getting hit while wearing Heavy armor
Comment: It’s easy to max out your Armor Value with either type of armor. Slightly better than Heavy Armor because it’s heavier but the difference is negligible. You can train both armor skills at the same time by wearing mixed armor types.
Training advice: Along with Light Armor, the hardest skill in the game to max. Past a certain point your Reflex will be high enough to dodge most enemy attacks, and improving your armor skills makes it easier to dodge by reducing weight, making each skill level progressively more difficult to get.
Miscellaneous Skills
Crafting
Each point gives:Max level of weapons upgrade +1, Level of armor crafted +1
Perks:
- Recycler (5): 10% chance to only use half resources when crafting
- Blacksmith’s Luck (15): 5% chance to double effects of weapons upgrades
- Master Armorer (30): Armor is crafted at Level 35
Trained by: Destroying items, crafting new items
Comment: The max level of weapons upgrade is largely irrelevant as the metal scraps cost beyond level 6 or 7 gets out of control. Perks are nice, and it’s trivial to max out your Armor Value with Level 35 armor if you max out the skill.
Training advice: You’ll gain a significant amount of Crafting skill just from destroying stuff you don’t want. Otherwise it’s best trained by grinding out Light Armor, as you’ll get more Hide Strips than you could possibly know what to do with.
Pharmacology
Each point gives:Medicine effect +3%, Medicine duration (when applicable) +1 turn
Perks:
- Resource Optimization (10): 5% chance to mix two medicines instead of 1
- Healer (20): Every non-Mana/Health medicine restores 10% HP
- Advanced Medicine (10): Health Medicine also adds Mighty and Furious buffs, Mana Medicine adds Focused and Bright buffs
Trained by: Mixing medicines
Comment: Fantastic skill. Buffing medicines drop off in usefulness but Health and Mana medicines are extremely useful throughout the whole game and the increase in effectiveness is noticeable. If you manage to max out the skill, the Advanced Medicine perk is amazing.
Training advice: You’ll probably get a decent amount of this skill on your own, but it’s hard to max without grinding out medicines you don’t need for the sake of skill gain. Monster organ drops are frequent enough though that components shouldn’t be much of a problem.
Survivalism
Each point gives:Avoid ambushes when resting +3%, Surprise attack chance +2%, Organ drops +2%, Hide Strips +1 per kill
Perks:
- Trap Finder (5): See traps on the minimap
- Gambler (10): Get +1 dice when clearing a Black Hole minigame
- Perfectionist (15): When you kill an enemy with max HP, +10% XP/Blood Drops
- Watchman (20): Halves confusion duration when ambushed during camping
- Hunter (25): Adds +20% damage to melee attacks on Beast-type enemies
Trained by: Resting, Killing monsters
Comment: Great skill. Effects are fairly subtle but useful, especially the perks and the increased organ drops.
Training advice: You will likely max this skill without even trying. Invest very little if any skill points during character creation.
Magic Skills
Black Magic
Each point gives:Ability to cast higher-level spells
Perks:
- Poisoner (5): Adds 2 rounds to the duration of Poison
- Scholar (Black Magic) (10): Max SP +250
- Black Curse (25): Curses the enemy for 20 rounds at start of combat
- Snake’s Blood (30): Immune to Poison
Trained by: Casting Black Magic spells
Comment: Mostly offensive magic–an interesting mix of damaging and debuffing spells, with more of a focus on the latter. Perks are mostly lackluster, though Black Curse is pretty great.
Training advice: Not hard to train as most Black Magic spells are pretty useful. If you focus on inflicting status ailments at all you’ll probably want to rely on the lowest-level spell, Curse, a lot.
White Magic
Each point gives:Ability to cast higher-level spells
Perks:
- Last Resort (5): Get Blessed if your HP dips below 10%
- Scholar (White Magic) (10): Max SP +250
- Divine Intervention (25): Random chance to be healed every round of battle
- Salvation (30): Become Blurred whenever you get hit
Trained by: Casting White Magic spells
Comment: Almost entirely buffing and defensive magic. Healing is useful, but the Restoration spell is where White Magic shines as it’s the most efficient way to restore stamina. Great perks, but Salvation will make the already hard-to-train armor skills even harder to train..
Training advice: Hard to max through normal play unless you use a lot of heavy weapons in melee, in which case you’ll be casting Restoration all the time. Easy to max if you stand in one place outside of battle and spam Cure Light Wounds, but that’s boring.
Elemental Magic
Each point gives:Ability to cast higher-level spells
Perks:
- Sub-zero (5): Freeze duration extended by 4 rounds
- Scholar (Elemental Magic) (10): Max SP +250
- Pyromaniac (15): Burning duration extended by 2 rounds
- Natural Barrier (25): Casts Ice Barrier on you every 25 rounds of combat
- Ice Lord (15): Freeze enemy for 10 round at the start of combat
Trained by: Casting Elemental Magic skills
Comment: Hands-down the fastest and most efficient way to kill enemies in the game. Mostly damage spells, but a handful of support and defensive spells as well. Great perks too.
Training advice: You might actually want to refrain from using your most powerful spells as you might kill your enemies too quickly. Still, Elemental Magic is so good at killing things you’ll likely end up leaning on it a lot and maxing it without trying to.
Conjuration
Each point gives:Ability to cast higher-level spells
Perks:
- Scholar (Conjuration) (10): Max SP +250
- Mind Recovery (15): Recover 250 SP every time you kill an enemy
- Mind Regeneration (25): Gain +25 SP regeneration
- Sorcerer (30): SP regeneration every round of combat
Trained by: Casting Conjuration spells
Comment: Mostly out-of-combat support skills. Fantastic perks for any magic-using characters. Unless you’re a melee-only character, you’ll want to max out this skill for the Sorcerer perk.
Training advice: You’ll max this skill without even trying simply through all the times you cast Magic Map.
Necromancy
Each point gives:Ability to cast higher-level spells
Perks:
- Voodoo Revenge (20): Does 10-60 damage to enemy every time it hits you
- Undead Control (25): Undead-type enemies have permanent Weakness debuff
- Taste of Blood (30): Get Vampirism buff for 10 rounds every time you crit
Trained by: Casting Necromancy spells
Comment: Unusual magic type that is mostly summons or other kinds of cast-once-and-forget-about-it offensive support spells. Note that you can only summon one type of monster at a time. Also of special note is the Dark Oracle spell–you can break the game’s already mild difficulty curve over your knee if you abuse it.
Training advice: Harder to max than other spell types during normal play as there isn’t much value to casting most Necromancy spells more than once per battle. Though tedious and boring, it’s easy to grind up by spamming Undead Servant outside of battle (and then not buying anything).
Personality and Perks
Character Personality
At the beginning of the game you get to pick your character’s Personality with a value on two axes. Once you pick you can’t change it.
Compassion/Wrath axis: Characters that lean toward Compassion gain more XP but fewer Blood Drops. The reverse is true for characters that lean toward Wrath.
Ecstasy/Apathy axis: Ecstatic characters gain Adrenaline faster at the expense of SP regen. The reverse is true for Apathetic characters.
Personality Strategy:
A balanced personality is pretty decent. What you pick will largely depend on your character build and play style. A few considerations:
- The Yellow Skull completely negates any reason to go Ecstasy. If you’re not interested in being a melee character, or want to gamble that you’ll find the Yellow Skull early, you might want to go full Apathy.
- Compassion helps you ramp up your character’s strength early and is not bad for early runs when you don’t have much in the way of gains from previous runs to give you a boost.
- Once you max out your Pillars there’s not much reason not to go full Compassion.
Perks
You get to pick a Perk at the beginning of the game. Perks are:
Bloody Hands: 40% Chance to cause Bleeding for 8 rounds when you critically hit
Rating/comment: 3/5: Bleeding isn’t terribly useful but not bad for a melee character.
Plague Spreader: Unguents last for 12 strikes longer
Rating/comment: 1/5: Unguents are not that useful and this is a mostly wasted perk.
Excitable: Adrenaline +20% when combat begins
Rating/comment: 2/5: Useful for melee characters, but if you find the Yellow Skull you’ll regret taking this perk.
Experimenter: Reduces spell failure chance by 50%
Rating/comment: 4/5: Lets you get powerful spells online early. Once you max out your magic skills this perk goes to waste though.
Collector: Increases Blood drops from battle by 20%
Rating/comment: 5/5: Great perk. Helps you fill out your Pillars more quickly or buy card draws from summoning Oracles.
Blacksmith: Triples the amount of metal scraps you get by destroying an item
Rating/comment: 3/5: Situational. Metal Scraps are hard to accumulate in great numbers so this can be valuable if you want to use a lot of Throwing Weapons or improve a really good weapon you’re passing between runs.
Defender: Defensive stance bonus +30
Rating/comment: 5/5: Great perk for any character. Lets you start using heavy weapons earlier and helps keep you alive.
Combo Master: Combo bonuses last 13 rounds longer
Rating/comment: 2/5: Good perk for characters using light weapons like Martial Arts or Twin Weapons.
Berserker: 2% chance to get Furious for 14 rounds when hit
Rating/comment: 1/5: 2% is awfully low and Furious isn’t that good.
Leader: Necromancy summons attack 15% faster
Rating/comment: 1/5: If you want your summons attacking faster, just recast the spell.
Northern Blood: Enemy is chilled for 13 rounds every time it hits you
Rating/comment: 5/5: Great perk; your enemies will be slowed all the time when you have it.
Slimy: Flee chance +20%
Rating/comment: 1/5: If you ever need to flee from a fight you’re probably doing something wrong.
Survival Instinct: Get the Stone Skin buff for 26 rounds after being critically hit
Rating/comment: 3/5: Stone Skin is a great buff, but once you max out your Armor Rating this isn’t useful.
Mana Thief: Recover 13% of your max SP every time you inflict a critical hit
Rating/comment: 4/5: Great perk; there aren’t many ways to restore SP. Pure mages might not be using melee attacks (and thus inflcting criticals) all that often though.
Witchery: Curse your enemy for 25 rounds after being critically hit
Rating/comment: 3/5: Not a bad perk for a character build oriented around debuffing enemies.
Explorer: Get 60 XP for every chest you open
Rating/comment: 2/5: 60 XP is nothing, but you will open a lot of chests.
Quick Reaction: Recover 55 Stamina every time you get hit
Rating/comment: 4/5: Great perk for melee characters, especially heavy weapons users.
Specialist: Special attack charge at +60% at the start of combat
Rating/comment: 2/5 Situational. Good for Martial Artists, not worth it for everyone else.
Unstoppable: Recover 250 stamina every time you inflict a critical hit
Rating/comment: 4/5: Great perk for melee characters with high Luck.
Mage’s Desperation: Recovers 50% of your Max SP once per combat when Stamina hits 0
Rating/comment: 4/5: Stamina isn’t a big issue for most mages, but as an easy method to restore a lot of SP, this is pretty good.
Blood Magic: Recover 13% of your max SP every round if you’re bleeding or below 10% HP
Rating/comment: 1/5: Bleeding or being below 10% HP should be extremely rare unless you’re doing something very wrong.
Clumsy’s Revenge: Special attack charges 11% every time you miss
Rating/comment: 5/5: Awesome perk for melee characters on higher difficulty levels where enemies dodge all the time. Special Attacks never miss, so this will let you recharge those guaranteed hits quickly.
Buffs and Debuffs
As there isn’t a complete description of buffs and debuffs in the manual, here is what each does;
Debuffs
- Burning: Lose 5% of Max HP every round (mutually exclusive with other temperature effects)
- Warm: Lose 50 Stamina every round (mutually exclusive with other temperature effects)
- Frozen: Speed -15 (mutually exclusive with other temperature effects)
- Chilled: Speed -3 (mutually exclusive with other temperature effects)
- Poisoned: Does 10-60 x poisoner’s level damage every round
- Sick: Strength -5, Speed -5
- Weak: Lose 100 Stamina every round. Armor -250
- Dumb: Intellect -8
- Crippled: Speed -10. More Stamina than normalis lost if you move
- Bleeding: -2% Max HP and -100 Stamina, but only if you move or attack
- Confused: Speed -5, Intellect -5, To-hit -20%
- Unbalanced: Reflex -20%
- Mute: Can’t cast spells
- Cursed: Fitness and Willpower saves -40%, Luck -10
- Blind: -50% To-hit
- Scared: Can’t advance in battle, -10% To-hit
Buffs
- Hasted: Speed +10
- Blurred: Reflex +20%
- Stone Skin: Armor Value +250
- Blessed: To-hit +25%
- Focused: To-hit +10%, Critical chance +10%
- Lucky: Luck +10
- Furious: Melee damage +25%, Stamina consumption -50%
- Bright: Intellect +10
- Mighty: Strength +10
- Vampirism: Heals user 2% of the damage done from each strike they make
- Adrenaline Rush: Melee damage +10%, Armor +100
Metaprogression
The 7th Circle features permadeath–when your character dies, that’s it, and you have to start from scratch. Character death isn’t likely to be particularly common as this is a fairly easy game, but if it does happen (or if you win the game), certain accomplishments of your previous character can be carried over to your next run.
Things that are shared between characters
- Any items in your inventory marked as “Stored”
- Metal Scraps
- Hide Strips
- Monster Organs
- Contents of your spellbook
- Deck of Doom cards
Things lost when beginning a new run
- Any inventory items not marked as “Stored”
- The contents of your Bag (Potions, Unguents, thrown weapons, etc)
- Skulls
- Black Hole bonus items
- Experience/Levels
- Blood Drops
- Attribute points
- Skill levels (unless you pick Path of the Mentor, in which case 25% transfer)
Achievement Bonuses
After accomplishing a certain number of attacks, spells cast, etc across all your games, you can start new runs with stat boosts of +1, +2,+3, or +5:
Strength: Land 1000/2500/5000/10000 melee attacks
Intellect: Cast 150/400/1000/2500 spells
Body: Die or complete the game 25/50/100/250 times (good luck with this one!)
Mind: Close 25/50/100/200 Black Holes (Another tough one)
Speed: Hit enemies with 200/500/1000/2500 thrown weapons
Luck: Make 100/250/500/1000 critical hits
Bonus for maxed skills
Once you max out a skill at level 30, any future new characters will start out with at level 5 of that skill instead of level 1.
Stored Equipment
At any point in the game, you can flag equipment in your inventory as “Stored.” Stored items will carry over between runs. To start with you can only store 3 items, but can eventually expand that to as many as 12 by investing in the Storage Room Pillar of Blood.
Stored Equipment Strategy:
As tempting as it is to save your most powerful weapons and armor for your next run, take its weight into consideration. Equipment that is deadly in the hands of a high-level character might be virtually unusable for a Level 1 character without the attributes and skills to use it yet.
The Deck of Doom
You’ll find much more powerful cards for your Deck of Doom than the ones you start with, but when you discover a new card, you won’t be able to use it until you start a new run. You can change the composition of your Deck of Doom on the title screen, but your new deck won’t be saved until you start a new character.
Deck of Doom Strategy:
Generally Attribute boosts are the best cards for your deck. If you’ve got a card you can get the same effect with an attribute boost, generally the attribute boost is a better choice (e.g. a +100 Initiative card can be substituted for a +2 Speed card, which gives you +100 Initiative and +4% Reflex save)
Pillars of Blood
After you die or win the game, you can add your accumulated Blood Drops to one of the 8 Pillars of Blood to add permanent upgrades to all of your characters. Each pillar can be upgraded more than once, but each successive upgrade is more expensive. It will cost a little bit more than 2 million Blood Drops to max all the pillars.
Pillar of Health: Increase Max HP by 10% for each level.
Blood Drop Costs:1000, 3000, 6000, 10000, 15000, 21000, 28000, 36000, 45000, 55000
Pillar of Mana: Increase Max SP by 10% for each level.
Blood Drop Costs:1000, 3000, 6000, 10000, 15000, 21000, 28000, 36000, 45000, 55000
Pillar of Attributes: Adds +3 Attribute Points per level during character creation
Blood drop costs: 1200, 3600, 7200, 12000, 18000, 25200, 33600, 42300, 54000, 66000
Pillar of Skills: Adds +2 Skill Points per level during character creation
Blood drop costs: 1200, 3600, 7200, 12000, 18000, 25200, 33600, 42300, 54000, 66000
Pillar of Perks: Increases effectiveness of Traits
Blood drop costs: 1000, 4200, 8400, 14000, 21000, 29400, 39200, 50400, 63000, 77000
Backpack Pillar: Increases carrying capacity of medicines and throwing weapons
Blood drop costs: 1400, 4200, 8400, 14000, 21000, 29400, 39200, 50400, 63000, 77000
Trials Pillar: Adds game modes (Forgotten Limbo and challenge levels)
Blood drop costs: 2100, 7000, 42000, 70000
Storage Room Pillar: Lets you store an additional inventory item for each level
Blood drop costs: 2000, 6000, 12000, 20000, 30000, 42000, 56000, 72000, 90000
Relics
When you beat a boss and continue to the next level of the dungeon, you’ll unlock that boss’ Relic. When starting a new run, you can equip one Relic that you’ve unlocked. The first 10 Relics have both positive and negative effects, but the final 5 have positive effects:
- Level 1: Seth’s Tentacle: Strength + 2, Luck -1
- Level 2: Golgoth Rah’s Head: Strength + 5, Intellect -1, Mind -1
- Level 3: Branches of the Suicide Woods: HP Regeneration + 10, Body + 4, Speed -2
- Level 4: Skin of Anguis: Speed +4, Armor Value +150, Luck -2
- Level 5: Tongue of the Mater Tenebrarum: Intellect +3, Mind + 3, SP Regeneration +5,
- Level 6: Kapit Ven’s Mask: Armor Value + 200, Speed -2, Fitness Saving Throw -10%
- Level 7: Hoof of Gormeran: Strength + 3, Body + 3, Luck +3,
- Level 8: Veneflos Petal: SP Regeneration + 3, HP Regeneration + 5, Strength -2,
- Level 9: Heart of Hades: Willpower Saving Throw +50%, Fitness Saving Throw -15%
- Level 10: Heads of the Horde: Body +3, Mind +3, HP Regeneration -5
- Level 11: Psycho Doll’s Umbrella: Fitness Saving Throw + 25%
- Level 12: Horn of the Green King: Luck + 7
- Level 13: Vlad Tepes’ Fangs: Strength + 5
- Level 14: Hat of the Killer Clown: Armor Value + 100, Intellect + 5
- Level 15: Pogo’s Costume: All Attributes +5, Armor Value +150
Weapons
The following is a list of all the weapons in the game–at least, all of those I’ve found. The stats below are for base-quality weapons. For higher-quality weapons, multiply their damage as follows:
- Fine: 1.25x damage
- Rare: 1.5x damage
- Excellent: 1.75x damage
- Legendary 2.125x damage
Bladed Weapons
| Name | Weight | Crit% | Crit x | Damage |
| Dagger | 15 | 3 | 1.2 | 20-160 |
| Switchbblade | 23 | 2 | 1.3 | 40-180 |
| Combat Knife | 45 | 5 | 1.7 | 64-220 |
| Wakizashi | 53 | 3 | 1.4 | 40-240 |
| Kama | 61 | 4 | 1.2 | 72-248 |
| Cutlass | 63 | 5 | 1.6 | 128-232 |
| Kukri | 91 | 4 | 1.2 | 48-288 |
| Sickle | 96 | 3 | 1.2 | 40-296 |
| Sabre | 99 | 2 | 1.6 | 80-288 |
| Dao | 102 | 4 | 1.1 | 120-280 |
| Talwar | 128 | 5 | 1.3 | 64-320 |
| Gladius | 133 | 4 | 1.5 | 80-320 |
| Cleaver | 159 | 5 | 1.3 | 96-336 |
| Scimitar | 160 | 4 | 1.6 | 200-320 |
| Machete | 186 | 2 | 1.3 | 80-360 |
| Greatsword | 480 | 1.5 | 1.7 | 160-480 |
Blunt Weapons
| Name | Weight | Crit% | Crit x | Damage |
| Baton | 17 | 1 | 1.2 | 48-160 |
| Spiked Club | 38 | 2 | 1.2 | 64-208 |
| Iron Club | 68 | 1 | 1.2 | 120-240 |
| Morning Star | 68 | 2 | 1.4 | 120-240 |
| Mace | 78 | 1.5 | 1.2 | 80-264 |
| Hammer | 88 | 1 | 1.3 | 64-280 |
| Flail | 133 | 1 | 1.2 | 80-320 |
| Maul | 563 | 1 | 1.4 | 120-520 |
| Sledgehammer | 1067 | 1 | 1.5 | 160-640 |
Pole Weapons
| Name | Weight | Crit% | Crit x | Damage |
| Quarterstaff | 19 | 1 | 1.1 | 64-160 |
| Spear | 60 | 3 | 1.8 | 80-240 |
| Glaive | 90 | 2 | 1.6 | 72-280 |
| Bardiche | 102 | 2 | 1.7 | 120-280 |
| Naginata | 147 | 3 | 1.5 | 120-320 |
| Trident | 169 | 3 | 1.5 | 40-360 |
| Lance | 271 | 4 | 1.5 | 120-400 |
| Pike | 353 | 2 | 1.7 | 120-440 |
| Scythe | 867 | 3 | 1.1 | 140-600 |
Twin Weapons
| Name | Weight | Crit% | Crit x | Damage |
| Sai | 12 | 1 | 1.1 | 40-144 |
| Nunchaku | 20 | 2 | 1.2 | 80-160 |
| Twin Daggers | 23 | 2 | 1.2 | 48-176 |
| Eskrima Sticks | 31 | 2 | 1.1 | 40-200 |
| Tonfas | 32 | 2 | 1.2 | 20-208 |
| Butterfly Knives | 36 | 2 | 1.3 | 80-200 |
Items
Medicines
Unless you choose to start the game with some, Medicines can only be made from monster organs you find throughout the game.
- Health Medicine: Restores HP. Made with 1 Monster Heart and 1 Monster Bowels
- Mana Medicine: Restores SP. Made with 1 Monster Brain and 1 Monster Tongue
- SPD Boost:Adds the Hasted buff. Made with 1 Monster Liver and 1 Monster Bowels
- STR Boost: Adds the Mighty buff. Made with 1 Monster Heart and 1 Monster Liver
- INT Boost: Adds the Bright buff. Made with 1 Monster Brain and 1 Monster Eyes
- Cure Ailments: Cures all non-temperature ailments. Made with 1 Monster Liver and 1 Monster Tongue
- Precision Boost: Adds the Focused Buff. Made with 1 Monster Eyes and 1 Monster Bowels
- Armour Boost: Adds the Stone Skin Buff. Made with 1 Monster Heart and 1 Monster Tongue
Souls of the Damned
Souls of the Damned can be found in chests and act like a Necromancy summon. They’re weaker than even a summoned Skeleton so there’s usually not much reason to use them. However they don’t count as using magic so you can use them to help kill enemies when you’re carrying out the Weapons Master Task of the Dead. (Or the Spell Master Task of the Dead if you want–they don’t count as using weapon attacks either)
Unguents
Unless you choose to start the game with some, unguents can only be found from chests. They come in three flavors, and are applied to your melee weapon for a number of turns. During that period, if you hit an enemy with your weapon you have the chance to inflict one of following ailments:
- Poisonous Oil:Poison
- Burning Oil: Burning
- Liquid Nitrogen:Frozen
Generally Unguents are not terribly useful as it’s much easier to inflict said ailments with magic. However, like Souls of the Damned, they do have some value if you’re taking on the Weapons Master Task of the Dead.
Thrown Weapons
Thrown weapons take 50 Stamina to throw, and can both be constructed with Metal Scraps or found in chests. Their effects and base max damage before Throwing Weapon skills bonuses are:
- Thrown Dagger:Single-shot. Max damage of 200
- Shuriken:Thrown in sets of 3. Max damage of 100 for each
- Hammer: Single-shot, can knock back the enemy. Max damage of 320
Note that enemy Armor Value affects Throwing Weapons’ damage.
Skulls
Skulls are very rare drops from red chests that act as permanent buffs. You’re never guaranteed to find one in any given game, but if you explore everywhere you’ll probably find a few in any given run.
- Black Skull: Recovers 25% of Max HP and SP on death. You lose this Skull when you use it, but frankly that’s unlikely to happen.
- White Skull: You get a permanent Focused buff. A nice bonus.
- Blue Skull: Regenerates .5% of your max SP every round. This adds up quickly and is very useful for mages.
- Red Skull: You get a permanent Vampire buff. Not super useful.
- Green Skull: Inflicts 5 rounds of Poison to the first enemy you face in combat. At higher experience levels this will outright kill or severely damage even powerful enemies.
- Yellow Skull: Your Adrenaline level is permanently set to 100%. Great bonus that makes several perks obsolete.
Black Magic
Curse
Level: 1
Formula: MALE
SP Cost: 180
Effect: Target is Cursed for 4 rounds. Target’s saving throw is halved.
Comment: Very useful spell, especially later in the game and on higher difficulties. Used to “soften up” an enemy so you can hit it with other status ailments.
Torment
Level: 3
Formula: ANTO
SP Cost: 220
Effect: Deals 125-375 damage
Comment: Weak but very cost-efficient attack spell. More powerful overall than equivalent low-level Elemental spells.
Black Mass
Level: 4
Formula: MENE
SP Cost: 240
Effect: Buffs you with Mighty for 12 rounds (increases with INT) but debuffs you with Cursed for 12 rounds (decreases with INT)
Comment: The duration of Cursed will eventually drop to 0. A significantly better spell than Song of Might, the White Magic spell that also grants Mighty.
Blindness
Level: 6
Formula: CENE
SP Cost:350
Effect: Blinds an enemy for 5 turns
Comment: OK spell in the early game, but eventually nothing will ever hit you anyway.
Cloud of Sickness
Level: 8
Formula: NUVE
SP Cost: 400
Effect: Deals 200-400 damage and inflicts Sickness for 5 rounds
Comment: Decent enough attack spell, though you’ll move on to another quickly.
Confusing Blast
Level: 10
Formula: CONE
SP Cost: 400
Effect: Deals 250-500 damage and inflicts Confusion for 5 rounds
Comment: Solid attack spell; will be your mainstay for a while if you focus on Black Magic.
Poisoning Weapons
Level: 13
Formula: ARVE
SP Cost:500
Effect: Brands weapon with Poison
Comment: The best of the three branding spells. Poison is great and scales with your level.
Mist of Death
Level: 15
Formula: FOVE
SP Cost: 1000
Effect: Target is Poisoned and Weakened for 10 rounds
Comment: Strong debuff. Very powerful at higher experience levels.
Vampirism on Self
Level: 18
Formula: VASE
SP Cost: 850
Effect: Buffs you with Vampirism for 5 rounds
Comment: Pointless. Vampirism heals so little it’s not worth casting.
Drain Health
Level: 20
Formula: SUSA
SP Cost: 750
Effect: Steal 100 of the target’s HP
Comment: Not very useful. Drains too little for the cost to be worth it.
Behemoth’s Voice
Level: 21
Formula: ELVO
SP Cost: 800
Effect: Causes Confusion for 5 rounds, Unbalanced for 3 rounds, and knocks the target back
Comment: Amazing spell for a melee-focused character on higher difficulties. Reduces enemy’s ability to dodge by a lot. Costly though.
Vengeful Eye
Level: 22
Formula: ANPE
SP Cost: 500
Effect: Tallies up all the damage the target deals you in 10 rounds, then hits the enemy for the same amount of damage
Comment: Nice in theory, but by the time you can cast it the damage an enemy will rack up in 10 rounds will be negligible.
Beelzebub’s Swarm
Level: 24
Formula: SABE
SP Cost: 1000
Effect: Deals 150-250 damage 5 times and inflicts Sickness for 5 rounds
Comment: Not on par with the high-level Elemental spells, but one of the most destructive Black Magic spell in the game.
Acid Rain
Level: 27
Formula: PIMO
SP Cost: 1300
Effect: Deals 20-40 damage a large number of times
Comment: Brutally powerful spell, but not very cost-effective.
Inferno I
Level: 30
Formula: BAAL
SP Cost: 850
Effect: When this spell is cast within 10 rounds of Inferno II and III, does massive damage
Comment: The most damaging spell in the game; one-shots bosses on lower difficulty levels. Essentially an “I win” button you get for mastering 3 schools of magic.
White Magic
Antidote
Level:2
Formula:ANVE
SP Cost:150
Effect:Cures Poison
Comment:Poison is really bad to get hit with at low levels, doubly so if you’re starting a run deep in the dungeon. Good spell for those occasions.
Cure Light Wounds
Level:2
Formula:CUFE
SP Cost:200
Effect:Heals 50-200 HP
Comment:Most cost-efficient healing spell until you get Cure Deadly Wounds at level 30.
Restoration
Level:3
Formula:RIBE
SP Cost:180
Effect:Restores a large chunk of your max Stamina
Comment:Arguably the most useful White spell in the game. Restores way more Stamina than just resting in battle.
Bless
Level:5
Formula:BEDI
SP Cost:300
Effect:Buffs you with Bless for 3 rounds
Comment:Useful on high difficulty levels where enemies have very high Reflex saves.
Self Blur
Level:7
Formula:AUSF
SP Cost:450
Effect:Buffs you with Blurred for 3 rounds
Comment:Nice in the early game but drops off in usefulness quickly.
Holy Touch
Level:8
Formula:SATO
SP Cost:350
Effect:Cures most status ailments
Comment:Very nice spell, but you’ll probably gain access to it about the same time status ailments stop being such a threat. Good for the early parts of runs where you start deep in the dungeon. Doesn’t seem to work against temperature-related debuffs which is annoying.
Song of Luck
Level:10
Formula:CAFO
SP Cost:300
Effect:Buffs you with Lucky for 5 rounds
Comment:Since most Luck effects happen outside of battle, this spell really only gives you a +3.5% chance to deal a critical. Not much, but every bit helps.
Cure Serious Wounds
Level:13
Formula:CUGR
SP Cost:450
Effect:Heals 250-500 HP
Comment:Heals more than Cure Light Wounds, but is not cost-efficient, so not great for after-battle healing.
Song of Speed
Level:17
Formula:CAVE
SP Cost:600
Effect:Buffs you with Haste for 5 rounds
Comment:By the time you cast this spell, you might not need the extra 500 Initiative and 20% Reflex buff it gives. Still a great buff though.
Song of Wisdom
Level:20
Formula:CASA
SP Cost:650
Effect:Buffs you with Bright for 5 rounds
Comment:Great spell, a mainstay of any mage. Boosts your magic damage by 100% and the duration of your buffs/debuffs by 5 rounds.
Holy Ray
Level:22
Formula:RASA
Effect:500
Comment:Blinds an enemy for 5 turns. Deals 500-1000 damage to Undead enemies
Mostly useful as an Undead killer. You probably won’t need to blind things by the time you get it.
Song of Might
Level:25
Formula:CAPO
Effect:750
Comment:Buffs you with Mighty for 5 rounds. Unless you’re ignoring Black magic entirely, cast Black Mass instead of this spell. It’s much better.
Cure Deadly Wounds
Level:30
Formula:CUMO
Effect:900
Effect:Heals 1000-2000 HP
Comment:Powerful healing, but by the time you can cast this you’ll probably be virtually unkillable anyway.
Elemental Magic
Magic Stone
Level:1
Formula: PIMA
SP Cost: 120
Effect: Does damage based on your Throwing Weapons skill
Comment: Odd spell. Does a decent amount of damage at high levels of Throwing Weapons but mostly not worth casting. Especially because it can miss.
Fire Claw
Level:2
Formula: LIFU
SP Cost: 170
Effect: Deals 150-275 damage and inflicts Warm for 8 rounds
Comment: Decent enough starting spell, but Warm isn’t that great of an ailment to inflict. Cast Freezing Ray instead.
Icy Rain
Level:2
Formula: PIGE
SP Cost: 100
Effect: Cures Burning and Warm ailments
Comment: Only really useful for runs where you start deep in the dungeon–otherwise you’ll probably resist by the time you reach enemies that can inflict Warm or Burn.
Freezing Ray
Level:3
Formula: RACO
SP Cost: 250
Effect: Deals 175-350 damage and inficts Chilled for 5 rounds
Comment: The best overall direct damage spell in the lowest floors of the dungeon. Chilled is nice to inflict too.
Freezing Weapons
Level:4
Formula: ARGI
SP Cost: 400
Effect: Brands weapon with Frozen
Comment: Great spell for melee characters, especially against enemies with high Reflex saves on higher difficulties.
Ice Barrier
Level:5
Formula: BAGI
SP Cost: 250
Effect: Negates a single enemy attack
Comment: Good spell for low-level characters that can’t tank hits just yet.
Fire Bomb
Level:6
Formula: BOFU
SP Cost: 280
Effect: Deals 250-450 damage and inflicts Burning for 2 rounds
Comment: Great all-around damage spell. Cast this instead of Freezing Ray once you can.
Blizzard
Level:8
Formula: PUGI
SP Cost: 200
Effect: Inflict either Frozen or Chilled for 5 rounds
Comment: Fantastic spell for higher difficulty levels as it never fails to inflict one of the two ailments. Guaranteed reduction of enemy speed and dodging capability.
Cutting Wind
Level:10
Formula: VETA
SP Cost: 250
Effect: Deals 200-450 damage and can knock the enemy back one space
Comment: A little more cost-effective than Fire Bomb but I prefer that spell for the additional Burning.
Thunder
Level:13
Formula: FUIN
SP Cost: 450
Effect: Deals 150-350 damage three times
Comment: This spell is where you start getting a little more offensive power. This will be your mainstay until you can cast Ball Lightning.
Tornado
Level:16
Formula: TOIN
SP Cost: 650
Effect: Deals 550-1100 damage and inflicts Confusion for 8 rounds
Comment: Use only if you want to Confuse the enemy; Thunder is a much more cost-effective spell for about the same damage.
Flaming Weapons
Level:17
Formula: ARFU
SP Cost: 500
Effect: Brands weapon with Burning
Comment: Merely OK; by the time you can cast this your level will probably be high enough that Poison will be a better brand for your weapon.
Ball Lightning
Level:19
Formula: FUGO
SP Cost: 850
Effect: Deals 50-100 damage 20 times
Comment: Very powerful spell; depending on difficulty you can kill most enemies with two casts of this.
Drops of Lava
Level:22
Formula: GOLA
SP Cost: 900
Effect: Deals 150-350 damage 8 times and inflicts Burning for 7 rounds
Comment: The damage output of this spell is even better than Ball Lightning but the spell animation takes an irritatingly long time.
Icicle Storm
Level:25
Formula: TEGI
SP Cost: 1200
Effect: Deals 40-150 damage 30 times and inflicts Frozen for 5 rounds
Comment: The overall best damage-dealing spell in the game. Cost-effective and can one- or two-shot most enemies. Melts bosses pretty quickly too.
Earthquake
Level:28
Formula: TEIN
SP Cost: 2000
Effect: Deals 1800-4200 damage and creates cracks in the battlefield
Comment: Damaging spell, but its best use is to create cracks in the floor to permanently Unbalance your target. Multiple casts can create cracks on up to 5 spots on the field.
Inferno II
Level:30
Formula: ASTA
SP Cost: 850
Effect: When this spell is cast within 10 rounds of Inferno I and III, does massive damage
Comment: Part two of the “I win because I maxed Black Magic, Elemental Magic, and Necromancy” spell.
Conjuration
Magic Map
Level:1
Formula:MAIN
SP Cost:100
Effect:Shows the map of the current dungeon level. Unexplored areas are not displayed.
Comment:This is probably the most useful spell in the game; you’re likely to max out Conjuration just by casting this. Map it to a hotkey!
Magic Compass
Level:3
Formula:BUMA
SP Cost:250
Effect:Displays an arrow on the minimap pointing to the exit
Comment:Pretty worthless spell. Finding the exit is rarely a problem on most levels; finding the way to open the exit is the issue.
Magic Vision
Level:4
Formula:VIMA
SP Cost:200
Effect:Lets you see through illusionary walls and shows the presence of any Lost Souls in your location.
Comment:Not as useful as Magic Map, but pretty close. Great for finding secret passages, and there are some Lost Souls you will likely never find without this spell.
Starting Point
Level:6
Formula:RICO
SP Cost:150
Effect:Warps you back to the starting point of the current level
Comment:Great spell; useful for backtracking in a dungeon instantaneously.
Sanctuary
Level:7
Formula:SAIN
SP Cost:250
Effect:Reduces the chance of getting attacked while camping
Comment:Kind of pointless spell as ambushes are generally not a huge issue in this game.
Death Point
Level:8
Formula:PUMO
SP Cost:1000
Effect:Teleports you to the point in the level where your last Alter Ego died (if they did)
Comment:The most useless spell in the game. Unless your previous Alter Ego got killed by the boss, you’re still going to have to clear whatever level they died on, so teleporting to wherever they died probably won’t do you any good.
Light Feet
Level:9
Formula:PILE
SP Cost:400
Effect:While this spell is active, traps will not go off
Comment:Very useful in many parts of the game, though deliberately setting off traps is often a better solution as doing so permanently disables them.
Concealing Mist
Level:10
Formula:NENA
SP Cost:350
Effect:If this spell is active when a battle starts, you automatically get first strike
Comment:Extremely useful spell when you’re starting a run in a deep level of the dungeon. Overall raising your Speed and Initiative is usually far more effective than relying on this spell though.
Deepest Warp
Level:12
Formula:TRIN
SP Cost:500
Effect:Teleports you to the deepest level of the dungeon you’ve visited.
Comment:Since you can start a new run on any level you’ve reached this spell has limited use. Mostly useful for grinding up a few levels before teleporting down.
Special note about this spell: The final boss is on level 16 of the main dungeon, but the dungeon extends all the way down to level 22, after which it loops back to level 1. Normally levels 17-22 are only accessible after you beat the game and choose to start on them, but they still count as “deepest levels” and you can teleport past the last boss using this spell once you visit them. Unless you want to wander the main dungeon forever you’ll need to reach level 16 the old fashioned way once you visit these lower levels.
Calm Enemies
Level:15
Formula:CANE
SP Cost:1000
Effect:Eliminates all enemies’ Zones of Control while active
Comment:Useful spell towards the end of the game when you’re basically unbeatable and don’t want to bother with fighting grunts any more.
Enhanced Magic Map
Level:17
Formula:MASG
SP Cost:500
Effect:Displays the entire map of the current level, including unexplored areas.
Comment:Not a full replacement for the standard Magic Map spell as seeing where you haven’t been yet is often useful. Still a great spell you’re likely to want to hotkey.
Vanishing
Level:22
Formula:FUMA
SP Cost:1500
Effect:Automatically flees from a standard (red Zone of Control) enemy
Comment:Pretty pointless spell. By the time you can cast it you probably won’t need to be fleeing from standard enemies.
Forward Phase Shift
Level:25
Formula:VOAV
SP Cost:350
Effect:Moves to the space directly in front of an enemy in battle
Comment:Great for closing the distance with a faraway enemy that you want to kill with melee attacks.
Backward Phase Shift
Level:25
Formula:VOIN
SP Cost:350
Effect:Moves to the space furthest from an enemy in battle
Comment:By the time you can cast this spell you probably will be able to tank any enemy just fine so this isn’t terribly useful.
Necromancy
Summon Skeleton
Level:3
Formula:EVSE
SP Cost:250
Effect:Summons a skeleton to occasionally attack your enemy
Comment:Your basic Necromancy summon. Becomes outclassed quickly.
Undead Servant
Level:6
Formula:SEZO
SP Cost:400
Effect:Summons a zombie that will sell you an item for 100x the current level in Blood Drops
Comment:Not a bad spell if you’ve got Blood drops to burn. Also very useful to spam in order to raise Necromancy skill.
Summon Dead Spider
Level:8
Formula:EVRA
SP Cost:450
Effect:Summons a zombie spider to attack your enemy and inflict Poison.
Comment:Despite the low level, one of the best summons as Poison damage scales with your level.
Dark Command
Level:10
Formula:OSCO
SP Cost:250
Effect:Speeds up your summon’s next attack
Comment:Just recasting whatever summon spell you want is usually faster–though likely more expensive in SP as well.
Voodoo Doll
Level:12
Formula:BAVO
SP Cost:1200
Effect:Deals 15-30 damage every round until the end of combat
Comment:Doesn’t do much damage, but it adds up. Good spell to cast once against bosses and hard-to-hit enemies.
Summon Undead
Level:13
Formula:EVZO
SP Cost:750
Effect:Summons an undead to attack your enemy and inflict Sickness
Comment:OK for when you get it. Sickness isn’t a great ailment to inflict, but there’s a large gap between this and the next summon spell.
Dark Oracle
Level:15
Formula:ORNE
SP Cost:1000
Effect:Summons an Oracle that will let you pick a card from your Deck of Doom for 1000 x the current dungeon level in Blood Drops
Comment:Break-the-game levels of powerful if you’ve got a good deck and enough Blood Drops to spam it. (Though you likely won’t)
Summon Ghost
Level:22
Formula:EVFA
SP Cost:1200
Effect:Summons a ghost to attack your enemy and inflict Weakness
Comment:Weakness is pretty nice and the Ghost is powerful. A good upgrade from the undead.
Summon Goblin
Level:26
Formula:EVGO
SP Cost:1500
Effect:Summons a goblin to attack your enemy and inflict Curse
Comment:The Goblin deals good damage but if you want to curse the enemy the Level 1 Black Magic spell is better.
Summon Demon
Level:29
Formula:EVLY
SP Cost:2000
Effect:Summons a demon to attack your enemy and inflict Burn
Comment:By the time you can cast this, Burn isn’t so great, but the Demon deals tons of damage which makes this spell worth it.
Inferno III
Level:30
Formula:BAPH
SP Cost:850
Effect:When this spell is cast within 10 rounds of Inferno I and II, does massive damage
Comment:Part three of the ultimate damage spell. It’s somewhat overkill but if you can cast all three parts, why not?
Dungeon Features
Chests
Chests have random items in them, scaled to your current dungeon level. Some are randomly placed at the start of a level, and monsters can drop them too.
Red Chests
Chests that drop better-quality items (e.g. deeper-level) than standard chests. Aren’t generated randomly, and have a chance to give you a Skull.
Switches and gates
Gates block your entry until the correct switch is pulled, or Black Hole is sealed.
Teleporters
Teleports you to a different area of the current floor.
Traps
Look like red landmines. When you step on one, an alarm sounds and you will have to fight three enemies in succession. Once you win, the trap you stepped on will be disabled.
Magic Walls
These are illusionary walls you can walk through. Casting the Magic Vision spell will allow you to see them.
Secret Doors
Some walls have a slightly discolored brick in them–this indicates the presence of a secret door. If you click on the brick the wall will be destroyed and you can pass through.
Duels
These are optional fights that pit you against a monster with higher stats than normal. If you win you’ll get a bonus to the chance that higher-quality loot will drop.
Blood Pact
Sometimes after winning a battle a demon will appear and offer to boost your stats by +1 for the duration of the current floor, for a cost of 500 x your current dungeon level Blood Drops. Not the best use of your Blood Drops in many instances.
Lost Souls
Lost Souls will drop a Red Chest when you click on them. The catch is that they only appear during one moon phase and are invisible for the rest. If you have Magic Vision active, you’ll be able to sense the presence of a Lost Soul during the other 7 moon phases, but won’t be able to click on them.
Tasks of the Dead
Randomly-placed skull piles that will grant you a task; if you succeed you’ll get to make a draw from your deck of Doom. Potential tasks are:
- Tireless Killer:Kill 10 enemies in a row without camping
- Tireless Seeker:Open 20 chests in a row without camping
- Immortal:Finish 5 fights with full HP. Note that they don’t have to be in succession so you can’t actually fail this task.
- Weapons Master:Kill 10 enemies in a row without using any spells during battle
- Spells Master:Kill 5 enemies in a row without using melee or thrown weapon attacks
Black Holes
Black Holes are minigames. They operate as a board game, where you roll a die and move an equivalent number of spaces. You have a limited number of rounds to reach the exit, and every space you deplete your Resistance bar a little. If you run out of rounds or you run out of Resistance, you lose the game, take 5% of your max HP in damage (will reduce you to 1 HP if you have less than that) and have to try again. If you win the game, you unlock a gate somewhere on the level.
Potential spaces on the board
Attribute Icons:Tests your character’s Strength, Intellect, Speed or Luck. Every board has a Difficulty which affects the difficulty of the test. Failing the test makes you lose additional Resistance; succeeding it gives you a bonus (extra Resistance, reducing board Difficulty, granting you an extra round or giving you Blood Drops)
Difficulty +/- Icons: Raises or lowers the game board’s Difficulty
Resistance +/-: Restores or reduces your Resistance level
Up Arrow/Down Arrow: Makes your next roll automatically a 7 or a 1 respectively.
Treasure Chest: Grants Blood Drops or an item you can use in any Black Holes: Dice (makes your next roll a 6), Health (restores Resistance), or Time (get an extra round).
Coins: Get extra rounds
The Scarlet Tide
You get 12 moon phases to explore each level of the dungeon before the Scarlet Tide arrives at the beginning of the 13th. The Scarlet Tide darkens the dungeon and floods it with red liquid, and never goes away until you change floors. Its practical effect is to reduce the speed of recovery while camping, which is more of a nuisance than an actual threat.
Nightmare Zones
These only show up in the postgame, but appear on the map as red tiles. You will be unable to camp in any area where Nightmare Zones appear in the minimap.
Walkthrough and Maps
Walkthrough
The 7th Circle is hard to write a “walkthrough” for as maps of the levels are generally sufficient for figuring out how to get through the game. With a few notable exceptions, enemies are similar enough that a strategy for one will generally work for all of them. With that said, here are some general survival tips for both games starting at level 1 of the dungeon and those starting deeper:
Starting at level 1
- Start on Normal or Hard until you get a handle on the combat system. Bumping the difficulty up doesn’t really make the game harder per se, just more tedious. Personally the tedium gets to be much past Extreme, but YMMV.
- Very early in the game, don’t risk overextending yourself with a “Do X without resting” Task of the Dead. If you don’t have the resources to heal yourself without resting, this will just get you killed
- Magic is straight-up better at killing things than weapons. It never misses, usually uses less Fatigue, doesn’t have to deal with enemy Armor Value, and magic damage scales up twice as quickly with Intellect than weapon damage does with Strength. The only downside is that you have to deal with managing SP. Weapons aren’t worthless, but if you want the easiest go of it, focus on magic.
- Equip lighter weapons and armor early on so you don’t tank your Initiative and Reflex.
- Pick a weapon type and stick with it. Enemies get better at dodging the further you go, and switching to a weapon type you’re unskilled in mid-game is painful due to how often you’ll miss with it.
- Any weapon type is viable, but Martial Arts or Twin Weapons by themselves can sometimes have issues with damage output against regenerating enemies later in the game.
- Always defend right before your opponent gets its turn; the additional Reflex goes a long way.
- Explore each level entirely before moving on, and don’t worry about the Scarlet Tide.
Starting deep in the dungeon
- You’re going to be heavily outgunned at the beginning no matter what, so you’ll need to plan ahead. See the “Character Creation” section of this guide for advice on how to set up a character that starts deep in the dungeon.
- Transfer equipment that will help you survive from previous runs, rather than powerful weapons. A good high-level Light Chest Armor is a good candidate. +XP jewelry is also useful to get you some levels quickly.
- Focus on killing things with magic first; enemies deeper in the dungeon dodge a lot and you can’t afford to be missing with melee weapons all the time.
Map Key:
The following sections of this guide are annotated screenshots of the maps of each of the levels in the game. As Tasks of the Dead and some chests are randomly placed every time, the maps below are not 100% accurate to every run. The following is a key to the annotations:
Red Line: Indicates the destination of a teleport tile
Blue Line:Indicates which gate is opened by a switch or Black Hole
Orange Tile: Secret door
Purple Tile: Magic Wall
Note on enemy lists: Any level that is not level 1-16 of the main dungeon is considered a “postgame” level in terms of enemies appearing and is labeled as such. Enemies that appear on “postgame” levels can be any one of the following, and appear to get better stats the deeper you go:
- Aconitum
- Blood Spirit
- Burning Golem
- Burning Heart
- Cerulean Skolopendra
- Corpse Demon
- Hellfire Golem
- Ivette
- Killer Clown
- Living Doll
- Root of Death
- Root of Sorrow
- Serpent
- Skolopendra
- Vampire
Game Modes: Main Dungeon
Level 1
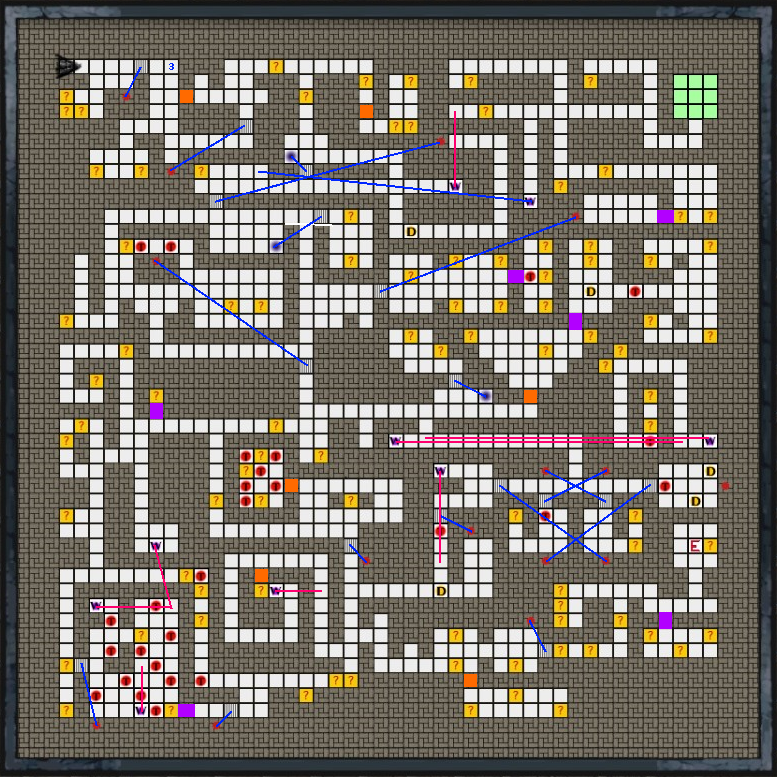
Enemies:Rat, Spider, Stone Zombie
Boss:Seth
Comment:Pretty straightforward, though you’ll probably need to do a lot of backtracking if you want to explore everything.
Level 2
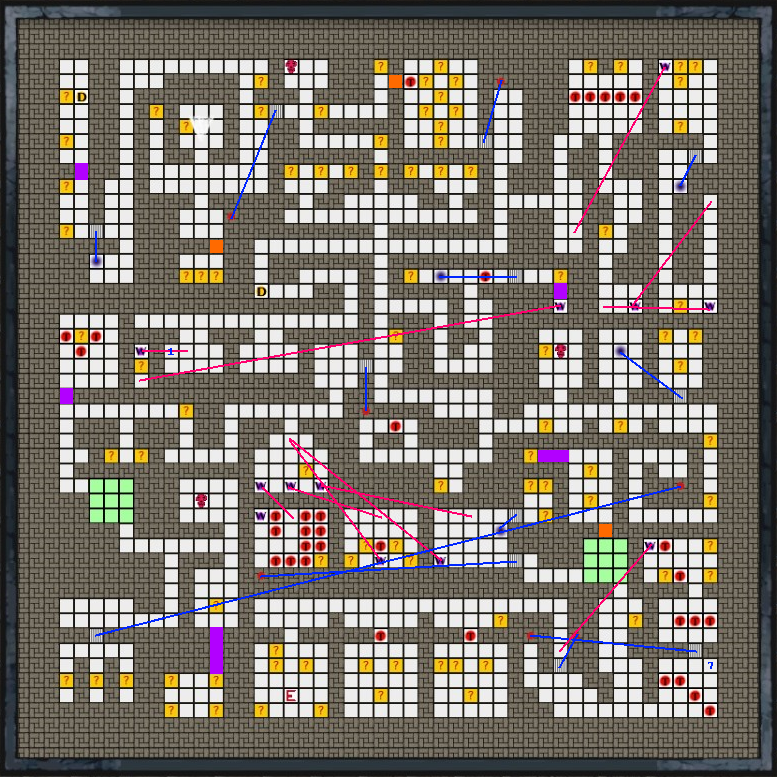
Enemies:Mantis, Rat, Stone Zombie, Spider
Boss:Golgoth Rah
Comment:The 9th-level Conjuration spell PILE is useful for avoiding all the traps. Though you won’t discover its “formula” until deeper in the dungeon.
Level 3
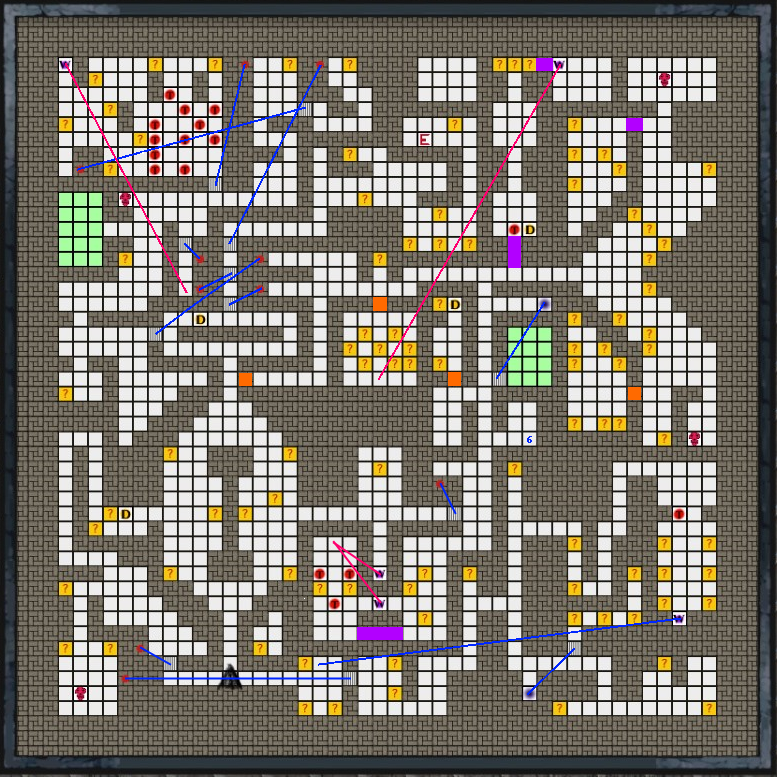
Enemies:Vermis, Stramonium, Mantis
Boss:Suicide Woods
Comment:The area 4×3 north of the exit is inaccessible.
Level 4
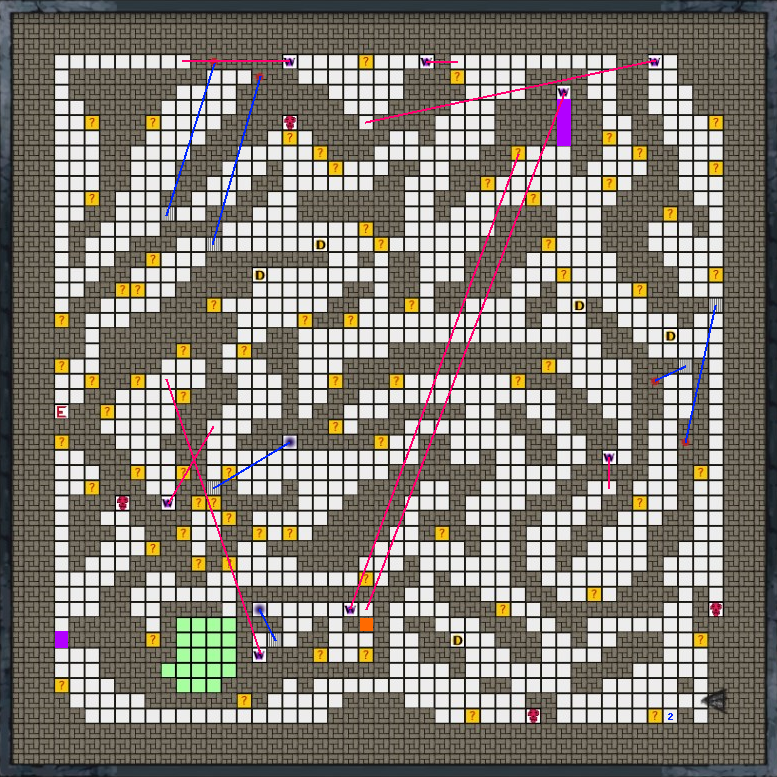
Enemies:Stramonium, Vermis, Suicide Tree
Boss:Anguis
Comment:Wide-open and relatively easy-to-navigate level. You really only need to explore the north and east edges of it; everything else is optional.
Level 5
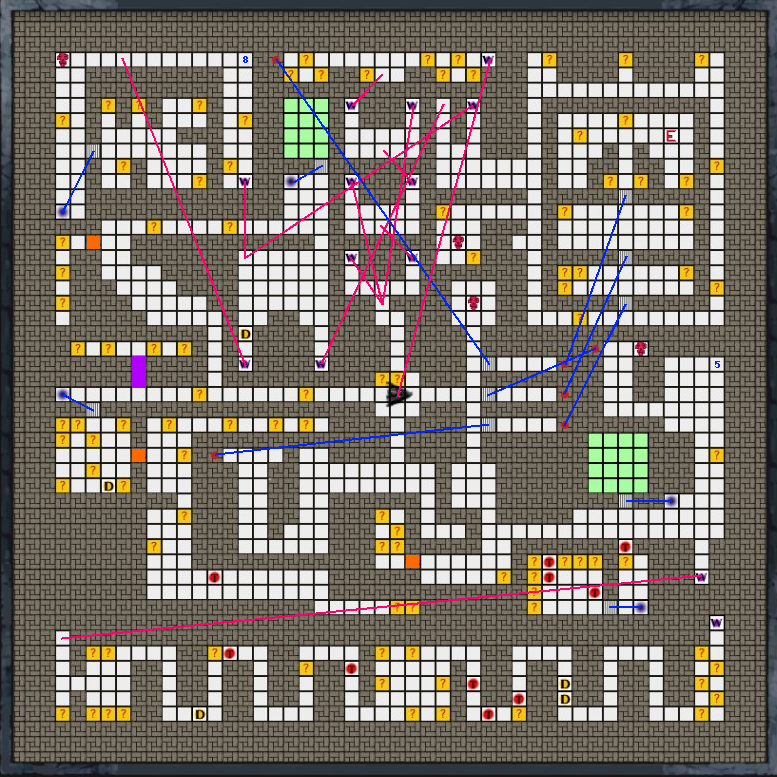
Enemies:Hunter, Spikes Zombie, Suicide Tree
Boss:Mater Tenebrarum
Comment:You start in the center with four exits; explore the west exit last unless you want to do a lot of backtracking.
Level 6
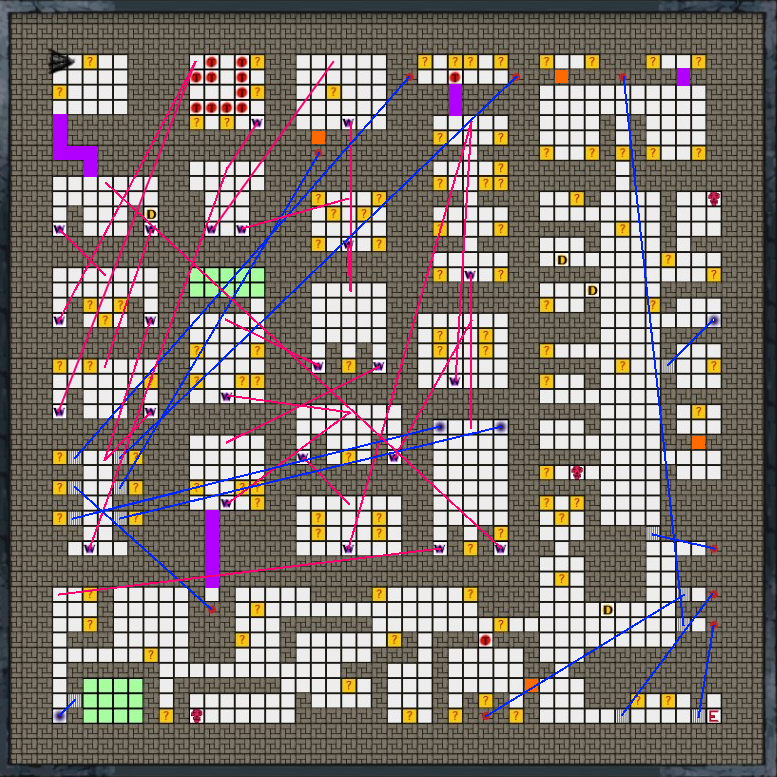
Enemies:Spikes Zombie, Lava Golem, Hunter
Boss:Kapit Ven
Comment:Tedious teleport maze. You’ll need to do significant backtracking if you want all the chests in the Path of Greed.
Level 7
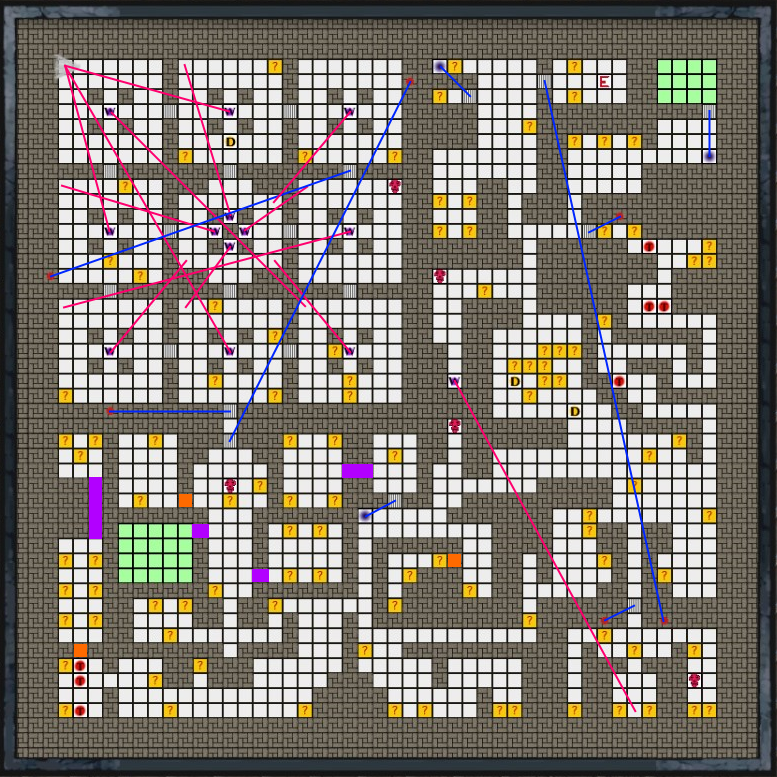
Enemies:Headhunter, Spikes Zombie, Lava Golem
Boss:Gormeran
Comment:Starts with another teleport maze, though not as bad as level 6. There are a lot of secret passages in this level.
Level 8
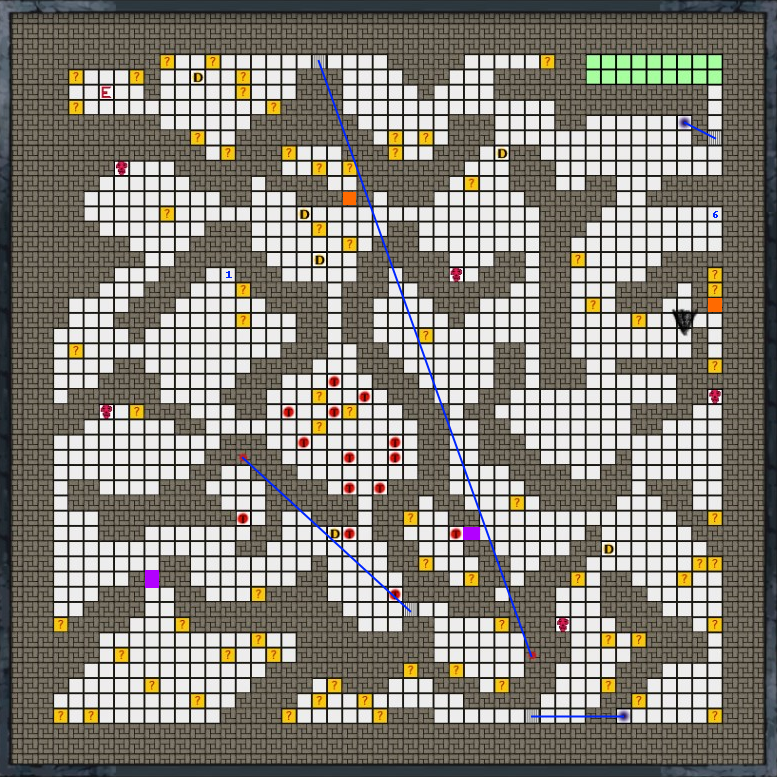
Enemies:Headhunter, Vermis Alpha, Lava Golem
Boss:Veneflos
Comment:Straightforward level, but requires a lot of backtracking. The RICO spell will help in that respect.
Level 9
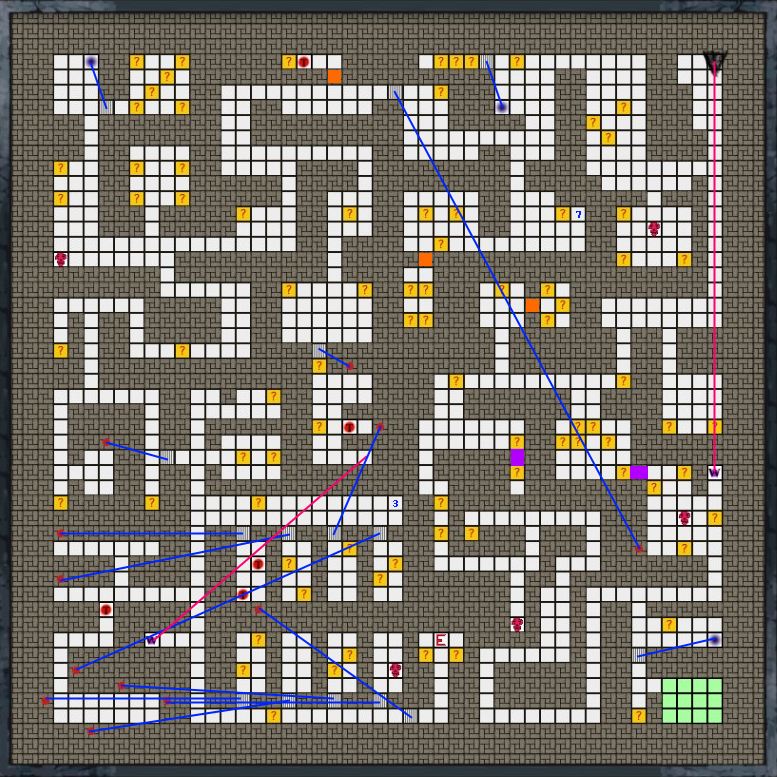
Enemies:Serpent, Skolopendra, Vermis Alpha
Boss:Hades
Comment:Note the magic wall shortcut in the southeast corner.
Level 10

Enemies:Ivette, Skolopendra, Serpent
Boss:Horde
Comment:The only switches you need to hit are the ones behind a secret door and Magic Wall. The remainder only lead to additional treasure and spell formulas.
Level 11
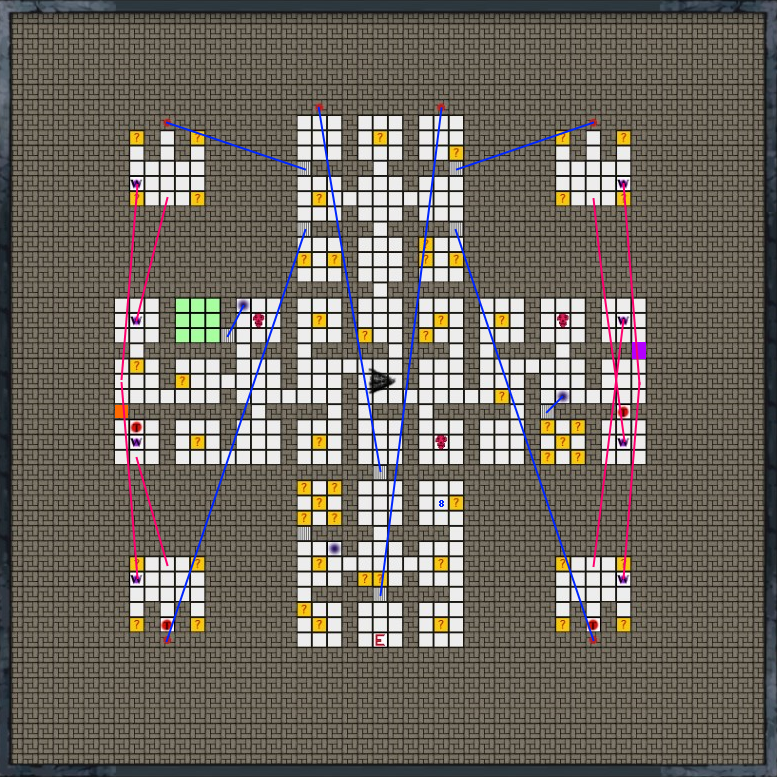
Enemies:Burning Golem, Blood Spirit, Serpent, Ivette
Boss:Psycho Doll
Comment:Simple and straightforward, though it requires a degree of backtracking so again RICO is helpful here.
Level 12
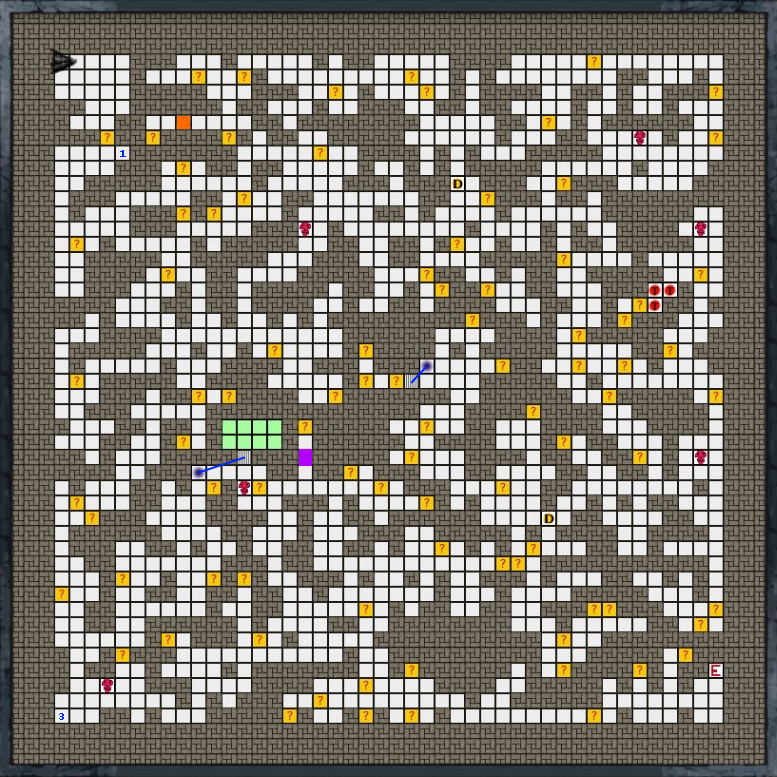
Enemies:Blood Spirit, Cerulean Skolopendra, Burning Golem
Boss:Green King
Comment:Unlike most bosses, Green King requires special mention because it has very high regenerative abilities. On higher difficulties weaker weapon types like Twin Weapons may have trouble doing damage quickly enough to keep up. Have some offensive magic ready as a backup.
Level 13
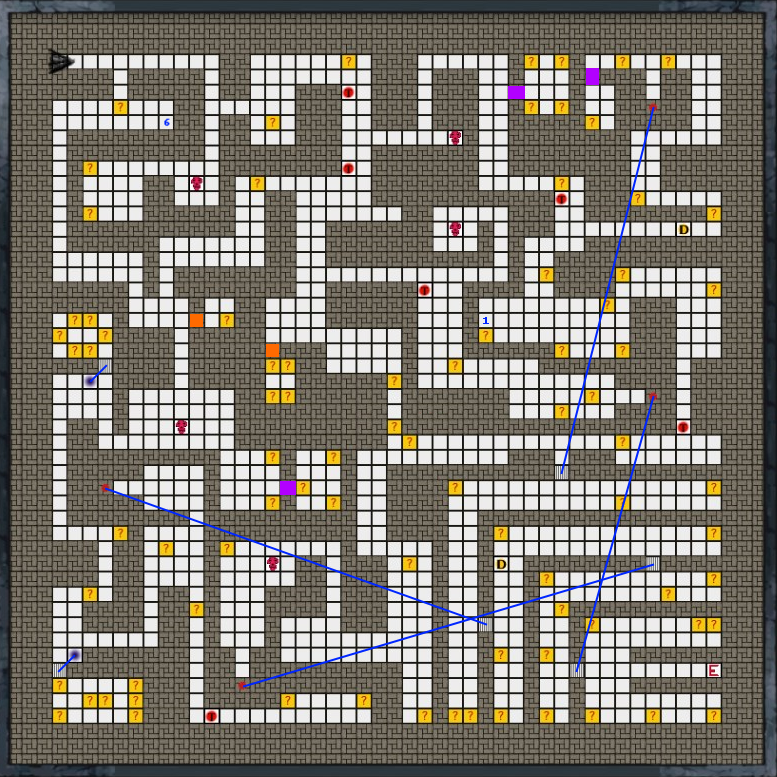
Enemies:Blood Spirit, Cerulean Skolopendra, Burning Heart
Boss:Vlad Tepes
Comment:The boss of this level has regenerative abilities like the previous one, though they don’t seem as difficult to keep ahead of. Still, having some magic for him is advised.
Level 14
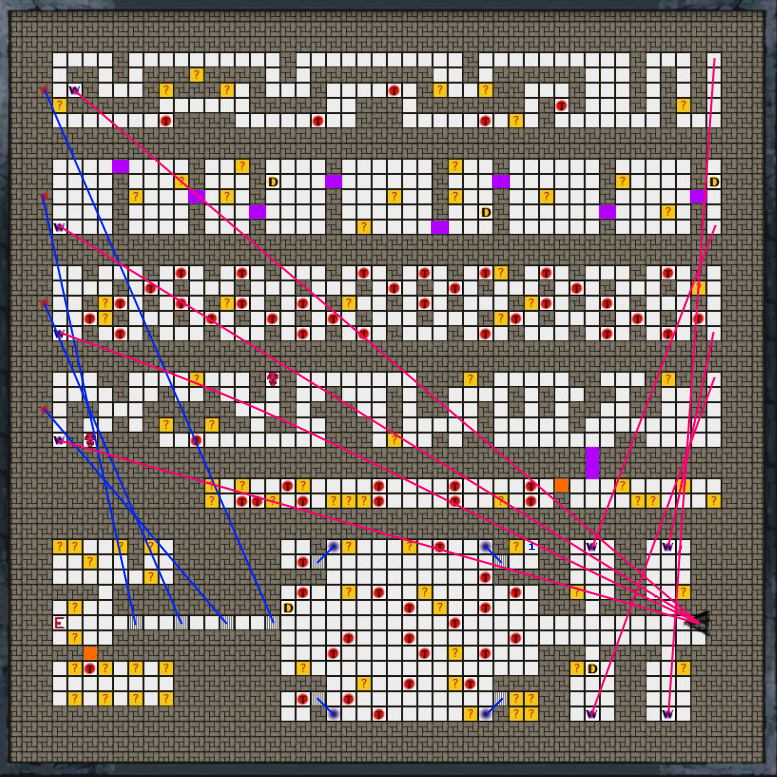
Enemies:Corpse Demon, Living Doll, Burning Heart
Boss:Killer Clown
Comment:This level has lots and lots of traps. The PILE spell will come in very useful here.
Level 15
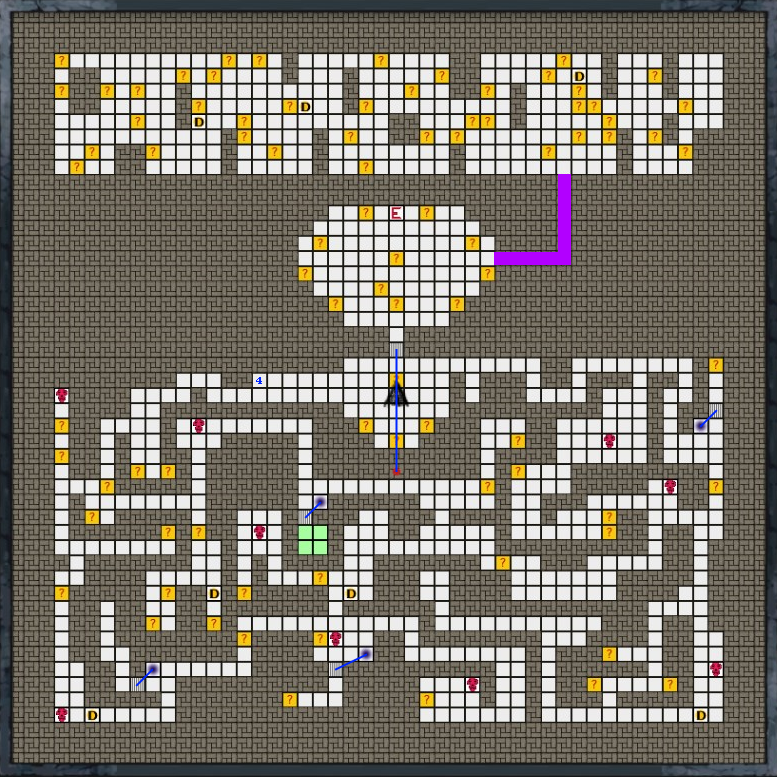
Enemies:Hellfire Golem, Aconitum, Corpse Demon, Living Doll
Boss:Pogo the Bear
Comment:Most of this level is completely optional–it’s just an opportunity to look for a last bit of loot before the final boss battle.
Level 16
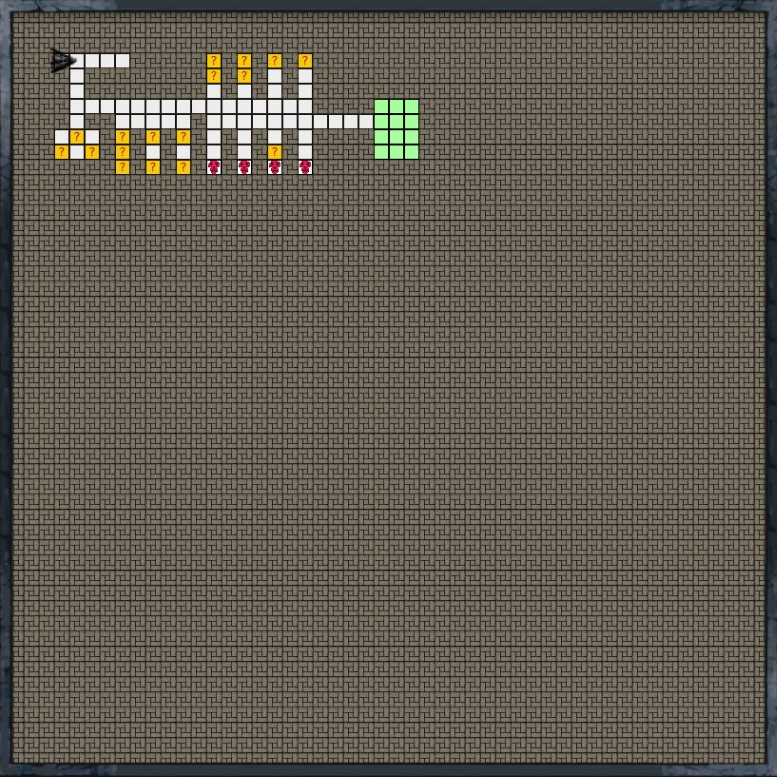
Enemies:Hellfire Golem, Aconitum, Corpse Demon, Living Doll
Boss:Pogo the Bear
Comment:The last boss is here. Winning the fight ends the game.
Game Modes: Main Dungeon Bonus Levels
The following levels are available after you complete the game; you can only access them by starting on them directly as the game will still end after you beat the boss of Level 16.
Level 17
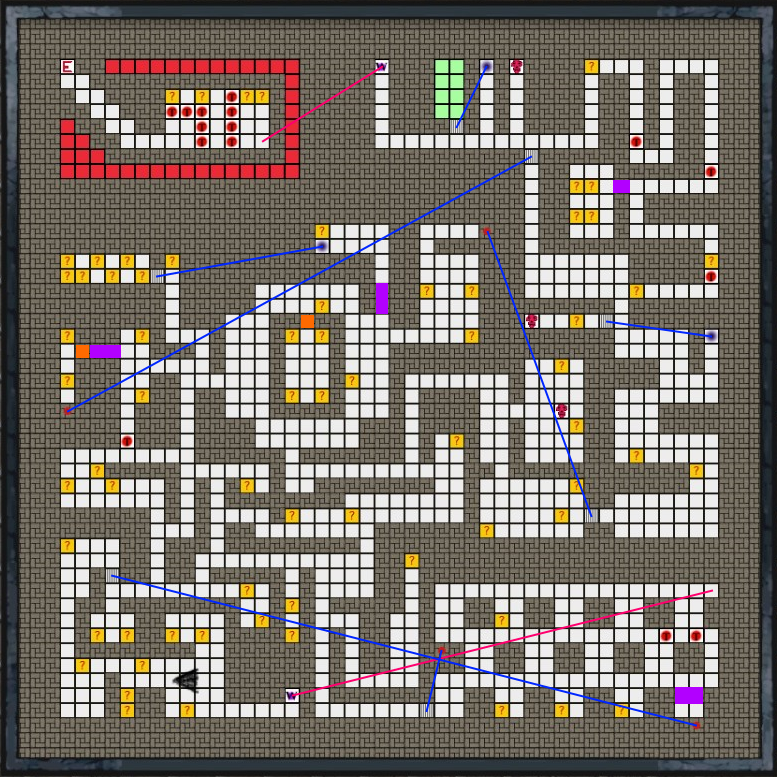
Enemies:Postgame enemies
Boss:None
Comment:This is the first floor you’ll find Cursed Zones, places that prevent you from resting when they appear on your minimap. But the primary challenge with this floor is that it’s full of end-game enemies and you’re only going to be Level 1 when you start. But you’ve beaten the game at this point, and presumably you’ve been able to put a decent investment into your Blood Pillars to give you a head start and have some good items transferring over too.
Level 18
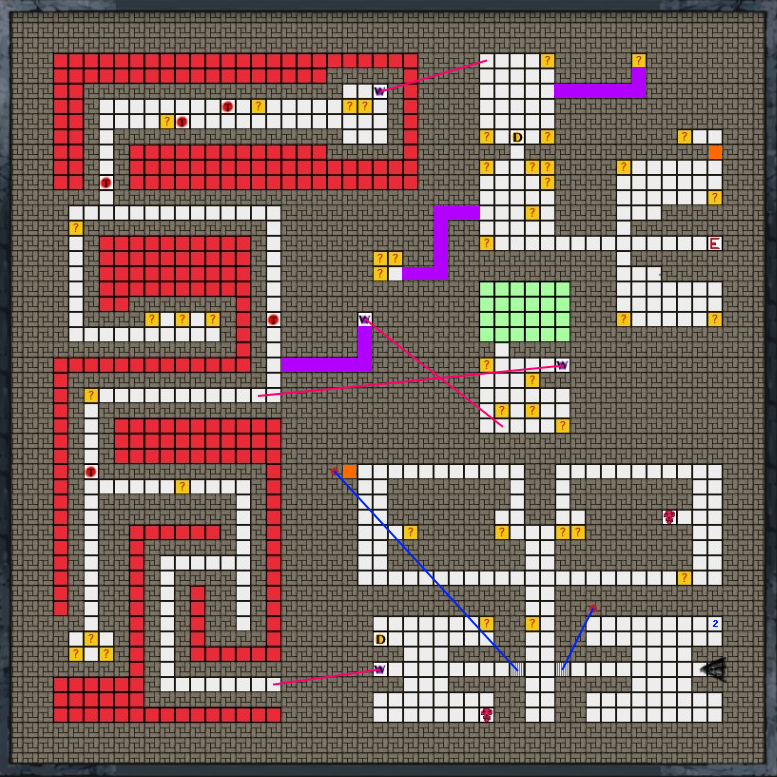
Enemies:Postgame enemies
Boss:None
Comment:Note that there’s a hidden passage to a safe zone midway through the gauntlet surrounded by Nightmare Zones–though at this point in the game you probably won’t be resting much anyway.
Level 19
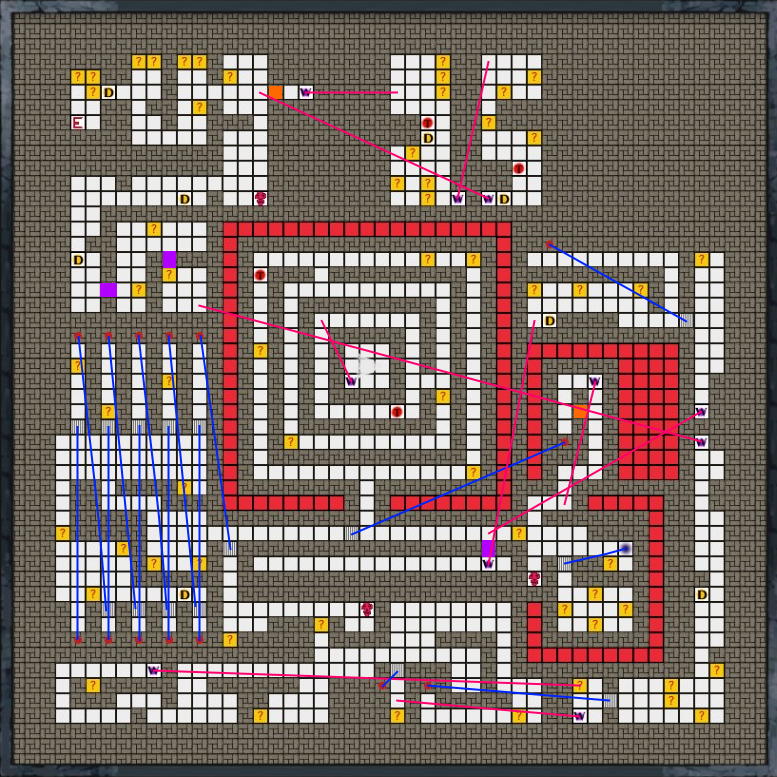
Enemies:Postgame enemies
Boss:None
Comment:I don’t think there’s any way to get into the rest of that central isolated hallway with the teleporter in it.
Level 20
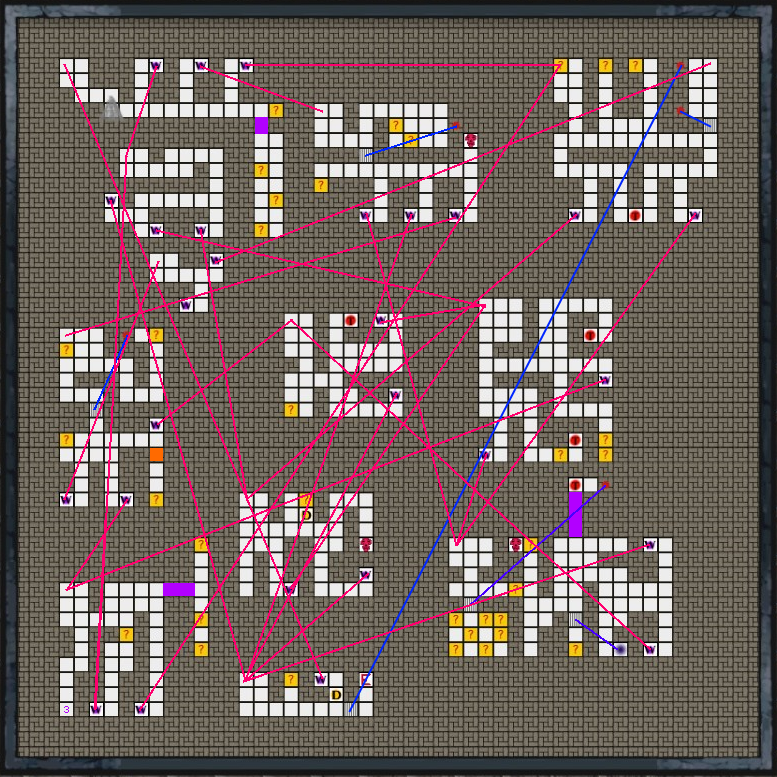
Enemies:Postgame enemies
Boss:None
Comment:The most devious level in the game. The secret is that “Room I” is actually divided into two separate rooms. Use the map to find the right teleporter if you get really stuck.
Level 21
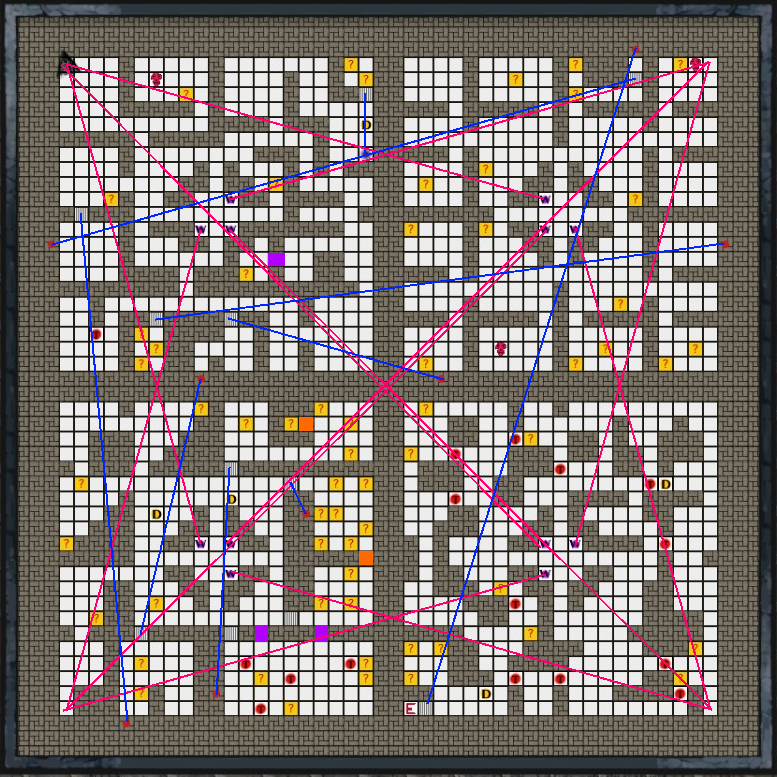
Enemies:Postgame enemies
Boss:None
Comment:It’s another teleport maze, but it’s pretty obvious how it works so after Level 20 this should be simple.
Level 22
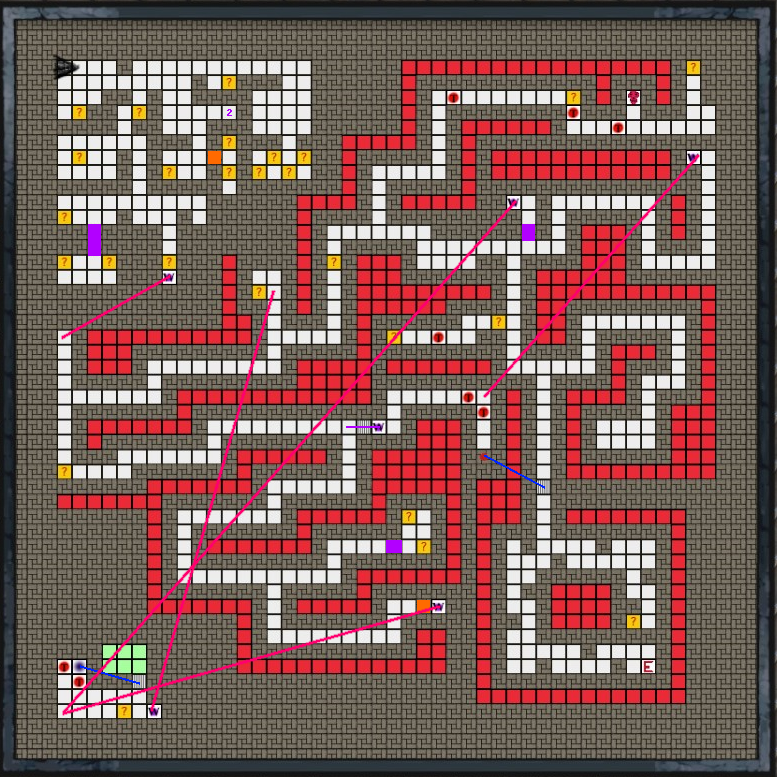
Enemies:Postgame enemies
Boss:None
Comment:Beat this level and you go back to Floor 1. Fun trick–you’re probably loaded with Blood Drops at this point, so if your Necromancy is high enough, spam Dark Oracle dozens (or hundreds) of times for 1000 drops a pop on Level 1 and make your character unstoppable with deck draws!
Game Modes: Forgotten Limbo
Forgotten Limbo is The 7th Circle’s “Roguelike” dungeon. It’s an endless dungeon, and the layout of each floor is randomly generated. It’s got a couple of rules and characteristics that make it different from other modes.
Limited dungeon features
Forgotten Limbo levels only have walls, passages/rooms, enemies, Tasks of the Dead, and treasure chests. No teleports/secret passages/lost souls/duels/etc.
One thing of particular note is that there are also no Red Chests in Forgotten Limbo; this means you cannot get any Skulls there. It is possible to bring a Skull into Forgotten Limbo if you get it from one of the Challenge Levels, since they dump you into Forgotten Limbo once you complete them.
Themed floors
Some floors in Forgotten Limbo have a “theme” that (usually) acts as an obstacle of some sort. Examples are:
- Lava Walls:You’re always affected with the Warm debuff
- Spikes:Lose 1 HP every step you take in the dungeon
- Icy Hell:You’re always affected with the Chilled debuff
- Wind of Magic:You recover extra SP during combat (a good thing!)
Requirements for descending floors
You can’t just run straight for the exit on a Forgotten Limbo floor; you have to kill a requisite number of Elite (yellow) enemies first. Next to your minimap there’s a bar with a marker; as you kill Elite enemies this bar fills up. Once the bar fills to the marker, you can use the exit to descend to the next level.
For each level you descend in Forgotten Limbo, your Loot Rarity bonus will increase by 2%.
Forgotten Limbo Strategy
Forgotten Limbo is pretty simple; though it doesn’t have any safe zones it’s not that hard to survive in. Since it’s endless you’ll just keep going until you get killed (or as is more likely past a certain point, suicide).
The primary reason to visit Forgotten Limbo is equipment. As loot quality increases as you descend, and there’s no level limit in Forgotten Limbo, you potentially can get far better equipment there than you could anywhere else in the game. In the case of armor, it’s important to remember that higher-level armor also is heavier, so something you find deep in the dungeon will be nigh-unusable by a fresh character, no matter how high its Armor Value.
Game Modes: Challenge Levels
Challenge Levels are unlockable game modes where you play a single level that’s essentially a gauntlet of tough enemies. At the end of the gauntlet is an area with a large number of chests containing Blood Drops or high-rarity equipment. Each Challenge Level is the equivalent of a deep level in the normal dungeon or Forgotten Limbo (e.g. The Chambers of Ishtar is the equivalent of Level 20). After you enter the exit of a Challenge Level, you’re sent to the equivalent floor of Forgotten Limbo.
The Chambers of Ishtar
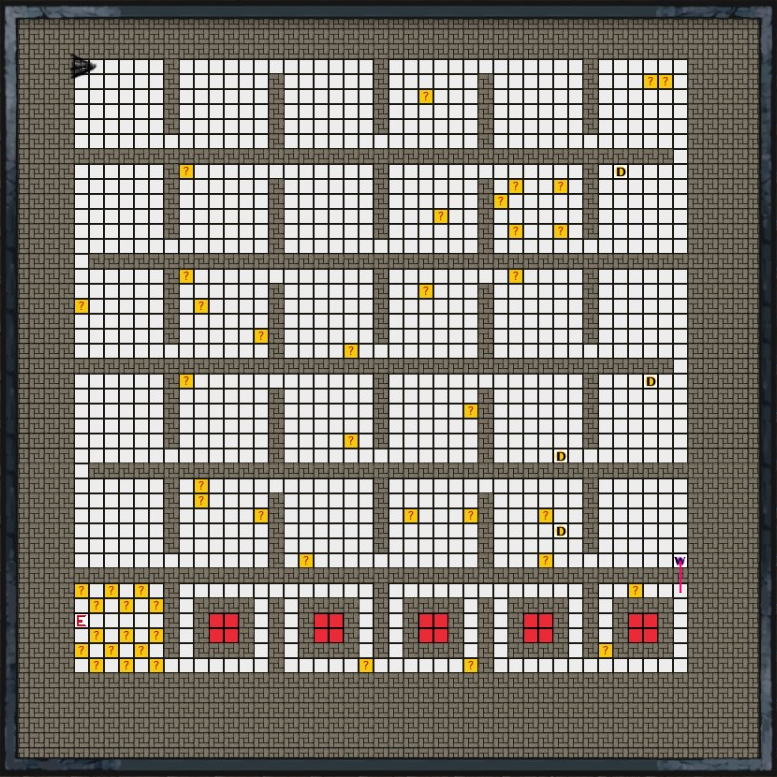
Enemies:Postgame enemies
Boss:None
Comment:The Chambers of Ishtar is a Level 20 dungeon. It’s a long gauntlet of rooms, each guarded by an Elite monster. Most of the other monsters are avoidable with the CANE spell if you want. The last bit you can’t rest in due to the Nightmare Zones.
Astaroth’s Trial
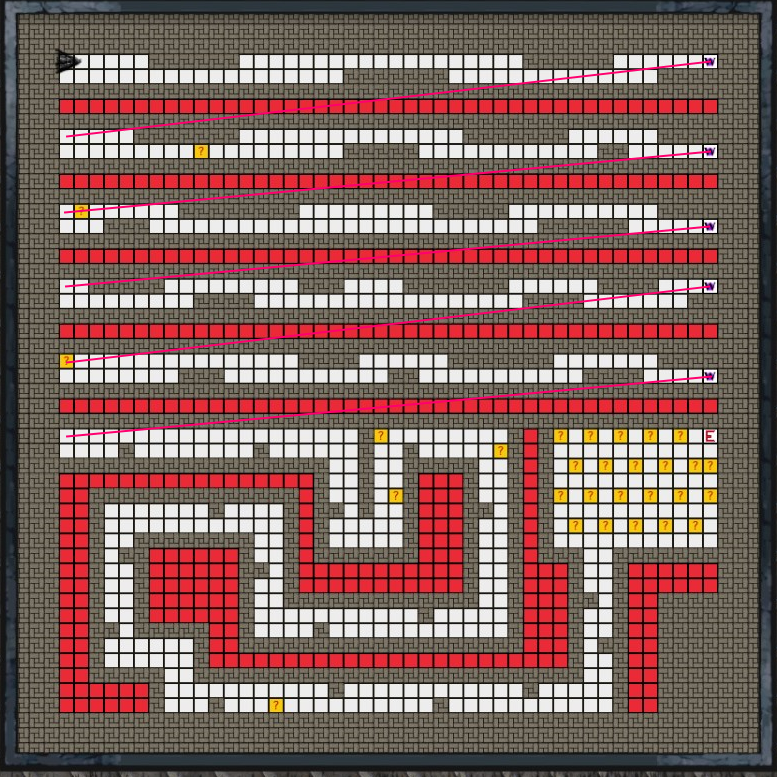
Enemies:Postgame enemies
Boss:None
Comment:Astaroth’s Trial is a Level 25 dungeon, also a gauntlet of Elite monsters. The catch is because the level is covered in Nightmare Zones, you can’t rest anywhere. However you can still avoid most of the normal monsters with the CANE spell.
Lucifer Rising
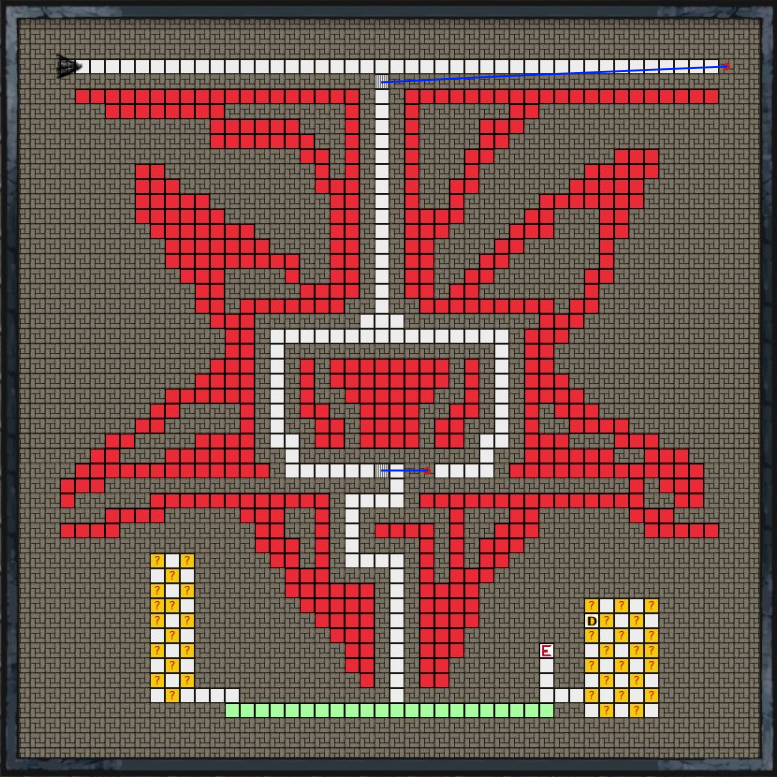
Enemies:Postgame enemies
Boss:None
Comment:Lucifer Rising is a Level 30 dungeon. It’s like Astaroth’s Trial in that you can’t rest anywhere. The primary difference is that since the whole level consists of a single-tile-width corridors, you can’t avoid any enemies–you have to kill them all. It is shorter than the other two Challenge Levels though
Hope you enjoy the Guide about The 7th Circle – A Guide to Endless Nightmare, if you think we should add extra information or forget something, please let us know via comment below, and we will do our best to fix or update as soon as possible!
- All The 7th Circle Posts List


Leave a Reply