Intro
So, you wish to be an unstoppable swordsman, running around swiping heads, like Solarlight eh? Well first, you must choose the right sword for the job!
Three things to note. Firstly, I will not be covering anything that isn’t a sword/axe (eg. bottle, ullapool caber)
Secondly, I will be talking about the pure-demoknight playstyle (aka boots, shield and sword) instead of a sword with grenade launcher or sticky launcher.
Thirdly, all swords share common stats which I will not mention for each individually again.
They are:
All swords have farther range than other melee weapons
All swords have the exact same damage (aka 65) as other melee weapons. They don’t deal more damage just because they’re swords.
All swords have a slower switch-to and holster speed than other melees.
All swords have no random crits.
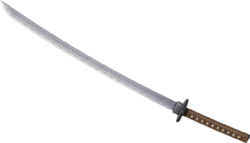
Half Zatoichi
STATS:
Heals you by 50% of your total HP for every kill (any extra healing gives you overheal)
Holstering it without killing anyone first causes 50 self-damage
One-shot-kills any soldier/demo that’s also holding a Half-Zatoichi
IN A NUTSHELL: A good all-rounder
You can’t go wrong with using the Half-Zatoichi. It offers no special disadvantages for a purely-demoknight user, and has a simple, easy to understand upside of healing half your healthbar. And the downside of dealing 50 self-damage on holster won’t apply if you’re a pure-demoknight with boots and a shield. An absolute recommendation for new demoknighters.
The playstyle for this sword allows for a more ballsy and free-roam style, since you generate your own healing, and heal yourself right back after every successful fight, you don’t need to play around your team or medic or healthpacks or any of that. Try taking flank routes and be a backline nuisance to the enemy, and pick off enemies who are alone. Take EXTREME care against other half-zatoichi demoknights, since a single hit from them will kill you instantly. Try using your charge to surprise them for an easy one-shot.
RECOMMENDED SHIELD: Any of the three shields works for different situations. The chargin targe gives even more resistances for your already beefy healthbar, the splendid screen will help you get around faster and do a little more damage, and the tide turner gives you a charge-reset playstyle, by that I mean since you get back your charge meter every single kill, you can chain multiple charge-kills together and get many kills in quick succession by charging repeatedly.
Eyelander
STATS:
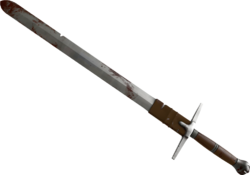
You start off with 25 less total HP
Each kill gives you one head, which increases your total HP by 15 and gives you faster speed, for a maximum of 4 heads (235 HP, 136% speed)
Each head increases your shield bash damage, for a maximum of 5 heads
Killing an enemy Eyelander demoknight who has stored heads will give them all to you
IN A NUTSHELL: Insanely overpowered once you reach 4 heads, but also really hard to start off at first
A lot of people think this sword is undoubtedly the best among all, since they see Solarlight fly around the map being an unstoppable killing machine. But what they don’t see, is how hard it is to get to that point first. Getting 4 heads isn’t an easy task, since you start off with no buffs which other swords will give you. More often than not, you’ll be struggling to get past 2 heads before dying, over and over again, when it would be best to simply switch to a different sword. And also, attaining 4 heads doesn’t make you invincible. You’ll move at the speed of a scout with 235 health, but that’s it. You’re still very susceptible to dying if you don’t play correctly, especially against demoknight counters like sentries, natasha heavies, and huntsman snipers.
That being said, you will indeed be a big force to be reckoned with once you get 4 heads, able to flank enemies and take out key targets like snipers or medics then running before anyone can catch you, and able to close the distance to get in killing range for any enemy. Try to stay in enclosed rooms and avoid large open areas, and ESPECIALLY avoid natasha heavies, who can slow you to a crawl and kill you easily.
Before attaining 4 heads, try to go for classes with 125 HP, because you can kill them in 2 clean hits. These classes are excellent food for you to grow to your full power of 4 heads. Never be afraid or ashamed to run away when you need to, it’s better to save your accumulated heads than die and have to start from scratch.
RECOMMENDED SHIELD: Splendid screen is a great shield to start you off since you can use the charge to get in killing range of those 125 HP classes as well as use it to charge away from danger.
Scotsman’s skullcutter
STATS:
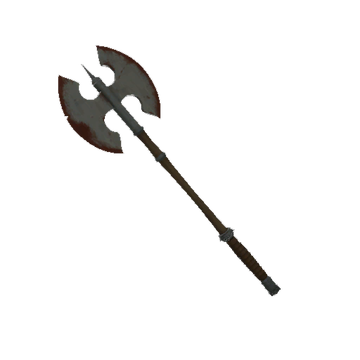
Deals 20% more damage (78 damage)
Move 15% slower
Can do random crits
IN A NUTSHELL: Play like an idiot.
This axe is absolutely counter-intuitive to demoknight’s playstyle, and that isn’t a bad thing per se. Demoknights usually want to move evasively, go for flanks and pick out key targets. But the slower move speed of this axe makes it hard to do any of that. So, don’t do any of that. Instead, play like an idiot. Go for dumb plays that no one would expect a sane demoknight to do. Charge that soldier in the face. Go for that medic who’s being protected by 3 enemies. Because this axe does more damage, and can also random crit. These two stats combined means in a single hit, you have the potential of doing 234 damage in a single hit, enough to kill anything up to a soldier. You can just go in and one-shot that enemy medic, then get blasted to pieces, but still have done something useful. And I won’t lie: you’d probably be more useful using any other sword, but this definitely IS fun to play around with.
Also: this axe is a surprisingly good counter against enemy demoknights. Since demoknights usually have 200 HP, three 65 damage hits from any other sword will still leave a demoknight with 5 HP. But with this axe, you can cleanly kill other demoknights in 3 hits, so you have an advantage to begin with. Also, you can random crit, while other demoknights can’t. It’s even really good against 4 heads eyelander demoknights, I’ve found, since a single lucky random crit will leave them straggling away with 1 HP, so they’ll play super cautiously around you.
RECOMMENDED SHIELD: Splendid screen, or tide turner. These both make up a bit for your slow speed with their increased charge. Tide turner is, once again, good for a charge-reset playstyle, with the added bonus that your random crit can make up for its charge only giving minicrits. The splendid screen has faster charge recharge rate, and the increased shield bash damage along with the guaranteed 234 crit hit can kill even a heavy with a bash-hit combo.
Persian Persuader
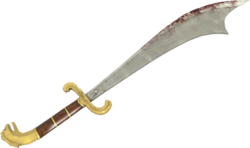
STATS:
Collecting ammo kits fills charge meter
Every hit gives 20% charge meter
IN A NUTSHELL: You are the charged one.
This thing is the tide turner, but in sword form. You will never run out of charge, since you get 20% charge meter for every hit you deal, and killing an enemy means you can collect their ammo kit and instantly have a charge ready. Play with a charge-reset playstyle using this thing, chaining charge-kill after charge-kill. Unlike other swords, you never have to conserve your charge for “the right moment”. Use it whenever you like, because it’ll be ready almost instantly. This sword fares slightly better than other swords in wide open areas, which demoknight really isn’t suited for, since the many charges you get can kinda make up for that.
RECOMMENDED SHIELD: Chargin targe. The persian persuader already gives you enough charge as it is, so you’ll be better off having more resistances and let the sword help out its slower charge recharge meter.
Claidheamh Mor
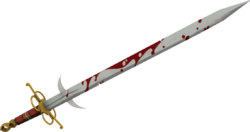
STATS:
0.5 seconds increase in charge duration
Kills refill 25% charge meter
Take 15% extra damage against everything
IN A NUTSHELL: High-risk, high reward
Make no mistake, +15% damage taken is a HUGE downside. Demoknight isn’t really that beefy to begin with, and giving him even less effective health is a real detriment. But its upsides are really unique and actually might make it worth the downside. Now, +0.5 seconds of charge duration might not seem like much, but considering demoknight’s charge only lasts for 1.5 seconds, +0.5 seconds is actually a lot. This allows you a larger window to land that charge-crit. You can also run away faster and farther, and charge in faster and closer.
The REAL unlisted upside of this, is the increased charge duration often catches enemies off-guard. Because most players who have dealt with demoknight a fair bit, can roughly guess the distance an enemy demoknight can charge by default. But the Claidheamh Mor extends its charge to just beyond that. I cannot tell you how many times, when I, an experienced demoknight with 33000 lifetime kills, have thought “Ok I’m just out of that demoknight’s charge distance, so I should be safe” and then it turns out they have the Claidheamh Mor equipped and actually do reach me with a crit and cut my head off, taking me completely by surprise. This, is the true upside of this sword. You can lull the enemy to a false sense of security by letting them think they’re out of your charge range, when actually they’re RIGHT in the place where you’ll be able to land a charge-crit on them. This actually makes this sword a good counter against enemy demoknights too, since if they charge away, you can follow them with your own charge – and even catch up to them with your extra charge duration and land a charge-crit on them.
Just remember, the 15% extra damage taken does mean you’ll have to play more carefully since you’ll die easily. Also, this means you’ll die in 3 hits against enemy demoknights despite having 200 HP, since you’ll take 75 damage per hit instead of 65.
RECOMMENDED SHIELD: Splendid screen utilizes the increased charge duration the most, so it’s a good combo. But if you find yourself dying a lot to pyros and soldiers, then go with the Chargin targe.
END
And that’s about it! Demoknight may be a niche class, but once you get used to him, he’s one hell of a lot of fun to play as, and can be a huge menace to the enemy if you know what you’re doing. Feel free to check out my other guide where I compare stats between the Splendid screen and Chargin Targe.
And give this guide a like, why don’t you? Instead of that “SEXI FEMPYRO BUTT” guide someone spent 1 minute making.
This is all about Team Fortress 2 – Guide to demoknight’s swords; I hope you enjoy reading the Guide! If you feel like we should add more information or we forget/mistake, please let us know via commenting below, and thanks! See you soon!
- All Team Fortress 2 Posts List


Leave a Reply