
Introduction
Hi, I made this guide for players who are stuck or just want to have a clear picture of the game and its mechanics. I hope it serves as a quick and reliable in-game resource for everyone.
This guide is divided into
– “introduction” part about your character, ship and how things work
– game ports (locations) and some quests
– officers and their quests/promotions
– achievement-related information
– trade routes and miscellaneous lore
There will be spoilers, so beware 🙂
Also, I am still adding content to certain sections.
I recommend checking out the “Emergency Aid” section, which is new. Check the “Making Money” for some tips, and “Ambitions” and “Quests” for story guidance.
I included some basic information about popular trade, lore, monsters. I hope it can show the real meaning of some things.
Character creation
In Sunless Sea character creation is a simple process, taking much inspiration from Fallen London. There are 5 main attributes and 5 paths to choose from, each provides a boost and a background. You make the choices that fit your general style of playing. There is no good or evil, only your perception of it.
It is also possible to remain without a past (at least for some time), being shrouded in shadows, and there are at least two good reasons to do that: a legacy item and an achievement.
Please read further to know more.
Skills
Your character’s skills are their only attribute and have one purpose: higher skill is needed to pass skill checks on various occasions, a skill check is called “a challenge” and with a probability of 0 to 100% you either pass (get a reward or progress a story) or fail. These challenges increase in difficulty as you complete more quests and storylines. This is the very meaning of the game: take risks.
The main skills are:
Iron,
the ability to force your way through life, to fight enemies, tied to monster hunting, as well as revolutionaries, it is considered harder to raise or train;
Mirrors,
the skill of observation, tied to sight, luminosity and the ability to spot monsters and “see” further at zee, also how fast your weapons can fire, easy to raise;
Veils,
the key skill for sneaky and deceiving actions, often a quality of villains and spies, smugglers, street-urchins, diplomats, also determines your stealth at zee;
Hearts,
or general charisma and courage, influence and generosity and therefore “goodness” of your character, related to love and romance storylines, obviously;
Pages
is often tied to Journalists, Investigators/Reearchers and general knowledge of things. Pages also determines the speed of “levelling up” and overall progress through the game. It is the most sought after skill, however, it is considered passive. Other skills are used more frequently.
If you have a zubmarine, you can perform an abyssal rite and increase your skill to +20 at the -10 cost of another skill:
Greeting: Hearts +20 Iron -10
Hearth: +20 Mirrors -10 Veils
Feasting: +20 Iron -10 Mirrors
Solace: +20 Veils -10 Hearts
You can only do one rite at a time, and first you have to find the correct place: there are many rifts, but they are all different, and also they change places for each captain in line. I suggest going along the north coast, there should be plenty rifts there.
Your Past
There are 4 careers your captain could have prior to catching zee-fever.
Street-Urchin.
In Fallen London, urchins live above the city and provide their eyes and ears for hire. This past gives a gunnery officer and a 25 boost to Veils.
Poet.
In Fallen London poets are struggling, addicted to honey-dreams and often affiliated with aristocrats. This past gives you a navigator and a 25 boost to Pages.
Soldier.
There are no ongoing wars in Fallen London, last was the battle for Hell (Campaign of 68). This past gives a 25 boost to Iron and a cook.
Ordained Priest.
It seems there is more than one religion in the Neath, plus the supernatural setting. It’s easy to start questioning your beliefs. This past gives a 25 boost to Hearts and an engineer.
Natural Philosopher.
These are probably the lost causes, best possible reason to go to zee. Curiosity. This past gives a 25 boost to Mirrors and a surgeon.
A you progress the story, you’ll notice that certain skill checks and quests are linked to certain lifestyles that may be also called zee-professions.
A monster-hunter may be an ex-soldier, with a starting bonus to Iron we have it around 50, plus the officer bonus which should give another 20 or so points. For mid-game fine equipment and a decent ship also give 20 points or more. An abyssal rite can give another boost (not to mention spending secrets on skills). A monster-hunter will have lots of trophies, stygian ivory, lamentable relics, a supply of fuel and food, and will rely on getting money from battle.
A trader’s main purpose is to zail far and wide, avoid battle and complete side quests on the way. A trading vessel will cost 7000 echoes, with 120 cargo space and a deck weapon slot to shoot off bats and miserable pirate ships. With Avid Suppressor and a good engine your main problem is fuel, supplies quite less so. You will also be limited to certain ports that sell goods you need, making half of the zee unused and unexplored. There will be a steady flow of echoes, depending on your trade routes. Money comes from long-distance zailing.
As an explorer/scholar your captain will rely on a light ship and little cargo, making good profit from courier jobs and completing most questlines. It will be a problem, however, for the Mechanic’s quest and the final part of the Venturer’s Desire (you’ll need a bigger ship). An explorer can hardly make much money, but on the other hand they can evolve to trader or even a monster-hunter. Their cargo hold is usually a mess of items, passengers and ship equipment.
The other important decision you are going to make about your character is their ambition, which is also a Victory condition.
Ambitions
There are 4 ambitions available after you choose your past.
– Wealth
– Your Father’s Bones
– Zong of the Zee
– Your Kingdom
– Immortality (zubmariner)
For early game I suggest Zong of the Zee or Your Father’s Bones. These are mostly about exploring and collecting items. Wealth requires 50000 echoes or more to complete, which can only be done by trading extensively. Not the best option for novice captains in my opinion.
When you complete an Ambition, it’s game over. Game will also end when you die, either of “natural” causes or by doing a certain quest which is not an Ambition.
I put a detailed guide later, under “Ambitions in Detail”.
Early advice and how things work
The best way to start the game is to be an explorer with higher Pages to quickly progress through stories and hopefully earn some money by doing quests. Once you have settled and acquired a weapon and a better ship, you can pass your legacy to next character who can be either a trader or a monster-hunter.
You can read more about this in the Quests and Legacy sections.
Note: SAY = Something Awaits You, an opportunity that appears after 1 minute at zee and can be used in ports.
UI
The user interface has 3 parts:
upper-left, with ship status (hull and cargo), fuel/supplies and terror counter,
upper-right, with your portrait and crew count, popup menu for officers and skills,
lower right, with popup messages and access to Gazette,
lower left with the log and SAY icon, fragments counter and oxygen level for zubmariners
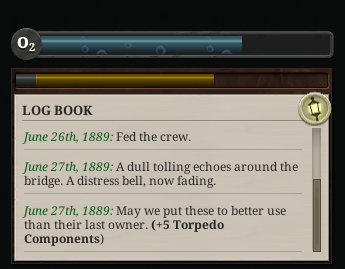
Here is the log book icon with SAY (lantern)
You start in London, the area known as Wolfstack Docks. There are more areas where you can trade and progress your story. London is the main hub with the biggest market and it also provides ship repairs, new equipment, crew and officers.
Gazette
The Gazette is your “assistant”. Every time you dock, a Gazette interface is displayed with Ship, Journal, Officers, Hold, Shop tabs available.
Story – takes you to the streets of the city. For some cities there will be “transitions” to other areas where the Gazette becomes unavailable.
Hold – displays your current vessel with all its equipment and your items. Allows to equip items while in port.
Journal – displays icons with all the information you collected so far. Note that your quests are scattered in the journal. It is sorted by port/location. When you need to find what you’re supposed to do, check icons under the “Objectives” and “Learning About”. If you didn’t find anything, check under port you’re going to.
Officers – displays your officers and mascots, allows to assign and interact with them.
Shops – displays available shops. In each location there are typically 1-2 sellers.
See the Trade section of this guide for details.
Shipyard – used for buying new ships (in London)
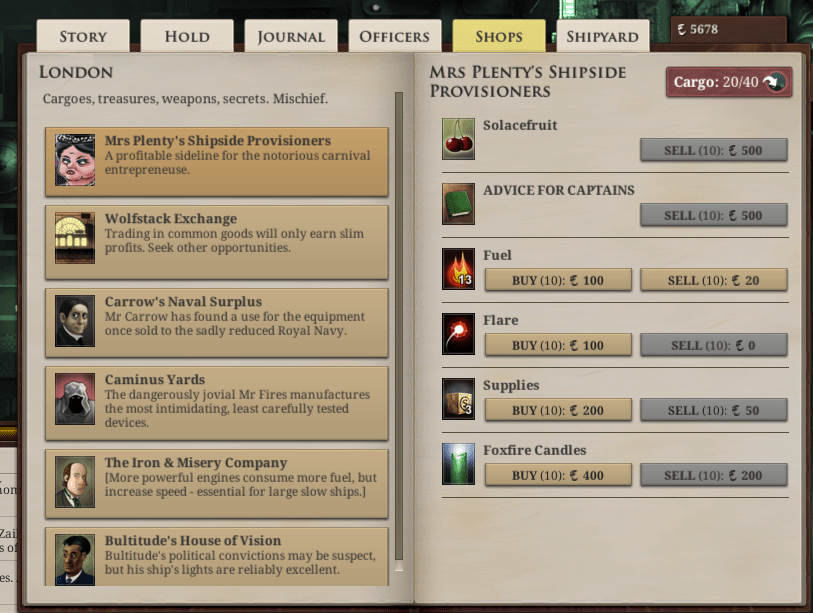
Here is the Shops tab.
When you first arrive at Fallen London, make sure to write an Ironclad Will to pass something to an heir. Because you never know when and where you’re going to meet your end. Right?
Zailing
To zail you need supplies and fuel, and to have them you need either to buy them for echoes, trade for items/favours or loot defeated enemies.
Fuel and supplies bars are displayed in the upper left corner of the UI. Fuel and supplies are consumed at some rate while at zee and have their own mechanics.
– fuel burns twice faster at gear 2 (increasing the speed) and Full power (F) burns even more fuel
– fuel burns faster with more efficient engines (more engine power)
– fuel burns faster with prow-lamp (L) on (lights burn 1% of fuel every second)
– fuel burns faster on heavier ships (either full cargo or ship’s own weight)
– supplies are consumed faster with more crew on board, which is crew count divided by 2 for every minute spent at zee
Tip: you need less supplies with claymen onboard as they reduce crew capacity by -3
If you feel especially nerdy, there are player-made spreadsheets on different gaming forums that calculate speed/distance and fuel consumption ratio.
Here’s an example for your Ligeia-class corvette with weight of 1000 and engine power 800:
speed = (4.5*800+2000*8-1000)/2000 = 9.3 distance units/second (for gear 1)
fuel consumption = ((800*0.0005)*1)*1+ 1 = 1.4 % per second with lights on (for gear 1) meaning that a barrel of fuel lasts a minute and a half at zee, and about 40 seconds at gear 2.
Advanced ships, engines and officers will make some difference.
Here’s an example for Phorcyd-class corvette with Boadicea engine and Maybe’s Daughter/Tireless Mechanic as officer
speed = (4.5*1600+2000*8-2000)/2000 = 10.6 distance units/second which is 10.375 without Maybe’s Daughter.
fuel consumption = ((1500*0.0005)*(1-0.05)*1)+1= 1,7125 % per second with lights on (for gear 1) and 1,75 % without Tireless Mechanic. Meaning that at gear 2 a barrel of fuel lasts for 28 seconds or so.
In general, it is more efficient to use Gear 2, unless you have the combo of Fulgent Impeller/Avid Suppressor equipped, which gives higher efficiency at Full Power (F)
Zee is vast, and sometimes a good fuel planning can save not only echoes, but also your quest or your life.
Hunger
One of the biggest terrors at zee is to die of hunger, or worse (the Sigil-Ridden Navigator quest is very illuminating here).
The hunger bar is located under the fuel bar in the upper left corner. Once hunger reaches 50 one point of supplies is consumed by crew. If there are no supplies, an event will trigger for every 10 points of hunger allowing to lower it if you are lucky.
Tip: lower hunger when hunting monsters, using their meat to save yourself a crate or two of supplies per voyage.
Map
The map in Sunless Sea is generated once per captain, unless you choose Correspondent as Legacy and get the old chart. Which is recommended if your map has shorter trade distances. See the “Trade routes” for details.
Map is divided into regions where some locations are fixed, and others shift for every new captain. Fixed locations are: Fallen London and Lower Barnet, Mutton Island, Venderbight, Whither and Codex, Irem, Cumaean Canal, the Iron Republic and Grand Geode, Port Carnelian, Adam’s Way and Varchas, Kingeater’s Castle. These ports are on the coastline and will be found exactly on the same spot where they previously were (not sure about Autumn Islands though).
Some ports will be shuffled. They either “travel” together or alone, but usually keep their regional boundaries. Chelonate, Empire of Hands and Aestival will always be in the East, between Kingeater’s castle and Irem. Isle of cats, Fathomking’s hold, Mangrove College, Visage occupy southern waters, while Chapel of Lights, Avid Horizon and Frostfound sit in the north.
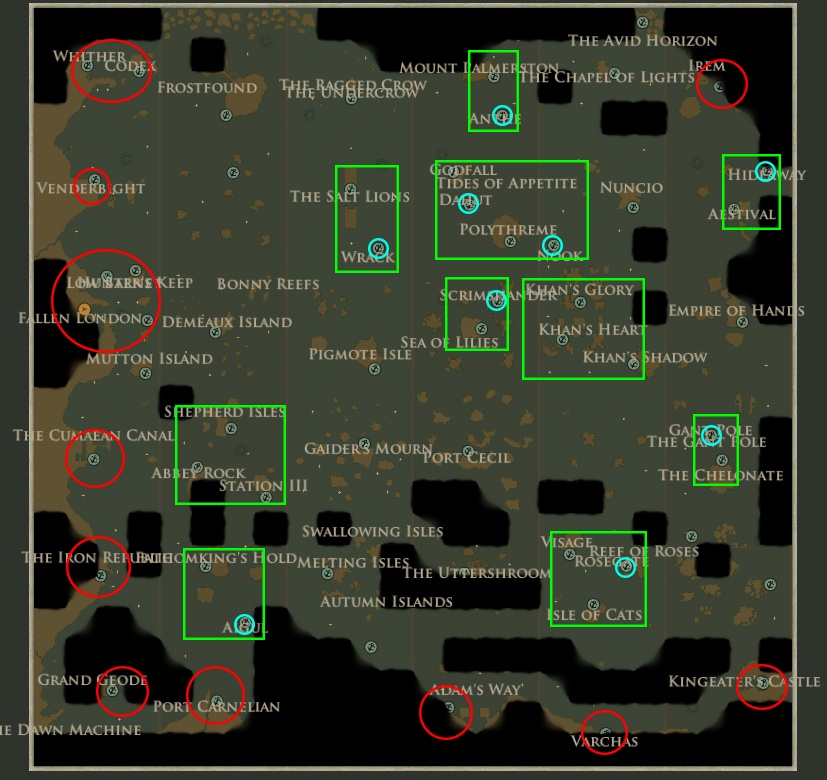
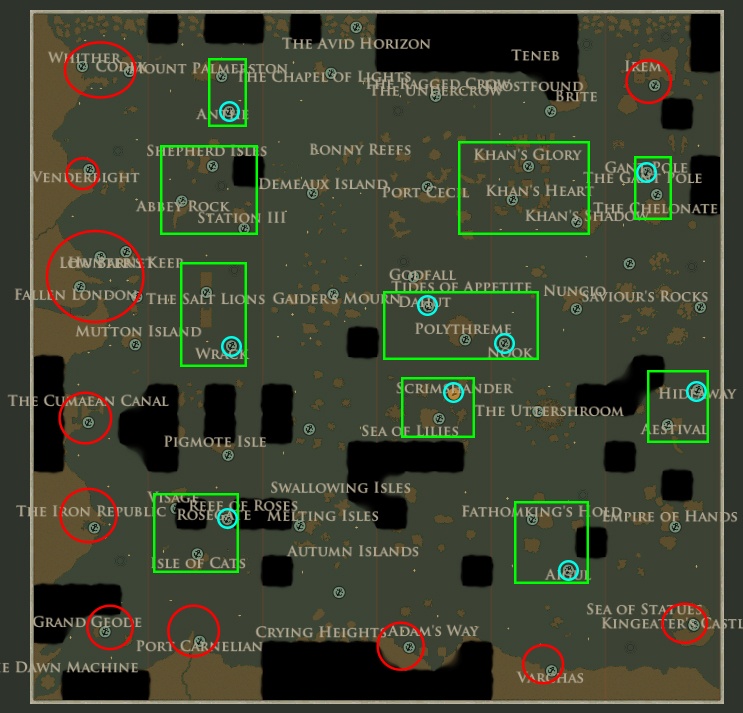
Here is a comparison of port locations on two maps. Blue circles mark underwater settlements that are tied to certain zee ports. I framed clusters of ports and marked permanent locations in red.
Cargo and Curiosities
As you zail and make progress you gather a variety of resources that take space in your hold (or they don’t). Cargo is a category for resources that are involved in trade or big quests and take space (goods, passengers, quest items).
The ones that don’t need cargo space are called curiosities, and all your fragments/secrets, port reports, books, trinkets go in that category.
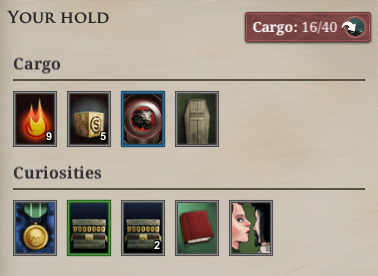
Here’s a view of starting cargo and curiosities.
Fragments and Secrets
Fragments are snippets of knowledge you collect on various occasions. Your progress is marked with a golden bar in the lower left section of the UI, above the captain’s log. When you collect enough you get a Secret which is a valuable item that has many uses. Secrets are spent to increase skills by talking to your Officers on the Journal page.
They are also a key component for serious quests and crafting powerful items like the Monstrous Almanac, Serene Aquarium, etc.
Death and Terror
High terror ultimately leads to madness and death, same as 0 crew or 0 hull. But there are other more elegant ways to die. These will be mentioned in the Quests section of this guide.
Terror is the main constraint of the game, supplies and fuel not as much… they can be easily replenished in ports.
Terror bar can be found next to a skull icon at the top left corner of UI, and there are 3 types of surroundings: serene, scary and very scary, each marked with green, orange or red dots, when they reach full circle your Terror increases by +1. Your ship will also signal terror increase by lighting its port and starboard sides with ghostly green lights.
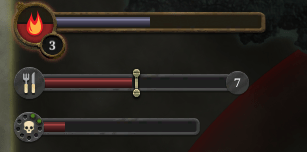
Here the green dots indicate a safe location.
The level of terror is tied to luminosity and proximity to land, being lowest near light sources (buoy or lighthouse) and the shoreline with prow lamp on, and the highest in the open zee with prow lamp off. When you reach well lit areas, the “terror dots” will change to green and start to decrease, eventually reaching 0, although not beyond that, so your terror level will not be lowered.
The only way to effectively lower terror is to dock at certain ports and use certain opportunities, either by paying echoes or some other favour.
There are certain levels to terror that will lead to frequent encounters on your ship.
0-30 is considered low, your crew will be spooked or scared, but nothing a pass of Hearts skill check can’t handle.
30-50 will make you very nervous, there will be more events and more losses if you fail
50-90 at this level docking in London will give you 1 point of Nightmares and decrease terror to 50. You can get a whooshing 50-70 points of terror after certain events at Frostfound or by sailing beyond the edge of the map, getting you right to this stage of terror if not beyond. At this point you will have events that will kill your crew, raise terror, and a Constant Companion will appear underwater, being a spider of 750 HP that follows you everywhere once you submerge until terror is lowered.
90-100 is basically suicide, but there is a brighter side: a phantasmal Officer will appear on your ship by the name of Lady in Lilac.
I include reliable locations to lower terror in the Emergency section of this guide.
Note that technically there is no death in the Neath, thanks to the energies of the Mountain of Light aka Stone, an on the Elder Continent (southern coast) there is no death at all. When you “die” at zee, usually you go to Fathomking’s realm as prisoner or maybe become a Drownie if you visited Mutton island and ate Rubbery lumps. If you retire and “die of natural causes” you’d be exiled to Tomb-Colonies, because, naturally, you’d be too old and probably too ugly to show your face to people. That’s why they wear bandages at Tomb-Colonies. Sometimes a Tomb-Colonist might meet a darker fate and become the hatching place for a moth… much like the movie Alien suggested. There are also Soothe&Cooper Long-Boxes, similar in their image to Tomb-Colonists, but much more sinister in the way they’re going to be treated (see Station III for more information).
Legacy
When playing the game you have to keep in mind that your captain will eventually die or complete an ambition. Sunless Sea has opportunities to pass your accumulated wealth on to your next in line.
Firstly, there is an Ironclad Will (allows to pass on Lodgings and Heirlooms), available for purchase in your Lodgings in London for 100 echoes.
Secondly, there is a romantic storyline in London which results in having a child who later goes to zee and becomes your Scion (allowing 2 Legacies instead of 1). This storyline also requires the purchase of an Elegant Townhouse to progress. In the house, there are options to create Heirlooms either from Captivating Treasures or Outlandish Artefacts, each Heirloom can be traded for 900 echoes and is a reliable source of income for your next captain.
Your next captain will have 5 Legacies to choose 1 (without a Scion) or 2 (with a Scion):
-Rival (50% of Iron and a weapon)
-Pupil (50% of Mirrors and 50% of money)
-Salvager (50% of Veils and 50% of money)
-Shipmate (50% of hearts and one officer or mascot)
-Correspondent (50% of Pages and the chart/map of the Neath)

Here is the Legacy menu.
As you can see, it is possible to pass on 100% of your captain’s money, but there will be no weapon, no chart, no officer.
Note that none of your items or ship will be passed on. You’ll have to buy a new ship and all the equipment for it.
There is a way to get a permanent boost to starting skills for all captains by getting the following items:
Horizon Codex (Pages +25)
A Travelling Light (Mirrors +25)
Manual of Miracles (Veils +25)
Boke of Sharps (Iron +25)
A Dream of Red (Hearts +25)
An Adumbration of Her Heart (Pages +10)
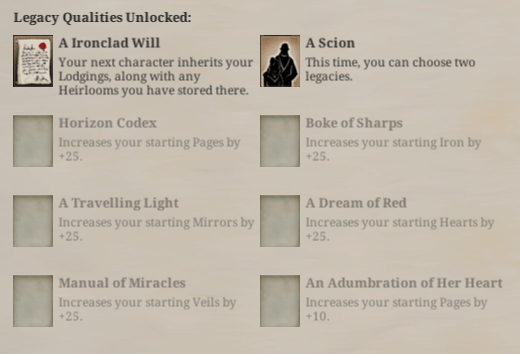
Here is the Legacy Items menu.
Please see Quests section for detailed information.
Your Ship
Every captain gets a starting ship, a simple one with a cargo hold of 40, 10 quarters and hull of 70 HP. You can only change equipment in ports.
Your ship can be equipped with and a total of 6 items: Forward, Deck, Aft, Bridge, Auxiliary, Engine. Some ships will have restrictions and only 4 or 5 slots available.
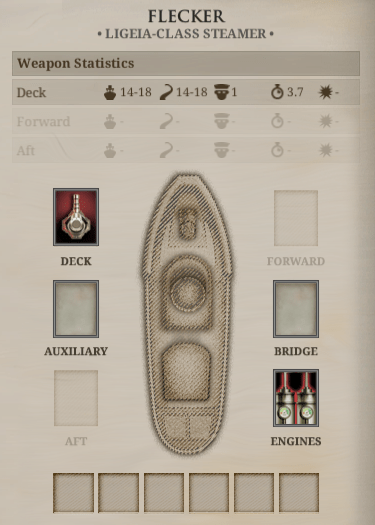
Here is the overview of starting ship.
Advanced ships can carry 3 weapons in Forward, Deck and Aft. Your starting ship only has 1 weapon and an old engine.
Equipment can be purchased in London or crafted by completing quests. See Quests section for details.
Please note that the selling price for most items is 50% lower than purchasing price, plan accordingly.
There is a total of 17 weapons, 8 engines and 20 miscellaneous items that increase or decrease skills. That makes a total of 45 items and 12 of them are craftable via quests or your Lodgings.
Hull
Your hull is your “health” and it works same way for any other ship you encounter at zee. Better ships have more hull. Here’s a comparison:
Lampad-class: 50 hull, Ligeia-class (starting ship): 75 hull, Phorcyd-class: 200 hull, Caligo-class: 300 hull, Maenad-class: 450 hull, Eschatologue-class: 600 hull. Most enemy attacks will deal 5-15 damage, 40-60 damage if it’s a Mt. Nomad or Tree of Ages. So.. well… don’t go east on a Lampad-class cutter.
Hull can be repaired by leaving your ship in drydock in London. It’s going to cost echoes, less if you have Admiralty favours. More if it’s a standard shipyard. Usually the hull is fully repaired. Not if rattus-faber are involved, though…
Quarters
It is the number of crew your ship needs to keep it going. 50% of crew can only run at 50% speed (gear 1). Here’s a comparison:
Lampad-class: 5 crew, Ligeia-class (starting ship): 10 crew, Phorcyd-class: 15 crew, Caligo-class: 30 crew, Maenad-class: 25 crew, Eschatologue-class: 40 crew.
Crew consumes supplies, so when you’re not planning going to scary places or dealing with scary people, or fighting monsters, better keep it at half +2-3 crew just in case. You don’t need 30 crew on caligo-class, you only need 18-20.
How do you lose crew?
– in fights when enemies launch special powerful attacks
– going to forests, castles, Surface, shore leaves, hunting, etc
– sacrificing crew for items and favours
– eating crew at certain places or when hunger is at 100
– losing crew to terror/mutiny/killers on board (unfinished men, spiders, assassins)
Hold
Determines your ship’s capacity to store goods, passengers, equipment. Usually ships have 40 or 70 hold, merchant class has 120 and Eschatologue-class has 100. Some of your hold will be reserved for fuel and supplies at all times. Also, there are sealed containers to contain dangerous species and concealed compartments for smuggled goods. Buy those in London or Gaider’s Mourn.
Emergency Aid
Here is some advice for those who want to make it safely to London in extreme conditions (low fuel/supplies/crew/hull/echoes somewhere between Irem and Kingeater’s)
Hull Repair
There aren’t many options to repair your ship out in the zee, but you might be just lucky enough.
– The most obvious, while your hull is above 50% and you have extra supplies, hit R and get some of that hull repaired at the cost of 1 supplies. Won’t work at critical damage below 50%.
– Kill a shark and use its cage for a 1-3 points of hull repaired
– Fathomking’s Hold provides an option to repair hull, but first you’ll need a live specimen to do it.
– Rattus Faber at Pigmote Isle can help, but only if you sided with them (the rat-engineer) for the main quest
– Aestival Colony has an option to repair hull, but I have never really tried it.
Crew
Unfortunately, your crew becomes the main currency for negative events that happen at zee. And the most frustrating you can get is crawling at gear-1 speed when crew is below 50%. But, occasionally, you can improve a bit without visiting London.
– Demeaux Island has an event when “Something Awaits You” when a volunteer wants to join
– Port Cecil and Venderbight might trigger a “Raggedy Fellow” event when a zailor joins in, however, that might have mild consequences
– At Fathomking’s trade a zailor for 1 scintillack, but you have to give him a zee-ztory to descend first
– You can hire crew at Khan’s Heart.
– At Codex, after retrieving strategic information for the admiralty, an event might pop up to take aboard a mute exile
Also, installing We are Clay docking at some port might help if you need just 1 crewmember.
Supplies
Getting food is an easy job when you are a monster-hunter. And what if you’re not?
– at Demeaux Island taking tea with the factor (requires SAY) yields 1 supplies
– in Frostfound taking tea with the squatters (requires SAY) yields 1 supplies and a fuel
– compiling a report at Mangrove College also gives 1 supplies
– Vengeance of Jonah in Venderbight trades strange catch for 3 Supplies, but you have to unlock it first
– Uttershroom will trade prisoner’s honey for 1 Supplies and a blemmigan for your propagation quest
– again, Fathomking comes to our aid when you ask him for a boon (requires SAY) and get 5 Supplies, but again, there is a small price to descend there
– at the Empite of Hands, hunting for supplies at Ash Isthmus, doing raid at Hearthsake Village (Iron check) and shore leave at Port Stanton (with SAY) will get you some supplies
Fuel
Unfortunately, there are no major opportunities to get free fuel other than the Admiralty in London. Sometimes Fathomking’s boon yields supplies, but mostly it’s killing monsters (like lifebergs or behemoustache) and defeating all kinds of ships.
Easiest option is to buy fuel/supplies in port. I prepared a map where supplies- and fuel-selling ports are marked.
But there are clearly some places that overprice: Empire of Hands, Irem, Gaider’s Mourn, Venderbight, Rosegate when you can have fuel at 8 echo from Iron Republic or Wrack (after luring enough ships).
Officers
A great addition to ship’s crew and your skills are the officers, recruited either in London or in other ports. There are 10 officers and 4 mascots available.
Some officers are a temporary addition to our crew and will disappear once their quest is over.
Each Officer has a quest promoting them to a better self which can be either difficult or not, however, with each new captain all officers return to their pristine qualities. Note that it is possible to recruit every officer, and if you haven’t found one, just take your time, that’s game mechanics for you.
Here is the list of default Officers for each background and a Mascot.
Shady Cook +1 Hearts (Veteran of the 68 Campaign background) – he is a cook and gives a reward for taking him to Wisdom
Gall-Eyed Engineer +1 Veils (An Ordained Priest background) a chief engineer who gives a reward for taking them to Kingeater’s Castle or giving them to Lady of the Cages on Isle of Cats.
Sly Navigator +1 Mirrors (Poet background) is a first officer who gives a reward for taking him to Frotfound
Longshanks Gunner +1 Iron (A street urchin background) is a gunnery officer who gives a reward for taking her to Khan’s Shadow
Plausible Surgeon +1 Hearts +1 Pages A natural Philosopher background) is a doctor who gives a reward for taking him to Chelonate
Comatose Ferret +1 Hearts well… its story may end in a pot if you’re feeling desperate
You can get rid of them if you like.
You can keep them, although there is no point except sacrificing the engineer at Port Cavendish.
Here are the permanent Officers
Cook
Bandaged Poisonnier +6 Hearts +3 Pages can be recruited in Venderbight after visiting Demeaux Island and having tea with the Factor. Requires supplies, strange catch, mutersalt, live specimen, zzoup, and, eventually a sacrifice of an Elegiac Cockatoo (or a fluke-core), then another 5 crates of wine and a trip to Fathomking’s hold to be promoted to a Chef-Paramount (+9 Hearts +5 Pages)
Nacreous Outcast +4 Hearts +2 Pages +2 Mirrors can be recruited in Principles of Coral while doing its quest, then taken to Salt-Lions, Frostfound, and eventually at the final chess match you either win or lose, losing and taking the Nacreous Survivor (+8 Hearts +4 Mirrors +4 Pages). If you win and lose the guy, you can get him back from Fathomking for 1 fluke-core+1 searing enigma, 7 scintillack and 7 captivating treasure.
Chief Engineer
Genial Magician -1 Hearts +6 Veils +3 Mirrors is usually available in London. His story takes you to Khan’s Heart where you find help with echoes, 2 watchful curios and 2 bales of parabola-linen. OR a pewter horsehead which you get on a random event in Gaider’s Mourn siding with the Khanate. For the next part, have some prisoner honey and scintillack ready. Depending on your choices the Magician becomes Urbane (-2Hearts +8 Veils +5 Mirrors +3 Pages), Satisfied (+6 Veils +5 Mirrors +1 Hearts) if you side with him or Prudent (+6 Veils +4 Mirrors) if you talk him out of his plan.
Maybe’s Daughter +6 Veils +3 Iron +100 Engine Power can be found in London. Her storyline is easy, you’ll have to visit ports in search for her mother, with final leg of the journey takes you back to London to the Penstock’s Wicket and promotes Maybe’s Daughter for higher Iron or Veils boost depending on whether you let her go there or not.
Tireless Mechanic +8 Veils Fuel Efficiency +5% has a quest of his own allowing you to get a Mirrorcatch Box full of Angry Snakes, and later on a super fast Engine for your ship that gives +5000 Engine power and 50% Fuel Efficiency. That part of the quest is very challenging. First, collect some zee-ztories and other items, plus a clay man and a mirrorcatch box from Khan’s Shadow. Take that to Hunter’s Keep (+foxfire candles if it’s destroyed), then talk to the man and find out the recipe. Rescue his pal from khanate prison at Wisdom (and better do it with a Hearts check than wait till your Pages is 139. Find the components for the Element of Dawn and take the enormous cargo of supplies, stygian ivory plus all I mentioned before to Kingeater’s Castle. Don’t even think about it when you’re early game.
First Officer
Carnelian Exile +6 Mirrors +3 Pages she is touched by the Dawn Machine, and her dangerous quest ultimately leads you to your end. Not to mention zailing 4 times beyond the map. But you were warned, right?
Merciless Modiste +8 Iron +3 Veils +1 Hearts can be recruited at Mt.Palmerston for 6 Parabola-Linen, her story is interesting and she can make you garment to permanently increase skills (Hearts, Pages or Iron). She was one part of the Set, a group of artists that zailed the Irrepressible, a deadly zub which can now be found below the Chelonate. Pirate-Poet was also a part of it. You can give them both to be killed when the zub finds you, but the Pirate-Poet will escape anyway. Use their hearts at Fathomking’s for the Father’s Bones Ambition progress.
Sigil-Ridden Navigator +6 Mirrors +3 Veils is a man who lost his memories, and at the end of his story you might think life was better without them. Anyway… bring 2 live specimen to Chapel of Lights. Then take the poor guy to Frostfound with some supplies and an outlandish artefact. Then to Avid Horizon with a piece of strategic information. When he learns his past, drop him off at Codex, Empire of Hands or Kingeater’s castle. The castle is the only option to keep him alive, and to do that you’d have to be..uh.. VERY unaccountably peckish (at 3+).
Gunnery Officer
Irrepressible Cannoneer +8 Iron gives a quest to craft a powerful weapon that can be either used or sold to interested parties (see Opposing Forces section for details). You’ll have to take him to Aestival, Iron Republic, and Station III to do it. He can also be sacrificed at Isle of Cats if you side with Zaira (and are evil enough) for a nice reward.
Presbyterate Adventuress +6 Iron +3 Veils There is no way to promote her. Dine with her 3 times for 3 supplies and 3 sacks of coffee, then fight off some assassins, then she decides to end her life and goes either to Abbey Rock or Godfall.
Surgeon
Brisk Campaigner +6 Hearts +3 Iron is a very sick woman and her quest will take you places to find ingredients for a cure. You’ll need 4 mutersalts, a strange catch, 2 solacefruit, zzoup, 7 drowning pearls, 5 secrets, 1 scintillack and a judgement’s egg to complete her story. The Indomitable Campaigner gives +9 Hearts and +5 Iron.
Cladery Heir +6 Hearts +6 Iron is probably half-Mr.Iron just as Maybe’s Daugher is half-tiger. To progress her story, you’d have to obtain “souvenirs” from surgeries. One such surgery can be done in Nuncio. Other ports are Irem, Aigul, Cumean canal, Port Carnelian. Then she’s going to need strange catches, live specimen, prisoners, blemmigans, other things to cut. In the end, you can get a ship, which is made from a part of the Bazaar. But it’s not that fancy.
Haunted Doctor +6 Hearts +3 Pages may seem innocent, but this villain will rob you of your Strategic Information/Vital Intelligence, sabotage your ship and do other nasty things. He lost his purpose, and you can give it back to him by taking him to Khan’s Heart (Determined Doctor +6 Hearts +6 Pages), and then persuading to be loyal to London (Disillusioned Doctor, +9 Hearts +3 Pages)
Here are the storyline-related Officers
Scrimshaw Chronicler -1 Hearts +3 Iron +3 Pages +3 Mirrors (Glory’s Bones Quest in Chelonate and Irem)
Your Father +1 Hearts +1 Veils (Ambition: Your Father’s Bones quest)
Wistful Deviless +1 Iron (her quest on Mt. Palmerston where at some point she asks to take her to London)
Lady in Lilac +6 Hearts +6 Pages +6 Mirrors (Nightmares 70 and above)
The Scarred Sister (is the youngest sister from Hunter’s Keep and her quest ends when you take her to Abbey Rock, Station III or Naples)
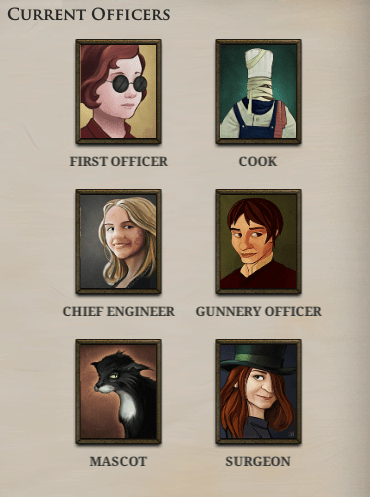
Here is the officers tab in the Gazette.
Mascots
Mascots:
Comatose Ferret +1 Hearts (starting mascot)
Blemmigan Gallavanter +3 Mirrors +2 Pages (joins in London)
Wretched Mog +2 Iron (adopted at Mutton Island)
Monkey Foundling +5 Hearts (steals your clothes at the Empire of Hands. Just be polite. Joins later.)
Albino Tinkerer +2 Veils (Pigmote Isle, siding with rats)
Guinea Page +2 Pages (Pigmote Isle, siding with cavies)
Elegiac Cockatoo +2 Mirrors (Wisp-Ways in Mangrove College)
Eyeless Skull -2 Mirrors +4 Veils (Genial Magicial storyline or Frosfound)
Keeper-Moth -2 Hearts +3 Mirrors +3 Veils +3 Pages (end of Curator’s story)
Vigilant Idol +4 Mirrors (end of Principles story on winning the game)
Ports
London is the central port, and home of your captain. London is the Fifth City that fell on top of cities 1-4 after being bought by the Masters of the Bazaar. It is ruled by the Masters (of course) and the Queen also has some power, even though she never leaves her palace. In London you can interact with many prominent figures (and locations): the Admiralty where you submit port reports, deliver strategic information and vital intelligence, the University where the Scholar is buying curiosities from the zee, the Market or Carousel with lucrative opportunities to earn money or decrease terror. Labyrinth of Tigers is available to your captains after the first one dies.
London is also the main trading hub where you can sell almost anything. Here you can fix your ship, hire crew, buy supplies and equipment.
The heart of London is Bazaar, a huge crutacean living in the caverns underneath, once it was a Messenger of the Stars (Judgements) who delivered Correspondence and eventually fell in love with the Sun. It was a sad and romantic thing, and after certain deal the Bazaar ended up with Curators who were chiropteran by nature (yes, one space crab and a dozen space bats), stealing 7 cities worth of love stories, 5 stolen, two to go. Read more in the wiki if you like 🙂
Hunter’s Keep is a small island usually sitting northwest of London. Three sisters live in the cottage: Lucy, Phoebe and Cynthia. The sisters are mysterious, each tied to the gods of the zee, and after few dinners with them the story progresses to a bitter end and the house is consumed by flames. It is inevitable, but also gives a unique legacy item in the end.
The cellar of Hunter’s Keep is mentioned in Tireless Mechanic’s quest.
Mutton Island is a fishing village where nothing usually happens until it is seized at some point by the Khanate. There is no way to go avoid this story. You can also pick a mascot in the village, and sometimes it is mentioned in Mr.Sacks’ quest. But when it’s gone, it’s gone for good.
Salt Lions (Station IV) are tied to the gods, and also mentioned in the Nacreous Outcast quest. There is also a profitable opportunity to haul sphinxstone to London, but it is limited and becomes unavailable later in game. Sphinxstone is meant as a drug for the Bazaar itself.
Gaider’s Mourn is harbouring all sorts of pirates, there you can drink in a bar and meet all sorts of shady characters (like the Pirate-Poet) and buy/sell illegal goods.
Venderbight is the port of the Tomb-Colonies which were the Third City. Here you will find the Vengeance of Jonah restaurant as well as a profitable quest given by the First Curator and the Last Tour Operator which is a repeatable quest.
Cumaean Canal is the gateway to the Surface (Vienna and Naples). It was once dug by the Stone Pigs. To get to the surface you need 24 fuel and 2 supplies, however, I suggest taking more because the events on the surface are unpredictable. Visits to Surface also reduce terror a lot. Supplies are cheaper, but not the fuel. First you go to Avernus, then Naples, then Vienna. Each trip is a risk, of course. From Naples you can run cargoes and get some profit at the risk of losing crew. To get back, repeat same steps in reverse. Note that you’re going to need fuel/supplies to get back to the Neath.
Whither is dedicated to the gods of the zee. It is a place of endless questions and no answers.
Codex is a small colony directly opposite Whither. It has all the answers, but its exiles are mute, because they dared to answer questions. Whither and Codex are somewhat opposite Irem, which is the riddle city.
Abbey Rocks is a monastery ruled by the Sister who was a prominent figure in the Second city. Here you can reduce terror and trade supplies, trophies and strange catches.
Shepherd Isles is a quiet place also tied to the gods of the zee.
Demeaux Island or the “Funging station” where you can have tea with the local “manager”, also gather supplies and get information about the Vengeance of Jonah.
Iron Republic is a colony of Hell south of London where no human or natural law is present, therefore it is very dangerous and always changing. However due to its nature fuel is very cheap, cheapest in the Neath. Iron Republic also has 4 markets that also change depending on the day. The place is affiliated with devils and revolutionaries, therefore anyone tied to it is either one or the other.
Station III is a base of Soothe & Cooper same as Demeaux Island is a base of Iron & Misery Co. As the name suggests, this is where Soothe & Cooper Long-Boxes go to. In other words, it is a secret weapon facility that melts heartmetal out of the hearts of miserable deceased who overdosed on their tonic that is supposed to cure heartache. Austere Acolyte and Heartmetal Smith are the only inhabitants.
Uttershroom is an overgrown fungus home to Blemmigan species of a sentient mushroom. Here you can start the Propagation quest.
Avid Horizon is the gateway to High Wilderness and this is where people (supposedly) leave the Neath and go on to the Reach, a region featured in Sunless Skies.
Port Carnelian lies on the Elder Continent (as well as Adam’s Way and Varchas). It is the diplomatic hub where local folk and tigers deal with londoners and Khanate.
Isle of Cats/Port Cavendish is the smuggling heaven ruled by Pirate-King Leopold. His daughters Isery and Zaira run the red honey trade. You will have to choose one of them as patron. Red Honey is a substance made of human memories, not exactly an ethical thing.
Pigmote Island is a fungal wilderness where two colonies of vermin are engaged in a civil war: cavies vs rattus-faber. You will have to support the island and finally lead it to prosperity or fall.
Nuncio is a postal hub where you can pick a few quests.
Visage is home to a strange face-shaped carving called The Flourishing of Years which is also found on the Jillyfleur and Jillyfish. The trick is to keep to your mask’s role: the frog is clumsy, a locust can steal, moth is above everyone but also respectful.
Chapel of Lights is connected to a very disturbing story from Fallen London about a Master who was eaten by the rulers of the Third city, and therefore gives a cannibalistic vibe. This story is also connected to Mutton Island where Master’s remains were dropped in a well, and Whither where he is called a Drowned Man.
Khan’s Glory is the administrative center of the Khanate where one can influence affairs same way it’s done in London: by making gifts, finding intel, doing favours and placing spies.
Khan’s Heart is the trading center of the Khanate. You can get access to trade by doing favours to Leopard/Taimen clans in Khan’s Glory.
Khan’s Shadow is a small port of exiles, pirates and warriors from the Khanate.
Wisdom/Sea of Lilies is a prison originally used by the Khanate, now independent. You can rescue prisoners from there if you have high Hearts.
Adam’s Way is a city on the Elder Continent where each visitor is only allowed to stay for one day, and the day is measured by a lifecycle of a tree that grows, fruits and dies in 24 hours.
Frostfound/Brite is a castle of ice presumably built by Salt before it went to the East. Salt left there its memories.
Polythreme is home to Clay Men, some quite normal, others Unfinished. They are born of the king’s dreams, and the king is one of-aThousand-Hearts. He was a prominent figure in the First City, now his clay offspring are the labourers of the Neath each having a Mountain-Sherd for a heart.
Fathomking’s Hold is the throne room of the Drownie king, married to a Lorn-Fluke who is famous for his unpredictable character and can also bring back the dead.
Grand Geode is the base of operations for a splinter cell of Admiralty officers who got under the influence of the false-Judgement (false-star) called the Dawn Machine. Their eyes glow with amber light. Ultimately, this faction is fighting for power and is very eager to overthrow the Admiralty and gain contr
Quests and Tips
I arranged major quests based on their difficulty and availability.
Tomb-Colonists and the Last Tour Operator: there are few minor quests from tomb-colonists depending on your captain’s past. Being a poet also yields a Soothe&Cooper Long-Box. These quests begin in London, and take you to the Tomb-Colonies.
The Last Tour Operator is a repeatable midgame quest that starts with 12 supplies (and additional 10 casks of wine if you were a poet). It is a continuous voyage to 3 random ports (Gaider’s Mourn, Shepherd Isles, Khan’s Glory, Chelonate, Irem, Polythreme) with a batch of “tourists” who may or may not cause havoc depending on your choices. It is better is you choose safer options for them because you have to bring back 12 bandaged bastards and no less. Sometimes a safer option costs a spare bottle of wine, supplies or good relations with certain pirate-king. In the end this quest awards you 1500 echoes and a judgement’s egg.
Neathbow is also a Venderbight quest given by the First Curator. It involves collecting the 7 colours of unterzee “rainbow”: gant, viric, irrigo, peligin, cosmogone, violant, apocyan. There are sometimes more than one way to get the colour, and some are easier than others. All colours except Gant yield a captivating treasure.
Apocyan: bring a lump of blue scintillack or an apocyan chess-piece. Blue scintillack is the “rat-star” on the Pigmote Isle. Stealing it will banish you permanently. Alternatively, you can make Murinia independent and get it anyway, or find it in the Wisp-Ways of Mangrove College, or bring the Report on London from the Iron Republic to the devils at the Brass Embassy after the Wistful Deviless’ quest. Apocyan chess-piece is given at the end of the Principles quest.
Cosmogone: bring a ray-drenched cinder. Ray-drenched cinder is given in the Uttershroom at the end of Propagation quest.
Gant: bring your weeping scar, a figurehead of Eater-of-Names or a Star-Shell. Weeping scar is acquired in the Chapel of Lights by sacrificing 1 point of Nightmares. A Figurehead of EoN is a tropty given after killing the ship (see the Weapons and Monsters part). A Star-Shell is found deep in the Gant Pole or Frostfound.
Irrigo: bring an eyeless skull or a fluke-core. An eyeless skull is either given in the Magician’s quest in London (which is worse) or acquired by pure chance in Venderbight when you have Something Awaits You (a better option).
Peligin: bring a hunter’s eye. It can be either found in Avid Horizon or after a brawl in Gaider’s Mourn.
Violant: bring a pot of violant ink. It can be acquired at random by bouncing into a shop when walking the Khan’s Heart, exchanged for red honey in the Empire of Hands or found while treasure hunting at Treasure Island in the same Empire of Hands.
Viric: bring a mirror-charm, a mirrorbox filled with angry snakes or a phantasmal encounter. Mirror-Charm is given at the temple in Varchas after you have some smoke-nightmares. A Mirrorbox is stupid easy to get via Mechanic’s quest (an empty box and a clay man to Hunter’s Keep). Phantasmal encounter is a random event at Venderbight.
Principles of Coral is a quest from an old chess master who plays chess with you and then asks you to bring him chess-pieces for the game. The game itself ends the quest and gives various items for a winner/loser outcome.
Wistful Deviless is an exile on Mt.Palmerston. If you make friends with her, she gives you packages to deliver to the Brass Embassy in London, then travels herself. In any case, her quest gives access to the Embassy where you can sell souls.
Isle of Cats gives a choice of two paths: either with Isery or Zaira. Isery will ask you to smuggle honey to the Scholar in London. She will give you rewards for successful delivery, then ask to give her a crewmwmber for experiments. Zaira smuggles honey to the Venturer. She gives a bigger reward, but asks for a sacrifice later (a crewmember, a prisoner, or an officer: Irrepressible Cannoneer or Gall-Eyed Engineer). She’d give you 20 supplies extra for the officers.
Mr Sacks is a nasty quest not good for early game.It appears once you have surveyed Avid Horizon. One of the Masters is going to travel with you, giving items to deliver to certain ports. Each time there are 2 alternative ports, and rewards will be different for each (Khan’s Heart: drowning-pearls and a point of Menace, Pigmote Isle: scintillack, Isle of Cats: Red Honey, Mutton island: 49 echo). Then, the beast goes with you to Avid Horizon and makes a snow child with your blood (or not, depending on your choices). The child is going to melt slowly, unless you help it. Go straight to Iron Republic with some scintillack, you get a Soothe&Cooper long-box, then go to Station III and exchange the box for a Heartmetal Ingot. From there the child is going to go to Irem.
Blind Bruiser and Cheery Man will give you some smuggling tasks which could be a start for a new captain. After a few runs, the Cheery Man himself will ask for some detective work and then a few more favours. You’d have to find the Last Constable who is his daughter, then help him with his health issues.
Zubmarine is available with the Zubmriner DLC.
First, go to Port Carnelian and find the Fierce Philantropist and their secret workshop.
Then steal the zonar schematics from Khan’s Shadow or Station III and go back for the final step.
Trade zee-ztories, outlandish artefacts, stygian ivory and extraordinary implications for experimental progress until it reaches 99.
Zubmariner “passengers”:
– Incomparable Aurelian (Port Carnelian/Venedrbight) to Undercrow
– Doggy Apprentice (Venderbight/Empire of Hands) to Rosegate
– Truth-Hunting Chelonite (Chelonate) to Scrimshander
– Impolite Investigator (Mangrove College) to Hideaway
– A Monastic Drownie (Codex) to Scrimshander
– Wandering Parson (Quaker’s Heaven/Visage) to Low Barnet
– Scholar of lost causes (Scrumshander) to Hideaway
There is a “Retrieve a Regret” quest tied to Aigul.
Prisoner of Dahut: also begins in Wrack where the composer tells you of another prisoner in Dahut, and continues in Dahut where you ask around first, and then do the same thing you did for the drownie songs, only this time you need Clarity above 20 and Length of stay 4 to 9 to get to the Prison and there, sing the Song of the Broken Hulls (you lose the song) to free the composer. Take her to Rosegate and report to Wrack to finish the story.
Flavour of a Cigar begins in Rosegate, you are asked to deliver a lost apprentice from the monkeys in the Empire of Hands. After that, bring unread logs, romantic literature, to complete a cigar. Bring him 2 Ambiguous Eoliths for the robust flavour, 3 Unread Logs and Lamentable Relics for the bitter flavour, 3 Romantic Literature for the luscious flavour.
Wrack is one of my favourite storylines in the unterzee. Trade 1 scintillack for the audience with its king. Then lure captains from other ports to Wrack and raise the city’s current state to Prospering. It opens some new shops. Also, remember to go and taste some tether, which induces memories from past lives(?) where you and the king were either family or friends or lovers. When you decide which one you’d prefer, return to him and from that moment on you get a nice terror reduction and your own sapphire tree in Dahut.
Blemmigan Propagation
There are total 29 “safe” ports to drop the blemmigan ashore. 30, including Iron Republic.
7 propagation points are needed for a reward at Uttershroom. Here’s the list:
Abbey Rock, Aestival, Chapel of Lights, Fathomking’s Hold, Gaider’s Mourn, Godfall, Hunter’s Keep, Irem, Isle of Cats, Khan’s Heart, Khan’s Shadow, Mutton Island, Nuncio, Polythreme, Port Carnelian, Salt Lions, Saviour’s Rocks, Shepherd Isles, Station III, Varchas, Venderbight, Visage
Anthe, Dahut, Hideaway, Nook, Rosegate, Undercrow, Wrack.
Ambitions in detail
Your Father’s Bones
It is a nice ambition to start with, different for each captain’s background:
Street-Urchin (Hand over the Stolen Bone) involves the Chelonate
Poet (Speak the address) involves Nuncio
Soldier (Match the knife to its twin) involves the Fathomking’s Hold
Priest (An interview with the Smiling Priest) involves Chapel of Lights. I personally do not recommend this one because..you know..the Mr.Eaten and all…
Natural Philosopher (A Crimson Lion-Mask) involves Visage

At some point you’ll have to go to Fathomking and he’s going to ask you for 6 items: a Legend’s Heart, a Miracle of Science, a Willing Guest, an Eldest’s End, Fruit of the Eternal Tree and a Sky-Light. Impressive, huh? Now, to business.
– the End. Easy to witness if you have been involved with the Curator at Venderbight or Principles at Port Cecil. Just finish one of the quests and there you go.
– the Heart. Easy to get if you have a Merciless Modiste and progressed her quest to the bitter end. You will have either her heart or Pirate Poet’s or both. Another choice of hearts can be trophies from Mt.Nomad or Tree of Ages.
– the Miracle. You will have to surrender one of your crafted items: Memento Mori (from the Cannoneer), Serpentine (From the Magician), Fulgent Impeller (from the Mechanic) or the Icarus in Black (from the Artificer at Iron Republic).
– the Sky-Light. A Mirrorcatch box is the easiest option. Another one is a Mountain-Sherd, or if you are particularly generous, an Element of Dawn.
– the Fruit. A Hesperidean Apple from Irem could be the one. Uttershroom Sporule could be another.
– finally, the Guest. Make your choice: Nacreous Survivor or Chef-Paramount. That’s it.
Zong of the Zee
An interesting quest that involves crafting 5 items. Crafting option is only available when your lodgings are upgraded. It uses a lot of rare items.
To make it you are going to need 5 port reports (Mt. Palmerston, Port Cecil, Irem, Khan’s Heart, Kingeater’s Castle) as well as 40 Secrets, 77 Zee-ztories, Memories of Distant Shores and Tales of Terror, a Dread Surmise (=7 Searing Enigmas) and those 5 items I mentioned:
Anatomical Cabinet (= 7 Secret + 7 Lamentable Relic + 1 Supplies)Monstrous Almanac (= 7 Secret + 7 Outlndish Artefact)
Serene Aquarium (= 7 Secret + 1 Live Specimen + 1 Supplies)
Shrine to Stone (= 7 Secret + Captivting Treasure)
Whispering Trophy-Case (= 7 Secret + 7 Strange Catch)
Wealth
Recommended for experienced captains. It requires 30000 gold and a Zeeside Mansion (upgrade from a Townhouse for 10000 echo). Making 40000 at zee (plus ship/fuel/equipment costs) is not exactly the easiest thing to do. Once you have it all, simply retire your captain at the Lodgings.
Your Kingdom
It is a serious ambition that requires a lot of hauling, and ideally a merchant ship. Finding protection from sunlight is a tiny drop compared to everything else. You will have to bring crew, supplies, treasures, leave one of your officers to look after it, set political powers in motion, and some other things.
Zubmariner Ambition (Immortality)
It is a lengthy quest that involves 7 people and endgame assault of a city of Nidah in the deep south. See details in the Ambitions section of this guide.
East
A secret ambition to zail east, done at great cost with help from the Carnelian Exile. Note that in the end all your stats will drop to 0 with nothing left for your scion to have except Legacy items and their own skin.
Legacy Items
Horizon Codex (Pages +25)
– Venturer’s storyline: bring him his goods, then agree to go North, take supplies and be brave. In the Avid Horizon, go all the way to the end.
– Dawn Supremacy: raise the Dawn Machine Supremacy to 7 (crafting Element of Dawn, selling them Memento Mori, submitting vital intelligence to Voracious Diplomat, etc)
A Travelling Light (Mirrors +25)
– Zeppelin: at the Empire of Hands, fully equip the Zep and steal it. Go East.
– It is possible to get the item at your Colony
Manual of Miracles (Veils +25)
– Shrouded in shadows: make a final sphinxstone delivery to Penstock without choosing a past for your character (don’t deliver to Dawn Machine)
– It is possible to get the item at your Colony
Boke of Sharps (Iron +25)
– Anarchists Supremacy: raise the Anarchists Supremacy to 7 (delivering packages from Vienna)
A Dream of Red (Hearts +25)
– Get to know the sisters at Hunter’s Keep, and as their story concludes in fires, rescue Phoebe and take her to the Surface.
– Finish the Austere Acolyte’s story at Station III. It requires quite a lot of Soothe&Cooper Long-Boxes.
An Adumbration of Her Heart (Pages +10) (Zubmariner)
– When you approach a black ripple (abyss), submerge and dive. To get the item, you need to complete 4 rituals and embrace the Lady in Black, which also means your end. Note that you have to “dive deeper” with a Hearts challenge first, then do the ritual and see the counter change from 0 to 3.
Here is the correct order:
– Abyss of Scriptures (Rite of Greeting). The Rite itself grants + 20 Hearts which helps pass the challenge.
– Abyss of Pyres (Rite of Hearth)
– Abyss of Pomegranates (Rite of Feasting)
– Abyss of Graves (Rite of Solace)
There are 15 or so rifts scattered in the unter-unterzee.
Achievements
Some of the achievements are pretty straightforward and story-related, meaning you can’t miss them when you explore the zee and visit ports. Others are tricky, and I based my list on steam’s global stats:
– Come Closer (Lady in Lilac). Lady in Lilac will come aboard when your terror is above 75, provided that you received a tattoo either from Pirate-Poet or in London. She is actually a “good” character, of the Clathermont family of tattooists. She is also Maybe’s Daughter’s mother. In Fallen London she is the one behind the Feast of the Rose festivals.
– Storm’s Curse. Easily caught doing the final piece of the Last Tour quest at the Chelonate if your Tomb-Colonists run wild during a ritual.
– Roaring Rise (The Eye). It appears in the southern waters.
– What lies Beneath (Constant Companion). Just submerge with terror above 65 and wait.
– Stone’s Curse is caught in Frostfound, in the Dark Room.
– The Lady’s Parlour (Lady in Black) is a simple riddle when you know where to look. Complete 4 rituals in the following order:
1. the ritual of Greeting (Abyss of Scriptures)
2. the Ritual of Hearth (Abyss of Pyres)
3. the Ritual of Feasting (Abyss of Pomegranates)
4. the Ritual of Solace (Abyss of Graves)
Note that in order for this to work you have to choose “Dive Deeper” option, NOT the Perform the Ritual one. When you do it right, the “ritual” counter will increase from 1 to 3.
Every abyss in the unterzee has two names: geographical/nautical and fictional, and there are only 4 types, one for each ritual.
– Salt’s Curse caught easily in interactions with the Raggedy Fellow, Mute Exile in Codex or by shooting a white zee-bat. Careful, as it removes your Child/Scion from London.
– Romans 6:9 (Immortality) First, Port Carnelian and a quest to find the Fierce Philantropist’s Husband (Lytton). Then, Scrimshander and a quest to find 6 people: the Financier, the Propagandist, the Guide, the Soldier, the Captain, the Healer, and yourself. There are usually options, because not all 6 would be available. Here are their locations:
Fierce Philantropist (Port Carnelian) can be bribed with zzoup and parabola-linen.
Voracious Diplomat (London) / Bourdain (Wrack), Vorcious Diplomat joins when you have good spy networks in Khanate and Port Carnelian. Bourdain is a little trickier. He is imprisoned in Wrack, so you either need to be the King’s friend/lover or trade the mirror for a Judgement egg.
Isery (Isle of Cats) / Almost Dead Man (Undercrow). Isery’s okay if you chose her as patron in Port Cavendish. Almost Dead Man can be lost if you finish his quest first. Also, he sends you to deliver letters to those locations.
Batuk (Nook) You have to convince him in few steps.
Sprightly Visionary (Hideaway) can be recruited in any case.
Rosina (Anthe)/ Banded Prince (Port Carnelian). Rosina’s quest can be hard, and to have her she has to be well. Or dead.
To progress further you’ll need a lot of resources. Spy Networks, Fluke-Cores, money, Captivating Treasures, Sunlight-Filled Mirrorcatch Boxes, Searing Enigmas, Torpedo Components, Sapphires…
Immortality is very costly. Which is understandable, because you are actually going deep into the jungle of Elder Continent to capture an ancient city of Nidah.
– A Drownie Devotee: story begins in Wrack, where a composer gives you a drownie-song, then you can get other songs from Dahut: achieve certain levels of Enthralment/Clarity/Length of stay.
Note that you need a SAY each time you do a piece of this quest.
– First, a Drownie Love-Song. You need Clarity less than 3, Length of stay 4 to 9 Spring Rites. Choose to Linger and pass Enthralment challenge (at 17) to proceed.
– Then, Drownie Song in Counterpoint. You need Enthralment more than 15, Length of stay 4 to 9 to go to the Midsummer Festival, and a Clarity challenge (at 13) to get the song.
– Finally, Drownie Hymn. For the final piece, first trade 1 scintillack for a fish from the Fathomking in his hold. (White Mollyflower sets Enthralment to 0) In Dahut, you’ll need Enthralment less than 3 and Length of stay 4 to 9 to attend the Liturgy of Souls and Clarity challenge (at 25) to get the song itself.
Now, the math. You’ll need to pass various skill checks to get points in either Enthralment or Clarity, each event also adds 1 point of Length of Stay.
Enthralment events: Blemmigan, Bonfire & Meal (on success), Clothes, Secret Places, Crypt and Calendar, reading an Unread Log (on failure)
Clarity events: Port report, Bonfire&Meal (on failure), asking about the prisoner, looking for other visitors and secret places, crypt and calendar (on success)
Note: all curses are remove in Whither by making offerings.
Weapons and Monsters
Weapons
I already mentioned weaponry in the section about your ship’s equipment.
However, there is more to it than just fancy names.
There are 2 shops in London where you can buy weapons and 2 craftable weapons that require some effort to make.
Weapons can be divided by damage type and ammunition. There are universal, life-damaging and hull-damaging weapons. These types are “cannons”, “flensing guns” and “torpedo-launchers”.
Cannons are universal and do same damage to ships and monsters. They can be mounted to deck, forward and aft. Here’s the list:
Frigate-Surplus (DECK)Cannon. (8)
Reproach (DECK) Cannon. (12)
Denunciation (DECK) Cannon. (15)
Hellthrasher (DECK)Cannon. (18)
Majesty(FORWARD) Cannon. (22) Stagger.
Memento Mori (FORWARD) Cannon. Life damage (32). Stagger.
Discouragement (AFT)Cannon. (24) Stagger.
Scorpion (AFT)Cannon. (22) Stagger.
Damnation (AFT)Cannon. (28) Stagger.
Flensing guns are forward weapons harpoon-like in nature and shoot spikes or similar projectiles at zee-monsters and enemy crew. Here’s the list:
Calvary (FORWARD). Harpoon. Life damage (24).
Britomart(FORWARD). Harpoon. Life damage (22).
Heart-Ender (FORWARD). Harpoon. Life damage (28).Stagger.
Torpedo-launchers can only be forward weapons. They have longer range and narrow firing arc, and require ammunition. Their advantage is the ability to stagger enemy ships, slowing their fire rate. Torpedoes are bought for 5 echoes or found at zee-bed while exploring the unter-unterzee. Here’s the list:
Dynamite Torpedo-Gun(FORWARD)Torpedo-launcher. (24) Stagger.
Seaworm (FORWARD). Torpedo-launcher. (24) Stagger.
Winnower (FORWARD) Torpedo-launcher. (28) Stagger.
Bandersnatch (FORWARD). Torpedo-launcher. (34) Stagger.
“Bandersnatch” staggers enemies for 8 seconds.
Note that your Iron skill count affects damage dealt to enemies, and Mirrors affects the warm-up speed of firing solutions.
WeaponDamageBonus = round( Iron * 0.16 ). At Iron 100 your weapons do 16 more dmg. A Memento Mori will do 48 damage to beasts and 40 damage to ships.
WeaponSpeedBonus = WeaponSpeed * Mirrors / 333 At Mirrors 100 a Memento Mori will be able to fire every 2.8 seconds (4 sec-1.2 sec)
Monsters
There are very few monster types in the Neath. There are ships, zee-beasts and unterzee-beasts as well as very strong opponents like Tree of Ages and Mt.Nomad.
1. Easy Level
Auroral Megalops (20 HP) not really worth the trouble. Often spawns in waters around London. Yields some fragments and hunger loss/supplies with a small terror loss. Ram attack.
Bat Swarm (20 HP) often seen near Venderbight. Primarily used to reduce terror by few points.
Jillyfleur (40 HP) Yields strange catch and fragments, after visiting Visage. Ram attack.
Antler Crab (150 HP) Not a big deal if you keep it at distance. Butcher it for supplies or knowledge. Ram attack.
Albino Moray (210 HP) Spawns at Coral reef near Port Cecil or Demeaux Island or Wisdom. Yields relics and other curiosities (Lamentable relics, Tomb-Colonists). Ram attack.
Bound-Shark (140 HP) Can be found in Sea of Lilies. Dissecting it might repair your hull by 2-3 points. Ram attack.
Particularly Tormented Bound-Shark (210 HP) Same type as above, only tougher. Ram attack.
Lifeberg (400 HP) often found near Whither-Codex. Not too hard to kill when kept at distance. Good source of supplies/fuel. Ram attack.
Usually, the strategy for zee-monsters is to keep them at range and use a powerful Forward weapon. Some monsters are slower and take time to rotate and launch an attack. Good Veils and a turned off prow-light mean you won’t be spotted. You can kill those even with a starter ship and a decent weapon. Harpoon-type weapons usually do more life damage.
Zee-beasts are a good source of hunting trophies. They can be sold for 65 echoes, but better yet, in some cases exchanged for more valuable items (Chelonate, Khan’s Heart, Shepherd Isles, Abbey Rock).
Pirate Steam-Pinnacle (30 HP) easy to sneak attack. Has a cache of curiosities to loot. Ranged attack (4 dmg).
Crack Pirate Steam-Pinnacle (80 HP)
Pirate Frigate (90 HP)
Alcaeus-Class Corvette (180 HP) is a Pirate-Poet’s boat. It usually starts the pirate-poet quest, an when you’re finished just gives 200-500 echo each time you rescue the Pirate-Poet. Fires ranged weapons and flares.
Unfinished Pirates (75 HP) Spawns near Polythreme.
Unfinished Revolutionaries (210 HP) Spawns near Iron Republic.
Rat-Barge (150 HP) Spawns near Nuncio. Usually gets sucked into a vortex. Easy prey.
There are also non-hostile steamers carrying cargo and passengers, they do not show a ? when approached.
The strategy for ships is a bit different: keep at its aft so it won’t attack and repeat its movements. This strategy works for deck weapons. Forward weapon does not have enough range for tailing. A recommended setup here will be a torpedo weapon.
Note: when your ship is a frigate or dreadnought, it becomes much harder to use this type of hunt.
Ships are not as profitable as zee-beasts when it comes to loot. You can spend a lot of effort and get a random reward equal to 60 echoes.
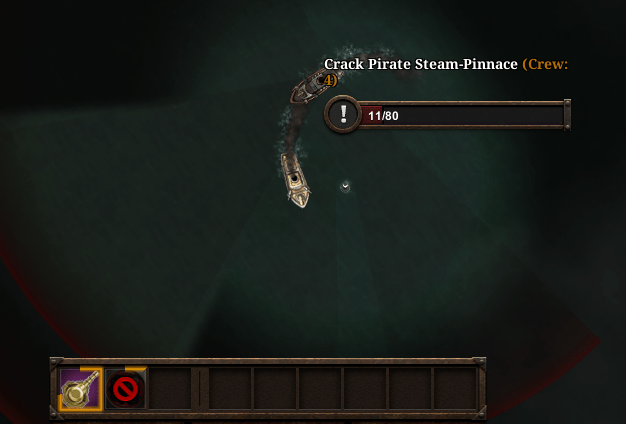
Unter-unterzee:
Corsair Undergalley (30 HP) underwater vessel, easy prey.
Putterpony (120 HP) Underwater Khanate vessel. Not hostile. Often seen sniffing around Fallen London.
Boundling (220 HP) Underwater version of a Bound-Shark. Ram attack.
Beloved (180 HP) Actually easy to kill. Spawns near Wrack, or (underwater) Port Carnelian. Can be sent to Gant Pole. Ram attack.
2. Mid Level
Faustic Corsair (300 HP) usually seen near Mt. Palmerston. Easy to defeat by tailing it. Ranged attack (15 dmg)
Western Antler-Crab (300 HP) Spawns near Uttershroom. 20 dmg. Ram and ranged attack.
Elder Crab (600 HP) Spawns near Aestival. 40 dmg. Ram and ranged attack.
Blue Prophets (400 HP) Bird swarm similar to bat-swarm. Yield some royal-blue feathers (50 or so). Deal quick damage by ram attack (15 dmg).
Jillyfish (400 HP) Absolutely useless, gives same options as jillyfleur. Ram attack.
Behemoustache (210 HP) Spawns near Elder Continent. Yields fuel and supplies (unless you send it to Gant Pole). Ram attack.
Khanate War Trimaran (210 HP) Patrol waters around the Khanate. 2 Ranged attacks. 5-15 dmg and crew dmg.
Tyrant Moth (400 HP) Spawns near Ragged Crow. Easy to kill when you keep the distance.
Lorn-Fluke (600 HP) Spawns near Empire of Hands. Has a ram attack (40-45 dmg) and shoots correspondence for 2-4 dmg and terror increase. Overall, not a big challenge.
Savage Lorn-Fluke (750 HP) a bit harder to kill, but anyway same variety.
Eater-of-Names (1000 HP) Spawns near Chelonate. Not too hard to kill, especially with good hull. Yields cargo or a figurehead (if you really need it).
Glorious Dreadnought (800 HP) and Glorious Frigate (500 HP) can be found near Dawn Machine or Kingeater’s Castle.
Unter-unterzee:
Wreckship (360 HP) can be discovered as curiosity on zee-bed, where it lies in wait. What works above water also works here: tail it if you can.
Trisklegant (260 HP) Spawns conveniently near Gant Pole. Easy to sneak attack. Can be sent to Gant Pole.
3. Hard Level
Republican Dreadnought (400 HP) has all kinds of attacks, even aft weapon.
Tree of Ages (900 HP) Spawns near spider-islands of Saviour Rocks. Most powerful ship.
Mt.Nomad (1000 HP) Spawns near Chapen of Lights. It is a child of the goddess Stone, or Mountain-of-Light. Nasty beast. Probably the most powerful beast ever.
Unter-unterzee:
Thalatte (420 HP) has a ranged attack (acid) and a ram attack. Nasty beast. Can be sent to Gant Pole.
Irrepressible (400 HP) Oooooffffffff…. Piece of work, that one. I have never actually engaged it in combat..yet
Gods
There are three gods of the zee: Salt, Stone and Storm.
Storm is probably the most powerful of the three. It is a space dragon, very angry and very violent. It is the force of law and punishment.
Stone is an offspring of the Sun and the Bazaar that lives in the Mountain of Light far to the south. It is the source of life and protection, and probably responsible for the immortality and the weird game of life and death in the Neath.
Salt is said to be the “traveller” (but probably another Judgement like the Sun) who went east, leaving behind Frostfound where it left its memories and Kingeater’s Castle where it left its hunger. It generally takes interest in the flow of time, memories
The Opposing Forces
In Sunless Sea the “Great Game” is full of spies, politics and revolution. The status quo of each party involved is also called “Supremacy”.
You are the only force that can shift the balance and give victory to a certain faction. For doing that there is a reward – a Legacy item, but only if you take the side of Anarchists or Dawn Machine and raise them to victory, or have your colony with Khanate or Presbyterate (Elder Continent) embassy open. That, and roleplaying itself, are the main reasons for digging into politics.
Supremacy: London
The Neath is ruled by Traitor Empress, referred to as Her Enduring Majesty. Interests of London are represented by the Admiralty.
There are, however, other agents fighting for power, and you as a captain can offset the balance by doing favours for those agents. Firstly, there are the Revolutionaries, exiled to the Surface. This faction is commonly associated with explosives, and there are hints that some of the characters in Sunless Sea were or are, in fact, working towards the revolution.
Supremacy: the Dawn Machine
Another prominent faction resides in Grand Geode, near the Dawn Machine. The machine itself is an artificial god, or “a Judgement” similar to the Sun. Its creators meant some good, but their creation got so powerful that it now has a will of its own, and its own goals. Carnelian Exile was once part of it. And the thing is said to be constructed by one of the revolutionaries/anarchists.
Supremacy: the Anarchists
This faction is represented by the Calendar Council, a group of revolutionaries who took names from January to December and plan to extinguish all light in the Neath. If you played Sunless Skies, you might have seen what they did to Eleutheria. A large faction is hiding in Vienna, and getting to the Surface will allow you to aid them by delivering explosives to London (to blow up the Bazaar, no less). Or you can refuse and report them. If you dislike such revolution, here’s a roleplaying tip: don’t make deals with the Jovial Contrarian in the market. The University (and probably the Scholar) are also involved. The Haunted Doctor was an anarchist, ended up killing one of the top revolutionaries.
Supremacy:The Khanate
The exiles of the Fourth City have a lot of reasons to hate London, the Bazaar, the Masters, and everyone else. After all, they stole their home and then destroyed it, forcing its people to flee and found a new society for themselves. They are mostly fighting for influence in Port Carnelian and Mutton Island, but they’d take Pigmote Isle as well. The primary qualities that describe your relations would be Khaganian Suspicion, as well as your standing with Leopard’s clan and Taimen’s clan. Earn favours by giving them moon-pearls or coffee.
Supremacy: Affairs in Port Carnelian
This colony is a major battlefield where interests of three factions collide: London, Khanate and the Elder Continent’s tigers. You can choose one side and progress the story, create spy networks and such.
Making Money in the Neath
There is a lot of variety here. You can choose how you make money and what inventory you use. Trade is the simplest thing that comes to mind, but there are other ways too.
– Monster-Killing is easy with good weaponry and high Veils/Iron. You can sell hunting trophies, trade them for supplies and outlandish artefacts in Abbey Rock or Chelonate. Sell stygian ivory and Lamentable relics, and other occasional items you get from wrecking ships. It’s a good living, and a steady flow of free fuel and supplies. While you’re at it, you can complete side quests that don’t need much thinking. In this case, you can convert Hunting trophies into Outlandish artefacts and make those Heirlooms at your lodgings.
– Hunting the Alcaeus-Class Corvette yields 400 echoes for rescuing the Pirate-Poet, and it can spawn very quickly at the same spot
– There are some very profitable quests, but they require some zailing: Sphinxstone, Neathbow, Last Tour Operator, Principles of Coral. With the Neathbow quest you can instantly get 7 captivating treasures and turn them into Heirlooms for your next captain. But this is a dangerous quest, too.
– The Admiralty is going to provide a steady supply of fuel, cash and repairs as long as you don’t play for the anarchists or dawn machine
Here are the rewards you get from the Scholar at the University:
1 echo: ambiguous eolith (on a rare event it gives 50 echo)
5 echo: lamentable relic
1. echo: zee-ztory, memory, strange catch
2. echo: unread log, watchful curio
5. echo: intriguing snippet
10. echo: outlandish artefact, live specimen, wakeful idol
12. echo: brimstone buzzings
25. echo: extraordinary implication
50. echo: judgement’s egg, fluke-core
80. echo: lump of blue scintillack, ray-drenched cinder
100. echo: captivating treasure, element of dawn, searing enigma, also red honey if you choose to betray Isery
7 enigmas yield a dread surmise and scholar’s gone.
Wisp-Ways. A treasure trove provided you have a lot of foxfire candles.
There you can find a lot of items, the better items the higher your “Another Day: Navigating the swamps” count.
Elegiac Cockatoo (81-90), Solacefruits (101-117), Blue Scintillack (118-120), Searing Enigma (121-127), Long-Boxes (128-130), Captivating Treasure (131+)
In Chelonate, there is a brief opportunity to sell meat from Gant Pole to a fleshmerchant for 200 echo (9 or 10 runs, then he leaves)
One-time deals and other opportunities
Now, there are certain deals that only appear when you have a certain item or SAY. It is extremely good for time when you need to get items for a quest:
– trade 1 lamentable relic for 3 unread logs at Codex
– trade 1 hunting-trophy for 3 watchful curios at Khan’s Shadow
– trade a hunting-trophy, zee-ztory and supplies for an outlandish artefact in the Chelonate
– trade scintillack for 2 solace-fruits at Gaiders Mourn
– trade 1 strange catch for a live specimen at Uttershroom
Items that are not recommended for sale. You might need those!
– pewter horse-head (from Gaider’s Mourn) needed for the Magician’s Story
– soothe&cooper long-boxes (better put them to good use at station III)
– any items from the Neathbow quest, unless used already
– live specimen (very rare, also do not buy at Labyrinth of Tigers unless really needed)
– drowning-pearls (don’t use cargo space) used as gifts in Khan’s Glory
mutersalt, scintillack, solacefruit: have1-2 items ready for Officer quests and other stories. Parabola-linen, wine and honey can be used in some quests, too.
Now…. Soothe&Cooper Long-Boxes…
– get one at Demeaux with SAY and 2 Strange Catches
– get one wandering Khan’s Heart for 77 echo
– get one for a hunting-trophy and a SAY at Shepherd’s Isles
– get one by chance exploring Venderbight
Trade routes
Trading occupies a lot of space on forums and in player guides. For some players it is the ultimate goal to have as much echoes as possible. Depending on your playstyle you may or may not agree, but in any case trade as part of the game can’t be avoided. Please note that you can find more about profitable storylines in the Making Money in the Neath section of this guide.
There are ports where you pick goods, trade them in other ports for profit, and sell to the highest bidder. Taking into consideration Zubmriner DLC, here are most popular trade routes:
– Wine trade (wine from London straight to Godfall) buy at 21, sell at 30, but it’s limited. You can sell for 24 at Adam’s Way and Aigul.
– Aigul also buys coffee from Port Carnelian making it a short but low-profit run.
– Honey to Coffee trade (coffee from Port Carnelian to Irem, Parabola-Linen back to London/Dahut) buy at 38, sell at 66 (Dahut) or 60 (London)
– Wine to Coffee trade (wine to Empire of Hands, Coffee to Irem, Parabola-Linen back to London/Dahut) buy at 21, sell at 66 (Dahut) or 60 (London)
– Coffee to Surface trade (coffee from Port Carnelian to Cumaean Canal and Vienna) buy at 38, sell at 80. The option dries out after 150 sacks or so.
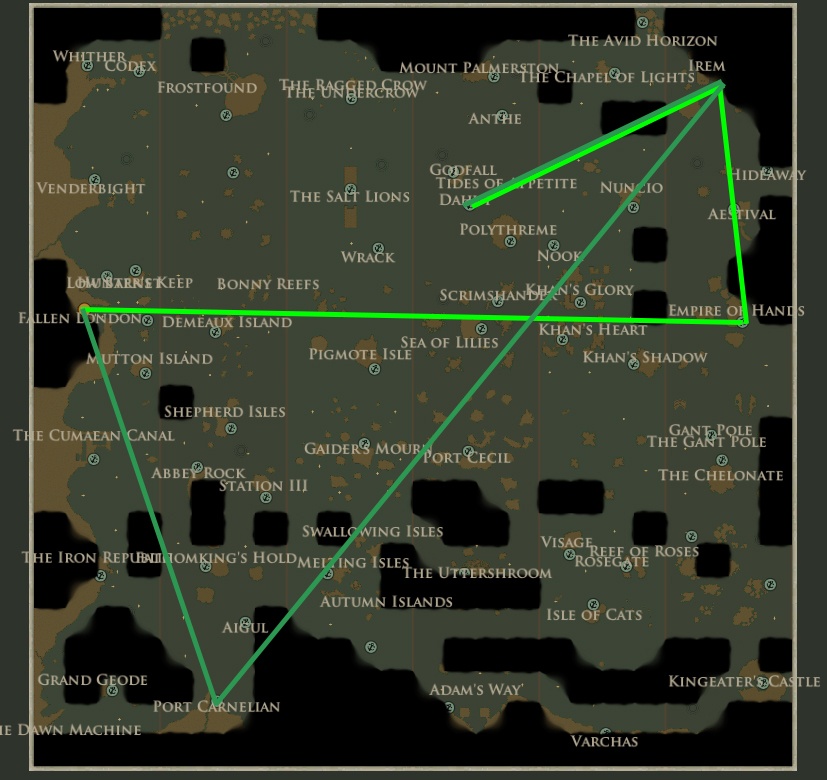
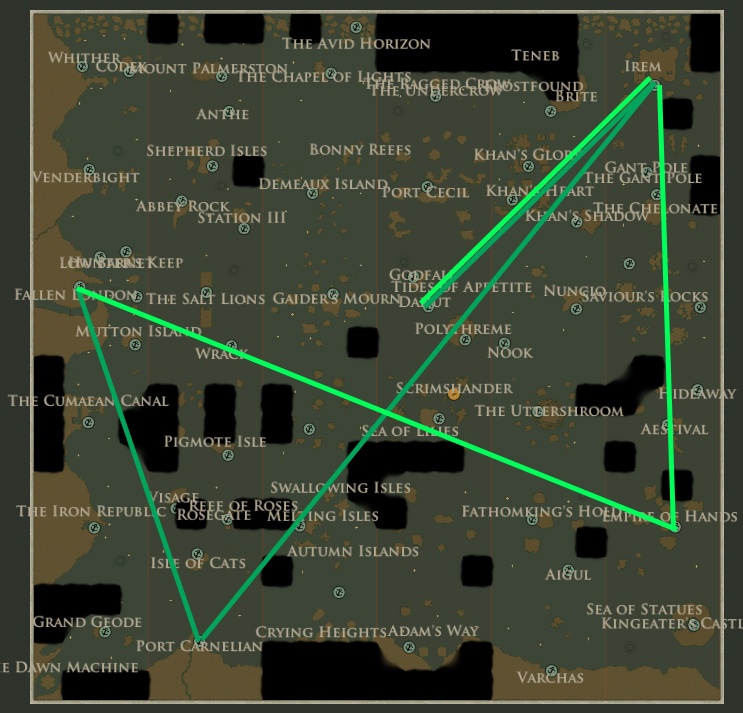
Here are two maps with two coffee routes
– Sunlight trade (Empty boxes from Khan’s Shadow to Surface/Aestival, then London or Isle of Cats). It’s risky and I tried it once or twice only.
– Sunlight to Sapphires trade (Empty boxes to Surface/Aestival, Filled boxes to Nook, Sapphires to Chelonate) buy at 250 sell at 693 (=7 Sapphires per box)
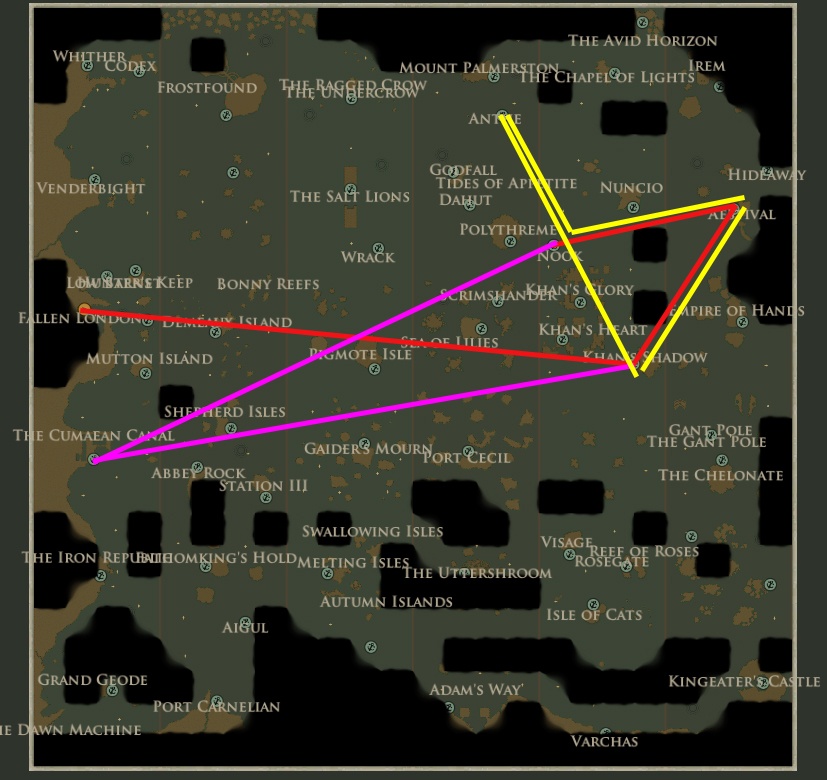
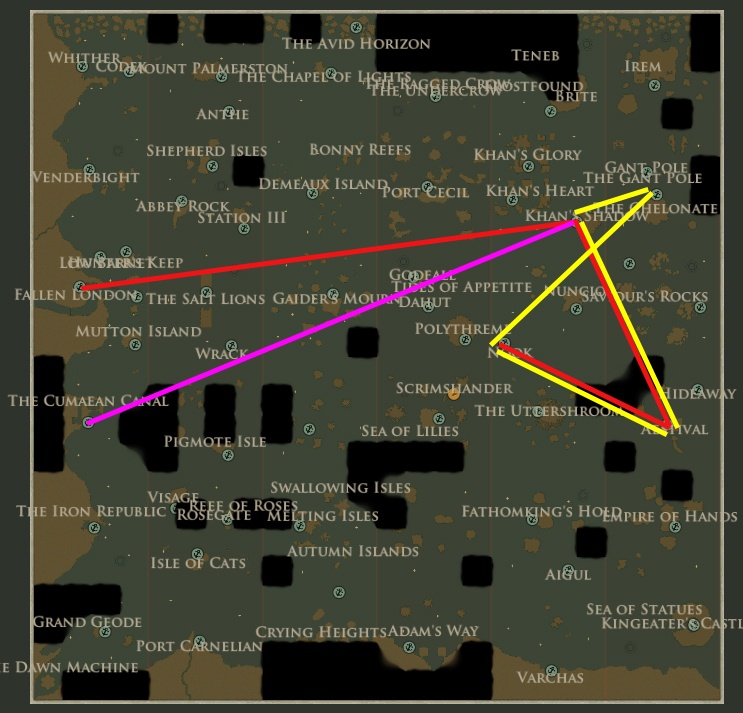
Here are two maps with two sunlight routes. Yellow route is repeatable.
– Prisoner’s Honey to Sapphire trade (Prisoner’s Honey to Gant Pole, Shrieks to Scrimshander, Mutersalt to Anthe, Scintillack to Wrack (prospering), Sapphires to Chelonate or Anthe) buy at 25 sell at 99. I use this route, especially when ports are close to each other.
This route can be repeated when Sapphires are sold at Hideaway each for 2 Mutersalt, then repeat the leg from Anthe to Hideaway again.
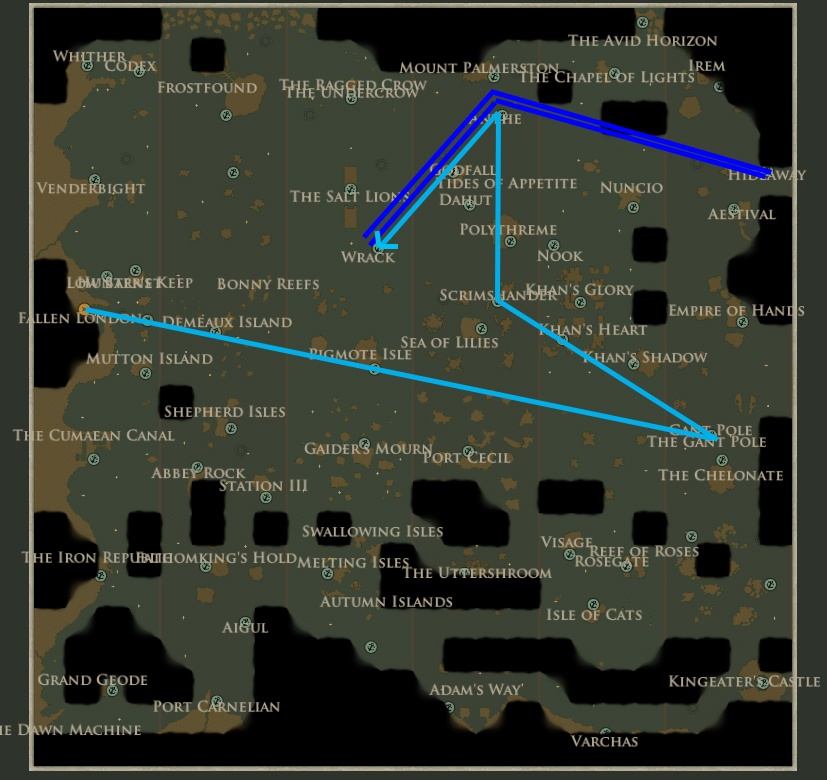
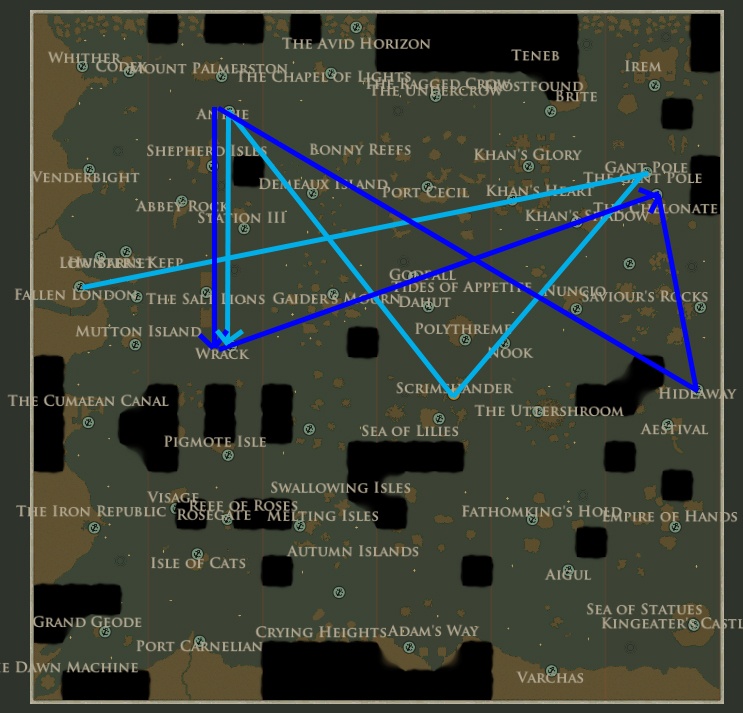
Here are two maps with two sapphire routes Blue route is repeatable.
As you can see, some maps are more suitable for trade than others. Note the difference between sapphire trade route length for map 1 and map 2.
Notes:
I like the sapphire trade route, even when combined with sunlight trade. When Wrack is prosperous, you can buy 80 firkin of prisoner honey and turn them into 80 sapphires, sell 40 sapphires at Anthe, go to Hideaway and make 80 mutersalt, go back to Anthe and Wrack, get 80 sapphires again, repeat as many times as you want, and buy fuel/supplies at Anthe/Wrack as well. Perfect, and there is no danger. Lots of echoes.
Hope you enjoy the Guide about Sunless Sea – Lore and Secrets, if you think we should add extra information or forget something, please let us know via comment below, and we will do our best to fix or update as soon as possible!
- All Sunless Sea Posts List


Leave a Reply