0 – Read first.
This guide covers various aspects of player customization and since it grew in scope as I was writing it, the different workflows became a bit confusing, I’m working on that aspect of the guide.
Depending on the task your are about to perform, some sections of the guide will be of interest and some others won’t.
- Transfer the appearance from one character into another [Difficulty:Beginner]
You create a new character with the appearance you want and transfer this appearance to your character. This is the original purpose of the guide, therefore, the main sections of the guide (Sections 1 – 9) walk you through this process.NINE SECTIONS?!!! ARE YOU INSANE?
Fear not, the main sections are super short. Like 2 lines kind of short sometimes. They are more like steps.
- Change name [Difficulty:Beginner]
For changing your name you don’t need a template character, so you can safely skip sections 1 and 6. You should also ignore any references to the Template character and the Appendix sections. - Special Customization [Difficulty:Advanced]
You get to customize your color scheme so that you can be unique online. You don’t need a Template character so again, skip section 1. Once you have the data json of your character, obtained in section 4 and read the explanation in section 5, skip to the Appendix A and B that specialize in this process. When you are done, return to section “8 – Generate A New Player File”.Known Issues: I got a report that the mod “Sexbound” resets the character colors while it’s custom animations play. I have never used the mod so I don’t know about a solution to this (But it must be fixable). When I get out of my current troubles I might install it for actual research purposes (who would have thought?) and see what’s going on.
1 – CREATE A NEW (TEMPLATE) CHARACTER
Run the game and create a character exactly the way you want it. We will refer to this character as the template.
You don’t need to start a game with the character, it merely needs to exist.
2 – LOCATE PLAYER FILES
The player folder is located at:
<SteamLibraryPath>\steamapps\common\Starbound\storage\player
In this folder, every player has a .player and .shipworld file named with the playerid. (.bak files are backups of these files). You only care about the .player files for this process.
example:
afd4133d29788b76caf3f2f684b8a139.player afd4133d29788b76caf3f2f684b8a139.shipworld
To pin down which id corresponds to your character, log in with the character, quit the game, and go back to the folder. The one with the most recent timestamp is the one you just played. You need to take note of the id of both your character and the template character.
3 – STORE INVENTORY AND BACKUP FILES
This is optional, but I highly recommend to dump all of the items you are carrying into a box somewhere, also your crew equipment if you use crew customization+. Some items might alter stats in ways the program doesn’t like. If you get errors about invalid values while repacking. This is most likely the reason.
Now, before moving on, copy the .player files somewhere safe in case you screw up.
4 – DUMP PLAYER DATA
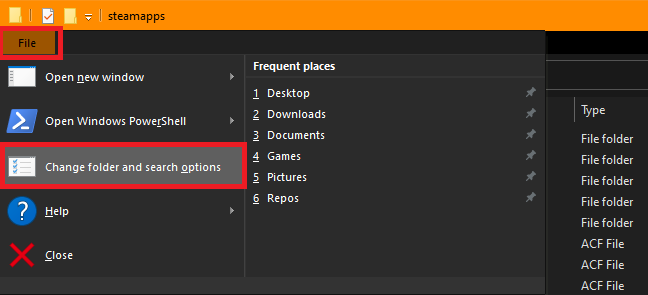
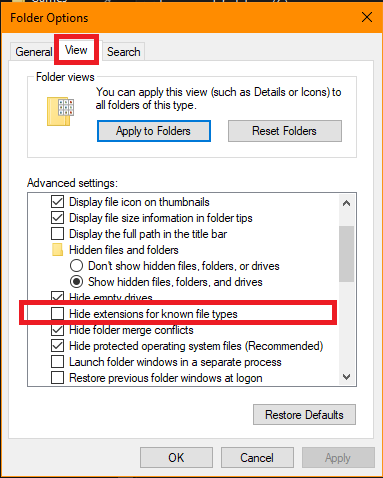
First let’s verify that file extensions are visible in Windows Explorer. Go to the menu at the top. File->Change folder and search options. There go to the view tab and make sure that “Hide extensions for known file types” is Unchecked.
.
Now, inside the game’s player directory:
<SteamLibraryPath>\steamapps\common\Starbound\storage\player
create a text file called: DumpPlayerData.bat
The .bat is an extension. It tells the OS how to handle the file. Like .txt is opened with a text editor.
Right click the new file and click “Edit”. Inside the file paste this:
..\..\win32\dump_versioned_json.exe playerid.player playerid.json
(Replace “playerid” with the playerid of your file)
Save the file, close the editor and double click the file to run it.
You will need to edit the script again, change the playerid, and run it again to dump both of the characters we are working with.
NOTE: Adding the word “pause” (without quotations) in the next line inside the script file will keep the window open. Usually I don’t do this, to make the process quicker. But it can help if the script is not working to read any potential errors. Example:
..\..\win32\dump_versioned_json.exe cea38b05bf93475ec1b58a39ddaf8014.player cea38b05bf93475ec1b58a39ddaf8014.json pause
5 – THE PLAYER DATA FILE
The only section of the file that we need is the “identity” section usually near the bottom of the file. Go to the very bottom and use the search tool to find “identity” going upwards (or backwards however your text editor refers to it). Should look something like this:
"identity" : { "facialHairType" : "", "facialHairGroup" : "", "personalityArmOffset" : [0, 0], "hairType" : "45", "bodyDirectives" : "?replace;6f2919=782027;ffca8a=ffb0a3;e0975c=fc8469;a85636=be424d?replace;735e3a=196072;f7e7b2=b1f1fe;a38d59=3491aa;d9c189=5dd1ec?replace;dc1f00=8a897a;951500=2c2915;be1b00=4e4f42;f32200=b4b3ad?replace;dc1f00=8a897a;951500=2c2915;be1b00=4e4f42;f32200=b4b3ad", "personalityArmIdle" : "idle.1", "gender" : "male", "color" : [51, 117, 237], "personalityHeadOffset" : [0, 0], "hairGroup" : "hair", "facialMaskDirectives" : "", "species" : "hylotl", "personalityIdle" : "idle.4", "facialMaskGroup" : "", "name" : "Hideki", "facialHairDirectives" : "", "emoteDirectives" : "?replace;6f2919=782027;ffca8a=ffb0a3;e0975c=fc8469;a85636=be424d?replace;735e3a=196072;f7e7b2=b1f1fe;a38d59=3491aa;d9c189=5dd1ec?replace;dc1f00=8a897a;951500=2c2915;be1b00=4e4f42;f32200=b4b3ad?replace;dc1f00=8a897a;951500=2c2915;be1b00=4e4f42;f32200=b4b3ad", "hairDirectives" : "?replace;735e3a=196072;f7e7b2=b1f1fe;a38d59=3491aa;d9c189=5dd1ec?replace;dc1f00=8a897a;951500=2c2915;be1b00=4e4f42;f32200=b4b3ad", "facialMaskType" : "" },
This section contains a collection of key-value pairs for every aspect of the character. Copy the features you are interested in. They are self explanatory except for “Directives”.
“Directives” (bodyDirectives, emoteDirectives and so on) define the palette color replacements for the character. They can take multiple lines so be very careful to copy the whole thing. Like for example:
"bodyDirectives" : "?replace;B3B3BA=7A0203;680D00=000000;E3E4E4=C6C6C6;91868D=6F0200;71FF35=61040E;60BDFF=383838;2D9600=6F0200;FF8D42=2B2B2B;BE1B00=31A500;7C1000=262626;FF3E21=161616;C0FFA5=6F0200;0094FF=2B2B2B;951500=267F00;796783=61040E;267F00=61040E;FFB07C=383838;0062A8=000000;F8F8F8=EDEDED;4CFF00=7A0203;FF6A00=1C1C1C;0084E2=1C1C1C",
Always remember that except for the last pair in the collection, all values in key-value pairs have a comma (,) at the end, this will help you clearly identify where does a directive section end.
These directives are the focus of the Appendix sections about advanced color customization.
6 – GET THE APPEARANCE FROM THE TEMPLATE
Once you have located the identity section in the template file, simply copy all the features you want to transfer. If you only want the colors, copy only the directive sections. If you want the ears, hairstyle or whatever, copy them too.
Remember to be especially careful when copying Directive sections since they can span across multiple lines.
7 – REPLACE THE ORIGINAL CHARACTER APPEARANCE
Now open the json file corresponding to your character. Again, go to the bottom, search upwards for “Identity”. Check the name property in this section, just to make sure you are working with the right character. Then start pasting the values you copied from the Template file.
For details on making your own color scheme check the new Apendix on advanced color customization.
Player name: I haven’t changed my name really. But searching every instance of the player name in the file and replacing them all with the new name should suffice.
Once done with this step, we are ready for the final step.
8 – GENERATE A NEW PLAYER FILE
Remove the .player file (and it’s bak files if any) for your character from the folder (HOPEFULLY YOU STILL HAVE THE BACKUP SOMEWHERE). And just like with the dump script, we have to create a Repack script.
Inside the game’s player directory
<SteamLibraryPath>\steamapps\common\Starbound\storage\player
Create a new text file called “PackPlayerData.bat”, right click, click edit and paste this:
..\..\win32\make_versioned_json.exe playerid.json playerid.player
(Replace “playerid” with the playerid of your file)
You only need to do this for your character. No need to repack the template since it was only used for reference.
Confirm that you have a new .player file for your character in the folder. Cross your fingers and run the game. If you did everything right, your character should have the new appearance.
9 – CLEANING UP
Once you are done. You can get into the game and delete the template character. Also you can delete the 2 json files generated during the process.
Appendix A: Advanced Color Customization (Setup)
In order to make your unique color scheme, you are going to need a couple things:
- A tool to pick colors: By recommendation of 0x00FF00lolwut, creator of “Green’s Dye Suite 1.7”, I tried the ShareX app and found it extremely convenient.
- The color template for your species.
Setting up ShareX:
-Download and install ShareX from: https://getsharex.com/
-Run the app.
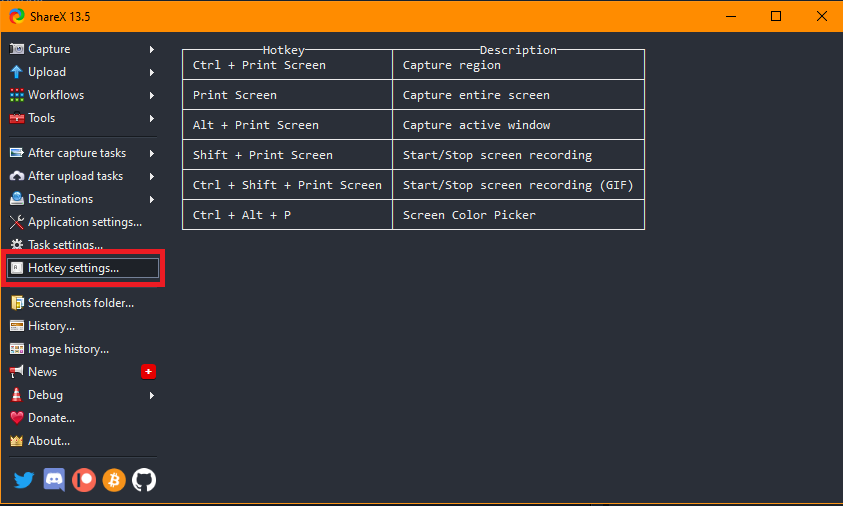
-On the left side click on “Hotkey Settings”:
.
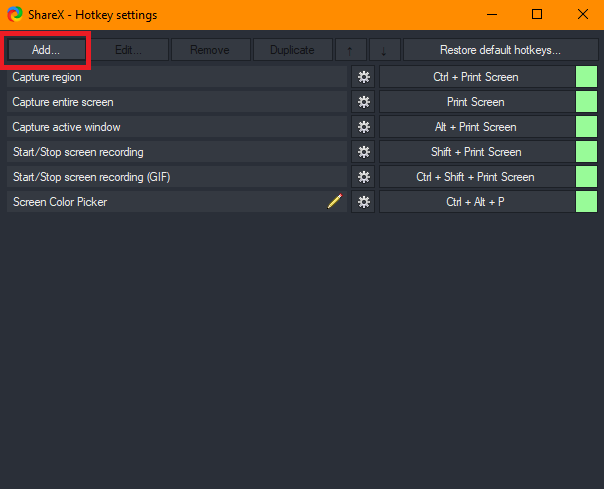
-In the following menu, click “Add…”:
.
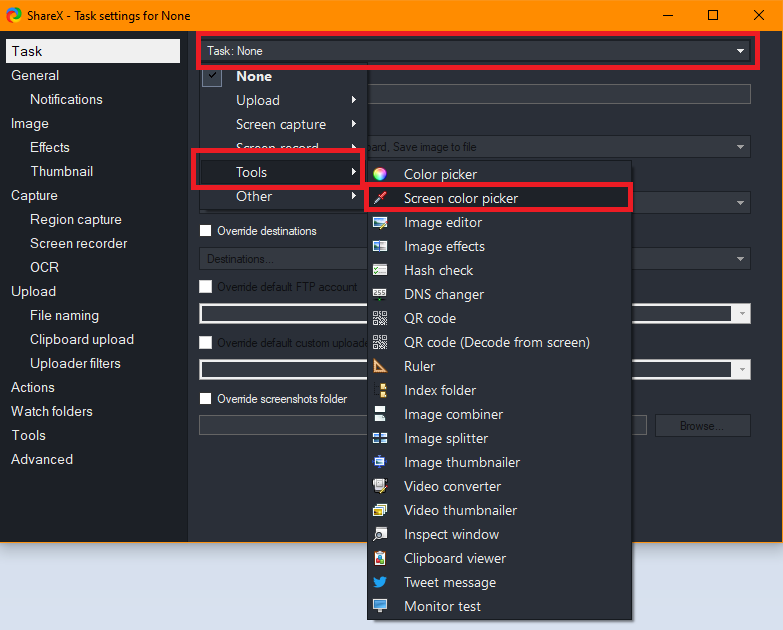
-In the next window, click the dropdown list at the top that should say “Task: None” and navigate to find “Screen color picker”:
.
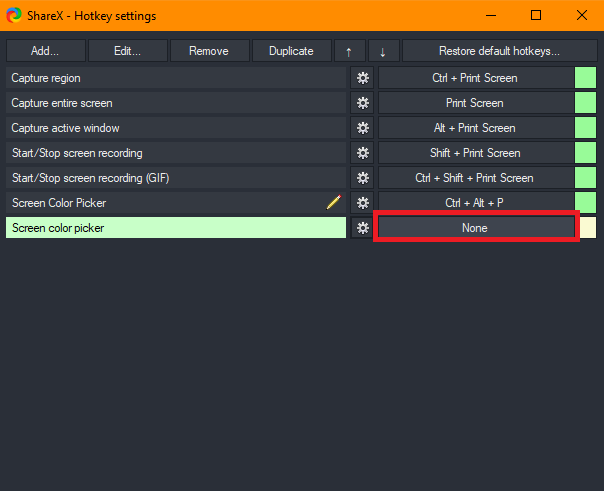
-Once selected. Close the window, and back at the hotkey setup, click to the right of your new binding where it says “None”, then press a combination of keys to activate the tool. As you can see in the image, I had already done it before and it was assigned to Ctrl+Alt+P:
.
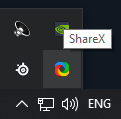
-Close the App and make sure it’s still active in the taskbar:
.
ShareX is now ready. Let’s move on to the next step.
Getting your species color template:
I’ll show you two methods. I highly recommend using the first method, because the mod has integrated tools to test colors on the fly. However I provide an alternative method in case you really don’t want to install the mod.
Method 1: The easy way – Use Green’s Dye Suite 1.7 mod:
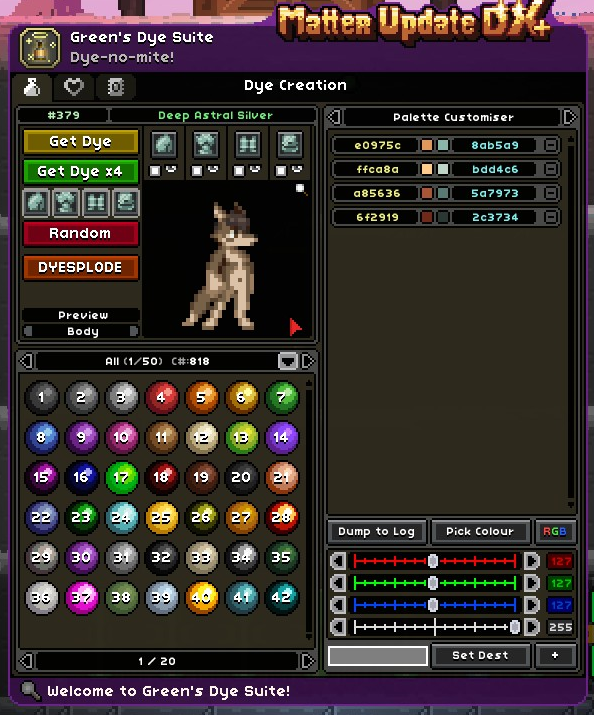
-This is my character:
.
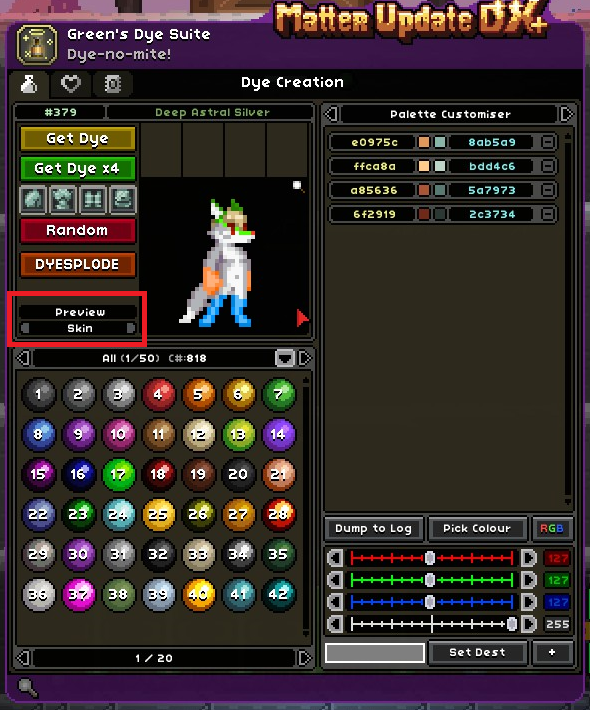
-Switch the preview to “Skin Mode”:
.
This weirdly colored abomination is the color template.
Method 2: Masochists welcome – Accessing the files:
For vanilla races the process should be similar but I haven’t unpacked the core files, so I can’t guide you there. But for custom races this is what you have to do:
-Find the mod in the workshop and take note of the mod ID. Should be in the address at the top of your browser:
-Go into the workshop folder for the mod in your PC. It should be located at:
<SteamLibraryPath>\steamapps\workshop\content\211820\ModId
(Replace “ModId” with the corresponding Id)
It should have a contents.pak file inside. Once you have an explorer window inside this folder, click on the path at the top, delete it and type “cmd” (without quotes) and hit enter.
This will open the command prompt. In fact the following command can go inside a .bat file as well. But since it’s a one time thing it’s probably not worth it. Up to you. In any case, now you need to paste the following into the command prompt:
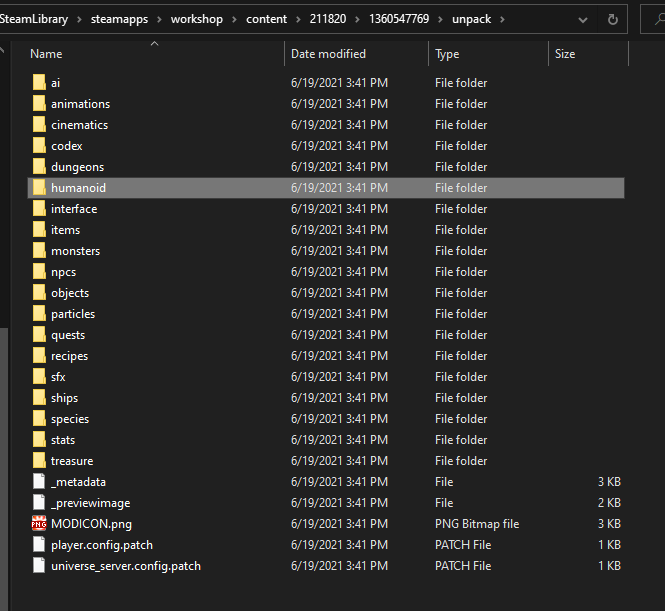
"..\..\..\..\common\starbound\win32\asset_unpacker.exe" "contents.pak" ".\unpack"
This will create a folder named unpack with the mod contents. Like so:
IMPORTANT: If you unpack the mod files, take them out of the workshop folder or delete them when you are done. Game will crash if you don’t.
I’m not a modder so I don’t really know how much can the structure vary from mod to mod, you might need to dig around a bit. In this particular case, what we need is inside humanoid->lyceen.
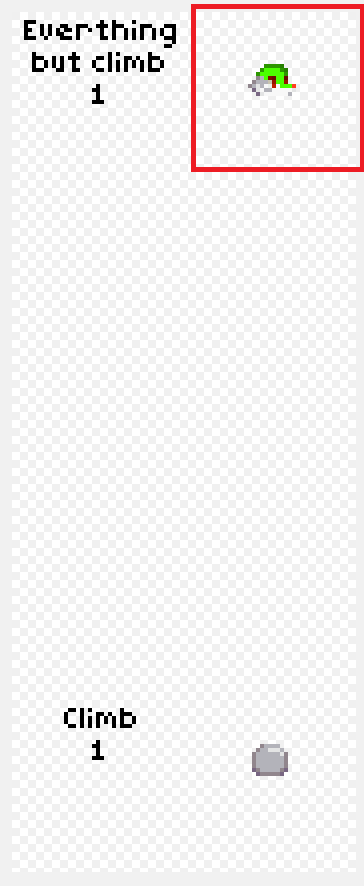
Here are a few images with sprites that the race uses:
.
Since I’m going to change the eyes, I’ll open malehead.png
There’s our color template.
Appendix B: Advanced Color Customization (Procedure)
In this example we are going to give my character purple eyes.
Directives
For this process we are mainly going to be using the Directive sections of the player file (for more info on this, check back on section “5 – The Player Data File”)
Directives contain a list of HEX color pairs like: 6f2919=3e5c6d, (this example replaces the 6f2919 color with the 3e5c6d color). The first color is the “TARGET” value. The value in the color template that will be replaced. The second value is the “DESTINATION”. The new value the original will become, I suppose.
NEVER EDIT THE TARGET VALUE UNLESS YOU KNOW WHAT YOU ARE DOING. ONLY CHANGE THE DESTINATION VALUE FOR EACH PAIR.
Each color value is composed of 3 double digit HEX numbers ranging from 00 to FF for a total of 6 digits. Each of the 3 numbers represents a primary color in order (Red, Green, Blue). 000000 is black. FFFFFF is white.
By manually editing these values you can achieve color schemes not normally available at character creation. And they should work in multiplayer, making your character look unique.
Find the target values
Important: Don’t try to take screenshots through Steam and pick the colors from them. In my experience, Steam screenshots alter pixel colors slightly, making it very difficult or impossible to get the right values to use in the Directive sections of the player file. This is the reason why I use ShareX.
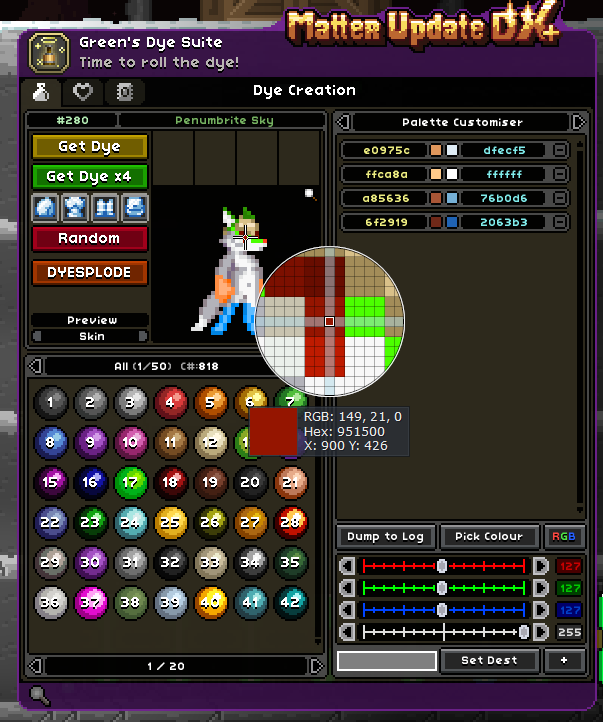
Regardless of the method you chose to reach the color template, you need to have the template visible on screen and press the ShareX hotkey you configured at the beginning. This will summon the color picker which looks like a magnifying glass. Place your cursor over the pixel that has the color you need to change. In this case the eye, which is made of two pixels of different colors, we need to pick both. Take note of the HEX value displayed under the magnifying glass:
.
The upper eye pixel has the color: 951500
The lower eye pixel has the color: be1b00
These are the TARGET values. For my character, the directive sections are:
"bodyDirectives" : "?replace;b3b3ba=776149;951500=282117;ff6a00=896f55;c0ffa5=57422f;ff3e21=161616;796783=331b0f;680d00=331b0f;7c1000=4f2a17;71ff35=331b0f;2d9600=57422f;91868d=57422f;0084e2=776149;60bdff=dbc2a6;0094ff=9b7e60;f8f8f8=dbc2a6;4cff00=776149;ffb07c=dbc2a6;be1b00=5b4126;e3e4e4=9b7e60;ff8d42=9b7e60;0062a8=57422f;267f00=331b0f", "facialMaskDirectives" : "?replace;b3b3ba=776149;951500=282117;ff6a00=896f55;c0ffa5=57422f;ff3e21=161616;796783=331b0f;680d00=331b0f;7c1000=4f2a17;71ff35=331b0f;2d9600=57422f;91868d=57422f;0084e2=776149;60bdff=dbc2a6;0094ff=9b7e60;f8f8f8=dbc2a6;4cff00=776149;ffb07c=dbc2a6;be1b00=5b4126;e3e4e4=9b7e60;ff8d42=9b7e60;0062a8=57422f;267f00=331b0f", "emoteDirectives" : "?replace;b3b3ba=776149;951500=282117;ff6a00=896f55;c0ffa5=57422f;ff3e21=161616;796783=331b0f;680d00=331b0f;7c1000=4f2a17;71ff35=331b0f;2d9600=57422f;91868d=57422f;0084e2=776149;60bdff=dbc2a6;0094ff=9b7e60;f8f8f8=dbc2a6;4cff00=776149;ffb07c=dbc2a6;be1b00=5b4126;e3e4e4=9b7e60;ff8d42=9b7e60;0062a8=57422f;267f00=331b0f",
I underlined the pairs that involve our target colors.
(Getting this from the player file is explained in the section “4 – DUMP PLAYER DATA”)
Get new color values
One advantage of using Dye’s suite, is that you can quickly test new colors. If you don’t use the mod, you are going to need some software like GIMP to test colors. Remember, no matter what tool you use to get color values, you need the HEX representation of the color. For the guide I’ll show the color testing process using Dye’s suite.
If you are not using Dye’s suite mod, you can use the tool at: https://www.color-hex.com/color-wheel/ to get the HEX values for the colors you want.
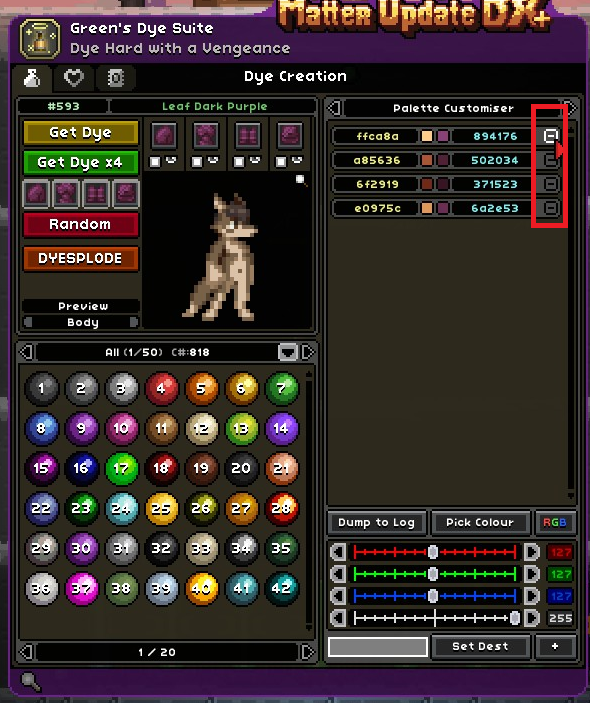
-On the right side, remove the 4 default colors with the tiny “-” button to the right of each one.
.
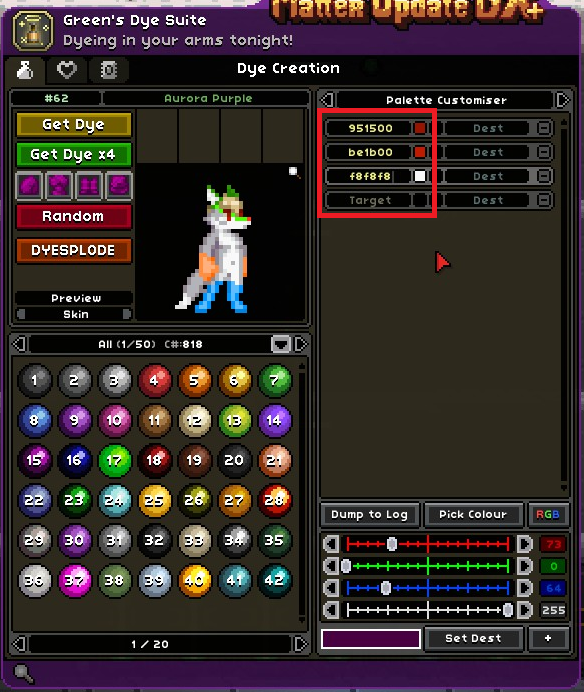
-For each row, in the slot marked as “target” fill the target colors we found (as a bonus I picked the chest fur color as well).
.
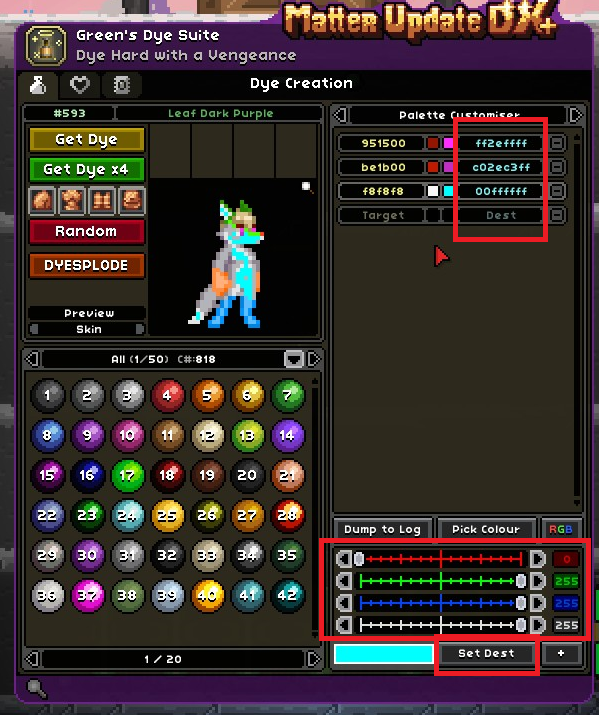
-For each row, click the slot marked as “dest”, then use the color sliders at the bottom to find a color you like and click “Set destination”.
In the screenshots, the destination colors have 8 digits. The mod uses an alpha channel that isn’t used in the player file, pick only the first 6 digits of each color.
Now you have the new color pairings for your directives:
| 951500=ff2eff | be1b00=c02ec3 | f8f8f8=00ffff |
Apply the new color pairings to the directives:
"bodyDirectives" : "?replace;b3b3ba=776149;951500=ff2eff;ff6a00=896f55;c0ffa5=57422f;ff3e21=161616;796783=331b0f;680d00=331b0f;7c1000=4f2a17;71ff35=331b0f;2d9600=57422f;91868d=57422f;0084e2=776149;60bdff=dbc2a6;0094ff=9b7e60;f8f8f8=00ffff;4cff00=776149;ffb07c=dbc2a6;be1b00=c02ec3;e3e4e4=9b7e60;ff8d42=9b7e60;0062a8=57422f;267f00=331b0f", "facialMaskDirectives" : "?replace;b3b3ba=776149;951500=ff2eff;ff6a00=896f55;c0ffa5=57422f;ff3e21=161616;796783=331b0f;680d00=331b0f;7c1000=4f2a17;71ff35=331b0f;2d9600=57422f;91868d=57422f;0084e2=776149;60bdff=dbc2a6;0094ff=9b7e60;f8f8f8=00ffff;4cff00=776149;ffb07c=dbc2a6;be1b00=c02ec3;e3e4e4=9b7e60;ff8d42=9b7e60;0062a8=57422f;267f00=331b0f", "emoteDirectives" : "?replace;b3b3ba=776149;951500=ff2eff;ff6a00=896f55;c0ffa5=57422f;ff3e21=161616;796783=331b0f;680d00=331b0f;7c1000=4f2a17;71ff35=331b0f;2d9600=57422f;91868d=57422f;0084e2=776149;60bdff=dbc2a6;0094ff=9b7e60;f8f8f8=00ffff;4cff00=776149;ffb07c=dbc2a6;be1b00=c02ec3;e3e4e4=9b7e60;ff8d42=9b7e60;0062a8=57422f;267f00=331b0f",
if the target value you want to change doesn’t appear in your directives, it means that your character is using the default color from the template. An example for the Lyceen would be the two pixels that make the sclera of the eye. Only one skin changes them. Fear not, you can just add your new pair to the directive by adding a semicolon followed by the new pair right before the last quotation mark. Like so:
"bodyDirectives" : "?replace;b3b3ba=776149;951500=ff2eff;ff6a00=896f55;c0ffa5=57422f;ff3e21=161616;796783=331b0f;680d00=331b0f;7c1000=4f2a17;71ff35=331b0f;2d9600=57422f;91868d=57422f;0084e2=776149;60bdff=dbc2a6;0094ff=9b7e60;f8f8f8=00ffff;4cff00=776149;ffb07c=dbc2a6;be1b00=c02ec3;e3e4e4=9b7e60;ff8d42=9b7e60;0062a8=57422f;267f00=331b0f;c8c3af=ebf0eb",
Once you have changed the directives in your player file, just repack the player file as shown in Section “8 – Generate a New Player File” and it should be done.
Look how I massacred my boy…
.
REMEMBER: ALWAYS BACKUP YOUR FILES!
Appendix C: Technical Concepts
In this section I will exaplain some concepts used in the guide if you are interested in getting a better grasp of what is going on.
What is a .bat file?
Known as “batch files”, files with this extension are text files that contain a series of commands that the computer will execute in sequence. The batch files used in this guide are very basic and only execute one command. Like the dump batch file which contains the command:
..\..\win32\dump_versioned_json.exe playerid.player playerid.json
However, as mentioned, the system can execute as many commands as you place in the file, in sequence. So if you wanted to dump both your character and the template at the same time, you could add both lines into the same batch file like so:
..\..\win32\dump_versioned_json.exe YourCharId.player YourCharId.json ..\..\win32\dump_versioned_json.exe TemplateCharId.player TemplateCharId.json
Obviously changing the keywords YourCharId and TemplateCharId for the actual Ids. I didn’t do this in the main guide to not add confusion, especially for the processes that do not require a template character.
Also it is not necessary to create a .bat file, you can directly input these commands into Windows command prompt.
Batch file scripting in depth: https://steve-jansen.github.io/guides/windows-batch-scripting/
How are the commands used structured?
- Path:Tells the computer where to go to find something. The double dots ( .. ) mean “go up one level”. The backslash ( \ ) is a sort of pointer. It concatenates the locations in the path. To illustrate what this specific command does, let’s look at the starbound folders we are using. It looks roughly like this:
starbound | |__storage | |___player-----DumpPlayerData.bat | |__win32-----dump_versioned_json.exe
This means that if our script file is located inside the player folder, it needs to up twice to get to the starbound folder ( ..\.. ), then enter the win32 folder ( \win32 ) and finally execute the program located there (dump_versioned_json.exe).
- Arguments: Arguments are the data that the program needs to work. This particular program needs the name of the source file (your .player file) and the name of the destination file, which really can be called whatever you want, but it’s best to name it with the Id to know which file belongs to who. Of course with the json extension to know what kind of file it is. In this case, the arguments don’t need a path, because the script is located in the same place. If you put your script in a different place, you would need to put a path on each argument as we did with the program.
Quick intro to the command prompt: https://www.cs.princeton.edu/courses/archive/spr05/cos126/cmd-prompt.html
What is a json file?
JSON stands for JavaScript Object Notation. It’s a standard container for information exchange. It happens to be the format in which player data is stored in Starbound.
A JSON container starts and ends with curly braces ( { } ) and data is stored as key-value pairs, separated by commas ( , ). The value is the data itself, and the key is the identifier for that piece of data. A very basic JSON container could be:
{ "name": "Corbent", "playtime": 100, "favoriteGame": { "title": "Starbound", "price": 30 } }Notice how keys are ALWAYS in quotation marks ( ” ), and there is always a colon ( : ) between key and value. Notice also how values are only placed in quotation marks if they are to be interpreted as text. A value that must be interpreted as a number isn’t in quotation marks, and most tricky of all… objects can be nested inside other objects. Like the “favoriteGame” key which corresponds to an object with it’s own set of key-value pairs.
JSON in depth: https://developer.mozilla.org/en-US/docs/Learn/JavaScript/Objects/JSON
Hexadecimal numbers
Hexadecimal is a numeral system similar to the one we normally use but instead of 10 digits that go from 0 to 9 it uses 16 digits that go from 0 to F:
0. 1, 2, 3, 4, 5, 6, 7, 8, 9, A=10, B=11, C=12, D=13, E=14, F=15It’s very common to see these numbers in computer applications because it’s a very convenient way to shorten binary numbers.
The basic unit of data is the byte, and one byte is made of 8 binary digits ( ex. 01010101 ) . The maximum value in one byte is 11111111 which is equal to 255. This same number in HEX is FF. This is why two-digit HEX numbers are so common.
To know the value of a two-digit HEX number, take the value of the first digit and multiply by 16. Then add the value of the second digit. Easy enough:
FF = 15×16 +15 = 240 +15 = 255
4. = 4×16 + 12 = 64 + 12 = 76
2. = 2×16 + 3 = 32 + 3 = 35Hexadecimal in depth: https://en.wikipedia.org/wiki/Hexadecimal
Color values
All colors displayed on the screen are made by some combination of three primary colors Red, Green and Blue (RGB). There are a couple other systems, but unless you are doing something really fancy, RGB is what you will be dealing with. Each of these values is called a channel and each channel can have a value between 0 and 255.
For example, purple would be [255,0,255] (Red and blue maxed out, nothing of green). The reason why 255 is the max value, is precisely because of the previous conversation about bytes. Remember that the max value of one byte is 255 and is represented as FF in hex. Therefore colors are commonly expressed as the combination of three double-digit HEX numbers.
The given example of purple would be [FF00FF]. More advanced applications use an additional channel for a total of 8 digits. The alpha channel used for transparency. It also goes from 0 to 255. But in the player files no transparency is used.
Hex-Color tool: https://www.color-hex.com/color-wheel/
Either use the color wheel or click the color dropdown at the top to get the HEX code for the colors you want. This one is cool because if you click on “Get Info” you get a ton of details including the values for shades of the color, which can aid you in properly coloring your character.
Hope you enjoy the Guide about Starbound – How to Edit Characters Name + Appearance + Customization Guide, if you think we should add extra information or forget something, please let us know via comment below, and we will do our best to fix or update as soon as possible!
- All Starbound Posts List






Leave a Reply