
Welcome to SimRail – The Railway Simulator – Basic Dispatching Full Guide,
This manual will teach you everything you need to know about dispatching.
This is still in the works; more information will be added soon). The delay was primarily for review/critique purposes. –
TODO: Tutorial on panel signaling and Bedzin & Lazy box details.) Signal boxes have been added to the playtest.
The Basics
Simrail’s main line (at the time of writing) runs from Opoczno, the northernmost point, through Katowice, the south. You can find a live map here:
https://panel.simrail.eu/main/map.html – [simrail.eu]
I’ll refer to mainline traffic as northbound/southbound to keep things simple, even if some stations are more east-west aligned. Also, as I don’t have a keyboard with Polish characters, you won’t find any in this instruction.
In Poland, trains drive on the right.
The Telephone
Every signal box has an answering machine.
Each telephone has large quick-dial buttons that allow you to call neighbouring signal-boxes.
Mouse over the quick-dial buttons, and you’ll see which neighbor it calls. If the neighbour is AI controlled, the button will be blue with the tooltip (AI). If the neighbour is player controlled, the button will be white and the tooltip will not show (AI).
To communicate with AI signallers, you can use a variety of text prompts. If the AI can understand what you are saying, they will be able to read it back.
These text prompts can also be used to communicate with player signallers (it translate to their language choice). If you have a microphone, voice chat is also an option.
The phone will ring if a neighbor signaller wishes to have a voice chat. To answer, click the handset.
Train Numbers
Every train has its own unique number that allows it to be identified. These are the basics to remember:
4 digit numbers – High speed express trains. These trains are not recommended for use at stations with limited access. They should be prioritized over other trains if necessary.
5 digit numbers – Commuter trains. These trains usually stop at all stations.
6 digit numbers – Freight trains or detached locomotions (also known as ‘running lights’). These trains don’t usually stop and can be slow. 6 digit trains have the lowest priority, and freight can expect that they will be held in sidings so express trains can pass them.
The Timetable
Each signal box has a computer screen that displays the timetable. To see the screen in detail, click the button and press ESC to close the view.
You will notice that Sosnowiec Glowny uses two timetables. We will explain the reasons behind this later in this guide when we examine that signal box in greater detail.
The arrows in this screenshot point to the columns of the timetable you will use most often.
The blue arrows indicate the “From post” or “To post” columns. These indicate which signal boxes the train is going to and which signal box it is coming from. Your job is to direct the train through your section to get it to its destination. Some signal boxes only have two neighbors in the game, but others have more. You should always verify the direction of a train before you send it.
The columns displaying the train’s ID number are indicated by the red arrows. The column in which the number is located indicates which direction it is traveling.
The Layover column is indicated by the yellow arrow. If the numbers in this column are not 0,0, it means that the train is expected to stop at your section, most likely at a platform. The “Pt” column would contain two pieces of information. First, a roman numeral (I or II) to indicate the platform at which it is stopping, and then a number (1 or 2 etc.) to indicate which track to use. Sometimes, a single platform may serve two tracks.
You can filter the timetable to show a specific train number. Simply type it in the Train Number: search box at top and hit enter. To return the timetable to its default state, click Clear under the search field.
Computerized signalling
Many signal boxes are now computer-controlled and modernized. To operate the signalling, click the screen and press ESC to exit.
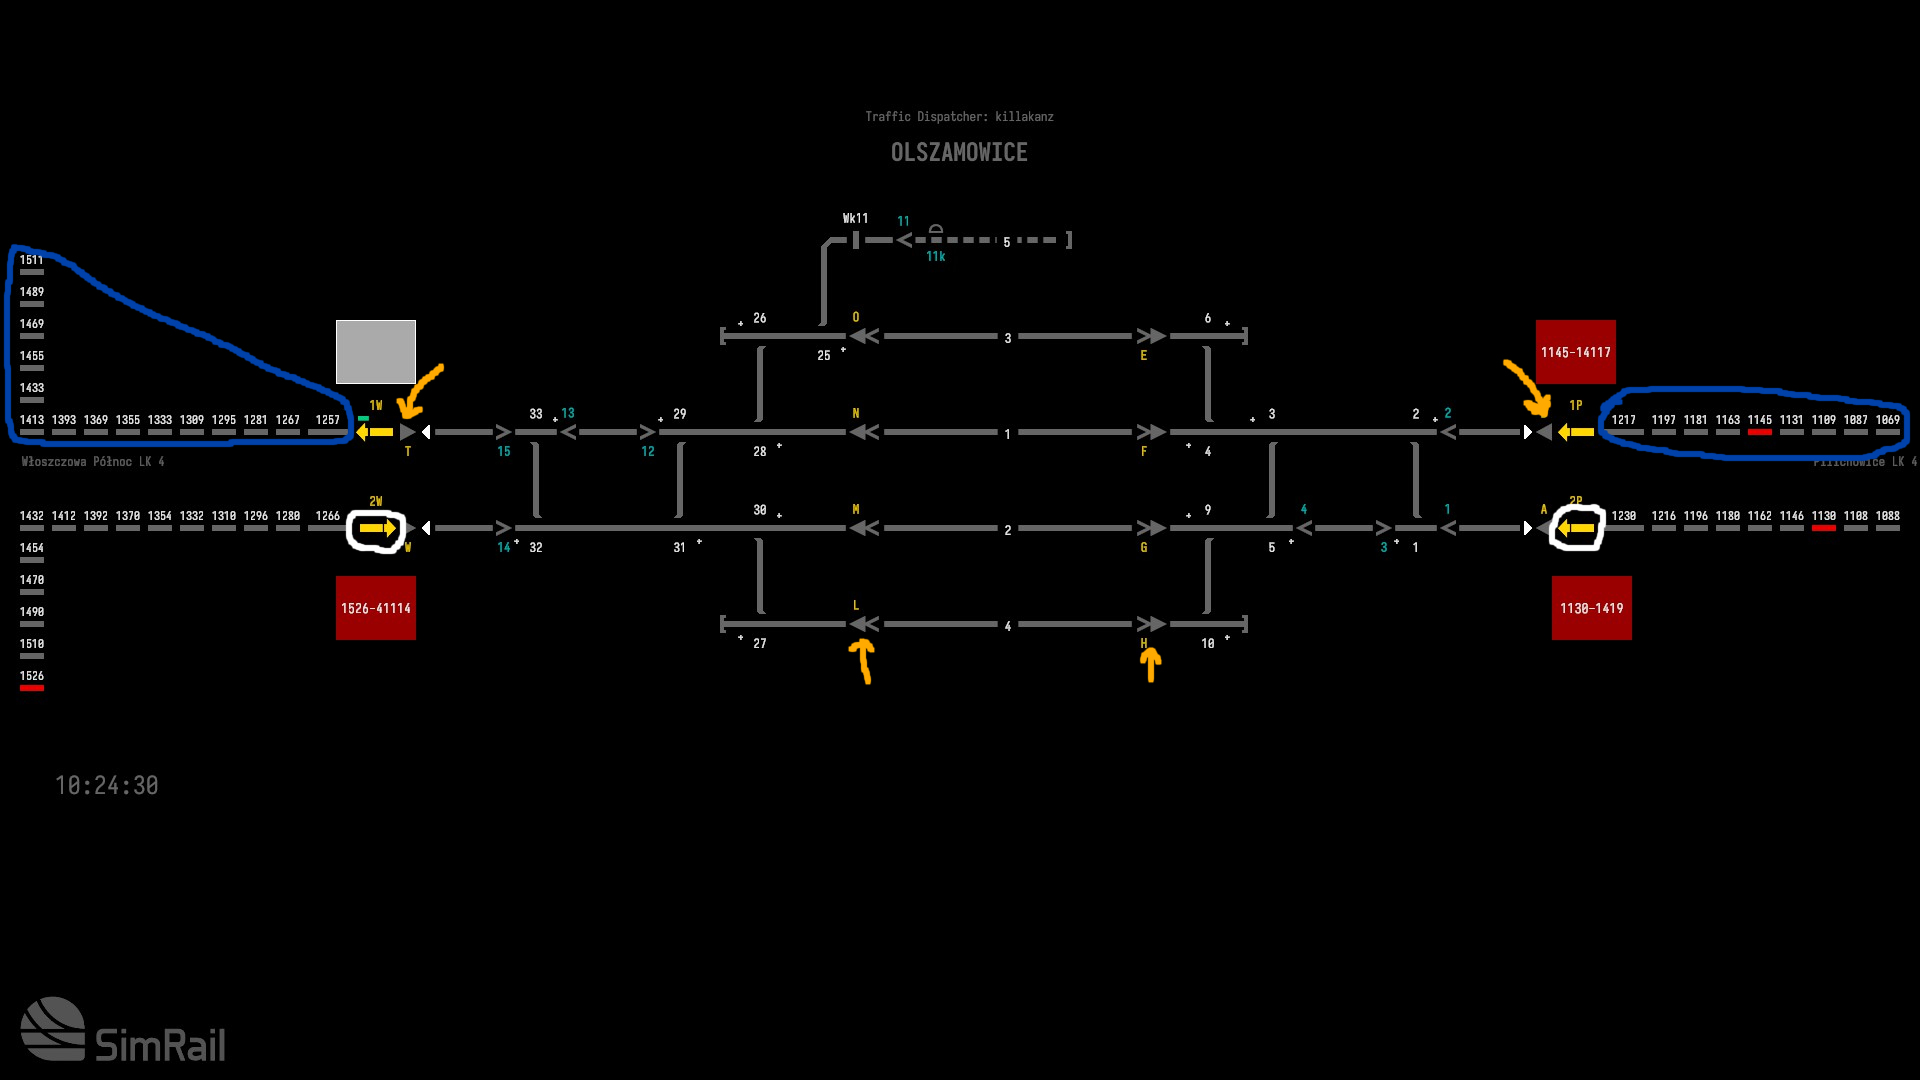
The blue circles are auto-block sections. These sections are tracks where trains can be separated by signals. Grey blocks indicate empty track. Red is when a train occupies a block. The number of the train will be displayed if you hover your mouse over a red block. The large boxes located next to the autoblocks will show which train is in which blocks. For example, the top right box shows block 1145 has train number 14117.
The direction interlock arrows are outlined in white. These encrypt the direction of travel. These can be turned to allow “wrong-way running”, which is possible if the signallers at both ends of an auto-block agree. This will be covered in more detail later.
The “Main Signals”, which are primarily used for setting routes, are indicated by the gold-colored arrows. As much as possible, use the main signals to set routes.
Shunting signals are indicated by the smaller icons ( >). If you are performing shunting moves, routes should not be set using shunting signals.
Establishing a route.
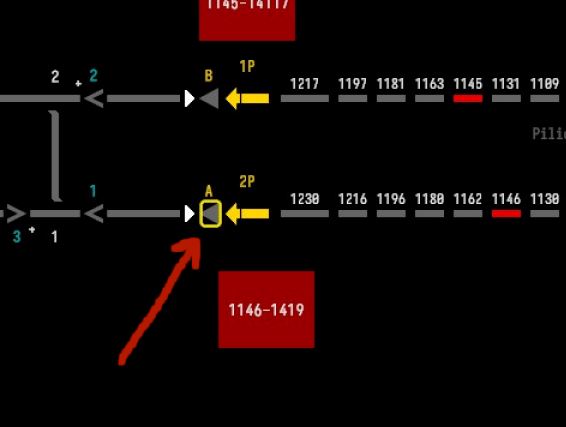
You probably noticed that train 1419 is not running on Line 2P. Let’s move it into the siding lanes 4 so it can be moved back across the mainline to Line 1W.
First, you need to go to the grey triangle. This is the beginning of our route. When you hover your mouse over the yellow box, it will appear…
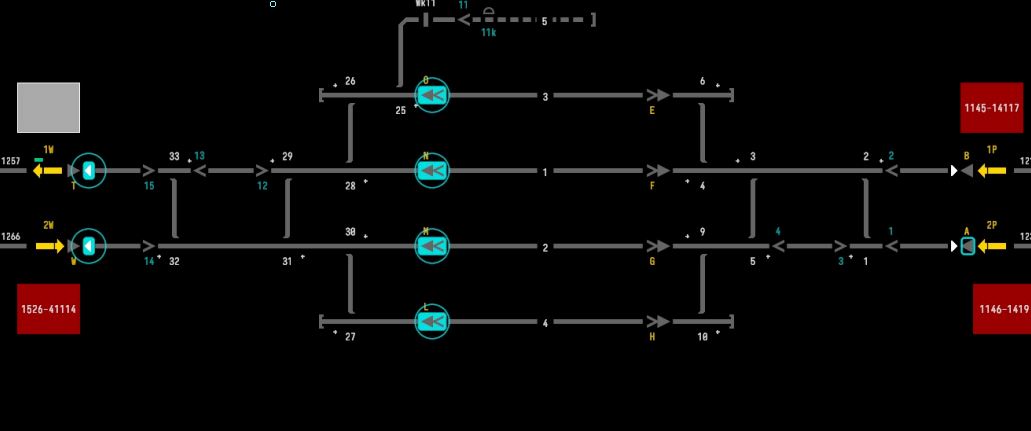
Clicking the triangle will turn the yellow highlight box blue and highlight possible route destination signals.
To select the route into the siding from the signal in Lane 4, click the buttons at the top of your screen. Click the TRAIN ROUTE button to set the route.
… and then click Execute to confirm.
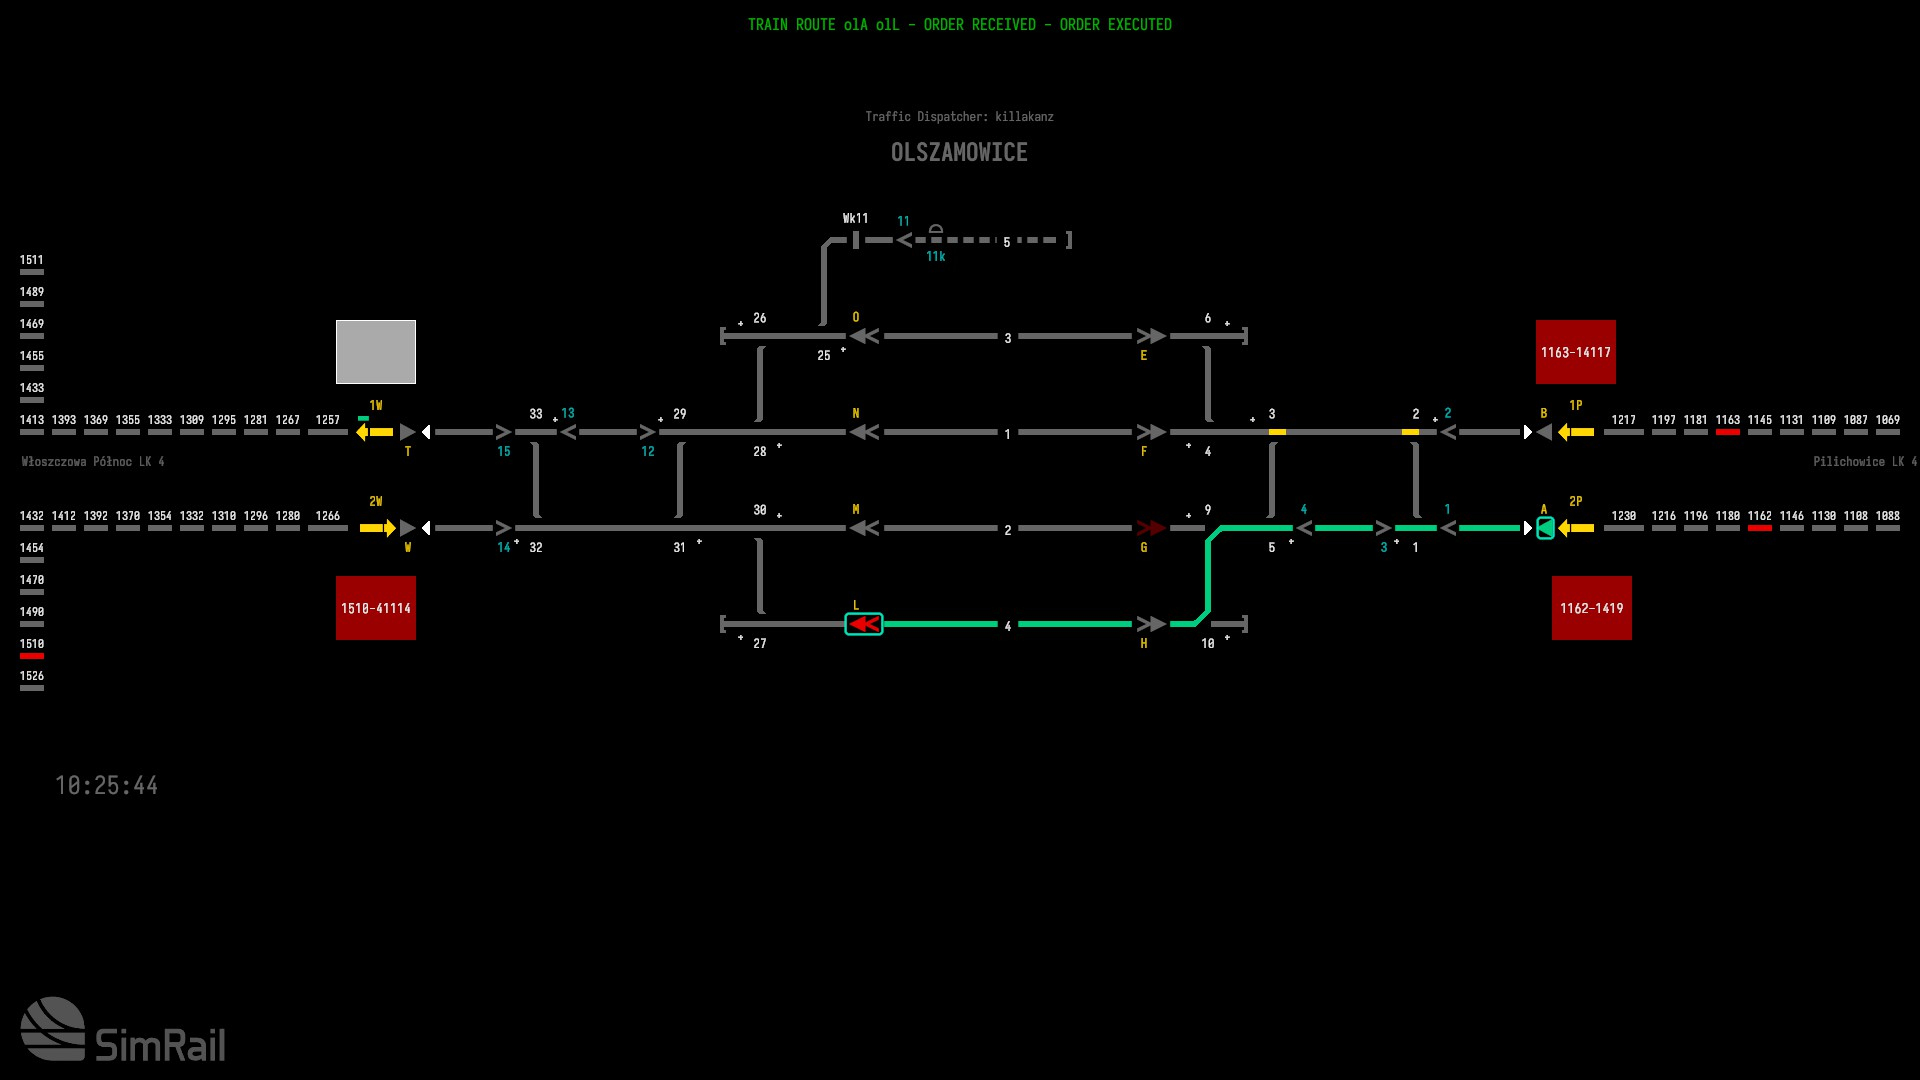
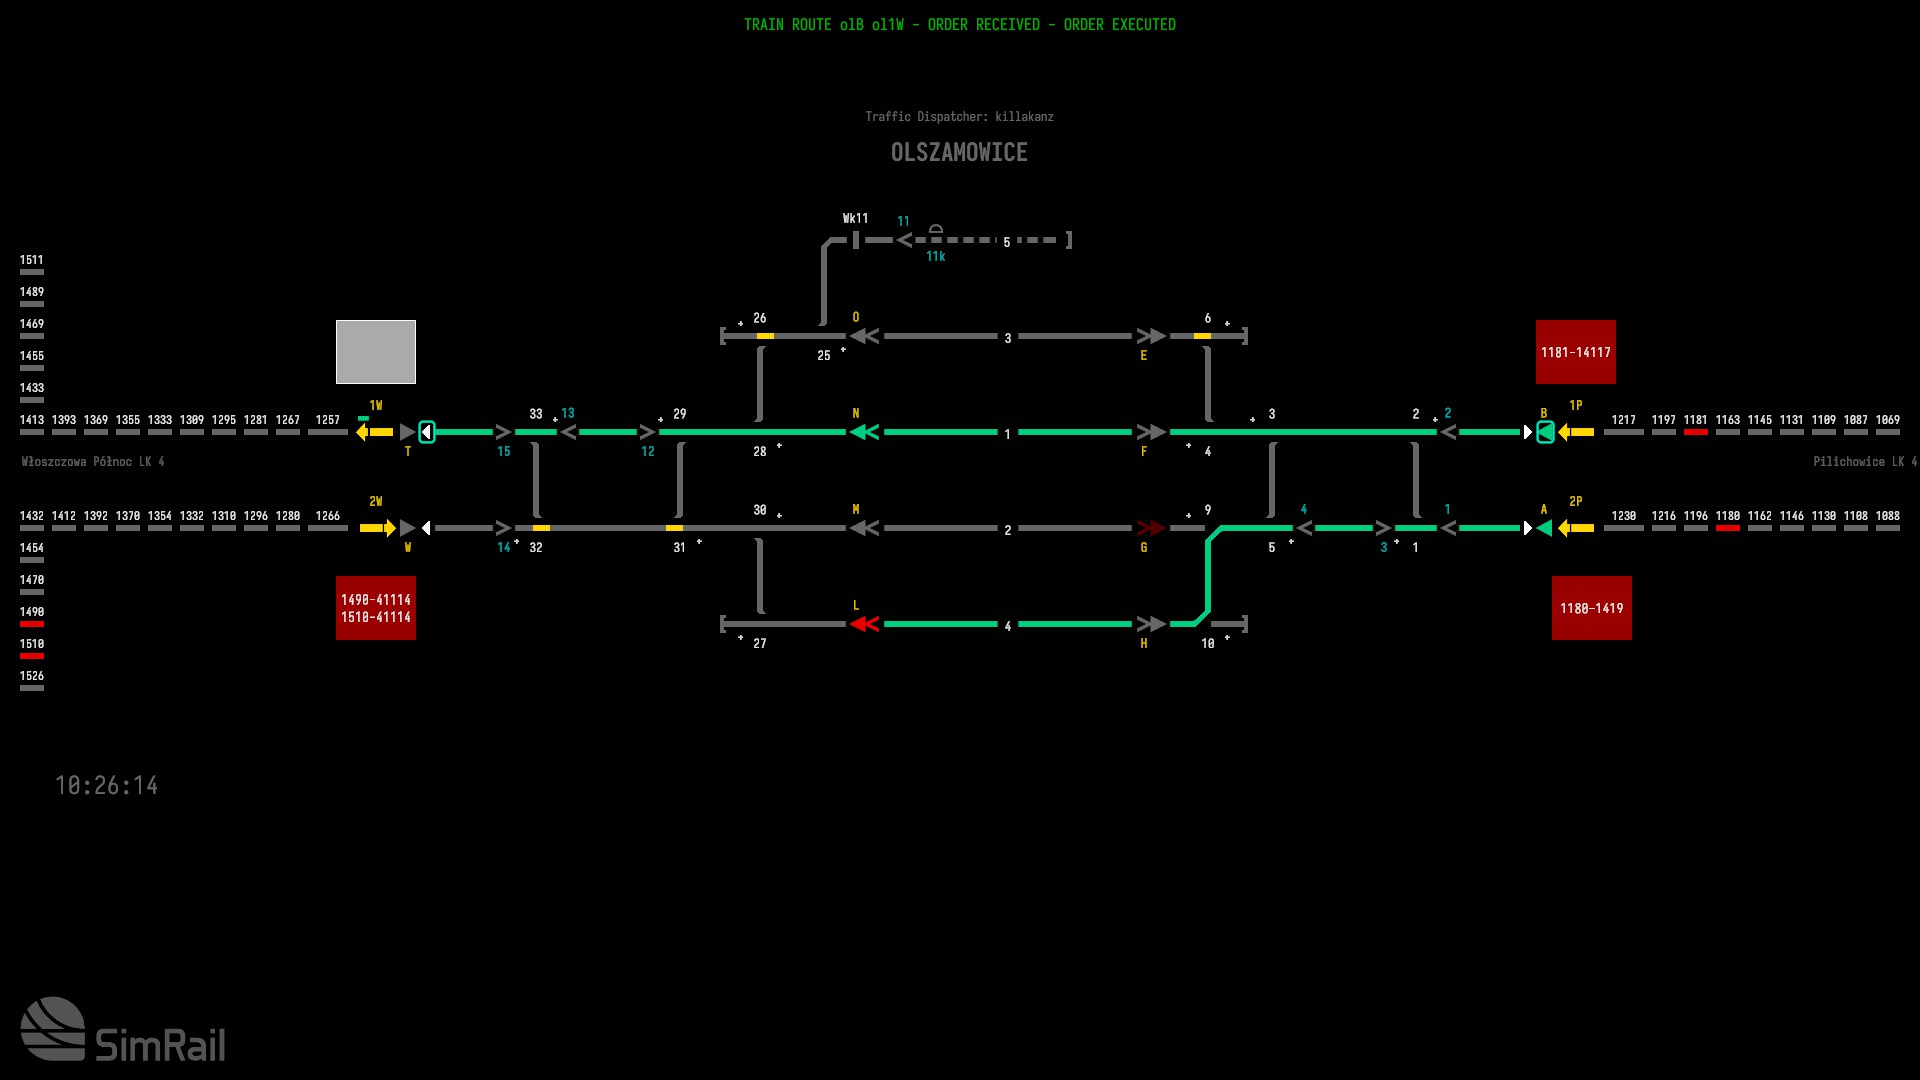
The system will then set the signals and change the points. This process will take a while. Once the route is complete, it will show a green line.
Notice that the starting signal is now green and the siding signal red because we have not yet set a route beyond it. These signals will be visible to the train driver.
You can also create a straight-through route for the train approaching on line 1. Select the start signal on the right and then choose the destination signal from the far left. The system will follow the direct route through all lanes.
Cancellation of a route
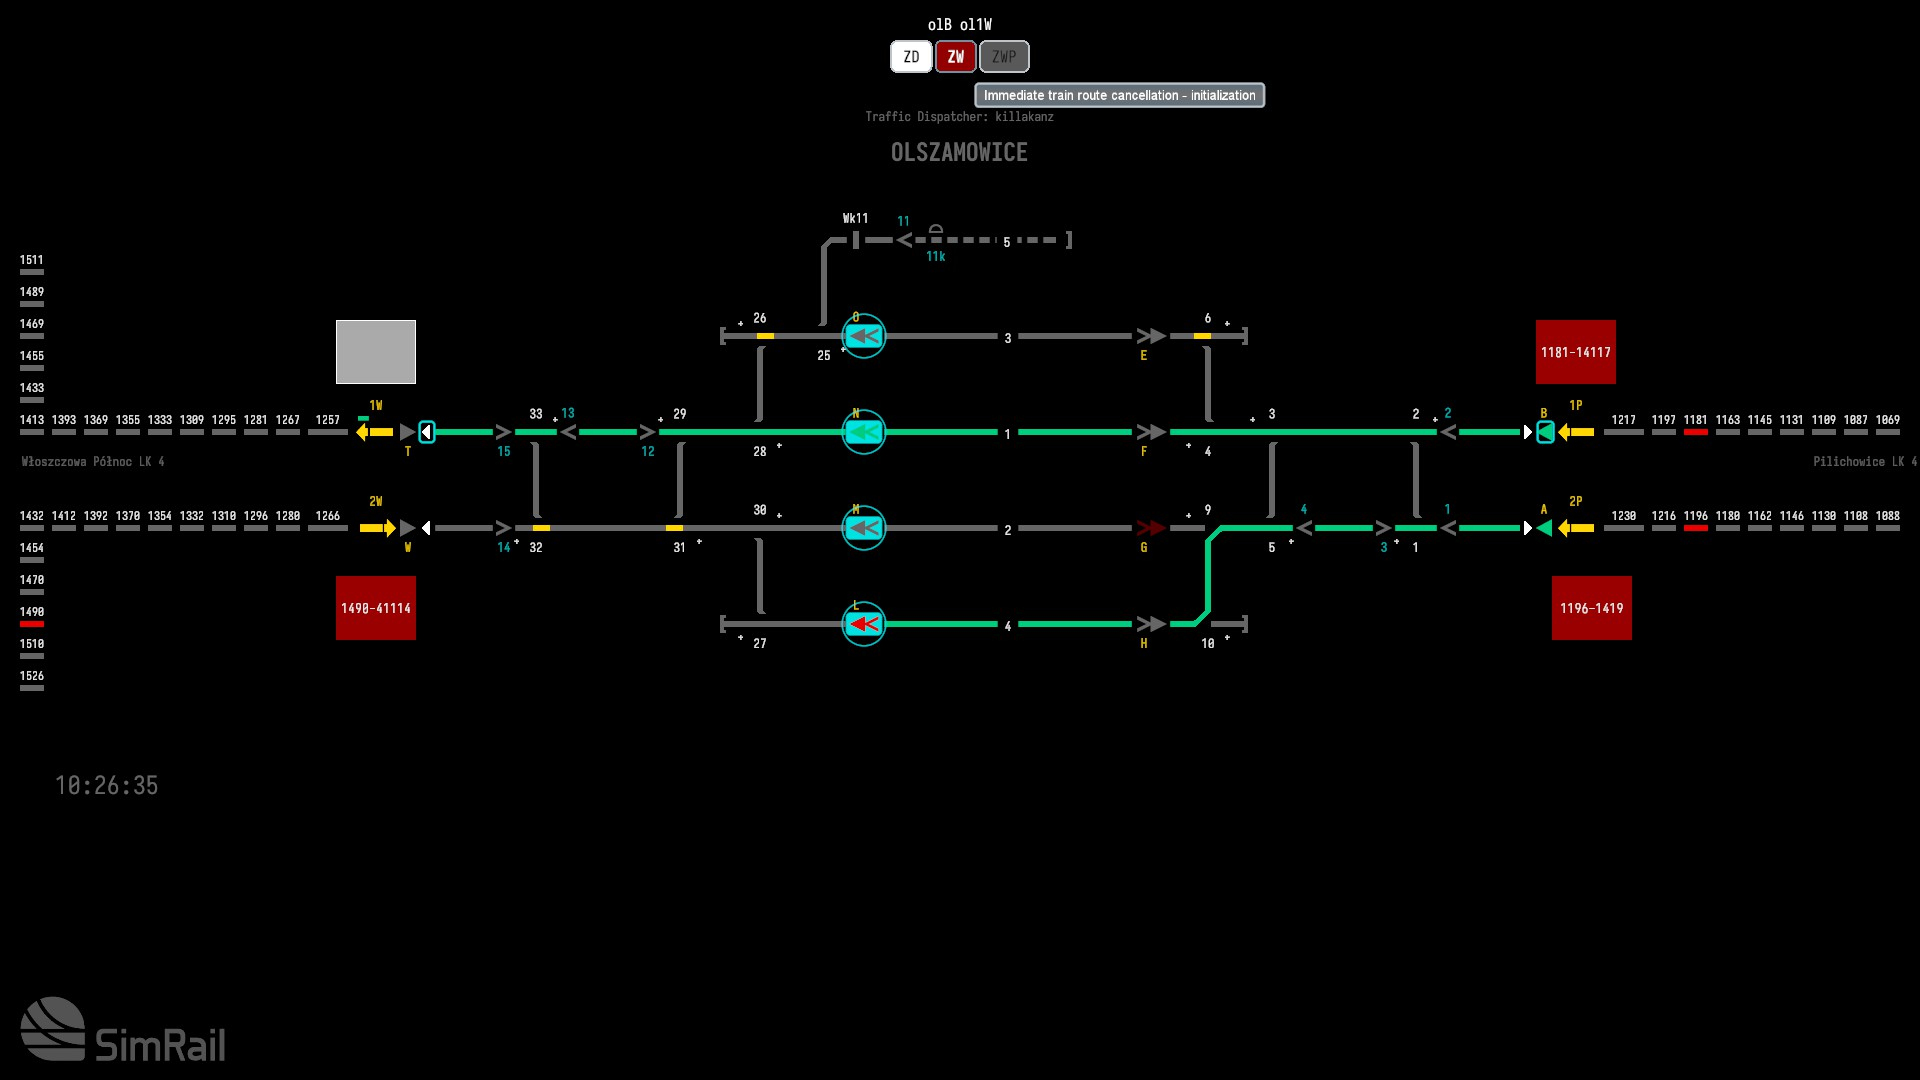
You can cancel an incorrectly set route by selecting the start signal and then the destination signal. The screen will display new buttons at the top.
To cancel the route, click the red ZW button. Next, confirm the cancellation by selecting the destination signal and start signal again, then click on the ZWP button. The route should now be clear.
It is not advisable to cancel a route if a train is too close. The train driver may have to stop if the route is cancelled as the train approaches the start signal. Trains need distance to stop. Main line drivers are often warned up to three signals in advance of a red signal with caution signals. It is not a good situation for a driver to speed up a green signal only to be confronted with a red signal.
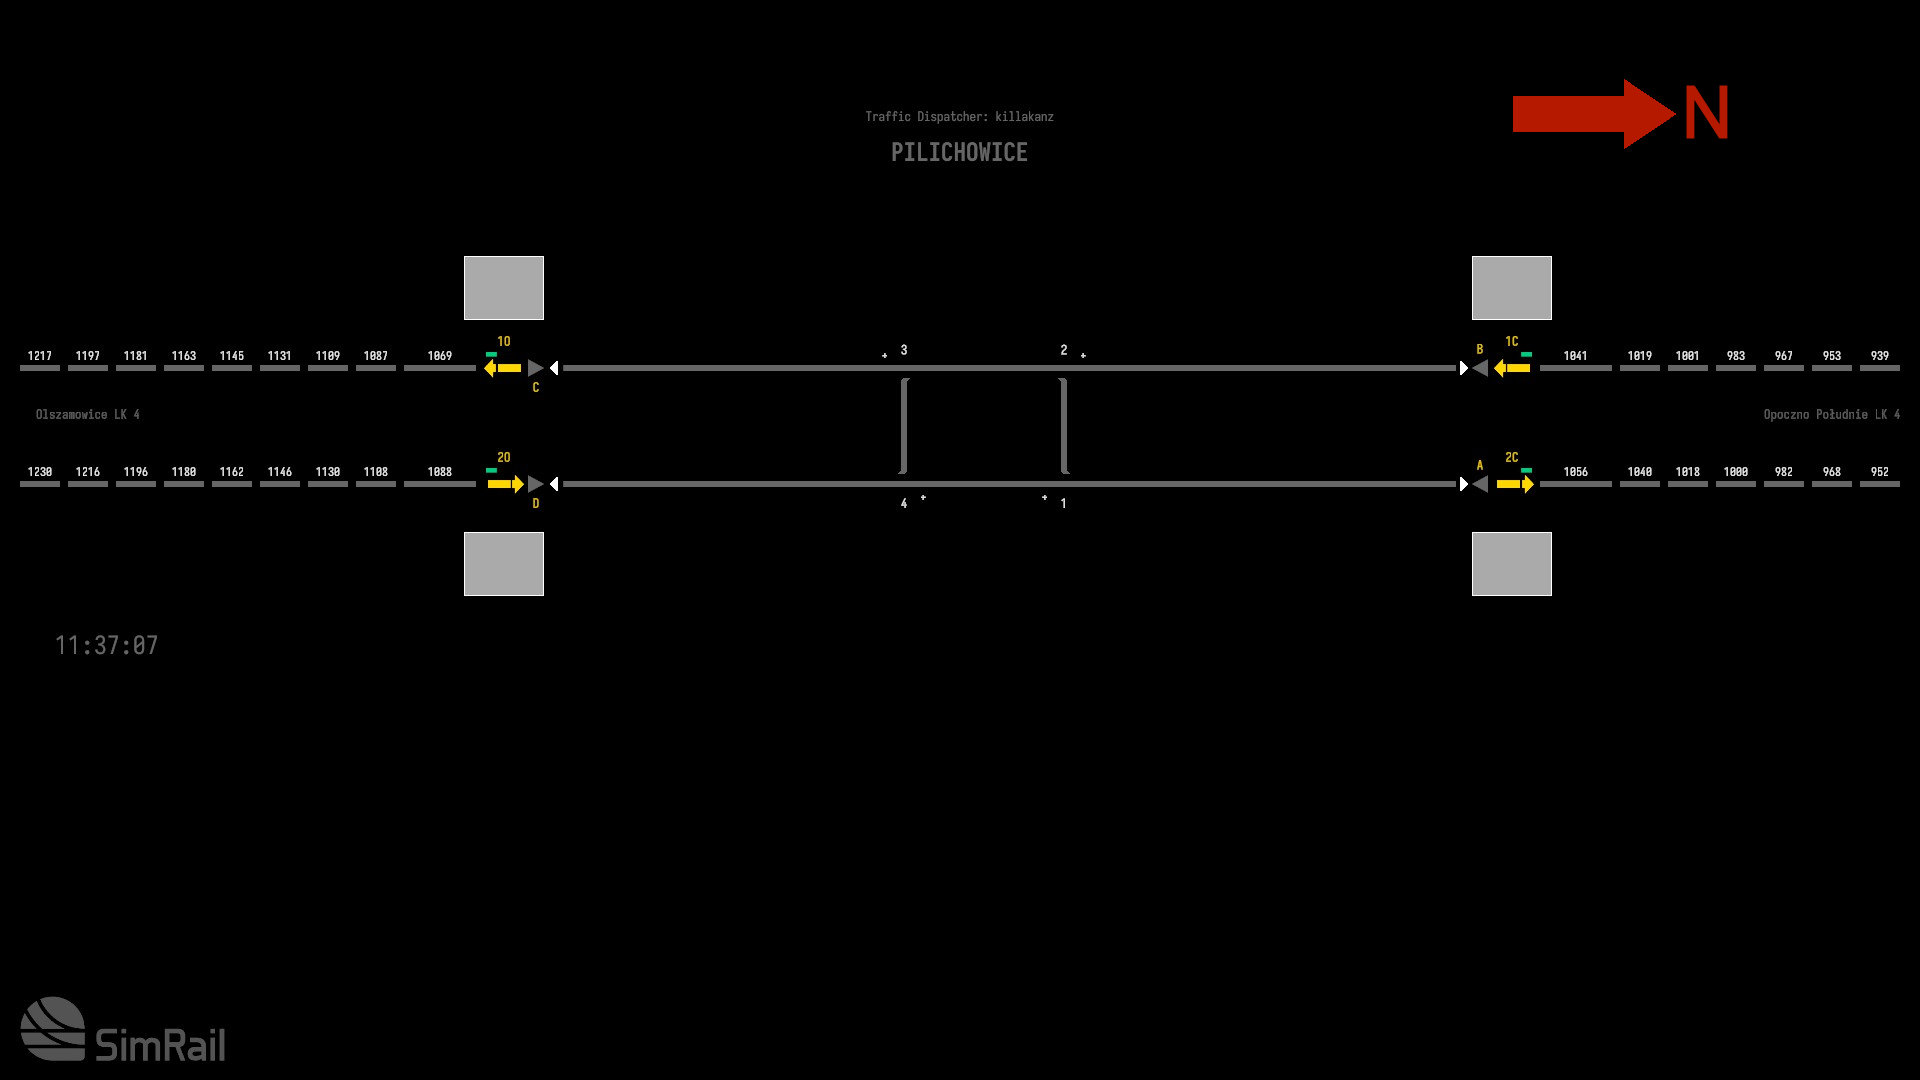
Pilichowice – In Detail (computerised).
Pilichowice can be described as a computerized signalbox.
It is the most northern signal box on the route and also the simplest. It is oriented so that northbound traffic is going right and southbound traffic is going left.
Its neighbors are:
Opoczno Poludnie in the North
Olszamowice to South
The layout is composed of two mainline tracks and crossovers in the middle. Each side has auto-block sections with directional interlocks. Each side has two start signals and two destinations signals.
This section does not have any stations or sidings.
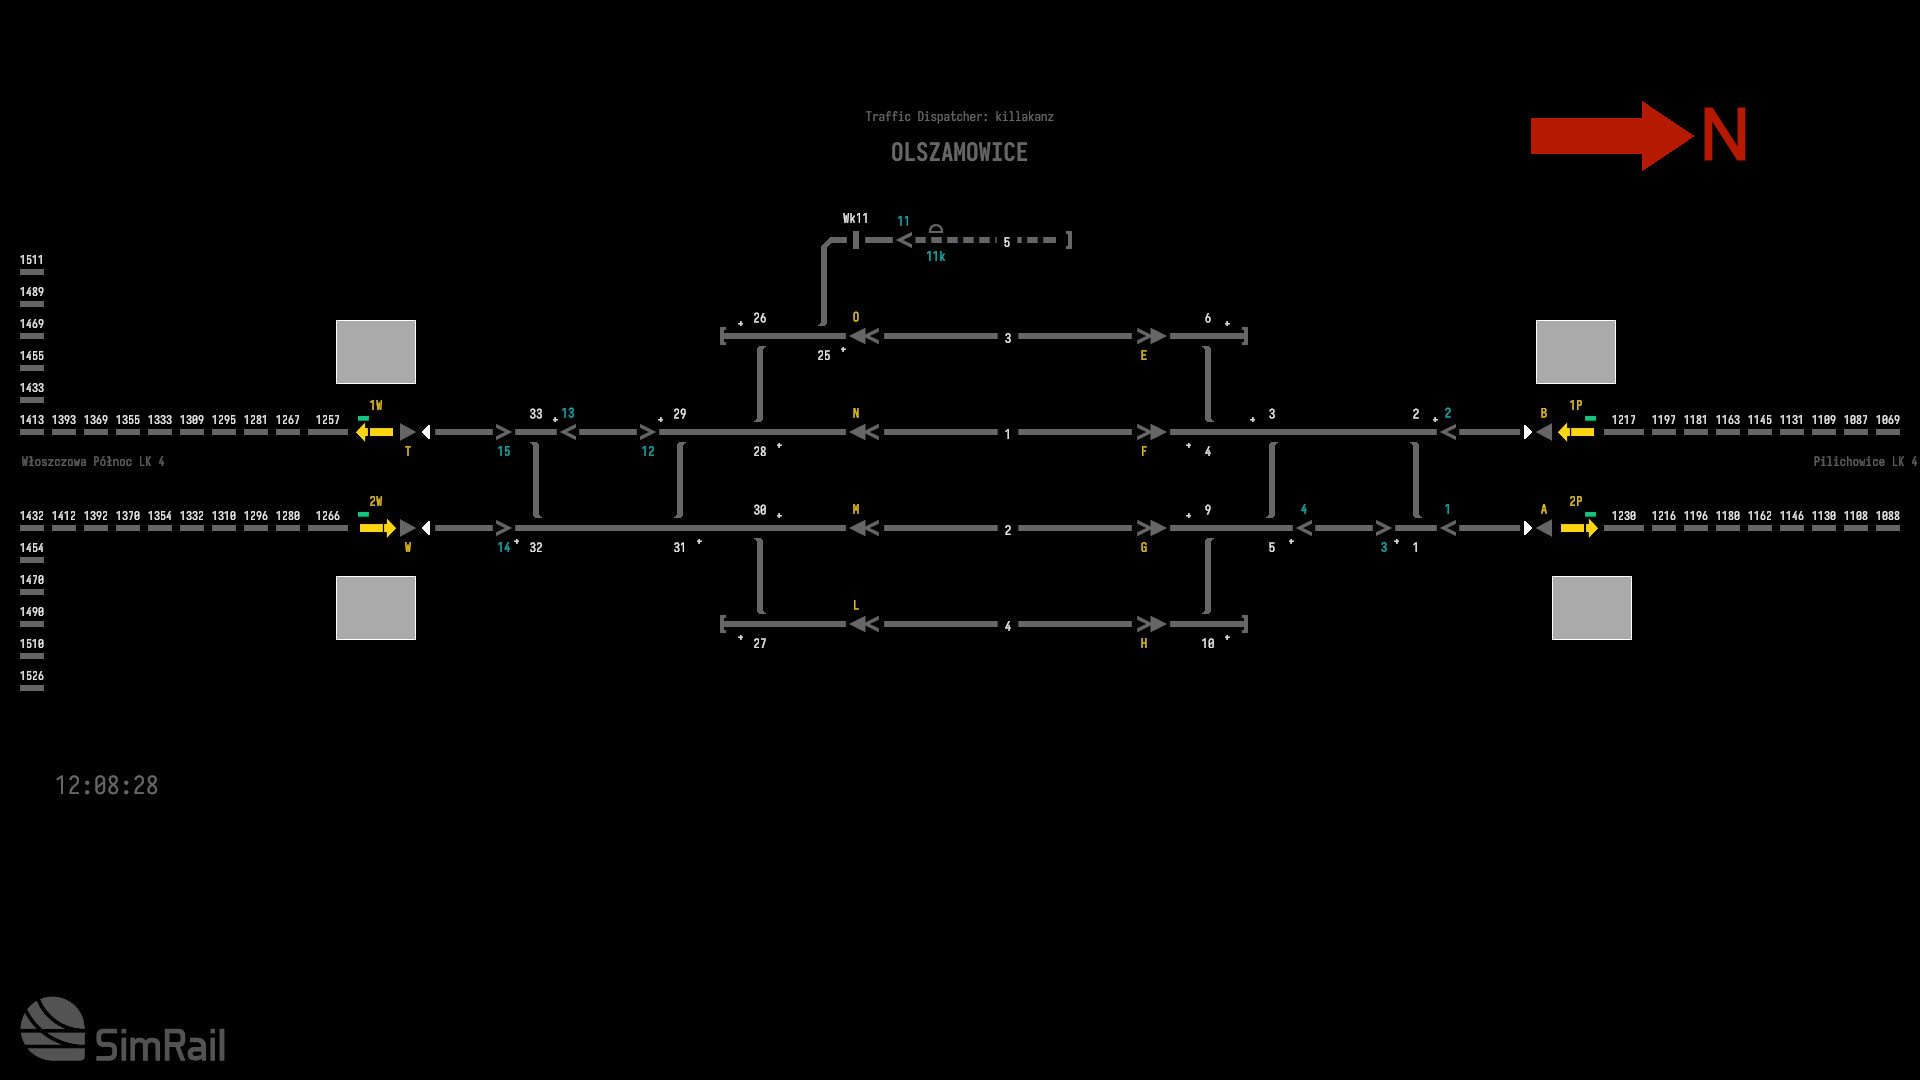
Olszamowice – In Detail (computerised).
Olszamowice can be described as a computerized signalbox.
This box is located in the northernmost part of the route. The box is oriented so that northbound traffic is going right and southbound traffic is going left.
Its neighbors are:
Pilichowice to North
Wloszczowa Polnoc in the South
The layout is composed of two mainline tracks with crossovers on each side. There are sidings on each side of the mainline, labeled lines 3 and 4. An industrial yard is located off siding line 3.
Each side has an auto-block section with directional interlocks. Two start signals and two destinations signals are on each side. There are shunting signals between and beside the crossovers and start/destination combination signal on each lane. All lanes can be used in either direction.
This section does not contain stations.
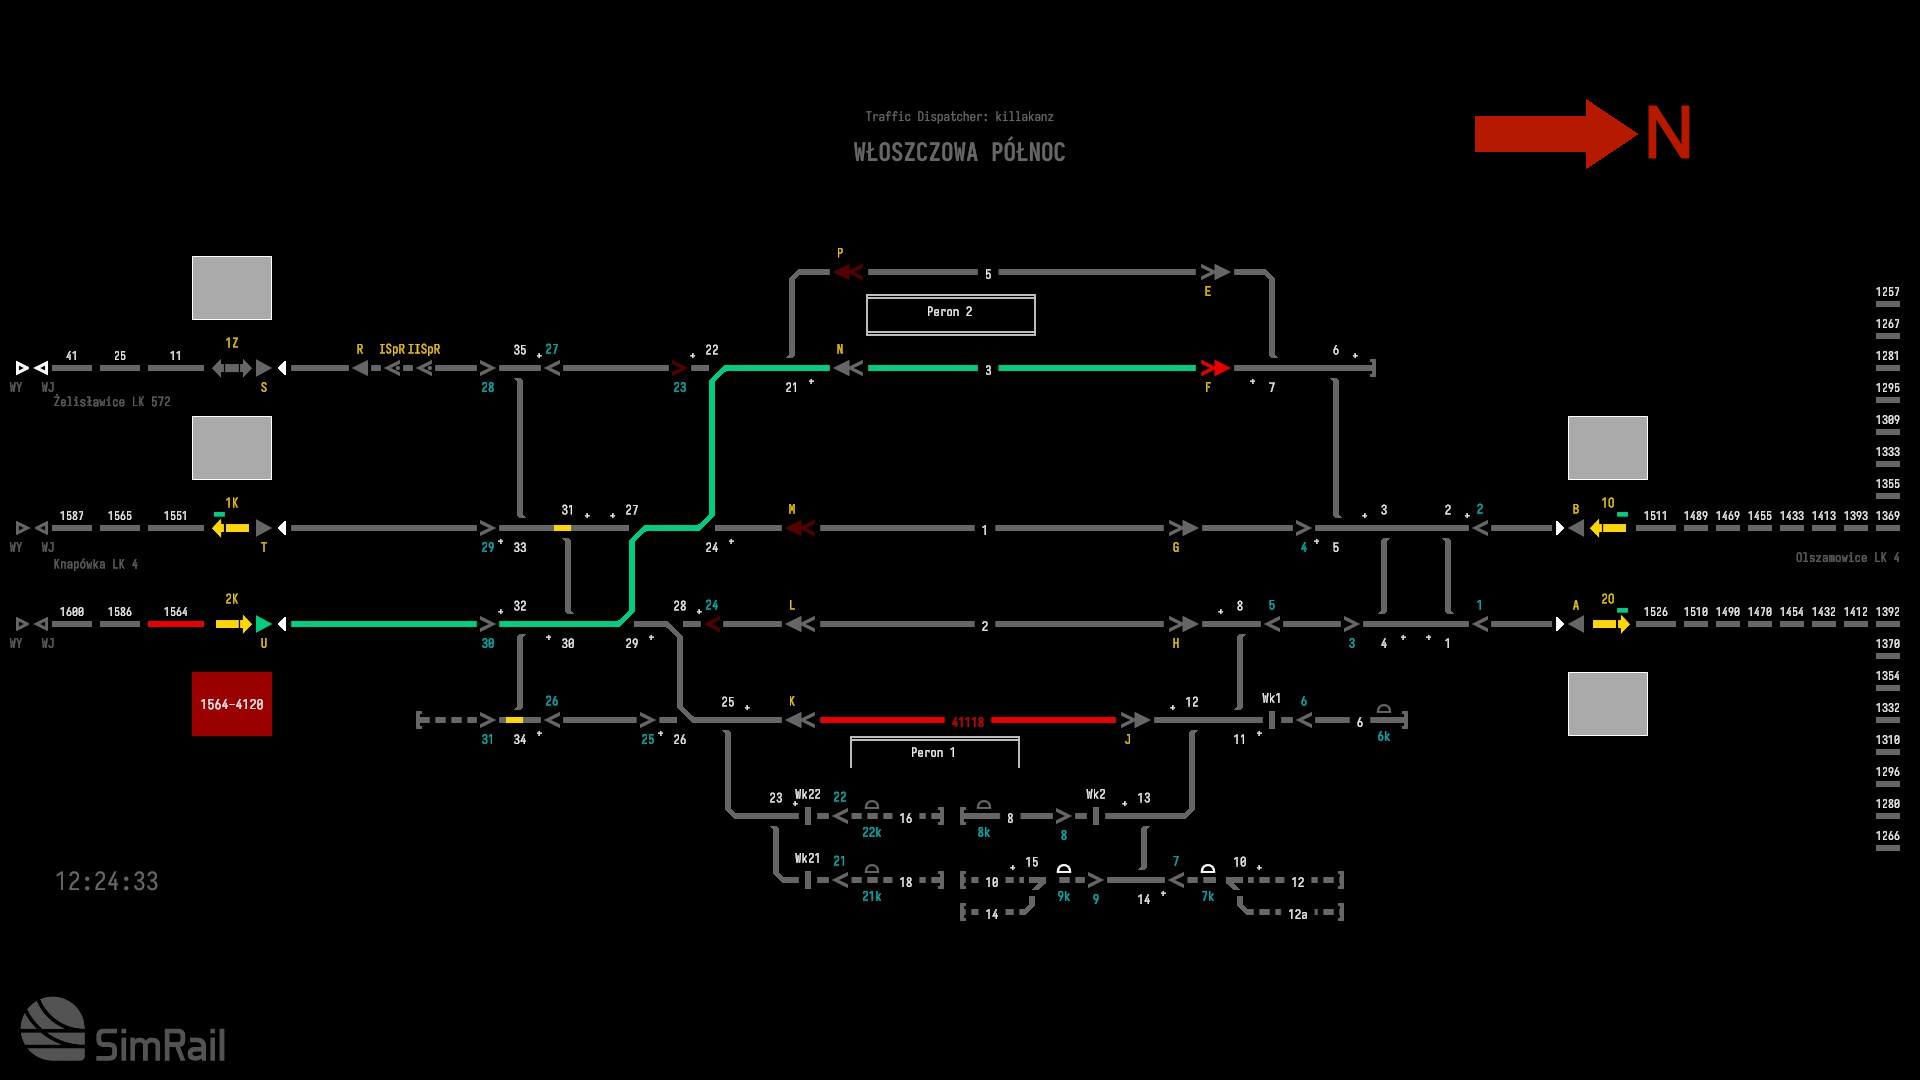
Wloszczowa Polnoc – In Detail (computerised)
Wloszczowa Polnoc can be described as a computerized signalbox.
This box is located in the northern part of the route. The box is oriented so that northbound traffic is going right and southbound traffic is going left.
Its neighbors are:
Olszamowice to North
Knapowka to South
Zelislawice from a branch line to South
The layout is composed of two mainline tracks with crossovers on each side and a branch to Zelislawice. The branch line is a single-track bi-directional track.
There are sidings along both sides of mainline, labelled lines 3, 4 and 5. Below lane 4, there is an industrial yard that has several sidings.
Each side has an auto-block section with directional interlocks. Two start signals and two destinations signals are on each side. There are also shunting signals between and beside the crossovers. Each lane has start/destination combination signals. All lanes can be used in either direction.
This station has 2 platforms. Only Platform 1 can be reached by lane 4. Platform 2 can be reached by lanes 3 or 5.
Lanes 1 & 2 don’t serve any platforms, but can be used for transit purposes to non-stopping services.
Branch line procedure
The branch line is a single-track bi-directional track.
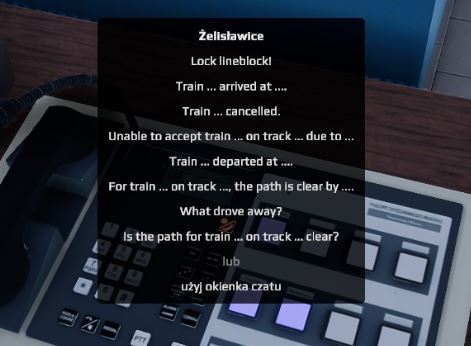
If you are sending a train You must call the neighboring box (Zelislawice), and use the text option “Is there a path for train… on track…?” clear? Enter the train number and track 1. The neighboring box should respond that the path is clear.
Next, you will need to set the direction interlocking. Next, click the interlocking Arrow and then the WBL button at top to execute. The interlocking arrow should light up. Once the interlocking change has been accepted by the neighboring box, the arrow will stop flashing. It will now show solid yellow. Now you can place a route on the branch line.
If you are a passenger on a train If the line is not clear, the neighboring box will first call you to check. If the track is clear, you will need to respond by texting “For train…on track…the path is cleared by …”,” and the train number.
Wait a moment. The direction interlocking will be set by the neighbouring box. Click the neighbouring box to set the direction interlocking. The interlocking Arrow should stop flashing and turn solid yellow. The neighboring box should then create a route onto this branch.
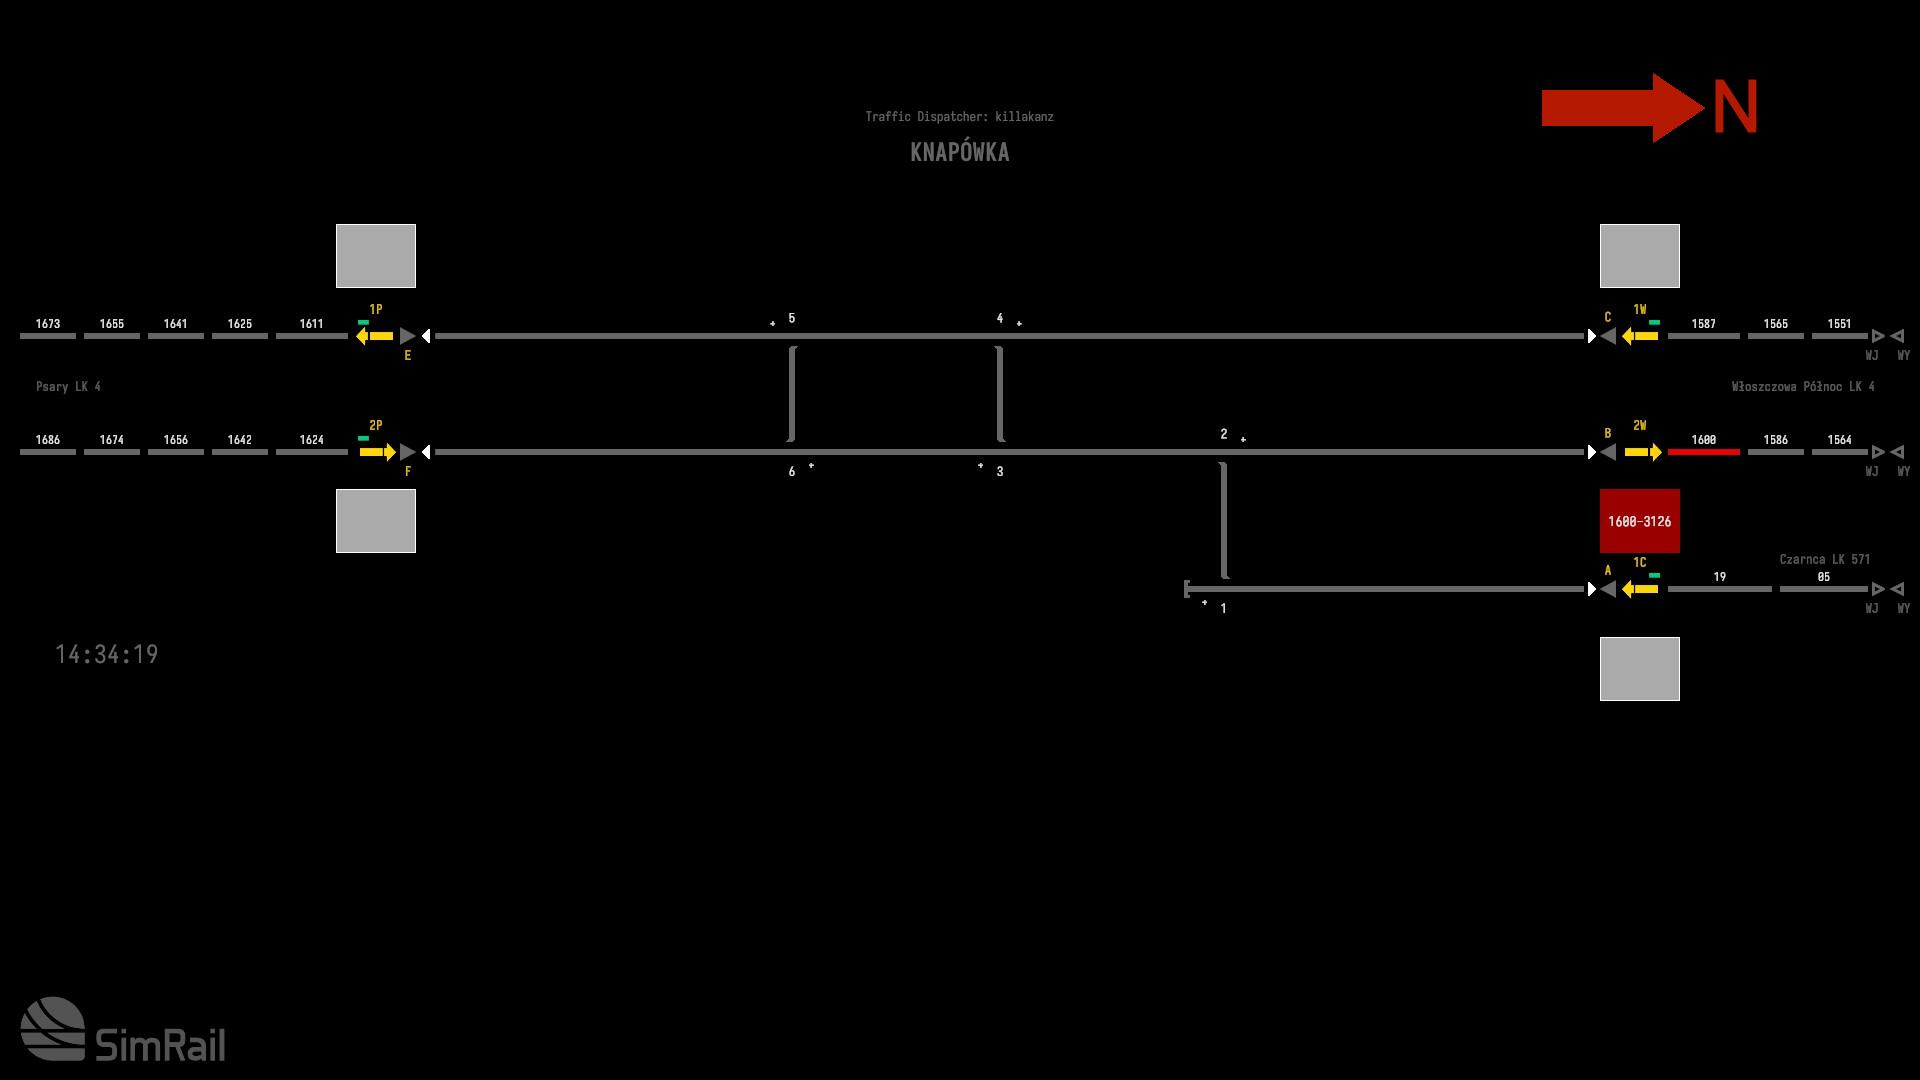
Knapowka – In Detail (computerized)
Knapowka can be described as a computerized signalbox.
This box is located in the northern part of the route. The box is oriented so that northbound traffic is going right and southbound traffic is going left.
Its neighbors are:
Wloszczowa Polnoc To the North
Czarnca on a branch to the North.
Psary to South
The layout is composed of two mainline tracks and crossovers in the middle.
To the right, Line 2 is diverging from it. This is a single-track branch line to Czarnca.
Each side of the mainline has auto-block sections with directional interlocks. The branch line has both auto-blocks as well as a directional lock.
Signals include start and destination signals at both ends of mainline tracks 1 & 2, as well as a start signal on the branch. There are no shunting signals.
This section does not have any stations or sidings.
Branch line procedure
The branch line is a single-track bi-directional track.
If you are sending a train You must call Czarnca, the neighboring box, and use the text option “Is there a path for train… on track…” clear? Enter the train number and track 1. The neighboring box should respond that the path is clear.
Next, you will need to set the direction interlocking. Next, click the interlocking Arrow and then the WBL button at top to execute. The interlocking arrow should light up. Once the neighbouring box accepts the interlocking change the arrow will stop flashing. It will turn solid yellow. Now you can place a route on the branch line.
If you are a passenger on a train If the line is not clear, the neighboring box will first call you to check. If the track is clear, you will need to respond by texting “For train…on track…the path is cleared by …”,” and the train number.
Wait a moment. The direction interlocking will be set by the neighbouring box. Click the neighbouring box to set the direction interlocking. The interlocking Arrow should stop flashing and turn solid yellow. The neighboring box should then create a route onto this branch.
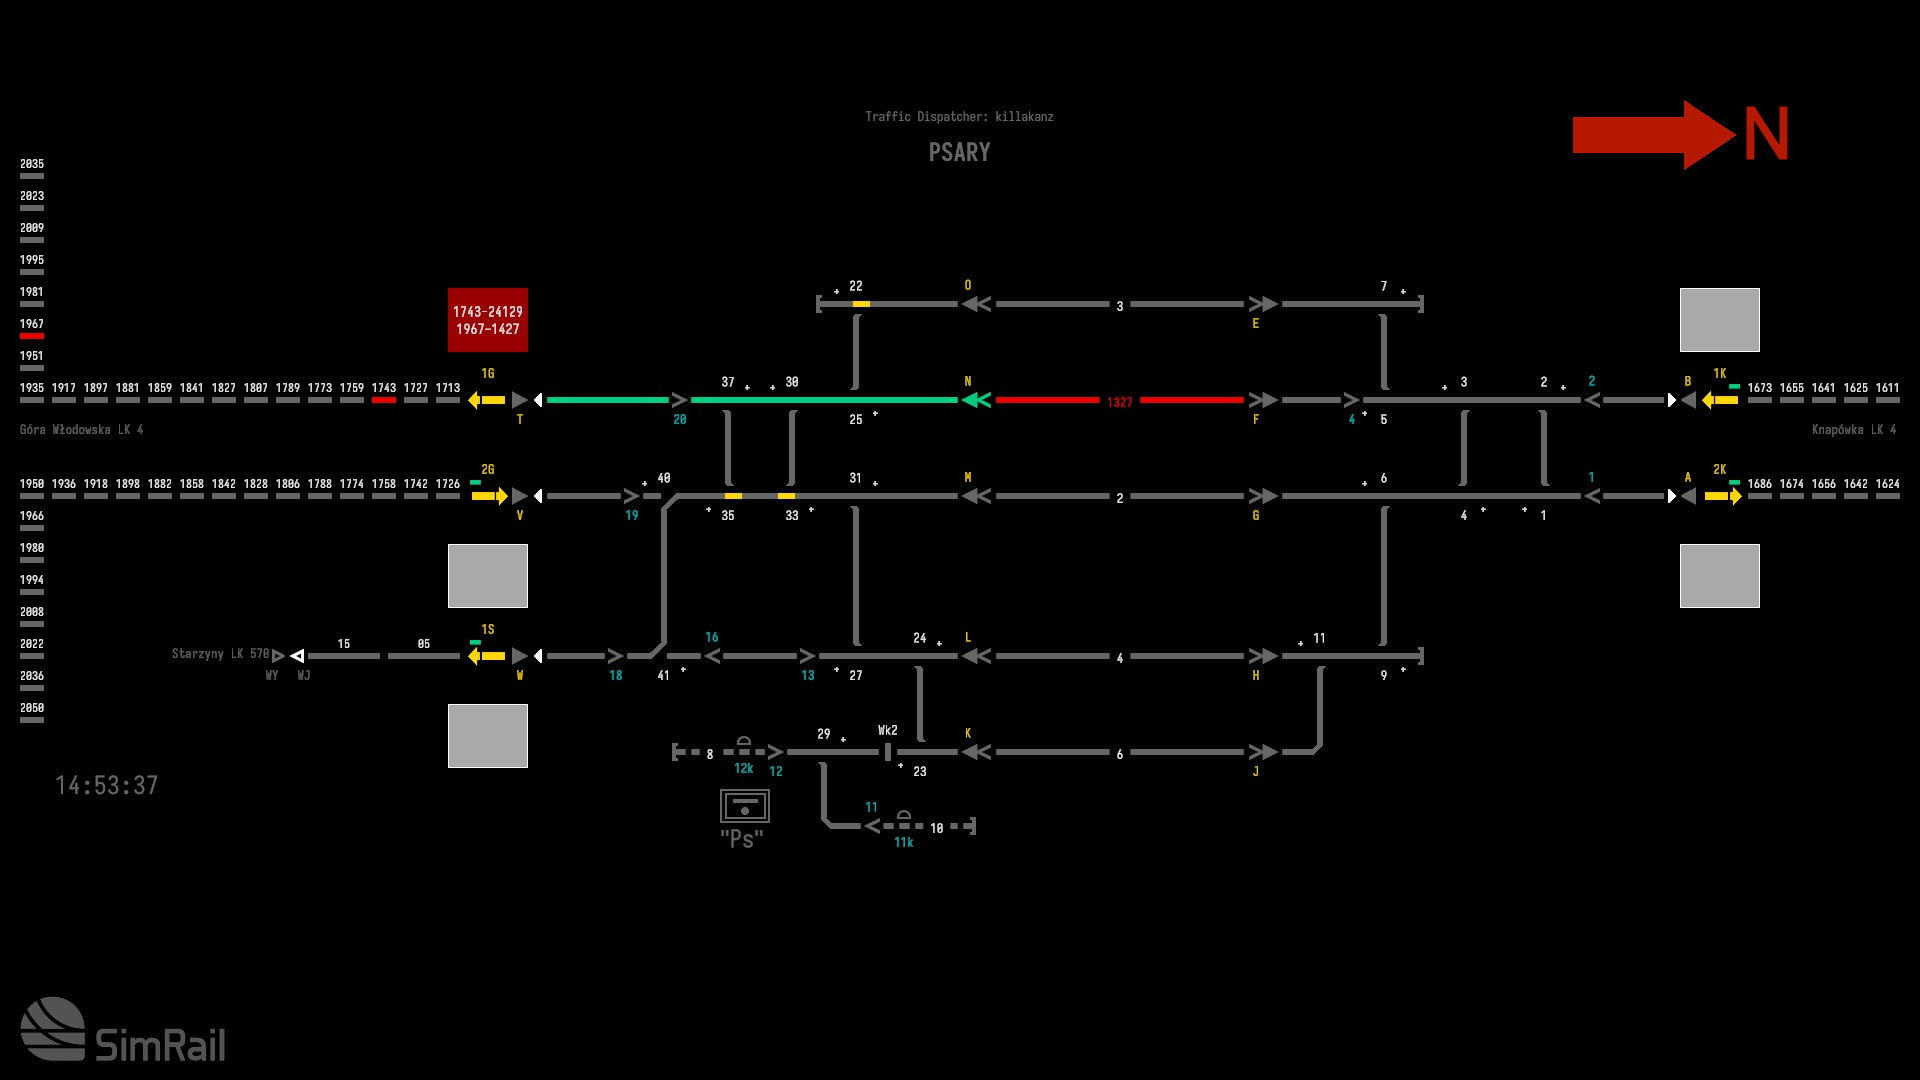
Psary – In Detail (computerized)
Psary is a computerized signalbox.
This box is located in the middle of the route. The box is oriented so that northbound traffic is going right and southbound traffic is going left.
Its neighbors are:
Knapowka to North
Gora Wlodowska in the South
Starzyny from a branch line to South
The layout is composed of two mainline tracks and crossovers to each side.
There are sidings along both sides of the mainline. They are labelled lines 3, 4, and 6. You will find sidings in an industrial yard off lane 6.
To the left of the mainline crossovers and sidings is a single track branch to Starzyny.
There are auto-block sections at the ends of mainline tracks that have directional interlocks and auto-blocks. The branch line also features auto-blocks with directional interlocks.
Two start signals and two destinations signals are on each side of the mainlines. Start and destination signals are on the branch lines. Shunting signals are beside the crossovers. Each lane has start/destination combination signals. All lanes can be used in either direction.
This section does not contain stations.
Branch line procedure
The branch line is a single-track bi-directional track.
If you are sending a train You must call Starzyny, the neighboring box, and use the text option “Is there a path for train… on track…” clear? Enter the train number and track 1. The neighboring box should respond that the path is clear.
Next, you will need to set the direction interlocking. Next, click the interlocking Arrow and then the WBL button at top to execute. The interlocking arrow should light up. Once the interlocking change has been accepted by the neighboring box, the arrow will stop flashing. It will now show solid yellow. Now you can place a route on the branch line.
If you are a passenger on a train If the line is not clear, the neighboring box will first call you to check. If the track is clear, you will need to respond by texting “For train…on track…the path is cleared by …”,” and the train number.
Wait a moment. The direction interlocking will be set by the neighbouring box. Click the neighbouring box to set the direction interlocking. The interlocking Arrow should stop flashing and turn solid yellow. The neighboring box should then create a route onto this branch.
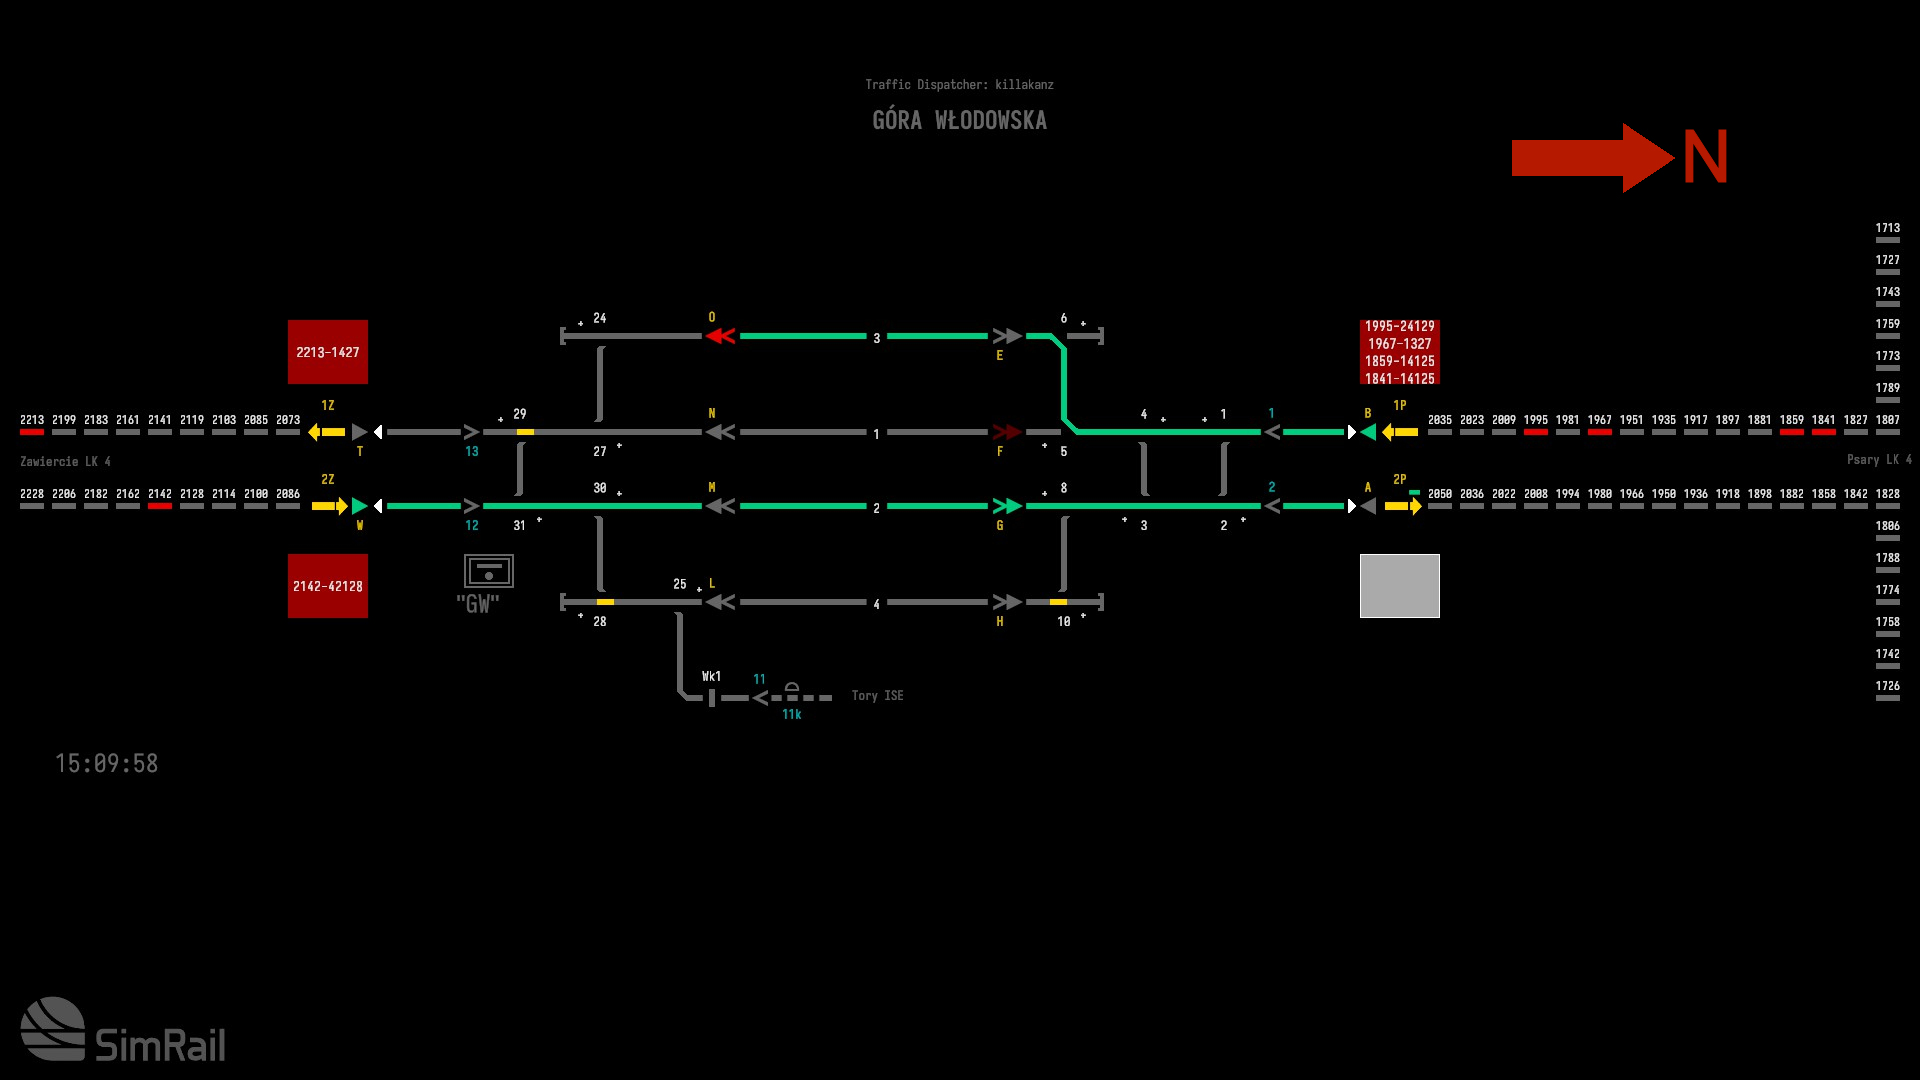
Gora Wlodowska – In Detail (computerised)
Gora Wlodowska can be described as a computerized signalbox.
This box is located in the middle of the route. Although the box is oriented west to east, we will simply say that northbound traffic is heading right and southbound traffic is going left.
Its neighbors are:
Psary to North
Zawiercie to South
The layout is composed of two mainline tracks with crossovers on each side and a half-crossover to the left. Note that trains traveling in lanes 2 through 4 cannot cross over to Line 1Z heading South.
There are sidings along both sides of the mainline. They are labelled lane 3 or 4, and an industrial yard just off siding lane 4.
Each side has an auto-block section with directional interlocks. The signals consist of two start signals and two destinations signals on each side, shunting signal beside the crossovers and start/destination combination signs on each lane. You can use all lanes for either direction. However, the left half crossover is a limitation.
This section does not contain stations.
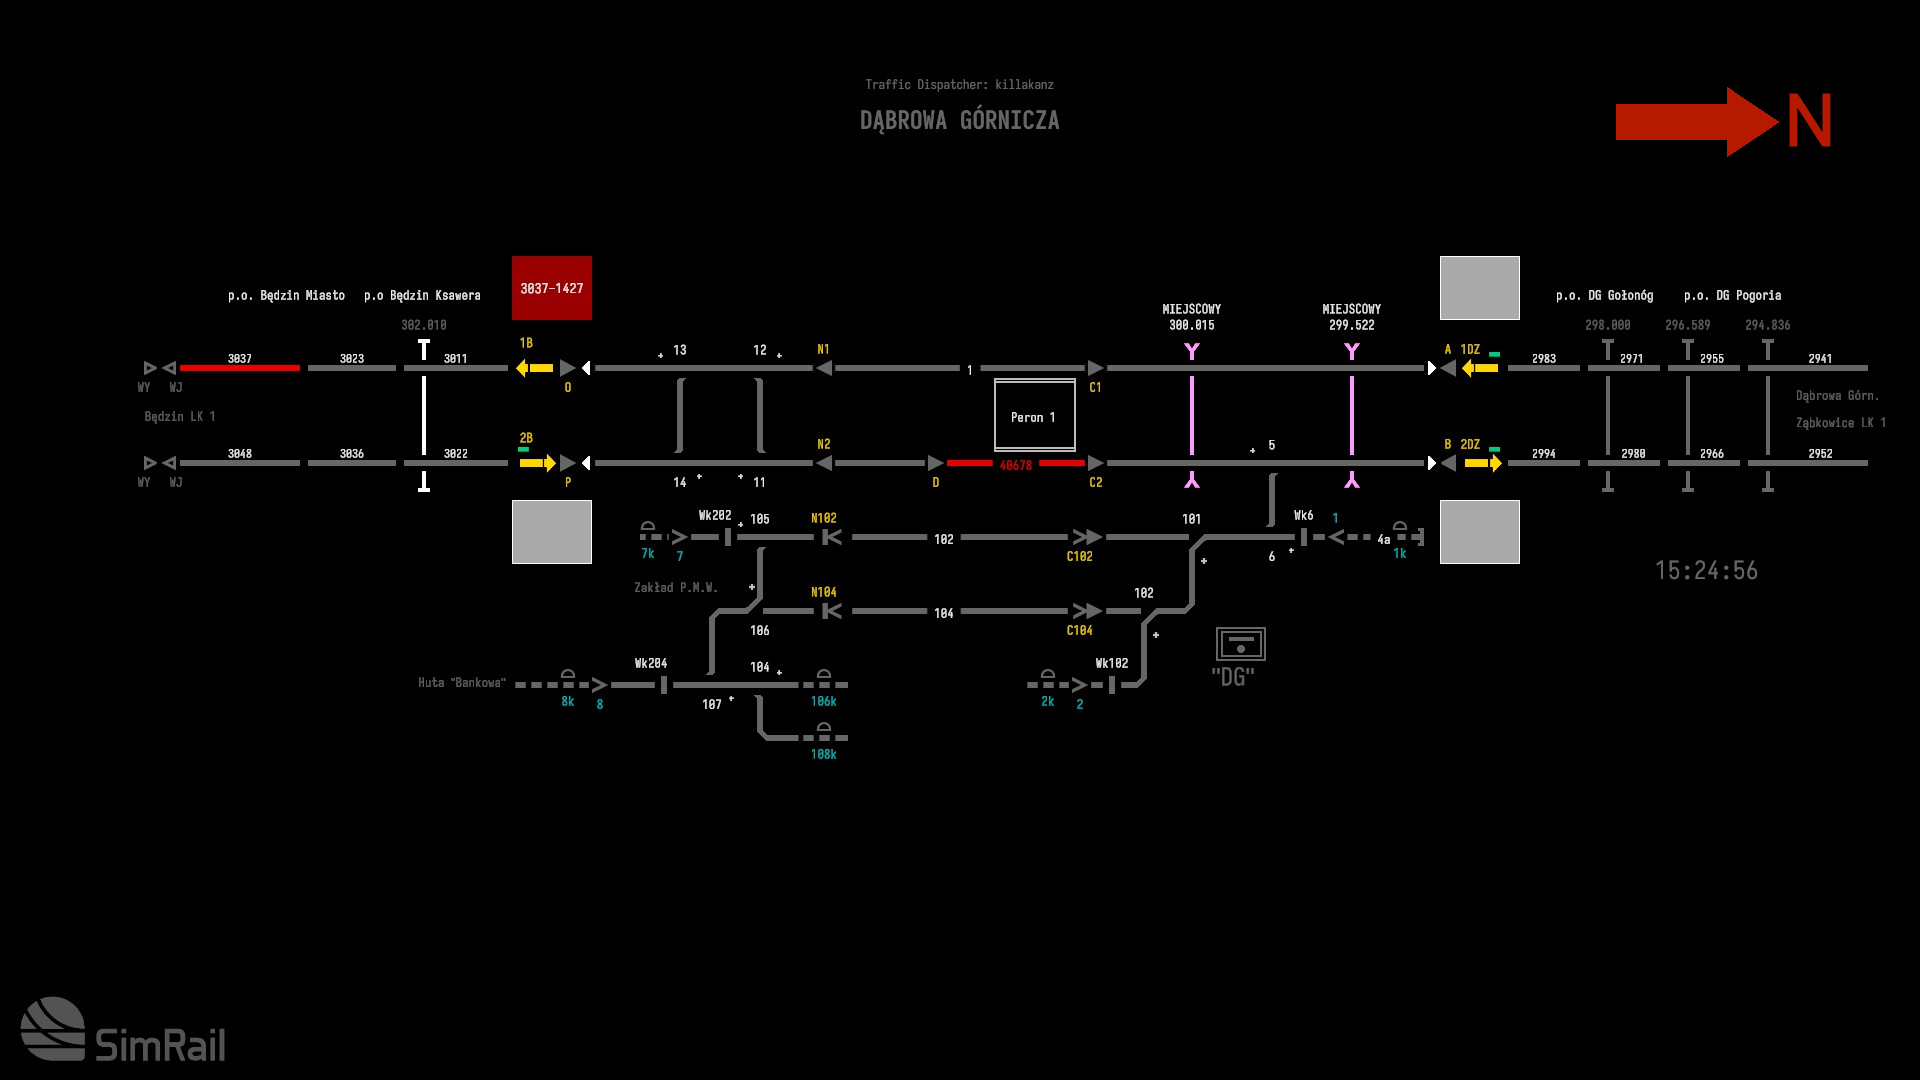
Dabrowa Gornicza – In Detail (computerised)
Dabrowa Gornicza can be described as a computerized signalbox.
It is located in the southern part of the route. The box is oriented east-west, so we’ll simply say that northbound traffic is heading right and southbound traffic is going left.
Its neighbors are:
Zabkowice to North
Bedzin to the South
The layout is composed of two mainline tracks and crossovers to the left. Each side has auto-block sections with directional interlocks. You can only access the sidings below track 2 from the right side.
Signals include two start signals and two destinations signals on each side as well as signals within the station area.
This station has 1 island platform that is served by both mainlines.
Level Crossings
This section has two signal-controlled crossings. The one at the edge of the station platform must be closed to traffic. Because there is a safety overlap, this is the case. Before routes between the station and the northern auto-block sections can be established, both level crossings must be closed to traffic. To avoid enraged motorists, only open the level crossings once the tracks are clear.
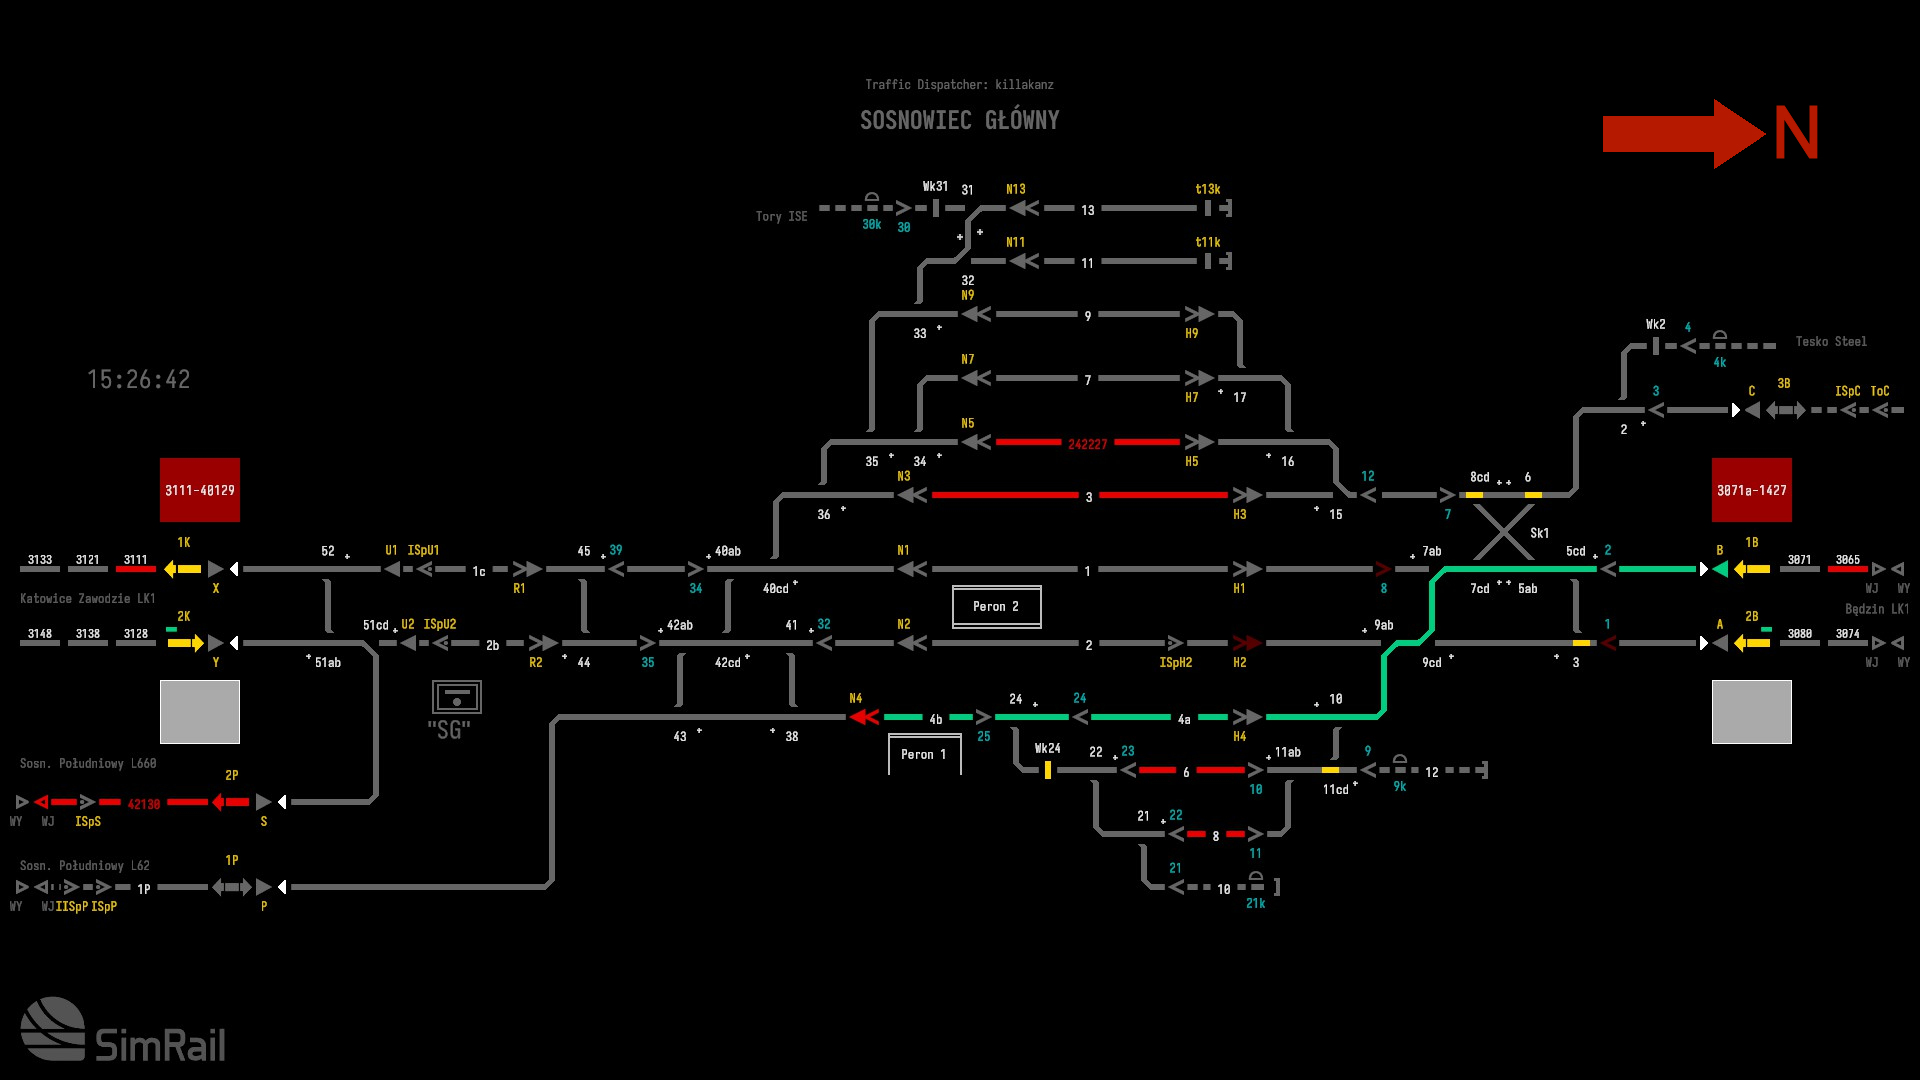
Sosnowiec glowny – In Detail
Sosnowiec Glony is a computerized signalbox.
This signal box is not recommended to beginners. Before you attempt this one, practice with other signal boxes.
This box is located in the southern part of the route. The box is oriented so that northbound traffic is going right and southbound traffic is going left.
Its neighbors are:
Bedzin to the North
Katowice Zawodzie to South
Sosnowiec Poludniowy has branched lines to the South.
Two timetables are available for this signal box. You can switch between timetables by using the dropdown menu at the top, next to Post.
The R52 timetable refers to the junction on the layout’s left side. The other timetable covers the station area. Trains arriving from the south should consult the R52 schedule first if a train is diverging on the branch to Sosn. Poludniowy, it will not be shown on the other timetable. If it is heading towards Sos.Glowny, it will appear on the other schedule. Double-check that it has the platform number and lane if it comes to a halt. Check to see if it is proceeding to Bedzin.
Trains from the north will appear on the opposite timetable first, then R52.
The layout is composed of two mainline tracks and crossovers to each side.
On both sides of the mainline, there are multiple sidings. Notably, sidings 3, 6, and 8 aren’t electrified so they are permanently “occupied” (when in fact empty) to stop trains from entering them. Lanes 11 and 13, which are dead-end sidings, can only be accessed from the left.
To the left of this layout are two branches that lead to Sosn.Poludniowy. They are labelled tracks 1P or 2P. This is a Y junction, so the signaller should be aware. Track 2P connects with the mainlines 2K, 1K for the south to/from Katowice Zawodzie. Track 1P connects with the Sosnowiec Glowny area for the north.
Both tracks 1P & 2P should be considered single-track bi-directional branches. Therefore, the branch line procedure for both should be followed. To avoid trains crashing into each other and blocking the network, this procedure must be followed at this busy junction. Always check the track before accepting any train onto it. If the AI box asks you if it is clear, don’t tell them!
Tip:
Trains arriving from Katowice with 42xxx numbers are always headed for the branch line. Make sure they know the right way!
On each side of the mainlines are sections of auto-blocks with directional interlocks. At each end of the mainline, signals consist of two start signals and two destination signals. Signals between the Y junction and all station/sidings area lanes are also included.
The branch lines are equipped with start and destination signals and directional interlocks.
There are two platforms at this station. Lane 4 is the only way to get to Platform 1. Platform 2 is accessible via mainline lanes 1 or 2.
Branch line procedure
The branch line is a single-track bi-directional track.
If you send a train, You must call the neighboring box (Sosn.Poludniowy), and use the text option “Is there a path for train… on the track…?” clear? Enter the train number and track number. The neighboring box should respond that the path is clear.
Next, you will need to set the direction interlocking. Next, click the interlocking Arrow and then the WBL button at top to execute. The interlocking arrow should light up. Once the neighbouring box accepts the interlocking change, the arrow will stop flashing. It will turn solid yellow. Now you can place a route on the branch line.
If you are a train passenger, the neighboring box will first call you to check if the line is not clear. If the track is clear, you will need to respond by texting “For the train…on track…the path is cleared by …”,” and the train number.
The neighboring box will set the direction interlocking. Click the neighboring box to set the direction interlocking. The interlocking Arrow should stop flashing and turn solid yellow. The neighboring box should then create a route onto this branch.
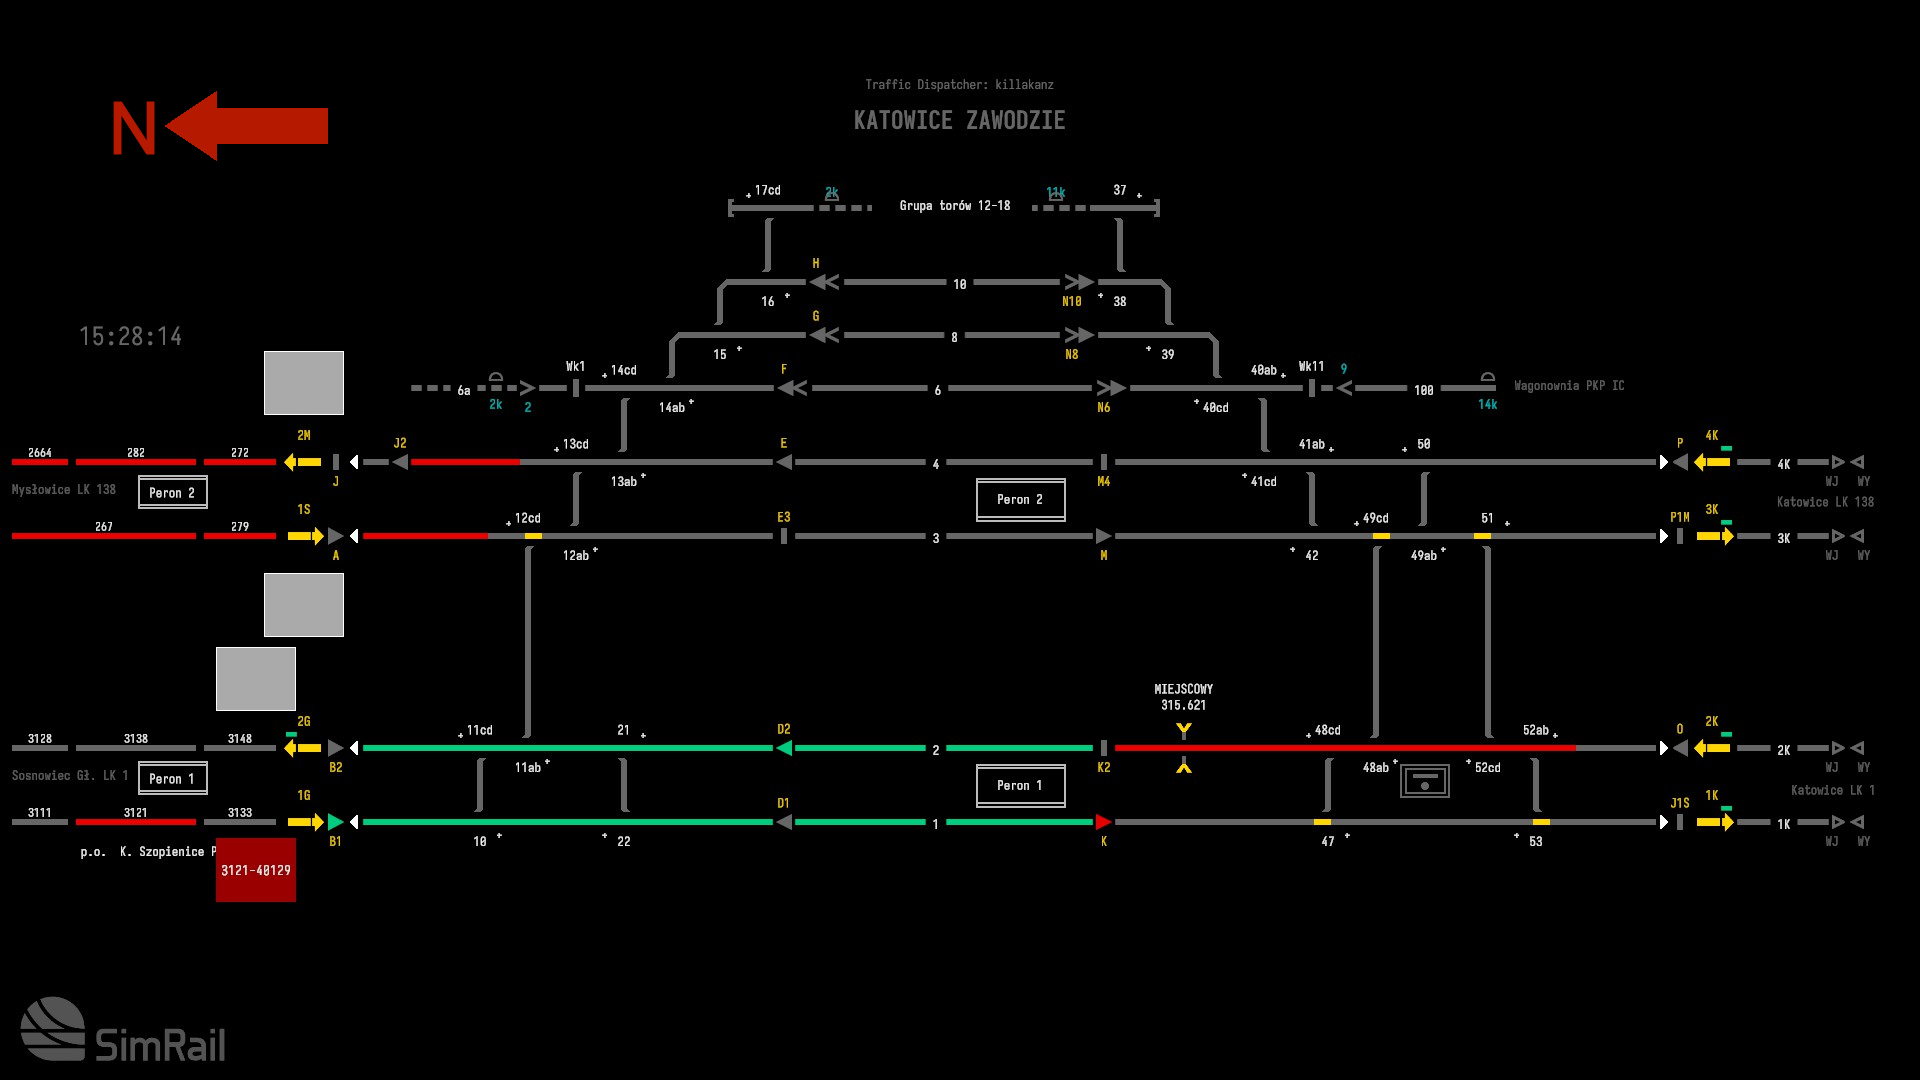
Katowice Zawodzie – In Detail (computerised)
Katowice Zaodzie can be described as a computerized signal box.
This is the southernmost signal box on the route. The box is oriented so that northbound traffic goes left and southbound traffic goes right.
Its neighbors are:
- Sosnowiec Glowny to North
- Katowice to South
- Myslowice on a branch to the South.
There are four mainline tracks on the layout. Two mainline tracks run from Sosnowiec Glowny to the left. Myslowice has two additional mainline tracks. They are, however, not currently in use and are constantly occupied to prevent trains from being sent there. To the right are all four mainline tracks to Katowice.
There are sidings along both sides of the mainline, labeled lines 3, 4 and 5. Below lane 4, there is an industrial yard that has several sidings. You can see partial crossovers for each main line on the left and full crossovers on the right.
There are three sidings located above the additional mainline.
All mainlines have auto-block sections to their left, equipped with directional interlocks.
You will see a single block for each mainline with directional interlocks on the right side.
Signals are composed of start and destination signals on both sides of mainlines, with start signs on each lane of the station/siding area.
Trains can travel to Lanes 2, 3, and 4, but only in one direction. Lanes 2–4 can only exit northbound, while Lane 3 can only exit southbound. All remaining sidings and Lane 1 can be traveled in either direction.
Here are two stations. K.Szopienice is located in the auto-block zone. Some trains may stop here.
The central station is located in the middle and has 2 island platforms.
Platform 1 is served via lanes 1 & 2.
Platform 2 is served via lanes 3 & 4.
Outro!
This guide should be beneficial. Although it may appear intimidating at first, it is simple to adapt to. This guide will assist you in determining which ones are simple and which ones require more practice. Maintain your cool and send more trains. Have fun with Simrail!
I hope you enjoy the Guide we share about SimRail – The Railway Simulator – Basic Dispatching Full Guide; if you think we forget to add or we should add more information, please let us know via commenting below! See you soon!
- All SimRail - The Railway Simulator Posts List




Leave a Reply