Getting Started
Required tools
github.com – https://github.com/nickworonekin/puyo-pac/releases
github.com – https://github.com/nickworonekin/puyo-text-editor/releases
Eternity Audio Tool (you need to google this)
notepad-plus-plus.org – https://notepad-plus-plus.org/downloads/
github.com – https://github.com/ArMM1998/Puyo-Puyo-lesson-scripts/blob/master/puyo_notepad++.xml
The first thing we need to do is extract the scripts located in the folder:
The scripts are inside in the chapterXX.pac files, so drag & drop the pac file you want to extract into puyo-pac’s extract.cmd. Type the folder name you want the scripts to be extracted to and press Enter.
Now inside that folder you have the .pss files you need to modify. You can open these with any text editing software but i highly recommend notepad++ because of its “user defined language” feature, so superuser.com – https://superuser.com/questions/1229830/how-to-add-user-defined-language-xml-file-to-notepad to make your life easier.
Available Commands
Now that we have access to the .pss files and we have notepad++ with the puyo language installed (or not, up to you i guess) we can begin modifying the scripts.
Here’s a list of some of the commands you have available and what they do:
Basic Syntax
– Declares an integer variable with the given initial value
– Gives the variable a specific value.
– Saves the result into the variable. The values can also be replaced with variables themselves.
Background
– Fade-In effect at the start.
– Loads a BGM into memory.
– Plays BGM.
– Play a sound effect.
– Stops playing a sound effect (needed when SE loops and you want it to stop)
– Changes the background.
– Plays an effect in the background.
– Waits for the effect to finish before executing the next command.
Character
– Loads a character into memory in the slot specified. When referring to this character you need to refer to the slot assigned.
– Used to load Jay & Elle (yes literally an entirely different command to load these two)
– A character enters the scene.
0 – right
1 – left
– A character leaves the scene.
0 – right
1 – left
-Waits for the character before continuing
0 – right
1 – left
– A character is highlighted.
0 – right
1 – left
– Change character animation.
0 – right
1 – left
– Plays an effect on the character.
(can also be used to remove the effect with MzEffectChr [left or right] -1)
0 – right
1 – left
Text
– Speech bubble.
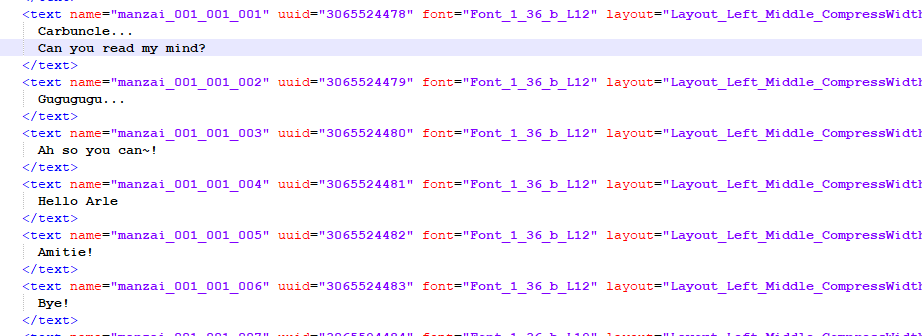
If you look at the corresponding manzai text for the chapter you’re editing, you will find every text line has a <text name=”[something]”>, you need to type the name of the text in [text name].
Then after that, who is speaking, the character on the left, right or both.
0 – right
1 – left
2 – both
And finally the style of the speech bubble:
0 – normal
1 – exclimation
2 – thoughts
After that the game expects two 0s for some reason, so just put 0 0 at the end.
– Waits for the speech bubble before executing the next command.
There are more commands available, you can mess around with them if you want but these are the ones we can use for basic scenes
Index values
Here are the index values you will need for things like characters, or music, or backgrounds
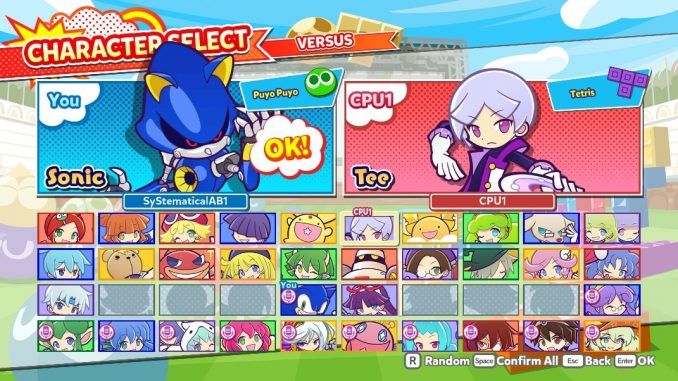
Character indexes
0 Ringo
1 Risukuma
2 Maguro
3 Amitie
4 Klug
5 Sig
6 Arle
7 Suketoudara
8 Schezo
9 Draco
1. Witch
1. Lemres
1. Jay & Elle (You need a specific command to load them “MzLoadChrPos”)
1. Ai
1. Ess
1. Zed
1. O
1. Tee
1. Raffina
1. Rulue
2. Feli
2. Satan
2. Ecolo
2. Ex
2. Carbuncle
2. Marle
2. Squares
2. Ally
2. Lidelle
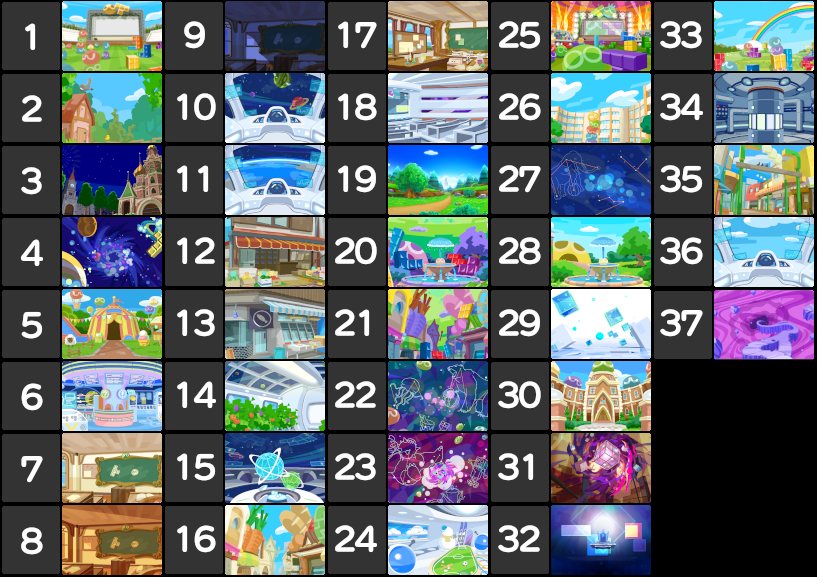
Background indexes

Music indexes
(I used the names from the playlist on youtube)
https://www.youtube.com/watch?v=tJTzSC03j_Y
http://www.youtube.com/watch?v=pq2AbAzqquE
https://www.youtube.com/watch?v=WmeVwl3sjec
https://www.youtube.com/watch?v=mqUwGbCzlbo
http://www.youtube.com/watch?v=3hMSuT1h18g
http://www.youtube.com/watch?v=YoJckWptm28
https://www.youtube.com/watch?v=Pm60Gl1aWAw
https://www.youtube.com/watch?v=SRdYhG2rR-Y
https://www.youtube.com/watch?v=PD67ljC2Y1Q
Sound Effect indexes
0 – Alarm (this will loop)
1 – Crash
2 – Fall
3 – Impact
4 – Shock
5 – Think
6 – Smash
7 – Step
8 – Warp
9 – Flintstones Run
Character animations
(I used a sound effect every time i change the animation, so you’re gonna have to count lol. Starts at 0 being the neutral pose they start with)
Text editing
https://steamcommunity.com/sharedfiles/filedetails/?id=2434803386 made by Nick for a more in-depth text editing guide.
But basically you need to extrac the text .pac located in:
With Puyo Pac, drag & drop the file to extract.cmd and type a folder name.
You will get a bunch of .cnvrs-text files. You need the one called chapterXX.cnvrs-text XX being the chapter you’re editing. In this case i will be doing chapter 1.
Now drag & drop the .cnvrs-text into PuyoTextEditor.exe and it will generate an .xml file.
Open that with notepad++ (or normal notepad if you want) and edit the lines you want.
Make sure to keep track of the name of the text you’re editing.

Here i’ve modified these lines for my cutscene.
Now drag & drop the .xml back to PuyoTextEditor.exe and repack the .pac file with PuyoPac’s create.cmd (just drag and drop the folder) and replace the original text_common pac
Creating a Cutscene
Now let’s start making a basic cutscene.
For this tutorial i’m gonna make a basic cutscene with amitie carbuncle and arle. they say a few lines, they make a few faces and it ends
I like to start with a blank script, so i usually delete everything from the .pss file and start by creating three functions.
They need to be called:
– main
– phase_manzai_init
– phase_manzai_main
Like so:
main
We will be using main to load characters, BGM, or set the background like so:
what i like to do next is make variables for my characters and left & right to make the code a little more readable.
phase_manzai_init
I use this to start playing the BGM selected, set the fade-in effect and not much else.
phase_manzai_main
This is where we will create the cutscene itself.
The first thing i want to do is have the characters show up and say a few lines and then have amitie enter say two things and leave. I’ve added comments to my code to make it easier for you.
Now we can start by changing animations and effects.
Now that we have our cutscene and we want to see how it plays in-game, just repack the chapterXX.pac by dragging and dropping the folder with all the scripts into create.cmd, then type the name of the pac and press Enter.
Now replace the old .pac with your newly created pac and boot up the game.
This would result in the next cutscene: https://www.youtube.com/watch?v=_tLYygv8dZkAs you can see, it still has the audio from the original scene. so next we’ll change the voice clips.
Voice Editing
One of the last things to do is usually change the voices. First we need to locate the voice clips for the corresponding chapter we’re editing. (in my case it’s chapter 1)
https://steamcommunity.com/sharedfiles/filedetails/?id=2435857193
Voices are located in:
Named Mz_voiceXX_[en or jp].acb and Mz_voiceXX_[en or jp].awb where XX is the chapter number (in my case 01)
First of all make sure to make a backup.
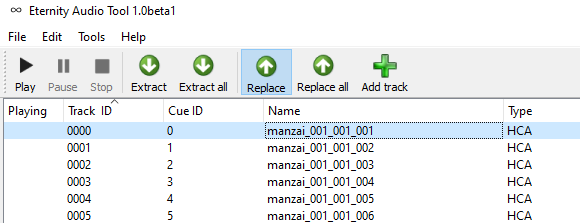
Open your acb file with Eternity Audio Tool (file > open)
You will see a list of all the voice clips used in that chapter of the game. You can double click the clip to play it.

To replace the voice clip, select it and click “replace”
after that choose a .wav file with your voice clip and hit select.
Then go to file > save and your changes will be saved into the .awb & .acb files.
Conclusion
Now you know how to make Puyo Puyo Tetris 2 cutscenes!
If you have any question feel free to ask. You can also reach out in the Puyo Modding discord server.
https://discord.com/invite/7DdjZPk
Have fun!
This is all about Puyo Puyo™ Tetris® 2 – How to edit the Adventure Mode cutscenes; I hope you enjoy reading the Guide! If you feel like we should add more information or we forget/mistake, please let us know via commenting below, and thanks! See you soon!
nbsp;
- All Puyo Puyo™ Tetris® 2 Posts List


Leave a Reply