Implements TypeScript support for modding Project Zomboid.
What is PipeWrench?
(Note: A markdown version of this guide is located here – [github.com] )
The PipeWrench project has three major goals:
- Allow TypeScript to Lua as an alternative to only using Lua when coding mods in Project Zomboid.
- Expose all API used throughout Project Zomboid’s Lua codebase with documenting types, generics, and methods with their associated parameters.
- Provide structured, scalable practices to keep code clean and manageable.
Other smaller goals include:
- Ongoing efforts to create an easy-to-use production environment when writing mods.
- Better documentation generated with TypeScript declarations of Project Zomboid’s API.
PipeWrench is essentially two major components:
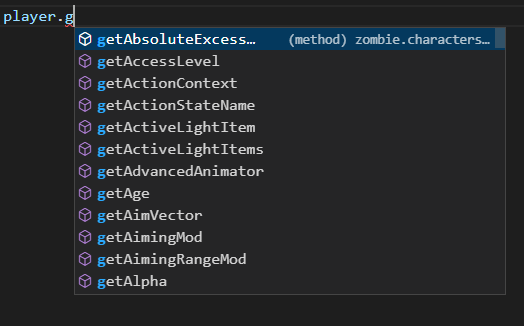
- A Java-based transpiler (source-to-source compiler) that converts exposed API from the core of Project Zomboid to TypeScript declarations, mapping the API in a digestable way for IDE software to intelligently forward to programmers when programming their mods.
- A workspace that compiles TypeScript to Lua that is compatible with the Kahlua2 engine, used by Project Zomboid’s runtime environment.
TL;DR: PipeWrench implements TypeScript support for modding Project Zomboid.
Snippets from VSCode
What’s the point of TypeScript in PZ? Isn’t Lua enough?
While you can do everything you need using only Lua (and that’s totally fine!), there are a lot of potential issues that come from writing in scripting languages like Lua. Like JavaScript ES5 and prior, Lua itself doesn’t deploy any solution for OOP (Object-Oriented Programming), coding practices. For example: While data types exist in Lua, checking parameter values are entirely in the hands of the programmer making for a lot of time spent writing code to maintain a bug-proof codebase. There are a few other issues while implementing pseudo-classes in Lua that deal with assigned properties, property signatures, mutability, visibility scope, property overloading, etc..
With that said, my opinion of Lua is that it is great for smaller projects and exposing otherwise close-sourced operations to allow transformations of code otherwise unreachable by customers & third-party developers. Lua is a fun language, however for a codebase as big as some mods and Project Zomboid’s codebase, this can cause a lot of headaches.
An advantage of TypeScript is strong-types. Java is like this too however TypeScript is focused on functional, event-based languages primarily used for JavaScript. It’s a language that provides OOP-standard features. Where Lua falls short, TypeScript (Using TSTL), bakes these tools into Lua. Classes, Interfaces, Abstracts, Generics, and other toolsets among what’s provided in TypeScript are available to save time and keep your code clean.
If you want to learn more about TypeScript and TypeScriptToLua, check out their websites:
- https://www.typescriptlang.org/ – [typescriptlang.org]
- https://typescripttolua.github.io/ – [github.io]
I won’t turn this into an opinion piece, so we’ll get into the meat and potatoes of PipeWrench!
Environment Layout
We will use my basic NPM environment.
DISCLAIMER: I'm not a wizard with NodeJs and setting up the best environments. I have a friend working on their own environment and I'd trust them over mine. For now my environment is in good enough condition to use. I plan on adding a directory option for outputting compiled Lua, and exported typings. I also plan to generate the mod.info file in the future.
- [root]
 |
 | # This is where exported typings populate when using 'npm run export'.
 | - [dst]
 |
 | # Right now this is the folder that provided & compiled Lua files in the 'src' folder go.
 | - [media/lua]
 | |
 | | - [client]
 | | - [server]
 | \ - [shared]
 |
 | # This is where the magic happens.
 | - [scripts]
 |
 | - [src]
 | |
 | | # These folders are just like 'media/lua/' folders when modding PZ traditionally.
 | | - [client]
 | | - [server]
 | | - [shared]
 | |
 | | # (When populated are attached to compiled & exported files)
 | | - header.txt
 | \ - footer.txt
 |
 | # This is where PipeWrench & other typings go.
 | - [typings]
 | - |
 | \- [ProjectZomboid/{VERSION}/..]
 |
 | - mod.info
 | - poster.png
 \ - (NodeJs & TypeScript files..)
Setup
- Grab and clone https://github.com/asledgehammer/PipeWrenchTemplate – [github.com]
- run npm install in the main folder.
You should now have a working environment.
Commands
- npm run build-scripts: Compiles the script(s) used to run the other commands. (Located in ./scripts/)
- npm run clean: Cleans the media/lua output Lua code.
- npm run compile: Compiles .ts files from the ./src/ folder to .lua files in the output folder.
- npm run dev: Runs a custom watcher, watching .lua, .ts, and .d.ts files.
- npm run export: (BETA) Compiles all TypeScript in the project to a TypeScript declaration file to use for other mods to use. (Exports to ./dst/)
Example: HelloPlayer
Source code
/** @noSelfInFile */
import * as Events from 'ZomboidEvents';
import { getPlayer } from 'Zomboid';
Events.onGameStart.addListener(() => {
 print(`Hello, ${getPlayer().getFullName()}!`);
});
Compiled Lua
local ____exports = {}
local Events = require('ZomboidEvents')
local ____Zomboid = require('Zomboid')
local getPlayer = ____Zomboid.getPlayer
Events.onGameStart:addListener(function()
 print(("Hello, " .. getPlayer():getFullName()) .. "!")
end)
return ____exports
Result
LOG : General , 1657321612424> Hello, Akiko Appleton!
Let’s break down what’s going on with this code.
/** @noSelfInFile */
This is required to prevent TypeScriptToLua from prepending an addition self-reference parameter for each function, constructor, and class-method. The code will otherwise easily break with this flag not being present. Make sure that it is at the top of each TypeScript file.
import * as Events from 'ZomboidEvents';
This is an adapter API of the Events.OnSomeEvent.Add(func) Lua API provided by Project Zomboid. This will provide a callback type that tell the programmer what the event is and what’s provided when the event fires.
import { getPlayer } from 'Zomboid';
Zomboid is the name of the ambient module that packages all generated types of Project Zomboid’s exposed API. Here we are importing the API method of grabbing the player object.
Events.onGameStart.addListener(() => {
 // ..
});
This is how the ZomboidEvents API syntax works for vanilla events. in this case, we have zero parameters, so a basic callback function is provided.
print(`Hello, ${getPlayer().getFullName()}!`);
This is the same as print(‘Hello, ‘..tostring(player:getFullName())..’!’) in Lua. It’s a lot cleaner now that we have the tools provided by JavaScript & TypeScript.
Example: CustomUIBox
In this example, we are communicating with an existing pseudo class already in Project Zomboid’s codebase. In order to do this we could either:
- Write the code invoking this existing Lua code in Lua.
- Writing an interface, bringing it up to TypeScript to keep things clean & tidy. (Preferred!)
We will use the 2nd option.
src/client/ISUI.d.ts
/** @noResolution @noSelfInFile */
declare module 'ISUI' {
 import { UIElement } from 'Zomboid';

 /** @customConstructor ISUIElement:new */
 export class ISUIElement {
 readonly javaObject: UIElement;
 constructor(x: number, y: number, width: number, height: number);
 initialise(): void;
 instantiate(): void;
 addToUIManager(): void;
 setVisible(visible: boolean): void;
 render(): void;
 drawRect(x: number, y: number, w: number, h: number, a: number, r: number, g: number, b: number): void;
 }
}
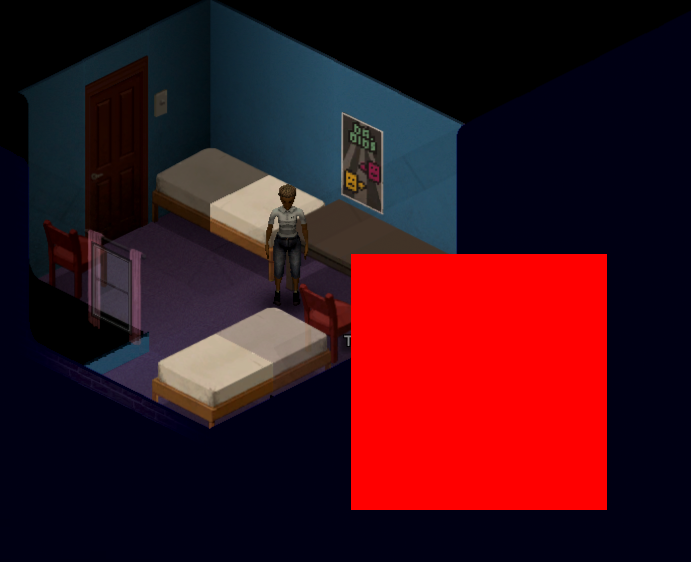
This is the TypeScript interface that’ll tell us what to pass and what to expect if anything is returned. This is not a complete typing however this will provide everything we’ll need in order to create a red square and project it on the screen.
Let’s break this file down.
/** @noResolution @noSelfInFile */
Use both of these flags for every d.ts file. This keeps TypeScriptToLua from trying to resolve paths to the file and keeps out self parameters from generating and causing issues with the code. Not using these two flags will break your compiled Lua code!
declare module 'ISUI' {
 // ..
}
This is how I get TypeScriptToLua to compile require(..) statements properly. (With post-compilation adjustments) We are naming both the file and the module as the directory that the pseudo-class resides. This will resolve as require(“ISUI/ISUIElement”).
/** @customConstructor ISUIElement:new */
export class ISUIElement {
 constructor(x: number, y: number, width: number, height: number);
 //..
}
This is the class declaration for ISUIElement. In here, we define the fields, methods, and constructors for the Lua pseudo-class. Using @customConstructor ISUIElement:new will tell TypeScriptToLua to compile const element = new UIElement(..) as local element = UIElement:new(..).
All other items in this file are normal TypeScript declarations
src/client/ISUI.lua
local Exports = {}
Exports.ISUIElement = loadstring('return ISUIElement')()
return Exports
This is how you create a basic library in Lua, creating a table and returning it. This is not used in Project Zomboid’s Lua codebase, making everything essentially static & global, unless assigned as local variables. ISUI.d.ts does not generate code when the project compiles. Instead,ISUI.lua is expected to be in the runtime Lua environment and all calls to ISUI.d.ts transform to calling the returned module.
Exports.ISUIElement = loadstring('return ISUIElement')()
The reason I am not returning the global ISUIElement directly is due to load-order of mods. Executing loaded Lua as a executed method seems to work as a bypass. This is what I use. As long as this is not resolve as nil when assigned, any other method should work.
src/client/CustomUIBox.ts
/** @noSelfInFile */

import { ISUIElement } from 'ISUI';

function addRedSquare() {
 const element = new ISUIElement(512, 256, 256, 256);
 element.initialise();
 element.instantiate();
 element.addToUIManager();
 element.setVisible(true);
 element.render = () => {
 element.drawRect(512, 256, 256, 256, 1, 1.0, 0.0, 0.0);
 };
}

Events.onGameStart.addListener(() => {
 addRedSquare();
});
There’s nothing important to explain here. This is applying the implementation of UIElement, using the class’s API to create a new UI element, registering it, and applying a render method that draws a red square.
When compiled, we get this result:
Caveats
https://typescripttolua.github.io/docs/caveats – [github.io]
If you write TypeScript code and something goes wrong when testing, Check your compiled lua file. If you see something not look right, try to write the problematic code differently. Not all TypeScript syntax are supported. I’d avoid theif (obj) { //.. } null check. It breaks in compiled lua. Use if (obj == null) { //.. } instead. Also avoid for .. in loops. (These are entirely unsupported)
Conclusion
Hey, you somehow got here! Thanks for reading and looking at this guide. This took me half a year to write, spending hundreds of hours compiling and testing endlessly to get a comprehensive, working solution for writing TypeScript mods in Project Zomboid. I can see more work coming for this project with the environment however the typings generator is pretty much good to go. With a flip of a switch I can update typings for newer versions of Project Zomboid to come.
Support
If you have any questions that cannot be answered here, ask in the PipeWrench section of my Discord server: https://discord.gg/u3vWvcPX8f – [discord.gg]
If you like what I do and helped your community a lot, feel free to buy me a coffee!
- https://ko-fi.com/jabdoesthings – [ko-fi.com]
- https://www.paypal.com/paypalme/JabJabJab – [paypal.com]
I hope you enjoy the Guide we share about Project Zomboid – TypeScript support for modding guide; if you think we forget to add or we should add more information, please let us know via commenting below! See you soon!
- All Project Zomboid Posts List


Leave a Reply