This will show you how to add maps and mods to your server.
This was originally used as a guide specifically for G-portal dedicated servers, but the steps can be used for any server that is being hosted. If you don’t have a G-Portal server can just skip the steps that I talk about it, the other parts are the same for all servers.
You will need Filezilla, can download it here:
https://filezilla-project.org/download.php?type=client – [filezilla-project.org]
Adding Mods
First, using a wordpad write down the Workshop ID and Mod name of all the mods you wish to add, with “WorkshopItems” (the Workshop ID) on one line and “Mods” on another, and separate them all by a semicolon.
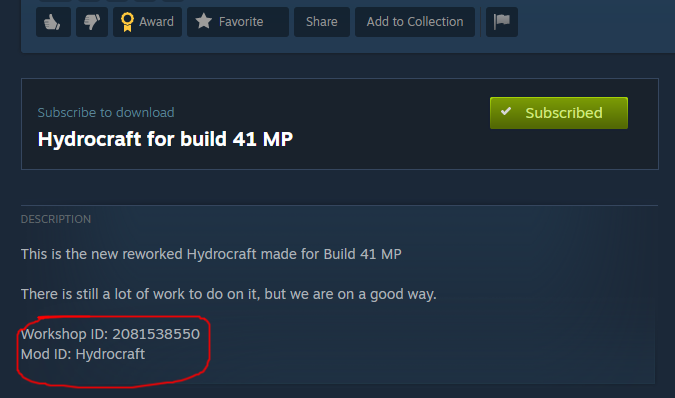
You can get this info from the bottom of each mod’s description in the Steam Workshop:
So, if you were wanting two mods, in this case Hydrocraft and the Evis mini map, you’d have in your wordpad:
Mods=Hydrocraft;eris_minimap

WorkshopItems=2081538550;1619603097
Do this for all the mods you want to add, and save the text file somewhere as a backup, as if you restart or wipe a server you’ll have to manually do this again. If you want a baseline to copy that has tons of mods, you can use mine below:
Mods=Grapeseed;BedfordFalls;EerieCountry;RavenCreek;Hashima;FORTREDSTONE;modoptions;Brita;Hydrocraft;MVM;More Gun;Making Bullets;svgMCerdato;USFpack;TMC_TrueActions;Tactical Weapons;ShowSkillXpGain;Swatpack;CraftHelper41;ATA_Bus;2206552815;ArmoredVests;2612617201;1904952813;Apocalypse Machines 2 WheelZ;ReducedWoodWeight2x41;autotsartrailers;FitnessGains;Arsenal(26)GunFighter;tsarslib;betterLockpicking;ProfessionFrameworkB41Patch;eris_minimap_hashima_island_plugin;eris_minimap_bedford_falls_plugin;eris_minimap_Louisville_plugin;MinimalDisplayBars;RainWash;Smoker;QuitSmoking;eris_minimap_westpoint_expansion_plugin;eris_minimap_grapeseed_plugin;eris_minimap_fort_redstone_plugin;eris_minimap_raven_creek_plugin;DisableAdminUI

WorkshopItems=2463499011;522891356;1254546530;2196102849;1600890711;1516836158;2432621382;2169435993;2423906082;2409333430;2003212948;1516836158;1896907770;2553809727;2209099061;2200148440;2081538550;1619603097;2036923155;2026976958;2142069709;2313387159;2619072426;2659216714;2657661246;2625625421;2356682893;2680324949;2557708236;926315905;1418620421;2487022075;2324223029;2313633950;2091564445;2186592938;2592358528;2206552815;1962761540;2612617201;1904952813;2638496761;2377867605;2282429356;2305280257;2297098490;2368058459;2216760107;1765098737;1764999262;2678312400;2004998206;2499879549;2484499439;2560865440;2484499615;2686772831
IF YOU ARE ADDING MAP MODS, LIST THEM FIRST IN ORDER IN BOTH PLACES, if not the order is mostly irrelevant, though some mods that rely on others will explicitly tell you in the mod description to put them first.
Afterwards, navigate to the Settings page of your server on the G-portal website and copy the Mods and Workshop Item numbers to their respective places:
If you are on a new server and haven’t run multiplayer yet, THEORETICALLY just restarting the server after saving these settings should be enough to get the mods into your game, but the sync and Settings page between the Settings page on the G-portal website and on the server itself get out of wack a lot, especially if you edit anything with the Admin panel in-game.
So, to double check, and if you are adding in mods for the first time, it’s best to verify your serversettings.ini file on the server itself via FTP.
On the Status page of your server is your server IP and password, as well as a guide on how to access your Server via FTP, I’ll link it here and in the next steps assume you have accessed your server already:
https://www.g-portal.com/wiki/en/tools-tips/#ftp-client – [g-portal.com]
(if you aren’t using G-portal just get Filezilla from here and FTP in:
https://filezilla-project.org/download.php?type=client) – [filezilla-project.org]
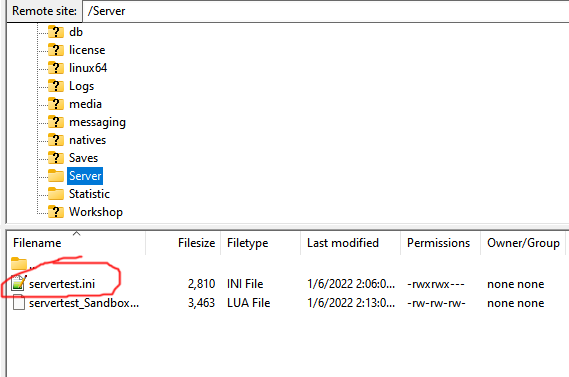
Now, you can copy this serversettings.ini file over to your desktop and open it:
This file is the most important file on your server and manages all the settings. It’s good practice in general to keep a copy of it on hand as backup.
Open it and make sure the
Mod=
and
WorkshopItems=
sections are the same as on your Settings page on the G-portal website. Just note that Workshopitems= is the same as
SteamWorkshopItems on the G-portal Settings page.
If something is missing, edit the .ini and overwrite the .ini with the correct settings over FTP.
Now the last thing to do, which may or may not be optional based on the mods you are adding, is to clear your server saves and map and reset everything. You can also do this if you want to do a server wipe later for some reason.
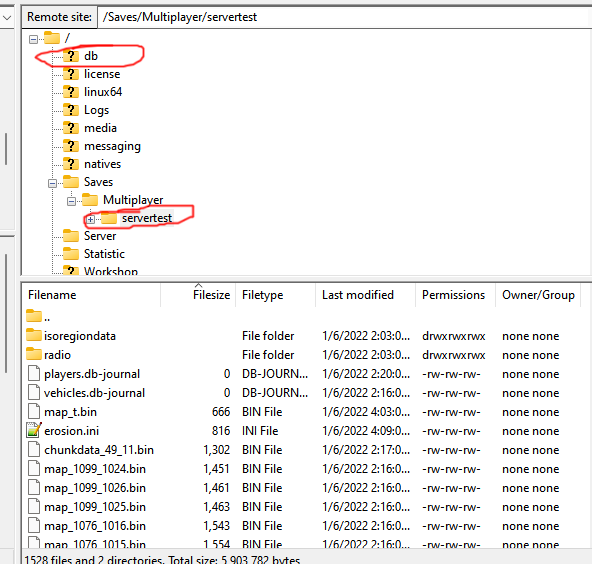
Just delete the contents of this servertest folder and db folder over FTP:
Do this after Resetting your server on the g-portal website and double-checking the servers servertest.ini file.
Now, when you start a new character the mods should all work. I’ve read other threads saying you need to copy mod contents but I’ve never had to do that, you should only have to copy anything when using map mods.
If you are not using map mods, and don’t care that the spawn selection is broken, then you are done and can ignore everything below. If you wish to add map mods, go on to part two.
Adding Maps
First of all, if you are adding maps follow the above steps to reset your server and delete all character saves. I’m not sure if it is entirely necessary, but if you follow the steps below and it doesn’t work, redo everything after deleting your server map and saves and I promise it will work.
Ok, now the next thing you need to do is create a “mods” folder on your server over FTP, then copy the map mods content to your server. You can get the files on your own computer from subscribing to the maps over the Steam Workshop, and search for them in your C:\Program Files (x86)\Steam\steamapps\workshop\content\108600 folder by default. The folders there correspond to the workshop ID from your maps that you have already gotten previously.
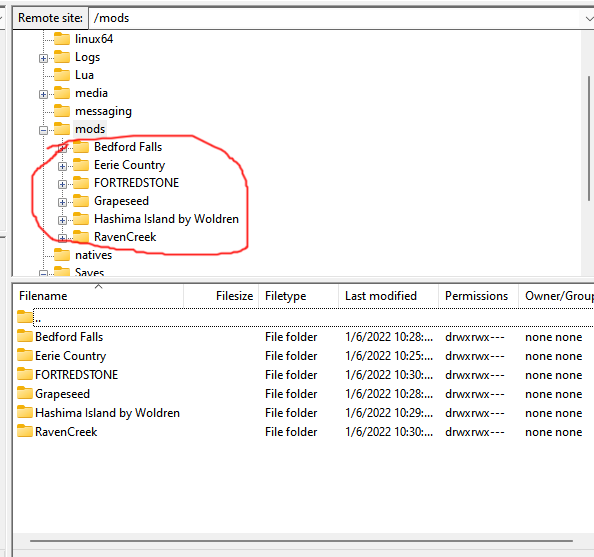
If you are using the same mods and maps as mine as a base, your server should look like this:
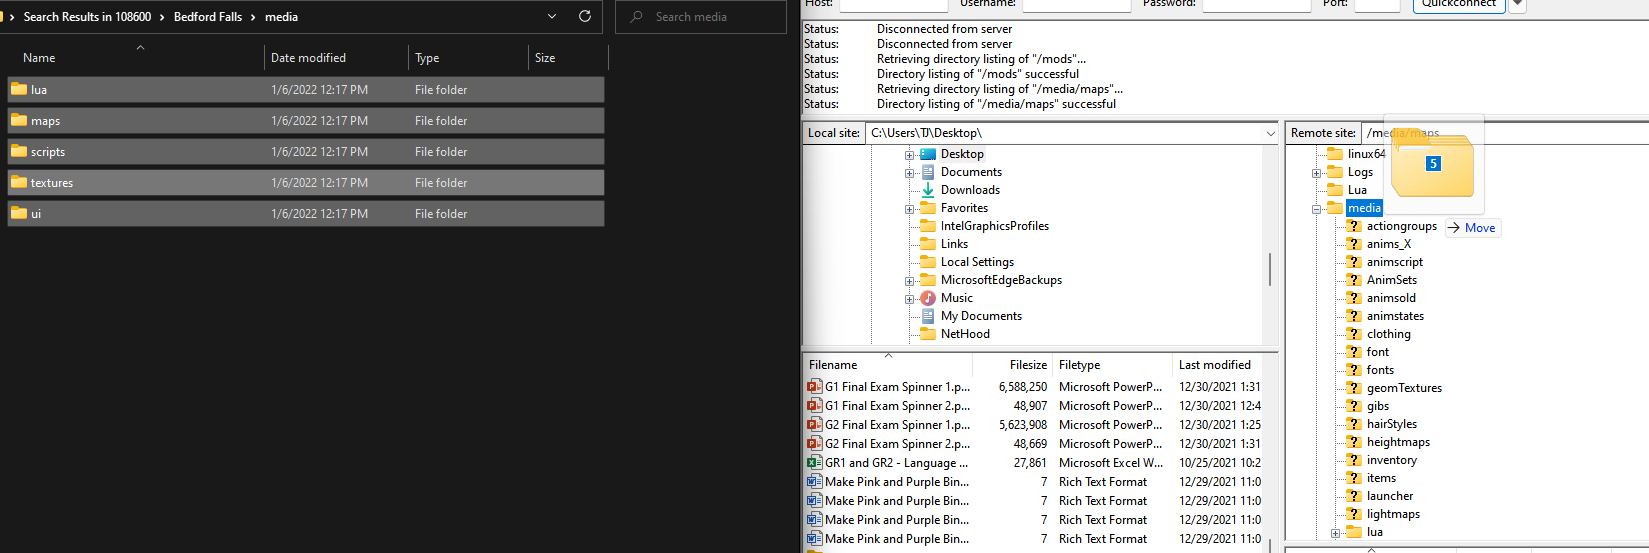
Next, copy ALL the contents of the “media” folder in each of the mod maps over ftp to the /media/maps folder on your server, and if you are asked to overwrite anything than do so.
Now we need to create a file that is missing from g-portal servers. I have no idea why and it must be some mistake related to how they implement forced spawning by default for some bizarre reason due to this dropdown menu in the G-portal website options here:
This dropdown menu is messing with your server and preventing you and your players from picking their map, spawn location, and also seems to lead to the lack of a .lua file that prevents map mods from working.
So, let’s create the .lua file. You can do this over notepad, create a .txt file and when you’re done change the extension to .lua.
The file should be called servertest_spawnregions.lua and goes in the same location as your servertest.ini file on your server, in the same Server folder.
The contents should include all of the maps you want and link them to the /media/maps/ locations of the map mods you just put on your server, and should look similar to this. If you are using my map mods from above can just copy this and create the .lua file directly:
function SpawnRegions()
 return {
 { name = "Muldraugh, KY", file = "media/maps/Muldraugh, KY/spawnpoints.lua" },
 { name = "Riverside, KY", file = "media/maps/Riverside, KY/spawnpoints.lua" },
 { name = "Rosewood, KY", file = "media/maps/Rosewood, KY/spawnpoints.lua" },
 { name = "West Point, KY", file = "media/maps/West Point, KY/spawnpoints.lua" },
 { name = "BedfordFalls", file = "media/maps/BedfordFalls/spawnpoints.lua" },
 { name = "North", file = "media/maps/North/spawnpoints.lua" },
 { name = "South", file = "media/maps/South/spawnpoints.lua" },
 { name = "West", file = "media/maps/West/spawnpoints.lua" },
 { name = "Eerie A", file = "media/maps/Eerie A/spawnpoints.lua" },
 { name = "Eerie B", file = "media/maps/Eerie B/spawnpoints.lua" },
 { name = "Eerie C", file = "media/maps/Eerie C/spawnpoints.lua" },
 { name = "Eerie Country", file = "media/maps/Eerie Country/spawnpoints.lua" },
 { name = "Eerie D", file = "media/maps/Eerie D/spawnpoints.lua" },
 { name = "FortRedstone", file = "media/maps/FortRedstone/spawnpoints.lua" },
 { name = "Grapeseed", file = "media/maps/Grapeseed/spawnpoints.lua" },
 { name = "Hashima Island by Woldren", file = "media/maps/Hashima Island by Woldren/spawnpoints.lua" },
 { name = "RavenCreek", file = "media/maps/RavenCreek/spawnpoints.lua" },
 }
end
Just change the names to those of your maps you wish to host, save as a .lua file called servertest_spawnregions.lua and then copy the .lua file to your servers “Server” folder.
Next, edit your servers “servertest.ini” file’s map= section to include the map name of all of the maps you are adding to your server. In my case, it looks like this:
Map=Grapeseed;BedfordFalls;North;South;West;Eerie A;Eerie B;Eerie C;Eerie Country;Eerie D;RavenCreek;Hashima Island by Woldren;FortRedstone;Riverside, KY;Rosewood, KY;West Point, K;Muldraugh, KY
YOU MUST PUT “Muldraugh, KY” LAST, I’m not sure why but if you don’t then the others won’t load.
Note that if you Restart your server on the g-portal website, or Save changes on the g-portal website, it will delete the map= section and revert to only having “Muldraugh, KY”, so I highly recommend future changes you do to just be over FTP alone and you keep backups of ALL the files in the servers “Server” folder so you can quickly fix things in the event of a backup.
Thankfully you don’t need to recopy the map files themselves in the event of a reset.
Now, you can finally login with a new character and pick your map and use map mods.
Hope you enjoy the Guide about Project Zomboid – How to add Mods & Maps Server + Restart/Reset (Dedicated Server), if you think we should add extra information or forget something, please let us know via comment below, and we will do our best to fix or update as soon as possible!
- All Project Zomboid Posts List





The fact that a Restart will delete those files is no bug, it’s a feature.
What you describe would be fine for singleplayer.
But since you are changing the base media content you corrupt it. This is like installing mods manually, which you should REALLY avoid, because:
– Automatic Updates from Steam Workshop won’t work (or must be applied manually each time)
– If there are any Lua files included, your lua checksum will differ from those of clients, so you have to disable the checksum check, which is the most important anti-cheat feature. Otherwise no one could join, except they do the same stuff to their base files.
– Any game update will erase your map mods as well
To properly add map mods:
– Shutdown pz on your server (litereally stop the service)
– Add the map mods workshop id to to your servers config file under key “WorkshopItems”
– Add the internal mod name to your servers config file under key “Mods”
– Add the map folder name to your servers config file under key “Maps”
Ensure to prepend it to existing values
(or at least before the base value “Muldraugh, KY” which should be the last value)
– Erase your servers world data
A soft reset should be enough, but never tested it.
If not, a hard reset is required to prevent loading of existing mapchunk_X_Y.bin
existing chracters might have stored clientside.
– Add any new spawnregion to your servers spawenregions config (lua) file.
The exact file paths might differ depending on your OS.
Its the place where steamcmd will installs/update your mod files.
Not all maps will come with a spawnpoint definition file.
In this case, you can create your own or renounce the possibility to spawn in that town.
– Start your server service again
I got BedFordFalls to work, however I’m trying to get Eerie and Fort Knox to work and they don’t seem to come up. Any ideas?
I did this and my server wont respond now.
When adding the lua folder to my server