How to get Hoodcraft working, install the classic POSTAL editor, and make and play fully custom levels.
Prerequisites
Note: DO NOT INSTALL PYTHON YET, there is a step during the install that needs to be done, if you have installed it beforehand, remove it by running the installer again.
-Python 2.7.14 x86 msi installer (NOT x86-x64)
-GIMP
-Postal Classic (for the classic editor, you can find this on Internet Archive, just look up “Postal Classic” to find it)
Installing Python
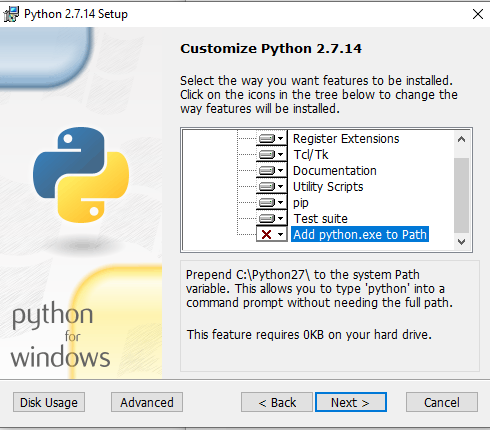
Install Python normally, until you get to the “Customize Python 2.7.14” window, there you have to scroll down the options until you see “Add python.exe to PATH” and change it from “Entire feature will be unavailable” to “will be installed on local hard drive”, this will make it so that we can use python commands in the command prompt, which we will need up next.
Installing the Pillow library for Python
Hoodcraft requires the Pillow library for Python in order to work. Pillow is not installed with Python so it is needed to be added manually. To do this go to the command prompt and enter “python -m pip install Pillow“, it should say “Successfully installed Pillow-6.2.2” if successfully installed.
Adding GIMP to PATH
Adding GIMP to the PATH environment variable will make it so that Hoodcraft can find the GIMP executable needed to build the level. to do this go to Settings > System > About > Advanced System Settings, then press the “Environment Variables” button on the bottom right part of the window. in that window, edit the “Path” variable on the “User variables for (USER)” half of the window, then hit “browse” and select the “bin” folder for the GIMP install (which if installed in the default location, the GIMP install should be in the “Program Files” folder), then hit OK on all of the windows opened to save the changes.
Editing the Hoodcraft code to FINALLY get it running
Now we have ALMOST everything done to get Hoodcraft up and running (Yeah, very simple right?). but we need to do one last thing in order to get it working, editing one line of code.
Open the search bar and search up “idle”, the first result should be “IDLE (Python GUI)“, if you want to use Hoodcraft a lot I recommend placing a shortcut for IDLE onto your Desktop as it’s the easiest way to run the file. Open that up, then hit File > Open, browse to Hoodcraft.py in Postal’s folder, and open it (You will need to open this on IDLE to run it).
Hit Ctrl + f to open the search function on IDLE, and search for “gimp_path = distutils.spawn.find_executable(“gimp”)“, on that line, change “gimp” in the “find_executable” command to “gimp-” and the version number of GIMP you have installed (for example, my version is currently 2.10 so I will have to change it to “gimp-2.10”), if the version of GIMP installed was old enough it might just work out of the box, but this is what you have to do if you installed it recently.
Now Hoodcraft will work, on IDLE still, save the program and then hit Run > Run Module, to run the program.
Basic Hoodcraft Guide
If everything has worked out, Hoodcraft should be running. It is a very simple looking window containing many things. Here is a very simple guide on the editor, but first, a disclaimer:
Hoodcraft is an editor for the Hoods of Postal, which are files that only contain collision and art of the level. For placing down entities and the Player, you will need the Classic Postal editor to do that. But this program is the missing half of what you need for FULLY custom levels with their own art and collision. We will get to running the Classic editor later.
Also I have not tried ALL of the things in Hoodcraft yet, so I will not be able to explain EVERYTHING about it, but enough to make something. if something is not on the list, it means that i have no clue about it, so experiment yourself! I’m too lazy to, took me long enough to get all of this working.
Now here is very basic explanations of what (almost) everything does:
- Insert: When selected, clicking on the background image in the menu will add points and draw lines on it where terrain is added, but it needs to be closed up to actually add terrain
- Select: When selected, will allow you to pick terrain added to edit its properties.
- Show: If something there is checked, will display it on the window, if not, it will hide that thing in the window/
- Walkable: if checked, the selected terrain will be considered “Walkable” so the Postal Dude and the enemies will not collide, if not, the Postal Dude and Enemies will not be able to walk in that area.
When you are finished, you can save the Hood by going to File > Save, and build the level into a .SAK file so it can be edited in the Classic Postal editor by going to File > Build, wait for the GIMP Output window to say to type any character to close it, press any key on the keyboard, then wait for a pop-up saying “(hood name) built successfully” for it to be built. the .sak file should be in the “res\hoods” folder in POSTAL’s files, with the name you have given it.
POSTAL Classic…
Alright, you got everything done for Hoodcraft, got it working and made a .sak file. But how do I add enemies, Postal Dude, Items, etc.? Well we will have to go back to the original Postal Plus to get the editor, you should’ve had the ISO file for it beforehand from the Internet Archive, but I am saying it again just to remind you.
…Do you have it now?
…yes, it might take a while to download, so if you just started downloading now, take a nice break, if you have already downloaded it, too bad, you have to keep going through this guide then…
..Do you have it now?
Ok good, now we will install the classic Postal Plus. To do that open the .iso file, it will add a new drive mimicking a DVD drive where Postal is put in. Run the setup.exe file in the drive, and go through the installation process, after that open the installed folder, and drag the “res” folder from the DVD drive into the installed folder, and replace the files there.
You are now done with the DVD drive, but DO NOT EJECT THE DRIVE, the ISO must be kept open to run.
Now you have to change the filepath of where the “hoods” folder is, to do that you have to edit the “Postal Plus” ini file BEFORE opening the game. But we need to give us permission to save our changes. To do that, right click the ini file, go to “properties”, then go to the Security tab, hit “edit”, select “USERS”, and give permission for full control of the file. hit “OK” on every window to apply changes.
Now you can open the ini file, in the [Paths] section, change the “Hoods” path to the same as the “HD” path is, which is where you installed the game.
Now you can place the .sak file of what you made in Hoodcraft into the same “Hoods” folder where Classic POSTAL is installed. Then open the game, select the editor, hit “New”, and select your .sak file. Now you can place entities onto your map!
After you are done, you can save your .rlm file. It will be found in the /res/levels folder of where you have installed Classic POSTAL. Get that AND the .sak file for your level, and put them in the respective locations of the modern release.
Playing the custom levels (Modern STEAM/GOG release)
Here is how you can play those custom levels in the modern version of POSTAL.
Put the .rlm and .sak files to their respective places (you should know this by now I have said it a lot). then open “Postal Plus Realms.ini” file in the res/levels folder. go to the “Single-Player Realms” section. and change the 1st realm’s (Which is the Home level) realm easy, medium, and hard paths to the path of your custom realm file (you can also change loading screen music, text, and bg too if you wanted to), and save and exit the file. Now if you start a new game, the first level will be the custom one you have set.
End
Congrats! Now you know how to make a completely custom POSTAL level and play it on the modern release on Steam and GOG!
PS: This guide has taken me HOURS to do, and I went through the process step by step during the creation of this guide using a cleaned out pc to make sure this works, but there still could be errors. So please be nice and give constructive feedback if there are any problems. Thank you for reading this guide! 🙂
Hope you enjoy the Guide about POSTAL – Custom Levels + Basic Hoodcraft Guide, if you think we should add extra information or forget something, please let us know via comment below, and we will do our best to fix or update as soon as possible!
- All POSTAL Posts List


Leave a Reply