To the best of my ability, I will try to explain all the following topics (in a different order than this):
* overriding vanilla assets with custom ones for personal use (portalgun skins etc.)
* mounting custom assets to portal 2 without causing issues or overriding portal 2’s files
* mapping with custom content (and packing it into the map for others to enjoy)
Introduction
Hello, and welcome to The Ultimate Portal 2 Custom Content Guide.
In this guide, I will be teaching you nearly everything I know about using custom assets in Portal 2, for your maps and mods.
This is knowledge I have figured out through painstaking trial and error over the long course of the development of my mod, “Portal: Forever Testing,” Which uses a huge amount of custom assets, both built from scratch and imported from other source engine games.
I have created a map development pipeline that not only helps me use these assets, but also resolves quite a few problems that other development pipelines in Portal 2 have failed to resolve, including:
- Properly building cubemap relfection in your maps (engine error often causes headaches)
- Missing or improperly packaged content in workshop maps (random fullbright wooden textures or errors)
- Accidental overrides of vanilla portal 2 content
- issues with DLC folders (suprisingly, theres gamebanana.com – https://gamebanana.com/mods/242133?post=8903771)
- and more
in this guide, You’ll be learning how to create this setup for yourself. 🙂
so, lets start with the basics…
Gameinfo.txt: The Core Of Content Mounting
Gameinfo.txt. You may have heard of it, but what does it do, exactly?
Simply put, Gameinfo.txt is what the game uses to figure out where all the files are.
This includes all the assets, such as music, voice lines, textures, video clips, etc…
By Default, the file can be found here:
Portal 2/portal2/gameinfo.txt
If you have not edited the gameinfo.txt previously (and have no installed BEE2 mod) the contents will look similar to this:
"GameInfo" { game "PORTAL 2" title "PORTAL 2" GameData "portal2.fgd" gamelogo 1 SupportsDX8 0 SupportsXbox360 1 FileSystem { SteamAppId 620 ToolsAppId 211 // // [insert whole bunch of irrelevant comments here] // SearchPaths { Game |gameinfo_path|. } } }
Now, the MOST important part of gameinfo.txt is the “Search Paths” at the bottom.
SearchPaths { Game |gameinfo_path|. }
You’ll notice that by default, it mounts ” |gameinfo_path|. ”
Which means that the folder that gameinfo.txt is inside of, will be mounted onto portal 2, and portal 2 will access this folder and all .vpk files within it when the game runs, in search of content.
Content is always included in specificly named folders (inside of vpks or just as normal folders).
These folders are:
- materials
- models
- particles
- sound
- scripts
- maps
- media
However, there is another trick that portal 2 does here:
ALL Portal 2 dlc folders all the way up to roughly number 16 (portal2_dlc16) are also mounted on top of the |gameinfo_path|. folder, meaning that they will override anything in the main |gameinfo_path|. folder; because the game will always use whatever the first version of an asset is that it finds.
With this knowledge in mind, you can now throw your assets into a folder anywhere on your computer, and mount them into portal 2, provided you maintain the same file structure as portal 2 itself does. Remember that everything must be in the materials, models, etc. folders of your folder, according to what type of asset they are.
The way you do that, is by putting the path of your content folder into the search paths part of the file, (each on a seperate line if you make more than 1), directly following the word “Game”. (Note: it actually doesnt matter what word you use at all in portal 2. I’ve even typed “yolo” before and it still worked fine; but for simplicity sake, its best to just stick to “Game”.)
For example, if you have your content on your desktop in a folder called “CUSTOM_ASSETS”, you would do the following:
SearchPaths { Game |gameinfo_path|. Game "C:/users/YOU/desktop/CUSTOM_ASSETS" }
This mounts your custom content below portal 2’s dlcs and vanilla content, meaning that it will not override portal 2’s files, but will still be usable in your custom maps.
The order of these paths is important: Things higher up on the list will alwaays override things that are lower. Remember, Portal 2 is looking for content until it finds it. once it finds it, it doesnt bother looking for the same stuff anywhere else- so if “my_model.mdl” is found in a higher folder on the list, portal 2 will use that version, even if “my_model.mdl” also exists in a lower folder!
SearchPaths { Game override //this is a folder that DOES override Game |gameinfo_path|. // this is portal 2 and it's dlcs. Game "C:/users/YOU/desktop/CUSTOM_ASSETS" // this is yours }
Now that you (hopefully) understand how to configure the search paths of Portal 2, The next section will go into more detail about a few quirks of the system; specificaally, VPK files.
VPK Files: Priority #1
As discussed in the previous section, the order of the search paths in gameinfo.txt is the primary thing that determines what content will be mounted.
However, there are a few oddities involving VPK files:
- Content in VPKs takes priority over loose files
- Portal 2 vanilla assets CANNOT
be overriden by loose files, only vpk’d ones - in some very rare cases, theres a folder called “Update” which takes priority over literally everything else..thats mostly not relevant here, however
So, say we have a custom skin for the portal 2 Vacuum tubes that makes them glow.
This skin consists of a few texture files (vmt and vtf) in a folder:
materials\models\props_backstage\[your files]
Following this tutorial, you might be tempted to install the files into a new folder on your desktop, mount it above the |gameinfo_path| in gameinfo.txt, and proceed to play the game, only to discover that your new vacuum tubes arent quite as glow-y as you hoped.
This is because, as per the oddities mentioned above, VPK files are required to override vanilla portal 2 content. Loose files do not override vanilla files.
So, with that in mind, you may be wondering how to create a VPK that contains your content, and more importantly, what a VPK file actually is.
Firstly, a VPK file is, in essense, valve’s weird version of a zip file- it is a container that holds your files in a special way that portal 2 prioritizes for some odd reason.
as for creating the files…
luckily, Its easy! Simply place your content into a folder called “Pak01_dir” (keeping in mind the folder structure!!) and then drag that folder onto the vpk.exe file in portal 2’s bin folder:
Portal 2/bin/vpk.exe
be patient- vpk.exe will do it’s magic, and as soon as it does, it will close. If you go to where your content is, you will see a new pak01_dir.vpk file right next to the folder you created of the same name.
Now, all you need to do to mount this file is to put it into either a “portal2_dlc3” folder; or better, create your own “override” folder and mount it in gameinfo.txt as follows:
SearchPaths { Game override // this is where you put your vactube vpk file Game |gameinfo_path|. }
If you would like to try that yourself, you can download the actual examplegamebanana.com – https://gamebanana.com/mods/242136.
with all this in mind; you should now be familiar with VPK files and how to create an “override” folder to override portal 2 vanilla assets.
If you ever need to actuaally open a VPK file to see whats inside (beyond this tutorial’s scope somewhat,) then i highly recommend using a tool called https://steamcommunity.com/groups/CrowbarTool for that.
In the next section, you will learn how to install Teamspen210’s Hammer Addons, so that you can utilize what you’ve set up so far in your maps.
Teamspen210’s Hammer Addons: Packing your content into the map
Teamspen 210’s hammer addons have a good amount of different features to aid in Portal 2 map creating.
github.com – https://github.com/TeamSpen210/HammerAddons.
Please install the addons, then come back.
back?
good. 🙂
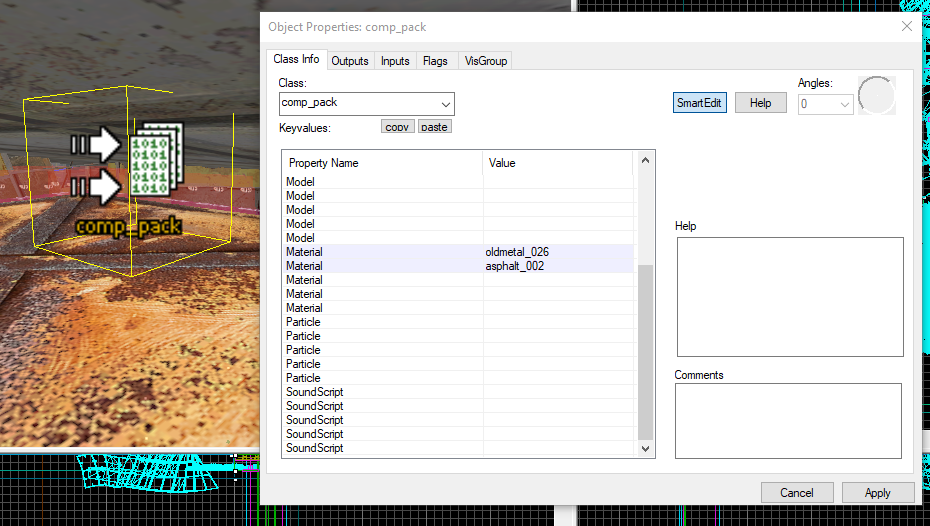
Now, if you installed the addons correctly, once you open hammer, there should be several new “comp_” entities availible in the entity picker. To pack the custom content you created (and not rely on the postcompiler always doing it automatically, since it sometimes misses content), we need the “comp_pack” entity.
simply place the entity down somewhere, and set the options accordingly. in this example, i am using it to pack 2 custom assets into my map:
Now, thats all there is to it mostly.
by this point, you are ready (at a basic level) to use custom assets in portal 2 in the most non-destructive way possible.
There is one more advanced topic worth covering, however…
GameConfig: Its like having multiple portal 2s!
You might be wondering about the extra perks I claimed this would do, such as building cubemaps correctly. we’re about to get to that!
This is the part of the guide where we modify portal 2’s hammer to, in essense, work as though you have multiple different configurations of portal 2’s files- by making alternate gameinfo.txts, and tricking hammer into being able to choose between them.
Hammer will compile into a different folder for the maps, and you will also create an advanced compiling preset which allows you to test the maps as though they were running from a vanilla portal 2 setup; which is useful for making sure you packed all of your custom content correctly.
Firstly, create a new folder inside of Portal 2’s root folder.
Next, create a new “gameinfo.txt” file in that folder; and edit the search paths to point at your custom content as we previously did with portal 2’s main gameinfo.
Its aa good idea at this point to remove your custom content paths from the old gameinfo.txt file to prevent confusion.
Next, the game configs for hammer. this is how we can make hammer able to choose between different gameinfo.txt setups.
you will need to edit this file:
"Portal 2\bin\GameConfig.txt"
It is difficult and lengthy to format this guide, so here is a brief break down of what you need to do:
1. replace all the backslashes with forward slashes in the file (or vice versa)
2. copy and paste the “portal 2” game definition as another game inside the “Games” section
3. rename your new game definition to “Portal 2 – custom”
4. change all the paths in the custom config to point at your new gameinfo.txt’s folder
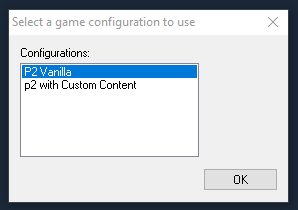
now restart hammer, and if you formatted the file correctly, this will pop up:
here is my own gameconfig file, for reference:
"Configs" { "Games" { "p2 with Custom Content" { "GameDir" "E:/Antonios stuff/program files/Steam/SteamApps/common/Portal 2/portal2_customcontent_hack" "Hammer" { "GameData0" "E:/Antonios stuff/program files/Steam/steamapps/common/Portal 2/bin/portal2.fgd" "TextureFormat" "5" "MapFormat" "4" "DefaultTextureScale" "0.250000" "DefaultLightmapScale" "16" "GameExe" "E:\Antonios stuff\program files\Steam\steamapps\common\Portal 2\portal2.exe" "DefaultSolidEntity" "func_detail" "DefaultPointEntity" "info_player_start" "BSP" "E:\Antonios stuff\program files\Steam\steamapps\common\Portal 2\bin\vbsp_original.exe" "Vis" "E:\Antonios stuff\program files\Steam\steamapps\common\Portal 2\bin\vvis.exe" "Light" "E:\Antonios stuff\program files\Steam\steamapps\common\Portal 2\bin\vrad_original.exe" "GameExeDir" "E:/Antonios stuff/program files/Steam/steamapps/common/Portal 2" "MapDir" "E:/Antonios stuff/program files/Steam/steamapps/common/Portal 2/sdk_content/maps" "BSPDir" "E:\Antonios stuff\program files\Steam\steamapps\common\Portal 2\override\maps" "PrefabDir" "E:/Antonios stuff/program files/Steam/steamapps/common/Portal 2/bin/Prefabs" "CordonTexture" "tools/toolsskybox" "MaterialExcludeCount" "0" } } "P2 Vanilla" { "GameDir" "E:/Antonios stuff/program files/Steam/SteamApps/common/Portal 2/portal2" "Hammer" { "GameData0" "E:/Antonios stuff/program files/Steam/steamapps/common/Portal 2/bin/portal2.fgd" "TextureFormat" "5" "MapFormat" "4" "DefaultTextureScale" "0.250000" "DefaultLightmapScale" "16" "GameExe" "E:\Antonios stuff\program files\Steam\steamapps\common\Portal 2\portal2.exe" "DefaultSolidEntity" "func_detail" "DefaultPointEntity" "info_player_start" "BSP" "E:\Antonios stuff\program files\Steam\steamapps\common\Portal 2\bin\vbsp.exe" "Vis" "E:\Antonios stuff\program files\Steam\steamapps\common\Portal 2\bin\vvis.exe" "Light" "E:\Antonios stuff\program files\Steam\steamapps\common\Portal 2\bin\vrad.exe" "GameExeDir" "E:/Antonios stuff/program files/Steam/steamapps/common/Portal 2" "MapDir" "E:/Antonios stuff/program files/Steam/steamapps/common/Portal 2/sdk_content/maps" "BSPDir" "E:\Antonios stuff\program files\Steam\steamapps\common\Portal 2\override\maps" "PrefabDir" "E:/Antonios stuff/program files/Steam/steamapps/common/Portal 2/bin/Prefabs" "CordonTexture" "tools/toolsskybox" "MaterialExcludeCount" "0" } } } "SDKVersion" "4" }
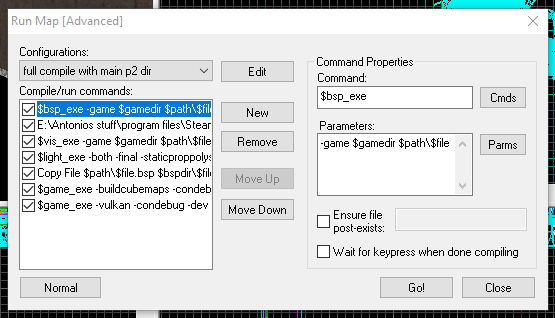
now, in hammer, to create the special compile preset, go to compile your map, and click “Expert…”
it will switch to this window:
click “Edit”.
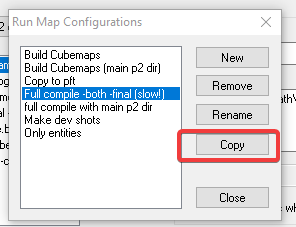
next, select the preset you want to make aa copy of and hit “Copy.”
Finally, edit the “Game” step of the new config to launch from portal 2’s main directory by replacing the “-game $gamedir” parameter with a full path to portal 2’s normal folder, for example:
-game "C:/program files/steam/steamapps/common/portal 2/portal2"
you may be wondering what the point of this is. Well; if you have set everything up correctly, you can now map with custom assets without actually mounting them to portal 2 itself. This allows you to easily and accurately test your maps in a way where you will see the same thing as everyone else, meaning that if you forgot to pack a piece of custom content into your map, it will show up as an error the same way as with people who dont have your content at all, which is good, because then you can fix it. You cant fix an error that you dont even know is there!
Conclusion
Well, thats everything.
I hope you learned something, or at the very least, found this guide useful for reference- I do apologize for the somewhat disorderly format of the guide, but this is a very complex topic and i am not sure on how to best articulate it.
That said, if you have suggestions for how this guide might be improved, please let me know in the comments below. thank you!
This is all about Portal 2 – The Ultimate Custom Content Guide; I hope you enjoy reading the Guide! If you feel like we should add more information or we forget/mistake, please let us know via commenting below, and thanks! See you soon!
- All Portal 2 Posts List


Leave a Reply