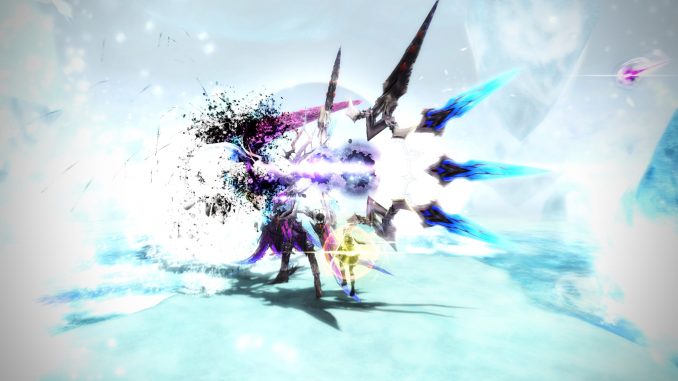
CM3 – Mission:Violent Tremor
Challenge Mode is a special type of quest where you start off with nothing and have to work your way up to the end of the quest with whatever you can find and scrape by with, giving you a score which both acts as a special currency for certain items and gets posted on the leaderboards of the current ship. It’s more or less like playing a rougelike version of PSO2. You are generally timed by your VR energy as well which when depleted ends the quest immediately and gives you your score.
However in this quest, it’s slightly different; The biggest thing at the start is that instead you get to pick from 11 different class archetypes divided into 4 groups, Attack / Rush / Support / Unique – This includes all the classes in the game minus Summoner. You then have to construct a team for your group that fits well and make it to the end as usual, however VR Energy is no longer timed. Instead, only through deaths does it count down. (The drawback to this change is that Deaths now effectively subtract around ~20 points and reviving with a Moon Atomizer only gives back 10) So it’s more of how little deaths can you take during the quest, none if all if possible.
This guide will give you a basic rundown of how the quest operates so you can go in with proper knowledge and build upon from there if you wish to improve the gameplay further. This quest only takes 8 players, and there is only 5 areas to go through in the quest (Making it similar in length to Mission:Decision)
Class Loadouts (1/2)
There is 11 class choices you get to make, divided into 4 archetypes. Each of these archetypes have their own skill selections that makes them different from the others and they all strictly follow the weapons their class name uses. Pick which one you may think works for you the best, or which one benefits your team more. As a note you can stack as many classes as you’d like if needed.
Attack
High Attack Power +
Trimate +1 on start
Start at Lv70
Low AOE capability –
Limited Selection of PA –
Fighter
Weapon: Ideal Twin Dagger-C
Units: Weapons Barrier x3
Class Skills:
Brave Stance (lv.10) / Brave Critical (lv.5) / Fury Stance (lv.10) /
Fury Critical (lv.5) / Overload (lv.1) / Adrenaline (lv.1) / Critical Strike (lv.5) / Deadline Slayer (lv.10) / Crazy Heart (lv.5) Attack PP Restorate (lv.10) / Double Saber Focus / Twin Dagger Focus / Knuckle Focus / D. Saber Wind Parry / T. Dagger Spin Move / Knuckle Focus Boost / HP Up 1,2,3 (Lv.10) / All Attack Bonus 1 (lv.5) / First Arts JA Addition / Step Advance (lv.4) /
Step JA Combo / Step Jump / Air Reversal / Just Reversal
Photon Arts/Techs: Tornado Dance (lv.17) / Surprise Dunk (lv.17) / Acro Effect (lv.17) / Raging Waltz (lv.1) / Bloody Sarabande (lv.1) / Quick March (lv.1) / Ducking Blow (Iv.1) / Decimator (lv.1)
Braver
Weapon: Ideal Katana-C
Units: Weapons Barrier x3
Class Skills: Average Stance (lv.10) / Average Stance UP (lv.5) / Katana Combat (lv.4) / Combat Escape (lv.1) / Combat JA Bonus (lv.1) / Combat Finish (lv.1) / Rapid Shoot (lv.1) / Attack PP restorate (lv.10) / Katana Focus / Counter Edge / Counter Bonus / Attack Bonus (lv.3) / Bullet Bow Charge Bonus (lv.1) / Braver Combination / All Attack Bonus 1 (lv.5) / Step Advance (lv.3) / Step JA Combo / Step Jump / Air Reversal / Just Reversal
Photon Arts/Techs: Nocturnal Blossom (lv.1) / Eviscerating Bloom (lv.1) / Lunar Flourishing (lv.1) / Master Shot (lv.1) / Torrential Arrow (lv.1) / Million Storm (lv.1)
Gunner
Weapon: Ideal Twin Machine Gun-C
Units: Weapons Barrier x3
Class Skills: Chain Trigger (lv.10) / Chain Finish (lv.10) / Chain Finish Bonus (lv.1) / Twice Chain / Attack PP Restorate (lv.10) / T. Machine Gun Focus / T. Machine Gun Mastery (lv.5) / Zero Range Advance 1 (lv.10) / Perfect Keeper (lv.4) / All Attack Bonus 1 (lv.5) / First Arts JA Bonus / Dive Roll Advance (lv.6) / Step JA Combo / Step Jump / Dive Roll Shot / Air Reversal / Just Reversal
Photon Arts/Techs: Grim Barrage (lv.1) / Satellite Aim (lv.1) / Gunslinger Spin (lv.1)
Rush
Good AOE capability +
Access to Complex Photon Arts +
Ability to use any CPA
Start with Moon Atomizer +1
Access to Double Jump +
Start at Lv70
Median ATK Power
Low selection of high power PA –
Bouncer
Weapon: Ideal Jet Boots-C
Units: Weapons Barrier x3
Class Skills: Dodge Auto-Field / Critical Field (lv.5) / Photon Blade Fever (lv.5) / Photon Blade Fever UP (lv.5) / Photon Blade Escape (lv.5) / Jet Boot Focus / Jet Boots Escape (lv.5) / Soaring Blade Focus / Next Jump / First Arts JA / Step Advance (lv.3) / Step JA Combo / Step Jump / Air Reversal / Just Reversal
Photon Arts/Techs: Heavenly Kite (lv.1) / Justice Crow (lv.1) / Dash Wing (lv.1) / Strike Gust (lv.1) / Gran Wave (lv.1) / Surging Gale (lv.1)
+Complex Photon Art
Ranger
Weapon: Ideal Rifle-C
Units: Weapons Barrier x3
Class Skills: Stun Grenade / Gravity Bomb / Blight Rounds (lv.3) / Panic Shot (lv.5) / Jellen Shot (lv.10) / Mirage Shot (lv.5) / Bullet Keep / Dive Roll Shot / Keep Roll Shot / Tactics Trap (Iv.1) / Next Jump / First Arts JA / Dive Roll Advance (lv.6) / Step JA / Step Jump / Air Reversal / Just Reversal
Photon Arts/Techs: Satellite Cannon (lv.1) / Impact Slider (lv.1) / Diffuse Shell (lv.1) / Triple Shot (lv.1) / Cluster Shot (lv.1) / Cosmos Breaker (lv.1)
+Complex Photon Art
Hunter
Weapon: Ideal Partizan-C
Units: Weapons Barrier x3
Class Skills: Massive Hunter (lv.5) / War Cry (lv.10) / Iron Will (lv.1) / Sword Focus / Wired Lance Focus / Partizan Focus / All Guard / Healing Guard / Just Guard PP Gain / Charge Parrying (lv.1) / Flash Guard 1 (lv.10) / Flash Guard 2 (lv.5) / Tech Flash Guard (lv.5) / Not Bad (lv.5) / Next Jump / First Arts JA / Step Advance (lv.3) / Step JA Combo / Air Reversal / Just Reversal
Photon Arts/Techs: Guilty Break (lv.1) / Rising Edge (lv.1) / Blaze Parry (lv.1) / Holding Current (lv.1) / Wild Round (lv.1) / Spin Dance (lv.1) / Slide End (lv.1) / Sacred Skewer (lv.1) / Speed Rain (lv.1)
+Complex Photon Art
Class Loadouts (2/2)
Support
Access to Resta, Zanverse (Techter), Anti (Techter) and Shifta (Force) or Deband (Techter) +
Access to Compound Techniques +
Start at Lv70
No crafted Techs –
Low Tech power –
Force
Weapon: Ideal Talis-C
Units: Weapons Barrier x3
Class Skills: Talis Fast Throw / Shifta Advance (lv.3) / Elemental Weak Hit (lv.5) / Flame Tech S. Charge (lv.3) / Charge PP Revival / Charge Escape / Rod Keep Bonus / Resta Advance (lv.5) / Wide Support / PP UP 1+2 (lv.10) / Tech ATK Up 1+2 (lv.10) / Tech ATK High Up (lv.5) / Burn Boost (lv.10) / Freeze Boost (lv.10) / Shock Boost (lv.10) / Mirage Boost (lv.10) / Panic Boost (lv.10) / Poison Boost (lv.10) / Tech Arts JA Addition / First Arts JA Addition / Step JA combo / Step Jump / Air Reversal / Just Reversal
Photon Arts/Techs: Rafoie (lv.1) / Rabarta (lv.1) / Razonde (lv.1) / Razan (lv.1) / Ragrants (lv.1) / Ramegid (lv.1) / Resta (lv.1) / Shifta (lv.1) / Fomelgeion (lv.1) / Barantsion (lv.1)
Techter
Weapon: Ideal Wand-C
Units: Weapons Barrier x3
Class Skills: Wand Lovers (lv.4) / Wand Gear / Killing Bonus (lv.6) / Deband Advance (lv.3) / Resta Advance (lv.5) / Party Assist / Territory Burst / Super Treatment / Wide Support / PP Up 1+2 (lv.10) / Tech ATK up 1+2 (lv.10) / Tech Arts JA Addition / First Arts JA Addition / Step JA Combo / Step Jump / Air Reversal / Just Reversal
Photon Arts/Techs: Gifoie (lv.1) / Gibarta (lv.1) / Gizonde (lv.1) / Gizan (lv.1) / Gigrants (lv.1) / Gimegid (lv.1) / Resta (lv.1) / Zanverse (lv.1) / Anti (lv.1) / Deband (lv.1) / Zandion (lv.1)
Unique
Up to lv55 Successor traits are usable +
DOUBLE JUMP IS EXCLUDED –
All Successor classes are available
Start at lv55 –
Racial stats are considered when playing –
Start with no recovery items –
Hero
Weapon: Ideal Sword-C
Units: Weapons Barrier x3
Class Skills: Hero Time / Hero Time Finish / Hero Focus Time Gain / Hero Counter (lv.5) / Hero Counter PP Gain / Hero Counter Bonus / Aura High Charge (lv.1) / Combo Aura Short Charge / TMG Attack PP Save (lv.5) / First Blood / Step Jump / Air Reversal / Just Reversal
Photon Arts/Techs: Rising Slash / Brightness End / Vapor Bullet / Brand New Star / Final Storm / Edge Racer / Jet Wheel / Wise Hound / Dive Bullet
Phantom
Weapon: Ideal Rod-C
Units: Weapons Barrier x3
Class Skills: Phantom Marker / Phantom Time / Phantom Time Finish / Phantom Time Mark Boost (lv.5) / Dodge Counter Shot / Dodge PP Gain (lv.5) / Quick Cut / Chase Mark Boost (lv.5) / Jellen Redress (lv.1) / Attack Jellen (lv.3) / Tech Charge JA Addition / Step JA Combo / Air Reversal / Just Reversal
Photon Arts/Techs: Sazan (lv.1) / Folter Zeit / Wolkenkratzer / Rose Schwert / Verbrechen / Nachtangriff / Strafe / Schwarze Katze / Voelkermord / Ruf Konzert
Etoile
Weapon: Ideal Soaring Blades-C
Units: Weapons Barrier x3
Class Skills: Over Drive / Recast Save / Around Mate Up / Stancing Massive / Damage Balancer (lv.6) / Just Guard PP Aile / ET Double Saber Focus / ET Soaring Blade Gear / ET Wand Gear / DS Skip Arts / DS Step Slide / DS Quick Take / DS Step Guard / SB Lock-on Chase / SB Gear Heat Up / Wand F. Dash / Wand Teleport / First Blood / Step JA Combo / Step Jump / Air Reversal / Just Reversal
Photon Arts/Techs: Saber Destruction / Shooting Star / Celestial Collide / Radiant Sting / Distortion Pierce / Light Wave / Glitter Stripe / Black Hole Rupture / Prism Circular
Luster
Weapon: Ideal Gunblade-C
Units: Weapons Barrier x3
Class Skills: Luster Time / Luster GS Gear / Luster Voltage / Voltage Heat Up / High Voltage / Tech Arts JA Multi Bonus / Deband Disorder (lv.1) / Stay Arts / Enhance Combo / Slash Rise / Slash Fall / Luster Step Slide / Step Slide Advance / Luster Counter / Luster Step Guard / Extra Attack / Purge Style / Quick Slash / Quick Shoot / First Blood / Step JA Combo / Step Jump / Air Reversal / Just Reversal / Zandi+Fomel+Baran Style / Zandi Shoot Enhance / Fomel Shoot Enhance / Fomel Attack Advance / Baran Shoot Enhance / Baran Attack Enhance / Move Arts V. Boost / Zandi Dodge Advance / Enhance Arts V. Boost / Fomel JA Advance / Stay Arts V. Boost / Baran JG Advance
Photon Arts/Techs: Slug Scatter / Brand Extension / Hollow Point
UNIVERSAL CLASS SKILLS: Step Jump, Just Reversal, Step JA, First Arts (Melee) / First Tech JA (Tech)
“””Meta””””
The current recommended getup (assuming you’re an 8 player mpa) is a follows:
x1 Ranger – x1 Techter – x6 Hero/Etoile
x1 Ranger – x1 Techter – x1 Bouncer – x5 Attack/Unique classes (Hero or Etoile priority for Unique)
All Rush classes (x8 of either Hunters, Bouncers, or Rangers)
Remember though that what matters most here is no deaths, so it would be best to stick to your best class. However certain stages will require you to clear it in a certain time in order to gain all it’s rewards, so stacking x8 Techters for might not be the best idea. You should have a good spread of attackers on your lineup and any one of the support classes in your team is always a good idea.
Anything you see on the floor, even the VR caps you are totally free to pick up. Just do note that if you are expecting deaths in an area then you could delay some capsule to pick up later when the inevitable happens (and certain bosses are accessed only through the state of your VR at the end) so just use your best judgement regarding the MPA. The idea is definitely to try and get it’s maximum point value out of it though.
If you have a Techter and an Etoile for your lineup, the Techter should swap weapons with the Etoile. This is because Etoile’s starting weapon isn’t too great at the starting points of the quest but Wand ends up being Et’s strongest weapon in the run, allowing them better clear speeds by having it at the start of M1. Techters main contribution is mostly just applying Resta when people need it and placing Zanverse, which more than makes up for it’s instance despite needing to cast with a weapon for at least one stage. Try not to have more Techters than Etoiles, and definitely try not to stack Techters at all since Force or Phantom is an alternative option anyways.
Intervals only allow a weapon exchange and it’s limited selection of items. You can only get more dolls through drops in the stages, and you cannot learn any new skills on any of the loadouts.
Any mechanic from the previous CM quests that isn’t changed here otherwise functions the same. You can check my previous guides if you want to see the full writeup.
Though there are certain time requirements for certain things in this quest, for the most part all that really matters if you can get the clear speeds and not die at all while doing it so really sticking to what you do know best is the option to go with until you get more comfy with the quest.
Extra addendum: for achieving max scores on CM3, you will need a full party bonus and certain bosses at the end of M5 may not give you all the miles needed. Max is 7368, and the Double Elder/Masq routes won’t give you enough to reach these scores.
All the Rush classes can use Complex PA’s on any weapon, and for a reminder the weapons are as follows:
Sword / T. Machine Gun / Bow / Launcher / Jet Boots / Knuckles
Be sure to use CPA stocks if you have a Rush class in your party, they are very useful.
MISSION 1 (Mothership)
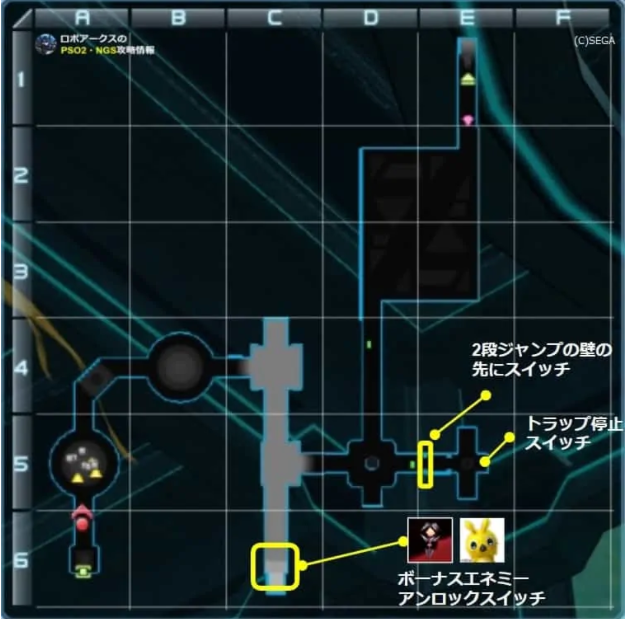
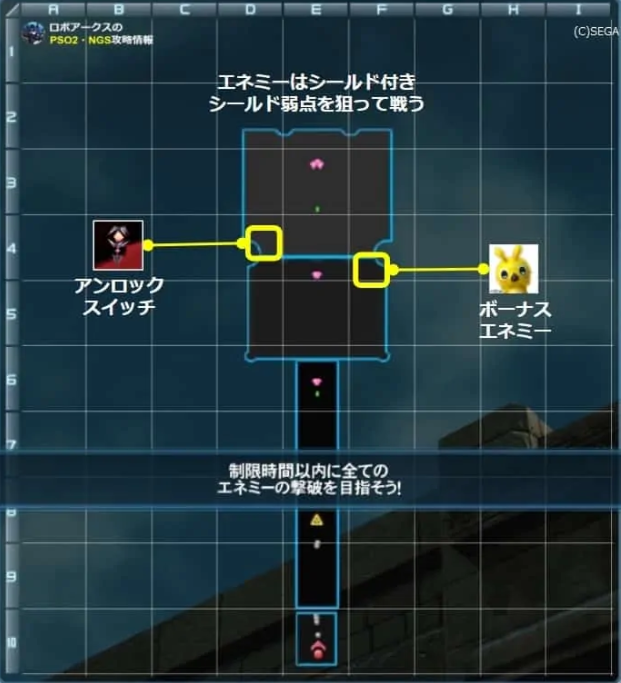
Remember: The switches unlocks the gates at the end, and the Rappy provides bonus points.
TL;DR Stage requirements: Kill Rappy, Hit Switch, do not activate Tripwires, hit the Button
After setting up your MPA’s classes, walking forward will spawn the first group of Yedi+King Yedi. Just note that King Yedis will hide their weak spot if they enrage by killing the smaller ones, so it’s recommended to kill them first or at least stunlock them until the pack is dealt with. There is a small bit with moving spike traps afterwards that will lead into a group of Wopal enemies – remember that since the only thing that really matters is simply not dying if you want the maximum points be sure to keep yourselves healed properly. Hopefully someone picked a Techer or Force!
The pack of Harukotan enemies a little more forward will have special shields on the floating guys, be sure to keep note since you will be seeing more of these later. They will have the close range bypass. The next spawn after also has the same shield weakness, which happens to be a Kodotta Idihta. Note that further down the hall, as you can see from the map above there will be a switch and a rappy spawn at the end. Make sure one person goes down to deal with both.
Omega enemies appear going forward and there’s two things to note: There will be a laser tripwire going around the area so do your best to avoid triggering the trap. Behind the Golem is a stack of boxes which may seem just like a normal wall, but there’s actually a path behind it for a switch and some VR that someone needs to go and get. Someone with a double jump ability should go and deal with it. When that’s all done with the next pack is just a group of Darkers with another small VR capsule for you to pick up.
The final area of Mission 1 is a wide space where you’ll face off against an ESCA Ragne. Deal with it in any way you can, there’s nothing else special about this area but I would suggest to try and keep it in one place as possible. A good class lineup should be able to just go right for the weak point and kill it very quickly.
Once you have dealt with all that, so long as you did all the extra requirements you’ll be rewarded with boxes containing: Extra supply items, a random 13* weapon, and a Challenge Doll. And a mile crystal at the end.
MISSION 2 (Darker’s Den)
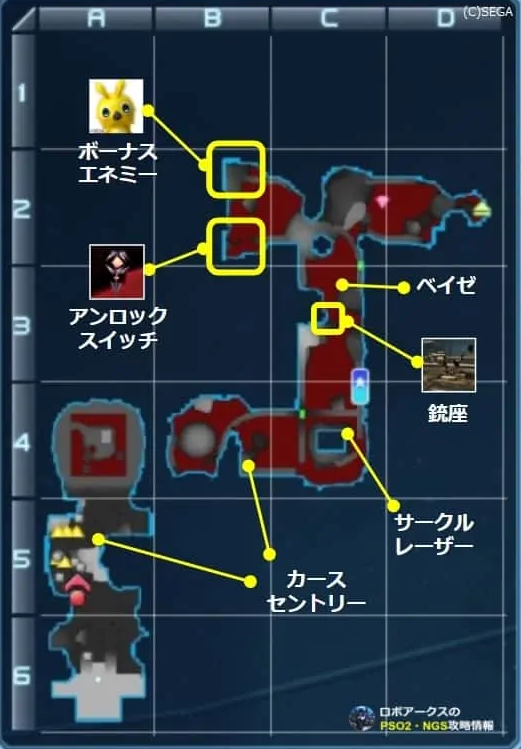
Remember: The switches unlocks the gates at the end, and the Rappy provides bonus points.
TL;DR Objectives: Destroy Baize, Kill Rappy, Activate Switch
First group of enemies to deal with is a pack of Luminmechs and some turrets. Even with a dedicated healer it would be a good idea to have someone deal with the turrets asap while the rest groups of the pack for AoE. If you have a weapon that you know someone else in your MPA can use, make sure to let them know to give it to them (Some do have better priority, for example Heros can still do fine with their main wep but Launchers should go to Rangers immediately.) As a side note here – off class weapons have very little use in this quest unlike the other ones so it’s not worth it at all to keep Gunslashes on say, a Fighter loadout. If you were low on VR, it would have been Dagans + Lenda spawns.
The next few spawns will be a mix of Darkers and Luminmechs, but do watch out for these spawns as they do hit much harder than some of the other packs in this area so feel free to do more careful play if needed. They’re otherwise generally prime for AoE damage. There is Nove Ringahdarl boss here too so Support classes should Resta and use Zanverse where appropriate. Low VR will have the mob selection switched around through these areas.
A telepipe will spawn taking you to the next section of the map when that’s all dealt with and now you’ll definitely want to try a little harder here. Firstly, there is a Baize trial here and the timer is strict, it’s also behind a couple of spawns before actually getting there so speed is of the essence. Secondly the first pack that spawns here contains a El Scudo and it will immediately go into it’s Deband casting animation. If it successfully gets it off then for a brief period of time all enemies around it will only take 1 damage from everyone’s attacks. Rangers and/or Force is absolutely a key class to deal with this spawn since you can use Mirage Shell/Razan to inflict Mirage on the Luminmech to stop it from casting Deband. If you have any class that can use a CPA, you should be able to one shot the spawn with any weapon CPA
It doesn’t get really get any easier after that, there is a small VR Capsule on the left, then going around through the right side brings you to a pretty troll-ish spawn of Radilugo Luminmech + some others all on top 4 corrupted trap pads above the damaging floor. If you can get away with deactivating the trap pads first without any deaths it might be a good idea to do so. Wulfs will also be floating around to make movement a little more difficult.
The Baize will be available to attack after all that nonsense, so hopefully you moved quickly enough to deal with it. It’s still guarded by some powerful Luminmechs, but there will be a group of pressure platforms leading up to a Turret at the top in which you can use to kill the Baize faster or shoot at the enemies, whichever seems more appropriate for your group to do – but destroying the Baize definitely should be the priority here. Another small VR capsule is knocking about in the area.
At the end of all that, the final enemy of Mission 2 is just one Elder Arm. Neither this one really has anything special going on for it, but you do have a much smaller arena to use which can be a bit dangerous for some of it’s attacks. There’s also a left split that leads to the Rappy+Switch combo, once again someone needs to take care of both of these objectives. The small area on the left side is also a bit bigger to use so it may make fighting the Arms a bit easier.
If you deal with everything properly, you get more boxes and miles as a reward. You’ll head into an interval area next.
Interval 1
Weapons – All Ideal-C weapon types (1:1 exchange of any Ideal-C weapon)
Items – Monomate, Trimate, Star Atomizer, Moon Atomizer, Tokyo Style Hamburger, Delicious Burger
You get much less stuff to trade in and consider for in these Interval areas compared to the other quests, though there are some decisions to make if a few.
Tokyo Style Hamburgers (Heals 40%) and Delicious Burger (Restores 40% PP) are instant use food items, which simply has a ~2 second CD or so before you can immediately use one again. It’s worth noting that Tokyo Burgers are 6 grinders a piece when Monomates/Star Atomizer are only 3 grinders each when they heal 30% and 50% in an AoE effect respectively. Even the Trimate is 6 grinders. However, the Delicious Burger is only 1 grinder, which is pretty insane for an instant PP restorative item so it’s very good if you’re an aggressive player if you can survive well.
For weapon trade-ins, simply just trade in for another weapon type your loadout can use. It is recommended that everyone picks up a second weapon of their appropriate loadout, even for the Luster loadout just to have better coverage if nothing else.
For rush classes, the best CPA weapons to take is Launcher and Bow. Make sure someone has a Bow for M4 if needed, otherwise Launcher for general CPA use.
MISSION 3 (Ultimate Tunnels)
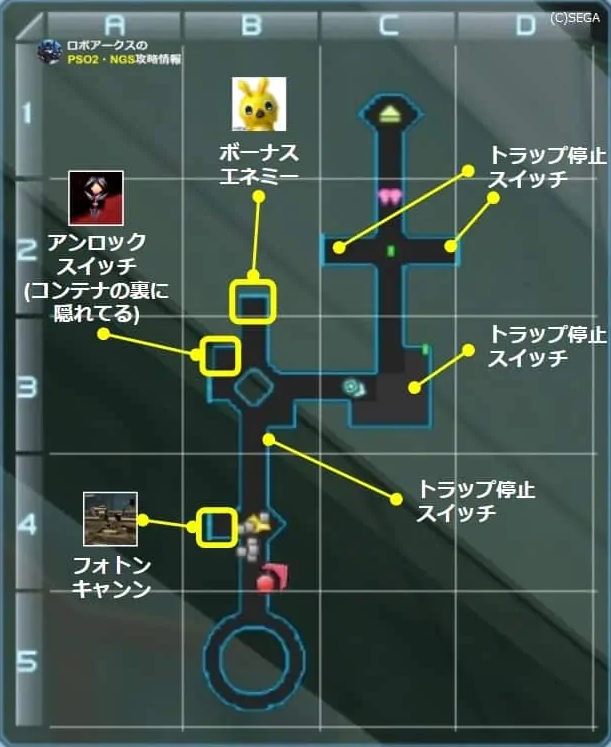
Remember: The switches unlocks the gates at the end, and the Rappy provides bonus points.
TL;DR Objectives – don’t activate Tripwires, Kill Rappy, Activate Switch, Acitvate buttons
The first spawn will generally be a group of Darkers + Luminmechs, on the left side there are two Photon turrets that do deal a decent amount of damage+AoE to have people use them if possible. Another variation of this spawn will be Lilipa mechs, both normal and corrupted versions.
The next part of the map will have an arrow pointing to a button, you will have to activate all the buttons on this map and not all of them are marked. The map above shows the locations of the buttons, have one person activate them ASAP. You also want to keep aware of the Tripwires moving about in the room, don’t activate them. There’s also the Rappy+Switch combo on this section, with all the enemies you’ll have to deal with so it’s a pretty busy room all in all. You will either deal with a combo of normal+corrupted Lilipa mechs or a group of Luminmechs.
Going forward will have an open square arena with active spike traps dealing a lot of damage while you face either: a Veldfodrus or a Mizer+Tranzexia combo with their appropriate, high damaging goons backing them. A Turret is placed on top of a couple of boxes and the switches around this area will deactivate all the spike traps – get to them ASAP. The Turret can activate these switches pretty fast if needed. A small VR capsule will be available to pick up here.
For this spawn, for safety make sure you don’t move after you hit the jump pad and use a ranged attack/weapon to hit the switches first. Then, if you have any AoE attacks be sure to use them on the Sabers/Mech enemies to group the up together so they can be bursted down easily (Launcher CPA highly recommended)
The last spawn to deal with has you fighting against either a Epsilon Granz or a Dralberouge – the 4 way intersection has the two left and right paths guarded by a laser fence (Which you can abuse for dodge interactions) Both sides has buttons you’ll have to activate in order to get all the objectives done, and there’s another small VR capsule in the middle. Should you be successful in all of that, the reward for this stage is two Miles crystals, and boxes for more grinders and another Challenge Doll.
Make sure everyone is ready to move on before you head on to the next area!
MISSION 4 (Castle)
Remember: The switches unlocks the gates at the end, and the Rappy provides bonus points.
TL;DR Objectives: Kill all enemies within the timer, Kill Rappy, Activate Switch
Immediately once someone spawns in, you will be greeted with an E-Trial that requires you to kill all the enemies within the stage before the timer given runs out (You have roughly ~4 Minutes) If there was any time to go into sweaty gamer mode this is definitely it, since if you fail to clear the objective then you’re just given a pipe to immediately go into the next area, regardless of how close you were to clearing any of the objectives. So hope you got a good DPS rotation going!
There’s otherwise no other special restrictions within the stage itself and it’s really just a straight shot to the end. The Rappy is on the top right side of the first castle rooftop, with the switch being on the bottom left side of the second castle rooftop. Make sure only one people gets to these. You will reach some Miles crystals and some small VR Capsules along the way.
Since it’s just a straight shot to the end, here’s just the list of possible enemies you’ll have to get through to the end. Similarly to Mission 3, the enemy set seems to be influenced by current VR when entering the stage:
Set 1: Fang Banther (Attack from Short Range WP) / Krabahda army + Zeshraider (Attack from Short Range WP) / Gigur Gunnegam (Frontal Attacks WP) / Jahmagrs Horde + Plosiogrs / x2 Dark Emperappy (Attack from Short Range WP) + Stage 3 Evilion Dragon (Attack from Short Range WP)
Set 2: Rockbear (Frontal Attack WP) / Sil Sadeenian army + Quartz Dragon (Frontal Attack WP) / Gwahl Jigmolde (Attack from Short Range WP) / Ventasaur Horde + Boks Deubarz (Attacks from Short Range WP) / x2 Emperappy (Attacks from Short Range WP) + Vol Dragon (Attacks from Short Range WP)
If you got Set 1, using some CPA on the Zesh’s core can speed it up. CPA usage is highly recommended on the Plosiogrs/Boks and the Dragon/Rappy spawns as well, Bow CPA preferred.
Interval 2
Items – Monomate, Trimate, Star Atomizer, Moon Atomizer, Tokyo Style Hamburger, Delicious Burger
Really, I would have something big to type here but there’s not much more you can get here.
I would highly suggest stocking on healing items here though. Since the final stage is simply a boss fight, spending excess grinders to afford the Burgers is actually a pretty fair investment here, so if you think it’ll help you not die then definitely afford it. For a team run though, the Moon/Star atomizers should likely be prioritized. Delicious Burgers are only 1 grinder each, so should you be left with any odd amount of grinders left may as well get these for your heavy hitters.
MISSION 5 (The Edge of Space and Time)
TL;DR Objective: Survive.
Unlike any other mission featured so far in CM quests, this one is very unique in that depending on a variety of factors when you enter this stage, all of which relates to your quest performance, you will face a different boss. All of these bosses are titled but since this is CM this doesn’t matter too much but you should watch out for their attacks cause it will hurt.
The requirements of each boss to spawn is as follows (You only get one of these groups each run):
The Primordial Darkness, Gomoras + Sodam – VR Gauge must be 100%, and you must reach this stage in 13 minutes or less (Interval time does not count towards this)
Omega Double + Doublis Clone – You must reach this stage in 13 minutes or less, missing a switch on one of the stages.
Falz Hunar + Omega Hunar – VR gauge is at 80-100% (Must not meet the PD/Double time requirement)
The Primordial Darkness, Sodam – VR Gauge is at 30-70% (Must not meet the Double time requirement)
Anga (Beast Form, no Weapon Resists) – VR Gauge is less than 30% (Must not meet the Double time requirement)
Omega Apprentice – The MPA must only choose Attack classes (Must not meet other boss requirements)
Omega Luther – The MPA must only choose Rush classes (Must not meet other boss requirements)
Execour – The MPA must only choose Support classes (Must not meet other boss requirements)
Omega Masqerader – You must reach this stage solo, with your VR gauge at 30-70%
If you were aiming at getting the maximum score for leaderboard purposes, you will be expected to fight TPD or Execour/Apprengia/Luther so might be a good idea to practice those fights since any of these bosses do hurt a lot thanks to all of them being titled.
Don’t worry if you happen to get Anga too much, since he does not have the ability to resist weapons (though being at a very low VR in order to spawn him, care is needed)
There’s no gimmick here otherwise, just kill the boss before they kill you, easy.
Rewards?
With this update, there are a few things that are worth the time invested here to get.
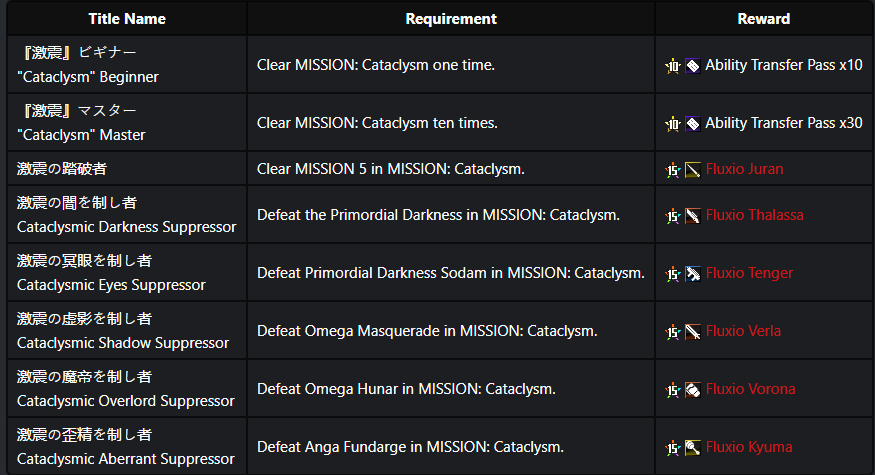
The Challenge Miles shop has been updated to add two important items: Enhance Cap +1 (Increase Grind value of weapons up to +35) and Ultimate Booster (Type of special currency) which are both important end game items to farm, and if you can nail any of the previous challenge quests well they’re very easy to farm for.
The big thing though is definitely the Fluxio series. These are 15* weapons that support SSA 1/4/5, have Ether Factor as the SAF, and power-wise they are only just one notch below Cras weaponry. The potential is as follows when grinded to +30:
Power is increased by 13%. By attacking, for 20 seconds you gain: 8% damage increase, PP cost reduced by 20% and maximum PP is raised by 100. You must deal 1.5 Million damage to refresh the duration.
They are very powerful weapons, and are very much worth getting. You can freely do a 1:1 exchange at Zieg to swap it’s weapon type at any time you wish as well. The Fluxio weapon comes at 30 cap when obtained from the title rewards
There also is clear titles for CM3, clearing it up to 10 times for a total of 40 Affix Transfer Passes.
This is all about Phantasy Star Online 2 – Mission:Violent Tremor Rundown (CM3); I hope you enjoy reading the Guide! If you feel like we should add more information or we forget/mistake, please let us know via commenting below, and thanks! See you soon!
- All Phantasy Star Online 2 Posts List



Leave a Reply