0: Welcome
Welcome to my guide, i’ll try to teach you how to create custom animations for Payday 2.
Note that this is a primitive guide for creating .animation files, that, due to how weapon part animations are set up, this guide will not contain explanations on how to change weapon part animations. The only animations this guide covers are arm movements. I have no idea how to change those, so i will not be covering this, and instead, i will be working around this limitation.
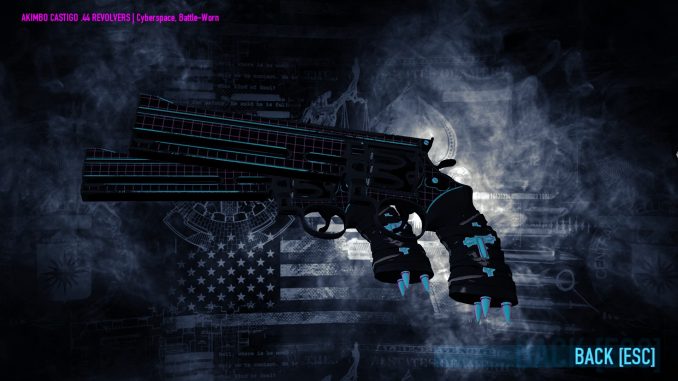
This is what I’ve made with those limitations:
Also here’s a video version of the guide, if you can’t understand what i describe, refer to this (tho it’s almost two hours long):
1: Requirements
Obligatory:
Blender: https://store.steampowered.com/app/365670/Blender/ OR https://www.blender.org/download/
FPS Animation Resource: https://modworkshop.net/mod/28271
Cpone’s Blender plugin: https://gitlab.com/cpone/io_scene_dieselanim
Diesel Bundle Viewer: https://modworkshop.net/mod/27741
Optional:
Free Flight Camera: https://modworkshop.net/mod/16272
string_id Revealer: https://modworkshop.net/mod/14801
2: Setup
First, you need to install Blender. The easiest task on the list. Then you need to install Cpone’s add-on. Do that via Edit => Preferences => Add-ons => Install…. In the filter drop-down menu select “User’ and make sure the add-on is there and the box on it is ticked.
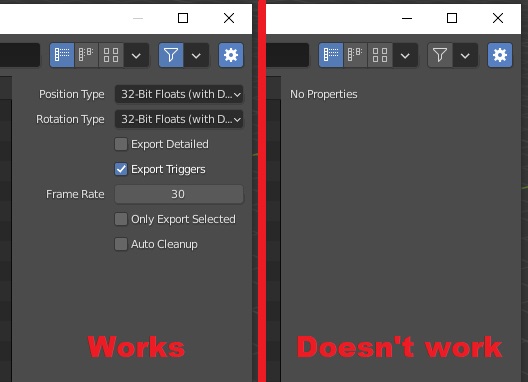
NOTE: Make sure the add-on is working. Try hitting Export => Diesel animation and make sure there are attributes on the right side of the export window that’ve just popped up. If there’s none, you’re on Blender 2.93, you gonna need to download 2.92 from the official website. 2.93 uses a new python version and that’s the issue as far as i know.
Now you need to decide what do you want to do and what animations you want to be changed. After you’ve picked an animation, you need to find and extract it via Diesel bungle viewer. If you can’t find the weapon, it might be added recently, and your Hashlist is outdated. Get a new one here: https://github.com/Luffyyy/PAYDAY-2-Hashlist/blob/master/hashlist
After you’ve exported animation from the game files, you gonna wanna open the DieselFPS_Arms.blend from FPS Animation Resource. Don’t save over it, you gonna need the original for other animations. To import an animation, select the skeleton, import an animation with Only the selected attribute box ticked, so it won’t affect the hand models. Now the rig will most likely lookup. In most cases, you can just rotate it 90 degrees flat so it will be the right side up. Some animations like 1887 won’t be easily rotatable, not even counting in that the weapon bone there isn’t in it’s lined up position, but it’s rare.
You could also create a camera that would imitate the ingame one, but it won’t line up correctly, so just use it for a rough preview. Now put a Inverse Kinematics on both hands with chain length of 3 and tick the rotation checkbox. We don’t need to set a target for IK for it to work, but we’re gonna need that if we want a hand to “stick” to the weapon. To do that for the left hand, create another armature with one bone, give it a Copy Transforms modifier, create a visual keyframe and delete the modifier. It should be now in the same position as the left hand. Then go to the left hand and set the target to be the new bone. Now to move the left hand you gonna move the new bone, not the hand. There’s a flaw though: IK doesn’t put the hand in a precise position of the bone. To work around that you need to create a blending from IK being disabled and enabled. To do that, keyframe the Influence parameter on the IK modifier. The weapon should follow the right hand as if it’s being held by it. Give the bone named a_weapon_right a child modifier and make the right hand it’s parent. Disable it, press Set Inverse, enable it back and it should be set.
2.1: Tracing the original animation
Now we face the limitations: we can’t edit a gun’s movement. That includes bolts, magazines, slides and pumps. Rarely that does not include shells and rounds on single round\shell loading guns.
To work around that we need to trace the original animation via a “copycat”. Create an armature, and create a second bone. You need it to be attached to the first one, but not restricted in terms of position. If you’ve created a bone that is connected directly to the first one, Right-click it, then go Parent – Clear – Disconnect bone. If you have two completely disconnected bones, then select both of them, make the first one active, Right-click it and then go Parent – Make – Keep offset.
If you did everything correctly, the first bone’s movement and rotation should affect the second bone, but the second bone should be able to rotate and move independently but relatively to the first one.
With this setup we will be able to track one hand’s movenemts relatively to another.
Now, if the left hand on the animation is used to operate the magazines, the second bone will be copying the left hand’s movements and the first bone will track the right hand. Create a Copy transforms for each bone to track it’s hand. Play the animation and check if it’s working.
If the bones fallow their set hands, go to the left copycat bone and create a “Visual rotation and location” keyframe. Press I in the 3d view window and find it there. Create visual keyframes for every frame. That will take a long time, and i don’t know about a faster way of doing it.
After you’ve created a visual keyframe for entirety of the animation, delete the Copy Transforms modifier on the left copycat bone. Select LeftHand, LeftForeArm and LeftArm bones, delete all but the first keyframe, go to left hand, in it’s IK modifier set the left copycat bone as a target there. Now play the animation. If everything’s correct, the left hand should move like nothing happened. Except now if we move the right hand in any position we desire, the left hand will do it’s actions relatively to the right hand.
For more control, have another armature be a target of the left hand’s IK and then give it a Copy transforms modifier that traces the left copycat, then keyframe it’s influence however you want. That way you can control what parts of the animation should be old trace and what should be animated by you.
NOTE: If you have a slight visual lag on the hands or the left hand sometimes glitches out and doesn’t update it’s position, you might have a dependency loop. Example: LeftHand has a IK modifier, it’s target is Left copycat bone. Left copycat bone has a Copy Transforms modifier that has LeftHand as a target. That way two bones track each other and we have a loop. They will mess up the movement slightly in the end, and it’s will look bad.
3: Animating
To start animating, you gonna want to delete the animations you want to animate yourself.Try to keep the first frame of an animation intact before you know what you’re doing.
For starters you can simply delete animation on the right arm, you’ll need to delete keyframes on RightHand, RightForearm and RightArm bones. Then move it however you want, try to create some simple movement for now, then go to part 4 of this guide.
NOTE: Do not use Trackball rotation (pressing R two times enables it), becase it might make your bones rotate the wrong way inbetween keyframes.
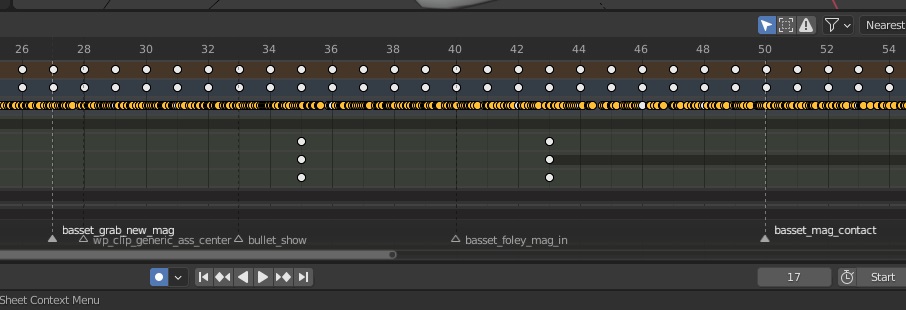
Weapon sounds are triggered by markers, that you can rearrange. Without coding, you can only use specific sounds that are assigned to a weapon. If you’ve created an animation without importing, and are missing the original markers, you can import original animation and copy it’s markers.
Example of those kinds of markers.
4: Exporting
Just to see how it works and how your basic animation will look in game, you gonna export the animation as soon as it looks like something. Not good, just something.
Select the following bones: RightHand, RightForearm, RightArm, LeftHand, LeftForeArm, LeftArm and a_weapon_right. Create a keyframe in the end of the animation for all these bones, and i there’s supposed to be one in the beginning already. Save now, then select all keyframes for those bones and press Key => Sample keyframes. A bunch of blue keyframes will appear. Don’t save after sampling because they are really messy to animate with, but we need them for our animation to look smooth in-game. Now select all the bones of the original rig (make sure all the armatures created by you are deselected).
NOTE: Sampling creates a keyframe between the first and the last keyframes on the whole animation. If you’re missing one of them, sampling won’t create some if any keyframes. If that happens, animation will look broken in-game as if there’s no animation happening. For example, a weapon may not move at all, while it does move in Blender correctly.
Go to export -> Diesel animation(.animation) and tick Only Export Selected, untick Export Detailed if it is. Export animation to wherever you want. Then go to the PAYDAY 2/assets/mod_overrides directory, create a folder there named however you want, then create the same path that you saw in the Diesel Bundle viewer (it should go like anims\fps\weapon_name), rename your animation into the same you’ve imported into Blender. You could do those actions in the export window in Blender.
Now launch the game. See if your animation works. If it is, then good job. You can ALT+F4 the game now and contintue editing the animation.
NOTE 1: If your game crashes upon starting an animation, see if you’ve exported any bones or keyframes other than the original rig. Third person animations also crash the game.
NOTE 2: If animation doesn’t replace the original, you might have capitalized some of the folder names. They’re case sensitive. You can check if the game sees any mod_overrides files in game’s options – advanced – mods.
5: Do whatever you want
I’ve told you how to export and how to set things up, now you should come up with something cool and do it. Keep exporting versions until they look good enough for you.
General thing is to keep in mind is other animations that yours should blend with, be it itself or other original animations like idle ones.
Try not to create meaningless keyframes on bones that do nothing, it will just make the animation file larger. One or two keyframes won’t hurt, but sampling… well, we aren’t even dealing with a singular megabyte, so idk, just think about it yourself.
If you’ve moved your hand too far worward and it maxes out on it’s movement, you can move the shouler bones forward to give the arms more reach.
If your animation doesn’t feel natural and you can’t point at the issue, try holding and playing around with an replica gun in real life.
The best advice i can actually give you is to watch animation tutorials, there’s a tonn of those on SFM and Blender.
6: Troubleshooting
This section repeats some of the noted problems and adds some on top, so that you won’d need to look for them in the guide later.
Cpone’s Blender Plugin doesn’t work.
Downgrane Blender to 2.92. You can download an older version from the official website. The issue is that 2.93 uses a newer Python version, that’s all i could figure out.
I’ve rotated a hand and when i play the animation it twists the other way.
You’ve used trackball rotation, it may cause this glitch, idk why. Just don’t use it, it’s not that vital. Or figure out how to actually fix this and tell me.
The hands freak out\lag behind.
It’s probably a dependency loop. It happens when two bones have two modifiers that rely on each other and modify each other’s position or rotation. Example: LeftHand has a IK modifier, it’s target is Left copycat bone. Left copycat bone has a Copy Transforms modifier that has LeftHand as a target. They will mess up the movement slightly in the end, and it’s will look bad. Dependency loops will mess up the movement in the end, and it’s will look bad.
Game crashes when i pull out my weapon\start my animation.
You’ve probably exported bones that aren’t a part of the ingame rig. Also third person animations crash the game.
My animations won’t play, instead the original plays.
BLT weapon mods and libs might cause this. Also folder names are case sensitive, so keep it anims/fps/weapon/weapon_reload instead of Anims/FPS/Weapon/weapon_reload
7: Exporting new weapon animations (OPTIONAL)
If you’ve made an animation mod and think you like animating payday, here’s something that can help you getting started with new weapons.
In order to extract files, Diesel Bundle Viewer needs to know a path and a name of a file. Those are stored in a Hashlist. It is being updated here: https://github.com/Luffyyy/PAYDAY-2-Hashlist/blob/master/hashlist
But im going to show you how to edit it manually.
Firstly, we need to know a weapon’s internal name. Since the hypothetical weapon is added today or yesterday, Hashlist resources might not have them included yet.
Install string_id Revealer and use it to figure out the gun’s name. Then locate the Hashlist, open it with a Notepad, and add following lines in the very end, replacing “weapon” with the internal weapon name you’ve found:
anims/fps/weapon/weapon_com_var1
anims/fps/weapon/weapon_com_var5
anims/fps/weapon/weapon_com_var6
anims/fps/weapon/weapon_com_var7
anims/fps/weapon/weapon_equip
anims/fps/weapon/weapon_get_up
anims/fps/weapon/weapon_gogo
anims/fps/weapon/weapon_idle
anims/fps/weapon/weapon_inspect
anims/fps/weapon/weapon_melee
anims/fps/weapon/weapon_recoil_enter
anims/fps/weapon/weapon_recoil_exit
anims/fps/weapon/weapon_recoil_loop
anims/fps/weapon/weapon_recoil
anims/fps/weapon/weapon_sprint
anims/fps/weapon/weapon_sprint_enter
anims/fps/weapon/weapon_sprint_exit
anims/fps/weapon/weapon_tased
anims/fps/weapon/weapon_tased_boost
anims/fps/weapon/weapon_tased_exit
anims/fps/weapon/weapon_unequip
anims/fps/weapon/weapon_use
If a weapon has a usable bipod:
anims/fps/weapon/weapon_bipod_enter
anims/fps/weapon/weapon_bipod_exit
anims/fps/weapon/weapon_bipod_reload
If it is using magazines:
anims/fps/weapon/weapon_reload
anims/fps/weapon/weapon_reload_not_empty
If it is reloaded with single shells or rounds:
anims/fps/weapon/weapon_reload
anims/fps/weapon/weapon_reload_not_empty_exit
anims/fps/weapon/weapon_reload_enter
anims/fps/weapon/weapon_reload_exit
Diffrent guns may have diffrent names for those, so it might not work with those generic names, peacemaker has a peacemaker_reload_insert instead of peacemaker_reload, shotguns have r870_reload_loop
If it has an underbarrel grenade launcher, it might use an entire new set of animations:
Underbarrel exclusive animations:
anims/fps/weapon/weapon_underbarrel_enter
anims/fps/weapon/weapon_underbarrel_exit
anims/fps/weapon/weapon_underbarrel_com_var1
anims/fps/weapon/weapon_underbarrel_com_var5
anims/fps/weapon/weapon_underbarrel_com_var6
anims/fps/weapon/weapon_underbarrel_com_var7
anims/fps/weapon/weapon_underbarrel_equip
anims/fps/weapon/weapon_underbarrel_get_up
anims/fps/weapon/weapon_underbarrel_gogo
anims/fps/weapon/weapon_underbarrel_idle
anims/fps/weapon/weapon_underbarrel_inspect
anims/fps/weapon/weapon_underbarrel_melee
anims/fps/weapon/weapon_underbarrel_recoil_enter
anims/fps/weapon/weapon_underbarrel_recoil_exit
anims/fps/weapon/weapon_underbarrel_recoil_loop
anims/fps/weapon/weapon_underbarrel_recoil
anims/fps/weapon/weapon_underbarrel_reload
anims/fps/weapon/weapon_underbarrel_sprint
anims/fps/weapon/weapon_underbarrel_sprint_enter
anims/fps/weapon/weapon_underbarrel_sprint_exit
anims/fps/weapon/weapon_underbarrel_tased
anims/fps/weapon/weapon_underbarrel_tased_boost
anims/fps/weapon/weapon_underbarrel_tased_exit
anims/fps/weapon/weapon_underbarrel_unequip
anims/fps/weapon/weapon_underbarrel_use
For melee weapons:
anims/fps/melee/weapon/melee_attack_var1
anims/fps/melee/weapon/melee_attack_var2
anims/fps/melee/weapon/melee_attack_var3
anims/fps/melee/weapon/melee_attack_var4
anims/fps/melee/weapon/melee_charge
anims/fps/melee/weapon/melee_charge_var2
anims/fps/melee/weapon/melee_start
If animation files don’t show up, that means that either the gun doesn’t use those animations, or that it reuses another gun’s animations. Or that it uses a diffrent name for a given animation like i’ve mentioned before with peacemaker and shotguns.
8: Closing notes
As far as i know, weapon movement is stored in a gun’s model. I don’t know how to extract them or how to edit them, so im just working around that.
If you have any issues, you may ask them in the comments, and if i got something wrong, write a comment as well. Also if it’s a Blender issue, you can try to google it.
I won’t make a guide about creating a complete reanimation including weapon movement untill i know how it works, or if somebody creates it before me.
I hope you enjoy the Guide we share about PAYDAY 2 – How To Create Custom Animation on Payday 2; if you think we forget to add or we should add more information, please let us know via commenting below! See you soon!
- All PAYDAY 2 Posts List


Leave a Reply