This guide will give you tips on how to beat all chains as Pawnbarian.
I’ll explain interactions and strategies in depth, and will show you example builds to beat each of the dungeons on Chain X.
Introduction
In this guide I’ll only be talking about the Pawnbarian class, as I don’t have much experience with the other two classes (yet), but the guide may be helpful for Knight Templar and Shogun as well, because I’ll also go over game mechanics and general strategies that all of them share.
First of all, I’d like to claim that I have a decent knowledge about chess, but I don’t think you have to be good at chess to be good at this game. It’s a way easier game to learn, all you need to know to begin is how pieces move, and you’ll naturally learn some patterns while playing the game.
You’re not pressured by time either, because you have as much time as you want for every single turn, so think your moves through, no need to rush anything!
As soon as I finished Chain V, I knew I wanted to make a guide once I hit Chain X, because looking at the achievements I saw that I was ahead of the curve, which makes it my responsibility to help others. (As far as I’m concerned, I’m the first person who beat Chain X.)
Knowing that I would make a guide eventually, I began paying more attention to what and why I was doing, and I kept taking notes, so that I could share it with everyone!
I’m not going to go through how pieces move, and what upgrades do, because that’s something you can read in the game.
Rating each upgrade
Here’s a list of which upgrades I’ve found the most useful and least useful throughout my journey beating the 10 Chains (from best to worst):
Shield:
Feels like easily the strongest upgrade. When the Blight on the board is getting overwhelming, this upgrade really shines. In an average game I block 3-5 times as much damage with Shields than the damage I take. It’s legitimately insane how much damage it can block in the long run.
The other great thing about Shield is that it’s not as situational as the other upgrades are.
Cantrip:
It would be the strongest upgrade if it wasn’t for the Spark enemies and its cost. It’s the best when you have both Shield and Cantrip on pieces, because they can stack up a really significant amount of armor (the most armor I’ve had so far was 5) together.
It’s also great for chaining attacks together and killing many enemies at once, then disengaging to a safe area, and it’s probably the most useful when you’re in the backline, and you can use 3-5 queens in a single turn, clearing many enemies that are in the back.
Diagonal Splash:
Very useful because of the enemies that can’t be hit from cardinal directions when you’re next to them. Good positioning makes clearing them with Diagonal Splash extremely effective and satisfying.
The drawback is that in The Foul Shrine, Diagonal Splash often causes you to take damage from multiple Void Grasp enemies, and often times those situations make me wish I didn’t have Diagonal Splash. Although in that dungeon I still tend to have at least one rook with Diagonal Splash, because I feel like rook with Diagonal Splash makes hitting tentacles easier and gives you more control.
It’s still a very decent upgrade though that I often take, it really shines in The Golem Fortress, where many enemies can be dealt with diagonal hits.
Heart:
My issue with this store item (I don’t know if it’s considered an upgrade, as it doesn’t belong to any of the pieces) is that it’s a lot weaker version of the Shield.
Because of the fact that you can only heal maximum 1 heart during each round, this upgrade feels useless.
Imagine the following situation: you have 4 full hearts, and you buy a 5th one. When will the 5th one ever matter? Only if you lose all 4 hearts. Otherwise, you don’t get any benefit from having a 5th heart. If you damage boost once and then get the heart back anyway regardless of whether you have 4 or 5 hearts.
You also can’t heal more than 1 heart in a round as I mentioned earlier.
So if the bonus heart only comes in handy when you lose all the other hearts, that means it’s basically a Shield that you can only use once.
In an average run, I take around 7-8 hits, and I block 20-30 hits with Shields. Paying 5 gold for one more hit is a little expensive.
Regardless, I still buy this upgrade once almost every run, but ONLY in the store before the final round, and mostly if there’s no Shield or Cantrip available in the store, or if I don’t have enough gold for those. Spending 5 gold on 1 hit is still better than not spending the money you have before the final round, and it can come in handy. (Saved a few of my runs.)
When I only have 1 or 2 full hearts before the final fight though, I highly prioritize the heart though.
Cardinal Splash:
I really want to like this upgrade, because it’s so satisfying to have both Diagonal and Cardinal Splash on a piece and kill many enemies in one move. On paper it shouldn’t be much worse than Diagonal Splash, however there’s a huge issue with this upgrade:
The bosses in The Golem Fortress and The Foul Shrine both spawn enemies that are completely immune to Cardinal Splash, because they are immune to attacks when you’re cardinally adjacent to them. This upgrade is hardly ever useful in those boss fights, and even buying a heart is more useful at that point.
Yeah, it can be fine in the Goblin Caves, but that’s the easiest dungeon of the three, and even there, Shield and Cantrip are just too good.
Strategies
In this section I’ll give you a general idea about certain concepts/strategies I’ve found useful.
Pawn promotion
You probably know that if you have 3 pawns in your hand, or if you reach the top row or start your turn in the top row, one pawn gets promoted. To my knowledge it’s always the right-most pawn in your hand that gets promoted. There are a few interactions though that I think are worth mentioning:
You DON’T promote the pawn if you move into the top row with a pawn move, but don’t have a pawn in hand. So if you’re 1 move away from the top row and you have a king and a pawn in hand, 1 action left this turn, then move into the top row using the king move, so that the pawn will promote, and it’ll be shuffled back into the deck as a queen, rather than a pawn.
However, if you only have 1 pawn in hand, which has Cantrip, then you move into the top row using that pawn, and you draw another pawn with Cantrip, then the newly drawn pawn will immediately promote to a queen.
If you start your turn in the top row and draw 3 pawns, then 2 of your pawns will promote to a queen, the first one because you drew 3 pawns, and the second one because you’re in the top row.
Staying in the top row after a move also promotes a pawn. So for example you start your turn on C5, and one of your pawns promotes because you started your turn in the top row. Then you move to E5, which will result in an additional promotion. This is why staying in the top row with a lot of Cantrip pawns is so strong and can clear the board really well.
Damage boost
It technically shouldn’t be called “damage boost”, because there are no invincibility frames involved like in other games, but I still found the phrase fitting.
Above the board you can see your rewards, and you’ll lose the most right reward after each turn. This encourages you to finish each round as soon as possible. The reward on the very left heals you 1 heart after the round.
So as long as you finish the round with any reward left, it doesn’t matter if you have full health or you’re missing one, because you’ll be healed anyway.
This allows you to take damage on purpose to clear the board faster, without losing anything.
Let’s assume that you’re full health, and you have two choices:
1) Take 1 damage this turn but greatly increase your odds of finishing 1 turn earlier
2) Don’t take damage and take 2 turns to clear the board instead
Because of the healing after every round, there’s no reason not to choose the first option. You’re going to be healed up anyway, so it shouldn’t matter.
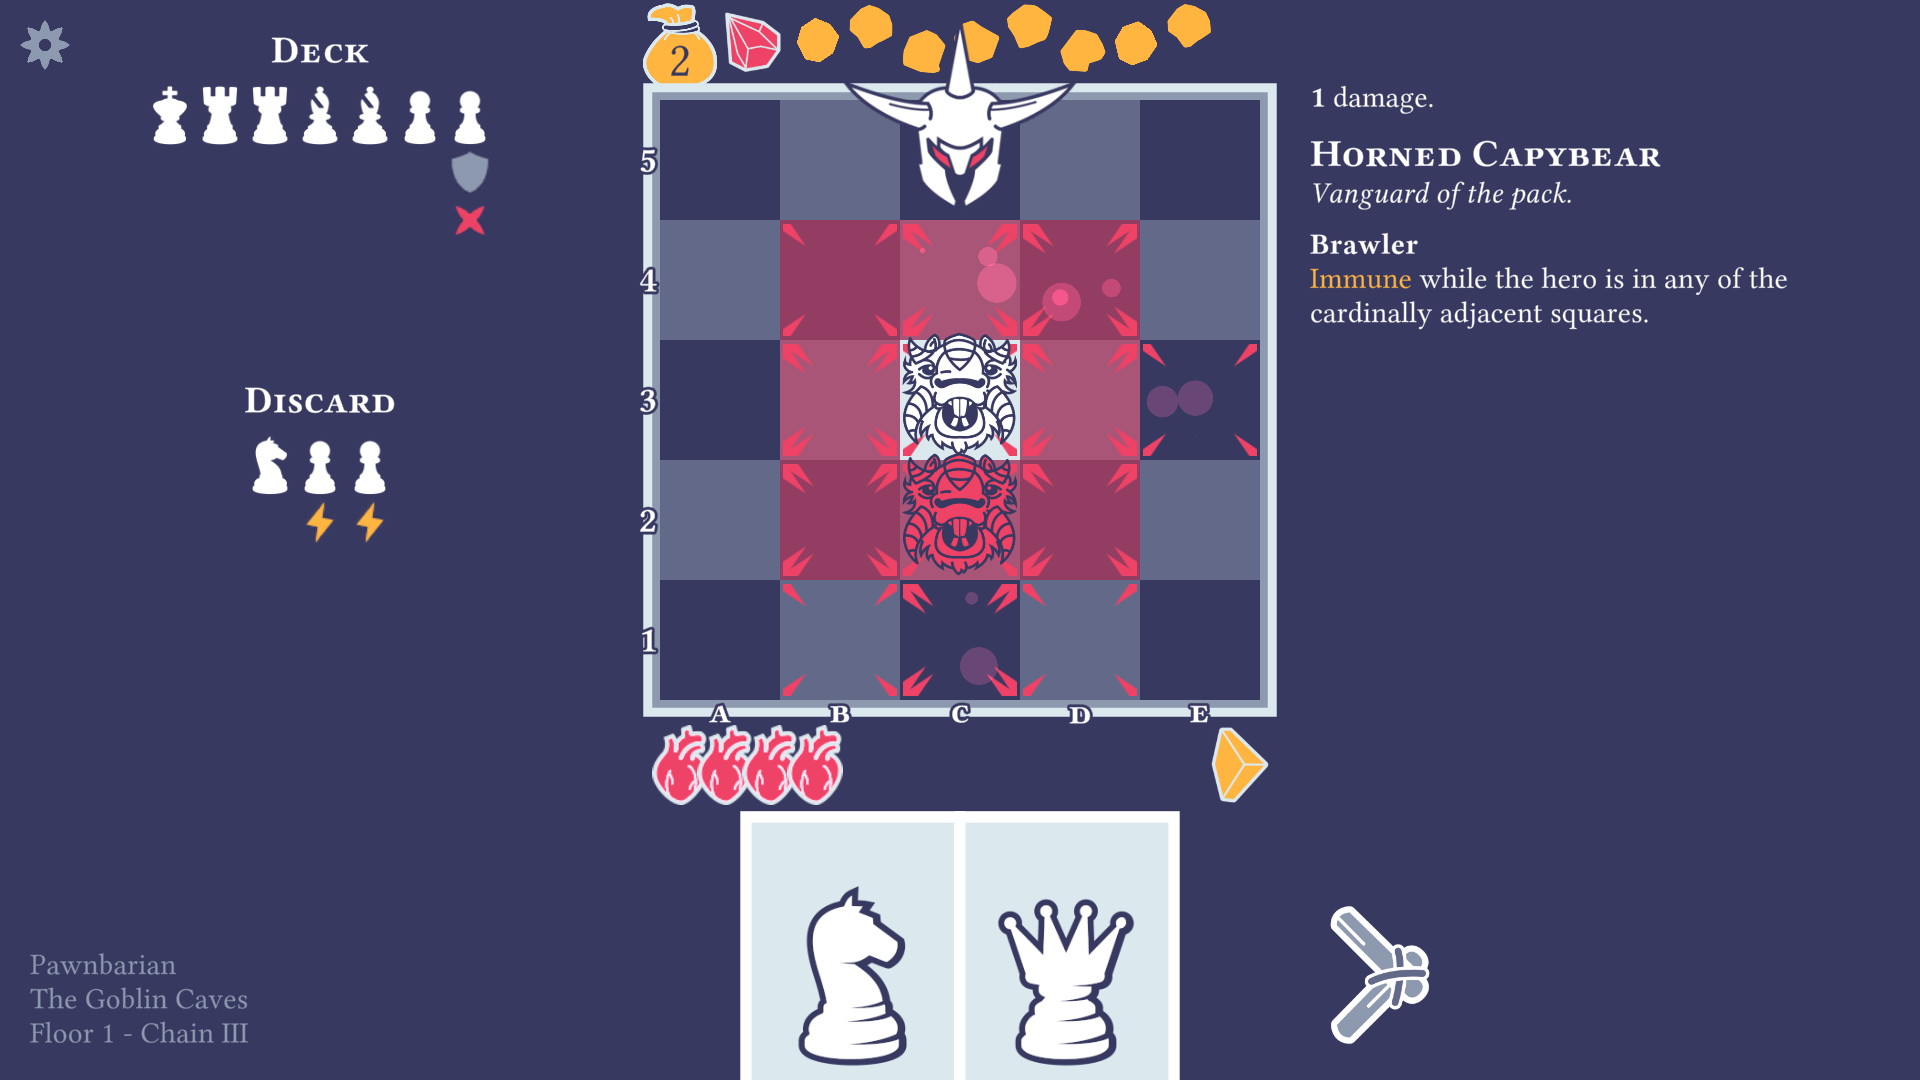
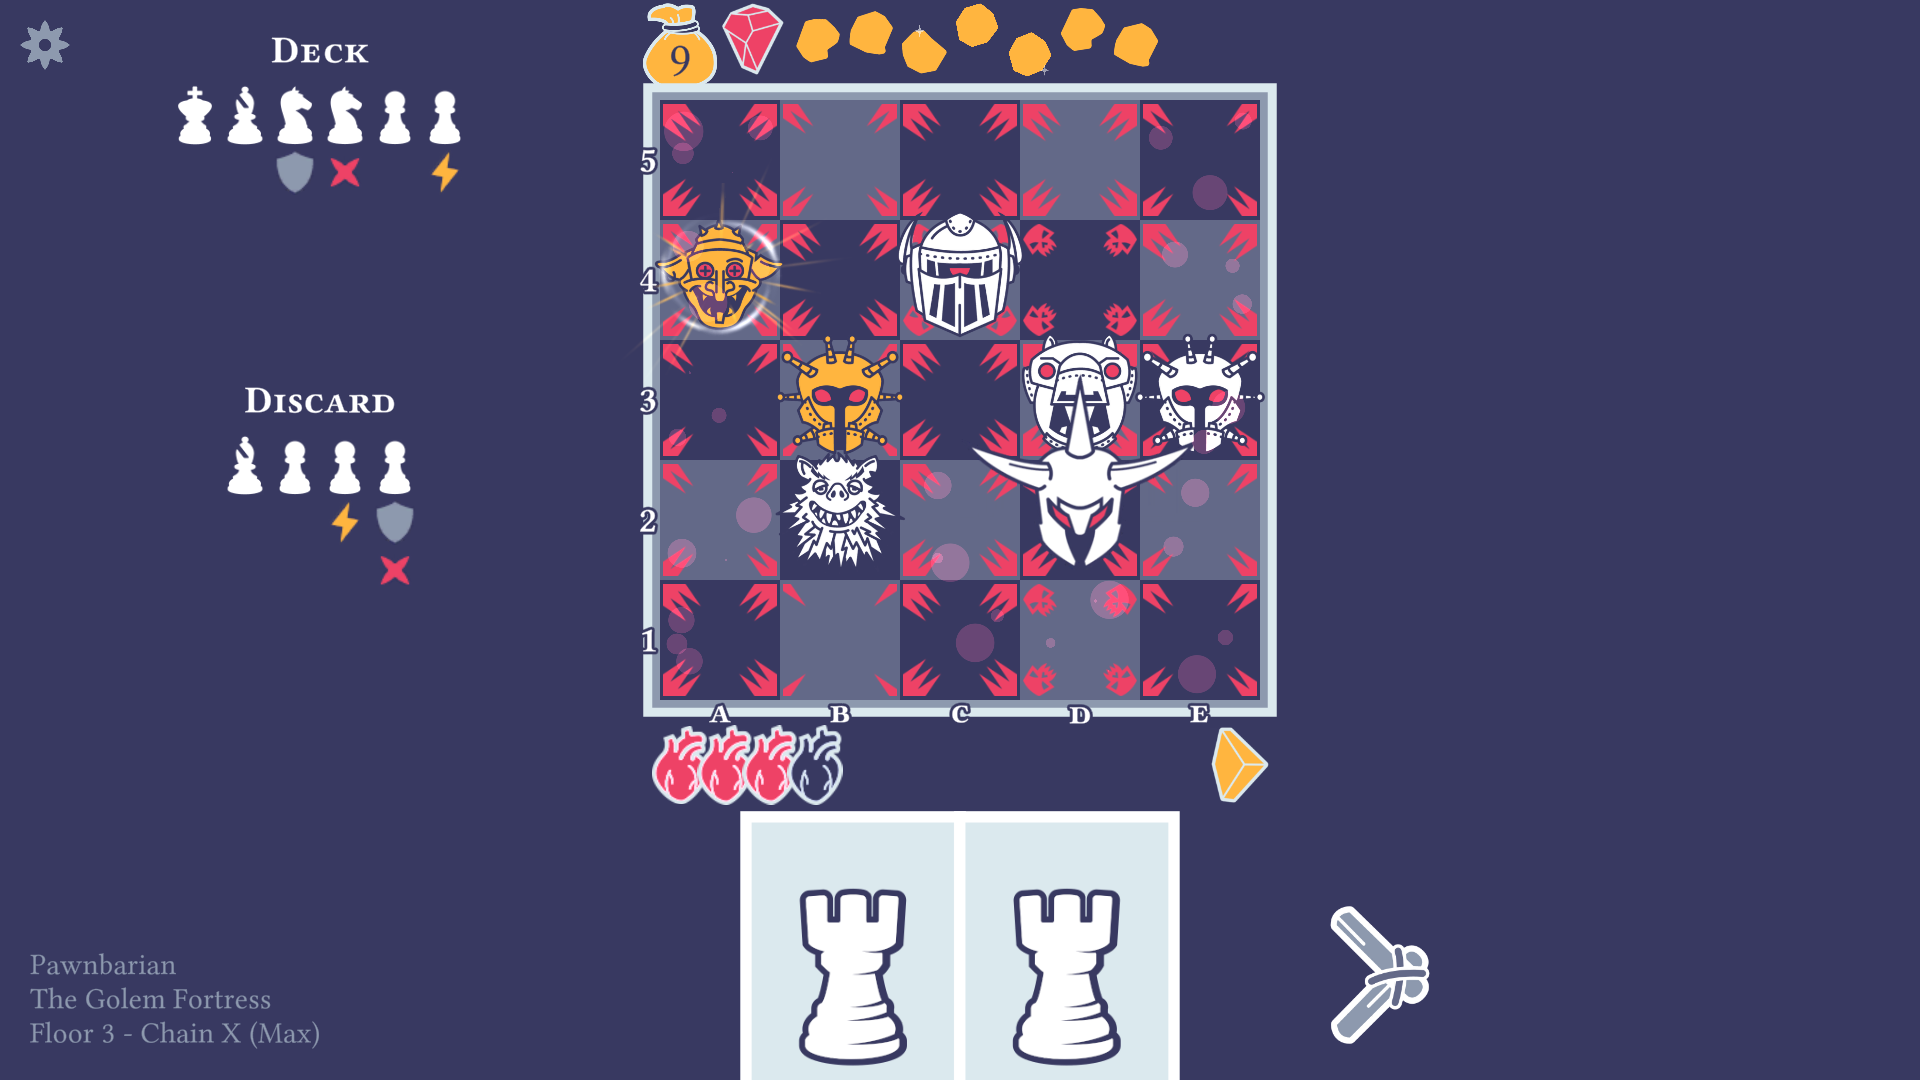
I managed to get into a situation that demonstrates this very well:
Here, both enemies have the Brawler trait (they are immune if the hero is in any of the cardinally adjacent squares). If I pass my turn to avoid damage, then it’s impossible for me to kill both of them next turn. Because of their AI, both of them will move up 1 square, and I won’t be able to kill both with only 1 Diagonal Splash in the deck, and no Cantrips or knights. It would be possible if I still had any of those in my deck, but they are all in the discard pile by the next turn.
However, if I take with queen on C3, then I’ll take 1 damage this turn, but I guarantee that I will be able to kill the last enemy next turn with the pieces that are still in my deck. The lost heart will also be healed back, because the left (red) reward is still there, and I gain 1 more gold this way for finishing 1 turn earlier.
So basically in this case, I lose nothing if I take on C3, but gain 1 extra gold.
I abused damage boosting a lot prior to Chain 6, but Chain 6 makes it so that you start the game with only 2 full hearts, so damage boosting becomes riskier to do.
Economy
The most important thing to mention here is that you don’t have to spend all your money in every store. If you’re doing fine with the floors and don’t run into difficulties, you can save up for the next store if the current one doesn’t have the upgrades you want. That way the next floor will be a little tougher to deal with, but your final build that you face the boss with will be stronger.
If you’re struggling and desperately need upgrades though, then don’t save. It’s really up to how you think you can handle the next floor.
And you probably shouldn’t buy more than 1 heart in a run. Hearts are quite inefficient, buying 1 when you only have 1 or 2 hearts and you’re struggling is fine, but the second one costs 7, and at that point a Shield upgrade is just a lot more efficient. Think of hearts as Shields that only work once, but they’re guaranteed to work once.
Restart until getting a good start
I’m personally not a fan of this strategy, and I haven’t been using it before Chain 8. Chain 8 however causes a huge difficulty spike in the game, and at that point I had to resort to this strategy.
It’s basically restarting until you get an easy first floor, and then hoping for an upgrade you need in the first store. If something goes wrong, restart.
For me a personal rule: finishing the first floor with 11 gold is fine, anything under that is a restart. That means a 2 turn finish when there are 4 enemies, and a 4 turn finish when there are 5 enemies. Although as I saw, having a Nimble enemy increases the gold reward you can get by 1. Not sure about the exact maths here, I usually just go for 11 at least.
But you don’t have to restart in early Chains. As I said, I avoided this strategy until Chain 8, because it’s a little boring.
Enemy Traits
Brawler: Immune while the hero is in any of the cardinally adjacent squares
This is the trait that makes Cardinal Splash a lot weaker than Diagonal Splash.
However, Cardinal Splash will never work here, because you have to move to a square that’s cardinally adjacent to the enemy in order to hit them with the Cardinal Splash, but that will make them immune.
Diagonal Splash is exceptionally useful against Brawler enemies, I personally prefer the Diagonal Splash upgrade on knights, pawns, and the king most.
For The Foul Shrine boss fight I prefer putting Diagonal Splash on one of my rooks, because there you shouldn’t hit multiple Kraken Tentacles at once, and attacking diagonally with a rook feels a lot more precise than it does with other pieces.
Vigilant: Immune while the hero is not in any of the adjacent squares
From what I can remember, Snakepacas are the only enemy with the Vigilant trait, and they can’t attack you if you’re adjacent to them (because of their attack range), so ending your turn next to a Snakepaca both protects you from them, and gives you a good chance to take them down next turn.
Both Diagonal and Cardinal Splashes work on Vigilant enemies, which makes those upgrades a useful tool to deal with them. I can’t remember a single time when Vigilant enemies caused me any sort of problem though, so I consider them really low threat.
Nimble: Dodges the first attack each turn if able (moves in the direction of the attack)
Visually it’s easy to tell if an enemy is Nimble: before they get hit, they have a wind-like aura rotating around them.
Nimble enemies can be killed in one hit if:
– you hit them and have Splash damage in the direction of the attack (Cardinal Splash on rooks, Diagonal Splash on bishops, knights, pawns, and the splash that corresponds to the direction of the attack on king and queen)
– you hit them and they can’t move backwards, because there’s a wall or another enemy in the direction they would move
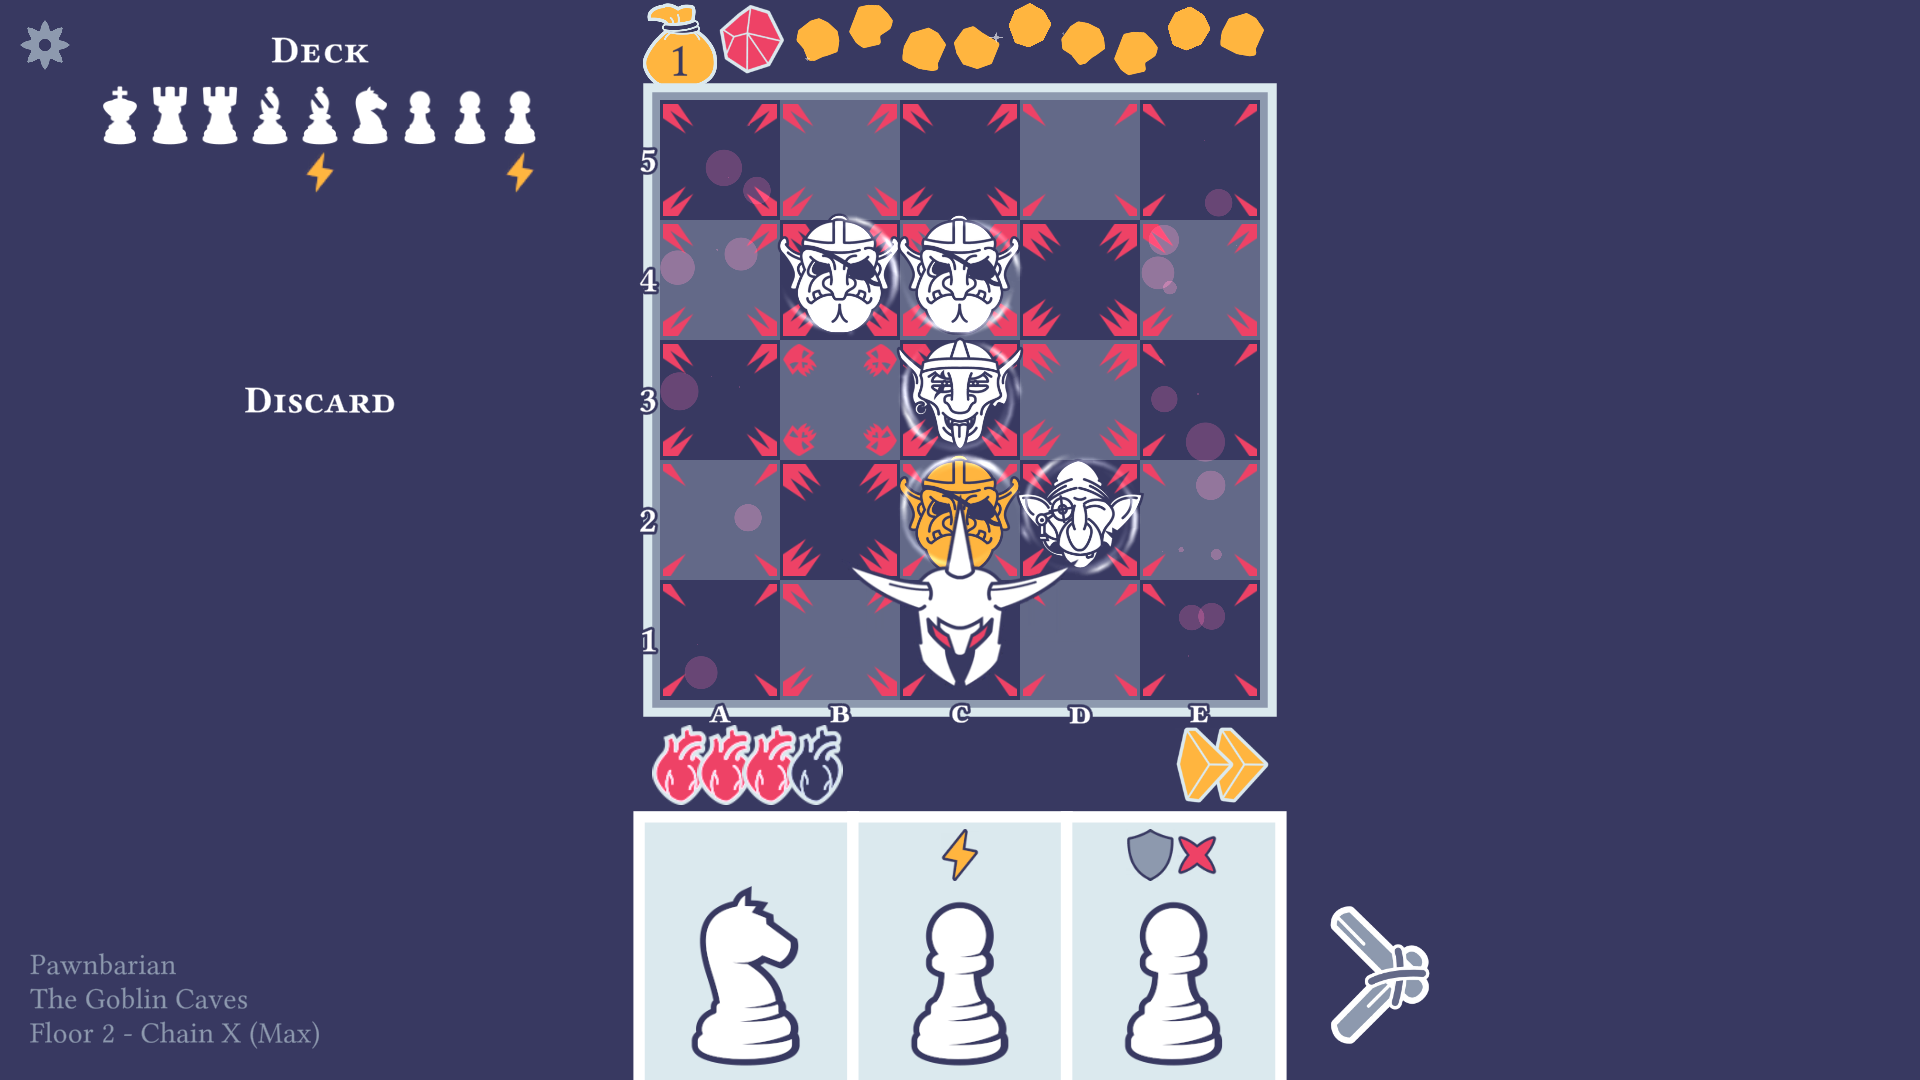
Here’s an example that shows both cases. If I move to D2 and attack the Goblin Archer with the pawn that has Diagonal Splash, the Goblin Archer will instantly die.
Moreover, it will also kill the Goblin Skirmisher standing on C3, because the Diagonal Splash would push him to B4, but B4 is occupied, so the enemy on C3 also dies in one hit.
A little thing about the movement of Nimble enemies: they will try to get away from walls while they’re moving.
Webweaver: On death, make the hero only draw up to 2 cards next turn
I don’t recommend killing one of these when there’s a lot of pressure on the board, because it will decrease your odds of pulling something that could save you. If the pressure is manageable though, kill them. Always look at the remaining pieces in your deck first though, to see how much that 1 draw could matter.
Luckily the debuff from Webweavers doesn’t stack, so it’s advised to kill as many as you can in one turn as opposed to killing only one. This way you can get rid of multiple Webweavers while suffering the 2 card debuff only once.
Blight Wake: Leaves Blight while moving
These enemies should be dealt with quickly, because the more you let them live, the more Blight they’ll put on the board, and the more difficult they’ll make it for you to maneuver on the board.
Blight Blast: Blights all adjacent squares after death
Unlike Blight Wake enemies, these ones you shouldn’t prioritize, because they’ll make the board more difficult to play after their death. If you can get a free kill on one, most of the times you should go for it. However, consider which squares they’ll Blight.
Think of Blight Blast enemies like this: if it’s something like a Goblin Blightbearer (that attacks all adjacent squares and has Blight Blast), then by killing them, you’ll basically stick them in one place for the rest of the game, because it’ll leave Blight in the exact squares that the enemy was originally attacking.
However, when it’s a Blightsack that only attacks adjacent squares cardinally, then you’ll increase their attack area by killing them, because then they will leave Blight on all adjacent squares.
In shorter floors it shouldn’t matter much if you kill Blightsacks early, but on floors that last longer, it can be damaging.
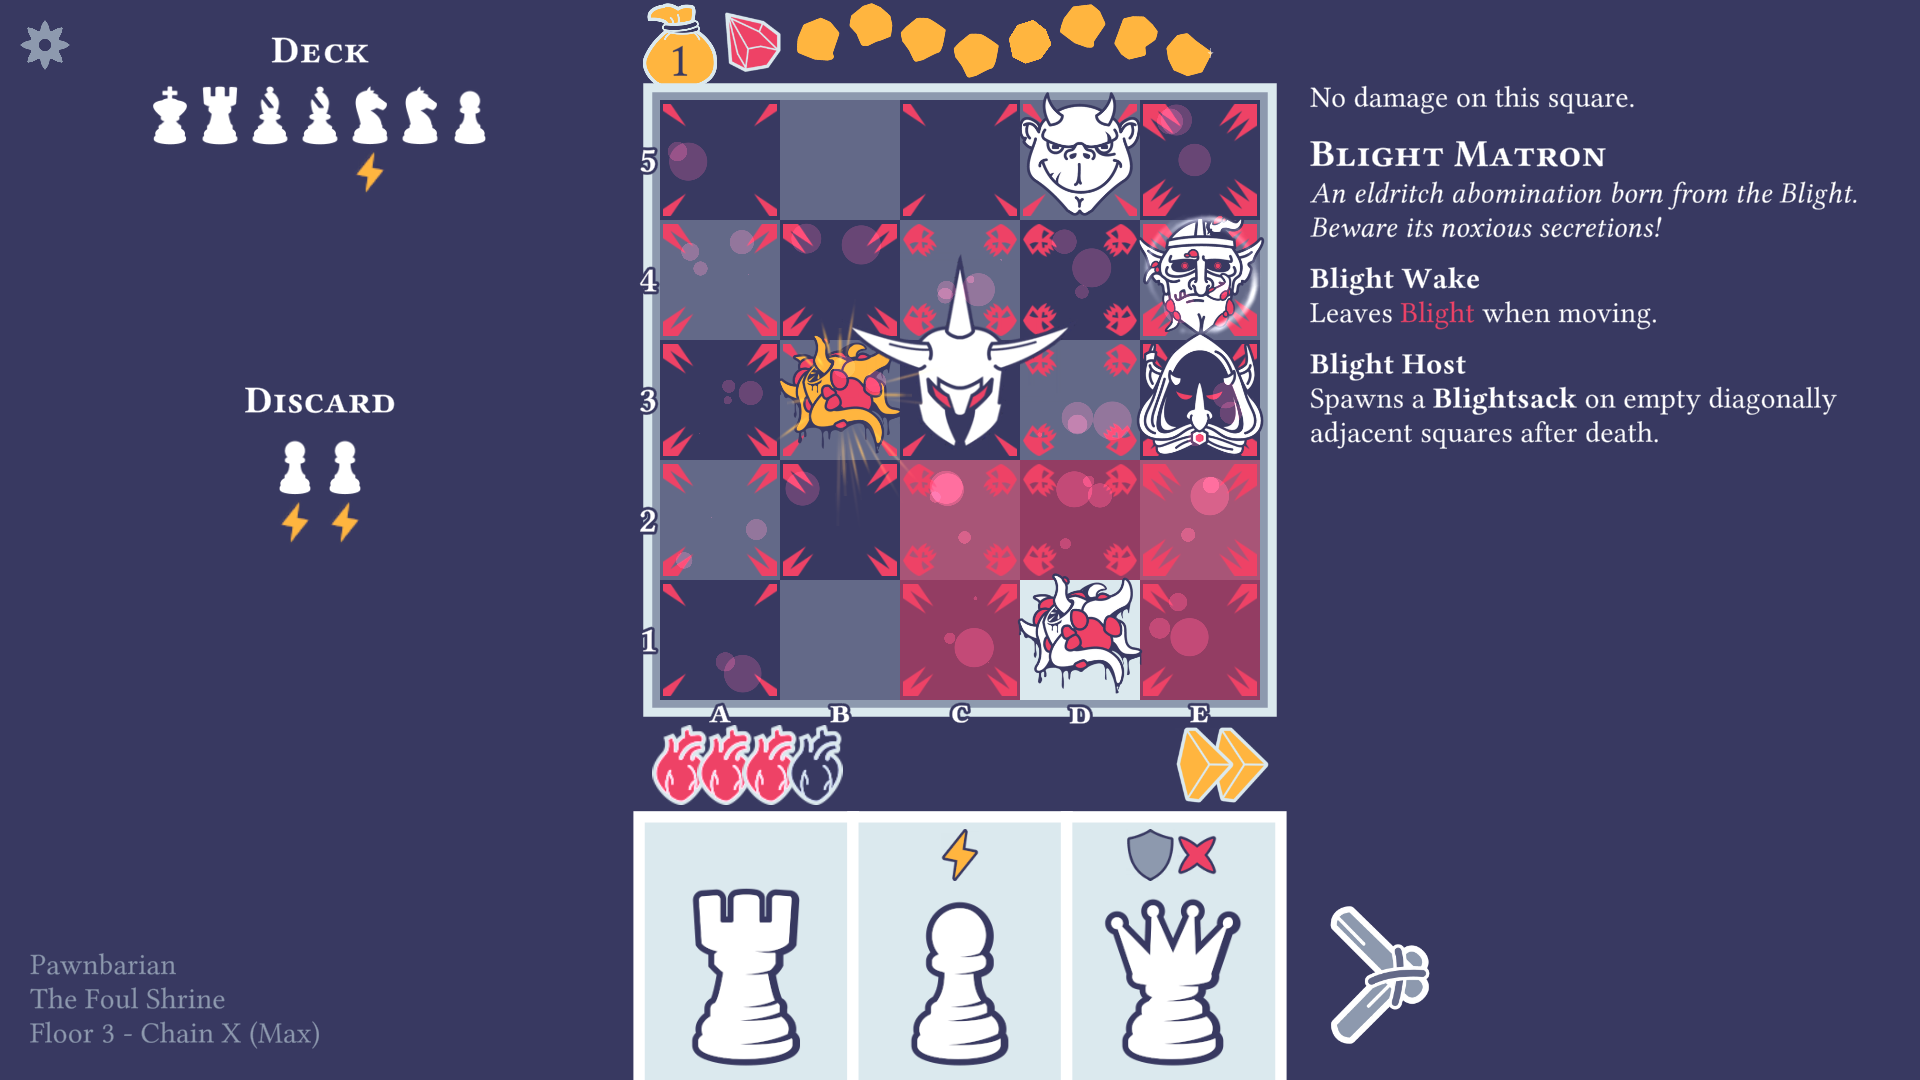
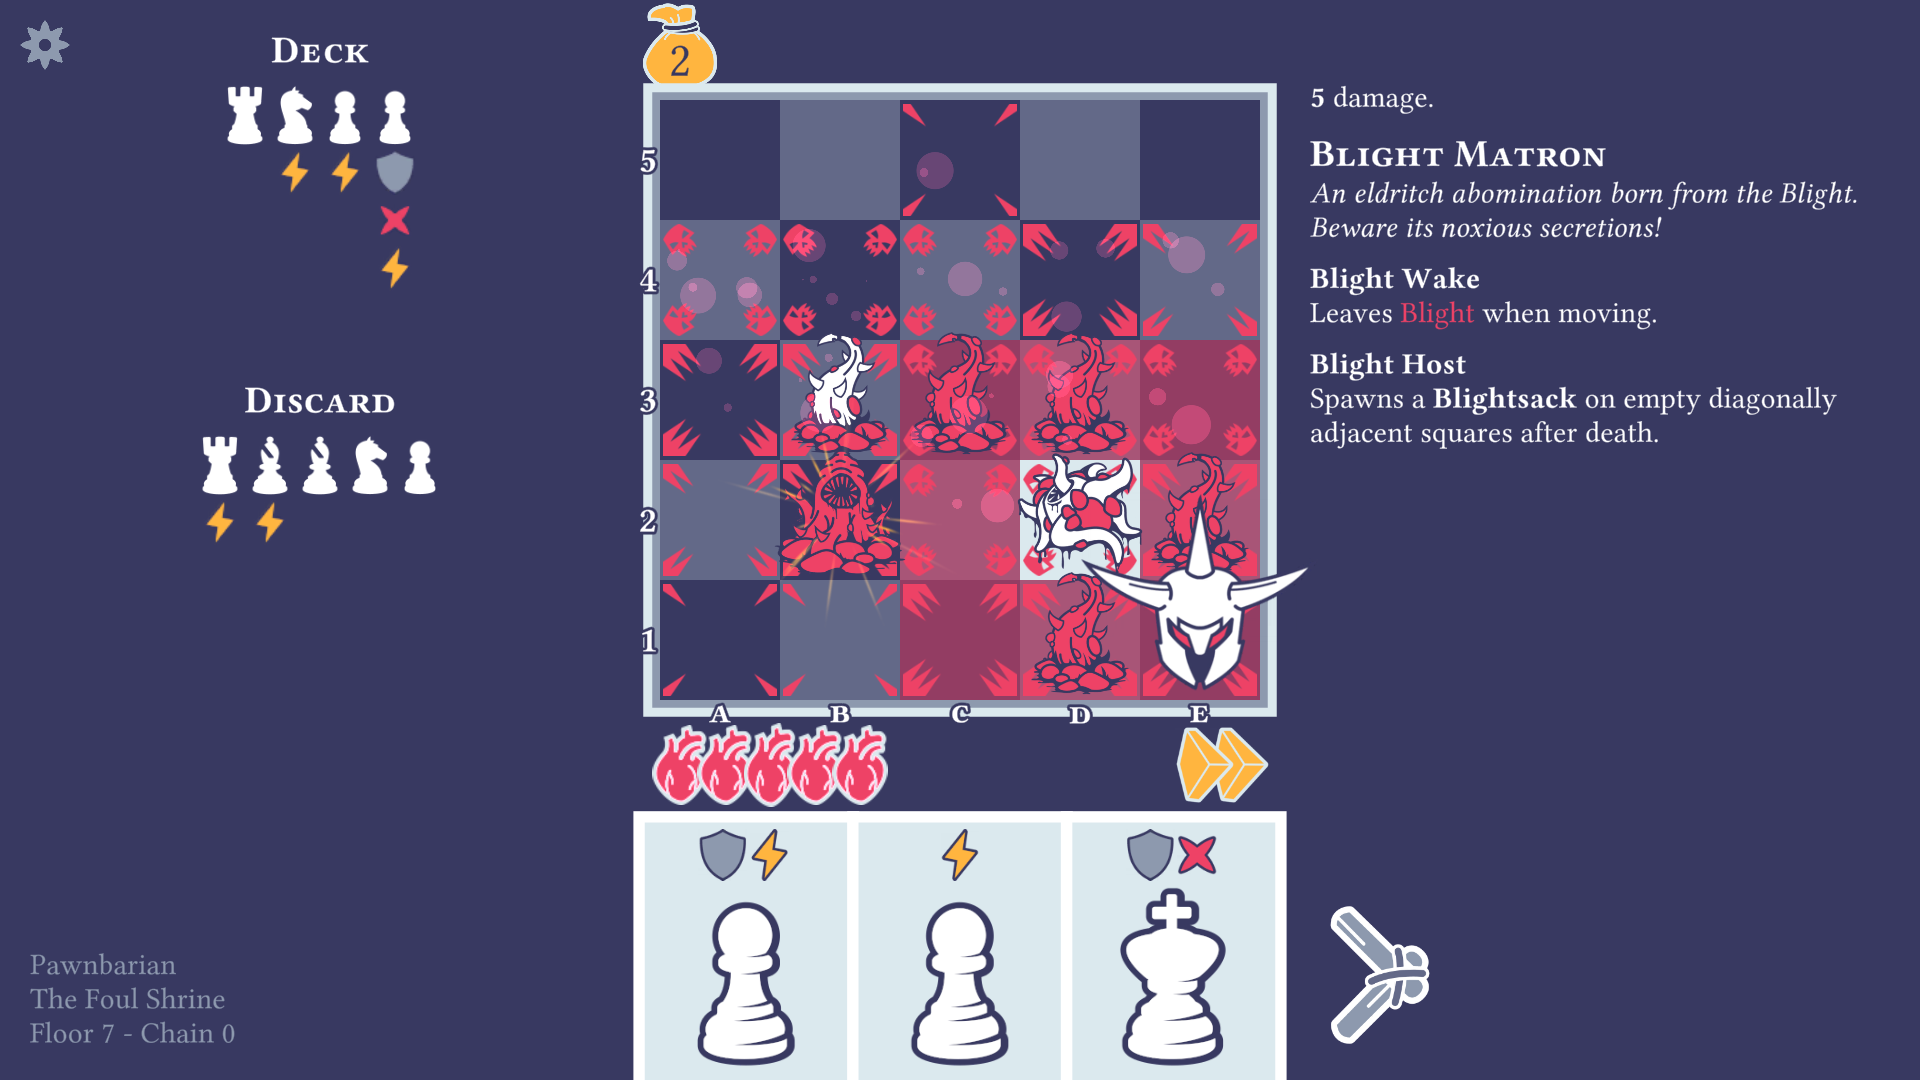
Blight Host: Spawns a Blightsack on empty diagonally adjacent squares after death
When it comes to Blight Hosts, it’s important to minimize the amount of Blightsacks they can spawn, because the Blight can get overwhelming quickly. If the diagonally adjacent squares are occupied, no Blightsack will be spawned on them. Try to look for an opportunity to kill them when they would spawn the least amount of Blightsacks.
In this situation, if I move my queen to C2 and kill the enemy Blight Matron (with the Blight Host trait) with the Diagonal Splash, only 1 Blightsack will be spawned (on E2), because C2 will be occupied by the hero, and the other two can’t spawn outside the board.
If you’re in a situation where you have to kill the Blight Host, splash damage is a great way of dealing with the Blightsacks spawned.
Spark Blight Blast: Blights all adjacent squares after a Cantrip
These enemies also have Blight Wake, the combination of these two make them one of the highest priority targets in the game. The more you let them live, the more Blight they will leave with Blight Wake, and Spark Blight Blast also punishes you a lot for using Cantrip.
Kill these enemies as soon as possible.
Spark Walk: Moves after a Cantrip
This one actually isn’t too bad, and can even be advantageous. A lot of the times when Spark Walk enemies are in a bad position, I use Cantrip just to reposition them, and perhaps prepare them for a splash attack. They can also move out of your way if you use Cantrip, so I think it’s a fun mechanic.
One thing you have to be aware of is that if you use Cantrip, they’ll move closer to you. So if you’re in a situation where you know you will get stuck after a Cantrip, don’t forget that Spark Walk enemies that are 2 squares from you will be able to walk up and deal damage to you when you end your turn.
Here’s an example of that. If I kill the Spark Imp on B2 here (which triggers all Spark traits) with a rook, I’ll take 1 damage, even though the board shows I wouldn’t take damage there. That’s because the Capybear Golem (who has Spark Walk) on D3 will move to a square adjacent to B2, and then attack me, as I’ll be out of actions.
Spark Aegis: Gains immune until next turn after a Cantrip
When you’re planning through your turn and there are Spark Aegis enemies, always take into account that they’ll be immune after your Cantrip. I used to forget about this and mess this up a lot.
Note that you can kill an enemy that has Spark Aegis but isn’t immune yet with a Cantrip attack (the immune will only trigger after your Cantrip attack goes off).
Spark Surge: Attacks after a Cantrip
When you’re planning on using a Cantrip, if you put your mouse over the square you want to move to, enemies attacking that square will be highlighted, so you can predict how much damage you’ll take if you look at the enemies who have Spark Surge.
Golem Soul: After death, triggers all Spark traits
Before you would kill an enemy with Golem Soul trait, always look through all the other enemies first and imagine what each will do. It’s better to kill enemies with Golem Soul later rather than early, but if you can kill one without any significant issues, go ahead. Care for Spark Blight Blast though!
Void Grasp
This trait deserves its own section. Even though it can be annoying at times, in my opinion this is by far the best trait when it comes to design.
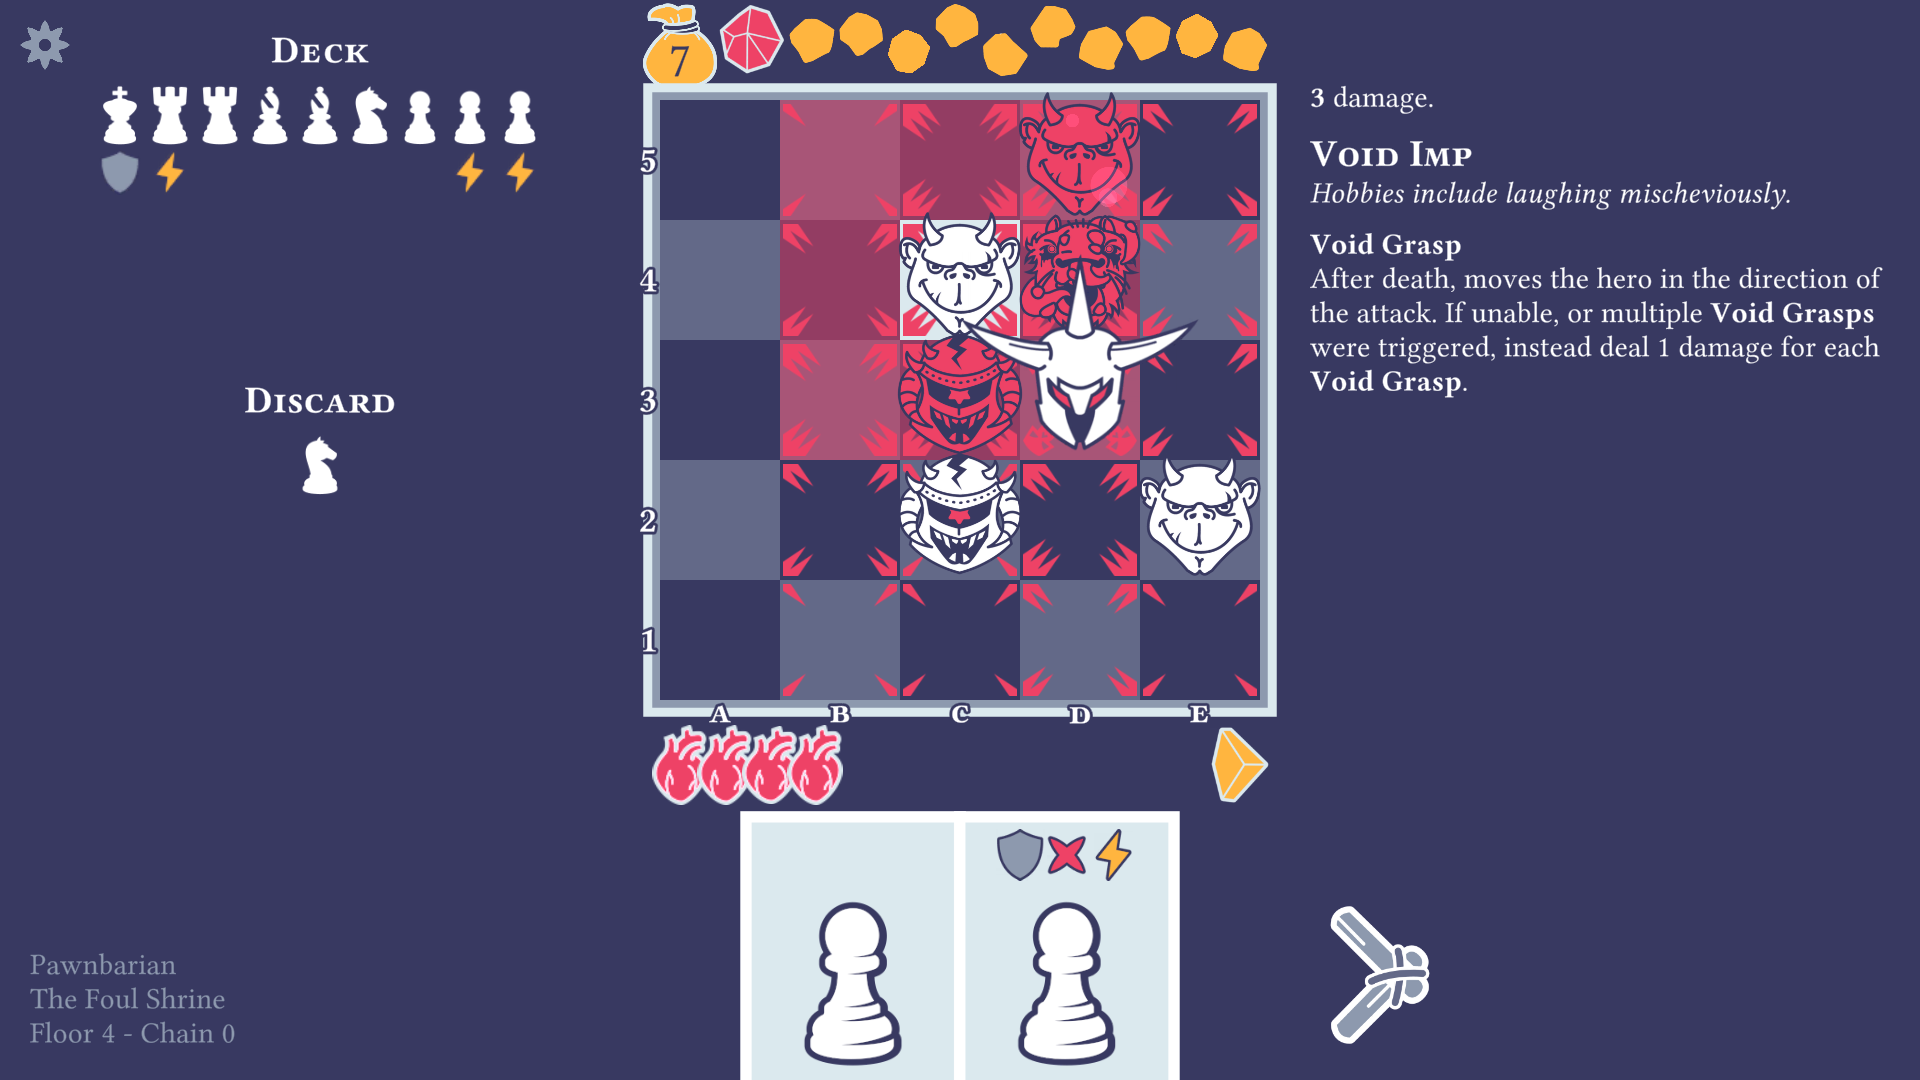
Void Grasp: After death, moves the hero in the direction of the attack. If unable, or multiple Void Grasps were triggered, instead deal 1 damage for each Void Grasp.
This trait only appears in The Foul Shrine exclusively. It can put you sometimes at an advantage, and sometimes at a disadvantage.
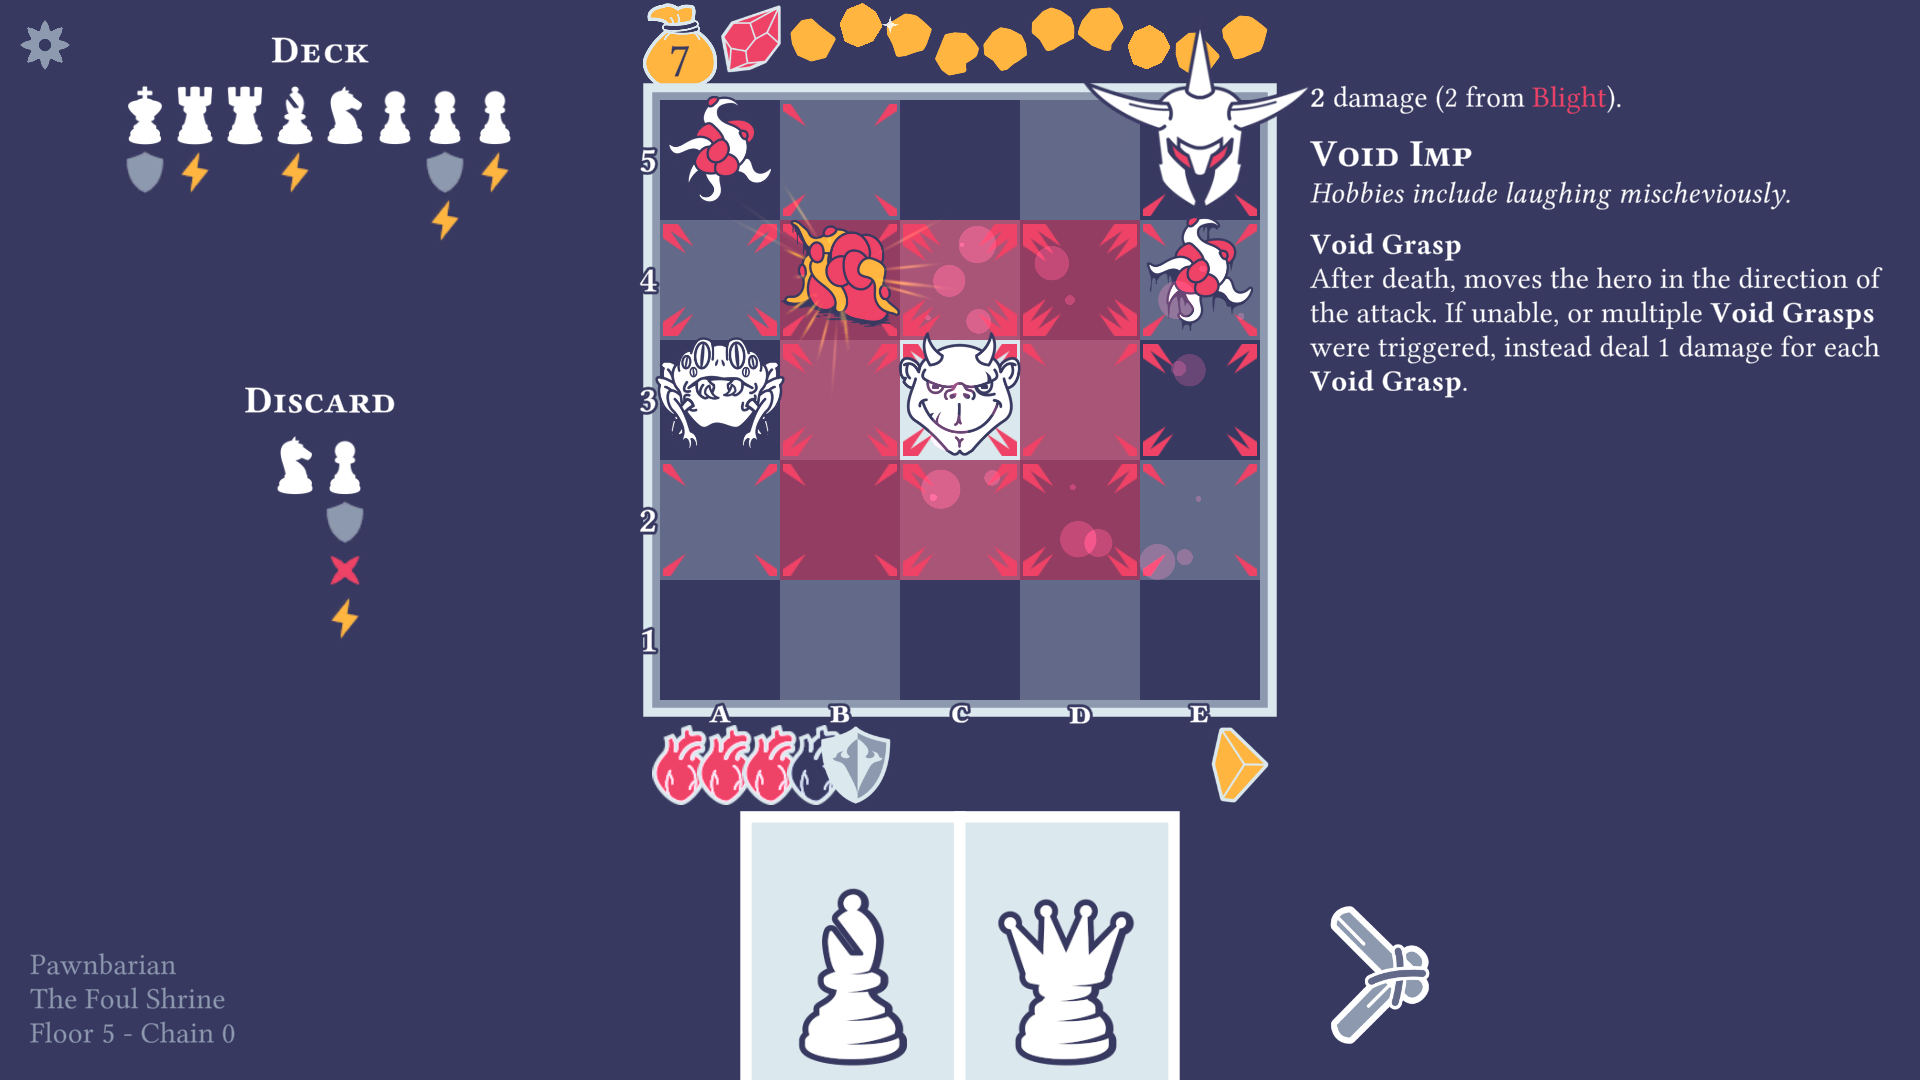
First, I’ll bring an example to show how it can be used for your advantage.
Here, the Void Imp is standing on C3, where I would take 2 damage from Blight. If it was a normal enemy, I wouldn’t be able to take on C3 without taking damage, as I only have 1 action left.
But the Void Imp has Void Grasp, so if I take on C3 with the bishop (or the queen, but it’s better to take with the bishop, so the queen gets reshuffled into the deck instead of becoming a pawn), the Void Grasp will take me to B2, which is a safe square, only attacked by the Void Imp that I just killed.
Using Void Grasp as a getaway tool can be very useful, and it can allow for some fancy set of moves.
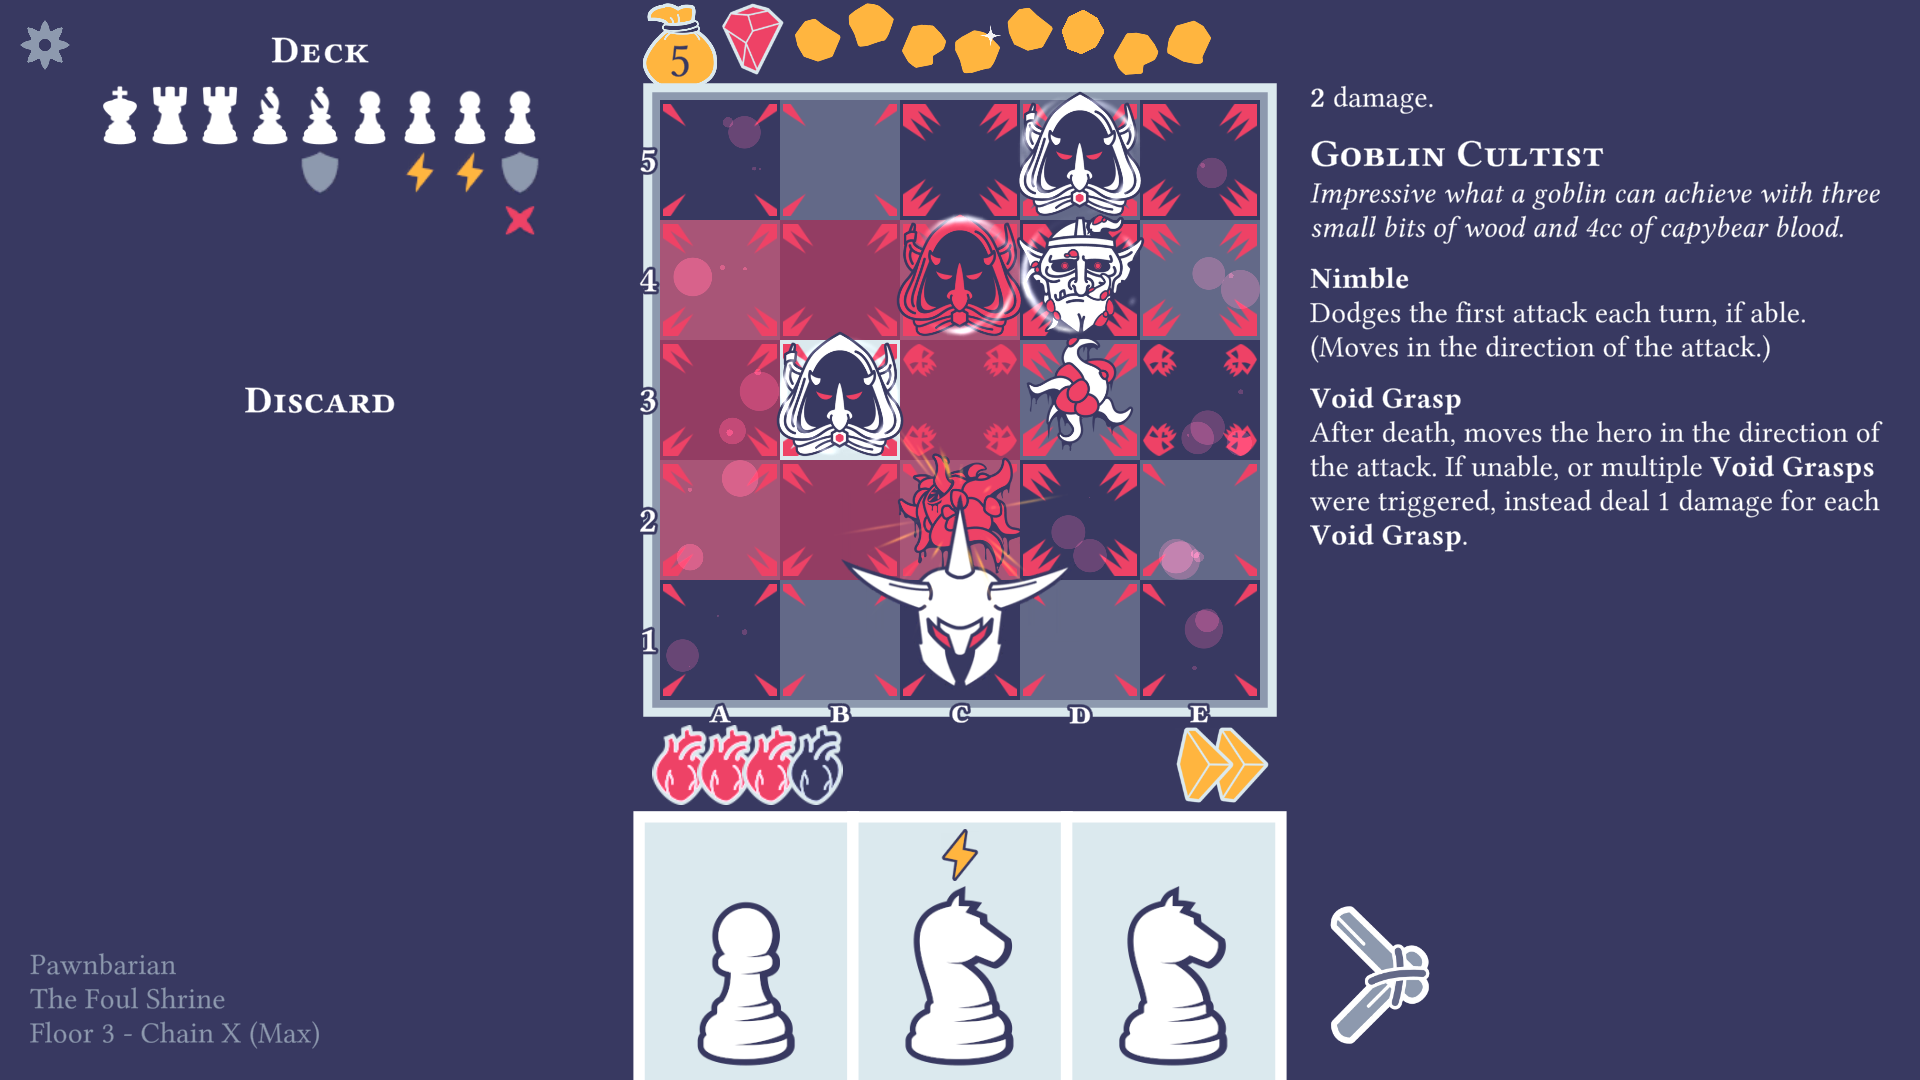
However, Void Grasp can create some annoying situations sometimes, like in this example:
Here, if I attacked the B3 Goblin Cultist with any of the knights, it would push it to A4 (because of Nimble). Then if I attacked the same Goblin Cultist (who’s on A4 now) with the pawn again, I would take one damage, because the Void Grasp wouldn’t be able to move me outside of the board.
If I attacked the C4 Goblin Cultist after the initial knight B3 move, I would again take one damage, because the D5 Goblin Cultist would prevent Void Grasp from moving me. Same thing if I went Cantrip knight to D3, managed to draw a pawn, and then pushed the C4 Goblin Cultist with 2 pawn attacks to B5 (which would be a safe square, as we killed the only attacker).
But again, after the second attack Void Grasp would still deal 1 damage.
Spark Surge:
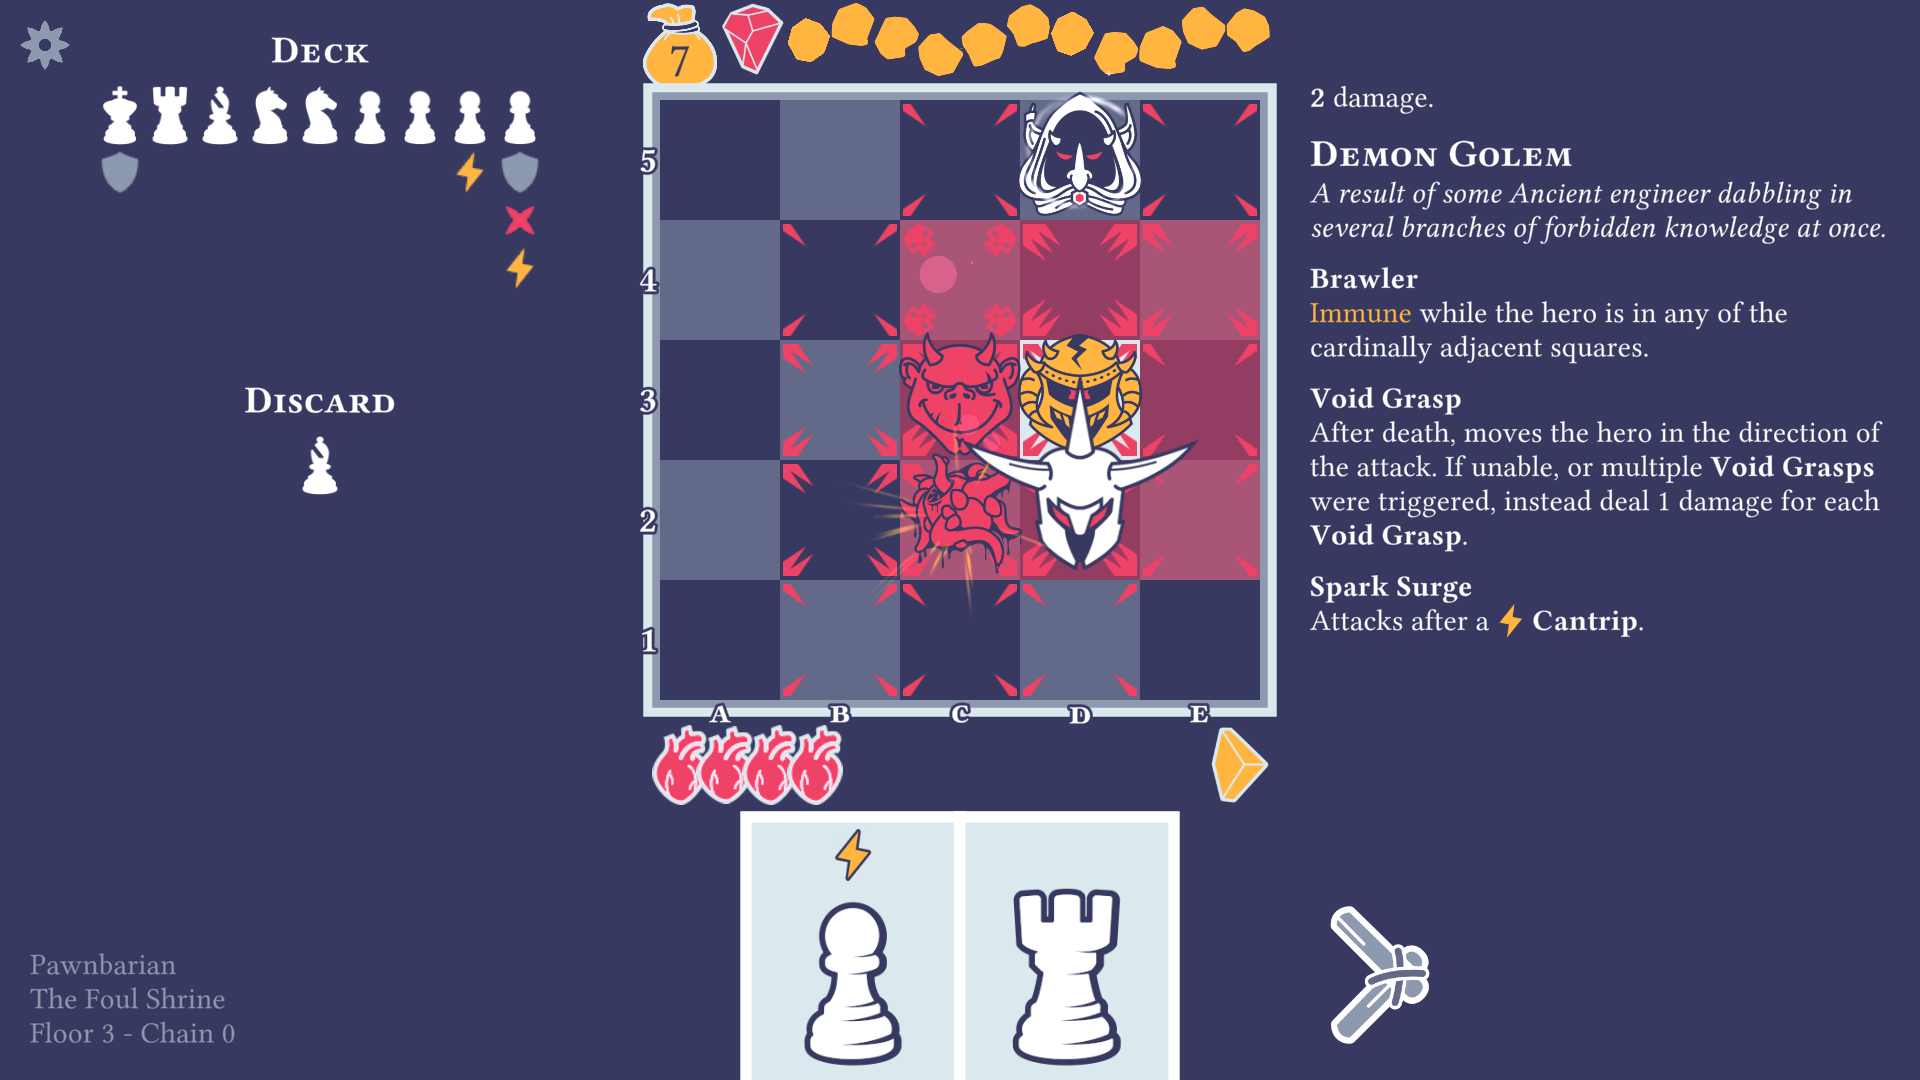
When it comes to Void Grasp’s interaction with Spark Surge, the trigger order is the following: attack -> Spark Surge -> Void Grasp. I’m bringing an example to show you what exactly I mean by that:
In this scenario, the Demon Golem on D3 has Spark Surge, and the Void Imp on C3 has Void Grasp.
If I kill the C3 Void Imp with the pawn that has Cantrip, then after the attack the Demon Golem on D3 will attack me because of the Spark Surge, and only after taking that damage will I be taken to B4 by the Void Grasp.
So when it comes to the order of traits activating, Spark Surge comes before Void Grasp.
Diagonal Splash:
Void Grasp has a few interactions with Diagonal Splash. Some are useful, the other ones can be deadly for you. Using Diagonal Splash is mostly risky on floor 7, where there are a lot of Kraken Tentacles, that have the Brawler and the Void Grasp trait.
Here, killing the Void Imp on C4 with the right pawn would be very painful. Even though you hit the C4 Imp normally and the D5 Imp with the Diagonal attack, both Void Grasps are triggered at once, which makes you take 2 damage and you’ll stay on C4 instead of being brought to a different square by the Void Grasp. On top of that, you also take damage from the Demon Golem for reasons I mentioned in the Spark Surge interactions.
So basically you’ll take 3 damage, you’ll end up on C4, and kill 2 Void Imps if you use the right pawn.
However, if you use the left pawn, you’ll kill the Imp on C4, the Void Grasp will bring you to B5, which is safety. (The only enemy targetting that square is the Imp on C4, which we just killed.)
In this case you take 0 damage, end up on B5, promoting your stacked pawn to a queen, and kill 1 Imp.
This is why Diagonal Splash becomes situational in The Foul Shrine. This issue is a lot more common during the boss fight, that’s why I don’t build Diagonal Splash in this dungeon (aside from building them on rooks).
Enemies that spawn:
I lost one of my runs to this interaction. Basically spawning happens before Void Grasp would activate.
Here, the Kraken Tentacles have Void Grasp and Brawler. If I kill the Blight Matron on D2 with the king that has Diagonal Splash, try to guess what will happen and which square I’ll end up on.
Answer: I will take 1 damage from Void Grasp which will be blocked by the shield, and I’ll be standing on D2. This will happen because when I kill the Blight Matron and also kill the Tentacle with the Diagonal Splash, the Blightsacks will spawn, one of them spawns on C3, then Void Grasp activates, and because there’s a Blightsack on C3, Void Grasp won’t be able to move me, and deals me 1 damage instead.
This is an interaction that really surprised me at first, because I was expecting the Void Grasp to pull me to C3, and only then would the spawning happen, but no Blightsack would spawn on C3, because I occupy that square.
But this was a false assumption, as spawning occurs before Void Grasp triggers.
Builds for each dungeon
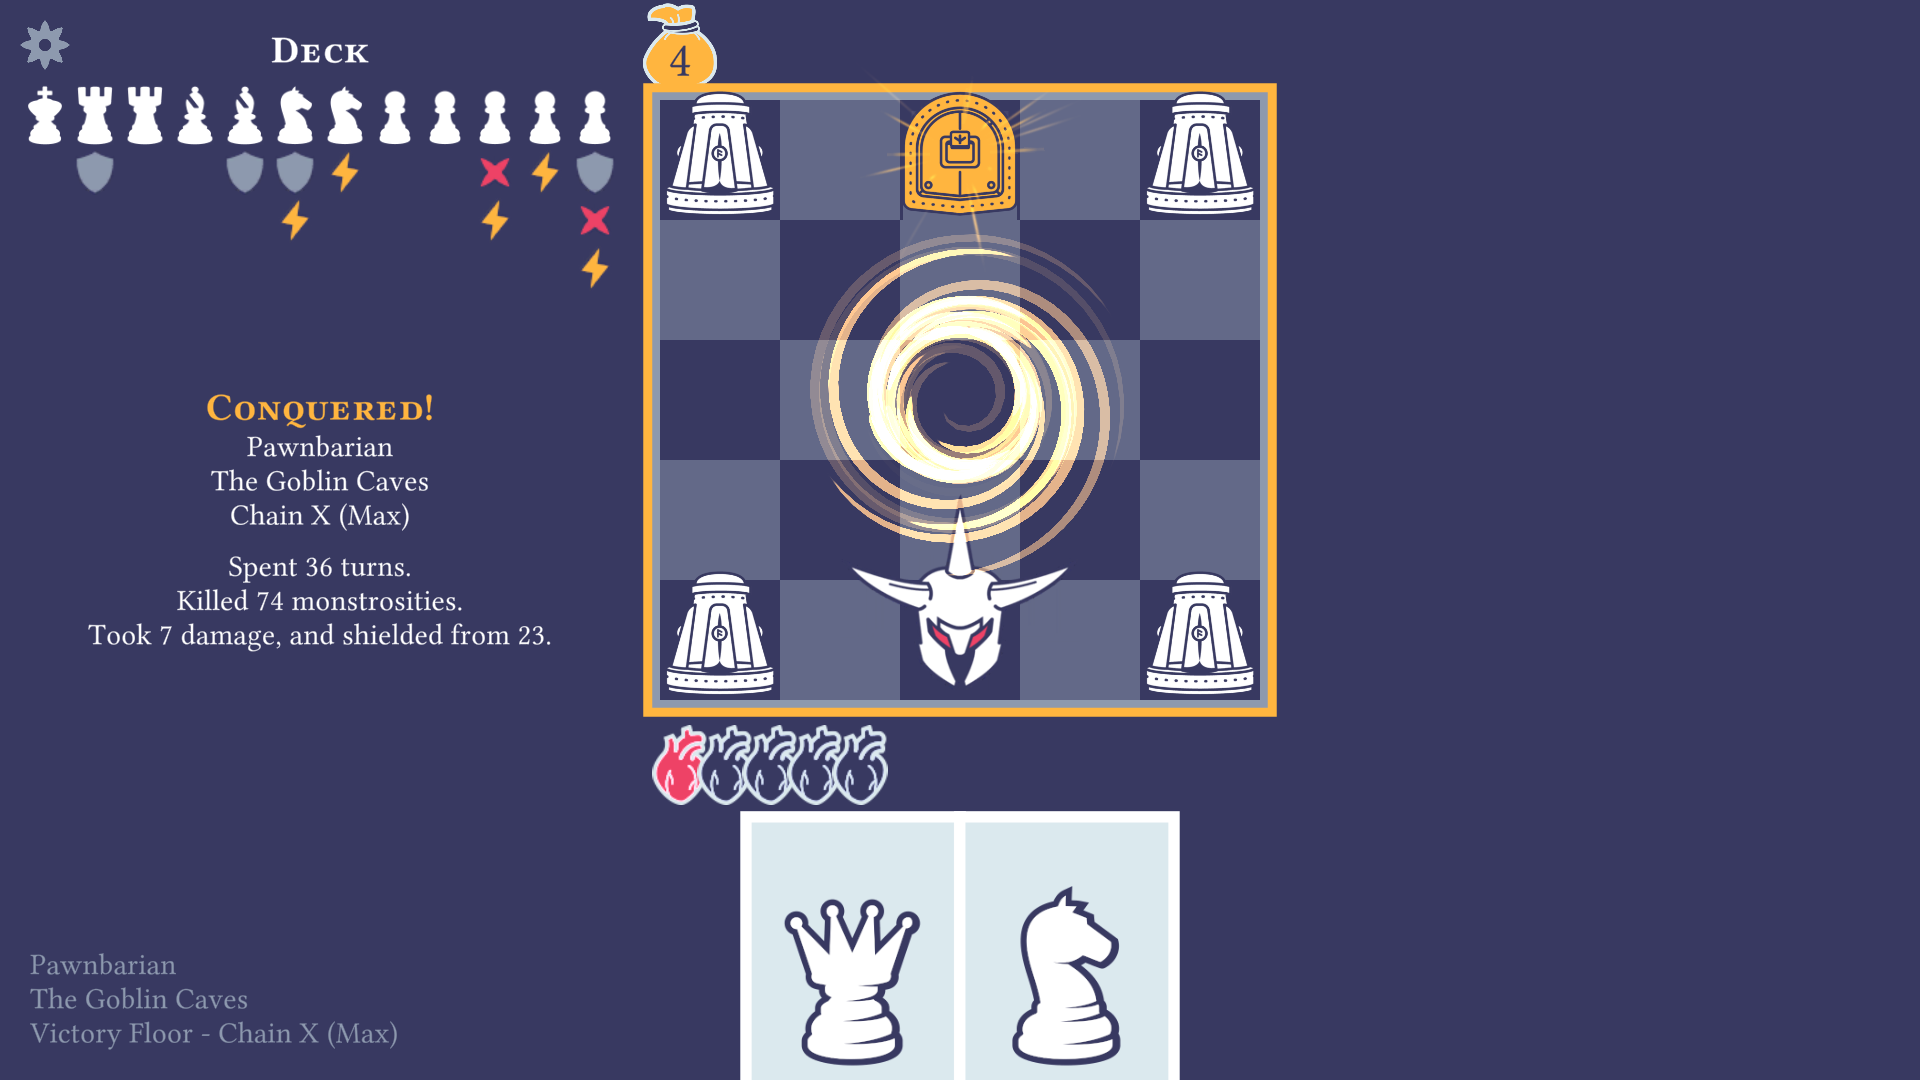
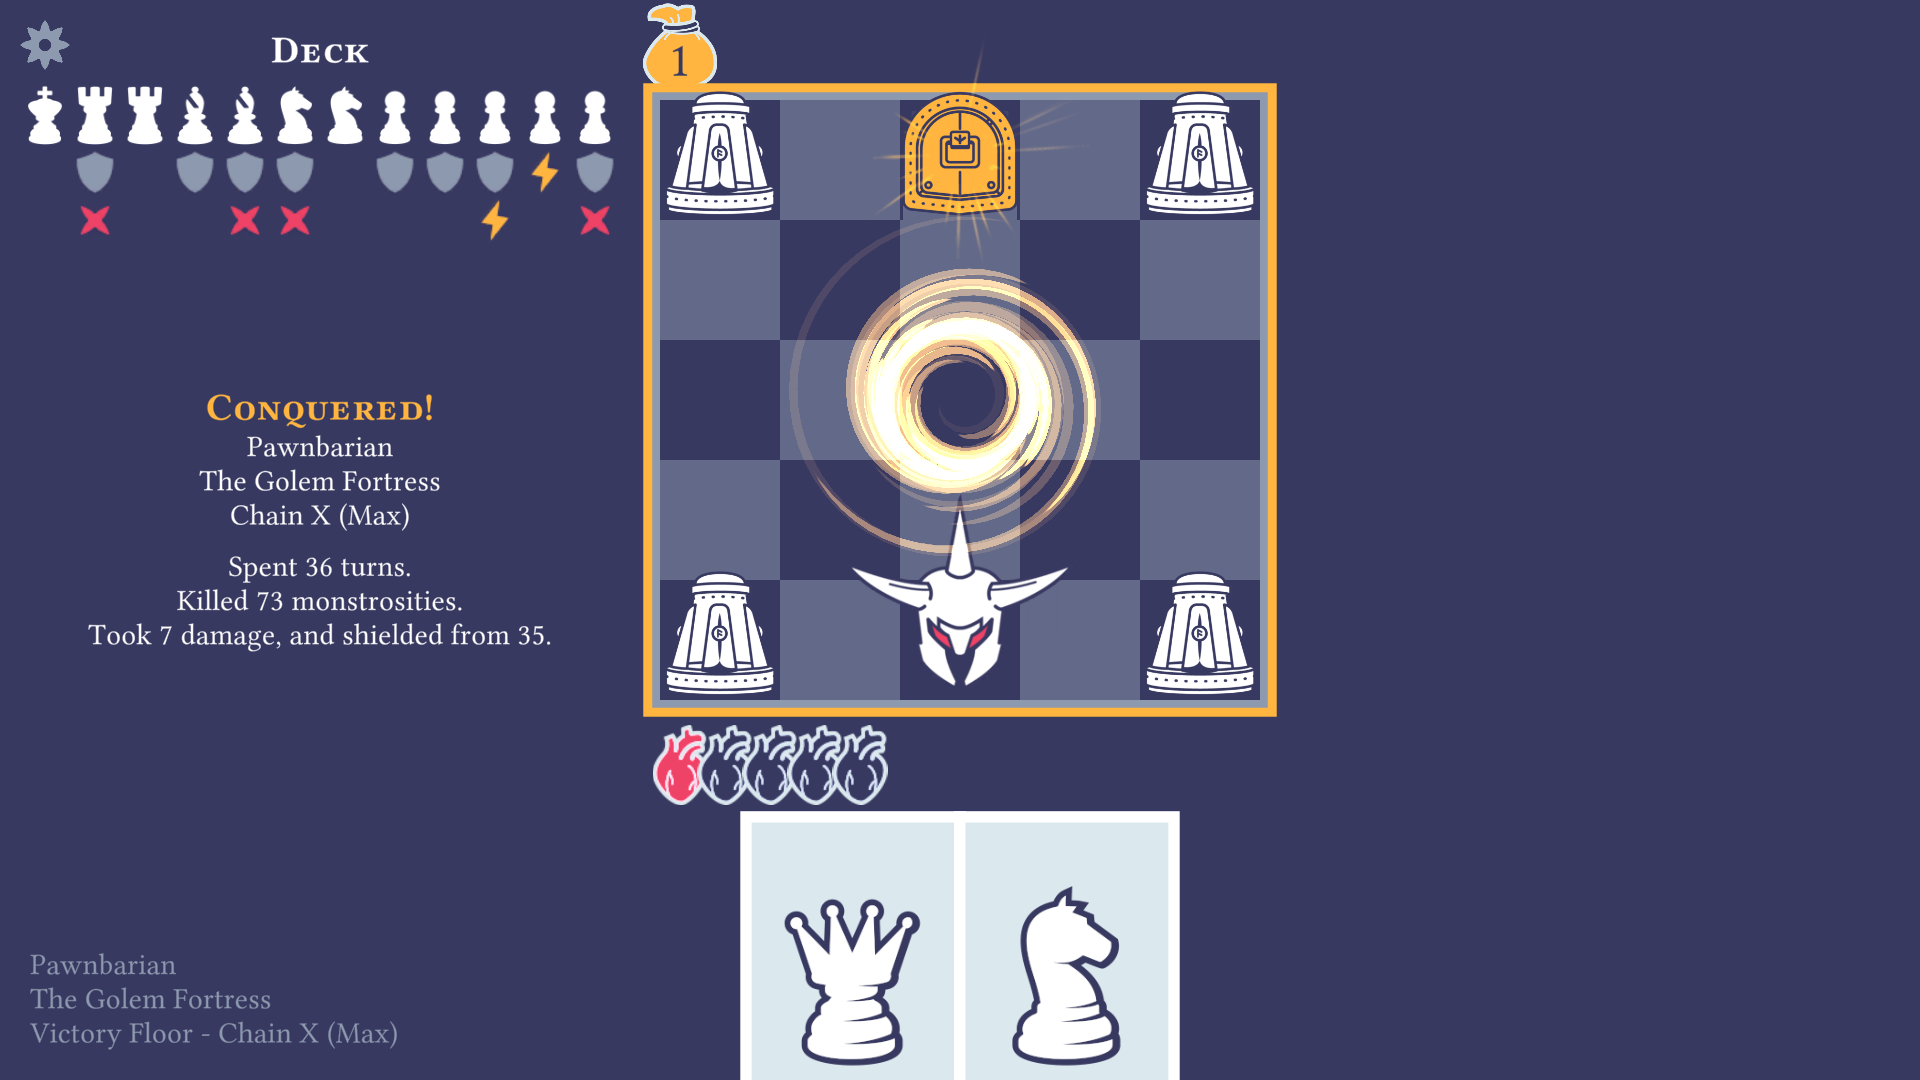
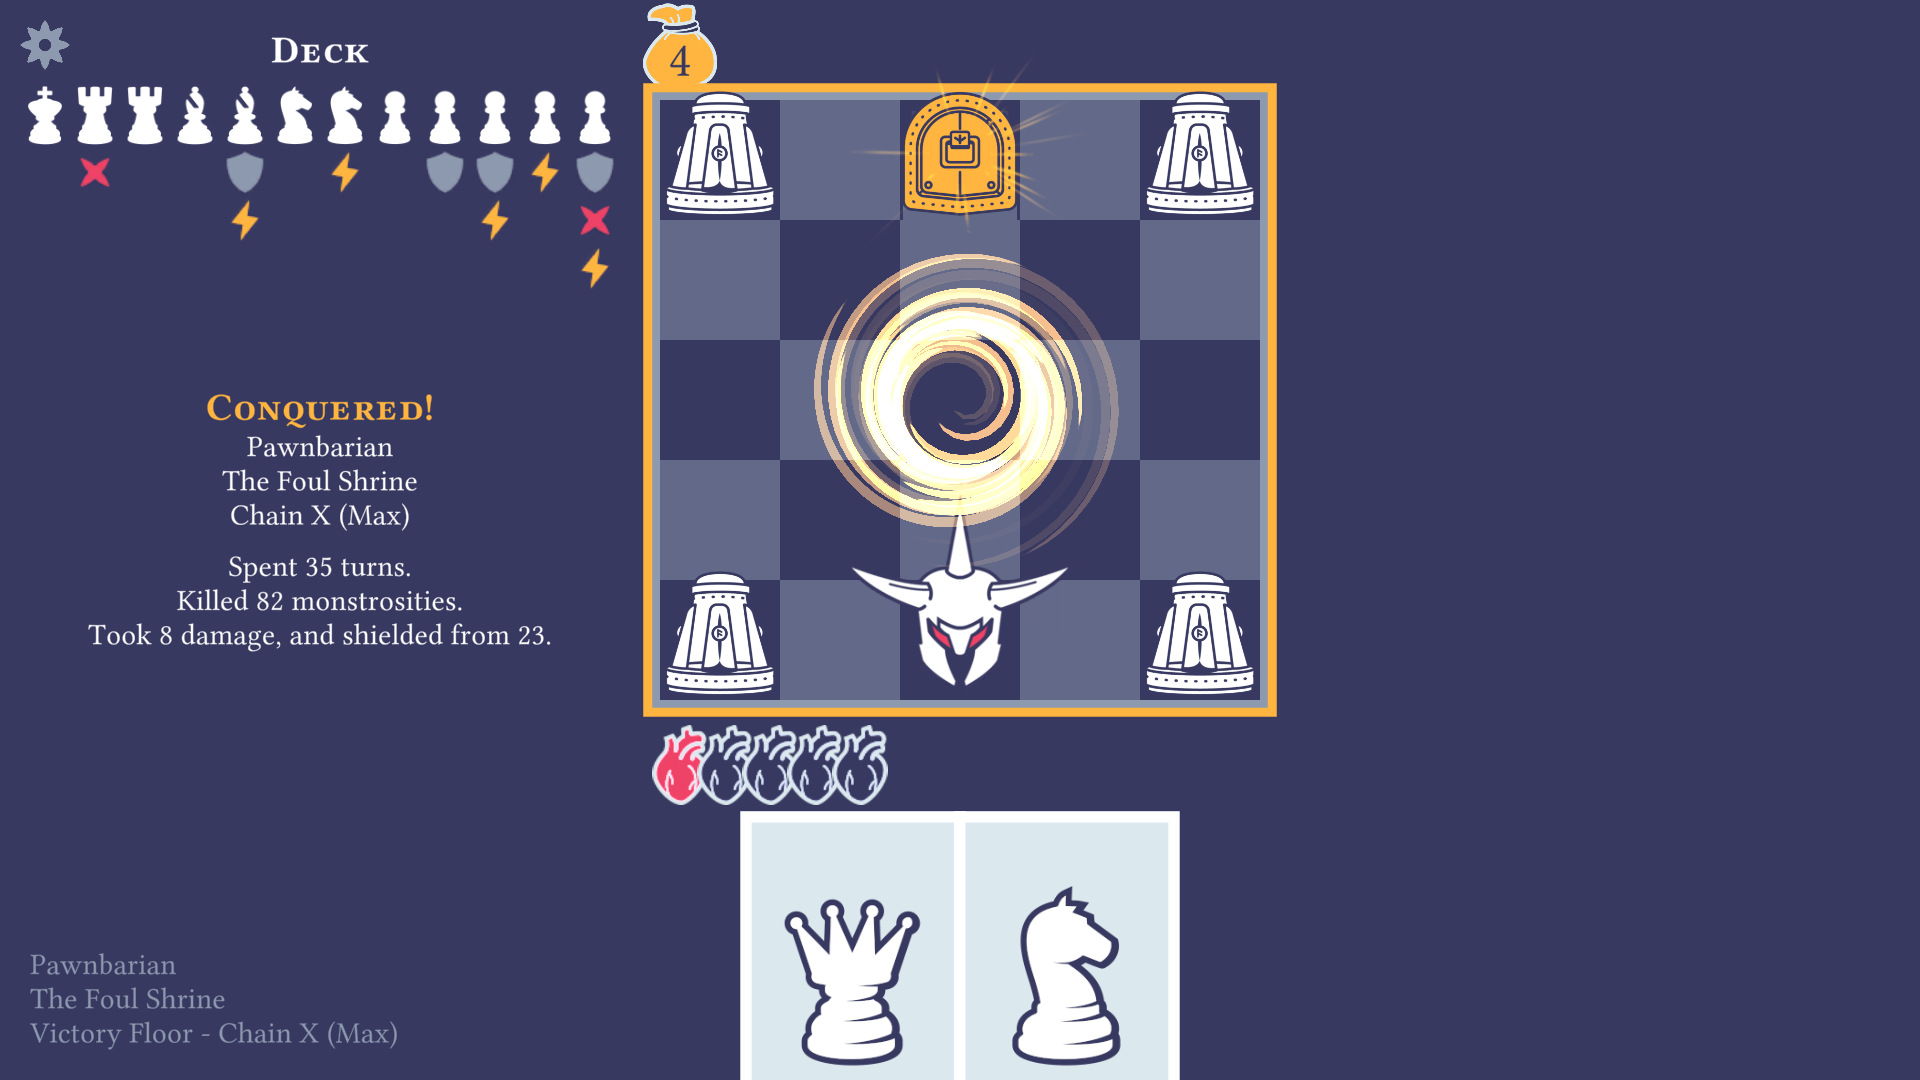
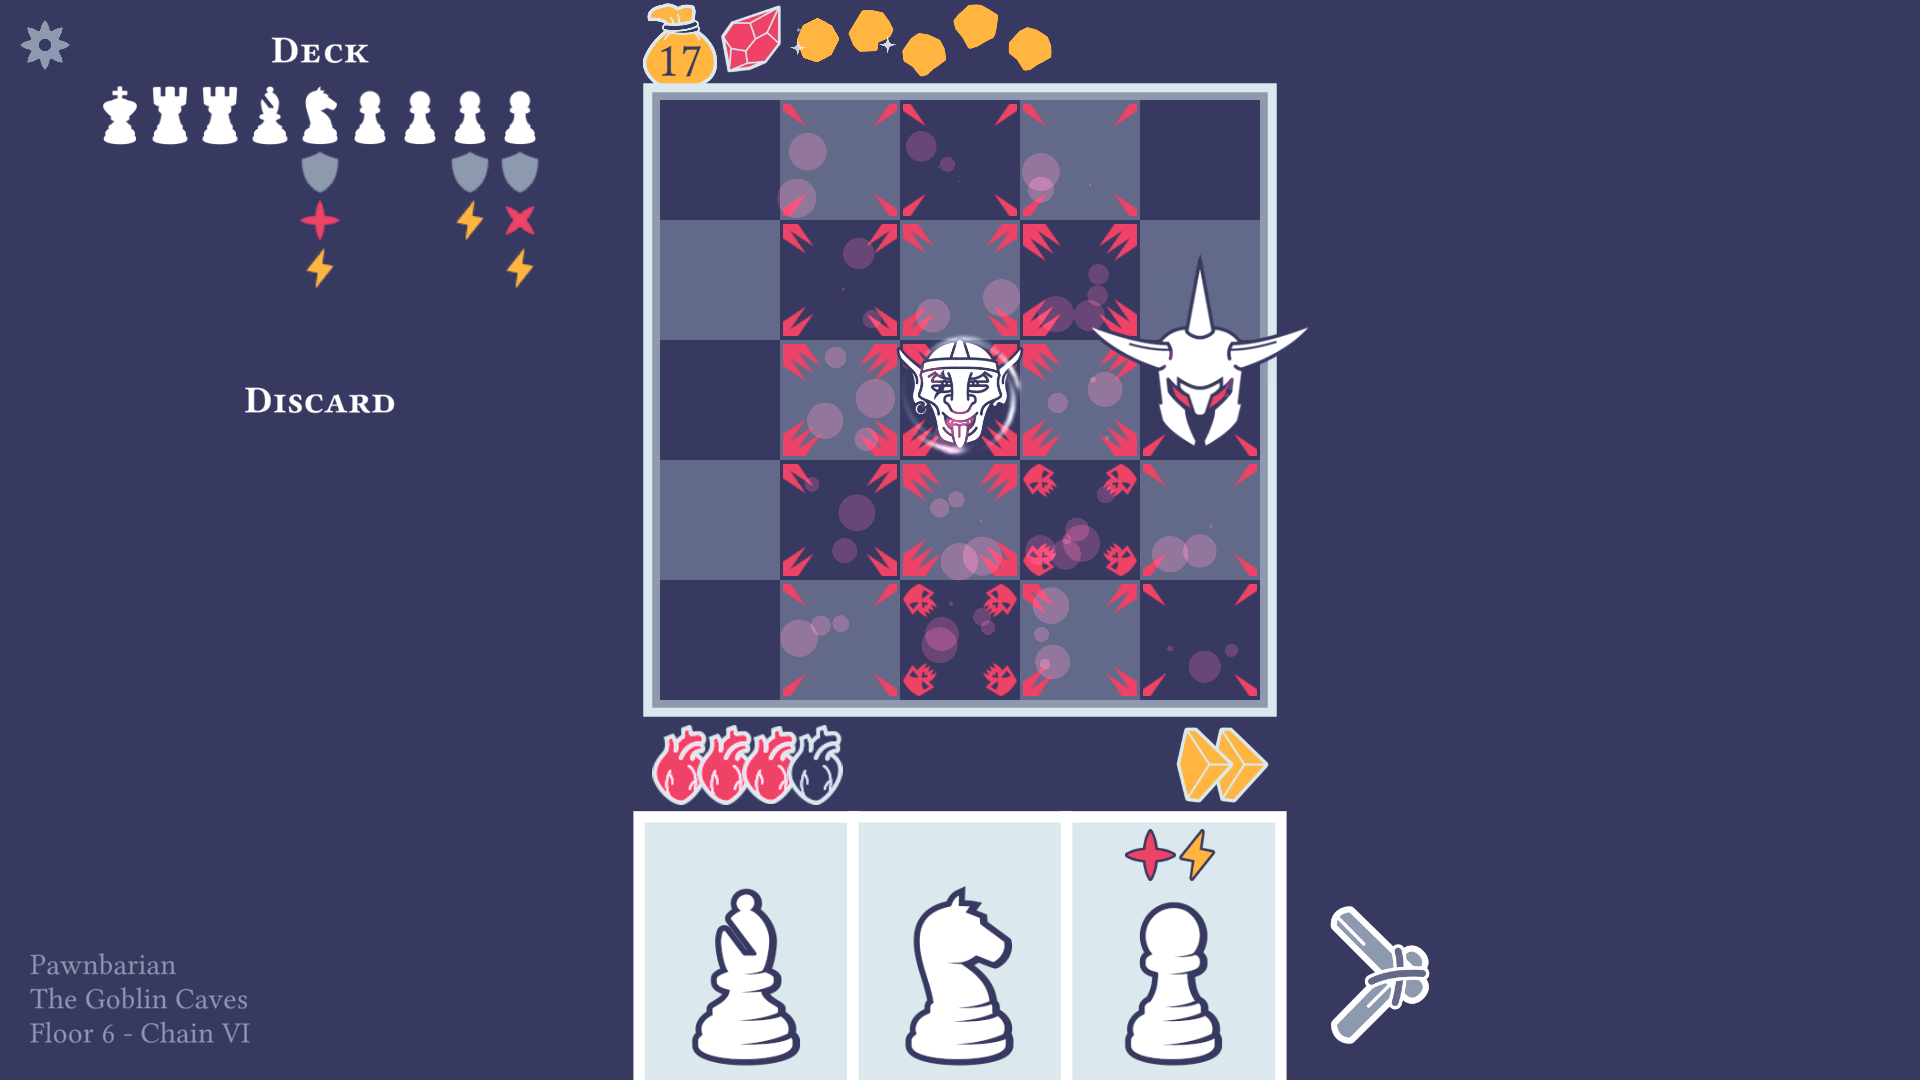
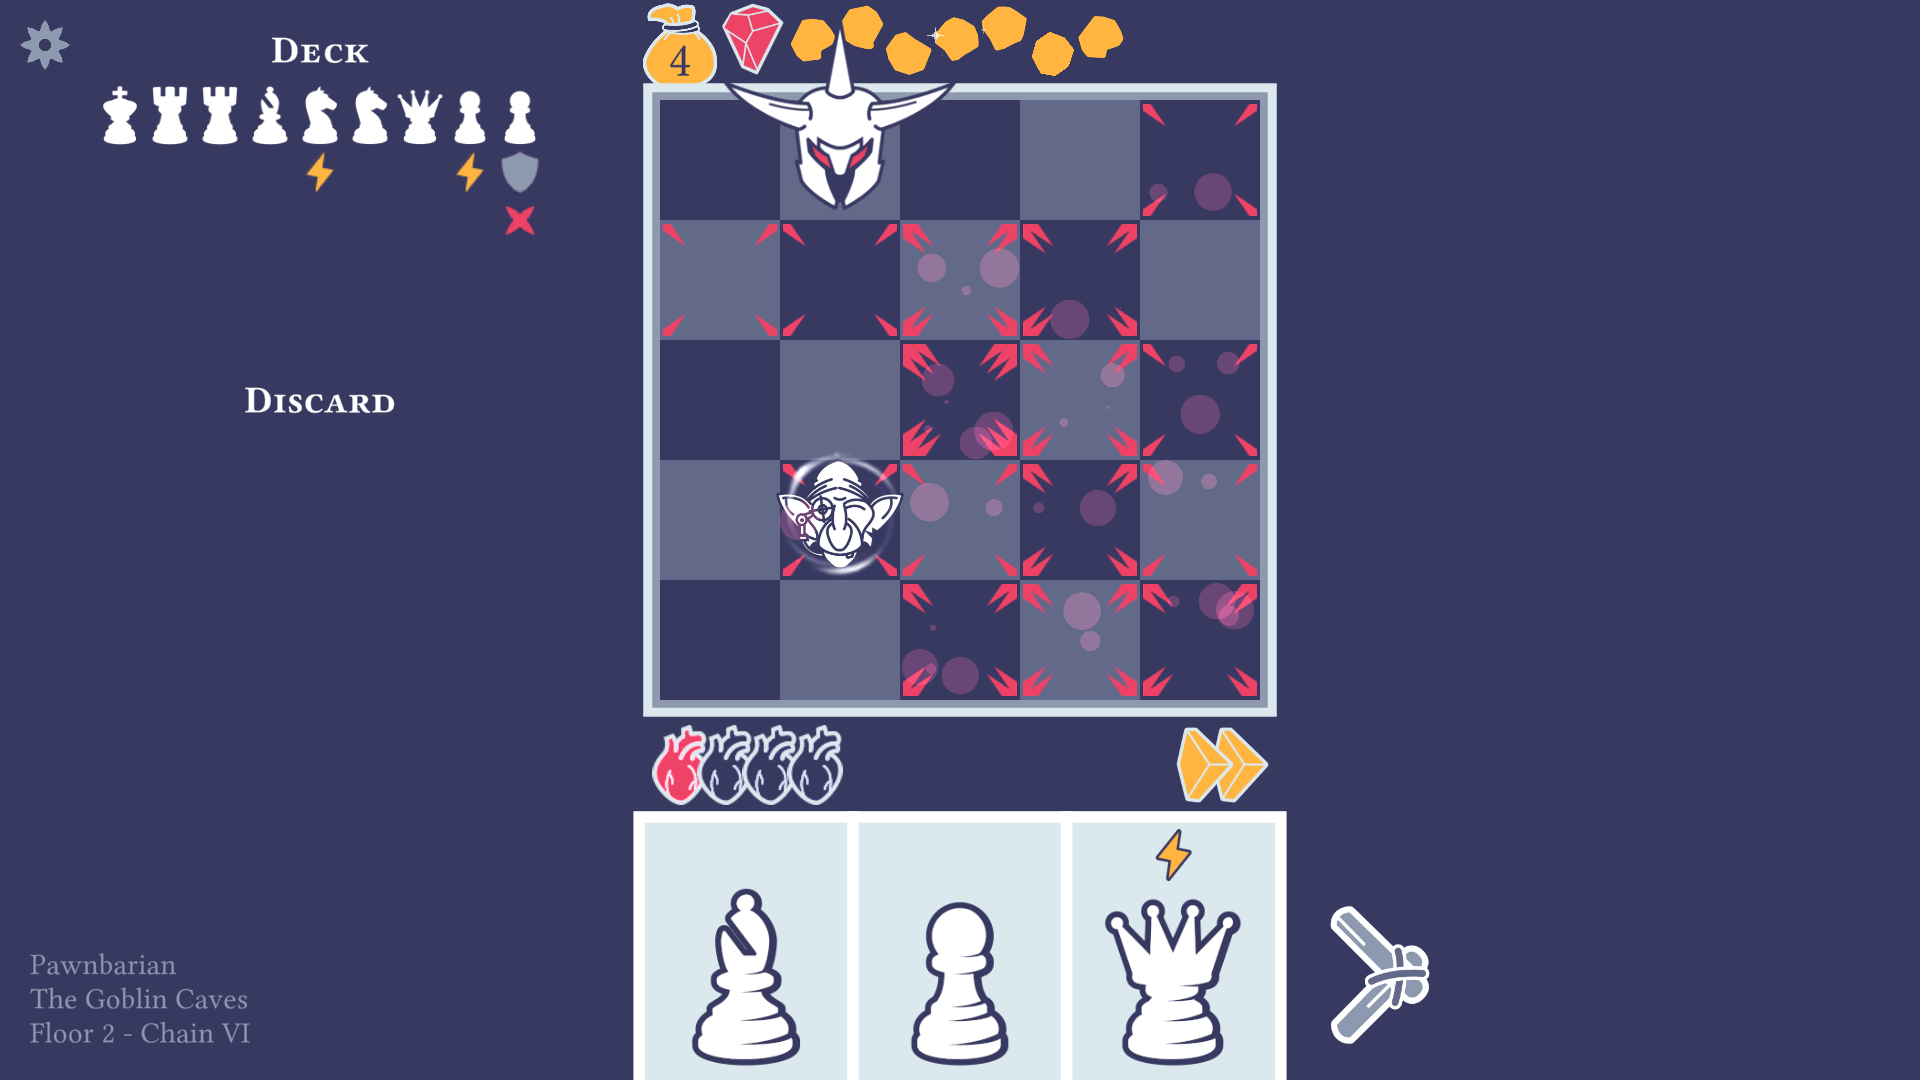
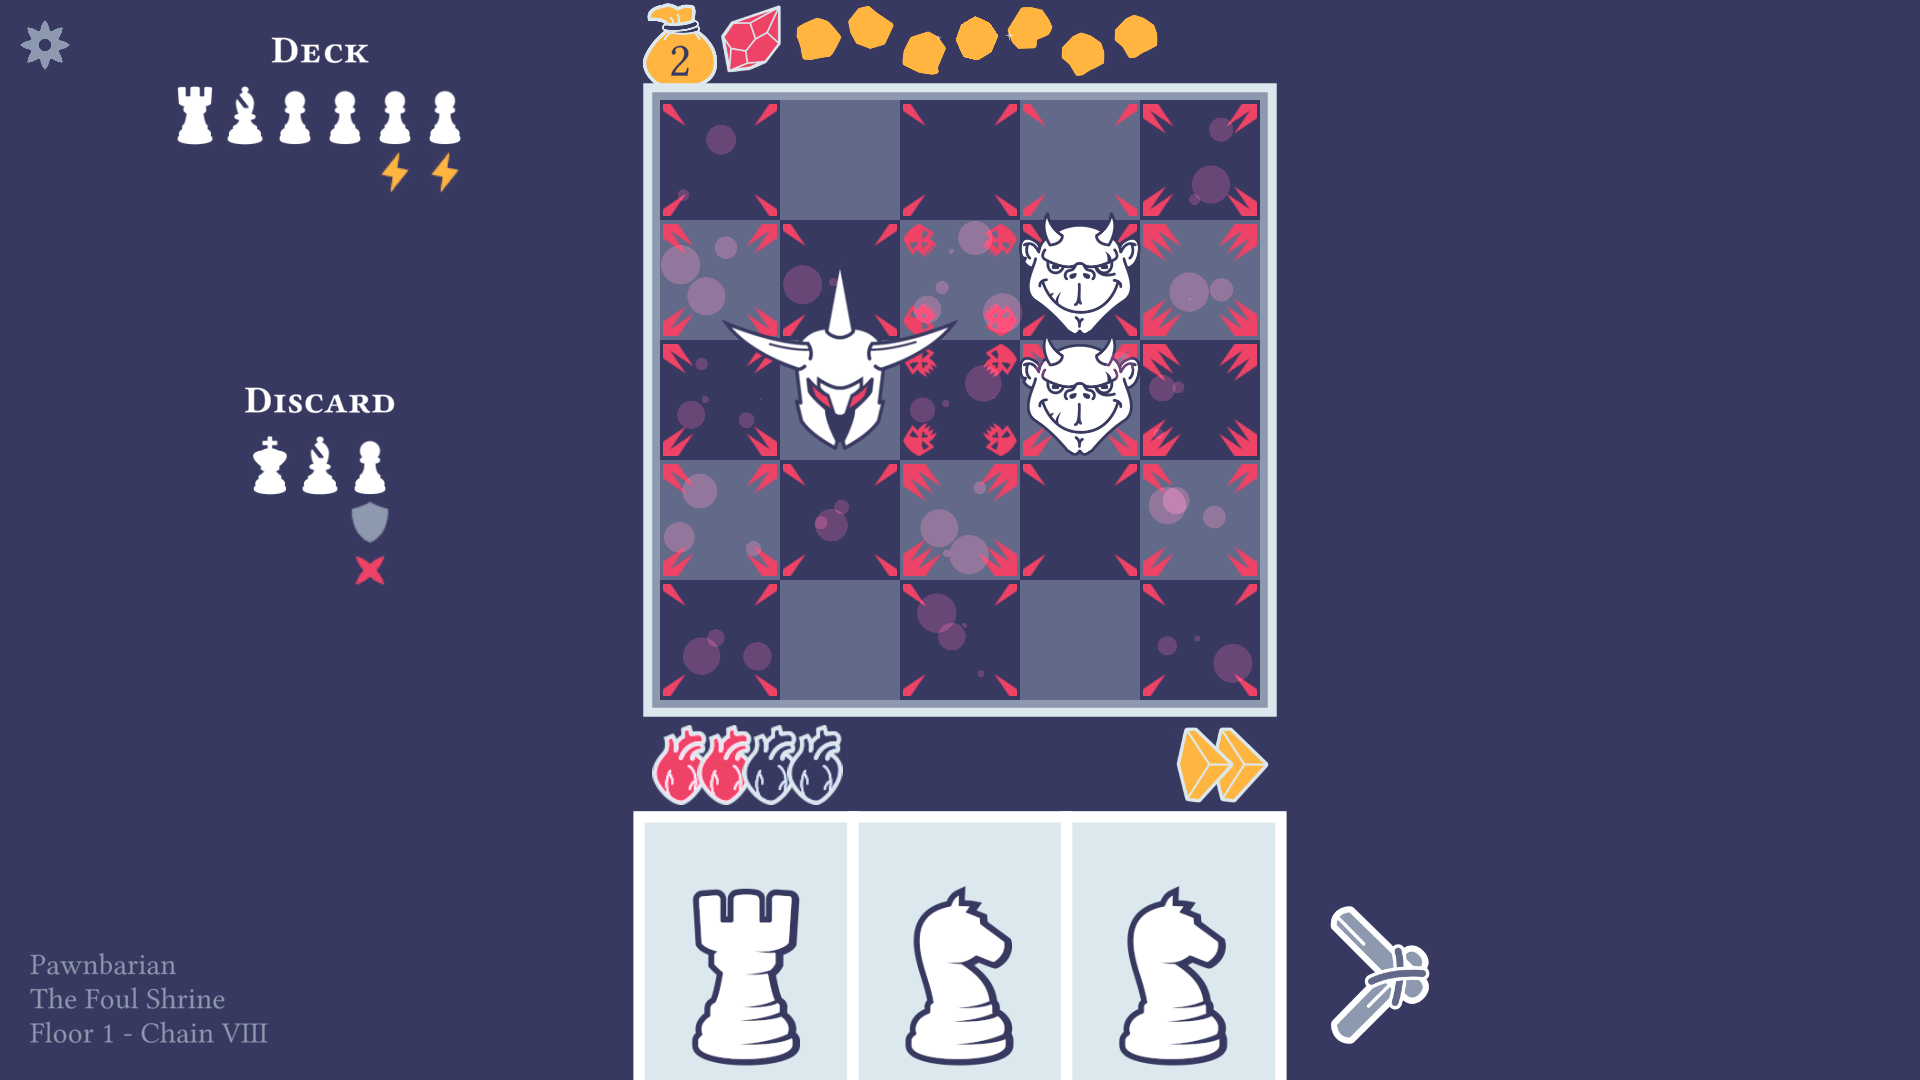
Here I’ll give you tips when it comes to what your build should look like for each dungeon. I’ll also show screenshots of what my Chain X decks looked like.
Note that during the early Chains the build doesn’t matter as much, and you can build whatever you find fun.
It’s just a little insight on what I found to be useful in later Chains.
The Goblin Caves:
The main difficulty of the boss here comes from the huge amount of Blight. The enemies leave behind a lot of Blight, the boss also keeps spawning Blightsacks, so the best build here is a combination of Shield and Cantrip.
Shield is necessary against a board full of Blight, but you can’t stack enough Shields with only 2 actions a turn, that’s what the Cantrip is for. With a build like this, it shouldn’t be too hard to conqueror The Goblin Caves.
The Golem Fortress:
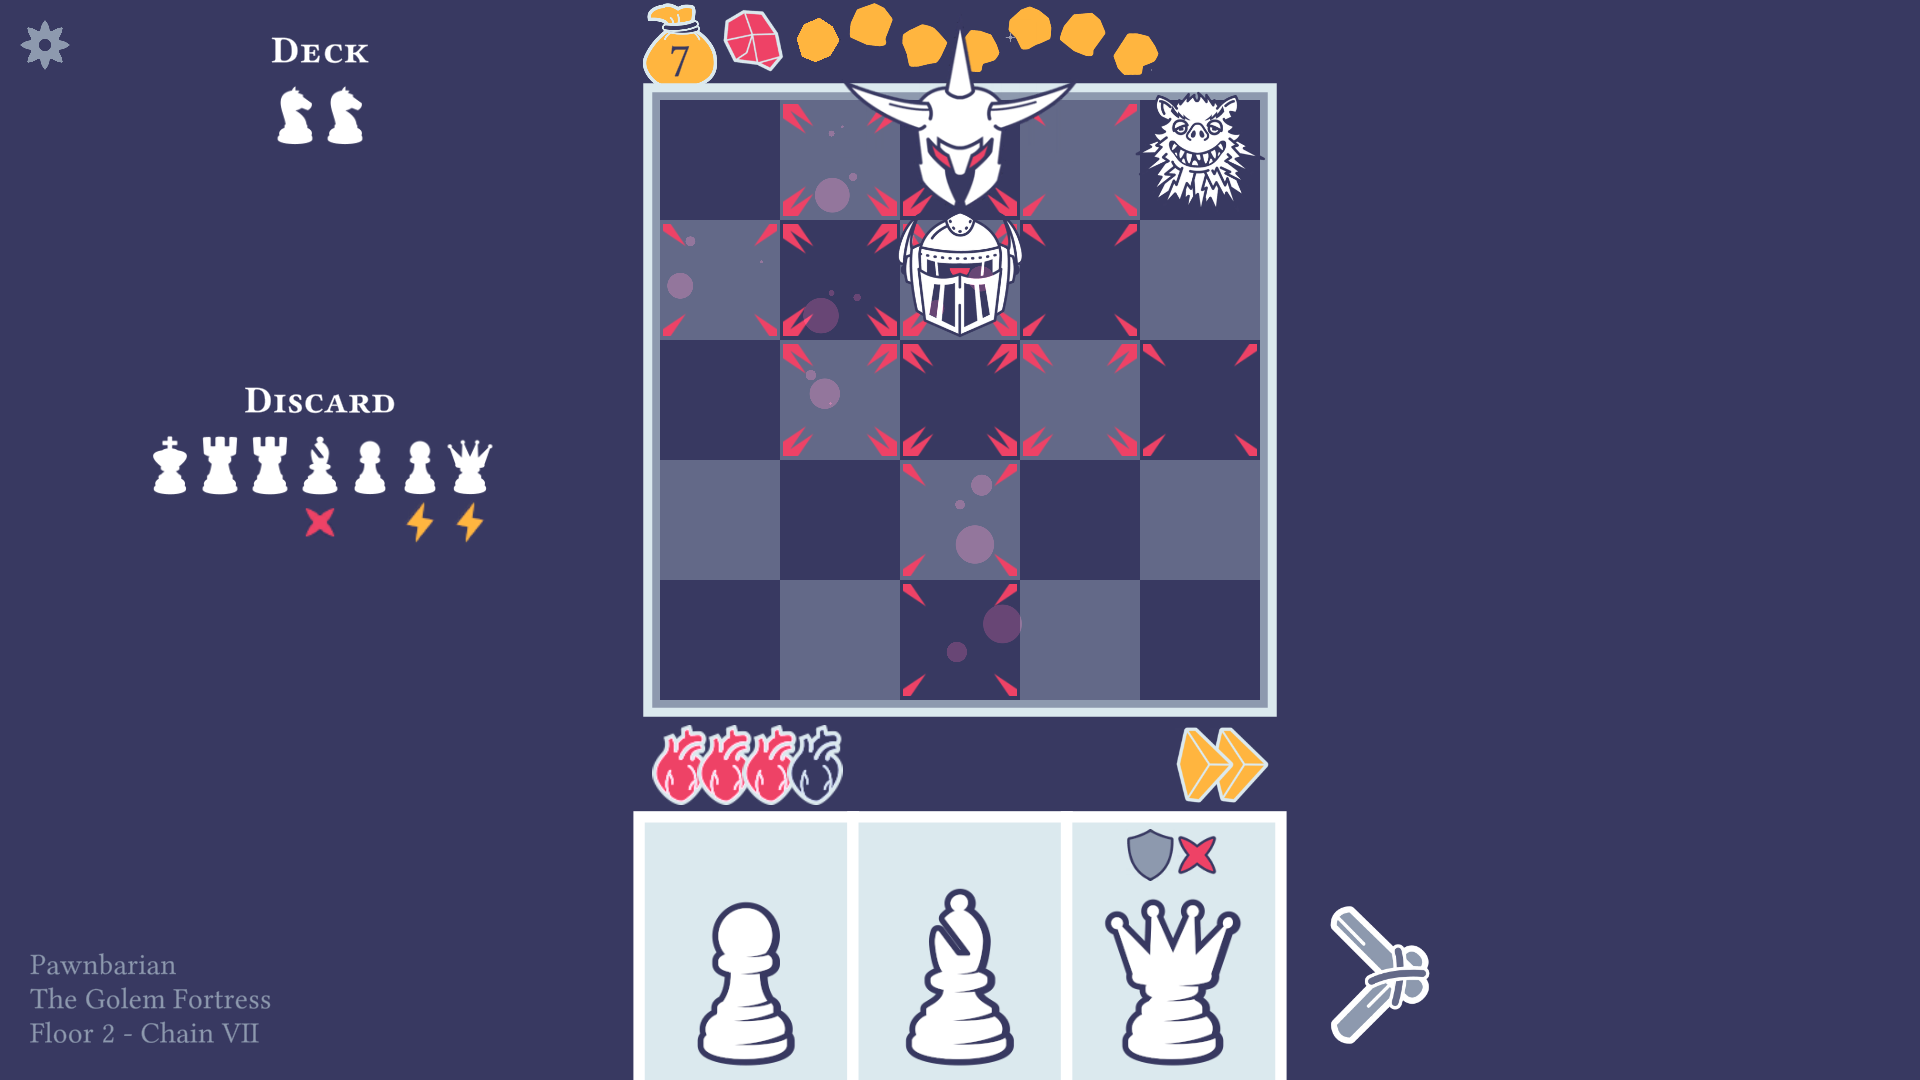
Here you get punished for building Cantrip, so you have to replace that upgrade with something else. I personally don’t even buy a single Cantrip item when playing this dungeon.
Here, the most common thing you’ll see (aside from Spark enemies) are enemies that can’t be attacked if you’re cardinally adjacent to them. This makes the Diagonal Splash upgrade incredibly useful here, because otherwise the enemies are painful to deal with. Diagonal Splash makes things a lot easier here. Of course, Shields are still the most powerful upgrades, so you should be stacking both Shields and Diagonal Splashes.
The Foul Shrine:
The main theme here is the Void Grasp mechanic, which makes Diagonal Splash less useful, as it could cause you a lot of damage if you try to kill several Void Grasp enemies at once.
The build is pretty much the same as The Goblin Caves build, although I prefer having a rook with a Diagonal Splash. It feels very useful in the bossfight, because it gives me so much control over what I hit with the Splash and what I don’t hit.
When there’s a Demon Golem, try to prioritize it, because with this Cantrip build, it can create some suboptimal and hard to play scenarios.
As a general strategy during the boss fight: because the boss spawns a Kraken Tentacle for the first enemy you kill each turn, there’s no reason to kill only 1 enemy. Try to create a position that allows you to kill many enemies in one turn (they don’t have to be Kraken Tentacles, it’s easier to kill the other enemies).
Chains
When it comes to Chains, even numbered Chains give you some sort of new challenge, while odd numbered Chains increase the difficulty of the floors. I won’t go into detail about the odd Chains, because the floors getting tougher doesn’t change anything about the general strategy.
I also won’t be using Roman numerals, so that people who are not used to them have an easier time following this part of the guide.
Chain 2: Leave Blight on each square you leave
At first this was a little challenging, but because of this being such an early Chain, you get used to it quickly, and this starts feeling like a base game mechanic.
An important tip: don’t make unnecessary moves! There are times when you get bad pieces, but you’re safe where you’re standing, and you don’t have an easy kill on any of the enemies. In those cases, don’t be afraid of skipping your turn without making a single move.
There may be exceptions when you can get a positional advantage if you move, but most of the times it’s just better to wait and leave as little Blight behind as you can.
It’s also advised to think about routing when you’re trying to get somewhere. If you want to get to a certain safe square with for example a king and a knight move, think about which order (knight or king first) leaves Blights on which squares, and evaluate which of those squares you are less likely to use. Personally I prefer leaving the edges clean.
Also, if you have the option to get to somewhere in 1 move rather than 2 moves, just go with the ones that’s 1 move to leave less Blight behind.
Oh, and move on already dead squares when you’re trying to get somewhere and you get the chance to. If you have a square with for example 6 stacks of Blight, you’re not going to end your turn there anyway, so passing through that and turning the 6 stacks into 7 doesn’t make your board worse, but going on a path where you would increase the Blight stacks from 1 to 2 could lead to some problems later on in the round.
Generally the more stacks of Blight a square has, the less useful it will be to you, so the more you should try to path through it and leave Blight on the already dead square instead of a useful one.
After Chain 2, the game begins feeling like it has a turn limit, because the more turns you play, the more blight gets on the board, and after a while it becomes overwhelming.
Chain 4: Upgrades are more expensive
The cost of all upgrades get increased by 1. Starting from here, you have to pay more attention to what you buy, and stop buying upgrades that perhaps don’t help you as much. Also, now is the time when it becomes even more important to finish the rounds as soon as possible to earn more gold.
Chain 6: Start with only two full Hearts
I always abused the damage boost (mentioned in the “Strategies” section) mechanic before this Chain, however after Chain 6, this became significantly harder, because I no longer had a spare heart to throw away in the first few rounds.
Since that, I’ve mostly been trying to do the first 2 rounds hitless to heal up to full hearts, and I’ve only been utilizing the damage boost after. Sometimes I still do it in the first 2 rounds though, really depends on whether I feel like it’s worth it or not.
This also resulted in me having to focus more on economy and try not buying weaker upgrades. After this point, I completely stopped buying Cardinal Splash as an upgrade, and began saving the gold for the next store instead. I realized how weak Cardinal Splash was compared to the other upgrades, mainly because so many enemies in the game can’t be hit if you’re adjacent to them from a cardinal direction.
Truth to be told, Cardinal Splash CAN be useful, but it’s a lot less consistent than any of the other upgrades, so while doing Chain 7, 8, 9 and 10, I completely ignored that upgrade.
Chain 8: Edge columns start with Blight
This was BY FAR the most sudden change in difficulty for me. The gap between Chain 7 and Chain 8 felt huge, because I’ve mostly been relying a lot on the edges, and this Chain took away 10 of 16 edges. The big spike in difficulty probably comes from the fact that it makes the Chain 2 handicap even stronger, because now you’ll have to be way more precise with your movement and where you leave Blight.
I do have a few tips that may help, but it may take a while to get used to the tighter board.
Firstly, when you have enough shield to absorb the damage coming from Blight on the edge columns of the board, and you have to move to either the edge columns, or any other part of the part before your turn ends, go to the edge columns. Those squares are the ones that you’ll get the least use out of, so make sure to use them whenever you can.
Of course, if you’re on a safe square in the middle of the board, you shouldn’t leave to get to the edge columns just for the sake of ending your turn there, but if you’re on an unsafe square and you have to choose between the edge columns and other squares, edge columns should be the way to go. This way, you’ll leave the Blight when you start your next turn on the edge columns and not on a square that’s more useful.
Same when you’re trying to route yourself to a safe place. Unless you have a path where you would pass through a square that’s more dead than the edge column, you should path through the column. But the same “the more stacks of Blight a square has…” rule applies here as well.
Chain 9: Tougher floors
I don’t know what it was about this particular odd Chain for me, but I was stuck here for a while. I didn’t feel the difficulty increase in the other odd Chains, but this one made me struggle a lot. Maybe I was tired mentally, I’m not sure, but from the 30 hours of playtime I’ve put into beating all the Chains, The Foul Shrine on Chain 9 took 4-5 hours for me alone.
Before this, I considered The Foul Shrine to be easier than The Golem Fortress. After this Chain however this all turned, and The Foul Shrine felt a lot more difficult.
But then again, I may have been tired when I was struggling with this, or I may have just gotten very bad RNG. I don’t even know, but I thought the difficulty spike I felt here was worth mentioning.
Chain 10: Final bosses deal double damage
I actually completed each of the dungeons a lot faster than on Chain 9. Maybe it’s the experience I got from the many hours spent on Chain 9 that made this last Chain more than doable.
I feel like both the Chain and the strategy are self explanatory. Scroll over the final boss when starting round 7, and that will give you a general idea of where you should and shouldn’t be.
A few important things to note:
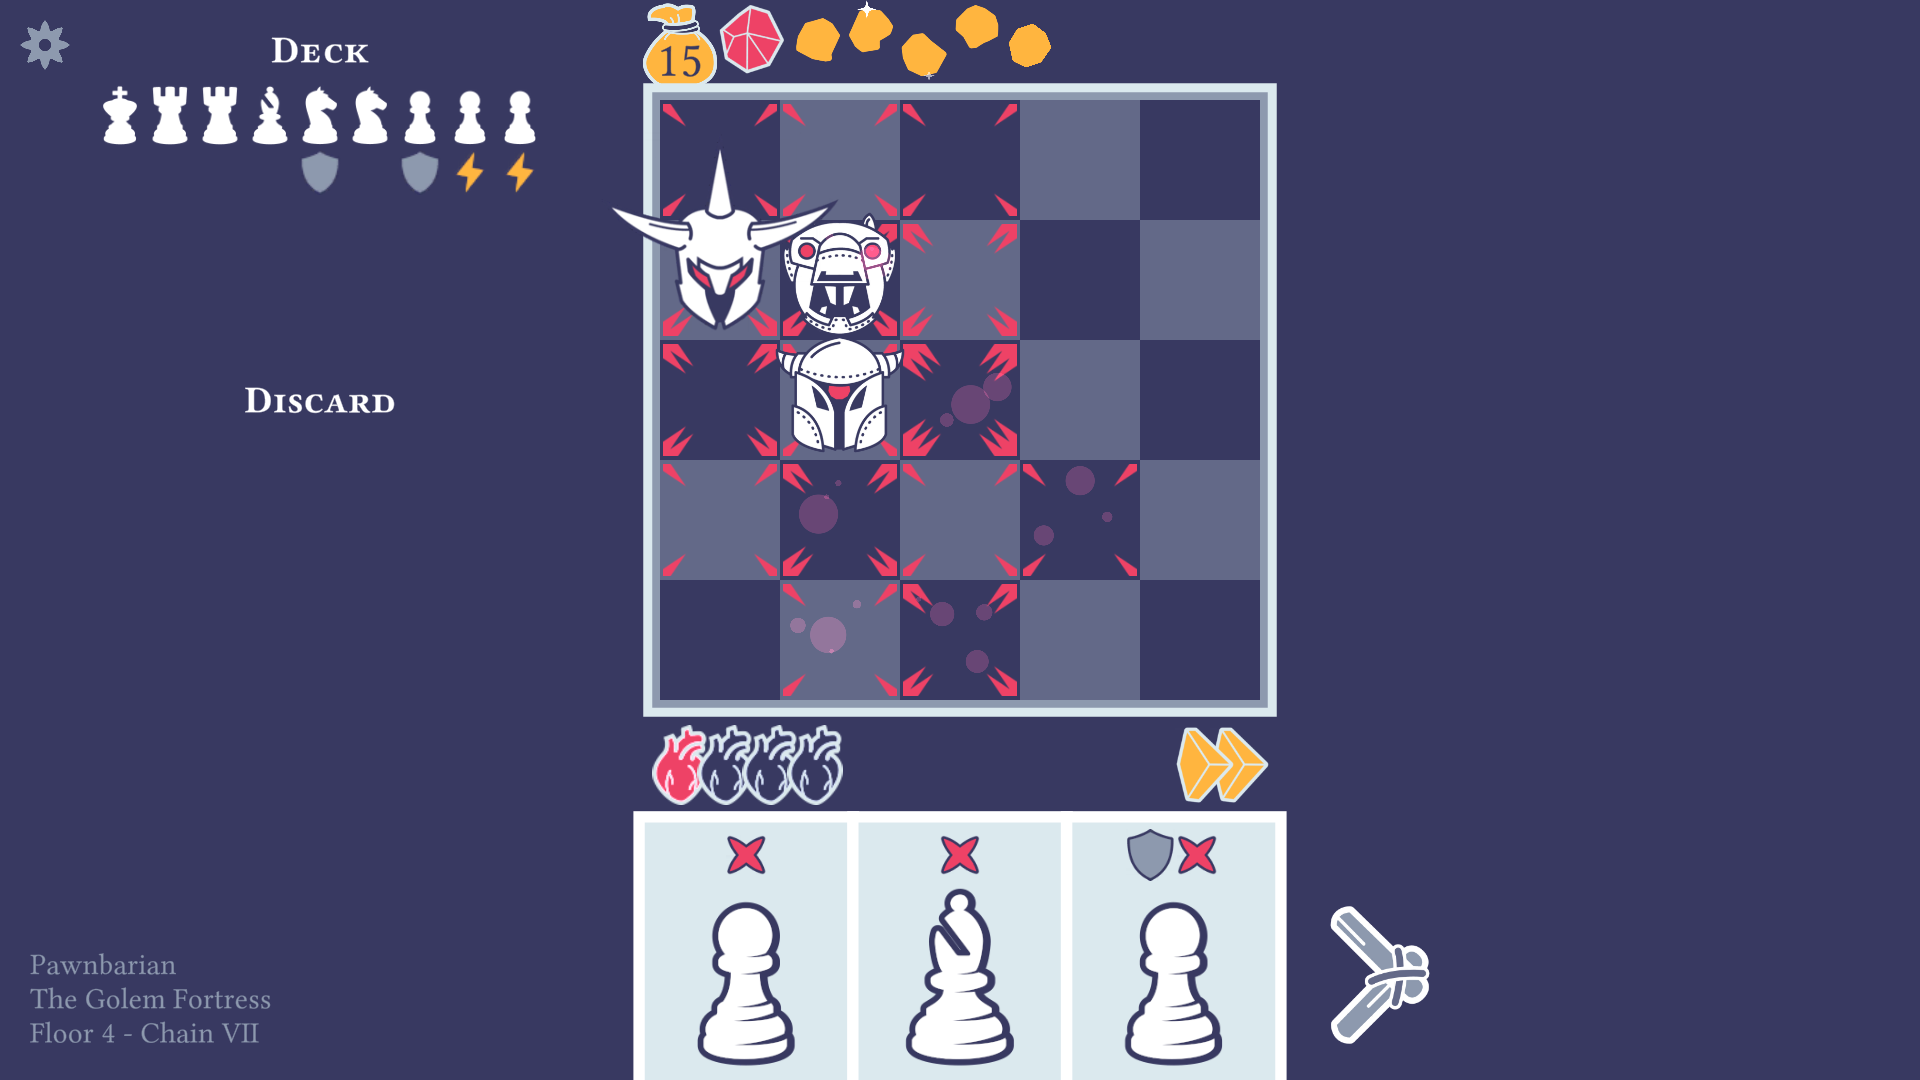
– Splash damage is really good in The Golem Fortress, because due to the double boss damage, you should almost always be in a cardinal direction of the boss, meaning that you’ll get less reach to other enemies. Splash can help with that, and you can also kill Spark Imps while staying in a cardinal direction of the boss.
– Stack up on shields for The Foul Shrine, because there the boss attacks in huge range, which can be hard to dodge if you’re not getting good pieces. Also, leave the corners open and don’t Blight them too much. If the boss steps in the middle of the board, only the corners are going to be safe.
Extra: Puzzles
One important skill in this game is recognizing certain patterns. A lot of the times you make a move without realizing what other options there are and where they would lead you, or you miss out on a gold because you don’t realize that you can actually kill the last enemy.
This is why I created this section as a little game, where I gathered a few puzzles that I think are worth sharing. These puzzles aren’t difficult, but they require you to see certain patterns, and how the pieces interact with each other.
The fact that you know that there’s a solution will probably make it easier for you, because in a normal game if you don’t see the solution immediately, you tend to wait one more turn, thinking there isn’t a solution.
Also, back when I made the screenshots of these puzzles, I wasn’t using the coordinates, but it’s easy to imagine they’re there.
From left to right: A, B, C, D, E.
From the bottom to the top: 1, 2, 3, 4, 5.
None of these puzzles require you to get a lucky draw with a Cantrip. There’s always a solution that doesn’t rely on drawing a good card.
Find a way to kill the last enemy. He has Nimble.
Solution: Cantrip pawn to E4, knight to C3, hitting the enemy once and pushing him to B2, then bishop to B2, finishing him.
Find a way to kill the last enemy. He has Nimble.
Solution: Cantrip queen to E5, promoting your other pawn to a queen, then new queen to B2, hitting him once and pushing him to A1, and finishing with bishop A1.
Find a way to clear the board. They both have Void Grasp.
Solution: Knight to D4, killing the first enemy and getting pulled to E5 by Void Grasp, and then knight to D3, finishing the second enemy.
Find a way to clear the board. C4 enemy has Spark Surge and Spark Aegis, E5 enemy has Golem Soul.
Solution: Queen to B5 or D5, killing the enemy on C4 with Diagonal Splash and promoting the other pawn to queen, then take on E5 with the newly promoted queen.
Find a way to clear the board. It doesn’t matter what traits they have here, because there’s no Cantrip in play.
Solution: Either one of the pawns to A5, killing the enemy on B4 with Diagonal Splash and promoting the other pawn to queen, then queen to A2 or A4 to kill the B3 enemy with Diagonal Splash.
Many of you probably had at least one puzzle here that made you feel like you wouldn’t have thought of finding it in a real game. I’m not saying that you couldn’t solve the puzzles, they were fairly easy, but for newer chess players some of these can be tricky to find, and they would most likely end their turns before attempting one of these, hoping for better pieces.
But even finishing 1 turn earlier can be the difference between winning or losing, so try to win as soon as possible, and in tricky situations like these, don’t immediately pass your turn. There’s no time limit in this game.
I hope these short puzzles helped you learn a pattern or two. (Although they were mainly about queen promotion.)
I may add some new puzzles every now and then if I find something tricky, I just wanted to end the guide in a playful way rather than with raw text.
Good luck working your way through the Chains! I hope you found this guide helpful!
Feel free to give me feedback, point out if I made a mistake somewhere, have a suggestion on how I could improve the guide, or ask if you have any questions!
This is all about Pawnbarian – Best Pawnbarian Class – All Chains – Upgrade – Strategy Guide; I hope you enjoy reading the Guide! If you feel like we should add more information or we forget/mistake, please let us know via commenting below, and thanks! See you soon!
- All Pawnbarian Posts List


Leave a Reply