Tips and useful knowledge covering many aspects of Path of Exile. It’s a great place for new and advanced players and a good starting place for you to find topics you want to know more about.
General tips, endgame knowledge, league mechanics, alternative progression … it’s all covered.
Have fun reading!
A Few Words Before We Start
Welcome
to my Path of Exile collection of knowledge.
You will find many useful facts, tips and recommendations about the game.
You will not find full-fledged in-depth guides on topics such as crafting, heists or the Azurite mine but instead extensive lists of quick-to-digest information, lightened up with screenshots and some attempts at humour, which, alas!, might be of a subjective quality :p
If you read about a topic you want to go deeper in, there are plenty of great guides focused on single aspects of the game out there. The official forums alone brim over with specialists that have gone where no man has tread before and discovered the deepest secrets and wonders of the game we love so much.
Everything’s based on my 700+ hours (actually a lot more since I started off Steam), starting with Vanilla and all the way to the present day in a kind of on-off relationship that I know many of you share. That said, I have participated in all but 1 or 2 softcore leagues at least for some time and recently started going for SSF instead as I do not like the trading system.
If you find obvious mistakes, let me know.
Oh and this is IN NO WAY WHATSOEVER an attempt to atone for my PREVIOUS Path of Exile guide which you can also find here 😉
And now: have fun reading!
ApathicAlpaca
General Tips and Tricks
Here I give you some valuable hints and information that do not fit in the other chapters or are just globally true.
- Let’s start off with the two almost mandatory tools to enjoy Path of Exile:
– Lootfilters. Use them. The game drowns you in loot, most of it not worthy of your precious inventory space that is so smol it could be compared to Diablo 2 😀
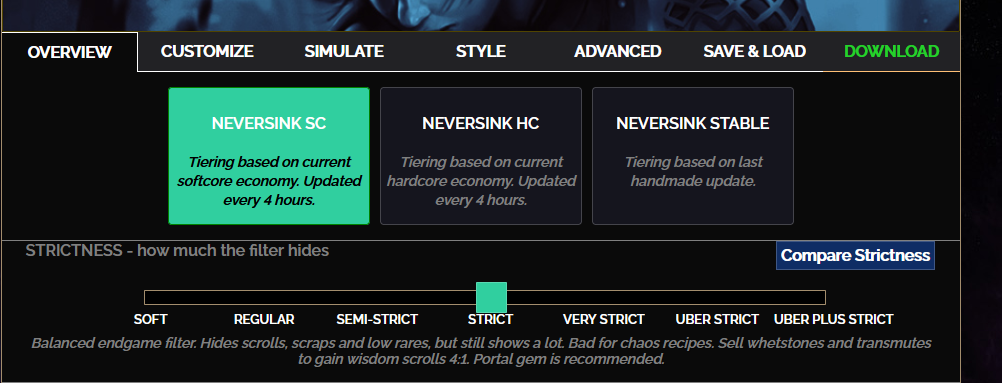
On https://www.filterblade.xyz/ – [filterblade.xyz] you can customize your lootfilter to your liking or just select one of the recommended strictness levels. To start a league I suggest ‘semi-strict’, then go strict once you start maps or soon after. Depending on your build you may want to manually show some additional loot (‘Customize’ tab).
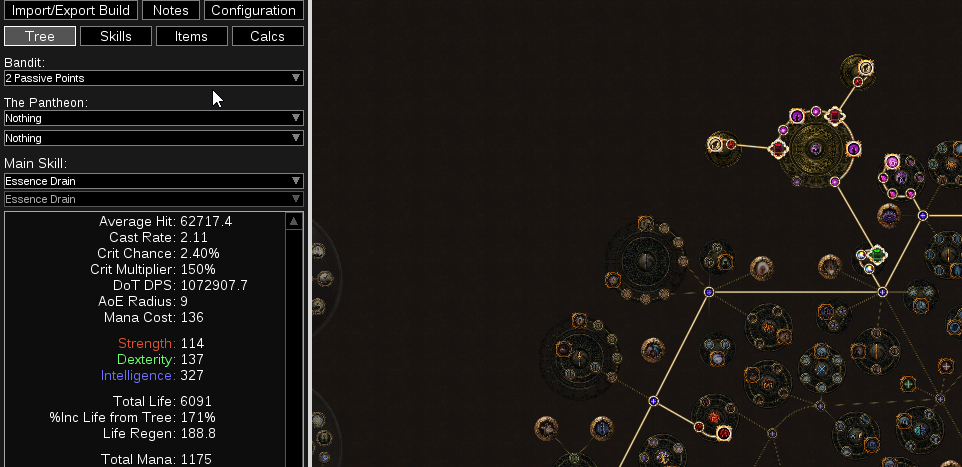
– Path of Building (community branch!). THE one and only tool you’ll ever need for your character build. You can plan everything in advance and copy in builds from other players to follow.
Among many other cool features, Path of Building has a complete talent tree and can calculate reliably the DPS of most skills. - In general, the ten story acts should not concern you too much. They are a way to get to know the tilesets, monsters, NPCs and story of the game. When you finish Act 10 you will most likely be around level 60-65ish and have found your first endgame progression enablers, in other words: maps.
- As for chosing a class and build, unless you are a real pro, I recommend checking the forums for build guides (there are also plenty of specialisted build sites around) and follow one of them, ideally with Path of Building.
With the great complexity of PoE’s talent tree, stats and ascendancies, it’s not a good idea to commit too much time into your own attempt at a good build – unless you know EXTREMELY well what you are doing. - Be sure to do all quests that grant skill points!
- There is only one multiple-choice quest reward in PoE that affects your build in the long term: kill all bandits in Act 2 or ally with one of them.
The build you follow will normally recommend an option. Many builds ultimately fare better with killing all to get those precious and hard-to-come-by skill points. Some however are better served with the bandit bonuses. Beginners often like to ally Alira to get a big boost to all elemental resistances (that mana regen also sometimes helps during leveling).
You CAN change your mind later on but it costs you dearly so think about it. - Quick summary of what ascendancies are because the game does not explain ingame how to get them.
Each class has 3 acendancies of which you can chose one. It IS possible to change to a different one but it’s an expensive and timeconsuming process.
Over time you get 8 points total to spend in your chosen ascendancy. These unlock super-powerful, unique bonuses that very much define your build. A necromancer witch is quite, quite different from an elementalist, a Berserker differs greatly from a Chieftain.
The first 6 points are rather easy to get: you need to beat the Labyrinth. It’s a special area that you unlock by doing all the ‘ascendancy trials’. Your quest log notifies you about these.
You will automatically enter the regions for each trial while doing the other quests (exception: catacombs).
The trial is a jump&run&avoid test with certain traps. You should not have any trouble with these after you get the general idea. Tip: whirling spiky blades probably hurt and holes in the ground often contain spiky surprises 🙂
The lab comes in 3 difficulties: normal, cruel, merciless. Your goal here is to get to the boss Izaro, defeating him leads you to a room with a unique enchantment option and: your price, 2 ascendancy points.
The last 2 points are more difficult since they require mapping (endgame content) and are a bit RNG-based. - In contrast to Diablo and many other genre titles, Path of Exile is quite unforgiving to the player who ignores defense. You MIGHT get through the story acts by just looking at your DPS but you will fail miserably in medium tier maps at the latest.
If you follow a popular build it will always contain information about your defenses and will take care to boost them properly through the talent tree and gear recommendations.
Be warned that you lose 10% of total XP to next level whenever you die (after finishing story) so you see it’s a good idea to think about defense.
To understand the mechanicsbetter, here’s a quick summary of how you make your character survive.
– Evasion: works against *attacks* but not spells and not damage over time. Evading is automatic, instant (unlike blocking which has a short block animation) chance-based (higher rating = more often) and naturally agrees with green gems and Dexterity.
– Dodge: a special defense that is harder to come by than evasion and acts separately. There is dodge against attacks and spells accessible via different routes.
– Armor: This defense reduces PHYSICAL damage (excluding physical damage over time, like bleeding) from spells and attacks both. So you get hit but you take less damage. Pretty simple to understand? Not quite.
Armor works better against small hits than big crushing blows. It will work wonders against, for example, those machine-gunning (physical) tentacle ladies but not as well against a slow, strong boss attack. The % shown in your stats ingame is misleading, it’s a kind of ‘average’ for an ‘average’ enemy physical hit. However the game does not tell you what it considers to be average on that level.
Anyway, keep in mind that armor is always useful but is more effective the lower the hit damage is. If a monster deals 10×10 damage in a second armor will make you avoid much more damage than if it deals 1×100 in the same time.
Armor synergizes well with Strength and red gems.
– Life: Your hitpoints. Duh.
– Energy Shield: Your hitpoints… volume 2? Energy shield (ES) acts like life in many respects, it’s a buffer that is consumed before your life takes damage (exception: chaos damage). It starts to regenerate automatically and with strong effect after not taking any hits for 2 seconds.
ES is affected by armor, resistances, evasion… just like life.
Some builds rely heavily on life, others on ES. As a tendency, ES is more expensive to come by, especially the very good rolls. If your chosen build relies on ES exclusively it may not be the best choice for new players (or SSF).
ES is related to Intelligence and blue gems.
– Blindness: Blinded enemies miss 50% of attacks (but not spells) which makes it a super-strong defense layer if you can apply it reliably.
– Resistances: reduce damage taken from elemental or chaos sources. Chaos resistance is hardest to come by. You get a -60% penalty to all resistances as you progress through the story acts. No worries though, talent tree and gear offer lots of ways to get enough resistances.
They are normally capped at +75% although there are ways to go beyond that. At 75% you take only one fourth of damage.
– Leech: You can leech life, mana, even Energy Shield. The amount of leech per second is capped although those caps can be raised. - Don’t neglect any of the main progression systems. Maps are only the most prominent endgame content but there’s the Azurite mine which can easily check in as a second, contained game mode and there’s the other huge league mechanic ‘Heist’ with its special dungeons aimed at short time spent, big win scenarios.
Also keep in mind there are many craft recipes not obtainable in maps but only in the Mine or (to a lesser degree) by doing certain league mechanics.
General Tips and Tricks, part II
- With the relatively new ‘affinities’ you can sort your items into the correct stash tabs or even different chests (like Expedition Chest or Heist Chest) simply by using CTRL+Leftclick while at your main chest. All you have to do is activate the little checkbox in the Stash Tab or Chest that says ‘affinity’.
It’s small and not very well placed so many players actually don’t know about this AWESOME feature and still sort everything manually.
To be clear, what this means is: you go to your main chest. You don’t have to select ANY specific tabs, you just CTRL+Leftclick any item and it automatically goes into the correct place.
If you are already using the special stash tabs for e. g. currency (extremely recommended), that’s the usual place you want the affinity. If you only have the regular tabs you can still select specific affinities for each of them, even multiple ones. So Blight and Delirium stuff could be put into one tab, maps and fragments in another, for example. - Vendor recipes are a great way of getting lots of useful stuff and get rid of unwanted items at the same time.
You can find all recipes here: https://pathofexile.fandom.com/wiki/Vendor_recipe_system – [fandom.com]
Arguably the most commonly used ones are Chromatic Orb, 7x Jeweller’s Orb and Chaos Orb. See the chapter about orbs fore more details how to create your own Chaos Orbs. - Flasks are possibly the most undervalued tool on many Exile’s belt. Understanding and using flasks correctly makes a significant difference in your combat performance.
Flasks range from clearly offensive ones like Diamond Flasks to defensive ones like Granite Flask and there are utility flasks that grant powerful abilities such as Phasing (move through mobs, invaluable in tight quarters).
What some refer to as ‘flask piano’ is having a good muscle memory of which flask is assigned to which shortcut (default keys are the numbers 1-5) and playing them just right… like a piano.
What kind of flask do you need? It depends on your build but there are some almost universally useful effects and some globally true tips about flasks:
– The Expedition update changed ‘removes X’ effects on flasks to only apply their full power when you are actually afflicted by something. This is a VERY big difference to before and something you must adjust for. Anti-Freeze flasks no longer work in advance, you need to wait until you are actually frozen to pop it. The same goes for anti-bleed, anti-burning etc.
– ‘Corrupted Blood’ and to a lesser degree bleeding can quickly kill your hero almost ‘out of nowhere’. These effects go through all resistances and directly assault your health. The only defense is a flask ‘of Staunching’ and quick reactions. As soon as you see the debuff icon pop up you should use your flask. This also grants temporary immunity to the effect. You want to make sure you ALWAYS have enough charges to remove these effects, the best place for the mod is normally on a life or mana flask because their flask charge costs are lower than on other flask types.
Advanced Tip: Jewels can be corrupted into having the ‘cannot be inflicted with corrupted blood’ modifier but it’s a low chance and in a trade league they will normally be VERY expensive.
– Another universally good flask mod to have is ‘removes freeze’. Freeze is without doubt the most dangerous elemental ailment because you can’t do anything, including evade or block, while you are frozen. 2 seconds of doing nothing is a surefire way of killing yourself in high tier maps.
– Flask charges refill when you slay enemies. That’s all fine and good as long as there are plenty around. But what if you are up against a boss that does not spawn loads of minions over the encounter? There is no way to gain flask charges and you quickly stand there with your pants down.
Right?
Wrong. There are multiple ways of recharing without killing stuff. One is having the ‘20% chance for a charge on crit’ modifier but this one only works with crit builds (what a surprise). This by the way is one of the main reasons crit builds are so popular. The most important flasks can be made to last forever.
If you are not relying on crits, there is still ‘gain a charge when hit’. Obviously you need to get hit so this requires thinking ahead a bit and letting harmless hits through (while avoiding any burst boss attacks).
The Pathfinder ascendancy (Ranger) has some insane means of generating flask charges.
Last but not least, if you can spare a map portal or two, return to your hideout via portal and all charges will be refilled. Not a particularly honorable way but hey, it works.
– Your important flasks at least should all have 20% quality because that increases the duration. Before rolling into a perfect magic flask, use baubles on it while it’s white, you get much more value out of them this way (5% quality per bauble).
– There are relatively new orbs that can enhance flasks further with enchantments. Consult in-depth flask guide for more details.
– For running ‘no regeneration’ maps you will want flasks that do not stop regenerating life or mana even when you’re full. Look for the respective modifier, it reduces the recovered amount greatly but keeps the regeneration running for the full duration, even if you reach maximum life or mana.
– The talent tree offers lots of opportunities to further strenghten your flasks and there are also effects in the game that only work during any flask’s duration. Combined with good recharge or wise use of the flask charges this can mean a real difference!
League Mechanics: Elementary, my Dear Watson, part I
Path of Exile’s developers from GGG are constantly adding new stuff to the game, there is a major content update roughly every 3 months and without fail every single one contains a new league (season). Every new league introduces a new mechanic to the game and seeing how PoE has some years behind the belt already, you can calculate quickly that with 4 updates per year, that means a WHOLE LOT of league mechanics. A few of them are well hidden or were removed for balance reasons but most are in.
What this means especially for a new player is that you get overwhelmed with many different mechanics from the start. Some are quite self-explanatory but it’s still useful to bear in mind these tips:
- The current league (Aug 2021) added a cartel of traders and gamblers. Almost every area you visit will contain somewhere one of these NPCs surrounded by a digging site. You place explosives where you like, detonate them and then fight the emerging enemies for loot. Occasionally you get a special expedition map that leads you to a special place of GREAT LOOT and danger.
There’s some things to note when chosing your detonation sites: The monster markers are just mobs, the bigger ones are ‘runic’ mobs with the new ‘ward’ defense and can drop quite valuable loot.
What you are really after are the little shrines (‘remnants’) that empower spawned mobs but be very careful with the damage immunities. Don’t detonate shrines with immunity to the damage you deal (e. g. don’t detonate a chaos immunity shrine if you play Essence Drain). The sequence of detonating them is actually of importance so you need to figure out where to place your charges first and last! The reason: bonuses from shrines carry over to all SUBSEQUENT mobs/chests so you want the most powerful/lucrative bonuses early in your detonation chain.
The second big loot opportunity are the chest markers. These are often within range of a detonation charge that also covers at least 1 shrine. But not always. The bigger chest markers and especially the red ones are often worth giving up on a shrine if that means you can get these chest markers instead. That’s because they can contain very sought-after currency, cards or maps.
On the expedition maps, which are really just a huge area covered with markers, you can even see in advance what the chests hold.
Now for expedition maps, your main goal are USUALLY, in this order:
1) BOSS fight markers. Yes, if you are lucky you can spawn a boss. Careful though, they can be pretty tough, not your usual fire&forget map boss for sure.
2) underground area(s) because they contain lots of mobs, lots of chests and special texts that help the NPC team
3) red chest markers
4) shrines with powerful modifiers such as 300% increased quantity
5) yellow chest markers
6) rest.
all) Take care to detonate as many runic mob markers as possible.
For chests, you specially want cluster jewels, maps and fossils first and foremost. Depending on your playstyle and build you may prefer others but cluster jewels in particular are otherwise pretty rare in the game. - Let’s continue with something easy: loot chests. They were added WAY back when the world was young, the iron hot and Moria full of busy dwarves instead of Hairy Midgets and Co.
You find these chests basically everywhere you go and just like your gear they can be normal, magic, rare or unique.
What many players still don’t know after all these years however is that YOU can decide their rarity. You can use orbs on them exactly the same as on gear. Orb of Alchemy turns a white (normal) chest rare, Orb of Transmutation turns it magic, Regal Orb transform magic into rare chest etc.
This is normally not worth it for the most common chest types but there are rare chests containing maps, divination cards and other very valuable and sought-after loot. These can and should absolutely be upgraded to contain more and better drops. - Somewhat more complex but intuitive is the Divination league mechanic: collections of cards that you can turn in at the NPC Navali for a reward. Some give access to very hard-to-get unique items or valuable currency like Exalted Orbs.
There are good guides out there about where to most efficiently farm specific cards because in contrast to other loot, some cards will only drop in certain tilesets and itemlevel ranges.
For beginners to PoE, one card recipe you should look out for is Tabula Rasa. It drops in an easy to access tileset and can be farmed relatively quickly. It is probably the earliest place to get a 6-linked armor which can massively boost your damage output. - The Legion league introduced monoliths that spawn ‘frozen’ mob pillars. You have to destroy as many of these as you can quickly, after the timer runs out all destroyed pillars will spawn the respective mob to kill and loot. Some pillars contain rare leaders or even unique bosses so quickly finding these is essential if you want to get the most valuable loot out of the encounter. Monoliths can be found basically everywhere.
- You will frequently come across floating green spectres, another legacy from a long-gone season. Killing these will yield mediocre loot but waiting for them to influence mobs or even ‘possess’ rare mobs means a lot more additonal loot. However, they vanish after a short time if they can’t possess a nearby rare mob, so don’t wait too long.
Warning: when possessing a rare or unique (boss), each spectre gives them a special powerful buff. This is normally of no consequence but hard bosses can become impossible if you allow spectres to possess them. Just saying. - Rogue exiles are another relic of the past. They are basically strong unique mobs though typically not as strong as map bosses. The risk with these rogue exiles is rather that RNG can give them some quite deadly combination of modifiers. Even if you routinely slay them with ease, be on the watchout for dangerous debuffs like corrupted blood or deadly offensive mods like critical strike boosts.
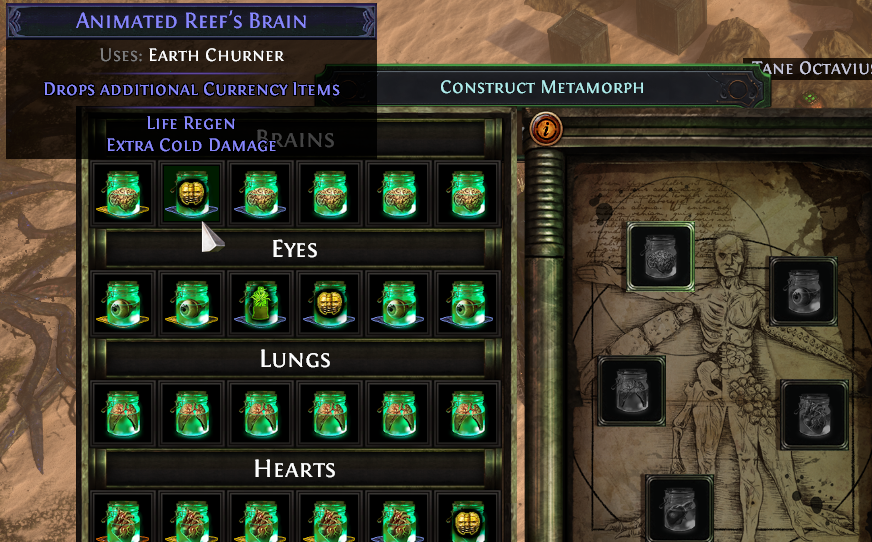
- Metamorphs were introduced quite a while back. If you spawn a Metamorph mechanic on your map you see ‘vial’ symbols on some mobs. If you kill them, you automatically gather Metamorphosis ingredients. Once you have obtained all ‘body parts’ this way, you can spawn the Metamorph device wherever you want and fill it with the parts of your choice.
Now the cool thing about metamorphs is that YOU decide what they can do and what they drop. Metamorphs are powerful unique enemies so paying attention to not making them TOO powerful is probably a good idea.
At the same time, you want to check all ingredients for special drops, like maps or currency. Even if the ingredient is maybe only magic rarity (or even white), if it means the boss will have guaranteed drops of what you are looking for, maybe it’s worth it. (ingredient rarity increases overall quantity and rarity of drops)
For example, if you are in a high tier map and you can guarantee map drops, that’s possibly a good idea to fill up your pool of high-tier maps.
You sometimes want to guarantee some drops even if it means not chosing the best body part rarity. The left option would be rare (more overall quantity/rarity) but I want that currency!
Now you have to defeat the metamorph. Each metamorph boss will drop one unique ingredient for some body part. These you can combine once again but this time in the special metamorph lab area accessible from any waypoint. Now you create a special uber-metamorph out of unique-only body parts… be warned, these can be pretty tough fights but the loot is amazing!
Assorted Map Knowledge: Path of Exile’s End Game, part I
Maps are PoE’s endgame content and have been regularly expanded with new mechanics since the game launched.
The main screen to manage your maps is the Atlas (default shortcut G).
- STAY SAFE, EXILE. You may be tempted to try the hardest ( == most drops) maps asap but this is no good idea in Path of Exile. Higher tier maps can have absolutely devastating modifiers, some of which make the map almost or totally impossible for certain builds. (lucky for you the map modifiers can be rerolled unless it’s corrupted)
I will list here some modifiers you need to watch out for. Too many of them on the same map – sometimes even one of them – can make the run either very tedious because you need to be extremely careful with pulls or can turn it into an XP grave for your character. (you lose 10% of total XP to next level each time you die, this can be very painful starting around level 88ish)
– Elemental or Physical Reflect: These can render some builds useless for the map. Basically any build that deals DIRECT damage by the character is affected. Builds that rely on minions, totems or damage over time may not suffer as severely although it still means those damage sources will probably be dead very soon. Traps and Mine builds usually have no problem at all. There is no chaos reflect so you are safe with skills like Poison Arrow or Essence Drain regarding these mods.
They don’t appear on low tier maps.
– No leech: particularly nasty for builds that rely on lifeleech. You can often work around this mod by using flasks but it’s still a risk.
– No life and mana regen: Can be devastating if your build relies on either. Some defense layers consist of life regen (example: Righteous Fire builds) and mana obviously is important for most caster builds. Again, you can probably work around it by using flasks but this will block a flask slot and you may not have enough charges for a prolonged battle.
– Monster Critical: Depending on the mobs you face, this mod alone can be deadly. Some mobs like the ‘machine gunner’ types are very dangerous with this mod. In other maps you just face the usual enemies and this mod is less dangerous. In that case just be sure to check if there are other big boost to monster damage, like the player being cursed with Vulnerability.
– Elemental resistance max decreased: This again depends a lot on the enemies you face. Some caster-type mobs deal massive burst damage (if you let them) and lower max resistances makes it a nightmare. The same applies when another mod adds elemental damage to all enemy attacks. That combination is something to watch out for.
– Spawn Beyond Demons: This mod is usually very welcome by players because it increases the XP and loot in the map way beyond the normal means. Plus, beyond enemies can drop some special stuff. BUT the thing is, you may get a big Beyond spawn when you can least deal with it. If you roll this mod, be happy – and careful with your pulls.
– Most other modifiers are manageable but certain combinations are still worthy of your attention.
– Last advice: Adding Alva or Jun to an already dangerous map is not a good idea. Syndicate NPCs usually hit for a lot of damage (more than other map mobs) and the Temple gets all the mods from the map you run, too while the mobs in there are just overall stronger than their counterparts of equal level elsewhere. - Maps with lower tiers have limited modifier options and the modifiers will not be as strong. Mobs start at level 68 (tier 1 maps) and then gain a level for each tier. The higher you go, the more likely deadly mods like damage reflection or insane monster critical strikes become.
To compensate you for the increased danger, every mod adds quantity and rarity of drops to the map. It is perfectly possible with high-tier maps to easily go beyond 100% increased quantity, doubling your average drops. - Defeating map bosses is the simplest objective in the Atlas. You need to kill a boss on a magic, rare or rare corrupted map (depending on tier) to get an important bonus that makes you loot maps with +1 or even +2 tiers than you would normally get. This is important to maintain a pool of high tier maps.
- The next mechanic surrounding the Atlas are the Conquerors. They are exiles you went into maps too often and became mad (you were warned ^^). To draw them out, just do maps normally, however each Conqueror you find will only react to maps in his Atlas area. You can defeat the same one multiple times, however each time the map tier you need to face him becomes higher and the fight more dangerous.
Your final goal here is to reach Sirius, the main antagonist for now (there have been plenty others since Vanilla). - Then there’s the Maven, a mystical being from ELSEWHERE that finds great pleasure watching you kill bosses in maps. So much so that she collects the bosses you slay, then lets you fight 3, 4, 5, up to 10 of them. Simultaneously. The reward are map area-specific boosts you can chose from and with which you can individualize your endgame experience to your liking. The bonuses are usually tied to a league mechanic (like the Grove or Legion encounters) or to a mission NPC like Alva.
Be warned: The Maven is not content just watching, she will also periodically empower the boss or hinder you in some way. This can become a problem on difficult bosses with many dangerous map modifiers. Luckily, YOU can chose which boss fights she will witness before entering the map. If you have troubles with some boss, chances are you do not want the Maven on top of that 🙂
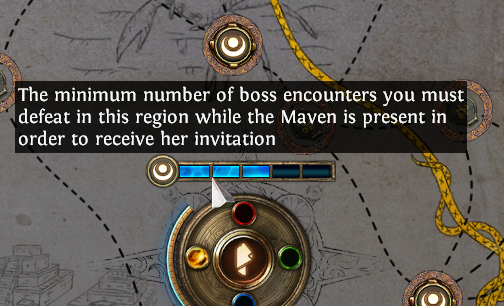
The Atlas shows you how many more bosses in that area you need to slay while the Maven plays peeping tom. Just two more and you get an invitation from her to fight all 5 bosses at the same time. - As if that was not enough complexity, there are also ways to add past main antagonists to the Atlas by using Elder or Shaper influence. Through scarabs, for example.
Elder and Shaper are no longer available through other means but their unique equipment mods and their unique item drops are amazing so you will definitely want to face these baddies at some time.
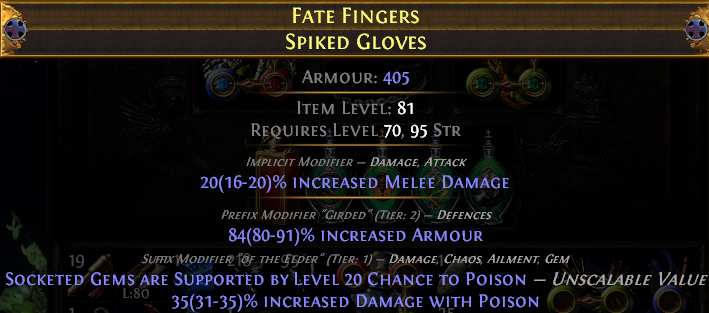
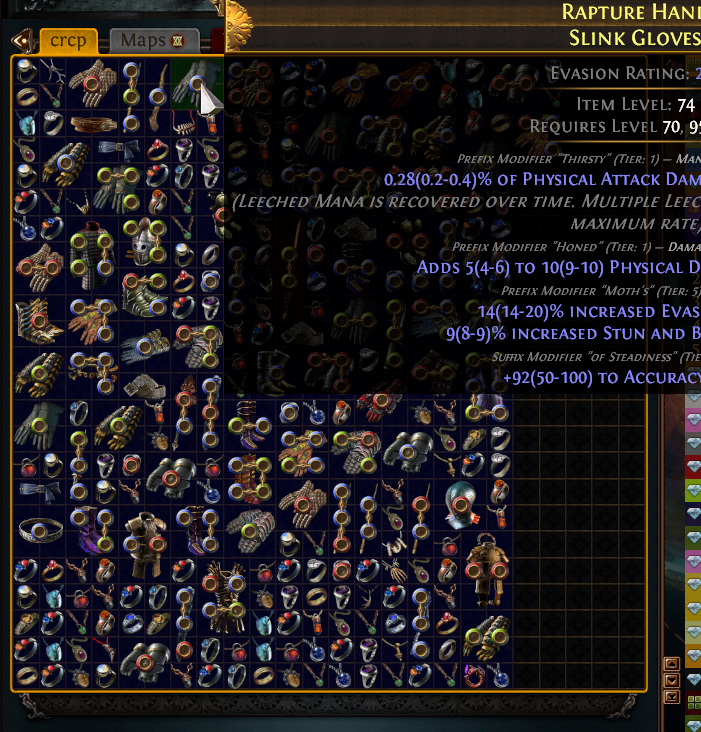
Elder and Shaper influence on an item means it can roll unique, nowhere-else-to-be-found mods like, in this case, a ‘free’ support gem (turning 4-link gloves into 5-link) AND a corresponding damage boost. Another favorite mod of these bad guys is automatic application of curses when you hit something.
League Mechanics: Elementary, my Dear Watson, part II
- Harvest League added a new type of powerful tools for players: plants. No, seriously. Now with the addition of the league mechanic into the regular game you will sometimes find portals to the ‘Grove’. It’s small area with multiple plant seeds that always come in pairs of two. You can select ONE per pair and activate it. It tells you what you get before you do, so read carefully. Clicking a second time on the plant releases many mobs that you must defeat. After that you can reap the loot and the rewards the plant offers.
These can range from changing gear modifiers to upgrading rarity, craft with a preference for certain modifier types (extremely useful to get mods you need) but also stuff that has nothing to do with gear, like exchanging maps for others (great to get maps you never did before), changing currencies or other cool options.
For newer players or SSF, some of the very best options that plants can offer include:
– Map exchange (because you will always get one you never did before unless the whole tier has been collected already)
– 5+ socket linking
– Adding 5 or 6 sockets
– Some of the ‘implicit’ modifiers offered (those are the ones you see above the affixes that are always there, even on white gear) can be very lucrative. Adding spectres to a map boss can make it a) drop insanely good loot and b) kill you before you can say ‘oops’. You were warned.
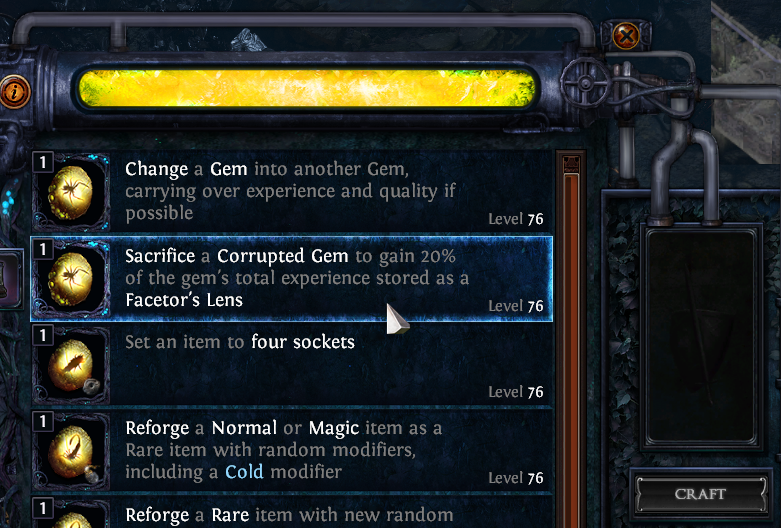
Some of the rewards in the Grove are unique and powerful, like storing corrupted gem experience or exchanging a map for another that you never did before. - Blight League introduced a mini-tower-defense. Sometimes you will encounter a priestess asking you to defend her contraption from waves of incoming mobs. To help you in that endeavour you can decide which types of defensive towers you want to build. Be warned some waves will be resistant to certain tower types, it’s shown in their icon on your screen.
The main reason you want Blight encounters is that they leave chests with good loot AND the chance to get the much coveted ‘blighted’ maps.
WARNING: Blighted maps are very challenging and quite rare (they normally only drop from blight encounters) so do not waste them, first watch some videos or read a in-depth guide on how to beat them. Blighted maps consist of one huge blight encounter (much much bigger than the small ones you normally find) and even well-geared characters and strong mass-clear builds can struggle with these. It’s a safe bet that if you can routinely handle, say, tier 12 maps, then you can MAYBE handle a blighted tier 2 map. Don’t overdo it with the modifiers either. Anything that gives mobs extra hitpoints or defense against your damage can make killing the waves in time quite quite difficult. Any skills that slow down mobs can be a great help, as can anything with huge area damage. Unfairly though the portals can also spawn super-tough unique enemies that require good single target damage. Be prepared!
Fortunately there are ways tosignificantly boost you (or weaken enemies) before you even start the map.
First off, Sister Cassis can anoint each of your rings with a mod that helps in blight encounters, including blighted maps of course. You can increase tower damage, range, make them hit harder against resistant enemies etc.
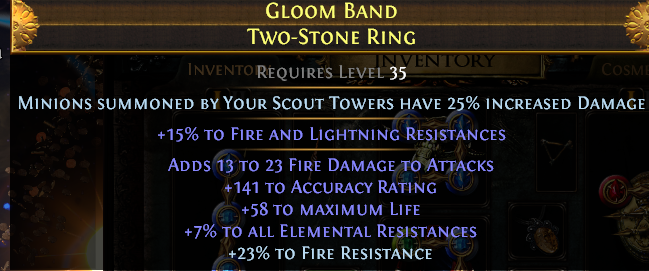
If you are a fan of scout towers (the flying minions), this anointment will make them stronger.
Secondly, you can anoint THE MAP itself, leading to additional mods that make life either easier or harder for you. Spawning mobs faster –> more challenge. More tower damage –> easier.
To compensate for this, one good run of a blighted map can make you obtain so much great loot as hours and hours of regular mapping would.
Example drops from single blight postule clusters. A blighted map usually ends with around 20 such clusters! These maps are tough but totally worth it! - The Beyond League added demons from … beyond… the fragile veil of what we laughibly call reality to the game. The normal way to encounter these in today’s game is to have the corresponding modifier on a map – they were not added to the core game. Slaying a lot of enemies near each other quickly then has a decent chance of spawning Beyond mobs. They are generally a little tougher than normal map mobs so if you have strong damage boosts for enemies on your map, you should be a little careful with pulling too many packs at once.
The main reasons you want this mod on your map:
– more mobs = more looooot. And XP.
– beyond-only unique items can drop! - The Temple of Atzoatl is another ‘almost another game mode’ league mechanic that you can read volumes on if you look for in-depth guides.
To cover the basic tips:
– Always do your best to open a pathway to the top or you can’t fight the final boss. (exception: you uncover the explosives chamber which allows you to FORCE open paths between rooms)
– Anything that increases quantity and rarity of drops is probably good. The Radiating tempests (tempest chamber III, I believe) in particular can help a lot with getting more and better loot.
Radiating tempests grant insane 70% quantity and 420% drop rarity!
– Doriyanis institute III lets you corrupt a gem TWICE which is normally impossible. This gives you a good chance of +1 level or even two good corruptions (like +1 level and +quality). One of the best ways to get level 21 gems.
– Rooms with lots of league mechanics (like legion monoliths) are also a good choice - The Heist league introduced the option to raid small and big vaults. You can chose one or more NPCs to accompany you and even put some equipment on them for added bonuses. The big vaults require careful planning as befits a ‘Grand Heist’. The main thing to keep in mind is that looting in these vaults raises the alert meter, once it’s full the vault goes on lockdown, loads of enemies spawn and you should quickly grab the final objective and run to the exit – or kill everything and then exit, if you feel brave.
The small vaults’ final objective always gives you those shiny coins that you need to unlock stuff in the big vaults. But there are plenty of reward rooms in both types of area and YOU can chose which you want to open and raise the alert: currency, maps, divination cards, splinters, equipment…
For Grand Heists you can decide how to spend your hard-earned coins to unlock reward rooms.
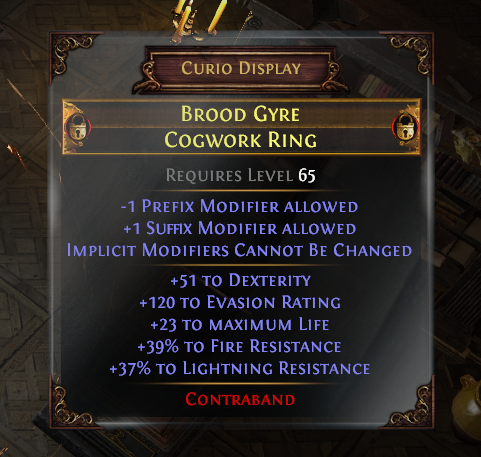
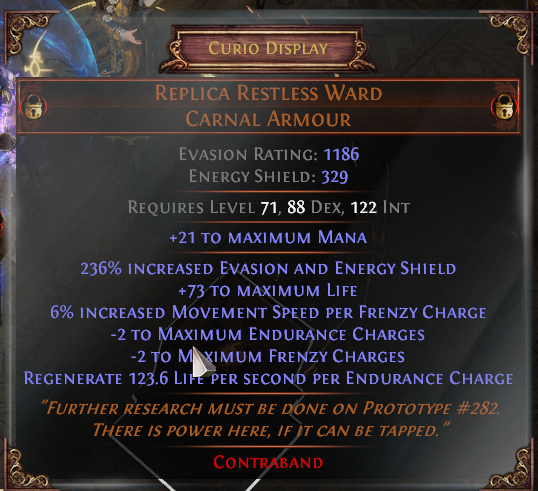
The final objective of Grand Heists is a selection of 6 specially powerful rare or unique items of which you can steal ONE and get away with it. They are often of a unique ‘replicated’ nature which takes the original rare or unique and changes it in a significant way that you can attain nowhere else in the game.
Example of replicate items with characteristics you can get nowhere else in the game.
Heist is kind of half of a new game mode and I could talk hours about it. Read a more in-depth guide to know more 🙂
Assorted Map Knowledge: Path of Exile’s End Game, part II
- Map missions!
There are multiple NPCs like Alva, Niko and Einhar that you can do missions for, selectable when you open a map.
There’s also a natural chance of one of them appearing randomly on any map.
To force a mission you must have mission points, shown on the right if you open the Atlas.
There are points for white, yellow and red map tiers. You get +1 point for all masters ONCE per day and there is a 20% chance to get a random point each map you complete.
Alva: opens 3 portals to the Temple of Alcoholicus (or whatever its name). But this is not a Temple guide. Beware: the temple area with the 2 bosses will inherit all mods of the map you open it in. If you are running dangerous/difficult mods, think twice about adding Alva. The temple mobs seem to be generally buffed versions of map mobs so such mods make them even deadlier.
Niko: asks you to find 3 Sulphite deposits. Niko missions are extremely valuable and should be saved for the highest quantity modifier maps. (quantity also improves Sulphite earned)
Einhar: Asks you to slay several unique beasts, enabling Beast Crafting. I won’t go into detail here but beast crafting lets you convert captured beasts into amazing crafting recipes, from generating unique items to adding specific modifiers or even duplicating stuff. See a dedicated guide for more.
Zana: A very special mission-giver, Zana will open ANOTHER map inside the map you are running. You can pick one of multiple choices, making her a great way to access maps you have not collected yet. She will give you a goal, like finding an item, slaying stuff or doing some league mechanic. Oh and she can offer unique maps as well!
IMPORTANT: Check her store first and buy any maps you like, especially buy the ones you never collected so far to get the bonus objectives.
As soon as you open a map with Zana mission, her store will REFRESH so you can once again browse it to find cool maps.
Jun: Jun’s speciality is the Syndicate league mechanic. You need to defeat Syndicate NPCs and get special items with selectable modifiers. These will enable new crafting recipes. - Let’s talk about those pesky Conquerors. The ex-exiles (ho ho ho) are not just hunting targets for you. They also influence the whole area of the Atlas when you discover them and while you track them down.
Firstly, they add additonal mob groups to the maps which is always welcome because of the XP and loot.
Secondly, they add detrimental effects to the maps, like poisonous snakes or damaging area of effect attacks.
Thirdly, once you have entered enough maps of ‘their’ area in the Atlas, they will steal some of you hard-earned Watchstones and wait for you to fight them in their respective Citadel. - Similar to the Shaper and Elder, each Conqueror has unique modifiers on his or her gear drops. You can easily see this as a small special icon when you check that gear. This makes hunting them all the more rewarding since these mods are nowhere else to be found.
The best thing is: rerolling the gear by e. g. Chaos Orbs or scouring it does not remove the ‘influence’ and gives you a shot at getting different Conquerer modifiers.
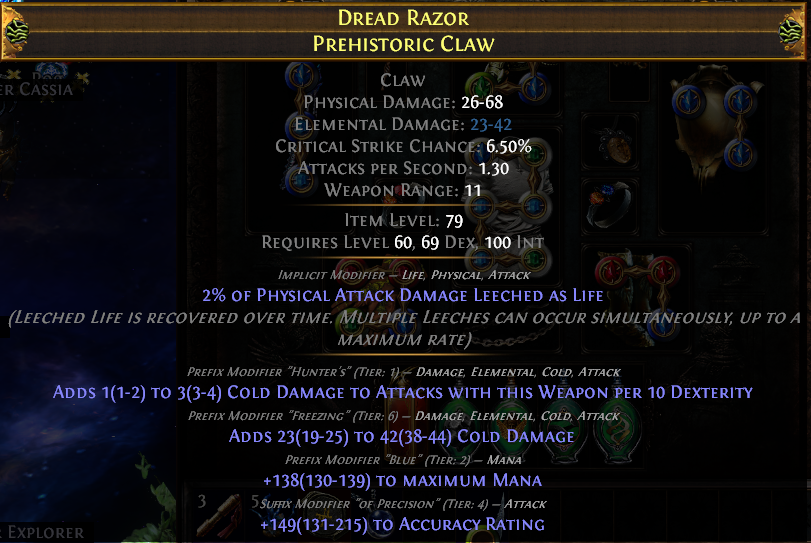
Example of Influence: the little green icon on top of the item details shows you this gear is influenced (here: the Hunter) and one of the modifiers says ‘Hunter’s’ – one of the possible unique modifiers only available from this foe. - Did you think we are finished? Oh no, Exile, not by a long way. Let’s talk about Watchstones and sextants. You get watchstones automatically when you defeat Conquerors on the Atlas and each socketed stone raises the tier of maps in its area of the Atlas. It also reveals new maps!
Sextants can be used on any watchstone (rightclick, then click on the stone) and give all maps in that area of the Atlas some bonus. These bonuses range from adding mob groups, eliminating detrimental effects like reflection up to guaranteeing a master NPC in the map (very useful) or other cool stuff. Sextants come in 3 rarities and become more powerful the higher their tier.
You may want to save up especially powerful bonuses (like adding Niko to a map) for high tier maps so make sure to check your watchstone placement before entering a map.
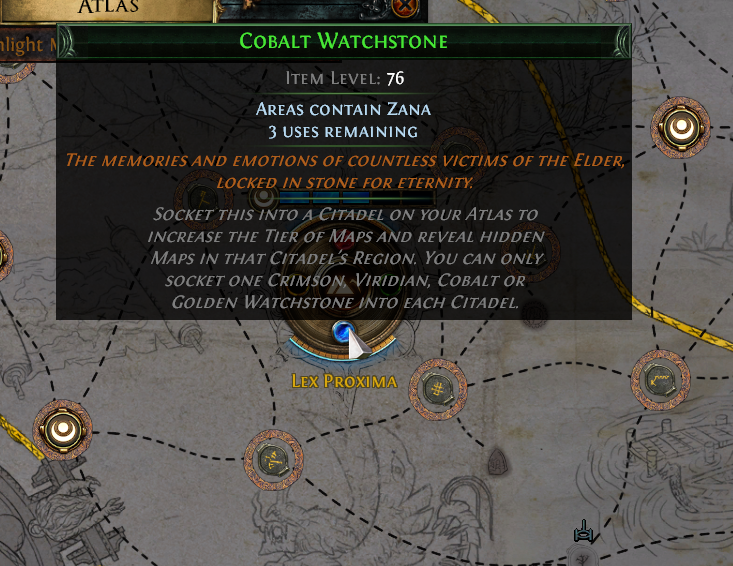
This watchstone was enhanced with a powerful sextant. Maps in the ‘Lex Proxima’ corner of the Atlas will have a guarantee to spawn Zana. (note all sextant buffs have limited uses) - While we are talking about checking your settings before entering a map, let’s make a quick list of what you can do / should do BEFORE you open the map portals!
– Did you know those funny sacrifice fragments you find can be used to increase the quantity modifer of your map? Oh yes, each (different) fragment adds +5%. Not much but if you do not need the fragments to fight Aziri/Uber-Aziri – that’s one of the oldest main antagonists FYI – then you may as well put them to good use. Just don’t use Midnight fragments, they are much rarer than the rest.
– Check if you want to deploy a scarab. They can add master NPCs (with a bonus), add Shaper/Elder influence (one of the VERY few ways of getting their loot modifiers and eventually facing them), add league mechanics etc.
– If you do the map for the bonus or Awakening objective, doublecheck it’s the right rarity. Highest tier objectives require it to be corrupted (Vaal Orb) and rare.
– Think about your watchstones. PoE now comfortably displays you all the ‘Atlas’ level modifiers on the map portal interface. Did you put the correct sextants on the Atlas area of the map you are about to attempt?
– GO! 🙂
League Mechanics: Elementary, my Dear Watson, part III
- The Syndicate league mechanic lets you fight against powerful NPCs and invade their strongholds. By killing or bargaining with these unsavory types you have a certain degree of control over what you will face in their final hideout. This is useful because there are some very powerful options available if you kill/bargain the right NPCs. Consult a guide for in-depth details.
Syndicate encounters reward items with ‘unveiled’ modifiers. These Jun can turn into one out of a choice of 3 special modifiers. They also unlock the respective crafting recipe! - Are you feeling sane? Are you… sure? Because the Delirium is taking you and for a moment, just a BRIEF moment, you will see reality as it really is. Let’s hope your mind can endure.
Delirium league introduced shimmering, crystalline mirrors to areas in the game. These days you mostly find them randomly in maps (some Atlas area improvements can increase the chances).
The main reason you want Delirium encounter is because both affected mobs and the final reward can drop the much-coveted cluster jewels.
Once you enter the mirror a mist will spread over the map and you will no longer only face the regular map mobs but also Delirium-specific enemies. While you are killing stuff a reward meter (seen on bottom left) will continually increase. At certain thresholds it will add additional reward types: currency, maps, gear, you name it.
The faster you can slay things, the better. And the further you venture from the mirror, the more delirious things become.
All mobs (regular map and Delirium) will gain new abilities and/or be buffed by the Delirium, the further out from the mirror you go, the stronger this effect becomes. You were warned.
What you normally want to do is enter the mirror asap (to have as many mobs as possible affected), then concentrate fully on clearing the map ASAP. Don’t bother with picking up loot, don’t bother with other league mechanics, masters or ANYTHING but slaying stuff.
You also need to continuously move away from the mirror position because after a short while the mist will stop spreading and dissipate, starting at the mirror. This means you are in a battle against time.
Staying outside the mist for 5 seconds (or clicking the button on bottom right) ends the encounter and drops your final rewards.
To stay in the mist as long as possible it’s absolutely valid and recommended to skip any tougher-than-usual rares, just move forward and kill all the easy stuff. Exception: there is a small chance a Delirium boss will spawn and that’s what you definitely want to battle.
After the encounter is done, sweep over the map and collect all the juicy loot and jewels.
The Azurite Mine or: A Complete New Game Mode
Collected Useful Stuff (CUS™) about the Azurite Mine!
- First off, the mine is a separate progression system, a new game mode that is completely distinct from the story acts or endgame maps.
The mine is infinite in size, both vertically and horiziontally but your progress through it is limited by sulphite that you mostly receive by doing missions for Niko. - Now regarding the WHY. There’s maps, why would you do the Azurite mine in between?
Several reasons.
a) It’s a relatively safe way to level. There are less and less dangerous mods than on maps with the same level but the mobs give the same amount of XP. In addition, the stream of enemies is relatively stable (unlike maps where your own movement can mean you are assaulted by 5+ packs at the same time) which makes for a more sedate and manageable difficulty level.
All the while the total number of mobs you can kill per time is the same or even higher than on maps because for maps you generally want to have as many dangerous modifiers as possible to get quantity. Since this is not possible in the Mine, mobs will be easier to kill while giving same XP.
b) There are some crafting recipes only available in the Mine. The stronger ones unlock when you venture deeper.
c) The Mine is the only place where you naturally find fossils and resonators. These are very powerful for crafting since they allow you to heavily limit the possible mods you can roll, making crafting much more deterministic than with other means. - Certain builds are better at beating the mine than others (as will all other aspects of the game). Since the mine can be used to level *almost* without maps, there are even special builds around that are only meant to excel here.
- The deeper you go, the higher level mobs you will face.
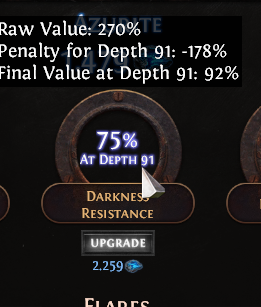
- There is also the Darkness that actually hurts you. You need to stay close to the crawler which emits light or use flares to temporarily illuminate your surroundings. You can survive the Darkness for some time by increasing your resistance.
Always keep that Dark Resistance up! - Mobs covered by darkness are immune to all damage so if you want that sweet loot and XP you gotta kill them quickly while they are in the light.
- While going from one node to another, the loot from killed enemies is stored so you don’t need to waste time picking it up. It will drop at your target node once you ‘beat’ it.
- In the mine encamptment you can buy many useful or even critical upgrades to survive the depths. All upgrades cost Azurite that you find mostly in specific Azurite nodes (I, II and III with increasing amounts and enemy forces) and sometimes along the way.
- To go anywhere in the mine, you first have to pay some Sulphite. Sulphite is gained by finding its deposits. They only show up in regions with a Niko mission so this is definitely your limiting factor.
- You get more sulphite from his mission the higher the item quantity modifier of the map is and there are also scarabs that guarantee Niko and increase Sulphite amounts even more.
- Once you have some sulphite, select a node in the mine to travel there. You can only go to the nearest unexplored nodes. This way, you can slowly progress deeper and deeper into the mine.
- While fighting towards the next node, you will notice branching tunnels sometimes. Instead of following the crawler you can explore these tunnels (the crawler will wait for you where you left it). Most of them will lead to chests with loot. If you are very quick you can open and loot them, then run back to the crawler before the Darkness kills you. Be aware the enemies protecting the chest are invulnerable because there is no light.
The normal scenario however is to get near the chest, light a flare so you are not damaged by Darkness, then kill the surrounding enemies and loot in peace. - There are ‘biomes’ in the mine that add map-like modifiers to the nodes and tunnels. Some of them are generic, some are special (like the Vaal biome that contains Vaal dungeons).
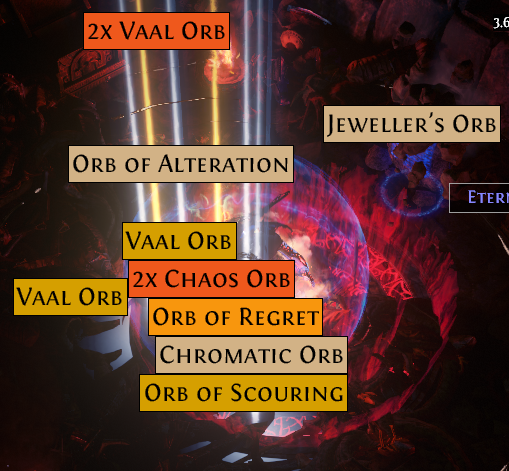
Exploration into special biomes can be dangerous but also quite rewarding (loot from a Vaal Dungeon currency chest)
Orbs: Best Friends for Crafting and $$$
The currency system in Path of Exile is a sealed book to many new players and even advanced players may not possess the knowledge to make good use of it.
The weird thing with this game is, its trade currencies are AT THE SAME TIME the crafting options. The orbs you need to alter items are at the same time used as ‘money’ between players.
While crafting itself is *KIND OF* optional outside of solo-self-found (as long as you are prepared to buy from others constantly), the myriads of different orbs, splinters and scrolls have real trade value while being much more ‘fluid’ in trading than items are. Plus, you can use them outside crafting, for example to enhance loot chests!
For crafting, there are excellent if somewhat nerdy guides out there, just look for them. I’ll only cover some basics here together with useful tips regarding orbs.
Let’s start!
- The nearest things to a common trade currency Path of Exile has are Chaos and Exalted Orbs. They have established themselves as a generic measure of wealth and as the standard currency asked for when buying stuff from other players.
Chaos orbs are used for anything under the value of 1 Exalted Orb and as a ‘in between’ currency to pay for example 1.4ex.
Exalted Orbs are normally at least a hundred times more valuable because they are exceedingly rare drops. A player can spend a busy week in PoE and not find a single one.
So to summarize, if you want to trade (and outside SSF you will HAVE to trade at some time), be sure to have a stock of Chaos Orbs at the ready. Later on, for the expensive stuff, be sure to trade some of them for Exalted Orbs as these are currency of choice for the most valuable equipment.
Oh yeah, there’s also Mirror but if you own one of these you PROBABLY don’t need to read all this 😀 - Don’t scoff at Orbs of Alteration and Augmentation! They are the most frequent orb drops and vastly useful for cheaply generating mods you want.
They are also used in great numbers for modifying flasks until you get that perfect movement speed / remove freeze combo. - Regal Orbs can be used after you have created your dream magic item to make it rare and add another mod.
- Chaos Orbs completely reroll a rare item. This can be very useful to remove annoying / impossible-to-do map modifications or have another go at a good map rarity/quantity. Don’t do this on cheap low tier maps though, it’s a waste.
- The main reason you want great quantity on maps is not so much for the item drops but CURRENCY drops. It affects all drops, including the valuable orbs you desire so much. For high tier maps (10+) you generally want to aim for 80% or more, for highest tiers (13+) you may want to reroll until you get >100% quantity bonus.
- Quality improving currency like chisels or armourer scraps work best on WHITE items where they add 5% quality per use. On magic and rare they add much less, making it quite expensive. You can use Orb of Scouring to make an item white rarity.
- Orbs of Chance may seem weird and not intuitive but can be very valuable if you know what you are doing. There are certain very valuable unique items and your goal here is to find their respective base type and use a Chance Orb on it. That way you have a … chance… to get that unique! You may want to carry around a stack of these with you when doing this as you can otherwise quickly clutter your inventory with base type items that only become magic or rare crap.
- Tired of picking up endless amount of scrolls of wisdom? You can exchange stacks of armourer scrap or weapon blacksmith’s wetstone for these scrolls instead. That way, you can exclude them in your loot filter. A single stack of armourer scrap or blacksmith wetstone gives you a whooping 80 scrolls of wisdom.
- The best place to pick up loads of scrolls in a very short time is the Azurite mine. Because all loot is stored and dropped at one place (the node you travel towards), you can easily pick up all scrolls in one location instead of scattered throughout the area. If you have excluded them from loot via filter, just press ALT (default key) to show them temporarily and pick them up.
- You can exclude town portal scrolls in your loot filter after you find a portal skill gem. (should not take too long)
- You can generate your own Chaos Orbs via a vendor recipe. (check them up on the wiki, for example)
This particular recipe is commonly used by many players to increase their wealth. Plus, Chaos Orbs can be used to reroll rare items.
You need to collect a full set of equipment that covers all slots on your character (excluding quivers, bows count as 2handed). The pieces must be >= itemlevel 60 and one at least must be in the range of 60 to 74. Sell them to any vendor and you get a nice shiny Chaos Orb in return. (if all items are >74 then you get a Regal Orb instead which can also be useful)
The downside of course is that you need to collect rare drops that clutter your inventory. If you think grinding maps (or mine) quickly makes you more of a profit, then do it. It really comes down on how powerful your character has become. At some time you will always want to stop using the Chaos recipe because it slows you down too much. It’s not just the picking up, it’s also stash management and selling it to NPCs.
Still, it’s very useful for new players and characters that have not yet reached the pinnacle of endgame.
A 4x tab filled with chaos recipe gear. If you want a Chaos Orb and not a Regal one, be sure at least one item is between itemlevels 60 and 74, the rest can be anything >=60.
Quality of Life: Recommended Shop Investments
The shop in Path of Exile is 100% optional and does not limit the game content in any way whatsoever.
However, there are some quality of life improvements available that I would *very* strongly recommend to every player, be it the busy father spending just 1/2h each evening in the game or the nerd who changed his official address to ‘c/o Hidden Hideout, Wraeclast’.
And since this game is *completely free of charge* and GGG are doing an overall amazing job, it’s also good manners to support them with some bucks. You will not regret it.
- Stash tabs
The regular tabs in your stash are just that. Regular. You can put all kinds of stuff in but you will soon get lost and spend more time searching for currency, maps, cards and items than you like.
Get as soon as possible:
1) a currency tab. This one is the most useful of all the ‘collection’ tabs and holds all non-league-specific currency in the game, like Chaos Orbs, Exalted Orbs, scrolls, Orbs of Alteration, Alchemy and so on. It makes organizing your wealth AND finding orbs to craft just 100 times easier.
2) a map tab. You will get totally lost trying to put all your maps in normal tabs. The map tab organizes them neatly into tiers and has a text search to quickly find what you are looking for.
3) if you want to buy from others, at least 1-2 premium tabs. Most players in a trade league will want to sell their stuff at some time. There are two ways. One is very cumbersome by posting on the trade forum and waiting for messages ingame or PM in the forum.
The other is very simple and quick: put your item in one of your premium tabs and price it via rightclick. (don’t forget to make the tab itself public)
It’s one of the biggest QoL improvements for a trade league imaginable.
4) (The Divination stash tab holds all you collectable cards and you can filter it to owned cards, complete sets etc. as well as text search.)
Putting this one on parantheses since it’s certainly very annoying to try and find all your cards in normal tabs but I think it’s not QUITE as mandatory as the other tabs mentioned above. Your choice. - Now there are several other very useful and cool stash tab types that organize and collect e. g. fossils/resonators, blight ingredients, metamorph ingredients, fragments and scarabs …
But I think none of these are actually mandatory to have fun with PoE. Just get the 3 mentioned above, I beg you. You will thank me later.
There are also giant tabs with 4 times the space of a normal stash tab. They are automatically premium and just GREAT to store lots of stuff for trading – or anything else. I use one of them to hold my chaos recipe-gear, there’s so much of it 🙂 - That’s it, really. The rest of the shop is purely visual improvements like new hideouts, character special effects, weapon special effects, armor special effects, costumes, pets, skill effects ….
- Tip: there are regular stash tab sales with reduced prices. If you can live with normal tabs for a bit, wait for one of these to save some money. They usually occur multiple times per league.
No Fate but What We Make: Build knowledge
As I mentioned before, it’s best to follow a well-written build from the character forums unless you are a pro and know what you are doing.
Let me give you some tips:
- Every build can be classified as either weapon-dependant or skill-dependant. Weapon-dependant builds get most of their DPS by improving the damage of your weapon while skill-dependant builds rely on a high skill gem level. (both build types rely on as many support gems as possible)
If you are starting into PoE or in a new league (especially SSF), skill builds are usually cheaper. Good rare weapons are hideously expensive but if you absolutely want to play a weapon build early, that is, before having farmed currency with a different character, then you should look for one that has an affordable unique weapon at its heart instead of the notoriously expensive rare weapons. - The trick to get maximum DPS with skill builds is to expand the level beyond 20. You can do so for example with a Vaal Orb but beware the chance of success is only ~1/8 so buy or level many skill gems up to 20 to try your luck.
By corrupting a level 20 gem you can end up with a level 21 gem. This one gave me a DPS increase of about 12%! - Weapon-dependant builds do not profit a lot from skill gem level but rather the weapon itself. You want big crunchy Tier 1, maybe Tier 2, modifiers for attack damage, attack speed, critical chance, critical multiplier, elemental conversion, chaos conversion… whatever your build requires.
Because it’s much harder to get a good rare weapon than a level 21 skill gem, skill-focused builds are cheaper. - There is no absolute truth about which type of damage you should aim for. Physical, elemental and chaos damage, not to mention the special ‘life degen’, each have their merits. There are also multiple ways to apply damage over time and builds focusing on DoT are usually safer to play because you can move around while your DPS keep ticking.
Some lore:
– Physical damage is especially well-suited to fight low-armor mobs like most casters and ranged mobs. Late-game mobs, particularly melee, can have some serious armor values so you’ll need some kind of armor penetration if your build relies a lot on physical output.
It can also apply bleeding (physical damage over time) and poison (chaos damage over time).
– Frost damage can chill and freeze. Freeze builds are among the most controlled gaming experience because you just shatter everything and enemies can do almost nothing. Bosses are obviously immune to Freeze but can still be slowed considerably by builds that focus on strenghtening their chill power.
– Fire damage can burn for SERIOUS damage over time in addition to the direct damage.
– Lightning damage can shock, making the enemy take more damage from all sources. The bigger the lightning strike (measured against enemy total HP), the bigger the shock effect. Bosses have high healthpools but shock will still make them suffer A LOT more damage.
– Chaos damage has two advantages going for it, or actually, three. 1) it bypasses Energy Shields which is extremely powerful against certain mobs and bosses, 2) enemy chaos resistance is the lowest overall, even for bosses, 3) there is no map mod to reflect chaos damage. - Same as for weapon vs skill builds, there is also a clear difference between direct and indirect damage. If your character is the one dealing damage it makes you susceptible to reflect. If you use minions, totems, traps or mines, you do not have to worry about it.
GENERALLY, totem, trap and mine builds are cheaper to build than builds with direct damage from the hero.
In summary, a good league starter build is normally skill-focused and possibly using indirect damage sources. - As for the classes, well, they are quite flexible. Caster Marauders, Melee Witches, you name it. For new players or league start, many recommend Witch or Shadow because they can easily focus on ranged (safe), magic (skill-focused), and optionally indirect (minion/trap/mine) damage.
That’s not to say you can’t start with Marauder or Duelist, it will just take a little longer to get up to speed. (note Marauder can go totem build, it’s fun if you like that playstyle) - Some of the most interesting builds in PoE are based on ‘triggers’. The most popular one, without doubt, is ‘Cast on Critical Strike’ or CoC in short.
Get a high crit chance and the corresponding support gem will trigger active skills whenever you deal a critical strike. To make things fair there is a slight internal cooldown of 200 ms but it’s still one of the best ways of not wasting time casting. Many CoC builds use movement skills to trigger the effect since that means you can be mobile AND slay mobs at the same time. A popular variant is and always has been the Cyclone CoC variant. - Trap and Mine builds deploy stationary tools to deal damage directly or cast other active skills when triggered. This makes for quite a safe experience since you can stay away from your enemies most of the time.
- Minion builds, mostly centered on the witch but absolutely possible with other heroes as well, can take a lot of ‘aggro’ from your own character and let your henchmen do the work for you.
- Physical direct damage builds can reach extreme survability through armor, lifeleech and warcries, at the same time using powerful buffed attacks to wreak havoc face-to-face with their enemies. Special variants deploy poison and bleeding to melt down enemy healthbars in a matter of splitseconds (or a bit longer for bosses, haha). Another popular choice is to start with physical damage but convert it partially or fully to elemental or chaos damage. This way, you can skyrocket your non-physical damage by improving your weaponry AND profit from the unique advantages of those damage types.
- Elemental direct damage builds, often centered around Witch, Shadow or Templar, profit from the powerful elemental ailments and often use some kind of trigger to avoid having to stand still and cast all the time. There are however certainly ‘facetanking’ caster builds that can even withstand the ‘instagib’ attacks of Elder, Shaper or Sirus – with the right gear.
- Cluster Jewels, almost a chapter itself. In the Delirium league, these special jewels were introduced and drastically changed the way you can power up and individualize your build. When you socket a cluster jewel in your talent tree, it will ADD NEW TALENTS based on its mods. Including notable talents!
And beyond even that, medium and large cluster jewels can add 1 or more NEW JEWEL SOCKETS (of a smaller variety, i. e. medium will add small socket(s) and large will add medium socket(s)).
To find out the ‘optimal’ number of added talents and socket, I recommend an in-depth guide. Cluster jewels are rare, good ones are expensive and not all builds rely on them to the same extent.
The power of manually adding exactly the right talent mods and notable passives in one place on the tree makes builds even more diverse than before but also increases the complexity. That’s why I always recommend following a good build guide from the internet which should have Path of Building link in it.
No Fate but What We Make: Build knowledge, part II
- The most important distinction in terms of combat performance is clear speed vs single target damage. All builds in Path of Exile lean more towards the one or other. Clear speed means how quickly you can ’empty’ a map of regular enemies while singlet target damage is mostly relevant for bosses and the occasional rare or unique foe (e. g. Syndicate encounters) with a lot of defensive buffs.
- Another important indicator is the ability (or disability) of a build to run certain map mods. The more mods are hard/annoying to do or literally impossible, the worse it NORMALLY is, of course. This is not an automatic judgment, though. There are builds around that are specifically mean to excel in one thing and one thing only so their poor performance in other respects is not a disadvantage. An example would be pure party-play support builds that can hardly kill stuff themselves but greatly help by supplying lots of auras or great quantity/rarity on kill. And Azurite Mine builds are not necessarily good in maps.
- Many players like builds that do not need constant attention or many different shortcuts.
There more automated your casting or attacking is, the better in this case. Most CoC builds or certain minions builds spring to mind. But beware there are big differences even in the same ‘genre’ of builds. Always read the build description carefully (assuming you follow one, as recommended).
Just to take an example at random: An ‘animated weapon’ (AW) minion build usually requires using several shortcuts regularly, like buffing, animating (minions are time-limited), supplying raisable weapons via Bladefall etc.
Compare this to a typical Zombie or Spectre ‘no-brainer’ build (no negative connotation) and you quickly see even the same build type can require more or less of the player. - If you are not into learning game mechanics in-depth and/or are just after a ‘in your face’, direct damage build, that’s another argument for certain builds and against others.
The simplest ‘direct action’ builds are when you, that is, your Exile attacks or casts himself, the spell or attack used inflicts more or less direct damage without fancy side effects and the build does not rely on mechanics such as e. g. good positioning, use of certain flasks in the right way or other prerequisites for full performance.
I want to stress Path of Exile DOES have such builds and they can be just as amazing as more complex ones. Let’s look at a manual Arc caster witch. Click, zap, ded. Hopefully the enemy, not you 🙂
Or some of the movement skill + ‘insert generic bam melee attack’ builds. - Through the talent tree, ascendancies and gear (particularly certain build-defining unique items) it is possible to pretty much change even a build of the same type around almost 180° and compensate ANY disadvantages it might otherwise have.
This makes is so very very difficult to make recommendations based on build type and is on the other side a great advantage in PoE over the competition.
That’s why I stress once more: read the whole build, maybe also watch videos (if supplied) and pay special attention to ‘pros and cons’! - Builds can also be distinguished by how much you need to pay to get at least their bare minimum requirements (like must-have unique items) and how well they scale with currency.
There are a lot of really great ‘league starter’ builds that need NO special gear and no trading whatsoever to shine in maps, enabling you to farm currency and gear to then use with a different build OR invest in the one you started with.
On the other hand there are builds requiring 5, 10, 15 Exalted Orbs or more before they can be used, simply because they are totally reliant on a rare unique or some difficult-to-get influence gear. - Scalability is important if you want to tackle the ‘end endgame’, these days that’s mostly Sirus, the most end of end bosses.
It means: how much stronger does this build get when you invest X Chaos/Exalted Orbs into it to buy better gear/gems/jewels?
As mentioned before, USUALLY builds relying on the weapon stats scale stronger than skill gem level-reliant ones. But be warned, this does not mean much. If your weapon build starts with a relatively low power (however you want to measure that, most players just look at the sustainable DPS) then the best scalability may still not mean you end up with a good finished build. At the same time, a gem level-reliant build that starts off annihilating white and yellow maps with ease may not NEED amazing scalability to tackle Sirus and Co.
Once again, the pure flexibility of builds in this game means you must pay ATTENTION 🙂
Crafting: Daunting but Profitable
There are plenty of in-depth crafting guides out there so I won’t even try to re-do their work.
However, there is some useful knowledge for which you do not need to read through 100 pages of nerd paradise 😀
- Modifiers on items are called affixes. They are split into suffixes and prefixes. This is most obvious on regular magic items that are called ‘X itemname of Y’, where X is the prefix and Y is the suffix
- Blue (magic) items can have max 1 prefix, max 1 suffix. You might think that makes them worthless but magic quality is actually a good starting place to craft your perfect gear. Since the orbs required to modify magic items are plenty and cheap, you can use dozens, hundreds of them to get the 2 affixes you need most. Like +2 bow gems or that sweet +1 to all skill gems on a wand. From there you can take different roads towards making it a good rare.
- Rare items can have max. SIX (6) affixes, 3 prefixes and 3 suffixes. Good rares are often better than the best unique items for the slot but they are also pretty difficult to come by. Rare drops from enemies are 99.9% crap (but useful crap still, which can be used for vendor recipes, as crafting bases etc.) by which I mean the affixes are either not useful for your build, they are useful but low tier or there are too many of them, blocking your way to add your own desired affixes.
The normal way to get a good rare is to wait for a decent drop and then enhance it further via crafting OR to start with a white base and go from there. - For a decent return and profit you need to follow the proverb that money makes money. You need a good supply of currency (orbs) first but with those you can quickly generate profits. You don’t have to create the PERFECT item. You can sell good magic bases (like the aforementioned +2 bow gem with another good mod) to the pro crafters, for example.
- PoE’s crafting can be a haunting experience for padawans. There are many places in the game that allow you to reduce the randomness, like:
– Beastcrafting via Einhar
– Fossils and Resonators from the Azurite Mine
– Certain syndicate stronholds contain powerful crafting-related contraptions
– … - For the regular mortal player who does not want to delve too deep into crafting, the main tool will be the crafting bench. Here you can add one prefix or suffix of YOUR CHOICE to an item, as long as it has a free slot. Press ALT (default key) to see full information about an item and check if it has maximum 2 prefixes or suffixes. In that case you can add the 3rd via the bench.
To unlock new recipes, there are again many ways. The Azurite Mine has some, many maps have a recipe somewhere near the boss and Syndicate unveiling adds a whole host of new recipes that are nowhere else to be found, some of them very powerful. And that’s not all.
More, Less, what the heck… The Small Mechanics Bible
Path of Exile does not always do a good job with ingame explanations.
Actually, it does a pretty bad job.
It’s really quite bad.
It’s plain bad.
Horrible.
Terrifying.
BOO! BOOO!
So this is why I’ll talk about some of the most common AND IMPORTANT concepts ‘behind the stage’ because these can and will make or break entire builds.
If you are following a build from some knowledgeable player, you may still want to understand these mechanics.
Don’t be afraid, I won’t torture you TOO much. It’s actually quite interesting!
- The difference between increase and MORE (decrease and LESS)
Once upon a time, all was very sunny and nice in the country of game mechanics. You just added 20% to your damage and went on slaughtering stuff.
Alas, here come the dreaded MORE and LESS modifiers. These unfriendly yet certainly powerful mods act MULTIPLICATIVELY.
Now, you might just remember enough school maths to understand what that means.
INCREASE and DECREASE act additively, if you have two sources of increase, like “increase damage by 20%” and “increase damage by 40%”, the bonuses will ADD up to 60% total.
But if you have a MORE modifier, it works after all the additive (increase/decrease) have done their job. To stay in the example, you are now at 160% damage, right?
Now add 20% MORE. Where are you? 180% WRONG. You are at 160% * 120% = 192% damage.
As you can see, MORE and LESS are normally more impactful because they impact the last bits of the calculation, when all increases and decreases have already been taken into account.
Now for DECREASE and LESS it works exactly the same… just reducing stuff.
To make a complete example.
Weapon grants 50% increased attack damage.
Talent tree offers 20%, and somewhere else, 10% increased attack damage.
A suppor gem you socketed affects that attack and makes it deal 20% LESS damage (compensating maybe some cool buff you get from it).
And a totem you built grants you 10% MORE damage.
Did you get the correct result?
(100+50+20+10)% * (100+10)% * (100-20)% = 158.4% total.
So if you did 100 damage before all that, you now do 158.4 damage.
Note how the increases are added to each other (+) while the MORE/LESS modifiers are connected with multiply (*) - Another common misconception surrounds local and global modifiers. Global modifiers affect your stat ‘globally’ while local ones only apply to a certain piece of equipment.
If a weapon ‘adds 5-10 fire damage’, then it’s a local modifier that only enhances THIS weapon’s attack but not for example an off-hand weapon or any spells. If however it statet ‘adds 5-10 fire damage TO ATTACKS’ then that’s a global statement and goes for all attacks. If again it says ‘attacks with this weapon …’, whoops, you are back to local.
Unfortunately, the description of a mod is not always very helpful in determining if it’s global or local. But rest ensured, there is actually a very strict and logically built system behind it and the texts are actually very precise once you understand the different kinds.
And x% evasion on a body armour means it only affects this armor’s evasion.
As a rule of thumb, a modifer that does not ‘make sense’ for the gear it’s on (like %evasion on an amulet that has no evasion itself) is global. Most modifiers on rings, amulets and belts are like that. - What is a ‘hit’? Many effects in the game only apply if you HIT something. If *YOU* hit something. But not your trap or your minion or your mine. Confusing? Certainly.
The simplest kind of hit is just using the default attack. Most direct damage is hits as well. But stuff like pure damage over time is not. Essence Drain is a good example. It’s a projectile that HITS for some unimportant amount of chaos damage, then applies a powerful damage over time effect. This effect never ‘hits’.
It’s a pretty good rule of thumb, if your damage physically ‘impacts’ the enemy, like a lightning strike, Fireball, melee attack etc., then it’s a hit. NORMALLY hits do damage but this is not a must. - I refered to damage sources earlier in this guide. Many modifiers and bonuses only work if your hero is the one doing something, others specifically mention your minions, traps, mines or totems.
It’s important to understand this concept because it has a big impact in the endgame especially. Your minions, mines, traps and totems all count as separate entities. If they deal damage, apply effects etc., it’s never coming from your hero as far as the game mechanics are concerned.
The most obvious way to see this is to play a ‘reflect’ map modifier. Say there’s elemental reflect and you play with some kind of fire totem. The totem will die, but not you.
Hope you enjoy the Guide about Path of Exile – Basic Gameplay Tips + Walkthrough Guide, if you think we should add extra information or forget something, please let us know via comment below, and we will do our best to fix or update as soon as possible!
- All Path of Exile Posts List




Leave a Reply