
A guide with both basic and In depth information separately on crafting, salvaging, upgrading, and repairing. Plus Kiosks, Commence Module, and other info semi-related to crafting/upgrading all items, gear, weapons, utilities, base building parts, etc.
Introduction to Guide
This guide is for P.A.M.E.L.A. released June 18, 2020 update V1.0.0.5
IF New to game? Then click “Crafting Basics” in Overview along right-side.
I found there’s only a little info on the forums about crafting after PAMELA was released.
Mostly found old forum posts on salvaging furniture and other features removed years ago.
Added basic guides far below as they likely won’t get used as often as the info at top of guide?
I created the mats chart to salvage more efficiently and to lookup materials needed to craft to avoid the in-game drains. Just thought I’d share the chart and hopefully it helps anyone else that enjoys taking the time to do some exploring, crafting, or base building.
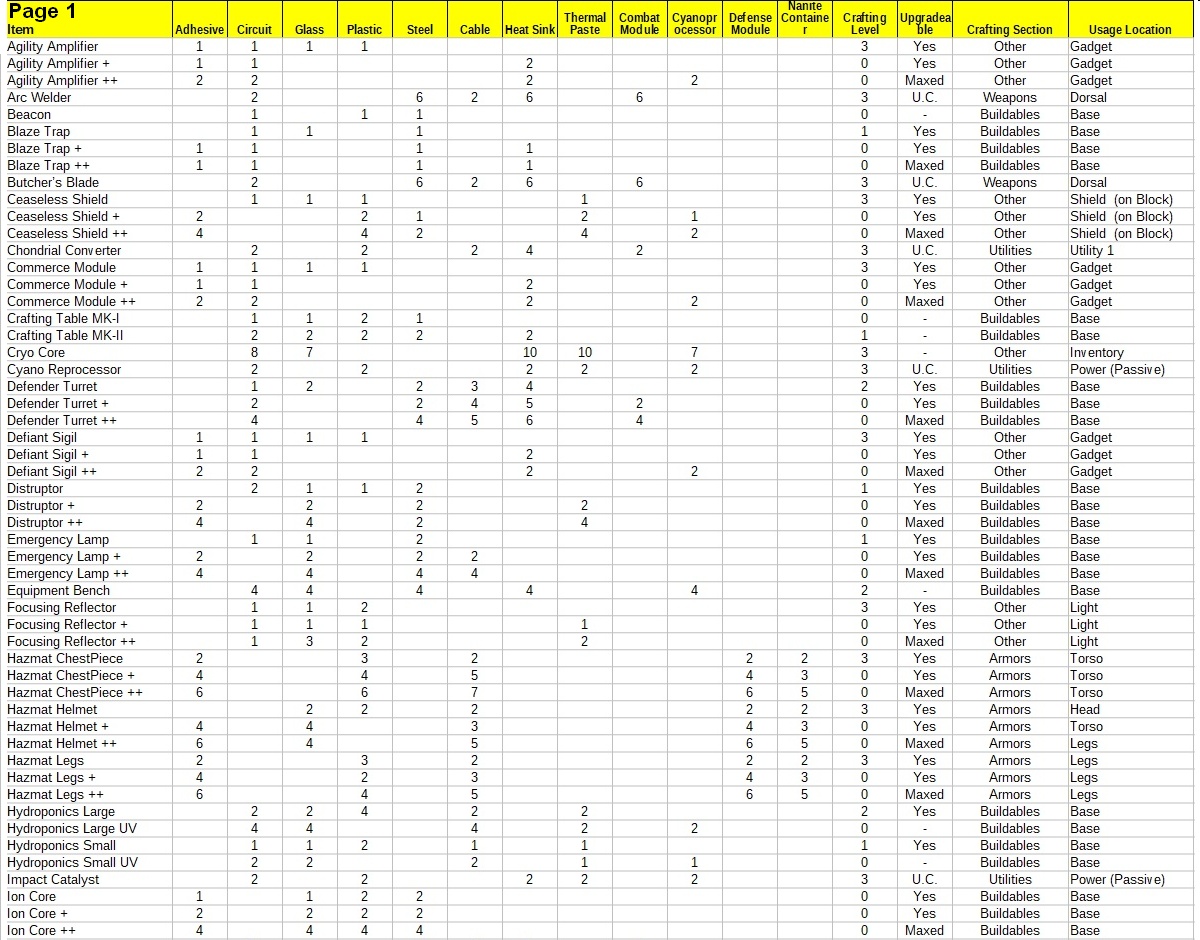
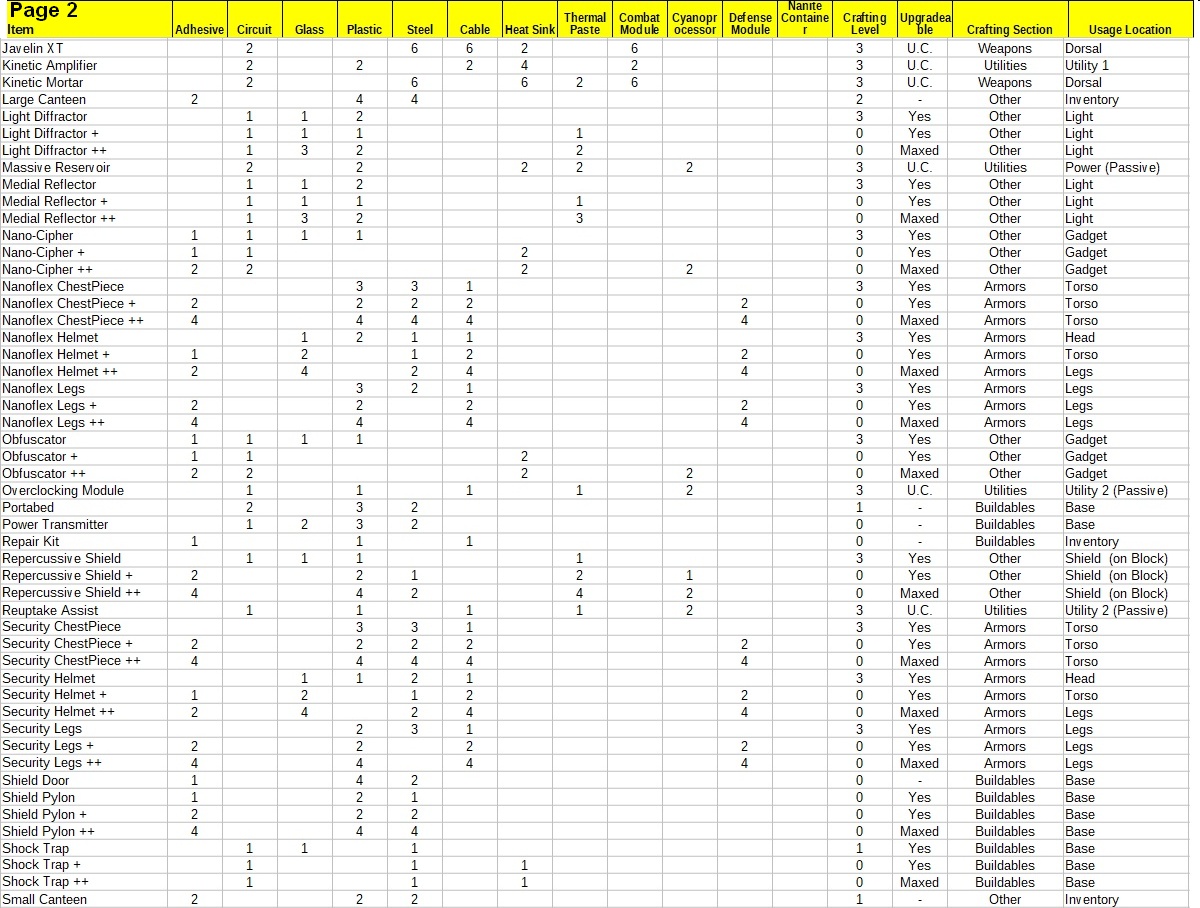
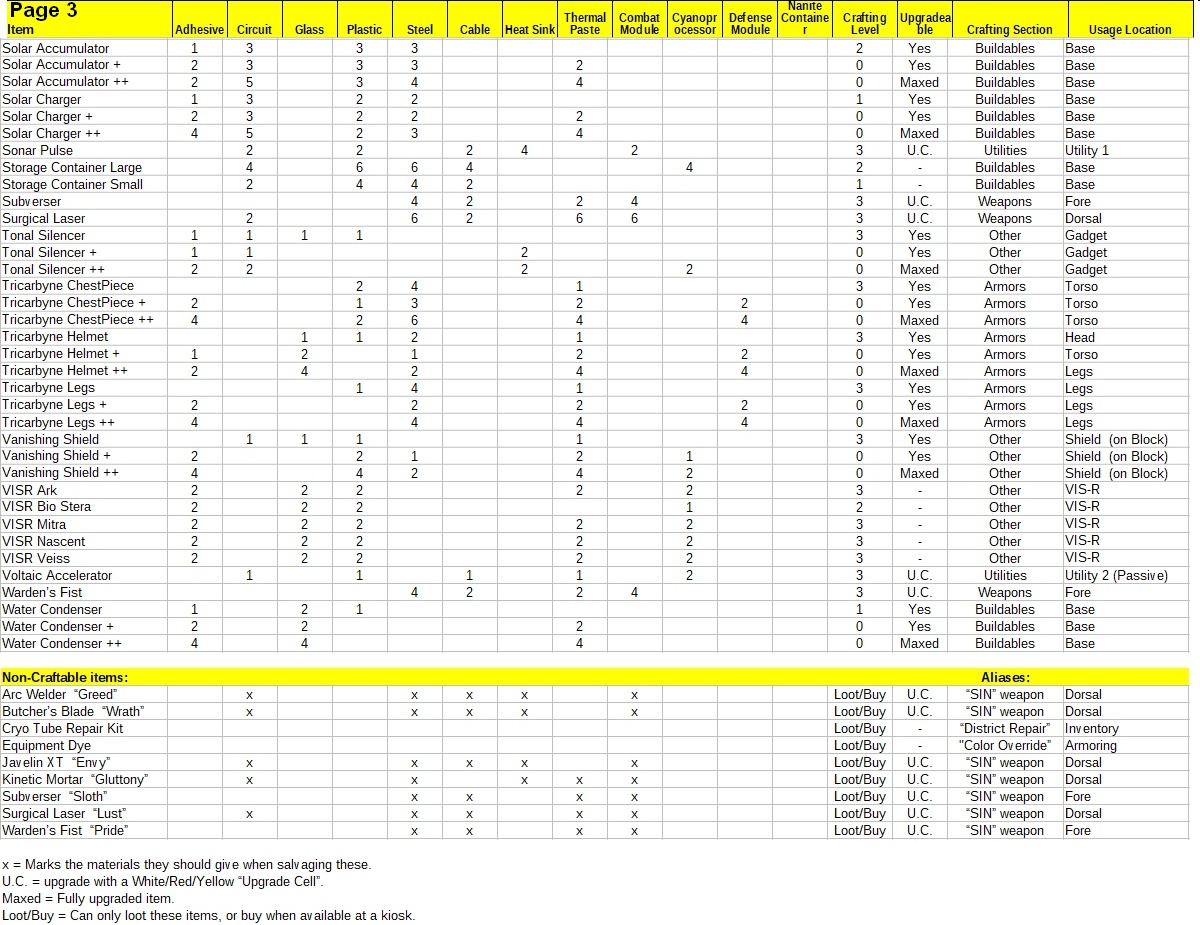
Crafting Materials Chart
Text searchable table won’t fit in section had to use 3 screenshots. (Click to enlarge / zoom in)
x = Marks the materials they should give when salvaging these.
U.C. = upgrade with a White/Red/Yellow “Upgrade Cell”.
Maxed = Fully upgraded item.
Loot/Buy = Can only loot these items, or buy when available at a kiosk.
Crafting level 0 = craft anywhere
Crafting level 1 = Crafting Table MK-I, or MK-II, or Equipment Bench
Crafting level 2 = Crafting Table MK-II, or Equipment Bench
Crafting level 3 = Equipment Bench
Salvaging Items for Materials
What materials you want to salvage will depending how you play your game.
For Example: I needed cable for Repair Kits, Hazmat suit, Defense Turrets, etc.
As a result the Cable chart below shows max possible cables. (sorted alphabetically)
| Item | Cable | ___ | Item | Cable | ___ | Item | Cable |
| Arc Welder | 2 | Hydroponics Large UV | 6 | Security ChestPiece ++ | 7 | ||
| Arc Welder “Greed” | 2 | Hydroponics Small | 1 | Security Helmet | 1 | ||
| Butcher’s Blade | 2 | Hydroponics Small UV | 3 | Security Helmet + | 3 | ||
| Butcher’s Blade “Wrath” | 2 | Javelin XT | 6 | Security Helmet ++ | 7 | ||
| Chondrial Converter | 2 | Javelin XT “Envy” | 6 | Security Legs | 1 | ||
| Defender Turret | 3 | Kinetic Amplifier | 2 | Security Legs + | 3 | ||
| Defender Turret + | 7 | Nanoflex ChestPiece | 1 | Security Legs ++ | 7 | ||
| Defender Turret ++ | 12 | Nanoflex ChestPiece + | 3 | Sonar Pulse | 2 | ||
| Emergency Lamp + | 2 | Nanoflex ChestPiece ++ | 7 | Storage Container Large | 4 | ||
| Emergency Lamp ++ | 6 | Nanoflex Helmet | 1 | Storage Container Small | 2 | ||
| Hazmat ChestPiece | 2 | Nanoflex Helmet + | 3 | Subverser | 2 | ||
| Hazmat ChestPiece + | 7 | Nanoflex Helmet ++ | 7 | Subverser “Sloth” | 2 | ||
| Hazmat ChestPiece ++ | 14 | Nanoflex Legs | 1 | Surgical Laser | 2 | ||
| Hazmat Helmet | 2 | Nanoflex Legs + | 3 | Surgical Laser “Lust” | 2 | ||
| Hazmat Helmet + | 5 | Nanoflex Legs ++ | 7 | Voltaic Accelerator | 1 | ||
| Hazmat Helmet ++ | 10 | Overclocking Module | 1 | Warden’s Fist | 2 | ||
| Hazmat Legs | 2 | Repair Kit | 1 | Warden’s Fist “Pride” | 2 | ||
| Hazmat Legs + | 5 | Reuptake Assist | 1 | ||||
| Hazmat Legs ++ | 10 | Security ChestPiece | 1 | ||||
| Hydroponics Large | 2 | Security ChestPiece + | 3 |
If buying items at kiosk to salvage, I suggest items with low cable counts for low costs.
Same chart as above but sorted by number of maximum cables possible.
| Item | Cable | ___ | Item | Cable | ___ | Item | Cable |
| Hydroponics Small | 1 | Hydroponics Large | 2 | Hazmat Legs + | 5 | ||
| Nanoflex ChestPiece | 1 | Kinetic Amplifier | 2 | Emergency Lamp ++ | 6 | ||
| Nanoflex Helmet | 1 | Sonar Pulse | 2 | Hydroponics Large UV | 6 | ||
| Nanoflex Legs | 1 | Storage Container Small | 2 | Javelin XT | 6 | ||
| Overclocking Module | 1 | Subverser | 2 | Javelin XT “Envy” | 6 | ||
| Repair Kit | 1 | Subverser “Sloth” | 2 | Defender Turret + | 7 | ||
| Reuptake Assist | 1 | Surgical Laser | 2 | Hazmat ChestPiece + | 7 | ||
| Security ChestPiece | 1 | Surgical Laser “Lust” | 2 | Nanoflex ChestPiece ++ | 7 | ||
| Security Helmet | 1 | Warden’s Fist | 2 | Nanoflex Helmet ++ | 7 | ||
| Security Legs | 1 | Warden’s Fist “Pride” | 2 | Nanoflex Legs ++ | 7 | ||
| Voltaic Accelerator | 1 | Defender Turret | 3 | Security ChestPiece ++ | 7 | ||
| Arc Welder | 2 | Hydroponics Small UV | 3 | Security Helmet ++ | 7 | ||
| Arc Welder “Greed” | 2 | Nanoflex ChestPiece + | 3 | Security Legs ++ | 7 | ||
| Butcher’s Blade | 2 | Nanoflex Helmet + | 3 | Hazmat Helmet ++ | 10 | ||
| Butcher’s Blade “Wrath” | 2 | Nanoflex Legs + | 3 | Hazmat Legs ++ | 10 | ||
| Chondrial Converter | 2 | Security ChestPiece + | 3 | Defender Turret ++ | 12 | ||
| Emergency Lamp + | 2 | Security Helmet + | 3 | Hazmat ChestPiece ++ | 14 | ||
| Hazmat ChestPiece | 2 | Security Legs + | 3 | ||||
| Hazmat Helmet | 2 | Storage Container Large | 4 | ||||
| Hazmat Legs | 2 | Hazmat Helmet + | 5 |
Salvaged items only return approx. 25-33% of mats used to craft and upgrade.
Salvage an item 1 time to see how many materials points they return.
What materials it returns is random but it only returns materials used to make it.
Salvaging Examples
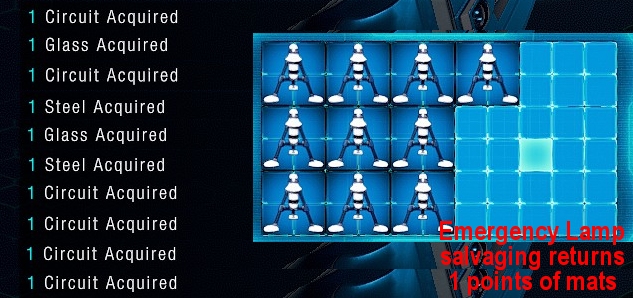
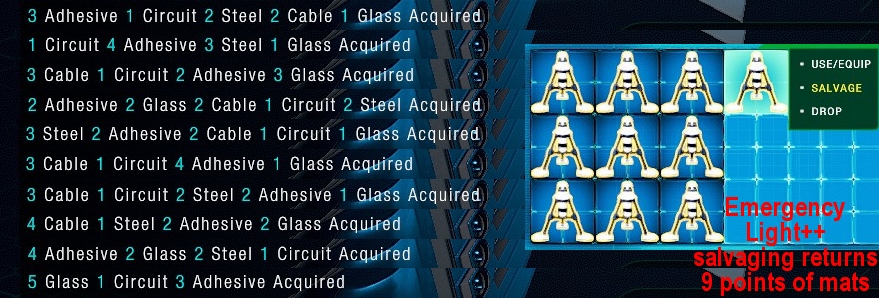
Emergency Lamp will randomly return only 1 material.
Possible returned mats are: 1 Circuit, OR 1 Glass, OR 1 Steel.
Which means an Emergency Lamp never gives mats like Adhesive, Heat Sink, etc.
Image of what mats were returned after salvaging 10 lamps.
Emergency Lamp+ will randomly return a total of 4 mats.
But it takes 12 materials to craft and upgrade to +.
Same mats as regular Emergency Lamp, and any mats used to upgrade it to +.
ie) It takes 2 steel to craft and 2 to upgrade therefore 4 steel is max returnable.
Possible returns are: 0-2 Adhesive, 0-1 Circuit, 0-3 Glass, 0-4 Steel, 0-2 Cable
Emergency Lamp++ will randomly return a total of 9 mats.
But it takes 28 materials to craft and fully upgrade.
All the same mats Emergency Lamp+, and any mats used to upgrade it to ++.
ie) 2 steel to craft, 2 steel upgrade+, 4 steel upgrade++ means 8 steel is max.
If you loot or buy any grade of emergency lamp, the rules above apply even tho you didn’t craft.
Kiosks Colors and Buying
Basically the Kiosks are Vending Machines.
| Top-Left | Faceplate | Items |
| Green | White | Food and Drink |
| Grey | Green | Armor, Weapons and gear |
| White | Blue | Building items and Materials |
| White | Red | Medical items |
| White | Grey | Upgrades and Security Bypass |
| Grey | Yellow | Upgrades and random other items |
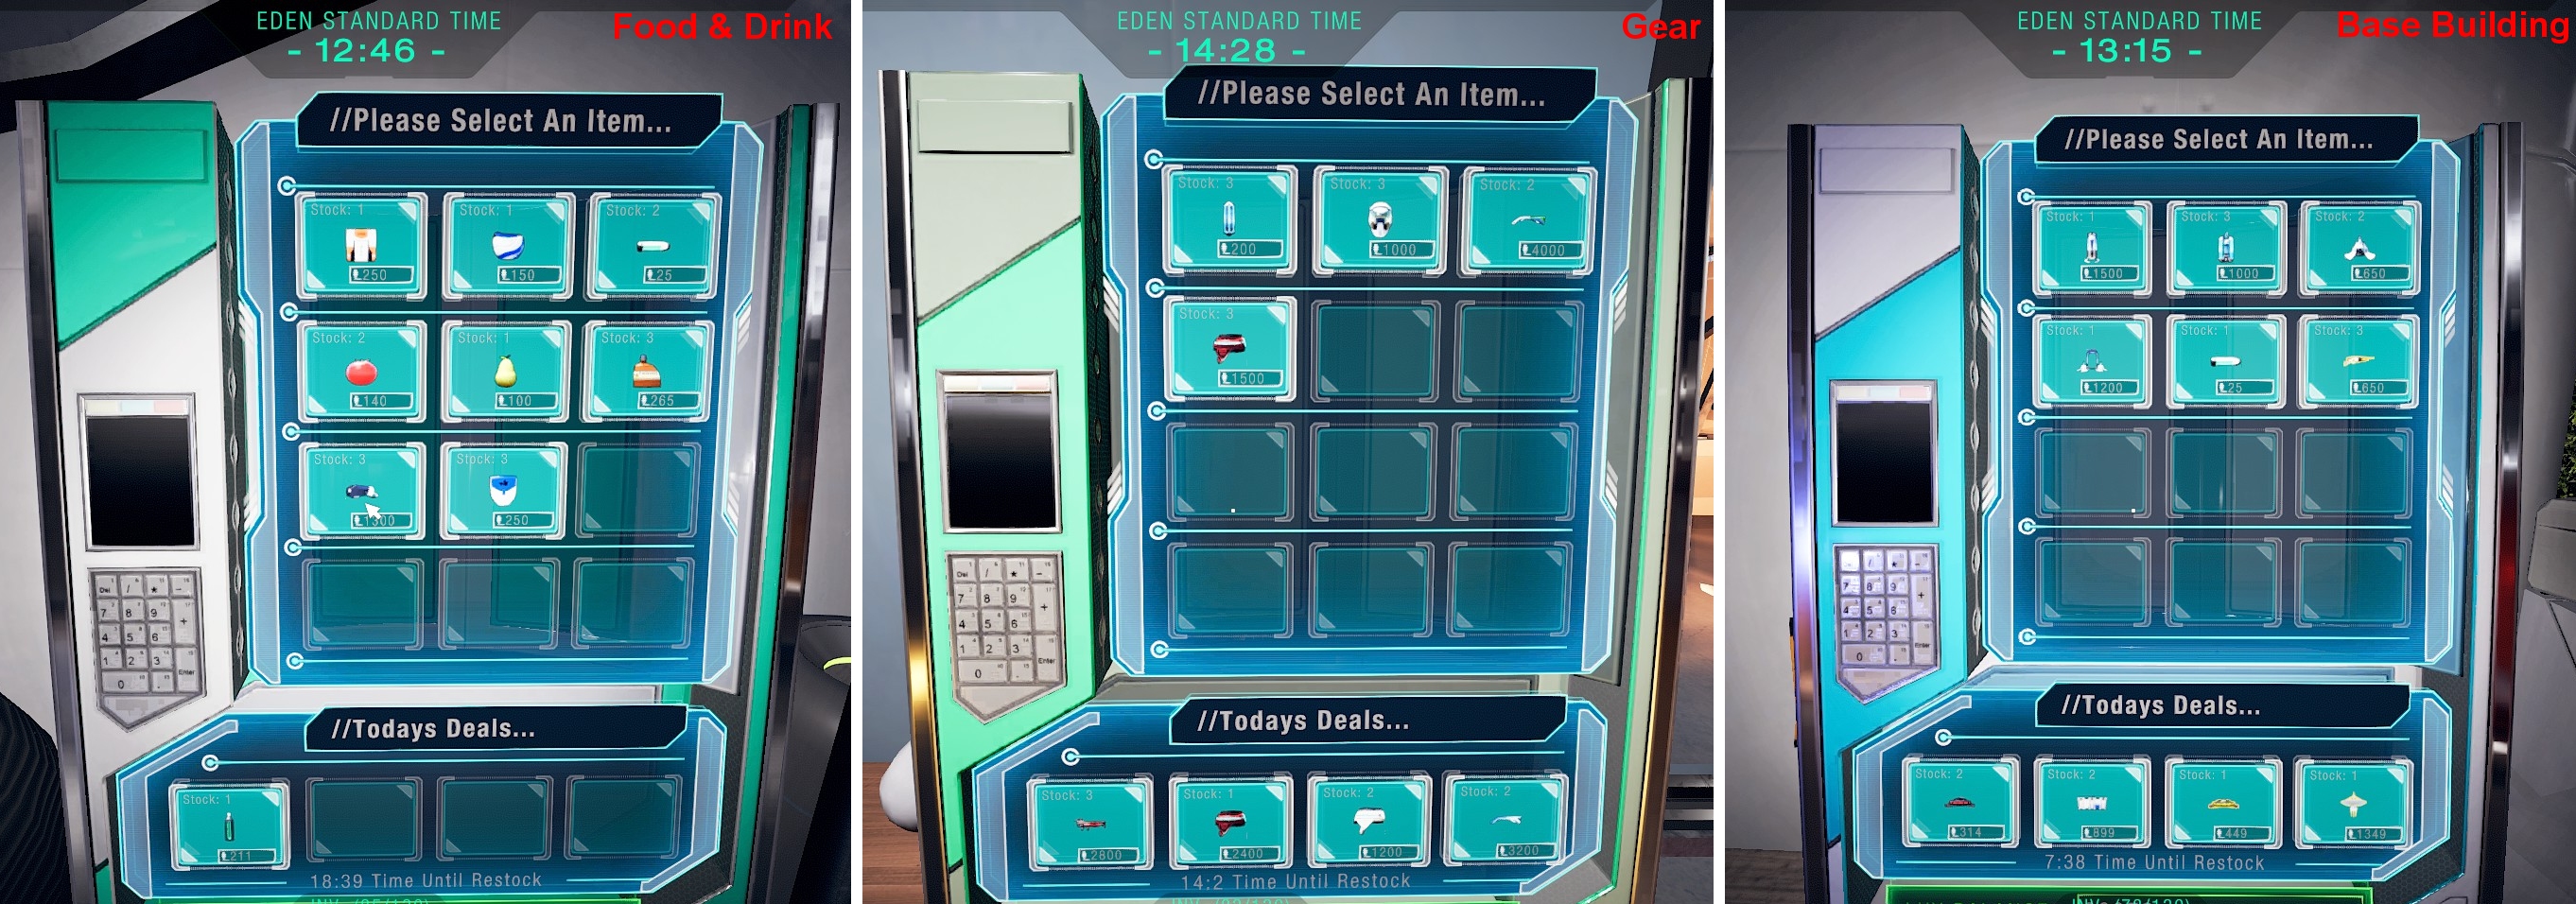
Kiosks sell certain categories of items based on kiosk colour.
There is a chance some random item from a different category will be for sale.
Which you can see from image below of each color of kiosk.
All items can be randomly found in any kiosk. ie) fertilizer, energy cell, etc.
Including rare items: Maintenance Keys, Repair Kits, Dyes, Cryo Core, etc.
“Cyano Tube Repair Kits” can be found in any kiosk randomly.
Exactly which “Equipment Dye” a kiosk is selling is random, just recycle duplicates.
Bandages in kiosk have a red tomato icon and list for 250 lux, vs Tomato 140 lux.
Non-craftable items like dyes, named “SIN” weapons, colour lenses, etc are rare to loot but can be found randomly in some kiosks.
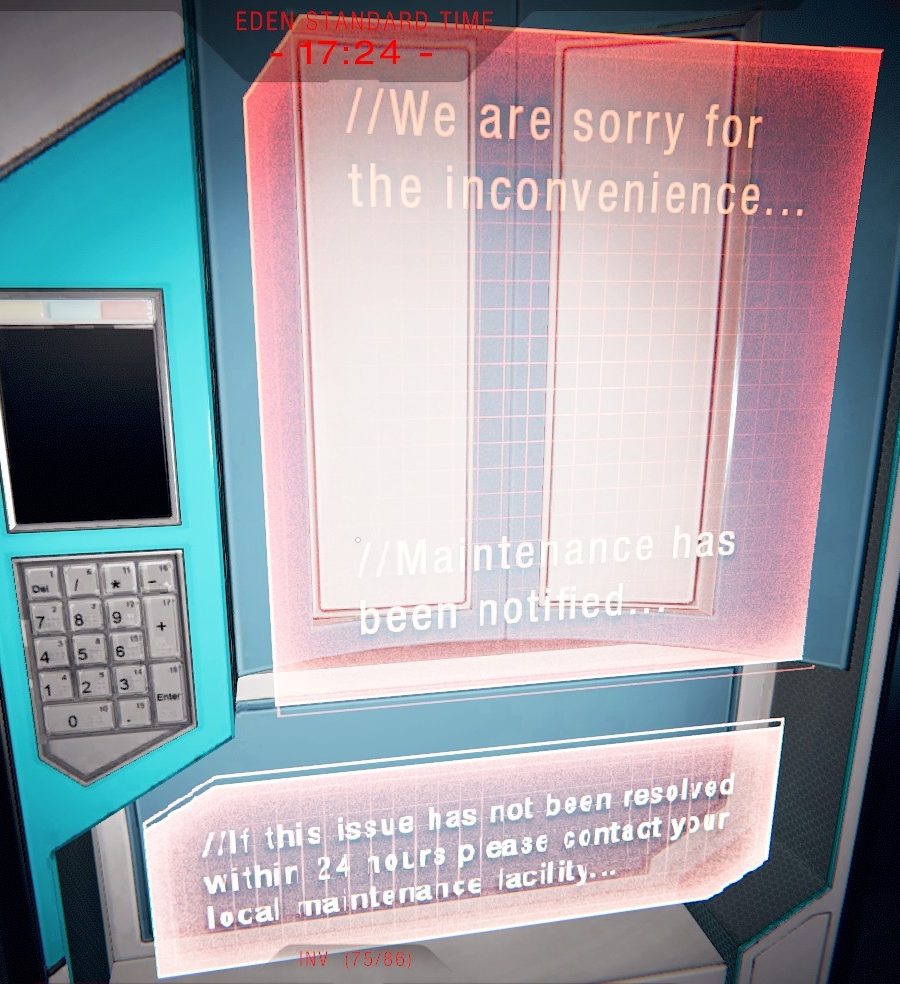
Plus a few Kiosks are out of order, or no power/moved/damaged/fallen down.
Kiosks Lux prices for an item stays the same for a given color Kiosk within a district.
However I believe there was price differences on occasion but I hadn’t investigated.
Also didn’t look into buying or crafting meds, stims, or energy cells.
I found that I generally looted them at about the same pace as I used them.
Fortunately Rad0 had made a handy guide about those and on growing food. (Here’s a link)
https://steamcommunity.com/sharedfiles/filedetails/?id=1448962097 – [steamcommunity.com]
Commence Module for Buying
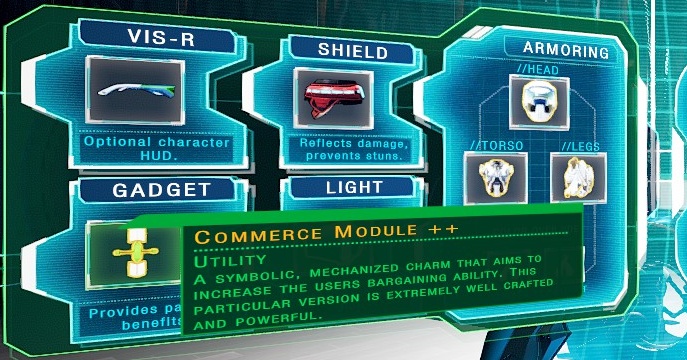
I quickly upgraded a Commerce Module to ++ early on.
Because it changes buying prices when it is equipped.
The ++ version reduces the purchase cost by 25%.
Doesn’t sound like much until you consider Kiosk’s Daily Deals.
Daily deals are -20% off list price, before -25% Commerce Module++.
Effectively the Daily Deal and CM++ together saves 40% off list price.
for example:
* Ion Core: Kiosk 1000 lux List Price (CM++ -25% = 750 lux)
* Ion Core: Kiosk Daily Deal 800 lux (CM++ -25% = 600 lux)
So saving 400 lux off list price 1000 lux is 40% savings.
That 40% off can be some nice savings when buying higher value items.
ie. SIN weapons listed 7000 lux vs 5600 daily deal plus CM++ -25% = 4200 lux
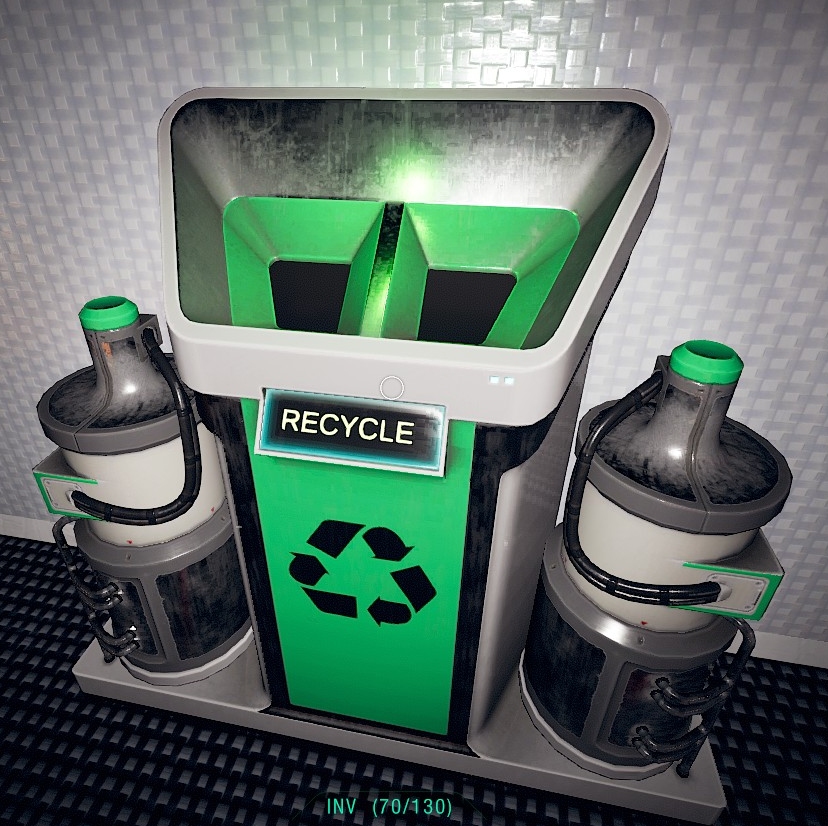
NOTE: Commerce Module does Nothing for selling at recycler.
Crafting Basics
Hopefully placing the charts at the start is better for frequent access.
I’m putting this basics info below because most players will only read it one time.
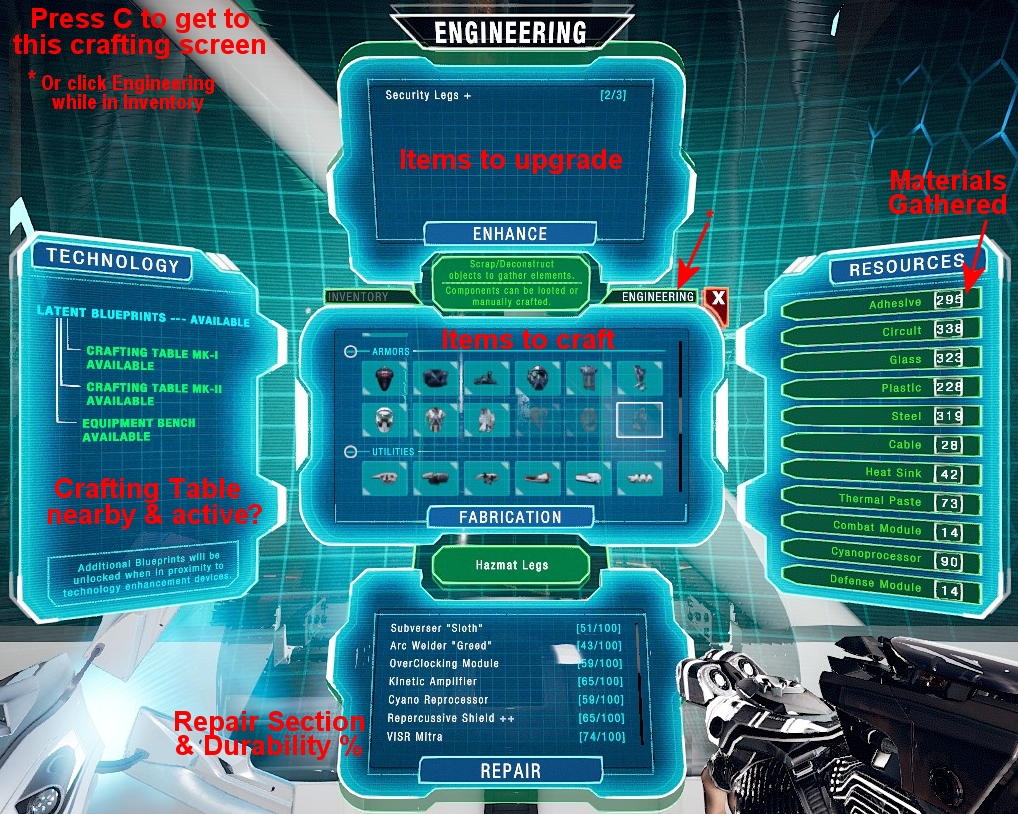
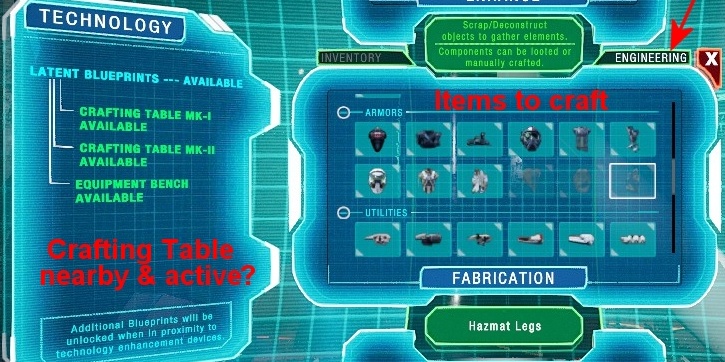
Pressing “C” is the default hotkey to bring up the Crafting screen.
Or from Inventory screen just click the Engineering tab.
The “Engineering” crafting screen shows:
- what items, weapons, gear you can Upgrade, at Top. (carried or equipped)
- what items, weapons, gear you can Craft, at Middle.
- what items, weapons, gear you can Repair, at Bottom. (carried or equipped)
- what crafting materials you have available, at Right-side.
- what crafting tables/bench your near, at Left-side.
Get Materials from looting defeated enemies, chests/drawers, kiosks, and salvaging.
Materials are: Adhesive, Cable, Circuit, Combat Module, Cyanoprocessor, Defense Module, Glass, Heat Sink, Nanite Container, Plastic, Steel, Thermal Paste
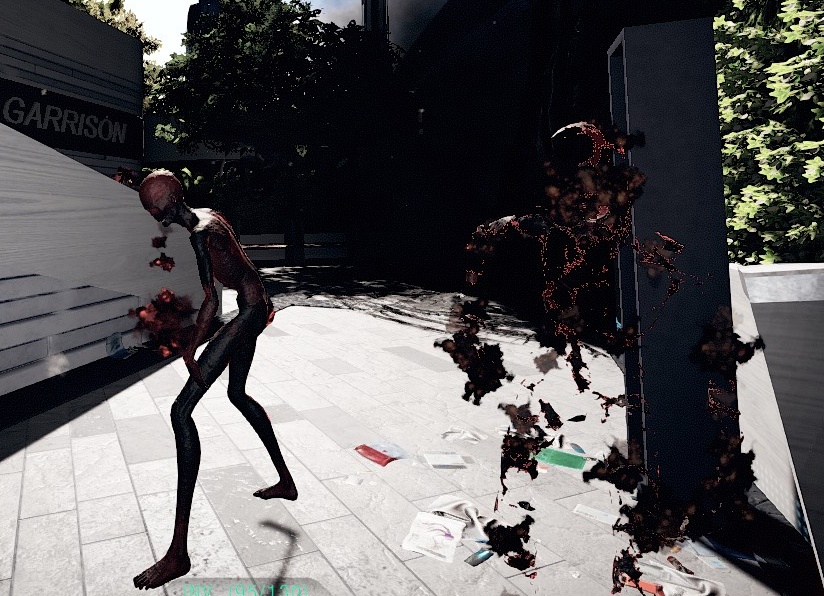
Note: The Nanite Containers are found by looting dead Shades and Revenants.
Pictured is a Shade after attacking, another in “geist” smoke/cloud-like form about to attack.
Revenants are the flying version of these nanite based mutants.
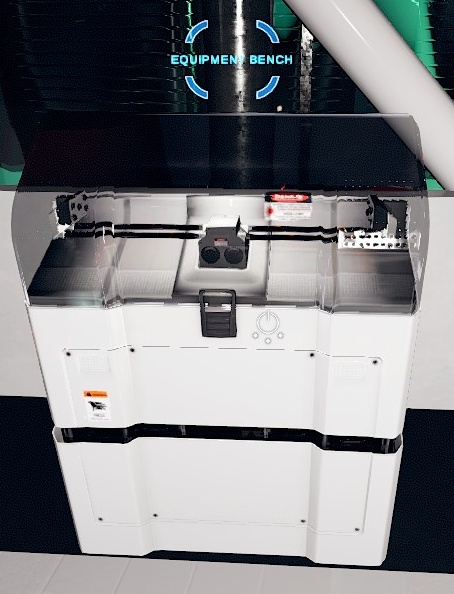
Crafting Tables and Equipment Bench
These are just used to craft items/gear.
They are Not used to Upgrade or Repair items/gear.
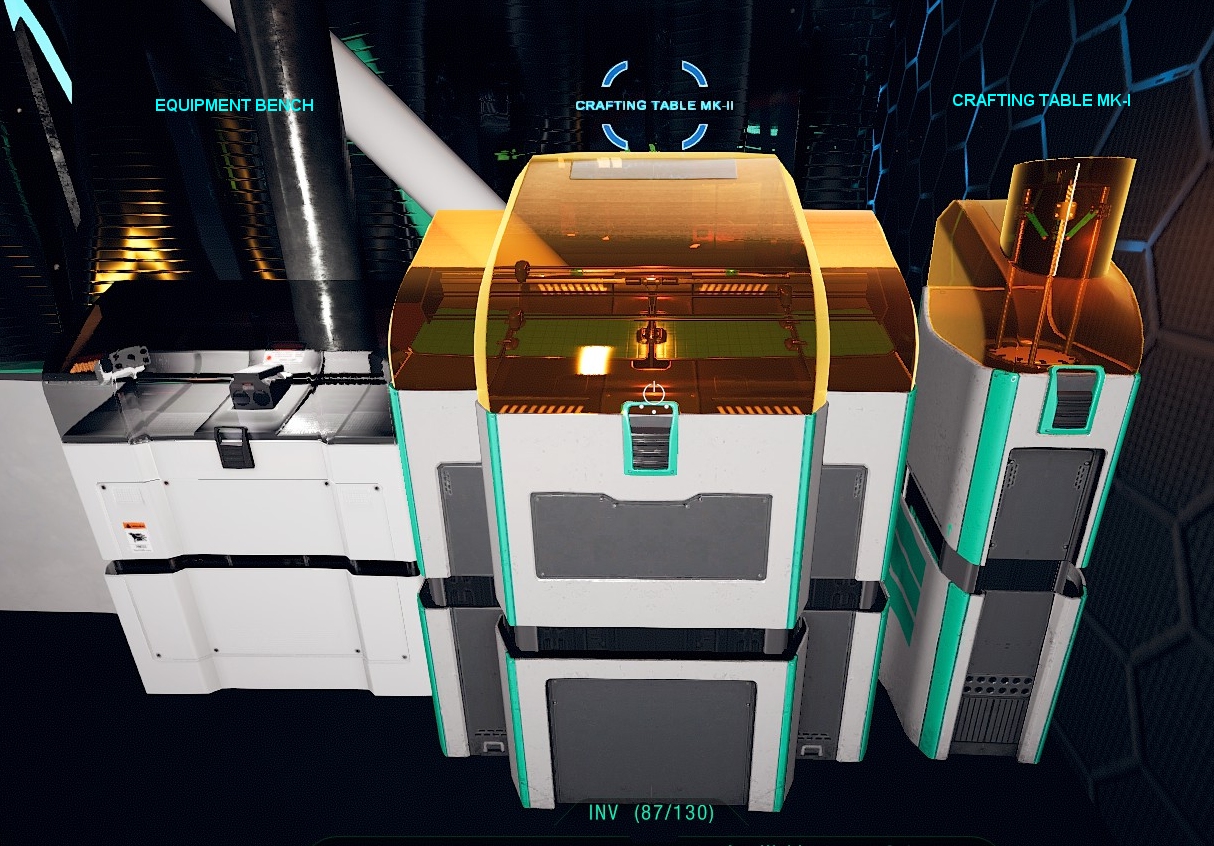
There are 3 levels of crafting tables/bench.
To use just stand near a crafting tables/bench that has power.
They will power up automatically when you are close enough to use.
The “Crafting Materials Chart” at top shows what items a crafting tables/bench can make.
When standing near a crafting table/bench your Fabrication (blueprints) items get automatically moved from “Unavailable” into categories for you to craft: Buildables, Weapons, Armors, Utilities, Other.
NOTE:
Crafting Table MK-II can make everything the MK-I can.
Equipment Bench can make everything the MK-II and MK-I can.
After getting Equipment Bench just store/salvage/recycle MK-I and MK-II.
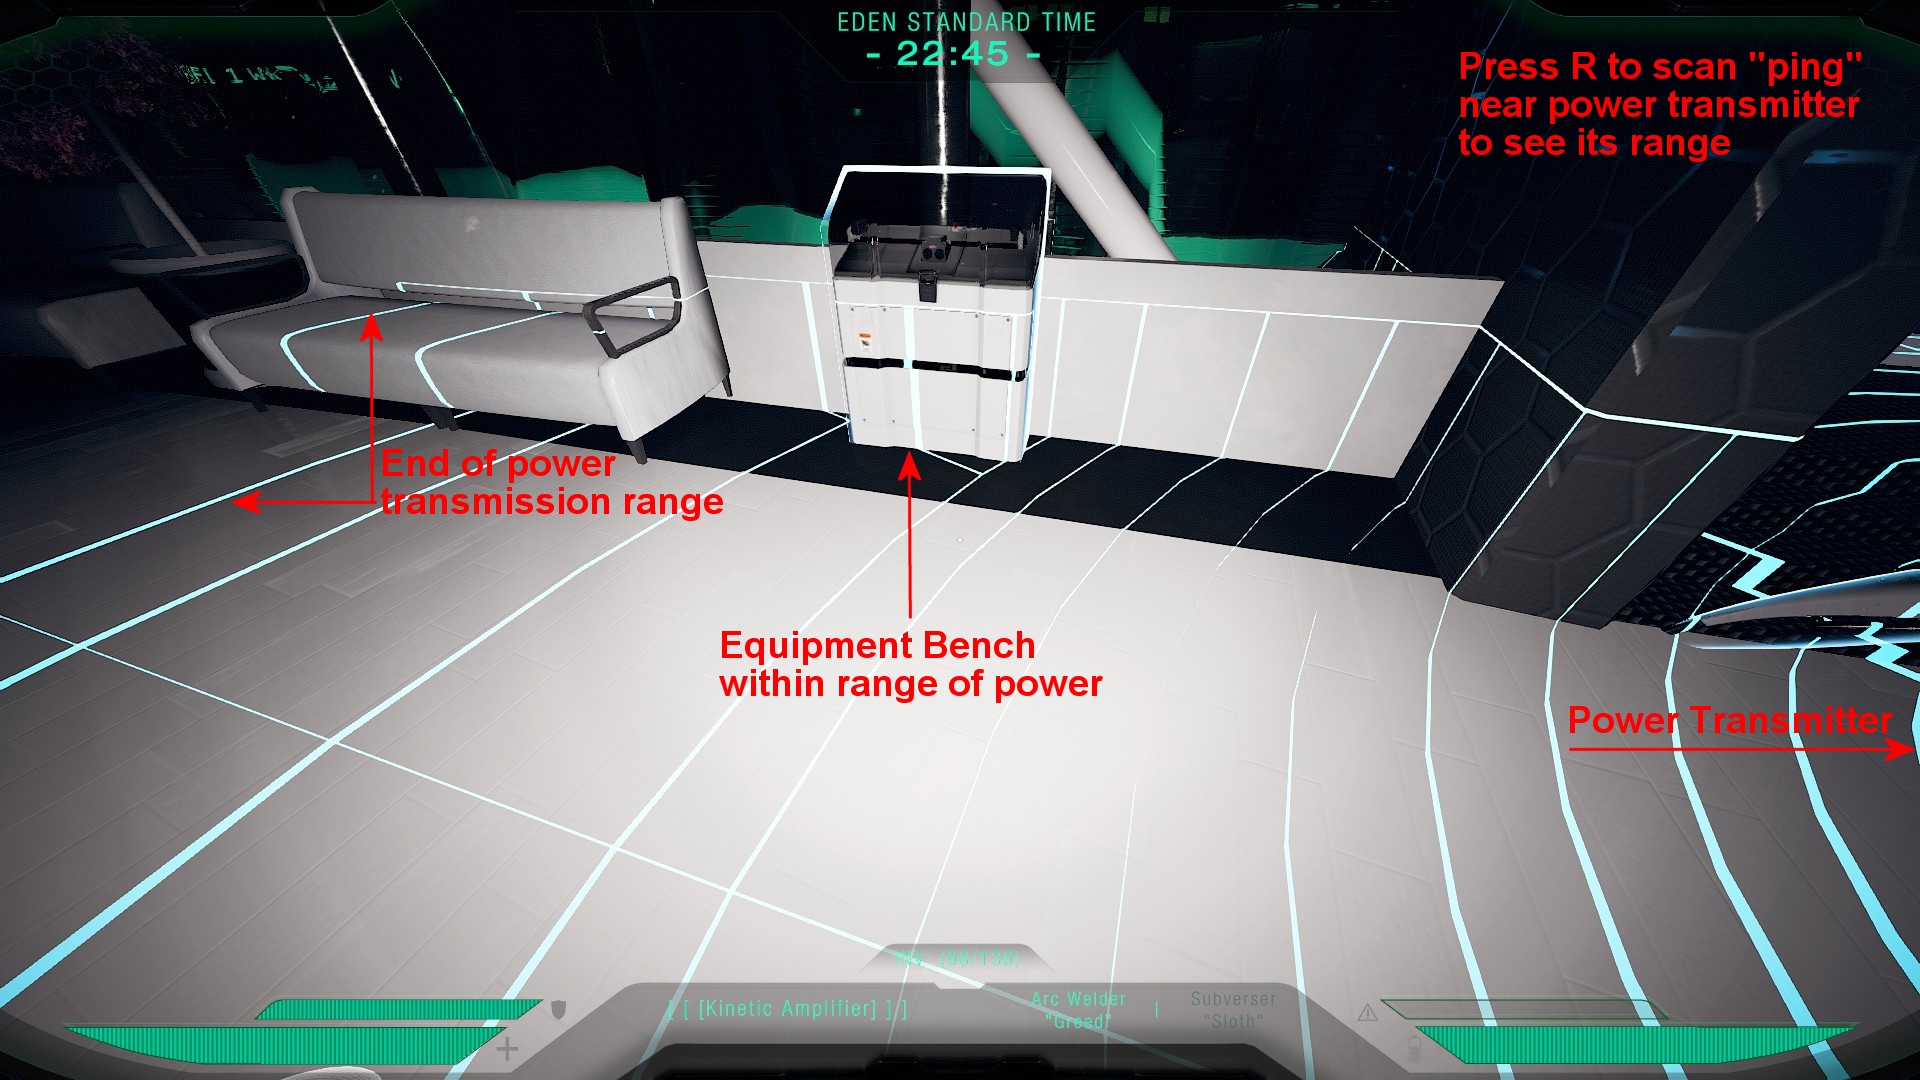
If crafting tables/bench doesn’t start up:
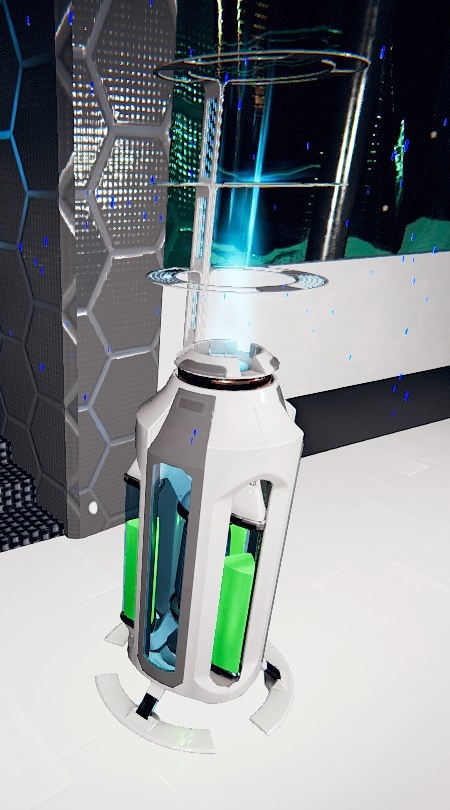
* ensure there is an active Power Transmitter with a charged Ion Core.
* look at bench press ‘E’ ring to bring up command ring and click top icon to Activate.
* hold R to ping and see if its placed within range of a Power Transmitter. [[needs image]]
* look at bench press ‘E’ ring to bring up command ring and click bottom icon to Move.
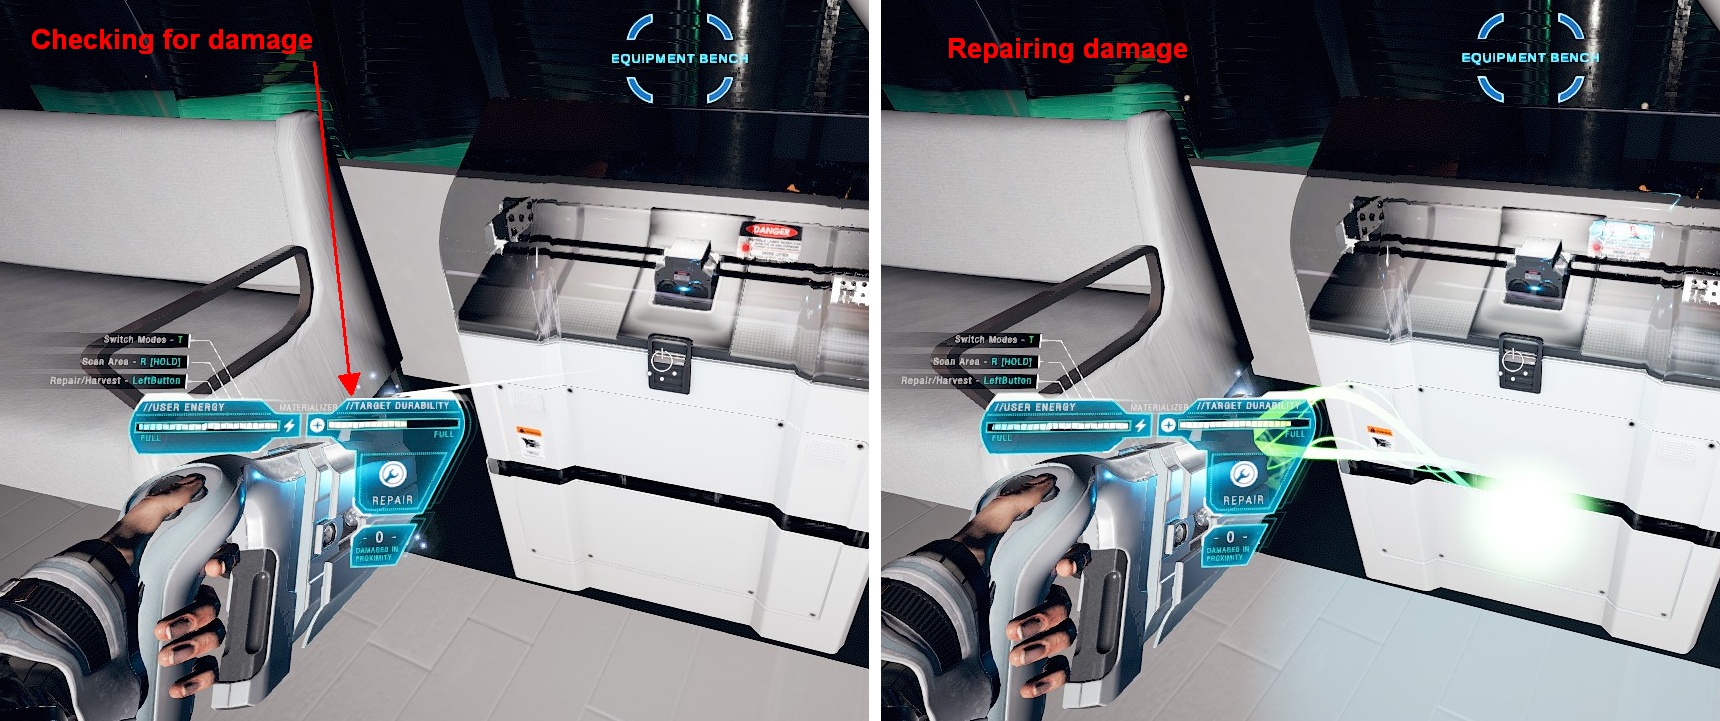
* look at bench press ‘R’ to see if it needs repairs. Click mouse button to repair using your energy.
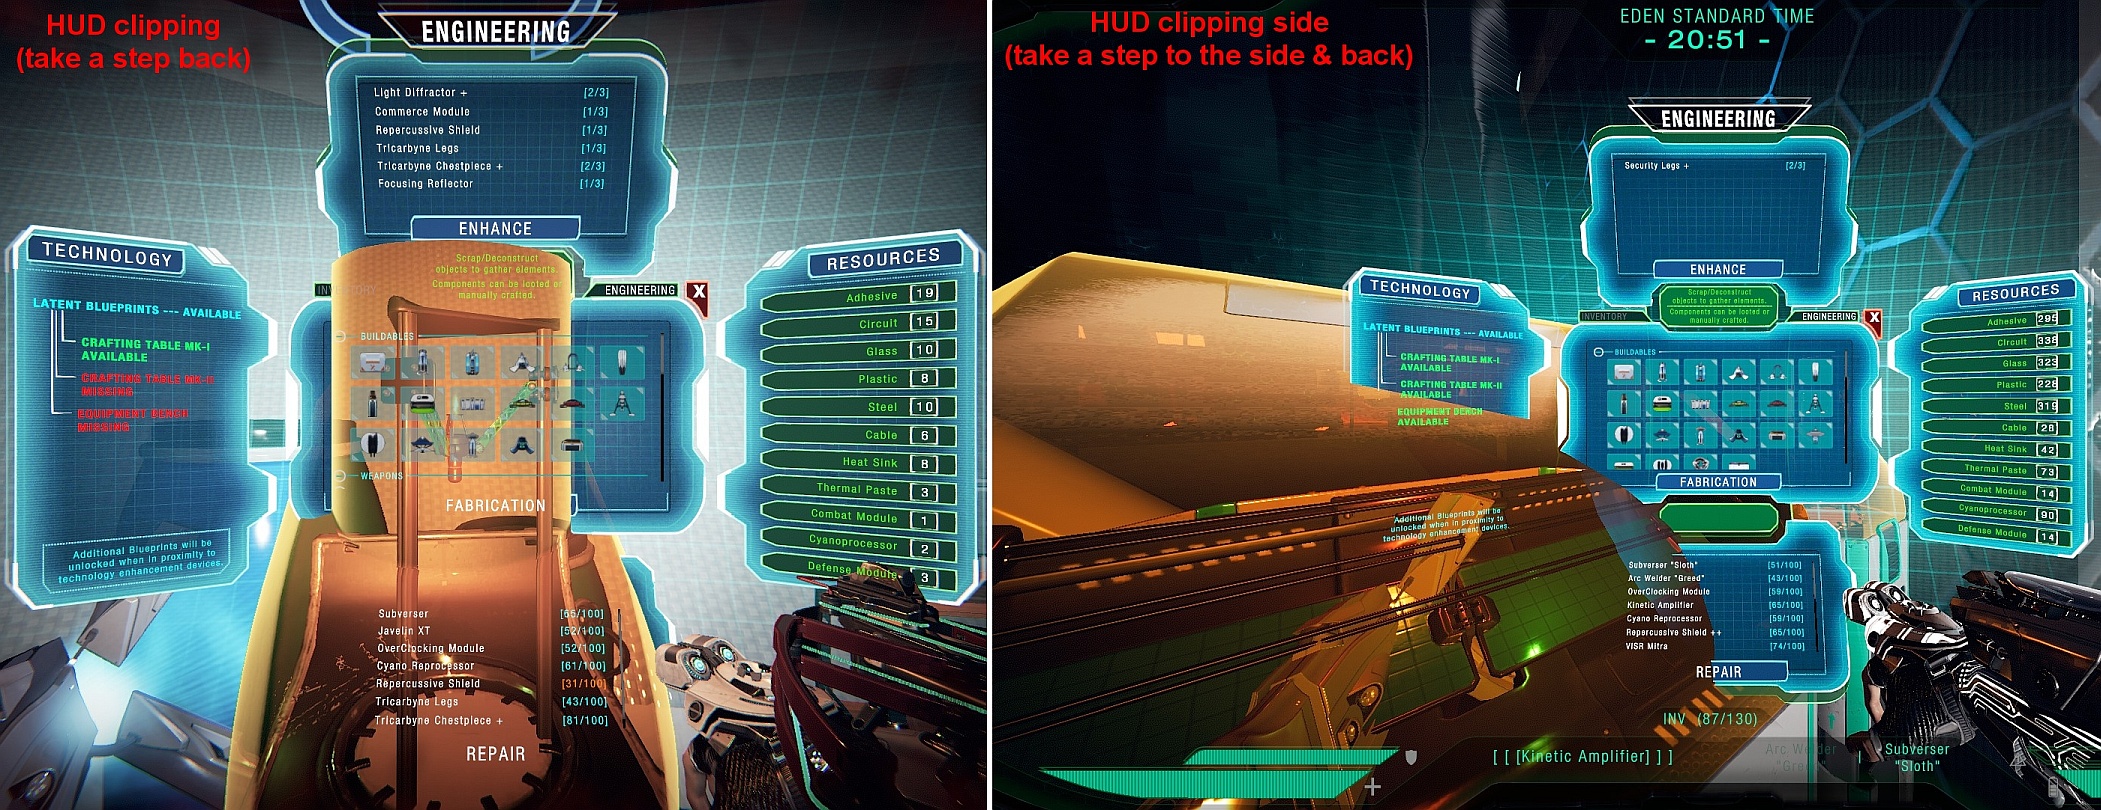
If your unable to craft or unable to click a button to craft.
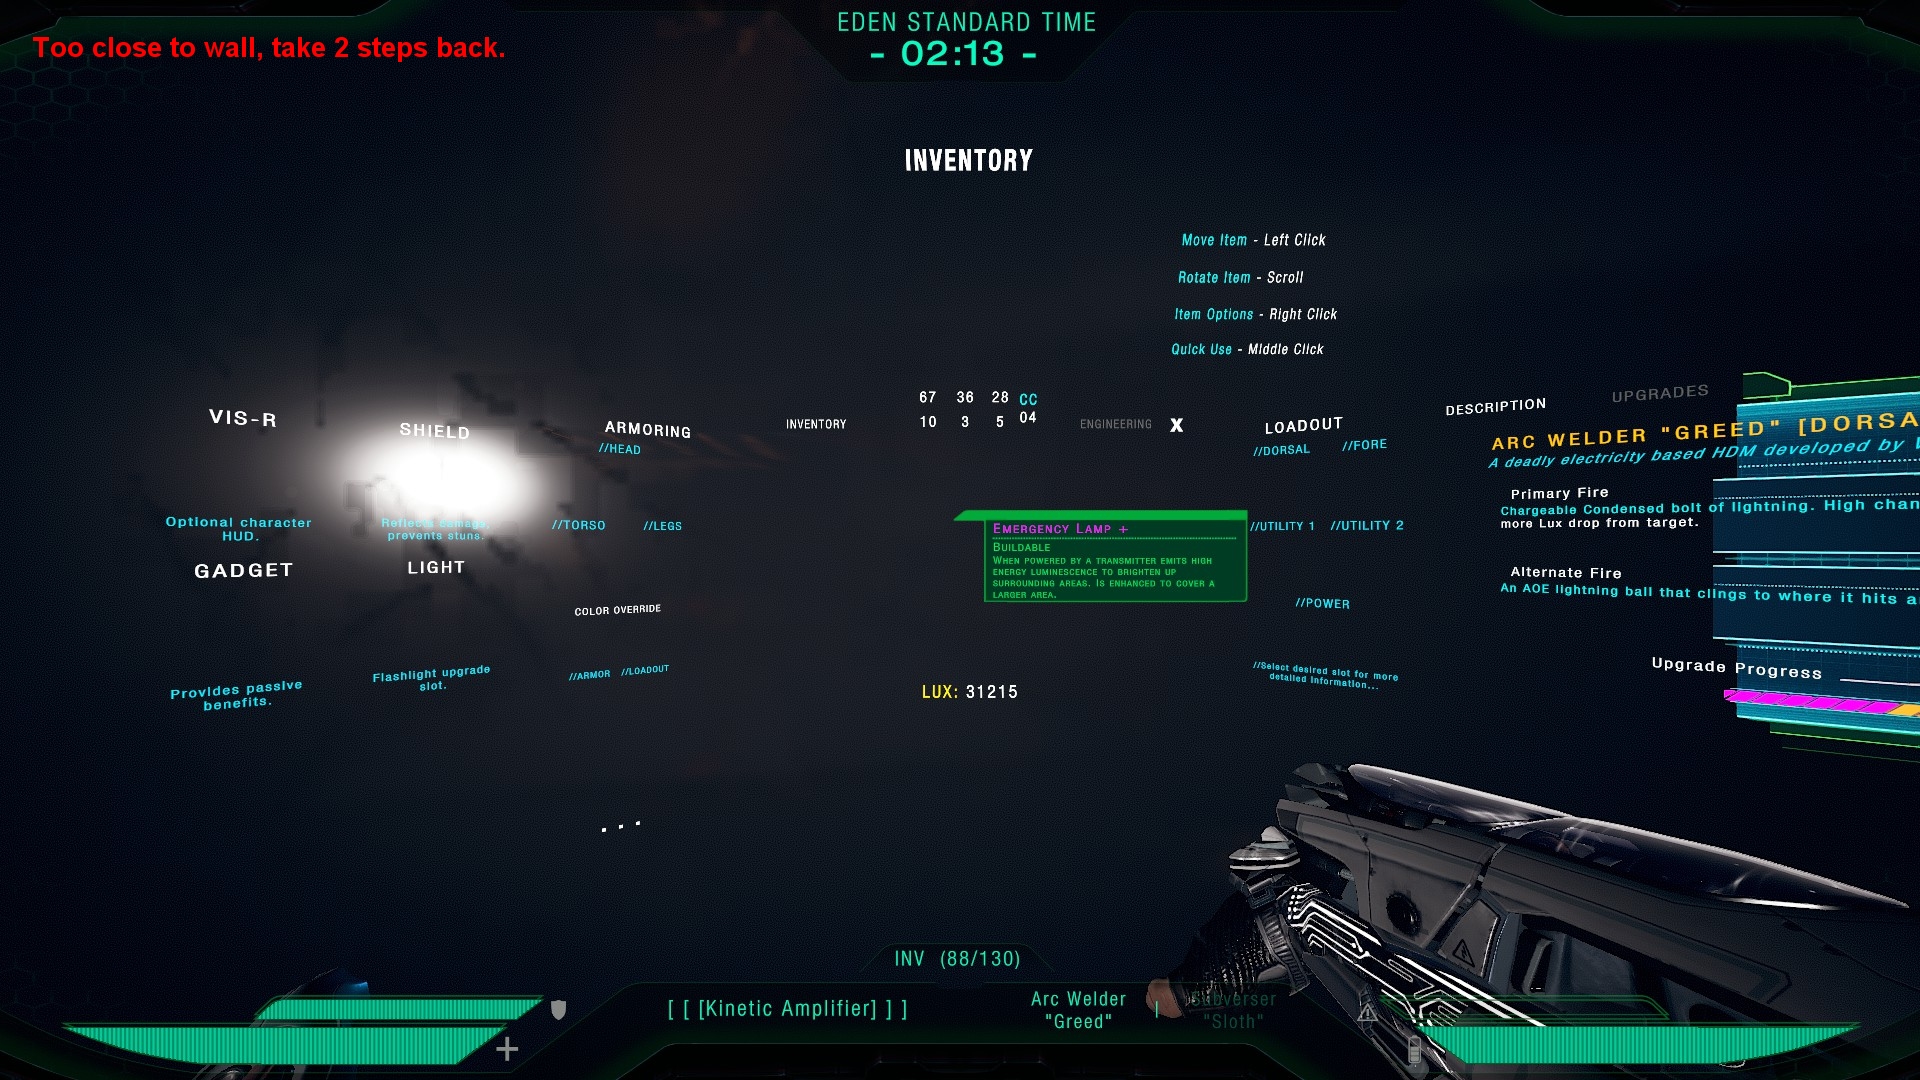
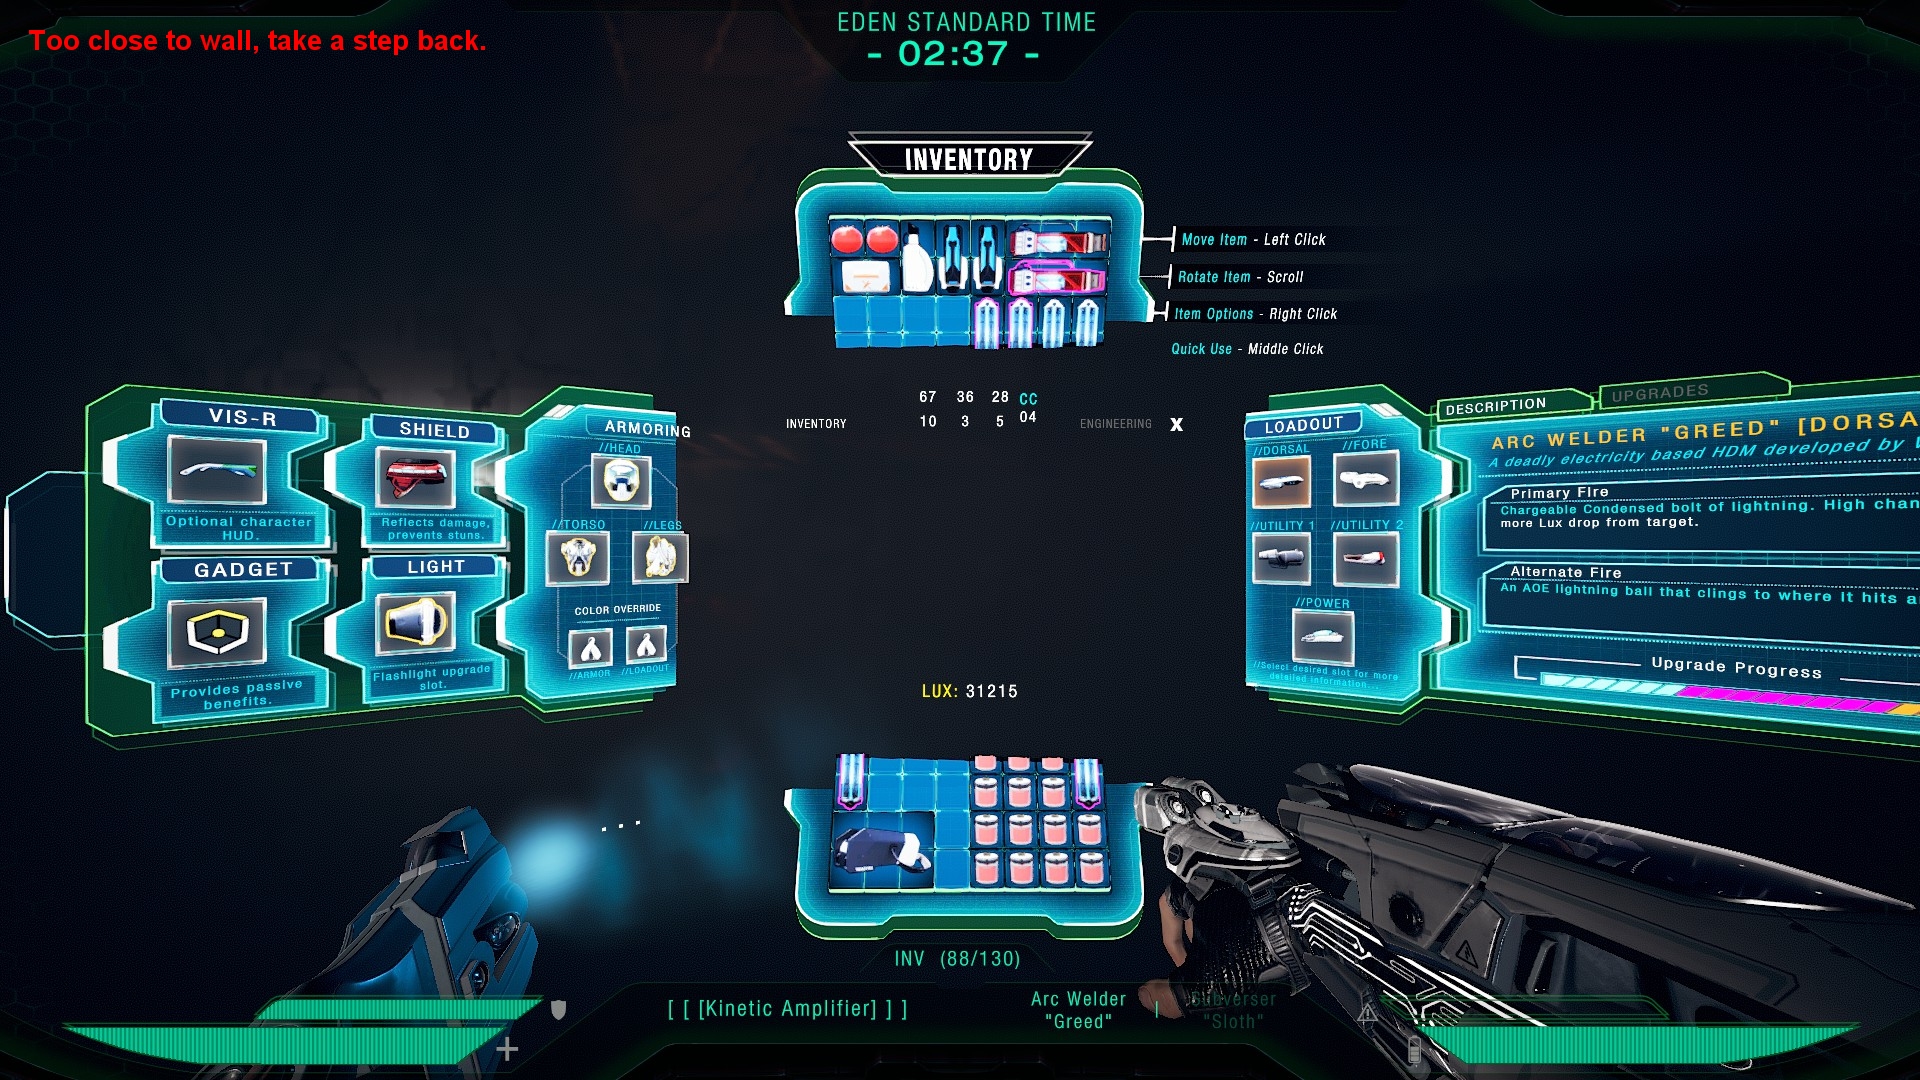
Its often the crafting User Interface simply clipping through a table or other nearby item.
Just take a step back and try again.
And this issue also happens when too close to anything. ie) Storage, Lamp, Shrubs, Walls
Additional Information and Upgrading
Here’s some semi-related info that might help out someone new to crafting or upgrading.
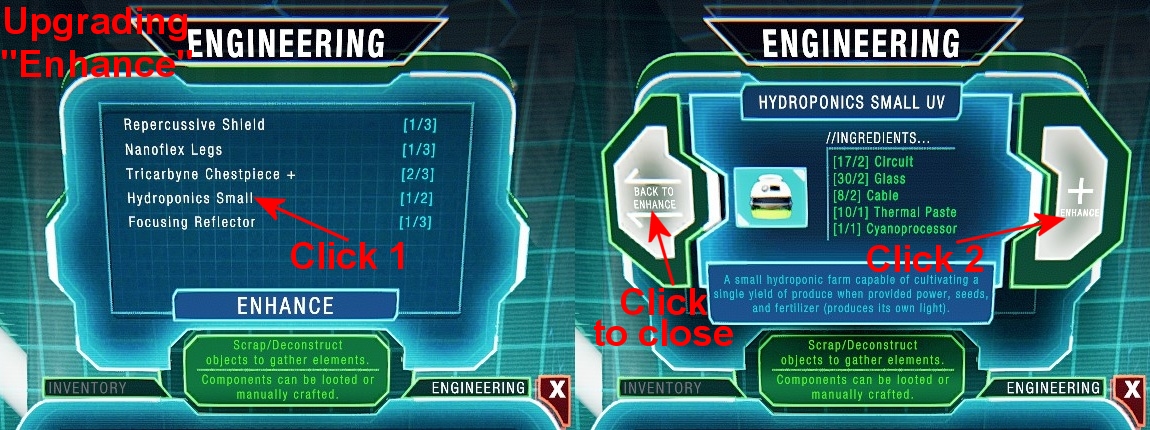
Upgrading a damaged/used item in Engineering Enhance will restore to 100% condition
For example upgrading a drained Ion Core will restore to 100% condition.
To repair item/gear/weapon you have equipped or are carrying.
You must be carrying a Repair Kit. (Do Not confuse with Cryo Tube Repair Kit)
Notice the Repair Kits will only repair up to 34% of the item/gear/weapon’s condition.
—
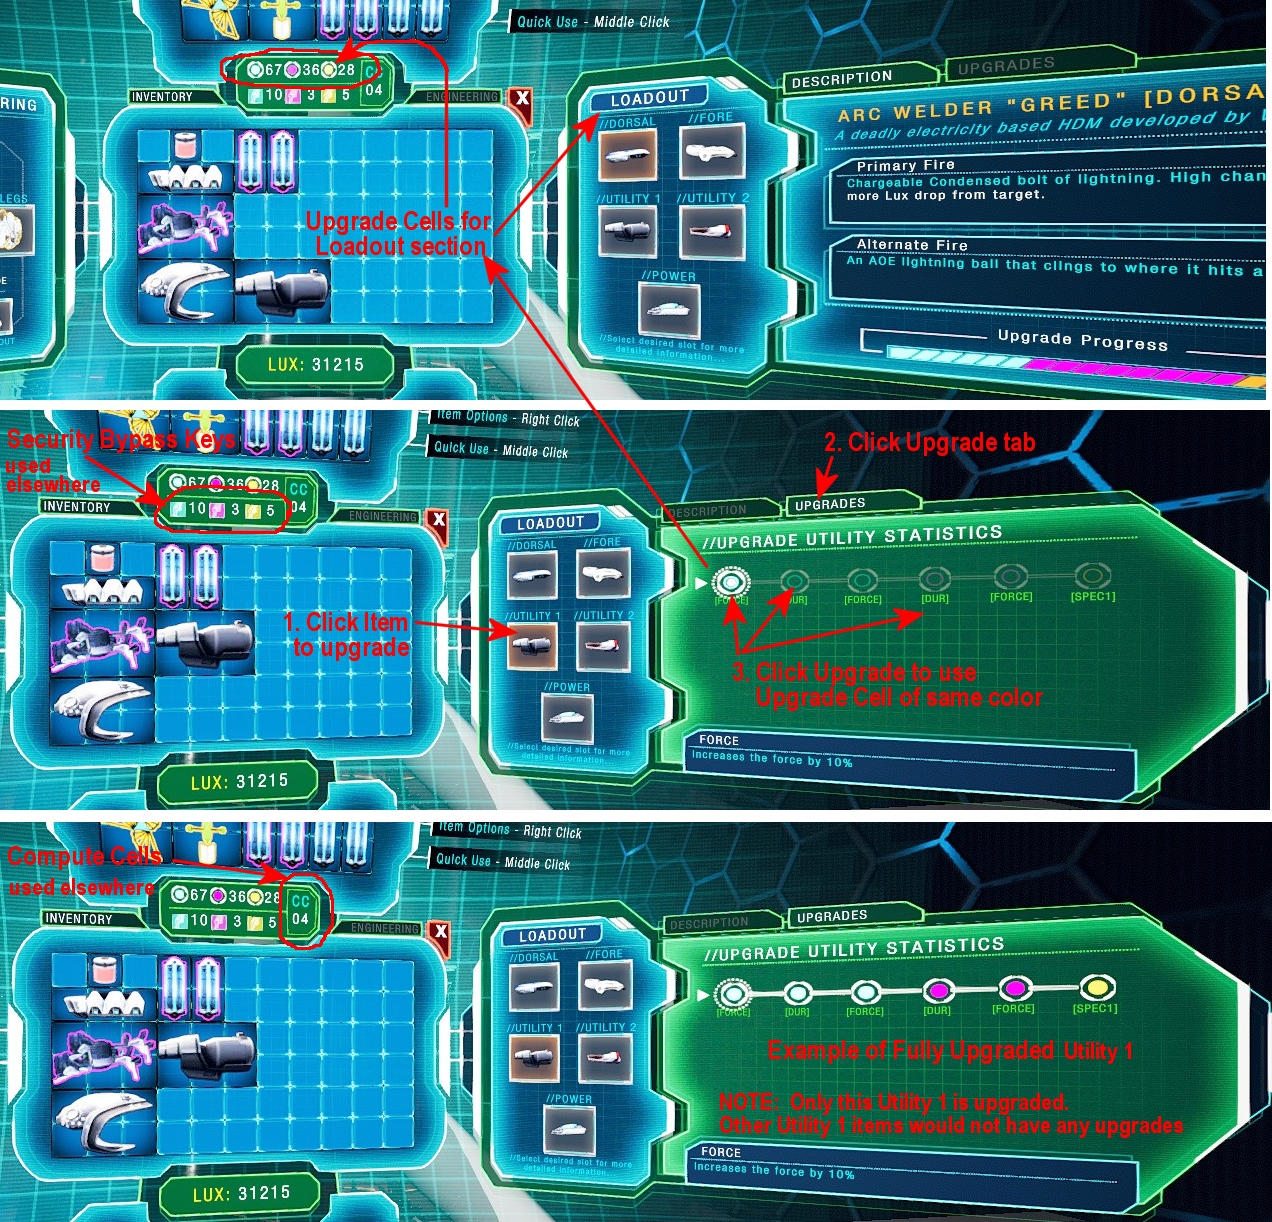
The Upgrade Cells (alias “U.C.”) are White, Red, or Yellow “Upgrade Cells”.
Press I to going to Inventory > and at the right side is “Loadout”
There are 5 spots/items shown, click one then click the tab “Upgrades”
Inventory screen shows the “U.C.” you’ve collected as round colors.
Upgrade Cells are used per item and do not transfer to items with identical name. ie) Arc Welders
—
PAMELA is the one thing (besides Genom) not upgraded in Inventory or Engineering screens.
Press Tab to bring up AARM, scroll mouse wheel to highlight and select PAMELA.
Now you’ll see the “P.A.M.E.L.A. Skill Tree”.
Just below the title is the number of Compute Cells you have.
Use the Compute Cells to upgrade your Pamela Skills.
Each skill starts disabled with 0/3 Compute Cells.
Upgrade to the minimum 1/3 (uses 1 Compute Cells) to begin using a PAMELA skill.
It takes 3 Compute Cells to fully upgrade a skill.
Up to 4 enabled skills can be drag & dropped to “//Equipped Abilities” for use.
—
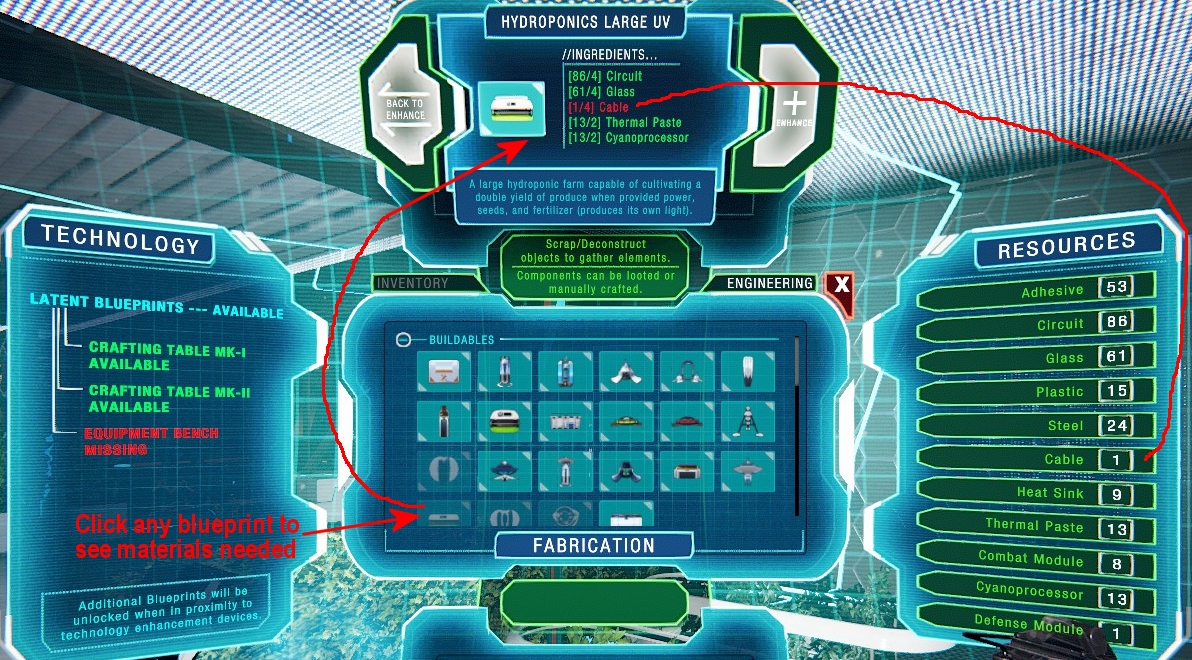
How to find out what Materials are needed?
Checking for materials is always easier when near a crafting table/bench if its needed for a particular item. Just click on blueprint even if its kind of faded out to see what material(s) you need to be able to craft it. Here’s an example of Hydroponics Large UV needing 1 mat.
—
Will it Salvage???
Repair Kit can be crafted, looted, salvaged, and in Kiosks.
Cryo Core can be looted, crafted, salvaged, and found in Kiosks.
Cryo Tube Repair Kit can looted, or in Kiosks, but Not crafted nor salvaged.
Maintenance Keys can looted, or in Kiosks, but Not crafted nor salvaged.
Hazmat suit parts must be crafted, and I recommend fully upgrading.
Canteens can be crafted, looted, salvaged, and in Kiosks.
Seeds can looted, or in Kiosks, can not be salvaged.
Salvaging Food and Beverages gives fertilizer.
Approx. 10% chance to salvage + fertilizer, and ~ 1% for ++ fertilizer.
NOTE: Sometimes items say “examine” instead of salvage.
Just hover mouse cursor over another item then return cursor for Salvage option.
Usually Examine performs the same salvage operation.
—
You can make a manual save by copying the “PAM_GameLauncher” folder at:
C:\Users\ [username] \AppData\LocalLow\NVYVE Studios\PAM_GameLauncher
OR if you have an old save just delete that folder to start fresh.
—
For the Pros/Cons of each named “sin” Named weapon vs normal weapon here’s a link to specs:
—
Click any images through out this guide to enlarge/zoom in.
Let me know what details I screwed up or should’ve mentioned and I’ll update this guide.
Keywords from Crafting Mats Chart images (top table) not searchable.
Keywords needed for people searching steam’s discussions since crafting table is in 3 images.
Agility Amplifier Agility Amplifier + Agility Amplifier ++ Arc Welder Beacon Blaze Trap Blaze Trap + Blaze Trap ++ Butcher’s Blade Ceaseless Shield Ceaseless Shield + Ceaseless Shield ++ Chondral Converter Commerce Module Commerce Module + Commerce Module ++ Crafting Table MK-I Crafting Table MK-II Cryo Core Cyano Reprocessor Defender Turret Defender Turret + Defender Turret ++ Defiant Sigil Defiant Sigil + Defiant Sigil ++ Disruptor Disruptor + Disruptor ++ Emergency Lamp Emergency Lamp + Emergency Lamp ++ Equipment Bench Focusing Reflector Focusing Reflector + Focusing Reflector ++ Hazmat ChestPiece Hazmat ChestPiece + Hazmat ChestPiece ++ Hazmat Helmet Hazmat Helmet + Hazmat Helmet ++ Hazmat Legs Hazmat Legs + Hazmat Legs ++ Hydroponics Large Hydroponics Large UV Hydroponics Small Hydroponics Small UV Impact Catalyst Ion Core Ion Core + Ion Core ++ Javelin XT Kinetic Amplifier Kinetic Mortar Large Canteen Light Diffractor Light Diffractor + Light Diffractor ++ Massive Reservoir Medial Reflector Medial Reflector + Medial Reflector ++ Nano-Cipher Nano-Cipher + Nano-Cipher ++ Nanoflex ChestPiece Nanoflex ChestPiece + Nanoflex ChestPiece ++ Nanoflex Helmet Nanoflex Helmet + Nanoflex Helmet ++ Nanoflex Legs Nanoflex Legs + Nanoflex Legs ++ Obfuscator Obfuscator + Obfuscator ++ Overclocking Module Portabed Power Transmitter Repair Kit Repercussive Shield Repercussive Shield + Repercussive Shield ++ Reuptake Assist Security ChestPiece Security ChestPiece + Security ChestPiece ++ Security Helmet Security Helmet + Security Helmet ++ Security Legs Security Legs + Security Legs ++ Shield Door Shield Pylon Shield Pylon + Shield Pylon ++ Shock Trap Shock Trap + Shock Trap ++ Small Canteen Solar Accumulator Solar Accumulator + Solar Accumulator ++ Solar Charger Solar Charger + Solar Charger ++ Sonar Pulse Storage Container Large Storage Container Small Subverser Surgical Laser Tonal Silencer Tonal Silencer + Tonal Silencer ++ Tricarbyne ChestPiece Tricarbyne ChestPiece + Tricarbyne ChestPiece ++ Tricarbyne Helmet Tricarbyne Helmet + Tricarbyne Helmet ++ Tricarbyne Legs Tricarbyne Legs + Tricarbyne Legs ++ Vanishing Shield Vanishing Shield + Vanishing Shield ++ VISR Ark VISR Bio Stera VISR Mitra VISR Nascent VISR Veiss Voltaic Accelerator Warden’s Fist Water Condenser Water Condenser + Water Condenser ++
Non-Craftable items:
Arc Welder “Greed” Butcher’s Blade “Wrath” Cryo Tube Repair Kit Equipment Dye Javelin XT “Envy” Kinetic Mortar “Gluttony” Subverser “Sloth” Surgical Laser “Lust” Warden’s Fist “Pride”
Crafting Sections:
Other Weapons Buildables Utilities Armors Weapons SIN weapon Named weapon District Repair Color Override
Usage Location:
Gadget Dorsal Base Shield (on Block) Utility 1 Inventory Power (Passive) Light Torso Head Legs Utility 2 (Passive) Shield (on Block) Fore VIS-R VISR Armoring
Keywords needed for people searching steam’s discussions since crafting table is in 3 images.
I hope you enjoy the Guide we share about P.A.M.E.L.A. – Ultimate Guide and Basic Gameplay Tips; if you think we forget to add or we should add more information, please let us know via commenting below! See you soon!
- All P.A.M.E.L.A. Posts List







Leave a Reply