This guide will show you how to play on the Pillars map of the game Nebulous Fleet Command.
Welcome To Pillars
Pillars is the most popular multiplayer map currently in Nebulous. It's likely you'll see it often so it's worth taking the time to familiarize yourself with the map, how it works, and what kinds of strategies you might be seeing. PuppyFromHell8516 is my name on the official Nebulous Discord server. This document will give you all you need to survive and make meaningful contributions for your team's victory while navigating Pillars.
Geography
Pillars is a medium-sized battlespace (measuring approximately 25 kilometers in diameter). It has a large number of rocks and asteroids which provide both radar and weapon cover. The asteroids are found in a central box measuring approximately 11.5 kilometers in width, 9.5 kilometers long and 12 kilometers high. It is asymmetrical with the cover in the lower diagonal of the battlespace. This gives the blue team a slight advantage. Five tall pillars made of rock divide the map into rough quarters. The map's bottom has a central plateau that divides the top battlespace, which is rich in cover, from the battlespace below. Additional asteroids can be found on the map between the pillars, which provide cover for transitions between them.
Gamemode Control
There are many game modes, but Control is the most popular. This guide will only focus on the Control gamemode. The Control gamemode involves capturing and holding the control of points scattered across the map. Every 10 seconds, each point a team controls adds 2 points towards their overall score. If a team controls 4 points, then every 10 seconds they will get 8 points towards their total. The winner is the team that reaches the agreed-upon number of points. This is usually 1000 points. No matter how many ships are present, it takes just one minute to capture a point. The presence of an enemy vessel will stop progress towards the capture of the point (. This is called "contesting"). However, if both teams have a combat capable ship on the same point, the point will not go to the team with the harmless ship.
Naming Map Locations
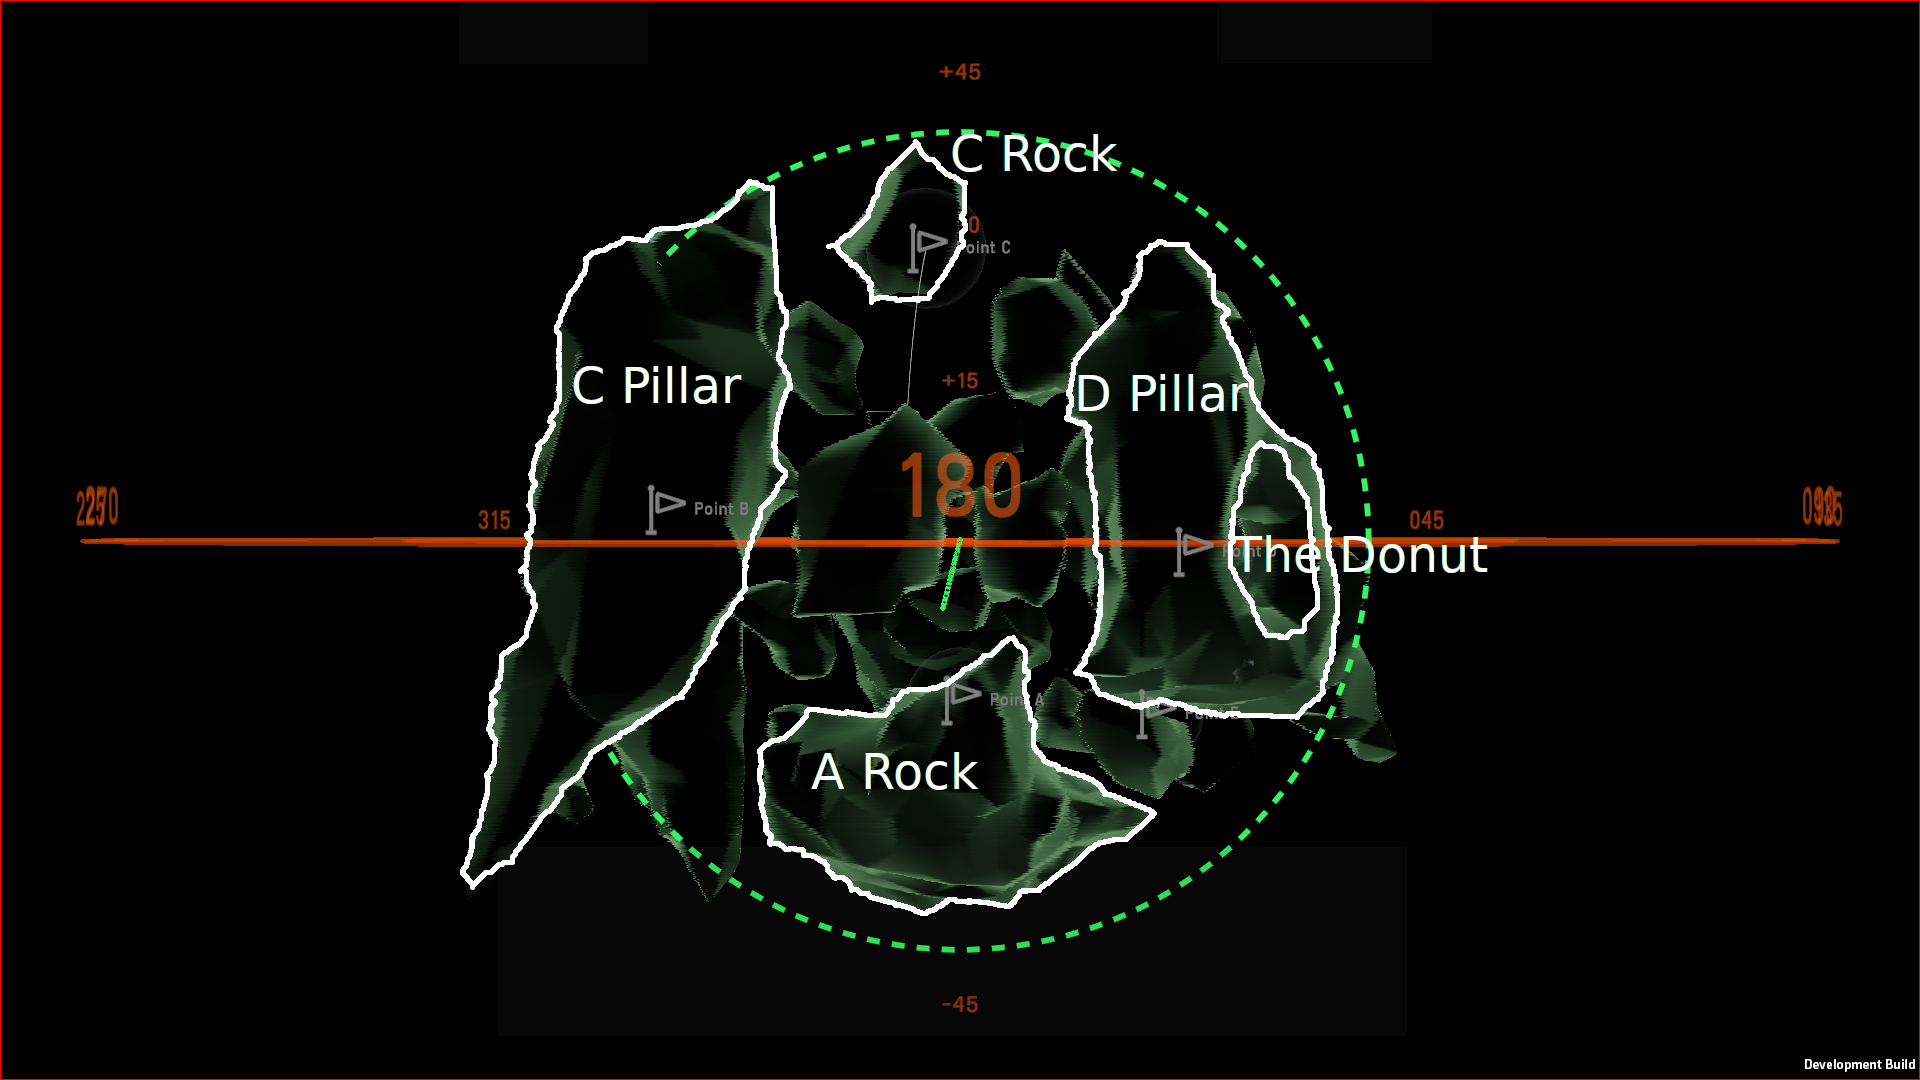
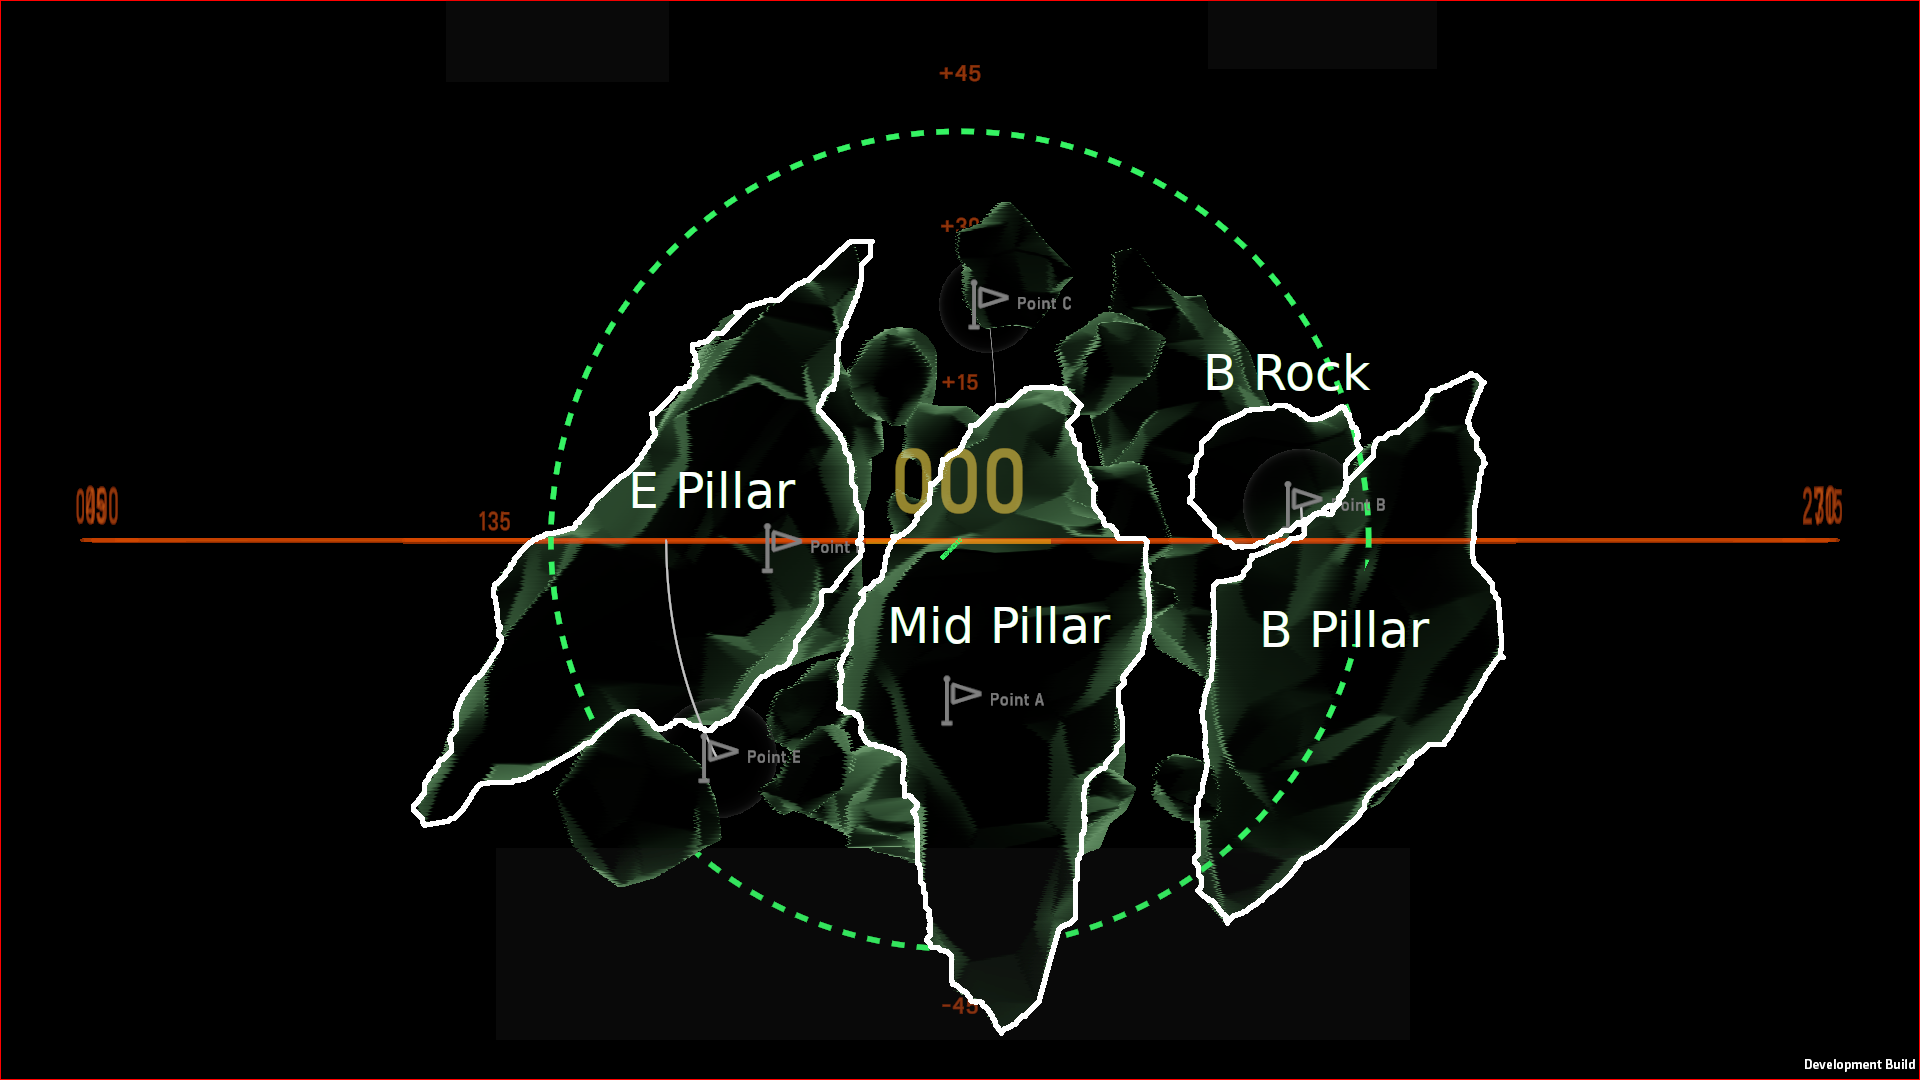
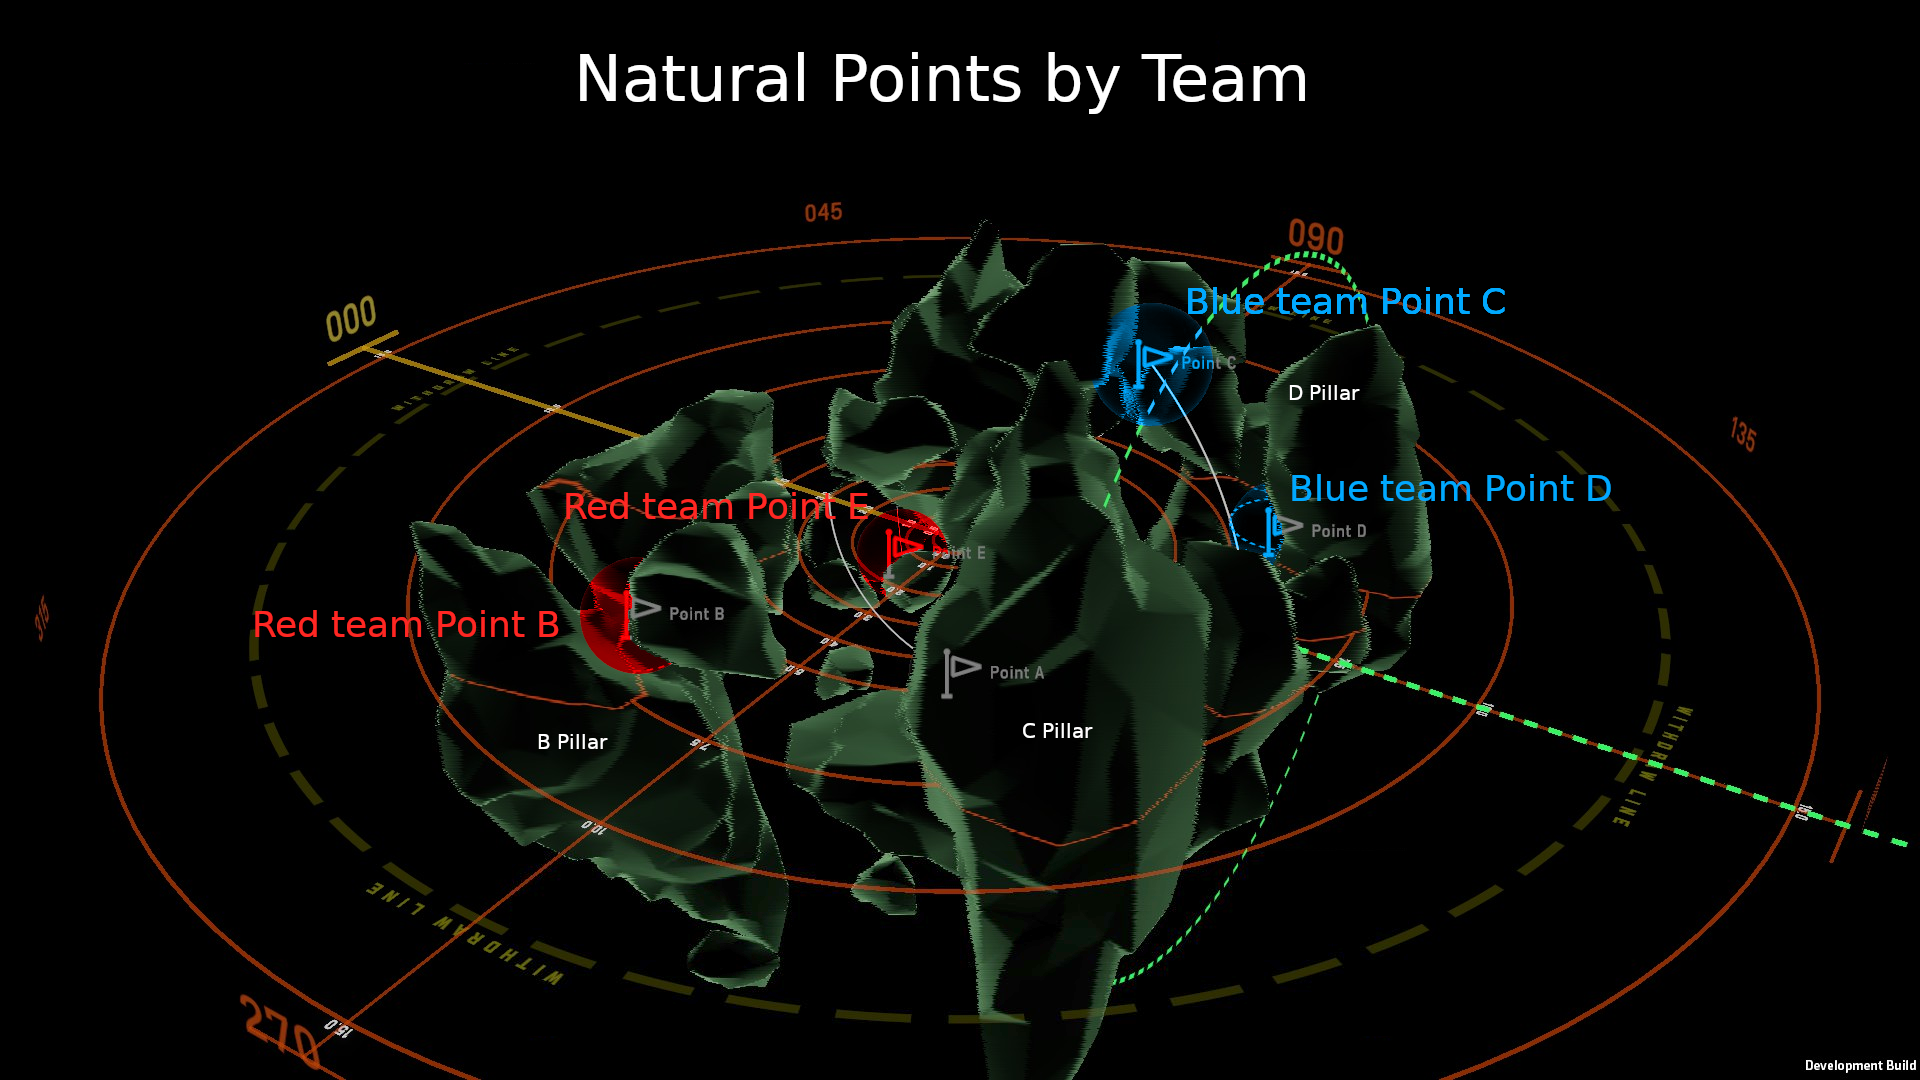
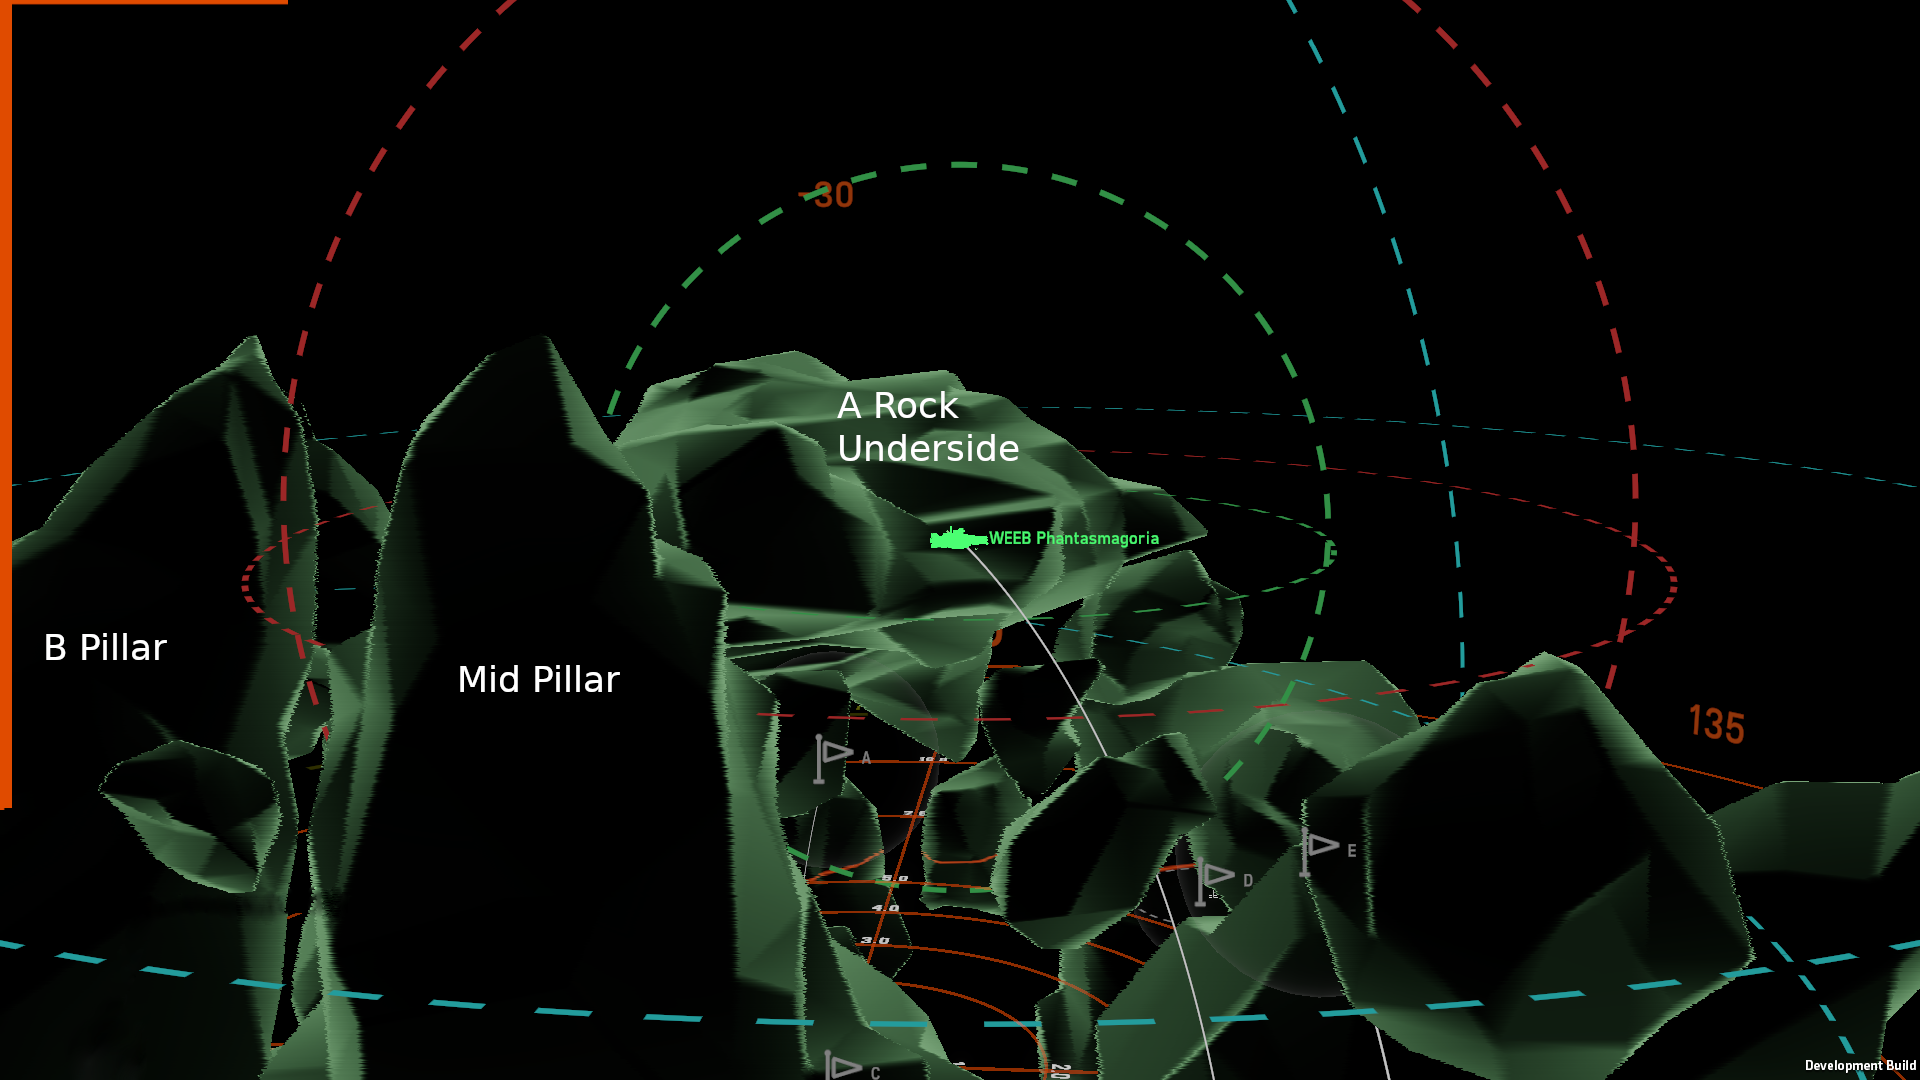
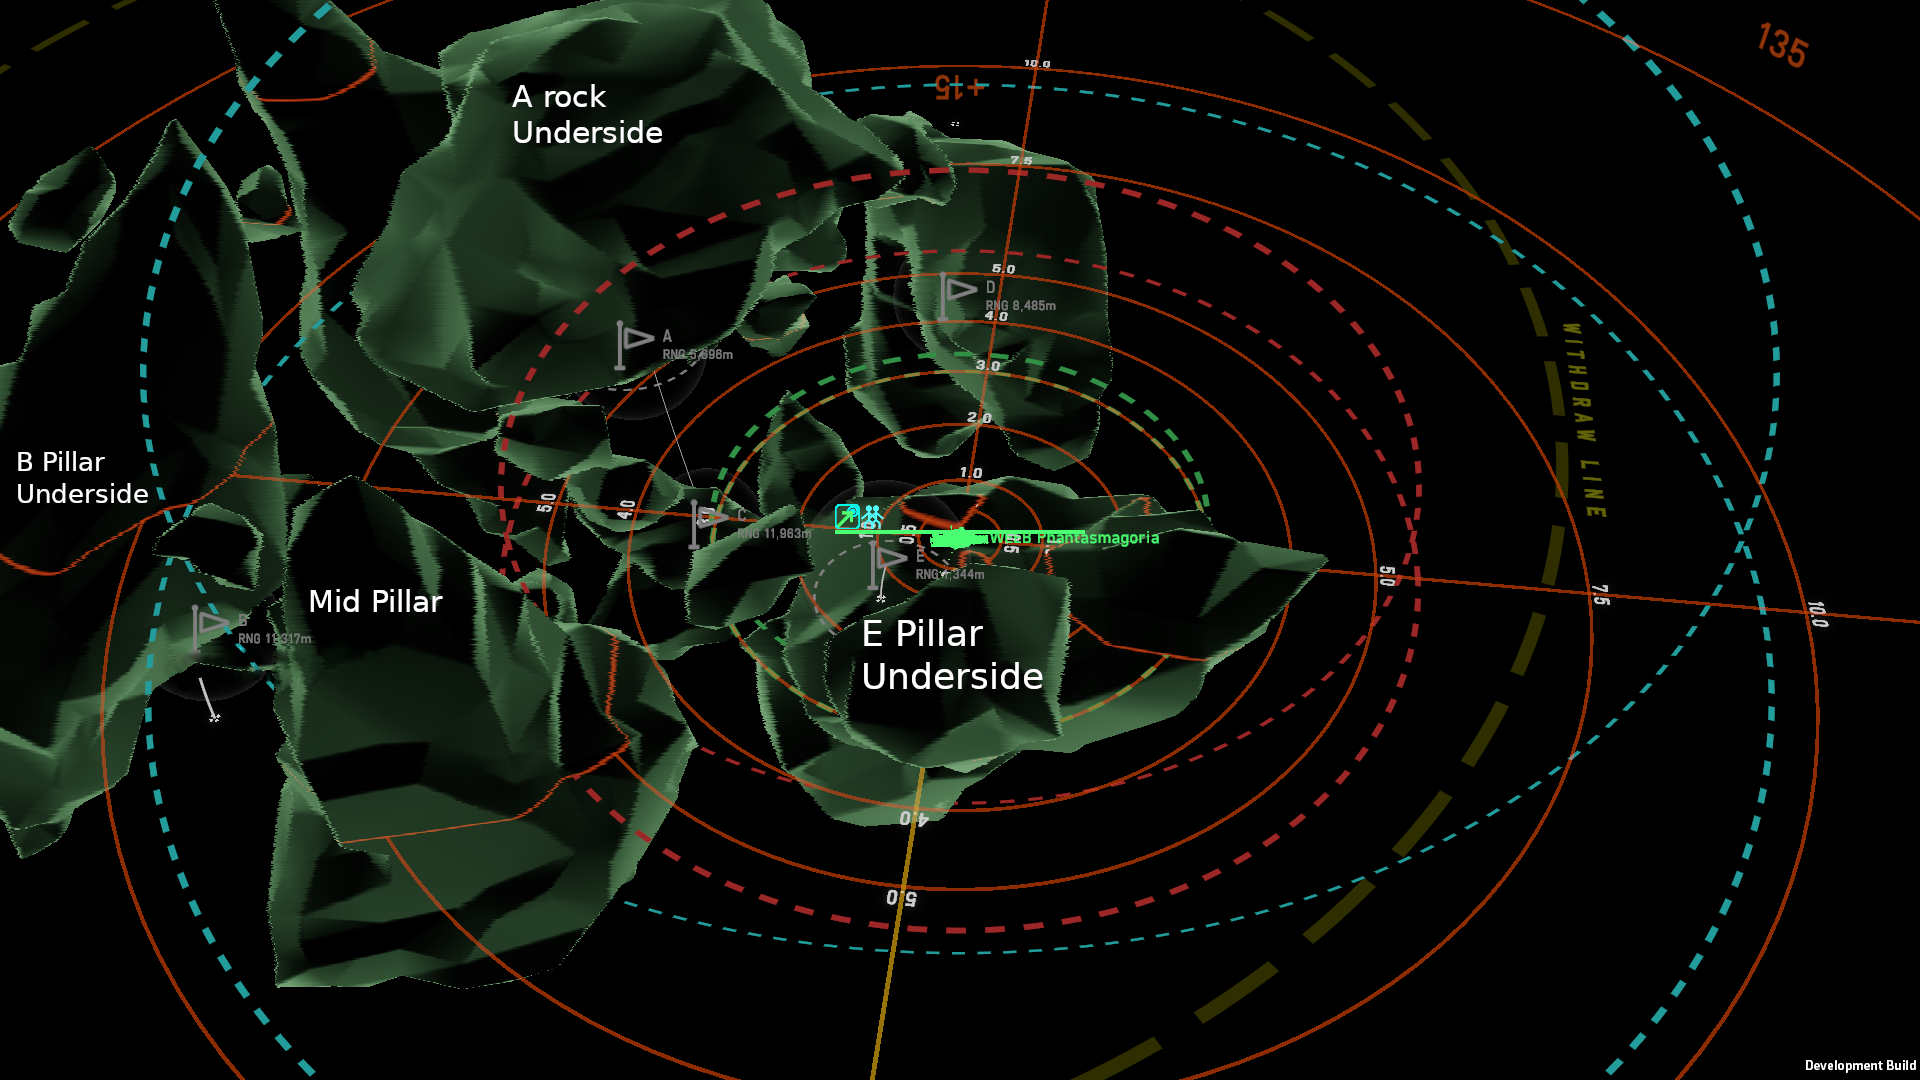
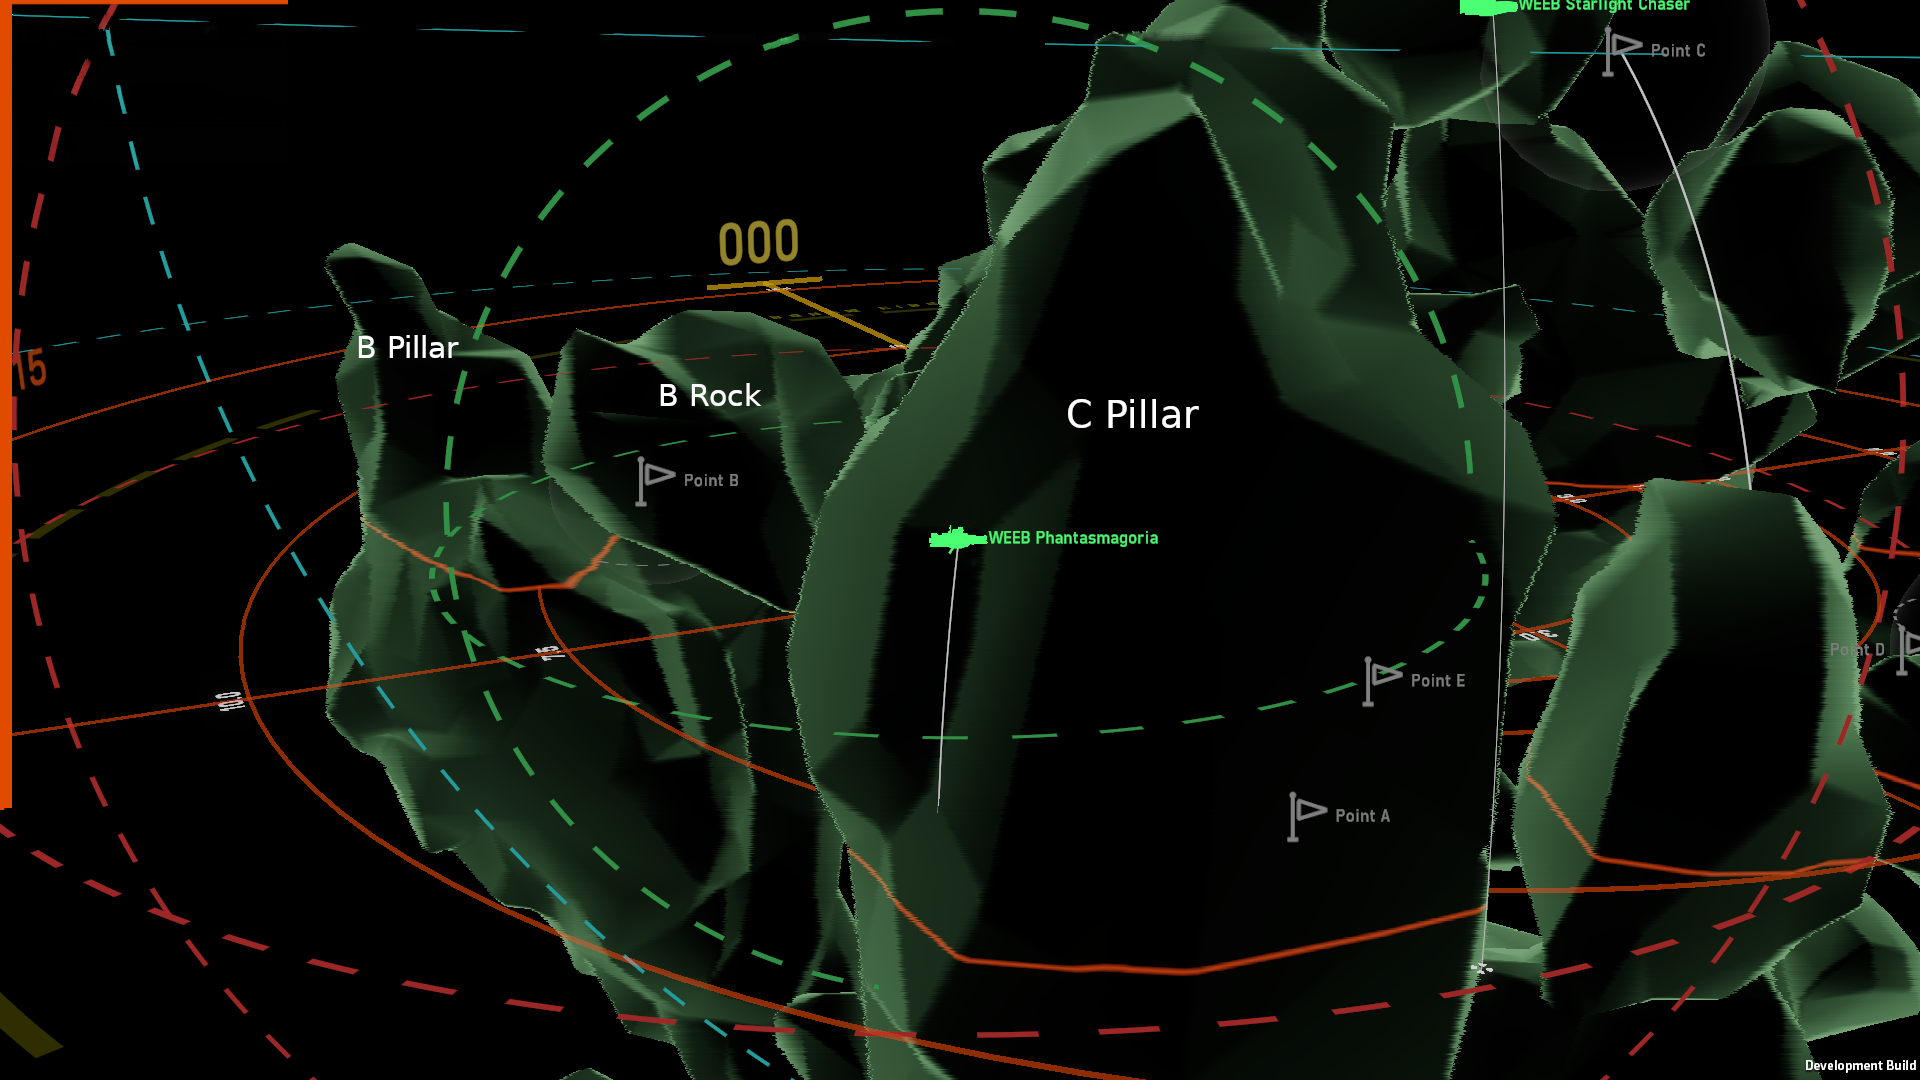
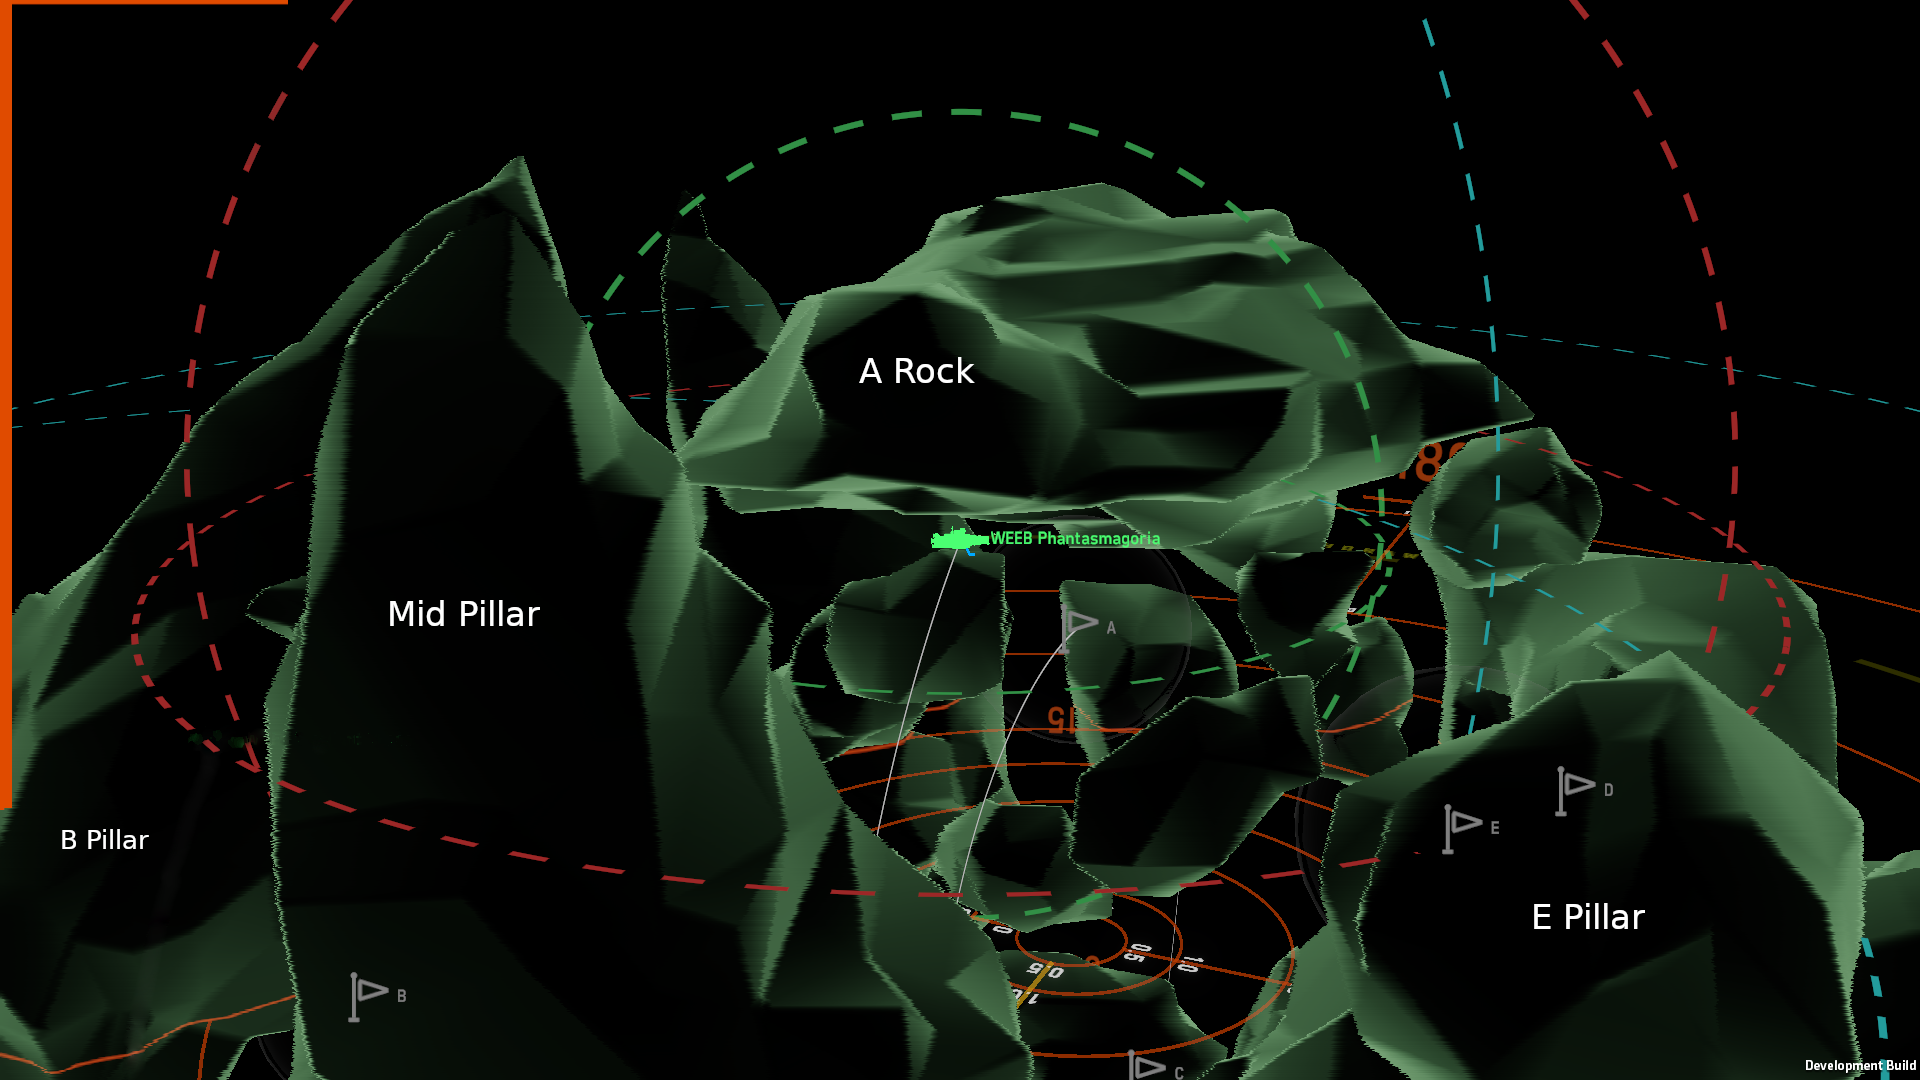
There are 5 capture points at Pillars. Their existence has resulted in common parlance for describing map features, regardless of game mode. The C and D capture point are located on the blue side. The rock directly above C is often referred to as "C rock". The pillar to the left of C is often referred to by the "C pillar". The "donut" is the hole where the D point is located, while the entire pillar that contains D is called "D pillar". The B and E capture points are located on the red team side. The rock and pillar touching the B point are called "B rock" or "B pillar". The pillar immediately above the E point, is called "E pillar". The "mid pillar" is the pillar located between E and B. The map's center is A point. The rock plateau on which it rests is called "A rock". Collectively, the area directly below A rock is called "sub-A". Below are diagrams that show the names of the maps:
Blue Team: Deployment
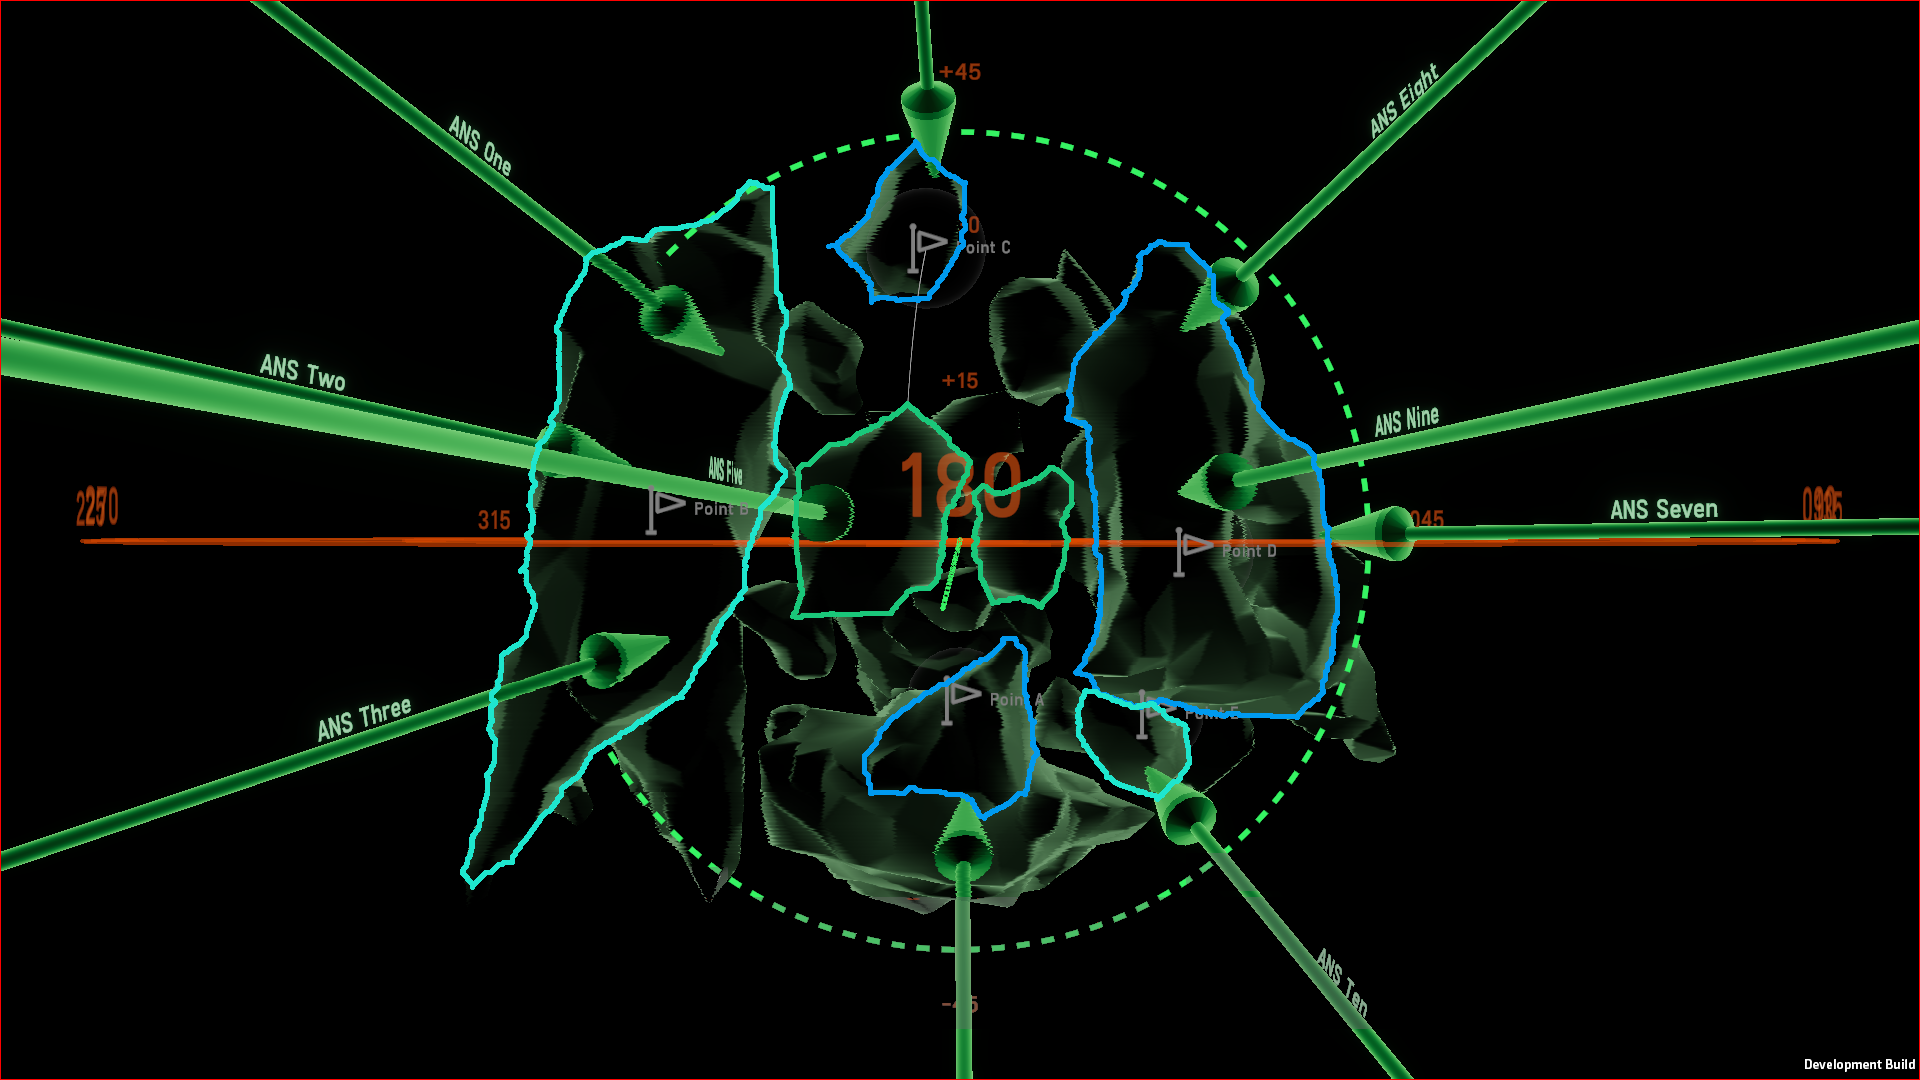
The map is on the opposite side of the map. The blue team deploys to two pillars that have a lot of cover between them. The diagram below shows and highlights possible deployment locations for the blue team. These locations will usually leave ships with rocky covers between them and the opposing teams, making it difficult for the opposing side to determine their starting position and movements. blue highlights the primary deployment zones. These are areas that are close to capture points and have high strategic and tactical importance. cyan highlights secondary deployment zones. These zones allow ships to attack key points or defend points already taken. green highlights tertiary zones. These zones are useful for specific strategies, but they are generally less desirable than other zones. It is particularly easy to deploy to the sub-A location. Ships can be deployed so that they are hidden on the A rock's primary deployment zone and then quickly move down to the sub-A location without being noticed.
Red Team: Deployment
Red team deploys in three pillars, with very little cover between them and almost no cover towards top of map. Below is a diagram that highlights the primary and secondary deployment zones. The capture points have very little direct cover. The secondary deployment zones should be where most ships should deploy. The red side's tertiary zone is used to conceal support ships from either of the capture points. This side can also deploy hidden ships to the sub A location. The mid pillar can be deployed on either side to hide ships and allow them to move quickly below the A rock.
Sightlines and Ranges
It is likely that a ship will be spotted and then come under fire. It is important to identify the common sightlines on the map. If you are certain that there is no enemy within reach, avoid them. If a radar is within range, all positions can be considered visible. The only cover is in central part of the map.
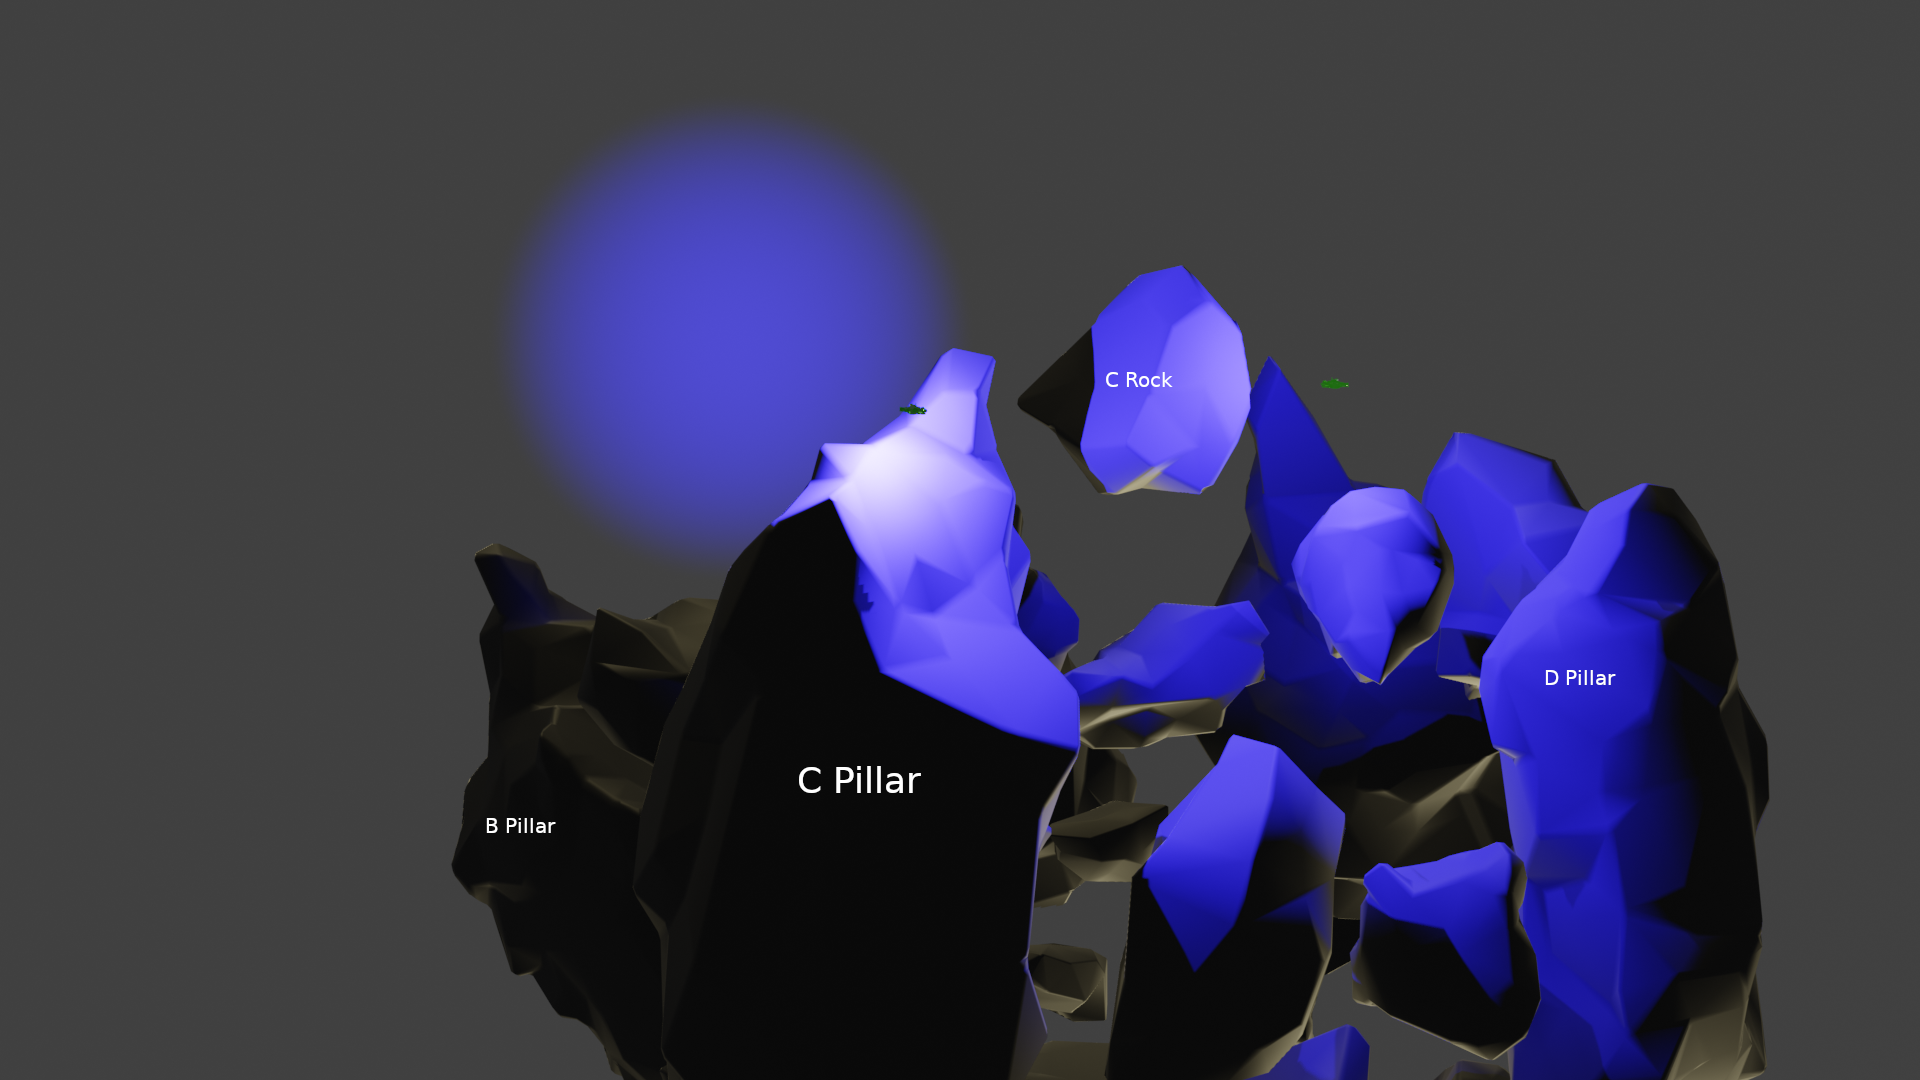
Below is an illustration of how a ship (, green solomon) equipped with a spyglass radar just above the C pillar, can have a lot of vision into the red team deployment area above the B.pillar. The ship has vision into the blue areas highlighted in blue. The blue ship can hide behind the C-pillar and is relatively safe. However, any ships it spots on its red side will be far from cover. The green solomon at the C rock is equipped a parallax radar and cannot see the entire deployment zone of the red team.
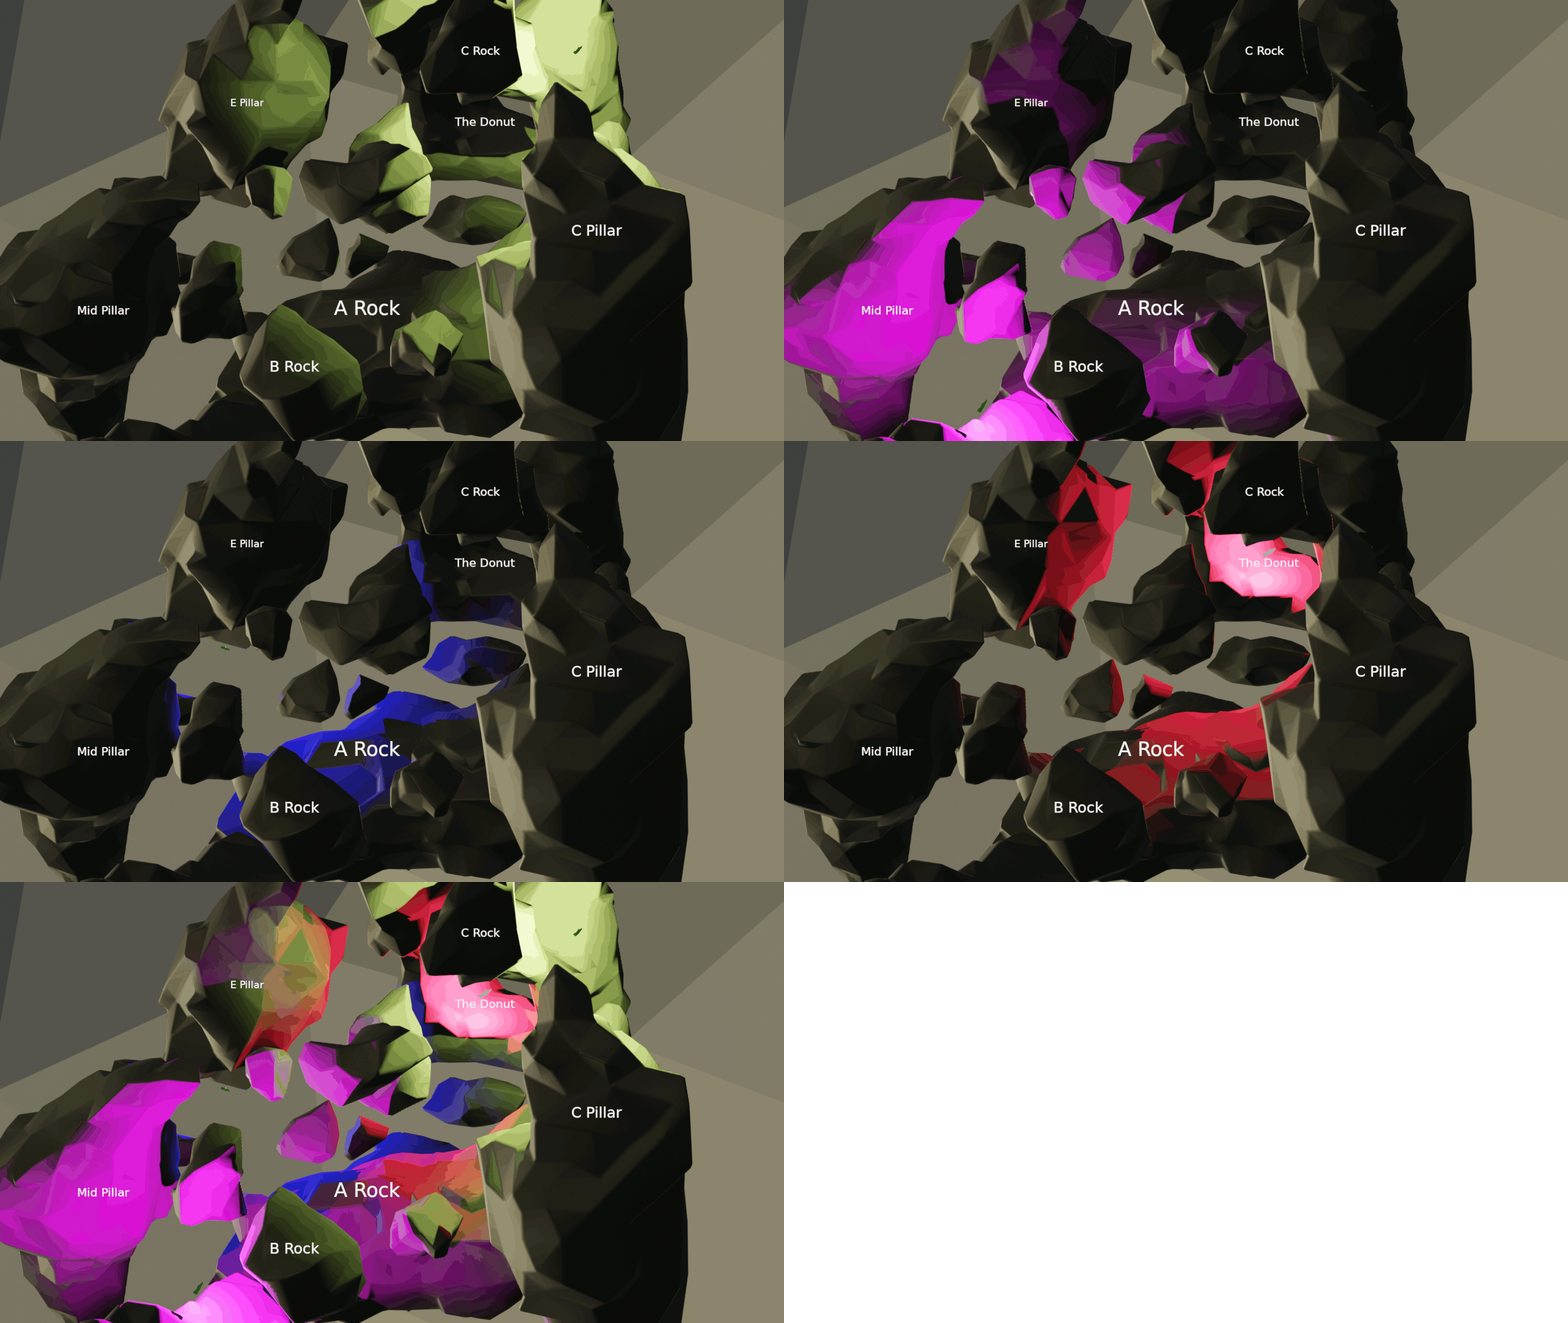
Point A is approximately 6.5 km from all four points. All four points have clear views of Point A. This distance is within the range of destroyers equipped spinal beam cannons, making them excellent units for attacking the A point from all angles. The diagram below shows that each point has vision over A rock with a radar range of 9.5 km. Each point below represents vision using a different color: magenta (from point B); yellow (from point C); blue (from point E); red (from point D). This indicates that each point has vision above A rock.
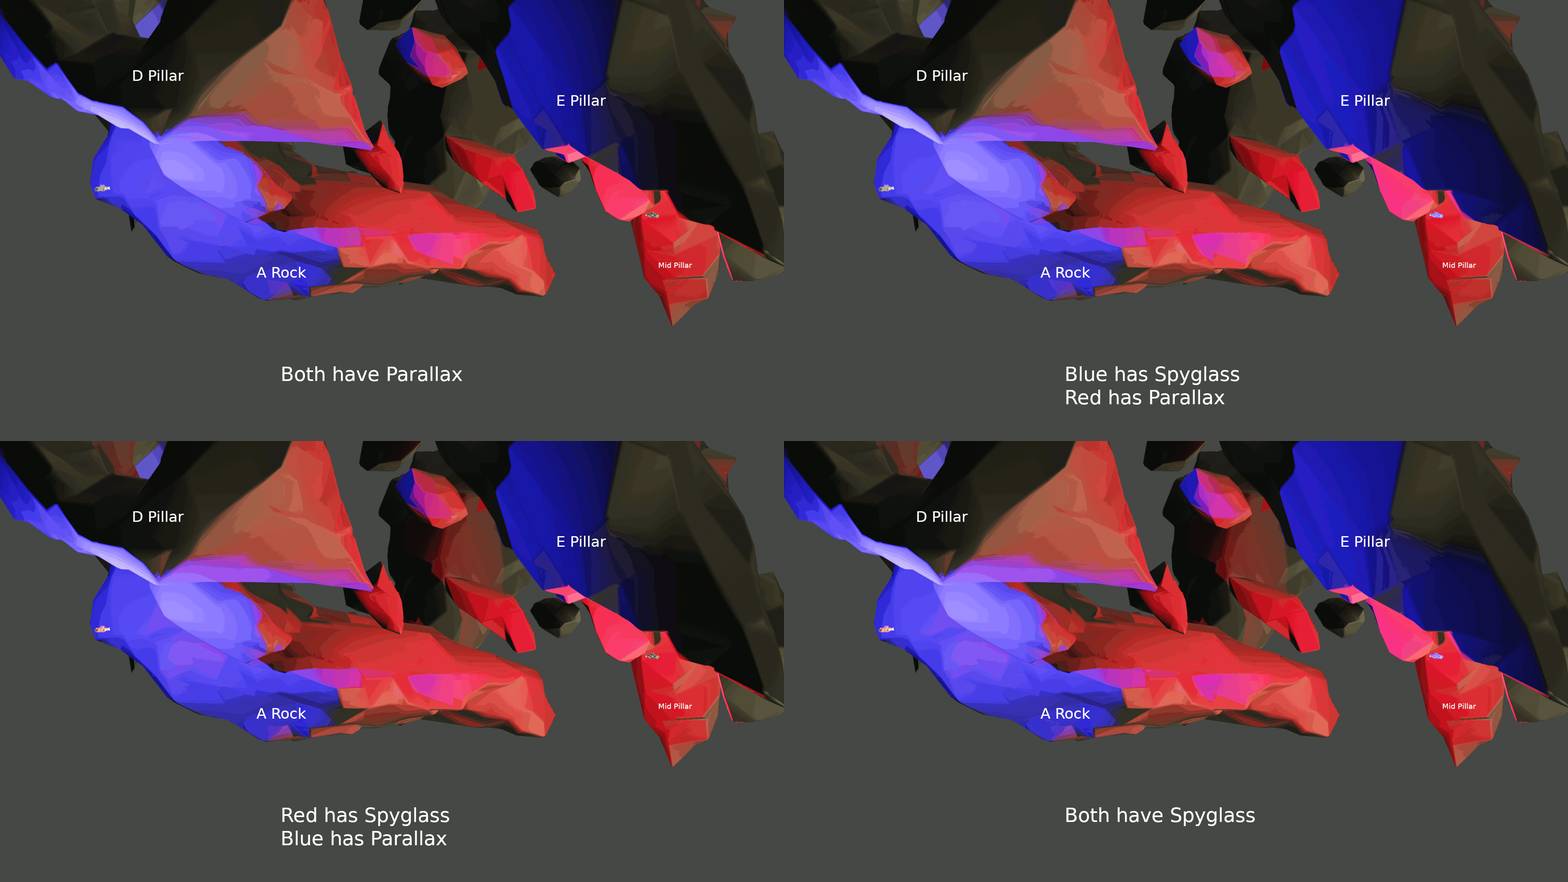
The distance between the bottoms of points E & D is approximately 10 km. Although a parallax will not be sufficient to detect ships at the opposite point from this distance, a Spyglass will suffice. The below visualization shows the two white solomons below D pillar, and E pillar with different radar configurations. Both ships have parallax radars, meaning that they are not reflecting the light of the other. Both ships can see each other if they have a spyglass. If only one ship has a spyglass, it is shown that it can see other ships but not the other.
Last but not least, you should note that there are small rocks scattered across the map, most notably on the blue side. You can cross these gaps while being only briefly exposed to enemy radar. Pay attention to enemy positions and time ship crossings if they are not able to see the gap. A fleet can also position itself halfway or nearly halfway between the points due to the rocky cover between each pair of natural points. This allows one fleet to cover both points, as long as the enemy attacks only one point at a given time.
The First Five Minutes
The tone for the match is set by the first five minutes of every game of Nebulous. The first five minutes of any game of Nebulous include deployment, possibly some type of opening action, capturing and setting up plans for what the rest of the match will look like. In the first five minutes, all players must survive.
Capture Points
Notice how each team begins with two points within a short distance of their deploy zones. These points are known as the "natural point" for the team, and can be captured quickly once the ships are deployed. The team that captures both their natural points first has a significant advantage. They will always have the lead in points and will win the game unless the opposing team takes an aggressive step. This could be capturing the A point or one of the natural points of the opposing team. The A point is approximately 6.5 km from all other points. It doesn't have significant cover, making it difficult to capture unsupported and alone. It is quite common for the A point to go uncaptured. All of the action will occur around natural points since the natural points have rocky covers that can be used to evade weapon fire.
Deployment
It is crucial to deploy to the right location to avoid wasting time repositioning. Nebulous ships are slow so it is important to not waste five minutes fixing a bad placement. Some general guidelines:
- Both natural points should be used to capture them as soon as possible.
- As it is risky to deploy the main force alone, and a fleet can easily become destroyed without support (, also known as deathballing).
- To keep the enemy from knowing about your deployment formation, deploy behind rocks
Communication with the rest is key to ensuring a positive outcome. Discuss the plan and ask for feedback.
Opening Action
The main goal of the first five minute is to survive. The opening action usually takes the form of early missile strikes, which can quickly catch unaware players and destroy their ships. An announcement is made to the enemy team when a point has been captured. The enemy team can then send a missile strike to destroy the ship. Capture points are extremely dangerous in the early stages of the game. These missile strikes can be countered by deploying point defense and radar tracks to detect the incoming missiles. Your team should make sure that the capturing vessel has radar and point defense to detect incoming missiles at least three kilometers away. If the rest of your team is covering them, you can avoid the capture points. In this case, the chances of being killed by an early-missile strike are low.
The Rest of the Game
Once each team has captured both of the natural points, the game moves into long-term planning. This usually involves scouting the enemy fleet to determine their composition and disposition. Then, you will have to plan your attack with the goal of capturing points and not chasing every enemy ship off the board. Both sides will maneuver their fleets to attack weak spots, pick up scouts and force their opponent from control points.
The team that captured their last points will be the one behind and must take an offensive action to win a third point. This is dangerous because the defending team will be able to see the exact location of the attacking team and can take defensive action. It is crucial to move ships at this point so that there is radar coverage. This will give you valuable information about the enemy's plans to capture that point. Make sure that ships are located in a concealable location that offers a line of fire towards the point. Wait to repel any attacks. To flush out any defenders, you can attack under radar jamming. It is important to not rush! Even if your team is losing control points, winning takes time. Although it may be worth it at the end to sacrifice fleets in order to capture control points, it is better to preserve your forces and fight for every point than to lose.
This general advice is not intended to replace the information in this appendix. However, it will cover common strategies and tactics for defense and offense.
Acknowledgements
Weeble, Nop and Meta, as well as Wall1ce, for reading, contributing and helping to create this guide.
Appendix A – Specific Tactics and Strategies
Nebulous allows for many different strategies and tactics. However, there are some common strategies to the Pillars map. These strategies are very popular, and we will discuss their successful implementation and defense.
Beam Ambush
The A rock covers almost the entire topography of the map. It is common to deploy a fleet beam destroyers under A rock. They can sneak under the rock undetected to attack E or D points, and they can also appear along side of the A rock to attack ships trying to capture A. The execution is simple for the attackers. The beam destroyers require blankets and at most one focused particle accelerator per ship. It is possible to hug the bottom of the A rock, (by flipping the map) so that it is not detected. Pre-firing the beams at the target point with the hold heading command will allow them to fire as soon as they are possible.
The job of the defenders is more difficult. Beam ambushes are best avoided by knowing when they are coming. One Spyglass equipped with a Spyglass, placed far below the A rock, is enough to alert you to a fleet of beam ships. The goal is to keep them out of your 5-6 kilometer range. As long as they are present, they can be engaged or ignored. It is a good idea also to anticipate their attack point and engage them from another angle so that their beams do not hit the target. A more effective strategy is to counter-ambush beam ships with another beam destroyer fleet. The same principle applies to defense as it does for offense: you must not be seen.
Although it is more difficult to execute the beam ambush using beam destroyers, it is possible. This provides more staying power than the destroyers. A battleship is more vulnerable when it is alone. Stealth is more important than ever because a battleship caught open to fire can draw fire from the entire team and make it impossible to maneuver quickly enough to escape. Jammers aren't strong enough to conceal the battleship from sensors, so rocks must be used for cover. Because of their speed and visibility, beam battleships work better for counter-ambush tactics than offensive pushes.
Rush A
The capturing team will have a significant advantage throughout the game if the A point is captured early. The pressure that an early A point capture puts on the opposing team to retake or capture other opposing points is significant. This strategy revolves around a corvette with whiplash drive. This ship can reach the A point in less than a minute and a quarter. It can also capture it in under three minutes if they play well. This strategy is effective against many teams and can be used to gain a significant advantage in points. For the defenses, one corvette is easy enough to destroy. Missiles are the best defense against the corvette. They can hit the target much faster than a ship's gun and do more damage than guns. A light cruiser equipped with 250mm RPF guns may also be effective, but they are more likely to kill the corvette than to destroy it. Another option is to send a defending Corvette to the A Point. This will contest the point and halt progress long enough to bring more weaponry to bear. This option should be considered if you are playing on the Red side. It has a shorter path to deployment from A and generally less attacking options against Blue positions. It is important to put Blue under pressure early and at the cost a single corvette.
Rush B
This strategy can only be implemented by the blue team. This requires at least two fleets of combined firepower, containing cannons and beams, as well as a good point defense network to protect missiles. Move at flank speed towards the B pillar, and then deploy under C pillar. To protect the ships, use EWAR. This is a quick push that can surprise small fleets capturing B Point. After taking out the enemy in detail, you can capture point B and then collapse onto point A. If the red team is not able to guess and has already deployed everything at B point, the only safe option is to abandon B and push hard to D point to equalize their number of captured points. Retreated ships from B can kite the advancing blue force forces, and any ships with 450mm cannons stationed at E point can fire on the blue team push. The blue team will be slightly ahead of the red team in captured points if the retreat goes smoothly, but it will have taken a lot of work to get there. If it fails, the entire fleet will be lost by the red team. This is a strong push.
Appendix B Hidden Capital Ships and Where to Find them
@WeebleKeneble1450 and his friends have provided a primer.
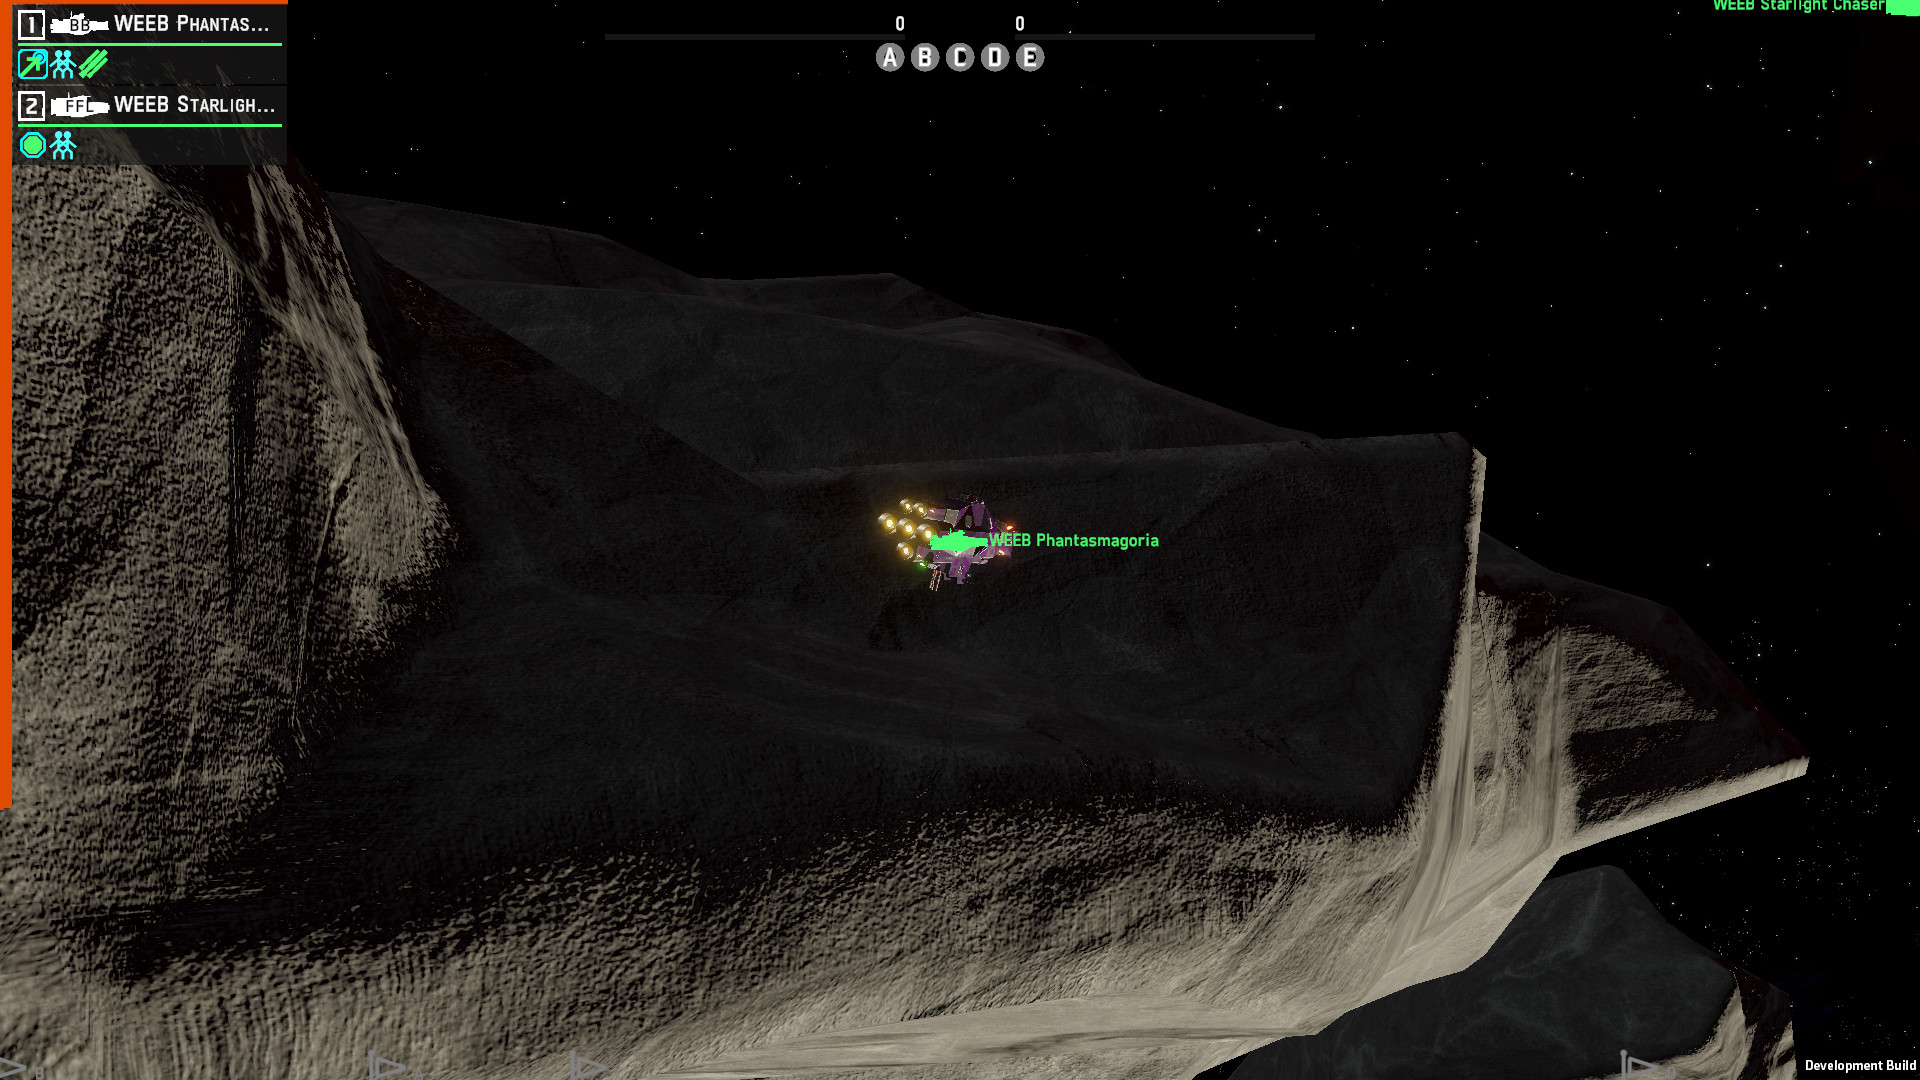
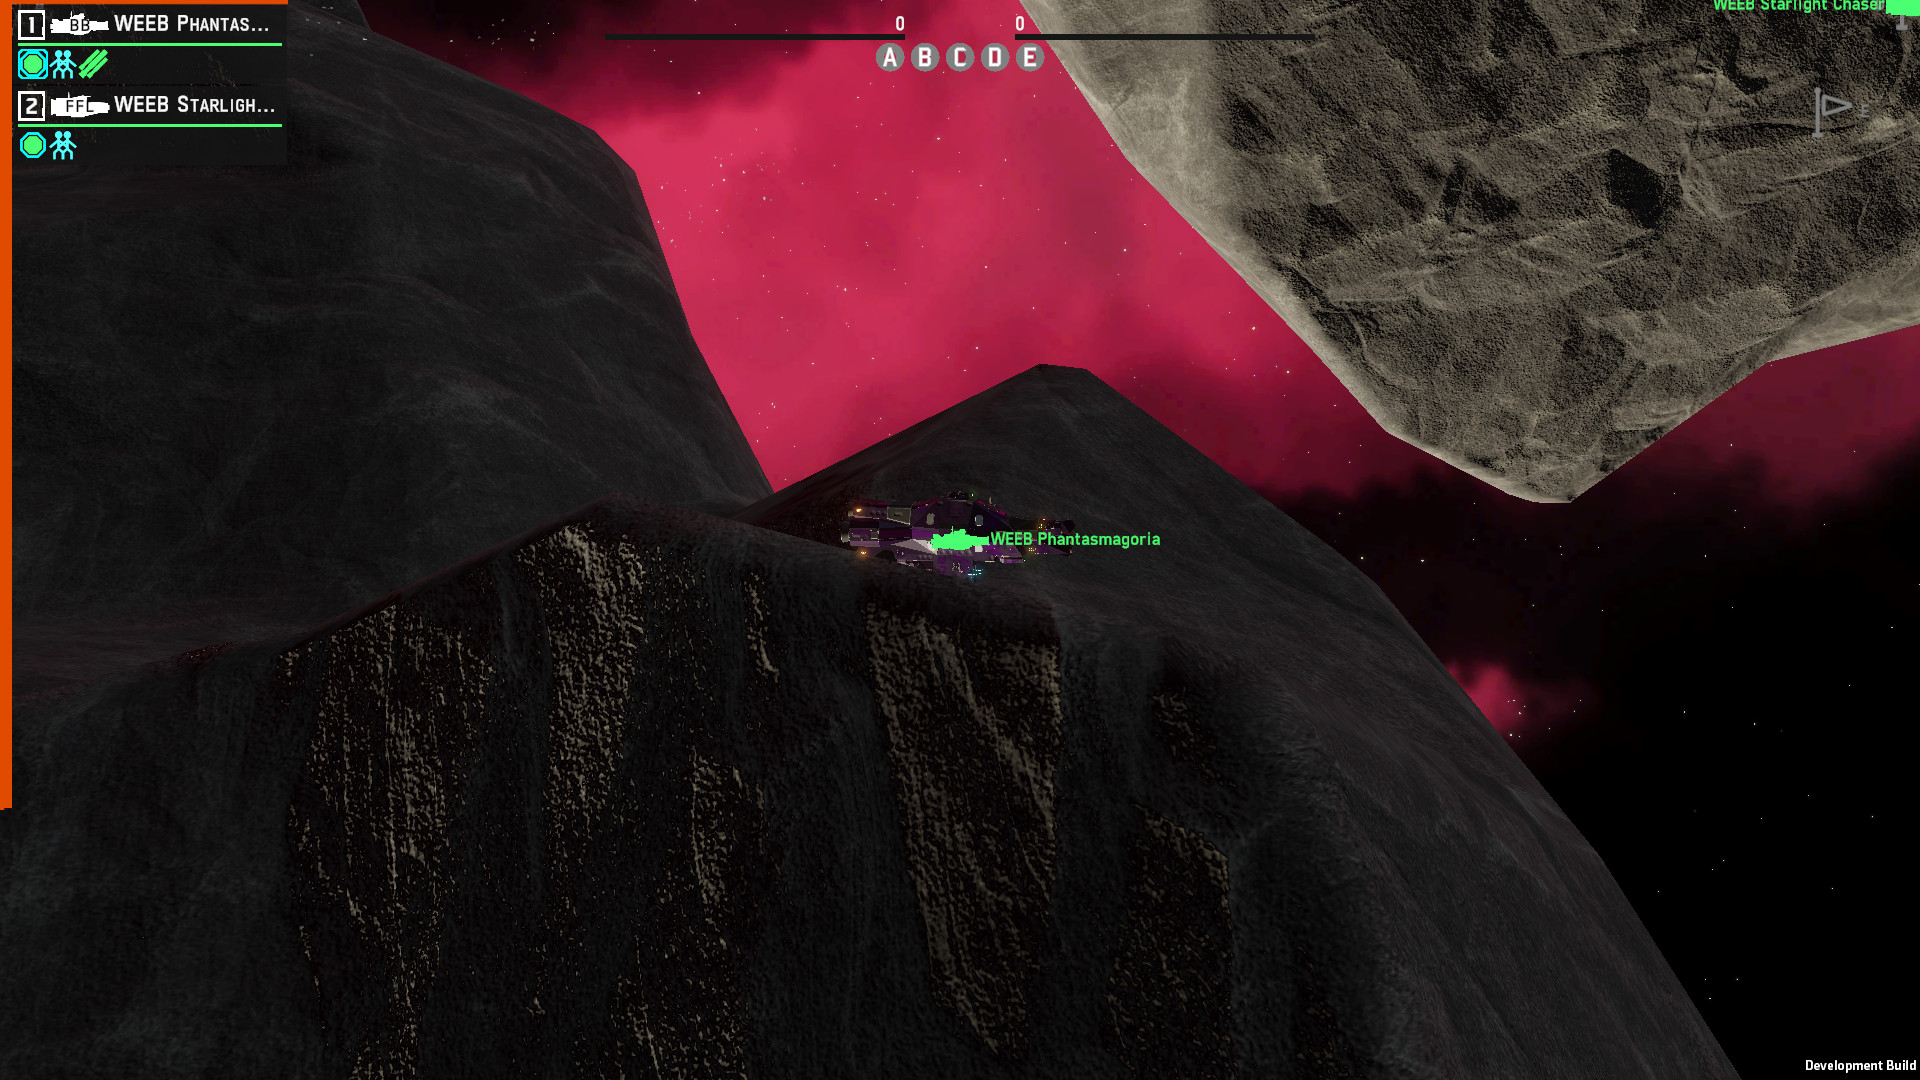
Solomons and Axfords cannot use the blanket jammers' great power to hide themselves, so the best way to stealth with large ships is to hide behind rocks. While the Pillars map has many great spots, some spots offer excellent cover so that ships can waltz within a mile of you and not know you're there. These are some common areas that you can use to find or hide a capship.
A rock cutout
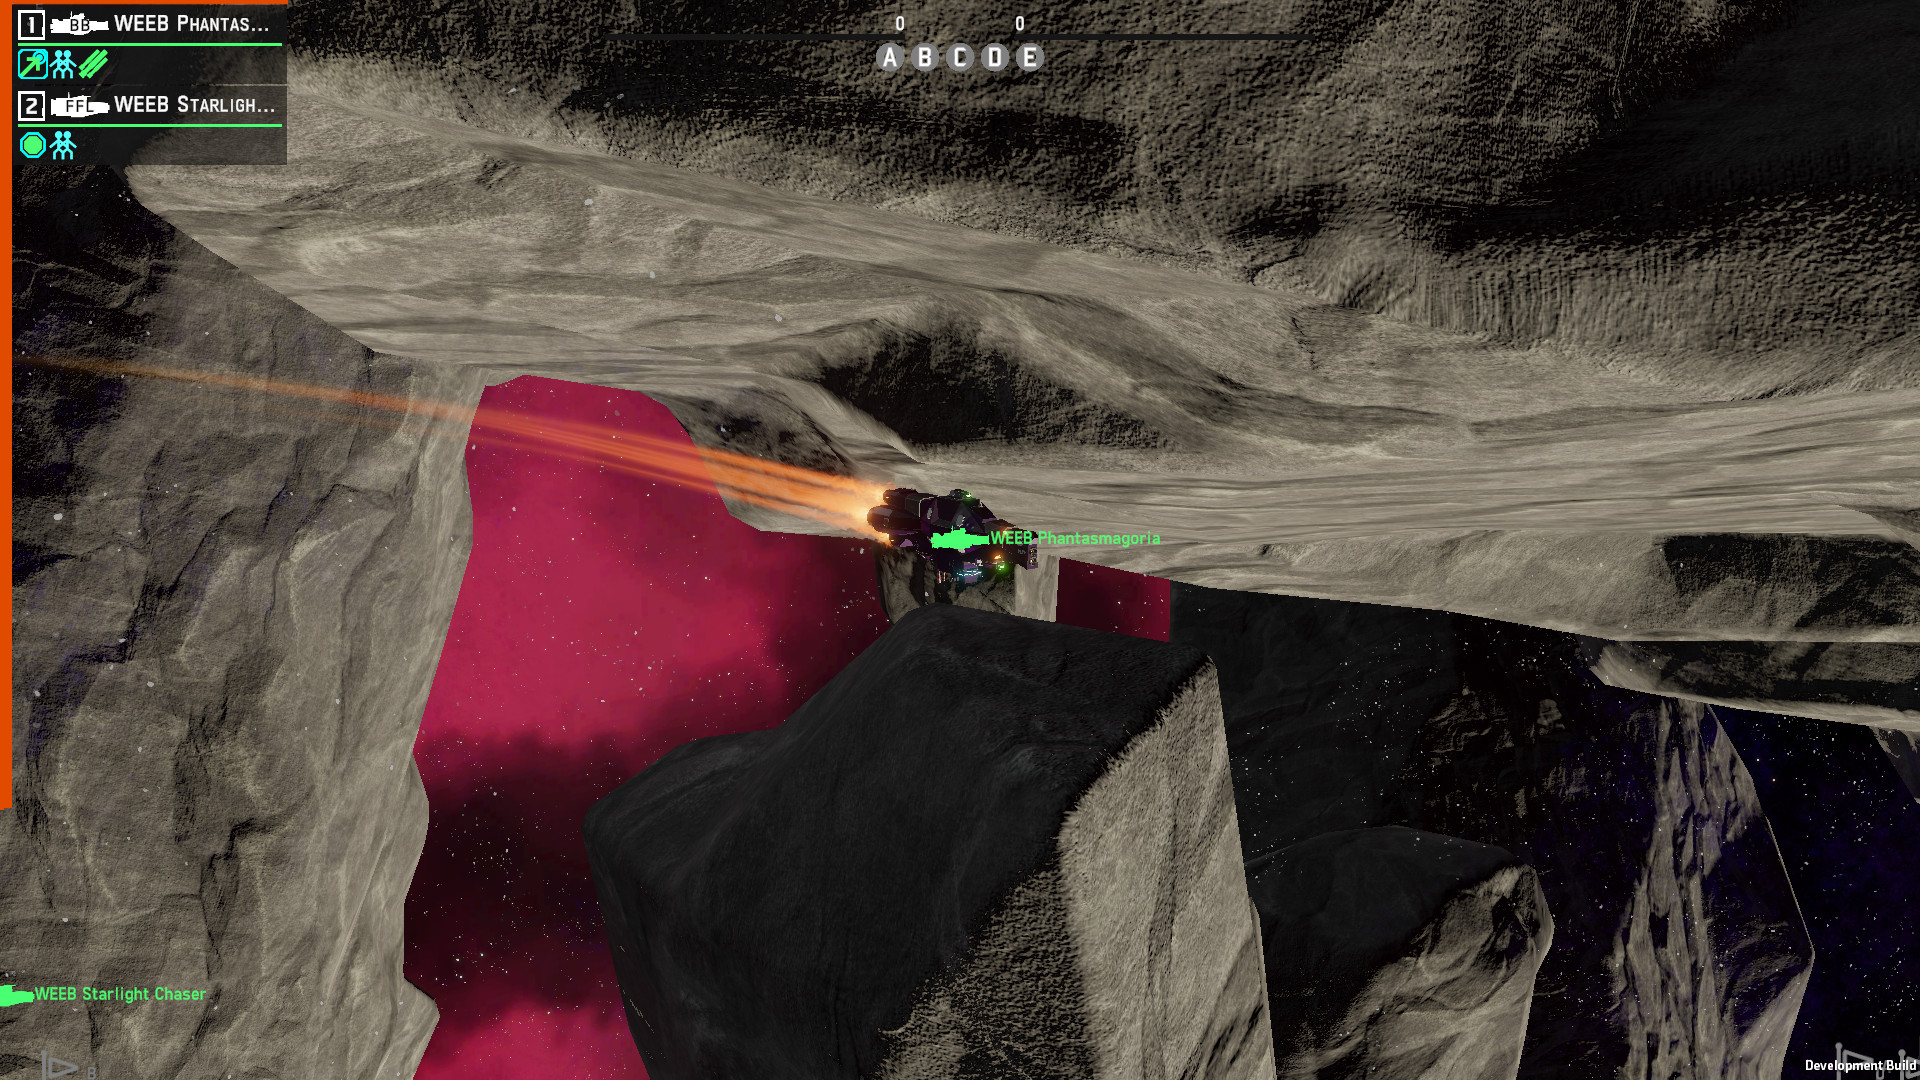
Red team will deploy low by E and notice a cutout on the A rocks. This spot can protect you from being seen under other fleets. It also makes an excellent staging area for E or A defenses. In the reverse situation, if blue team rushes to sub A they can use this cutout for an attack deep into red-controlled E point very early in game.
The E pillar tooth
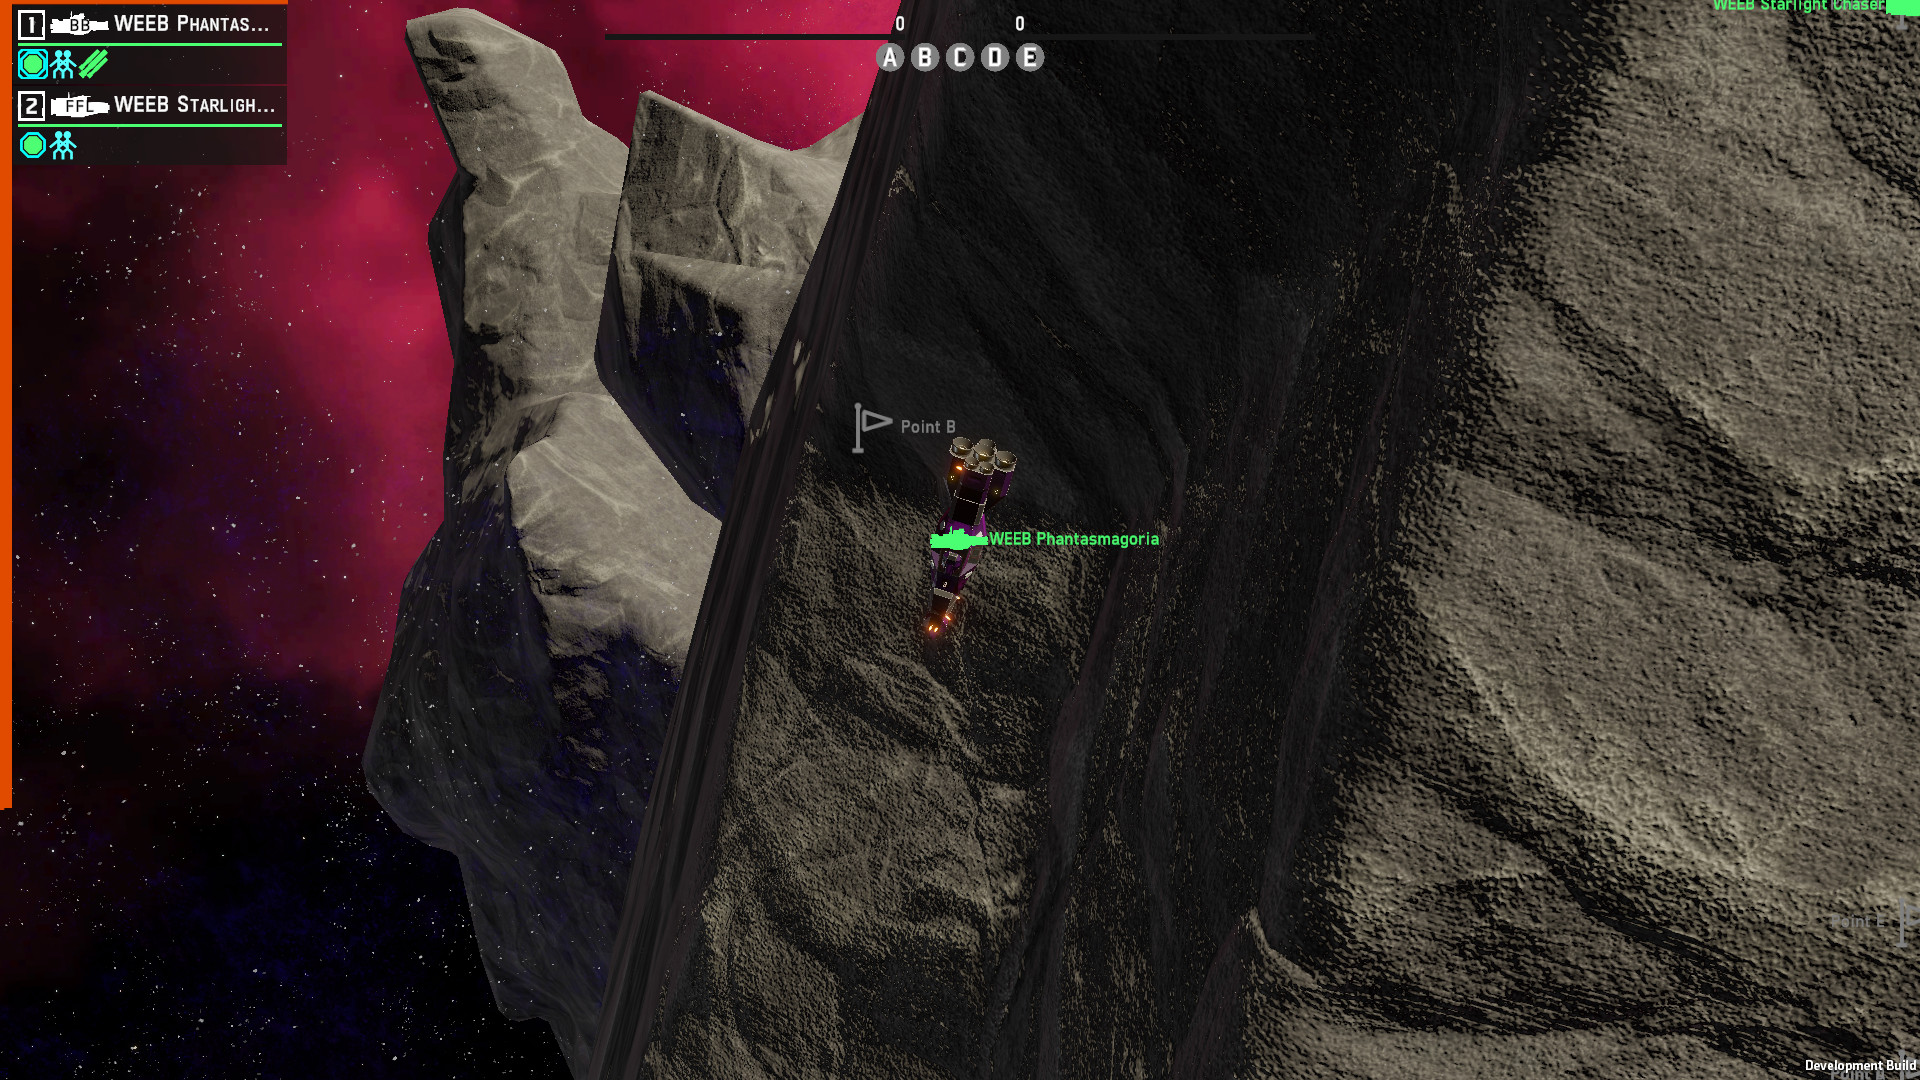
If you flip the map, you will see a red team hiding place at the bottom of E pillar. A molar tooth-shaped valley can be seen that isn't very deep, but can hide a Solomon. It also acts as a great beam ambush spot for the blue team's early aggressive pushes to E. This allows you to quickly move from the inside to the outside field, allowing you to focus your weapons.
C pillar ridge
The ridge is located on the outside of the C-pillar, in the upper middle. This is the path of a common attack vector that the red team will use in order to flank allied long-range fleets, which were staged on C cap. This is a great spot to hide an ambush vessel and can result in some huge counter flank payoffs. You can also gain momentum to push to B soon afterwards. This ridge is not the best hiding spot. Your ship can be seen if the red team has a spotter far and wide. Use caution.
A rock sandwich
After the opening attacks of the game have been resolved, there is a safer hiding spot for special cases. The Mid Pillar is just above A rock. It provides excellent cover that you can push a ship between. This is dangerous because any fleets doing aggressive early E pushes or sub-A assaults can find themselves in the perfect spot to ambush the position. This location should only be used if an enemy holds the high map. You want to be in a difficult to remove location to not only control the lower map but also provide attack routes into D and B.
Appendix C – Monster's Thoughts On Composition and Roles
By @Hopeful-Monster9212 –
When we talk about fleets, we tend to focus on the need to specialize. However, this is a team game and it is important to consider balance when assessing team composition. There are two main aspects to balance. One is simple and the other is more complicated.
Balance of Damage
It is important to ensure that a composition does not suffer too much damage in order to be able to engage effectively against the enemy. A team that is solely focused on the destruction of light ships will eventually be overwhelmed by heavy capital ships they can't destroy. A team that is purely anti-capital will be outflanked by light ships that can quickly capture points and outmaneuvered. These dynamics are quite simple so I won’t go into detail.
Balance of Roles
Although killing ships is important, Control games have the main goal of controlling space and achieving objectives. There are three main roles that players can play in a fleet.
Pushing
This is the center of gravity for a fleet. Capital ships often hold this role as they move into an area and demand you either surrender or fight them. They are usually found in the middle of the map, fighting to control enemy fleets' main movements.
Good Qualities
- Tankiness
- Anti-Capital Weaponry
- Strong PD
Common Drawbacks
- Slow
- Vulnerable to EWAR Suppression
Main examples
- Most battleship builds
- Heavy cruisers with Cannon
Where to Play?
You can play around with points A and B. Keep your eyes open to bring weapons to bear. Don't be surprised if you are cornered by cruise missiles.
Flanking/Ambushing
This role is to sneak behind enemy lines, set up ambushes and generally nip at any edges of the enemy’s formation. A fast flanking fleet can either scout against an enemy's jamming screens or pull it away, leaving their pushing vessels vulnerable. An ambush fleet is able to pop out and turn the tide in a major push, or can send forces back to guard control points.
You can have good qualities
- Speed
- Burst Damage
Common Drawbacks
- Fragile
- Usually, the range is very short
Main examples
- Beam fleets
- Torpedo fleets
- Cannon light cruisers
Where to Play?
Play on the flanks (, including high/low edges and). Keep your eyes closed until you are ready to fight.
Screening
This broad category is used to identify the enemy's movements, deny vision, and protect capitals from being ambushed. Scouts, as well as scout hunter, fall under this category. They will usually play close to the main push, but they can roam the map to find the fight. These fleets are very powerful in the final game, as they can split up and fight for many points at once.
You can have good qualities
- Speed
- Stealth (can be used natively or via EWAR)
- Flexible damage types
Common Drawbacks
- Inadequate sustained damage
- Fragile
Main examples
- Frig Blob
- EWAR support fleets
- Submarines
Where to Play?
Start in the middle and go wherever your team needs help.
A Note on Missile Fleets
You may be able to see that (is pure missile build (, e.g. Yub Nub and 3K Missile Vauxhall and 3K Missile Axford,), don't really fit into these roles. While their closest analog would be flanking/ambush they are quite distinct. Missile boats, the only indirect fire weapon in the game have the option to hide behind rocks while they attack their enemies. This is a double-edged sword as they have very limited staying power and are not visible on the map. Strong teammates are needed to locate and bind enemy ships and break down the enemy's PD net. Missile fleets work well with strong partners. Overly dependent on missile dumps is a "all-in" play. You'll either lose your opponent or die because you don't have a way to fight for objectives.
Non-Standard Play
The game becomes more difficult if you are lacking one of these elements. A fleet of four battleships might have trouble moving around the map late in the game. Without spotting support, it will also be difficult to chase down back-cappers. A fleet without anti-capital weapons or tankiness might also struggle to push the enemy off control points and win direct battles.
Some fleet builds can fulfill multiple roles while others are more specialized. Some fleets have elements of a particular role but lack others (. For example, old railguns were great at controlling the space and could melt capital ship capital ships but were not very tanky. Beam destroyers are fast but have high alpha damage. As you play, you'll discover the strengths and weaknesses in your fleet. The rule is that you should be allowed to play the role you want. Although it might seem impressive to send cannon-heavy cruisers on a stealthy mission to the flanks, they will be slow to reach their destination and will be at disadvantage when it comes time to scouting. Even if they do make it to their positions, the fight could be over before they get there. They could be in the fight sooner if they play in the middle of a field with a good scout monitor.
Sometimes you will have to go beyond the standard. Your opponent may not be able to contest A if there are no capitals. Therefore, your team will need to play flanks and cap the edges to try to dismantle the opponent. To better manage vision, a team with all the heavyweights and no screens may force everyone to use one side. This is the starting point. Experience will show you when to depart.
I hope you enjoy the Guide we share about NEBULOUS: Fleet Command – Pillars map gameplay and map location; if you think we forget to add or we should add more information, please let us know via commenting below! See you soon!
- All NEBULOUS: Fleet Command Posts List


Leave a Reply