This guide will introduce you to the basics of modding NEBULOUS: Fleet Command. It includes instructions on how to set up your modding environment, access the game’s code, build your own components, write your own code, and compile it all and upload to the workshop.
Introduction
NEBULOUS was built from the ground up to support modding, as I have always been an avid enjoyer of modded content since I first started playing video games. Many of the early decisions regarding how the game’s code was structured were intended to make modding as easy as possible, within the constraints of the Unity game engine.
Creating simple mods (e.g. adding a module which applies a stat modifier) should be trivial after reading this guide. In order to create more complex components will require some experimentation and extracting the stock game assets to dissect how they are put together. There are simply too many different configurations for components (from fixed weapons to turreted weapons to missile launchers) to provide a comprehensive setup guide. The spirit of modding has always involved digging into how a game works, so I encourage you to have fun with it.
The goal of this guide is to provide you with the basic understanding of the modding process as it relates to NEBULOUS, so you can hit the ground running.
Let’s begin…
Environment Setup
NEBULOUS is built on the Unity Game Engine. This provides us with lots of powerful tools to speed up development of the game. On the downside, Unity is not intended to support modding, and there are endless threads on the forums of game developers asking how it can be accomplished. There will be a few hacks you’ll have to do (as well as others I have already done for you) to make it possible for you to easily add content to the game.
Unity Setup
The first thing we’ll need to do is install Unity. You can download it from here – [unity3d.com] .
I recommend downloading Unity Hub, as you can manage your Unity installations from it and choose the correct version. You’ll need to match the version of Unity that the game is built on, in order to minimize compatibility issues. That version is 2020.3.19f1.
Project Creation
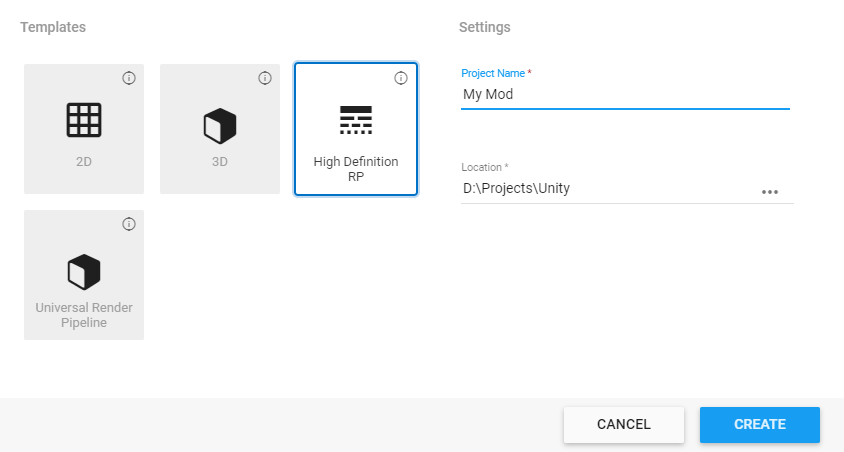
Next we’ll need to create a Unity project for our mod. Click the “New” button in the top left corner of the Unity Hub to create the new project. Choose a name and location for your mod project to be saved. Make sure you choose the “High Definition Render Pipeline”, so that your materials will be compatible with the game’s renderer.
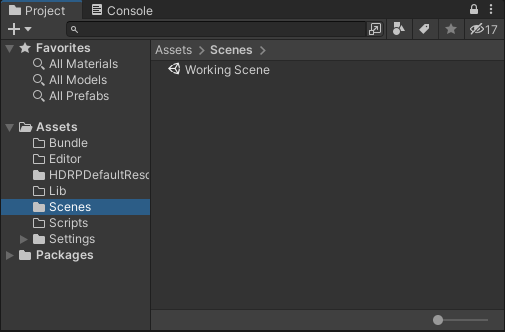
Once the project is created, the first thing you should do is delete Animations, Art, and TutorialInfo folders, as well as the Sample Scene and the contents of the Scripts folder. Unfortunately, there is no way to create a blank HDRP project. You can structure your project however you like, but I recommend something like this:
- Bundle – Where all your mod prefabs will go.
- Editor – For an editor script we’ll talk about later. It must be in this folder.
- Lib – Where you’ll copy all of the game’s DLL (code libraries) to.
- Working Scene – This is where you’ll do a lot of your prefab building.
- Scripts – For any custom code you write.
Copying DLLs
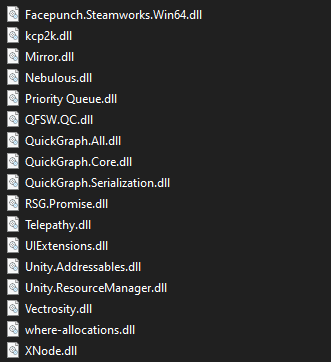
Dynamic Link Libraries (DLLs) are the code packages that the game uses to function. Typically Unity games have all of the game-related code in a uniformly named Assembly-CSharp.dll, but because we are also building our mod with Unity this causes naming conflicts. Because of this, the game code is compiled into a specially-named Nebulous.dll. There are also several supporting libraries you’ll need to resolve all the dependencies.
The good news is that all of these can be copied directly from the game’s installation directory, and you won’t need to go hunting around the internet or build any yourself!
To the right is a full list of the libraries you will need to copy over. They can be found in the game’s installation directory, under “<installation_dir>/Nebulous_Data/Managed/“. Copy them all to the Lib folder in your project.
Once they are copied over, return to Unity and wait for it to load the libraries. You may receive errors if you missed one (or if extra dependencies are added down the line and I forgot to update it here). The error will tell you which library is missing. Copy it over also. If you have copied everything, including what the error says is missing, try restarting Unity to make sure it loaded them all correctly.
And that’s it, your environment is now good to go. Let’s start making our mod!
What You Can Mod, and How
Using just the default modding facilities built into the game, you can add just about anything that we the developers can add. Theoretically, a total conversion should be possible without even needing additional installers.
Here is a comprehensive list of all the assets that can be included in a mod:
Factions
Factions describe a space nation that has a set of hulls, components, and weapons/munitions that it uses in its fleets. When more than one faction is present, you will be asked to select one when creating a new fleet in the fleet editor. Common components, such as the CICs included in the base game, are not locked to any particular faction.
Hulls
A hull is the fundamental component of a ship. It is comprised of a set of sockets that components are inserted into in order to make it functional. Hulls are the most complex element in the game, and there are a number of constraints required to make them work correctly.
Components
These are the functional portions of the hull and are divided into three classes: Surface Mounts, Modules, and Compartments. There is very little functional distinction between them in the code, but they serve as a way to limit what components can be placed where on the hull (e.g. a turret can only be placed on a Mount type socket).
Munitions
If it goes boom (except for a reactor, at least), it falls under this category. These include shells, bullets, missiles, and more.
Maps
A battlespace for the players to fight in.
Debuffs
These are random effects that are applied to Components as they are damaged, and have various effects. They range from simple stat modifiers to catastrophic reactor explosions.
Voices
When each ship is spawned a voice set is randomly chosen to deliver that ship’s callback lines. Voice sets has normal, heightened, and panicked sub-sets for all of the required lines.
Mission Sets
A mission set is a group of missions that form a campaign. These are accessed through the campaign browser on the main menu. The tutorial is implemented as a mission set.
Scenarios
Scenarios provide additional variety in multiplayer matches, such as point control.
All of these different assets can be added to the game by creating either the correct prefabs or instantiating specific scriptable objects. When the mod is loaded, they will be added to the global database of all the available assets of the given type, and can be referenced by the game when needed.
Structure of a Mod
Mods in NEBULOUS are built primarily around Asset Bundles, which is a Unity feature used for packaging assets together for shipment and loading. You can read Unity’s documentation on Asset Bundles here – [unity3d.com] .
Asset Bundles
Asset bundles are prepared using the Unity Editor. When you have an asset selected, you will see the Asset Labels banner at the bottom of the Inspector. You may need to click it to expand it. By clicking on the dropdown you can select “new” in order to enter the name of the asset bundle you want to create. The name can be anything you want. Assets in your mod can be in multiple asset bundles, but it’s recommended to not do that to limit dependencies and prevent double-inclusion of supporting assets like models and textures.
Unity does not provide a built-in Editor menu option to build asset bundles, so you need to make your own script to do it. You can use the one below. This file must be located in the Editor folder we created earlier!
using System.IO;
using UnityEditor;

public static class CreateAssetBundles {

 public static string AssetBundleDirectory = "Assets/AssetBundles";

 [MenuItem("Tools/Assets/Build AssetBundles")]
 public static void BuildAllAssetBundles() {
 BuildBundles(true);
 }

 [MenuItem("Tools/Assets/Build AssetBundles (Uncompressed)")]
 public static void BuildAllAssetBundlesUncompressed() {
 BuildBundles(false);
 }

 private static void BuildBundles(bool compressed) {
 if (!Directory.Exists(AssetBundleDirectory)) {
 Directory.CreateDirectory(AssetBundleDirectory);
 }

 BuildPipeline.BuildAssetBundles(AssetBundleDirectory, compressed ? BuildAssetBundleOptions.None : BuildAssetBundleOptions.UncompressedAssetBundle, BuildTarget.StandaloneWindows);
 }

 [MenuItem("Tools/Assets/Clear AssetBundles")]
 public static void ClearAssetBundles() {

 EditorHelpers.ClearDirectory(AssetBundleDirectory);

 }
}
The Manifest File
There is no required folder structure and you can arrange your assets in any way that makes sense to you. However, there must be a manifest.xml file located in the root of the bundle, and must be so named. If your asset bundle does not have a manifest file, it will fail to load. This is not a Unity requirement, it’s part of how the game knows what assets are used for what purpose.
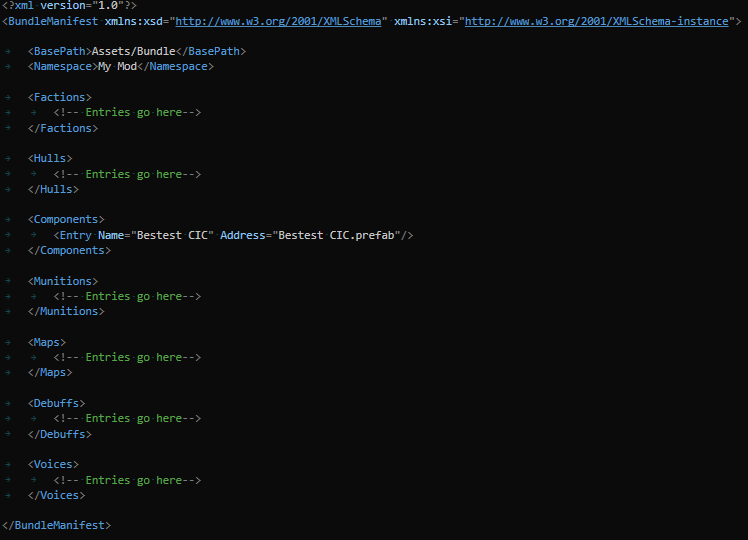
The manifest file is an XML that describes what is in the bundle, where it’s located, and what type of asset it is. Let’s take a look at a cut-down example of a manifest.
This is the manifest file we’ll be using for the example mod we’ll build in this tutorial. It will create a new CIC component called the “Bestest CIC”, which will be neigh un-killable and give bonuses to our weapons.
Note that you don’t need to have all of the categories in your manifest file, such as Factions/Hulls/Etc, they are included in the screenshot so you know what names to use if you want to add one of these things. This manifest file only need to include the BasePath, Namespace, Components, and the Entry for the new CIC, as seen below.
Now let’s break down what each of these tags are for.
BasePath describes the path from the root of our project folder to the directory you are keeping all of your assets that will make up the bundle. By Unity convention, all of our assets need to go inside the Assets directory in our project root, and I have created a Bundle folder to keep my mod prefabs in one convenient place. The path stored in BasePath will be appended to the front of the Addresses for your entries.
Namespace is a unique name for your mod that distinguishes assets with an identical name from each other. This helps prevent name collisions. If someone else’s mod “Another Mod” also has a component called “Bestest CIC”, it’s full name will be “Another Mod/Bestest CIC” while yours will be “My Mod/Bestest CIC”. Together, the Namespace and Name form the Save Key that uniquely identifies your object.
Components is the group of all entries that should be imported as a HullComponent. All assets loaded from this group will be checked for a HullComponent script so they can be attached to a ship.
Entry is the item that will actually be loaded by the game. It is comprised of a Name and an Address. The name is what players will see in the component list, for example, as well as forming the second half of the Save Key described above. The Address is the path to the asset, not including the BasePath.
Your First Hull Component
You can now get started making your first HullComponent. The HullComponent class is the base class for everything the player can install on a ship. Every other functional component on the ship – such as turrets, reactors, etc – are derived from this class and implement specific behavior.
Initial Component Setup
Make sure you have your Working Scene open.
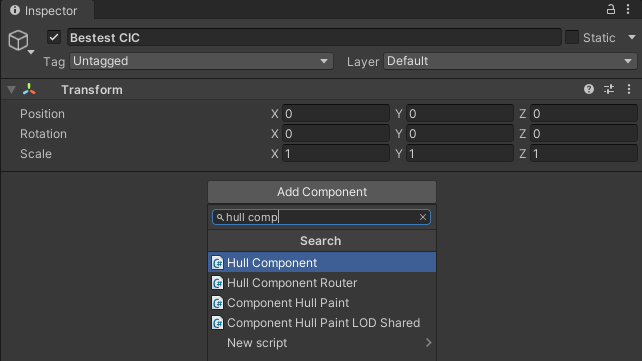
Create an empty GameObject, name it “Bestest CIC”, and position it at the origin. Assuming your DLL setup was correct, you should be able to access Nebulous.dll components from the “Add Component” menu in the Inspector. We want to add the HullComponent script to our object.
Compartments do not have geometry associated with them, so we don’t need to worry about any visuals. In fact, for a simple component like a compartment or module, we only need this otherwise-empty GameObject.
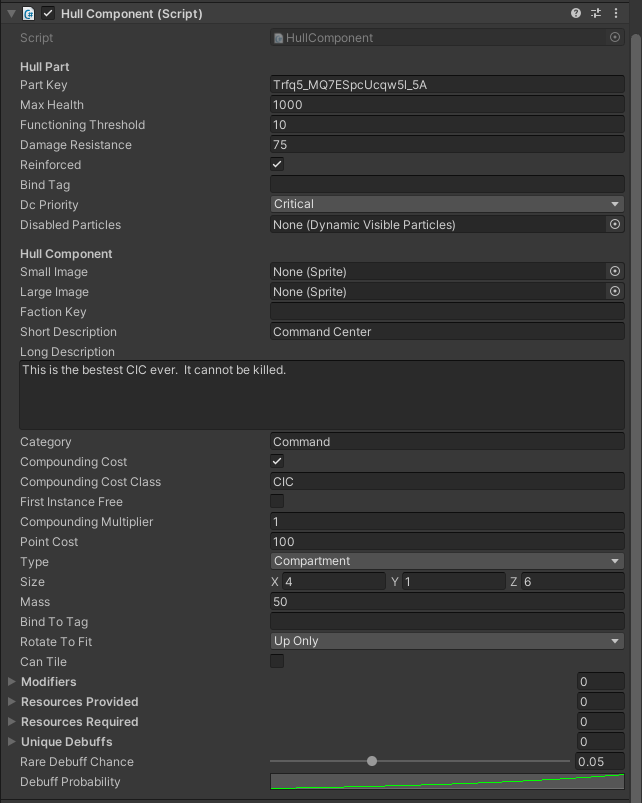
Many of the fields should be self-explanatory, but we’ll break down a few of the less intuitive ones now. Because HullComponent derives from HullPart, there are a few fields that appear in the Inspector but are not used. These are Part Key and Bind Tag.
- Disabled Particles – A reference to a VisualEffectGraph (via a DynamicVisibleParticles component, specific to the game) component on the prefab that will be turned on or off depending on if the component is disabled/destroyed.
- Faction Key – The SaveKey of the Faction asset that this component should be locked to. Use the fully qualified name, such as “Stock/Alliance” to have it locked to the default faction. Leave blank to make it available to all factions.
- Compounding Cost/Class – The group of components which will have their cost multiplied by a factor if more than one is added to the ship. For example, CICs have their cost multiplied.
- Type – This limits the component to only being able to be placed in a certain type of Socket.
- Size – Defines the size inside the hull that the component takes up, at a minimum. The component will always have its hitbox be the size of the Socket it was inserted into, regardless of this value.
- Bind To Tag – The name of the BindTag that this component relies on. For example, Radars rely on a set of RadarPanel parts to determine their coverage area.
- Rotate To Fit – The component will have its bounds checked against the Socket in multiple rotations. This would allow a 1x1x2 component to fit in a 2x1x1 Socket.
- Can Tile – Compartments and Modules can multiply in size to fill up the Socket and provide a certain benefit per unit. For example, Berthings are 1x1x1 size but would be 4 units large in a 4x1x1 Socket.
CreatingThe Prefab
When you’ve set the initial values you want, you need to make a prefab out of this object. To do so, drag the GameObject from the scene hierarchy into the Bundle folder you created earlier. This will create a prefab out of it, so it can be instantiated later. You can now delete the object in the scene.
To edit the prefab beyond this point, simple double click it to open the prefab editor.
Make sure to add the prefab to the Asset Bundle you created as described earlier. You can name the bundle whatever you like. I used “mymod”.
Modifiers
Modifiers are applied to stats on the ship in order to change their values. These modifiers are applied whenever the module is installed and functioning.
The modifiers provided by a component are in a list under the “Modifiers” drawer. Each stat is referenced by a string name, and can have a discrete value added to it (i.e. increase power output by 100) or a percentage value.
For our Bestest CIC, we’ll make have it make our turrets swing 100% faster, and our damage control teams work 100% faster.
Resources
Resources are provided and consumed by components in any given Tick. Each resource is defined in an XML file that can be included in your mod, and is referenced by a string name. For the sake of our CIC, it will not produce or consume any resources.
Debuffs
Debuffs are random events that modify the performance of a component. Normally the list of debuffs that can be applied to a component is based on its class hierarchy. For example, the Fire debuff can be applied to anything that derives from HullComponent.
However, if you’d like to create a debuff that is specific to this component, you can add it to the Unique Debuffs array.
Rare debuffs are unlikely, (usually) catastrophic events. When a the game rolls to add a debuff to a component after it receives damage, if does a second roll to determine if the debuff will be chosen from the normal table or the rare table. You can adjust the probability of a rare debuff occuring on this component by adjusting the “Rare Debuff Chance” slider.
The overall probability of a debuff occuring is controlled by the “Debuff Probability” curve, with probability increasing by default as the health of the component approached zero.
Unpacking Stock Game Assets
As mentioned before, there is a lot of complexity in how many of the components in the game are set up. It would be impossible to write a guide for everything, especially as things change, so making more advanced assets to add to your mods will have to be based on your own experimentation and examining how the stock assets are put together.
TODO
Writing and Compiling Custom Code
All scripts written in a Unity project are, by default, compiled into a C# DLL called Assembly-CSharp.dll. This creates a problem because NEBULOUS also has an Assembly-CSharp.dll, and so will every other mod.
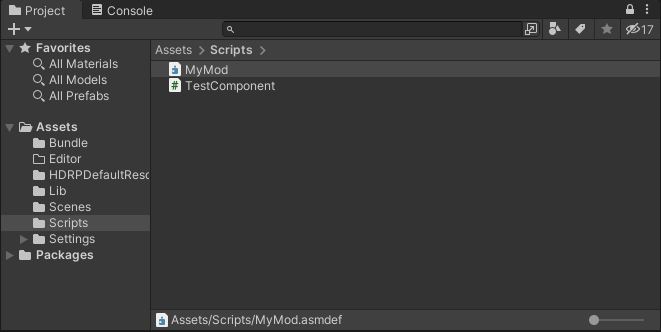
Fortunately, Unity offers a special type of asset called an Assembly Definition. This allows us to change the name of the DLL Unity will compile our scripts into. You should create an Assembly Definition in your Scripts folder, at the root of where all your scripts are located.
Your can read more about the use and setup of Assembly Definitions here – [unity3d.com] .
Name your definition whatever you’d like your DLL to be called. Make sure this is something unique to your mod, such as the mod’s name. No two mods with a DLL with the same name will be able to be loaded at the same time.
Once you have an Assembly Definition created and your custom components are written, you can add these components to your prefabs. Prefab assets in Asset Bundles are referenced by the fully qualified class name of the component, so as long as these scripts are present in the DLL with the mod, they will be probably attached to the instantiated GameObject. The game loads DLLs from a mod before any Asset Bundles, so your scripts are always present when needed.
In order to build your DLL, just build your Unity project using File > Build Settings and click the Build button at the bottom. Choose a location to build the project to that won’t interfere with the rest of your assets. I recommend a Build folder inside the project directory. Once the project is built, your DLL will be located in the Build/MyMod_Data/Managed/ directory as MyMod.dll.
Packaging Your Mod
There are two ways to use mods in NEBULOUS: Local mod (primarily used for developing new mods), and Workshop mods downloaded from the Steam Workshop.
It’s important to note that Local mods, not uploaded to the Steam Workshop, cannot be used in multiplayer. Also note that the unique identifier numbers for mods will be different between the Local and Workshop copy of the same mod. Fleets keep track of what mods they are built with, so building a fleet with a Local mod means it cannot be used in multiplayer, even if you now have the Workshop version of that same mod loaded!
Local Mods
Local mods are stored in your NEBULOUS installation directory at “<installation directory>/Mods/”. If this directory doesn’t already exist, you can create it yourself. Keep in mind it’s case sensitive.
Create a new folder inside Mods to contain your mod’s files. For this mod, we’ll create a new folder named “My Mod”.
Every mod requires a ModInfo.xml file, which describes the mod and what resources need to be loaded for it. Create a new file and add the following:
<?xml version="1.0"?>
<ModInfo xmlns:xsd="http://www.w3.org/2001/XMLSchema" - []  xmlns:xsi="http://www.w3.org/2001/XMLSchema-instance"> - []
 <ModName>My Mod</ModName>
 <ModDescription>Adds the bestest CIC in the game.</ModDescription>
 <ModVer>1.0</ModVer>
 <Assemblies>
 <string>MyMod.dll</string>
 </Assemblies>
 <AssetBundles>
 <string>mymod</string>
 </AssetBundles>
</ModInfo>
All of the fields should be self-explanatory. There is an additional GameVer field which will be added to the xml when you upload it to the workshop, to reflect the version of the game that it was verified to be compatible with and uploaded with.
If you would like your mod to have a preview image on the Workshop, add the PreviewImage field to your ModInfo.xml. Note that the preview image requires a full path to the image, drive letter and all, even if it is located in your mod directory.
Now, copy your Asset Bundle and DLL files into the directory as well.
Once you start NEBULOUS you should see your mod appear in the Mod Manager’s inactive mods list. Activate your mod and restart the game. Go to the fleet editor to see if your new component appears in the component palette, and try adding it to a ship.
Workshop Mods
Once you’ve tested your Local mod and you’re satisfied with the content and that there are no errors, it’s time to make it accessible to the rest of the world.
In the Mod Manager, select your mod in either the active or inactive list. In the bottom right corner, next to the cancel button, you’ll see a Steam logo with an arrow. Clicking this button will upload it to the Workshop. You’ll also be asked to select a set of tags that describe what your mod contains.
It can take a few minutes to upload a mod, particularly if the Asset Bundle is large, so be patient.
Conclusion
You should now have a basic understanding of how NEBULOUS is put together, and how to build the most basic of assets for the game. Please visit the #mod-development channel on our Discord – [discord.gg] to talk with other like-minded developers or ask questions. Maybe you’ll even find a team for your next project.
A special thanks to our testers AGM and NotSoLoneWolf for helping with test mod development, and figuring out the best workflows.
Good luck!
– ERI
Hope you enjoy the Guide about NEBULOUS: Fleet Command – Modding Tutorial Guide via Unity3D, if you think we should add extra information or forget something, please let us know via comment below, and we will do our best to fix or update as soon as possible!
- All NEBULOUS: Fleet Command Posts List





Leave a Reply