Guide to Gameplay
Will be piecing this together slowly part by part.
Introduction
I’ll be filling out this guide as I have time with information to help clarify the systems in this game.
Starting Location
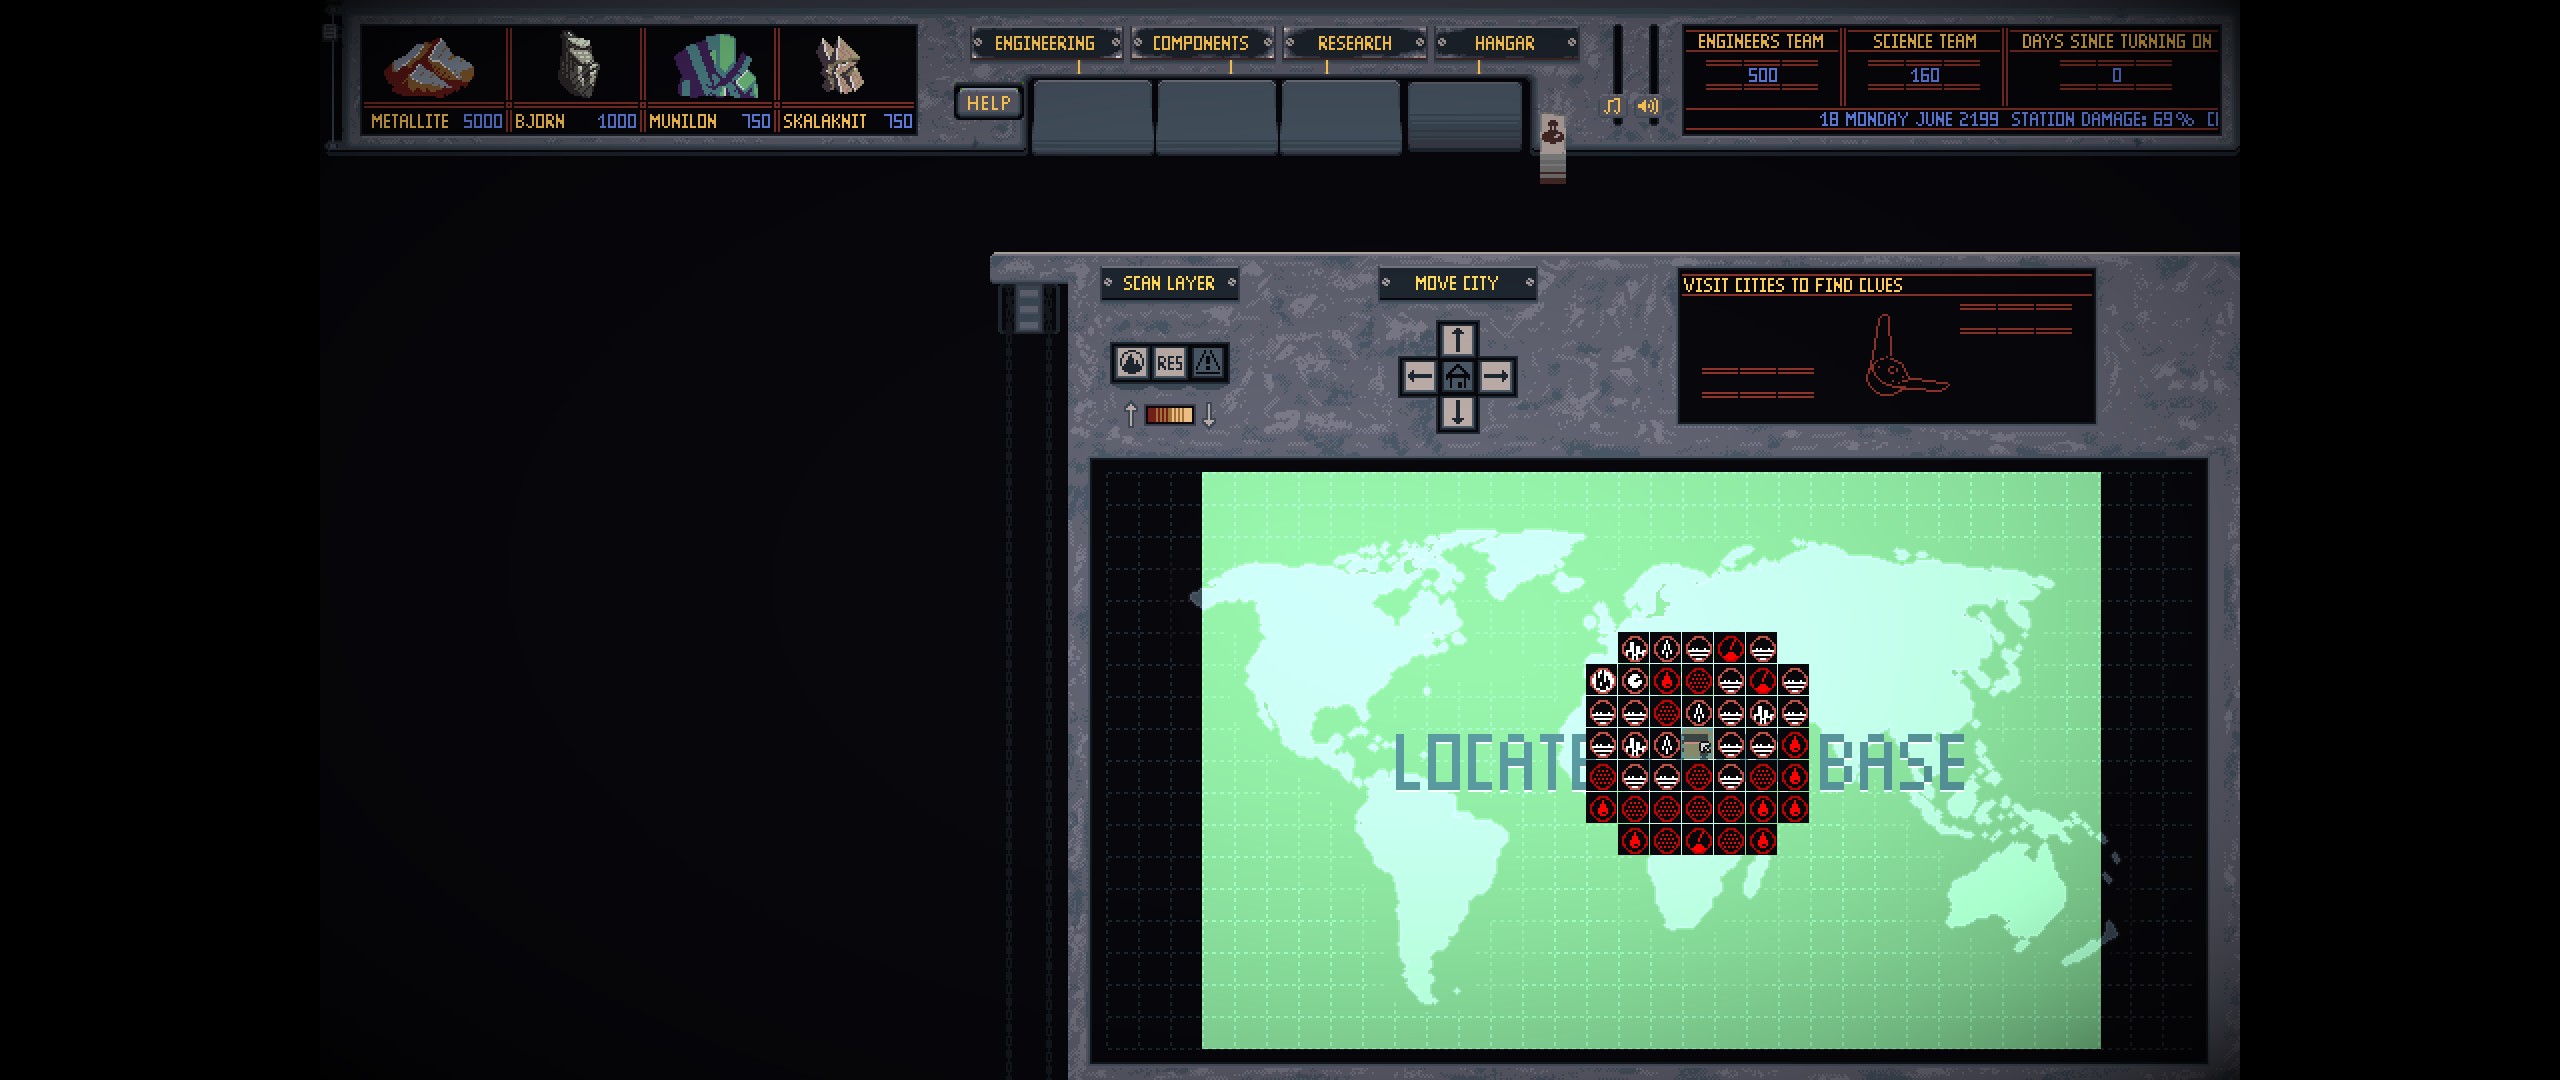
When you start a new game, you will get to choose where your base starts. As you move around the cursor, each area will show up as either red or white. White locations are “easy” to handle terrain; red locations are difficult, and will generally require you to have upgraded and specially fitted out mechs to succeed. When choosing a starting location, there’s no difference between choosing a red or white spot, but you will want to choose a location that has access to a lot of white spaces, or you’re not going to make it very far.
This is what I’ve found to be the best starting spot:
This is a red desert tile in Africa. You start pretty close to three cities, and you have fairly easy access to Europe, Africa, and Western Asia.
Getting to Eastern Asia from here looks like it would be easy, but is actually fairly difficult. There’s unpassable mountains, and 300 degree terrain that block off most routes to Eastern Asia. You’ll have to cross some 161 degree red desert to get to Eastern Asia, and there’s a high chance you will get blocked out by enemy bases on these tiles, so you’ll need some luck. In practice, you’ll probably need to get to Eastern Asia through the Indian Ocean, so prepare accordingly.
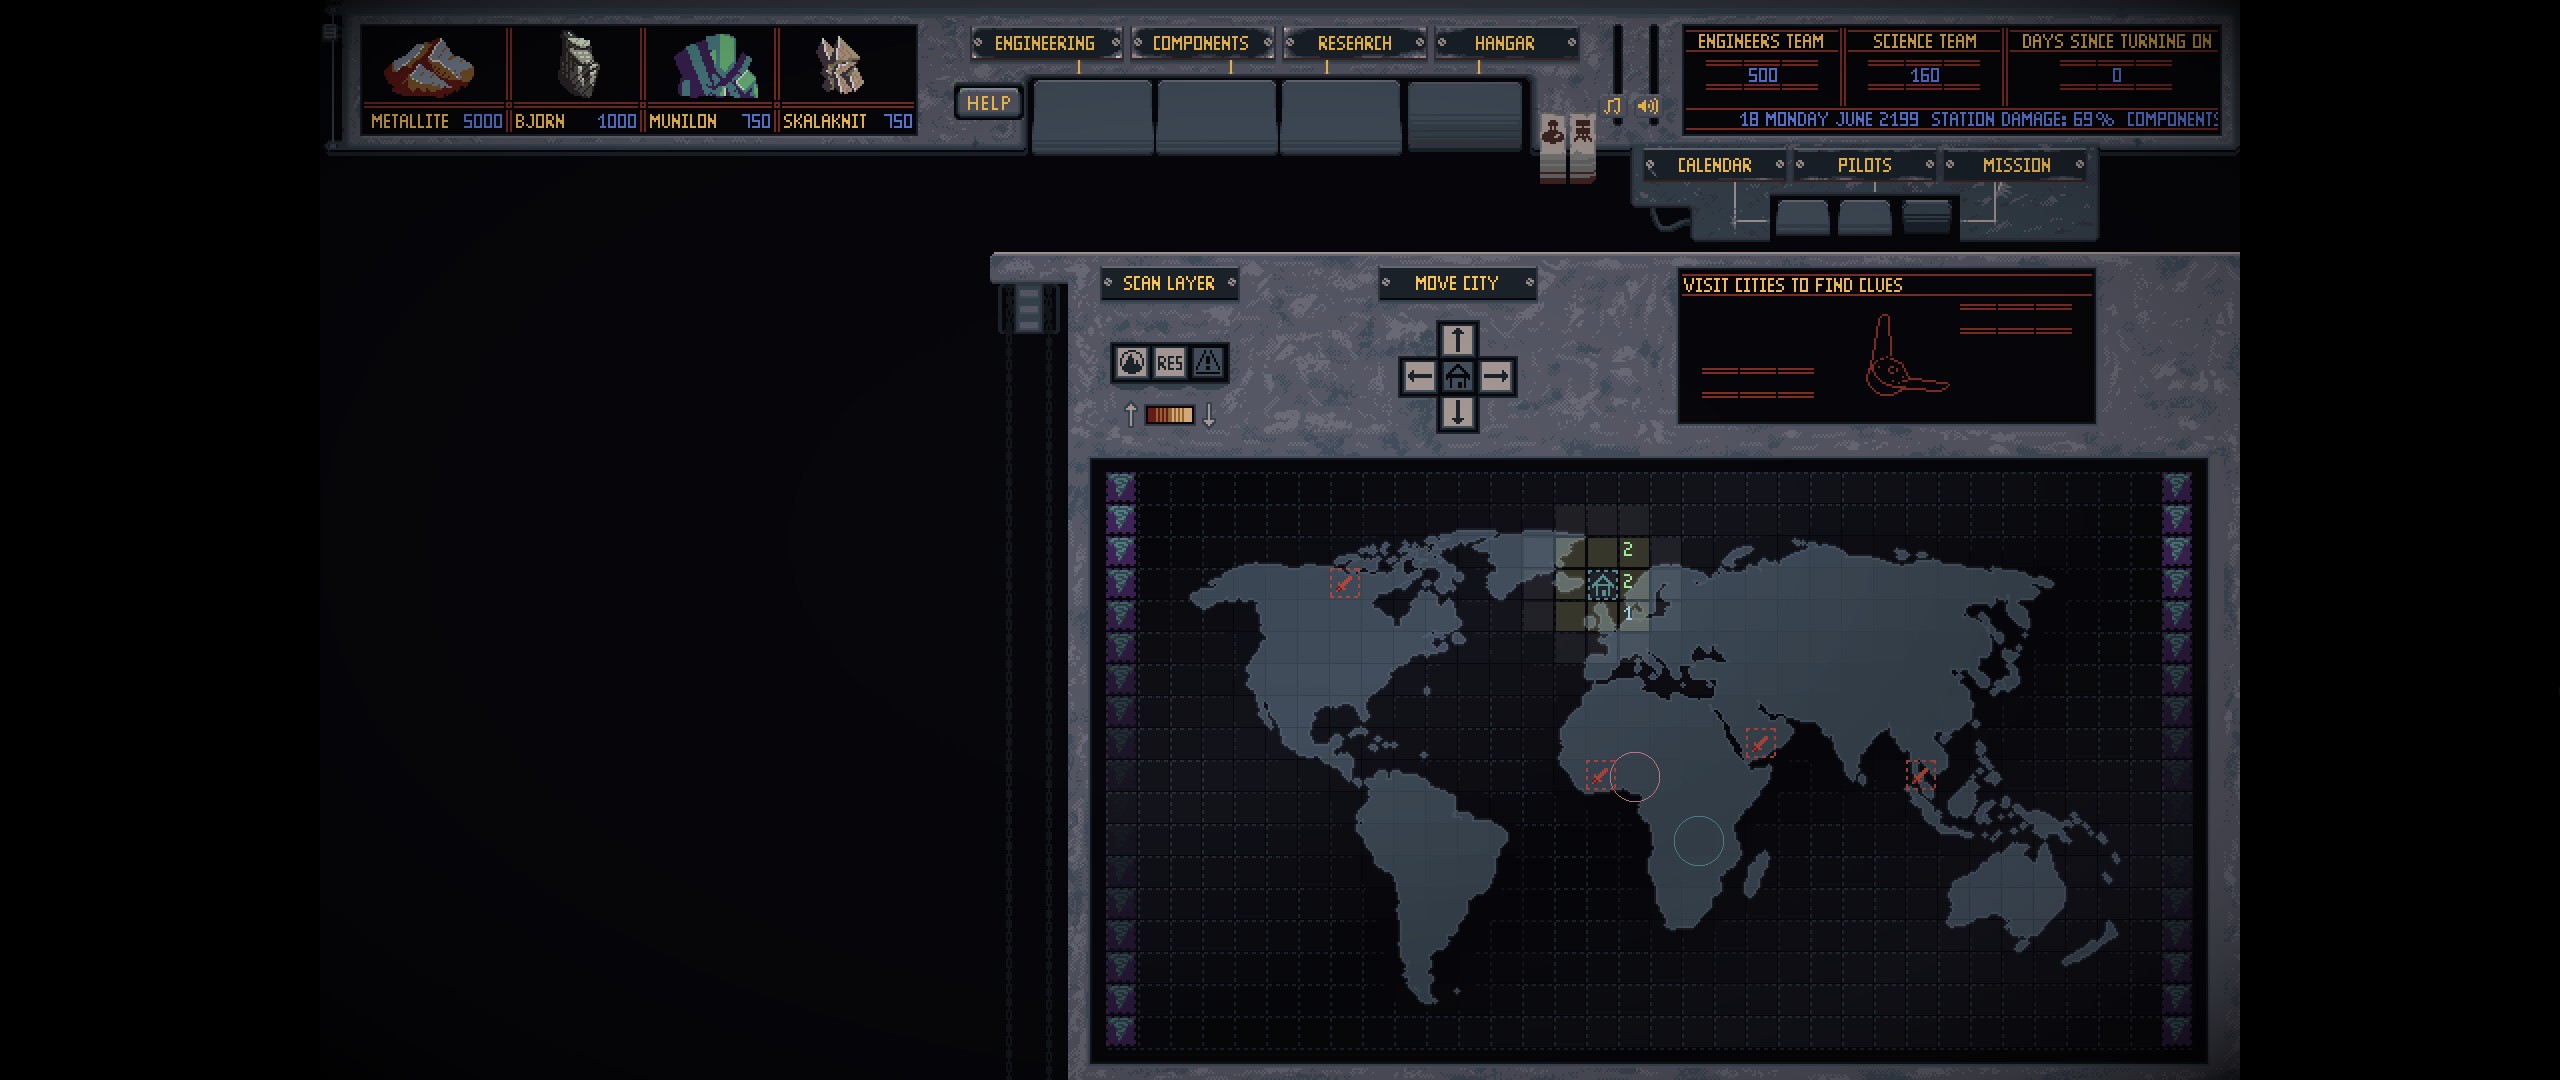
Here’s one interesting starting spot:
This is a red water tile. Choosing this as a starting location connects North America to Europe with a white trail of tiles, which allows you to access most of the white areas of the map without needing to go through any red tiles. You might still get blocked by an enemy base, but at least you have a chance of making it through with minimal difficulty.
In theory this should be a pretty good starting spot. In practice, I’ve had really bad luck with this spot, getting wedged in by enemy bases, hard enemy spawns at the start, and enemy bosses chasing me very early.
Internal Combustion Engines (ICEs)
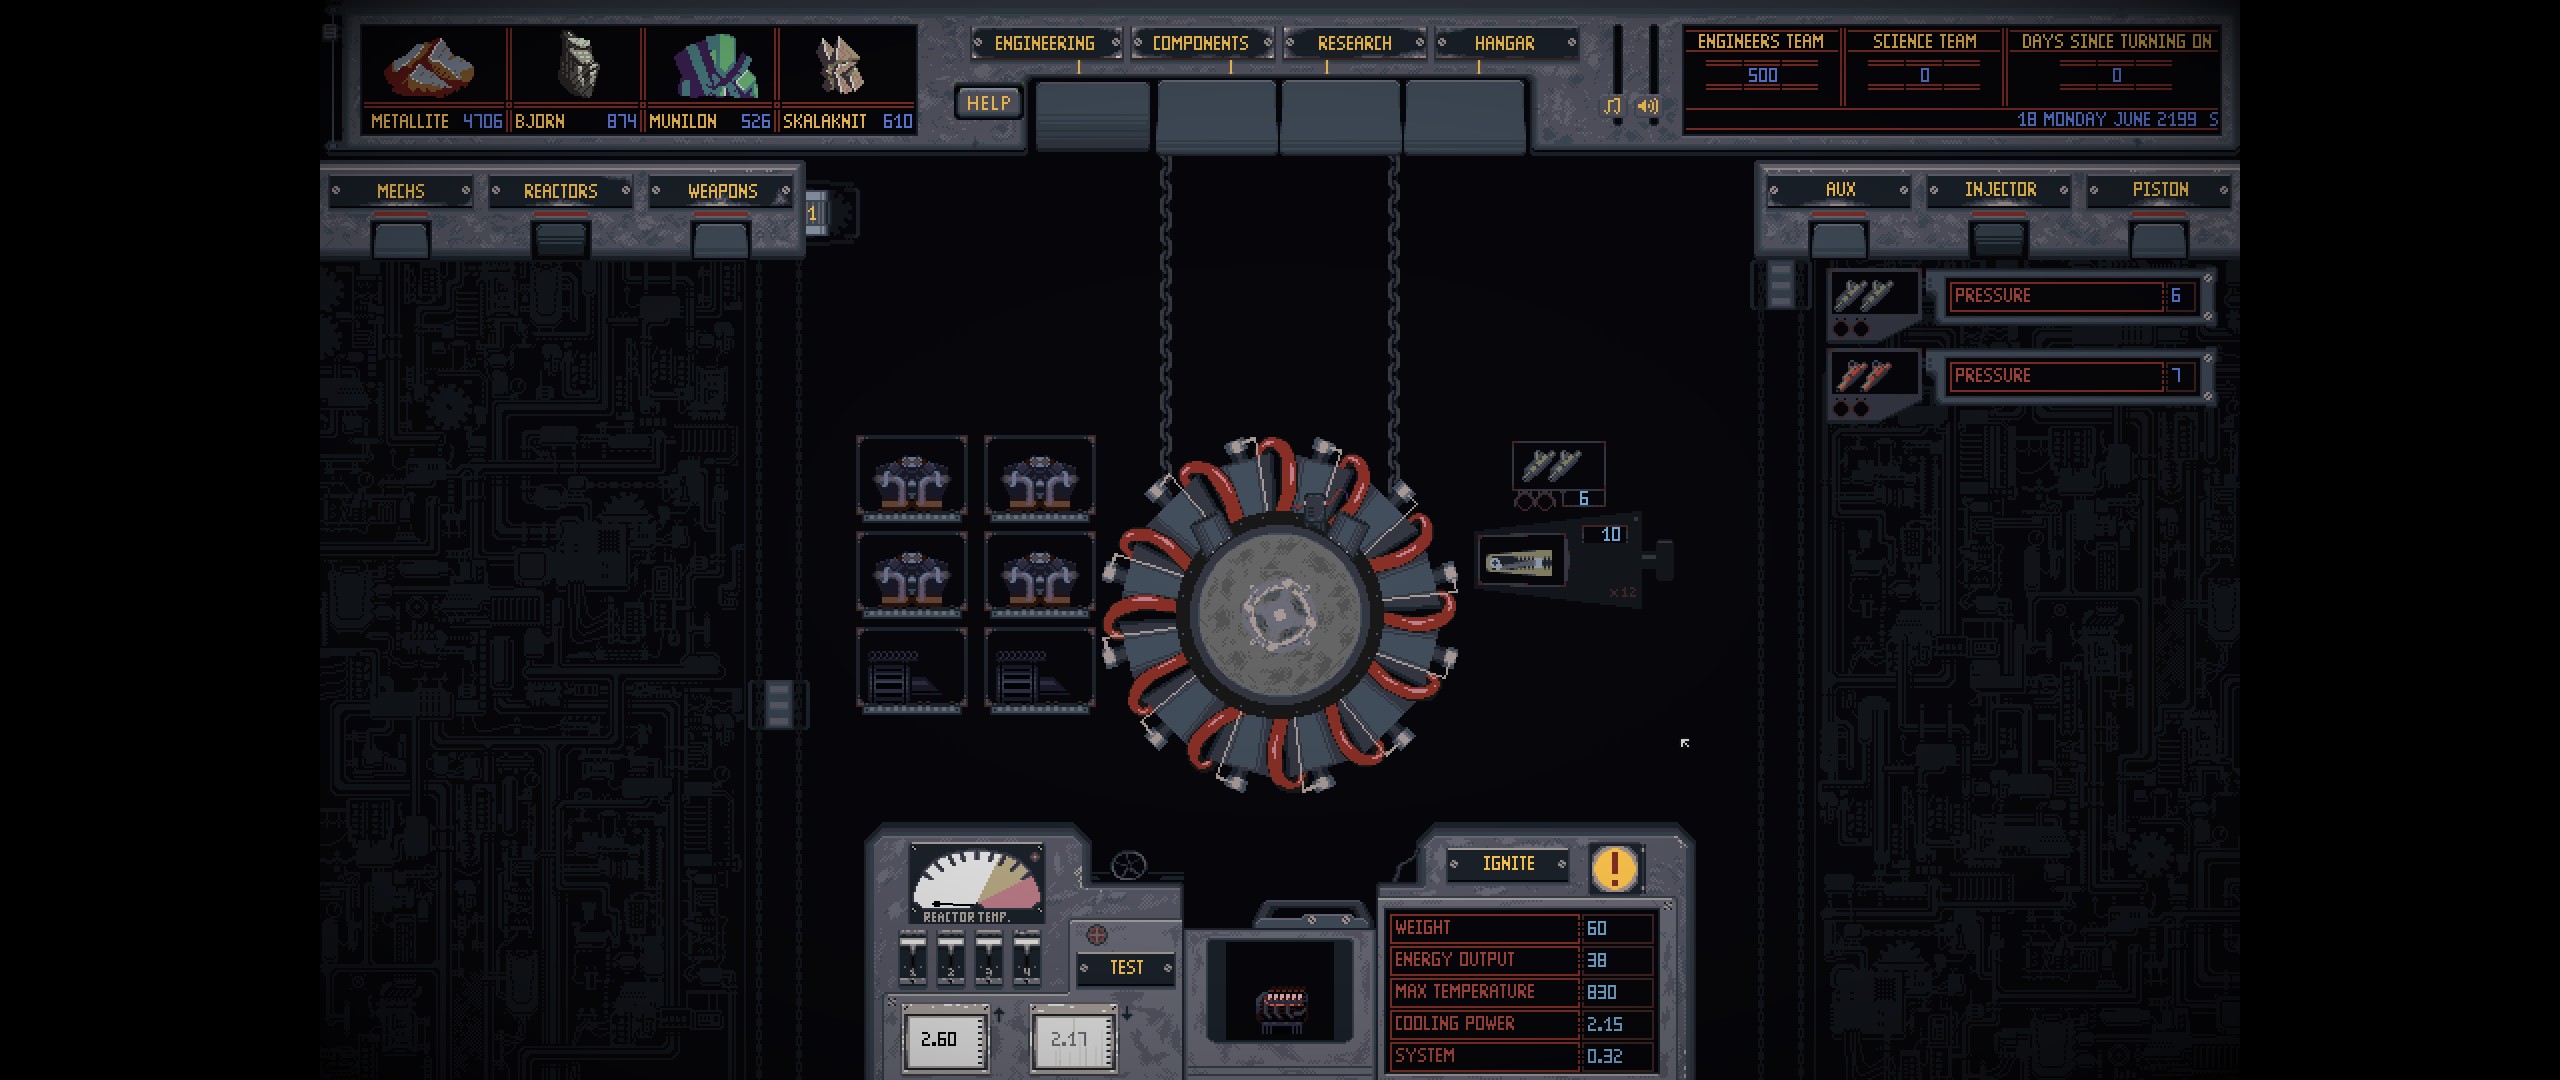
Injectors and Pistons
In general, run the biggest piston with the smallest injector that will meet your energy requirements.
The behavior or Injectors and pistons are not documented at all in the game, as far as I can tell. However, they appear to work as follows:
Higher injector values increase energy output and decrease maximum temperature.
Higher piston values decrease energy output and increase maximum temperature.
Both change the values at an equal inverse to each other, so increasing the value of both the injector and piston by the same amount will result in no change to an ICE. It’s only the difference between the two values that matters.
Note, the maximum temperature is the maximum temperature caused by load on the ICE, and has no impact on external temperature resistance.
AUX Components
The general rule with AUX components is to always fill up slots 1-4 with cooling modules, always put a system multiplier in slot 6, and put either a cooling module or a system multiplier in slot 5, depending on what you are optimizing for.
First thing to note is the order of the AUX components matters. The components are loaded in from top to bottom, right to left. When you hover over one of the AUX component slots on the ICE, the top number will show you the order number: 1 through 6.
The second thing to note is that up to 4 numbers that will come up when you hover over a component slot. They appear to be as follows:
- Slot number
- System Direction Negative
- System Direction Positive
- Cooling
System multipliers will have all 4 numbers.
Cooling components will have three numbers, with the middle number being the System Direction, with an implicit negative or positive, depending on the cooling type.
There are three types of Aux components:
Internal Cooling
Use this when you are using weapons that produce a lot of heat.
-0.04 System Direction
+0.20 Cooling
External Cooling
Use this when you want to increase the environmental heat resistance of your mech.
+0.04 System Direction
+0.20 Cooling
System Multiplier
These multiply the cooling and system totals of the previous component slots. Only use these in slots 5 or 6.
1.5 * System Direction
1.2 * Cooling
Examples
Environmental Heat Resistance Optimized
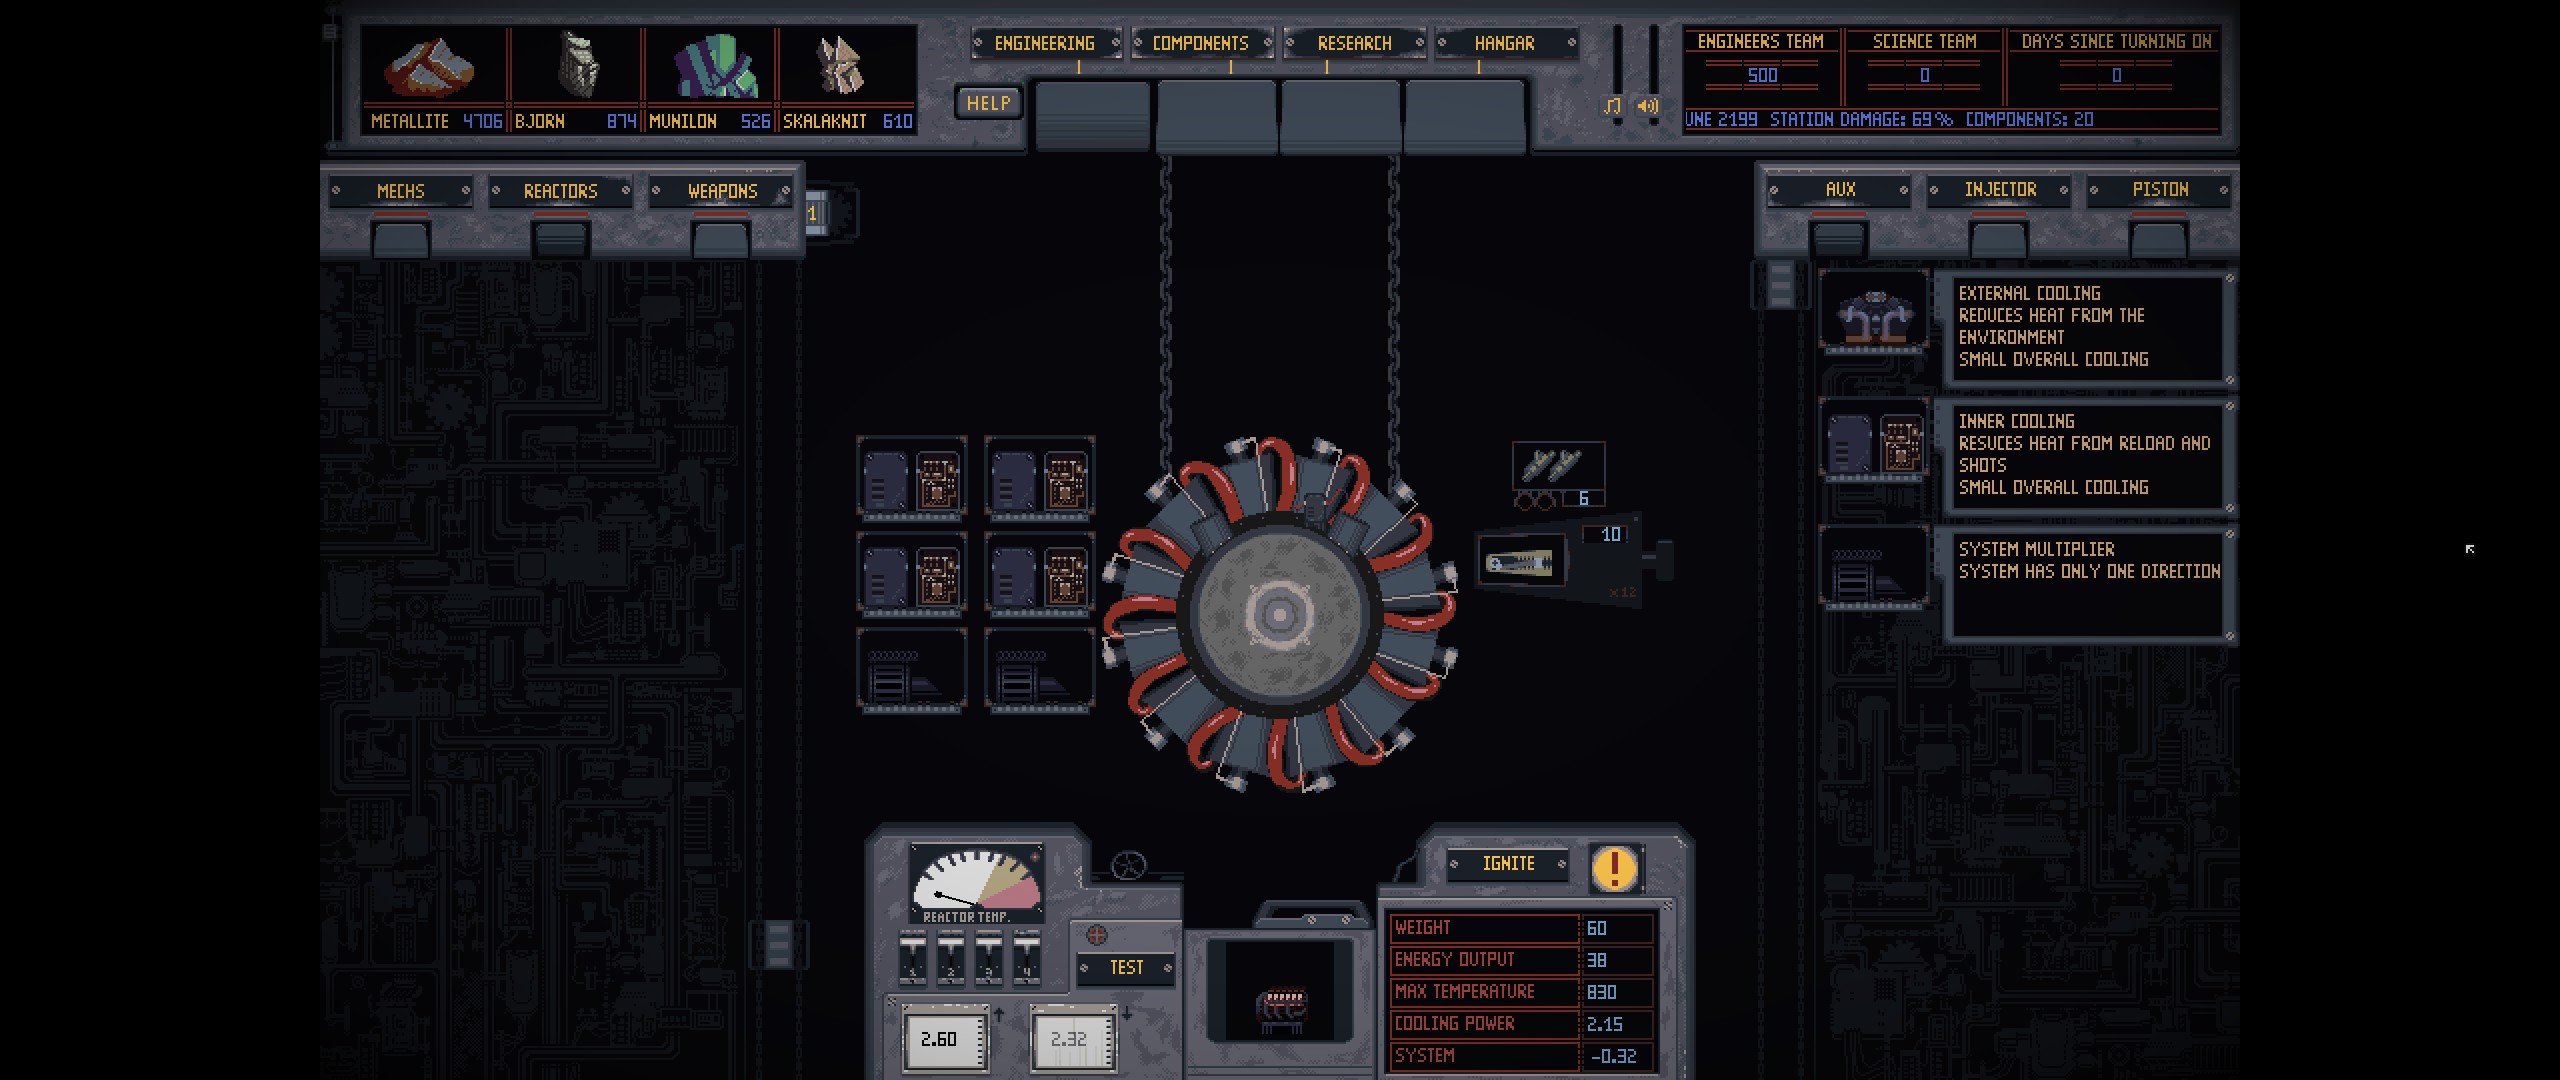
This layout sacrifices a bit of overall cooling, but gives you a max outside temp of 156 on the starting mechs. In practice this layout seems to be the most useful for the start of the game, since the highest environment temperatures you see are either 161 or 295. This layout lets you access most terrains, and lets you complete a 161 temperature mission with heavy damage to your mechs if you really need to. You won’t be able to complete a 295 temperature mission with this engine, so don’t try.
It would be nice if this layout could handle 161 on the starting mechs, but I haven’t found a way to get it there.
Weapon Cooling Optimized
This layout is fully optimized towards weapon cooling. It gives you a max outside temp of 112, which is high enough most environments. You really only need this if you’re going really heavy on heat producing weapons though.
You can swap slot 5 for another internal cooling component for a minor increase to the overall cooling, but the weapon cooling amount will drop significantly.
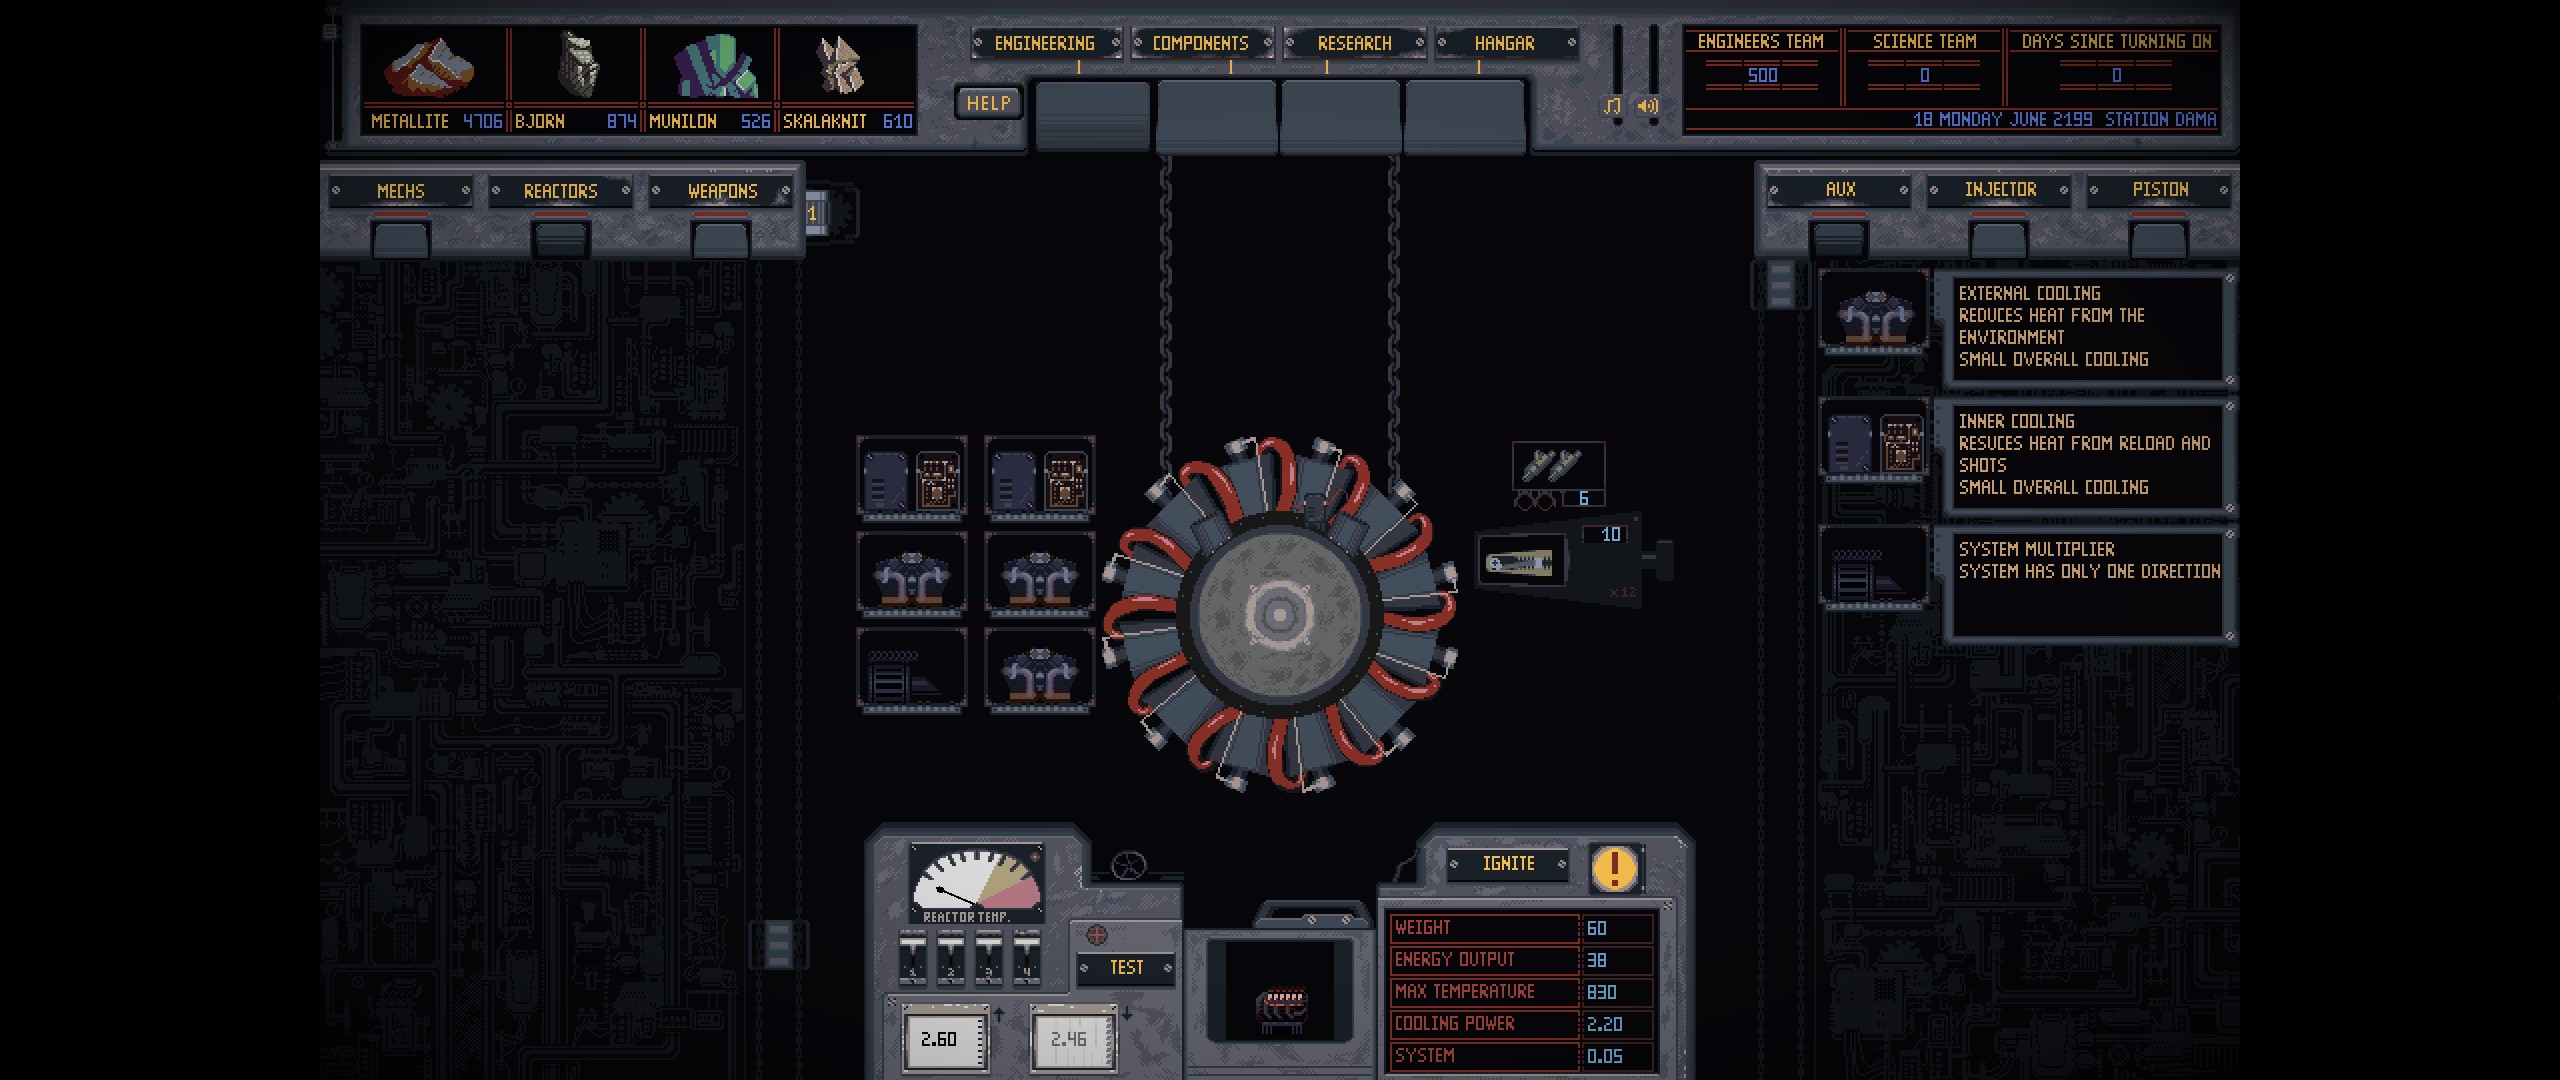
Balanced Cooling Layout
This is a fairly balanced engine layout that I’ve had success with. It gives you the highest possible overall cooling at 2.20, with a slight bias to external cooling. It gives you a max outside temp of 121, which is high enough for most missions.
Station Upgrades
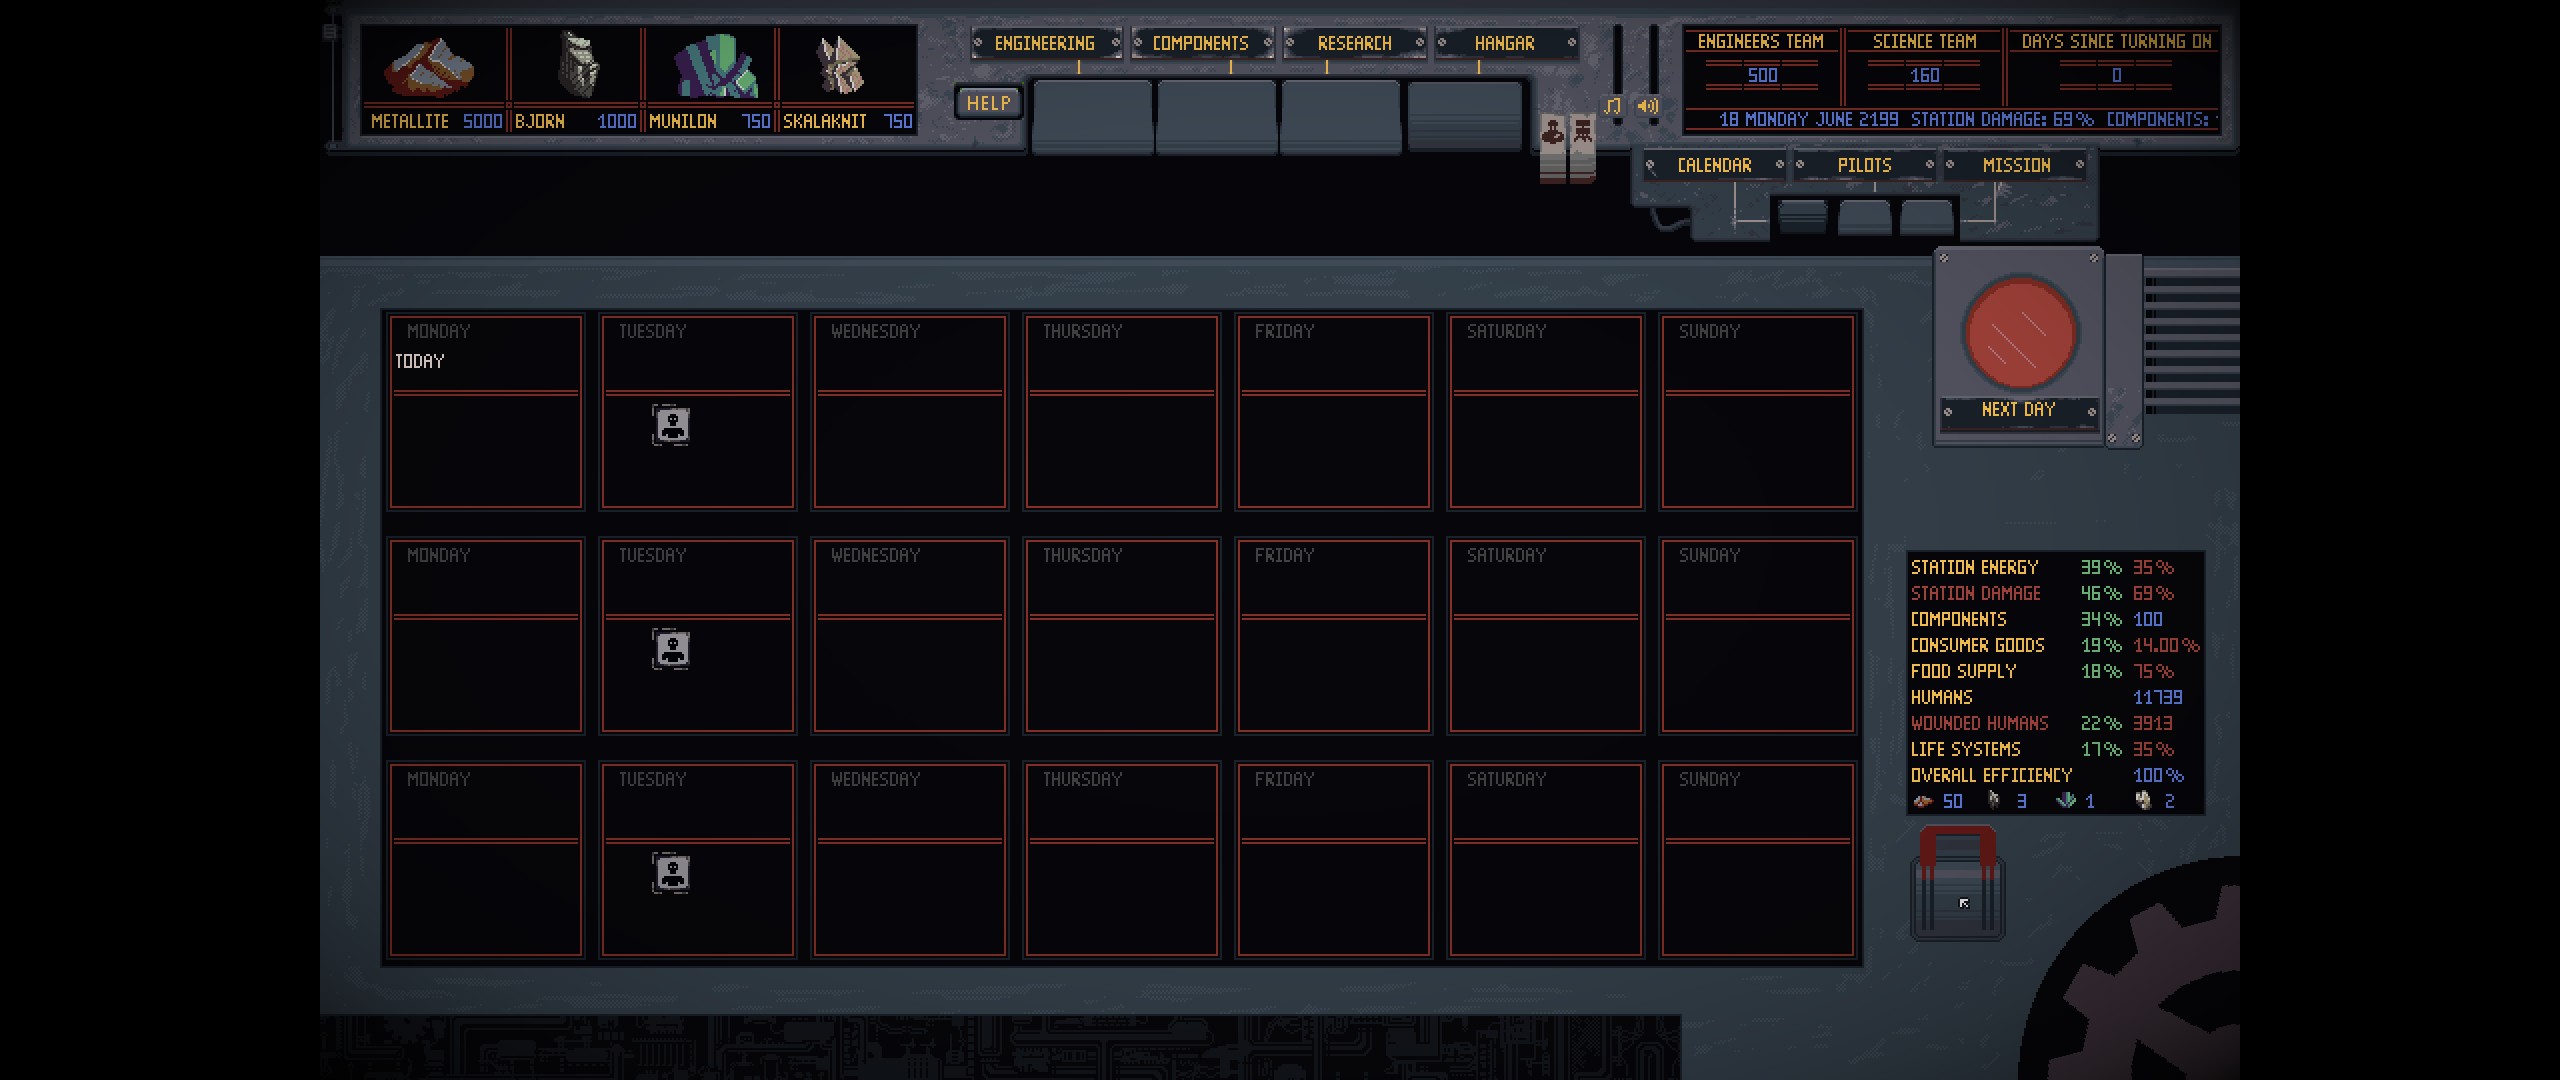
To access the station upgrades, go to the calendar and click the lever in the lower right corner.
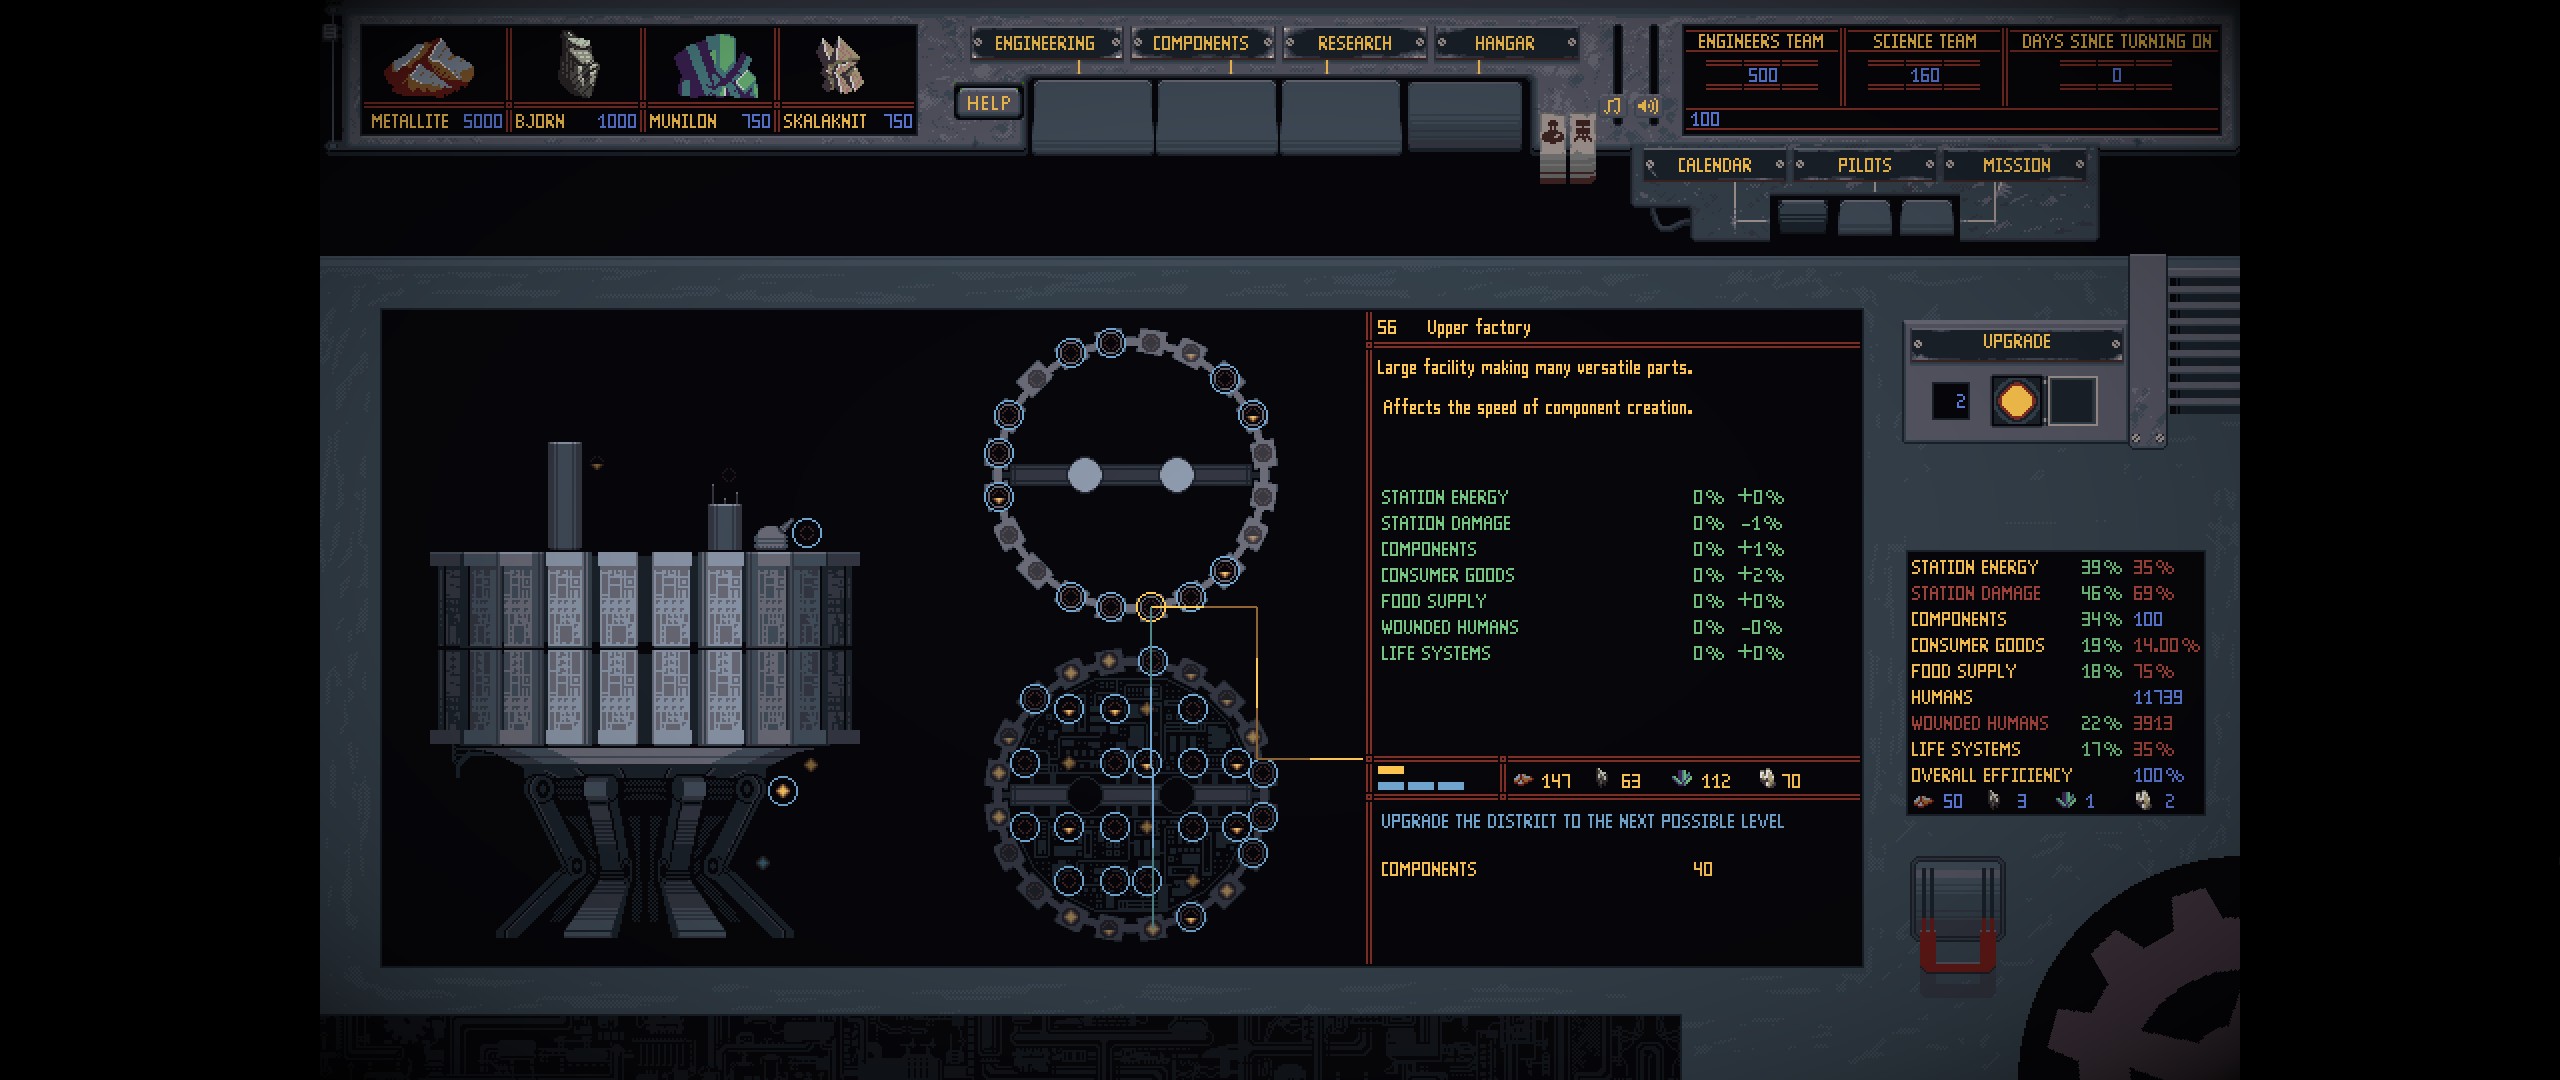
Here’s what the station upgrade screen looks like
When you click on a station module, a couple of lines will come out of the section.
The orange line signifies the current module, and will point at the detail panel on the right. The orange squares in the detail panel signify the current level of the module.
The blue line points at the parent module for the currently selected module. The blue squares in the detail panel indicate the level of the parent module. A module cannot have a higher level than its parent module, and so the blue squares represent the current maximum level for the selected module. If you want to increase the max level, you will need to upgrade the parent module.
Every module provides some stat bonuses to your station, but there’s a few modules that provide additional bonuses that are detailed in their description.
Special Modules
There are modules that provide special bonuses. In general, you should focus on maxing the upgrades on all of these special modules before focusing on upgrades for normal modules.
56 – Upper Factory
This module reduces the time to produce items in the components tab. It is the most important module to upgrade, and should be upgraded to max level before focusing on upgrading anything else. You will probably need to upgrade its parent modules to get it to max level, but it is still worth maxing module 56 and its parents before upgrading anything else.
23 – Waste Recycling Center
Provides a few resources of each type every day. This is a very useful module, since it will provide resources that you are having trouble finding on the map, and will prevent you from getting locked out of running missions due to insufficient ammo. This should have very high priority for upgrades.
62 – Ammunition Factory
Reduces the resource cost of sending mechs into battle. This is very useful, since the cost savings are significant, and it’s easy to deplete a single type of resource, locking out you of missions. This should have very high priority for upgrades.
59 – Repair bay
Since the addition of ranged units to many missions types, your mechs are likely to take some damage on a most of your missions, even if you’re doing everything right. And occasionally things will go wrong and you’ll have a mech take a big chunk of damage that can cost over a 1000 metallite to fix. This module helps cut the costs on the repairs, and will pay for itself very quickly. Should have a have high priority for upgrades.
4 – Artillery Gun
Upgrading this module provides more artillery shots during a mission.
Artillery can do a lot of damage, and can open up the terrain, but it is pretty inconsistent, and cannot be used at all during underground or water missions.
It is very useful at helping deal with turrets. If a turret is behind some terrain that makes it difficult to attack from outside the turret’s range, using artillery can remove the terrain and allow you to safely destroy the turret.
Artillery has limitations, but since it’s useful for taking out turrets, it should have medium priority for for a special module.
26 – Western Factory of Standart Parts
Typo in the module name. This reduces the cost to produce the components item in the components tab. Components aren’t very expensive to begin with, but a reduced cost doesn’t hurt. Low priority for a special module.
5 – Communication Center
Reduces communication delay, but the effect is relatively minor and has low priority for a special module.
15 – Mech hanger
Normally mechs require 5 hanger bays in the components tab to build. This module purports to reduce the number of hangers required on the components tab to build the first type of mech when fully upgraded. However, I’m not clear on if that just means the starting mech type that you begin the game with, or if it provides benefits to other types of mechs as well. I’ll need to experiment to figure this out. Depending on how many mech types this impacts, this could have either high or low priority.
Weapon Customization
Armor Penetration
It is important to understand how armor and armor penetration interact when customizing weapons.
If a attack has a *higher* penetration value than a unit’s armor, the weapon will ignore the armor and do full damage.
If an attack has an *equal or lower* penetration value compared a unit’s armor, the armor will deflect the attack, causing no damage to the unit.
All attacks, whether they penetrate or not, will have a chance to reduce the target’s armor by 1. This means is the slower the weapon’s rate, the more important penetration is.
If you have weapons with low penetration, you’ll want to balance this by putting weapons that do a lot of armor damage onto your mechs to help reduce enemy armor so the lower penetration attacks can also do damage.
20MM Six Barreled Gun
This is one of the two weapons you start with, and the only weapon you can build from the start.
This gun is lightweight, uses minimal energy, and has a pretty high base rate of fire. It has issues with accuracy, raw damage output, and penetration.
There’s really only two attributes to balance: rate of fire, and accuracy. As a result, there are two main customization paths to go down with this weapon: either optimize for raw damage, or optimize for accuracy.
The raw damage route is more flexible in terms of customization options. Your goal should be to optimize for clearing out many enemies at extremely close range, and so accuracy isn’t very important. The mod you choose will have a big impact on what the weapon does. Try using different mods and see how it works out for you. Here’s some that I’ve found work well on the 20MM for close range:
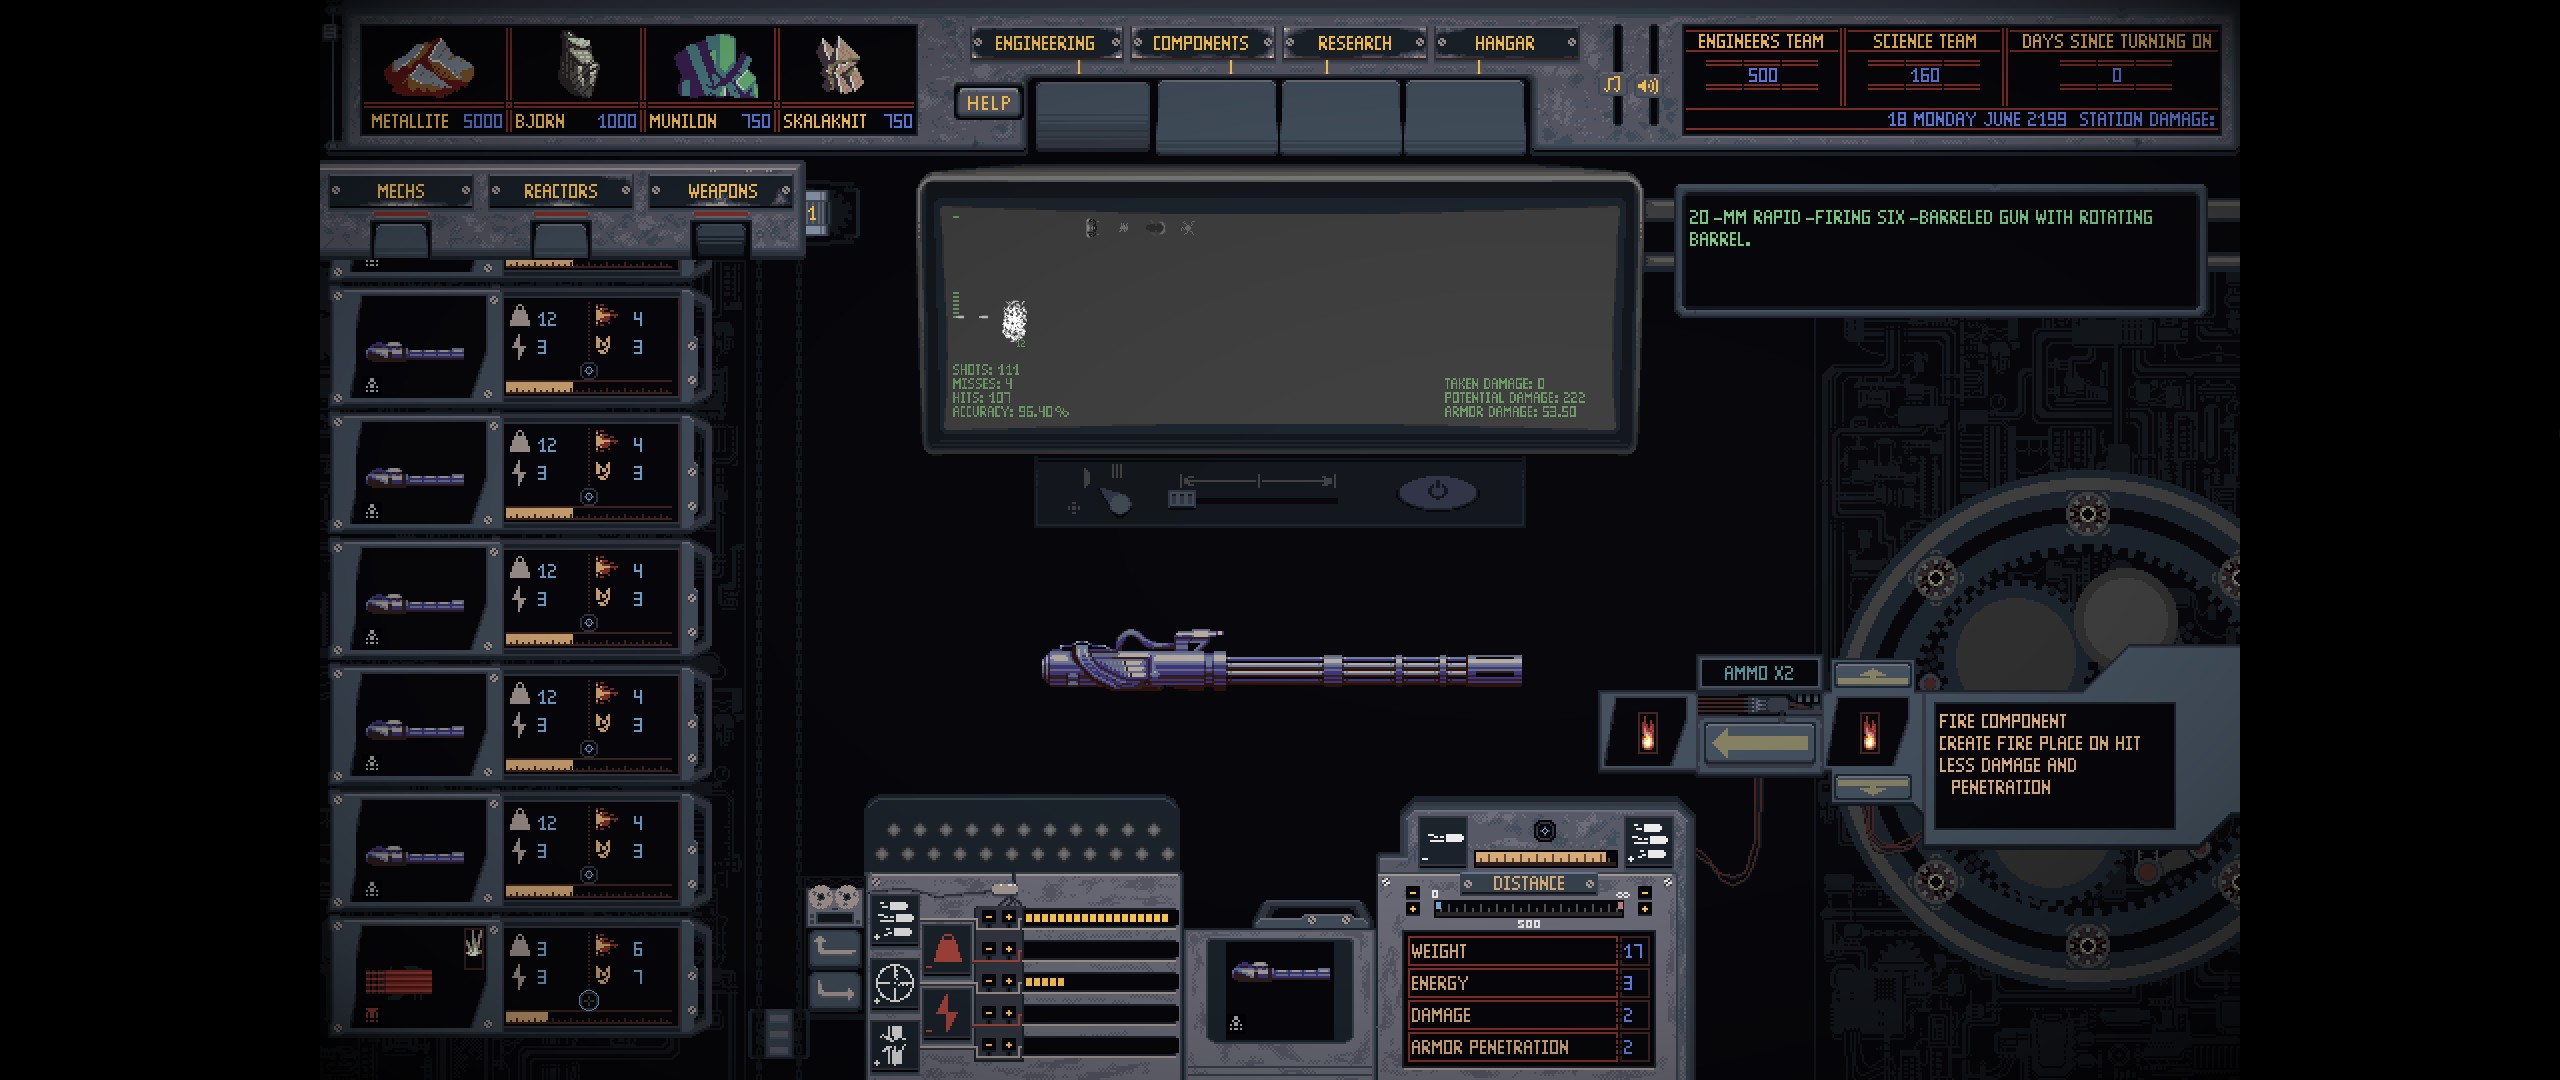
Fire Component: Fire seems to do a very high amount of damage over time, but it’s hard to tell exactly how much it does.
Slowing Enemies: Very effective at preventing enemies from closing the gap. Is a hard counter to the hammerhead enemies that try to charge you.
Shards after hit: Gives you extremely high damage potential at close range, and is probably the best mod if you aren’t looking to fill a specific niche.
Increased Penetration: This will let you cut through the armor of the base enemies, allowing you to penetrate through multiple enemies. However, it lacks any crowd control.
Here’s an example of a 20MM with a Fire Component mod that I’ve found works really well:
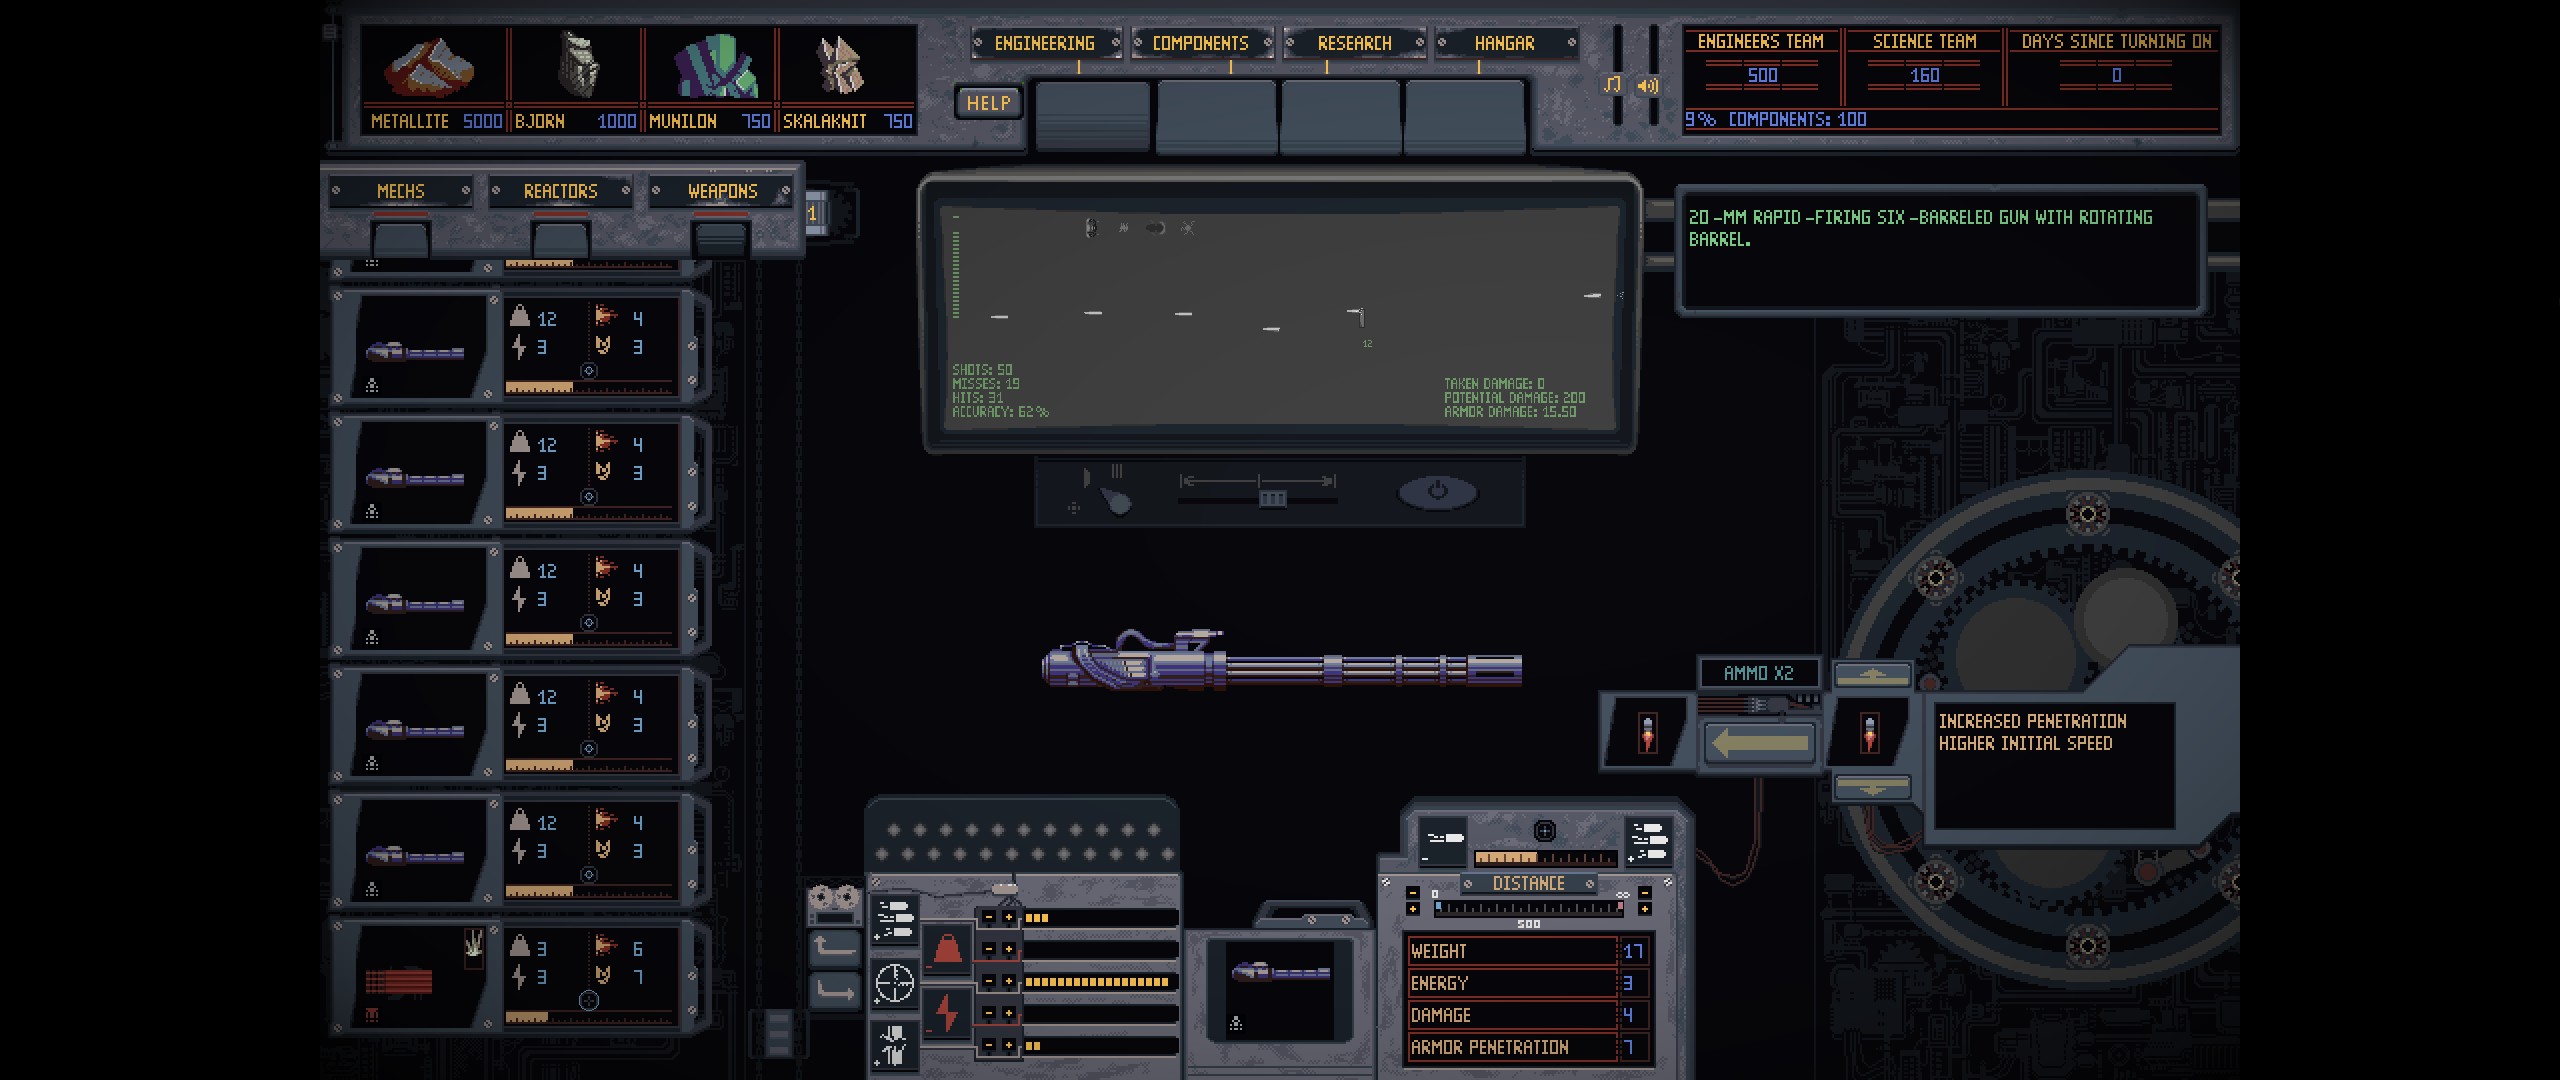
The accuracy focused route is more limited in terms of customization options – penetration becomes more important, and so you’ll want to have at least 5 penetration, with 7 being ideal. This means you’re going to have to take the armor penetration mod, which limits your ability to customize this weapon. With a setup like the following, you’ll have around 200 DPS, which is pretty low, but has the benefit of being able to apply that damage out to very long ranges, and has the ability to penetrate multiple targets, allowing the weapon to reach up to 600-800 DPS in many situations.
Rapid Firing Missile System
This is the second weapon type you start with, but you’ll need to unlock some research before you can build more. This weapon is kind of the inverse of the 20MM cannon. It has decent base penetration, and gets more accurate the further away it’s firing. Its biggest downsides are that it doesn’t work well with most weapon mods, and it weighs a lot for a starting weapon.
Since one of this weapon’s benefits is its good armor penetration, weapon mods that reduce armor penetration don’t work well with this weapon.
Mods that increase projectile speed don’t work well with this weapon either, because they greatly harm the accuracy.
This means you’re best off running the missile system with either the shards after hit mod, or no mod at all. The shard mod has higher damage potential, but causes the missile launcher to use twice as much ammo.
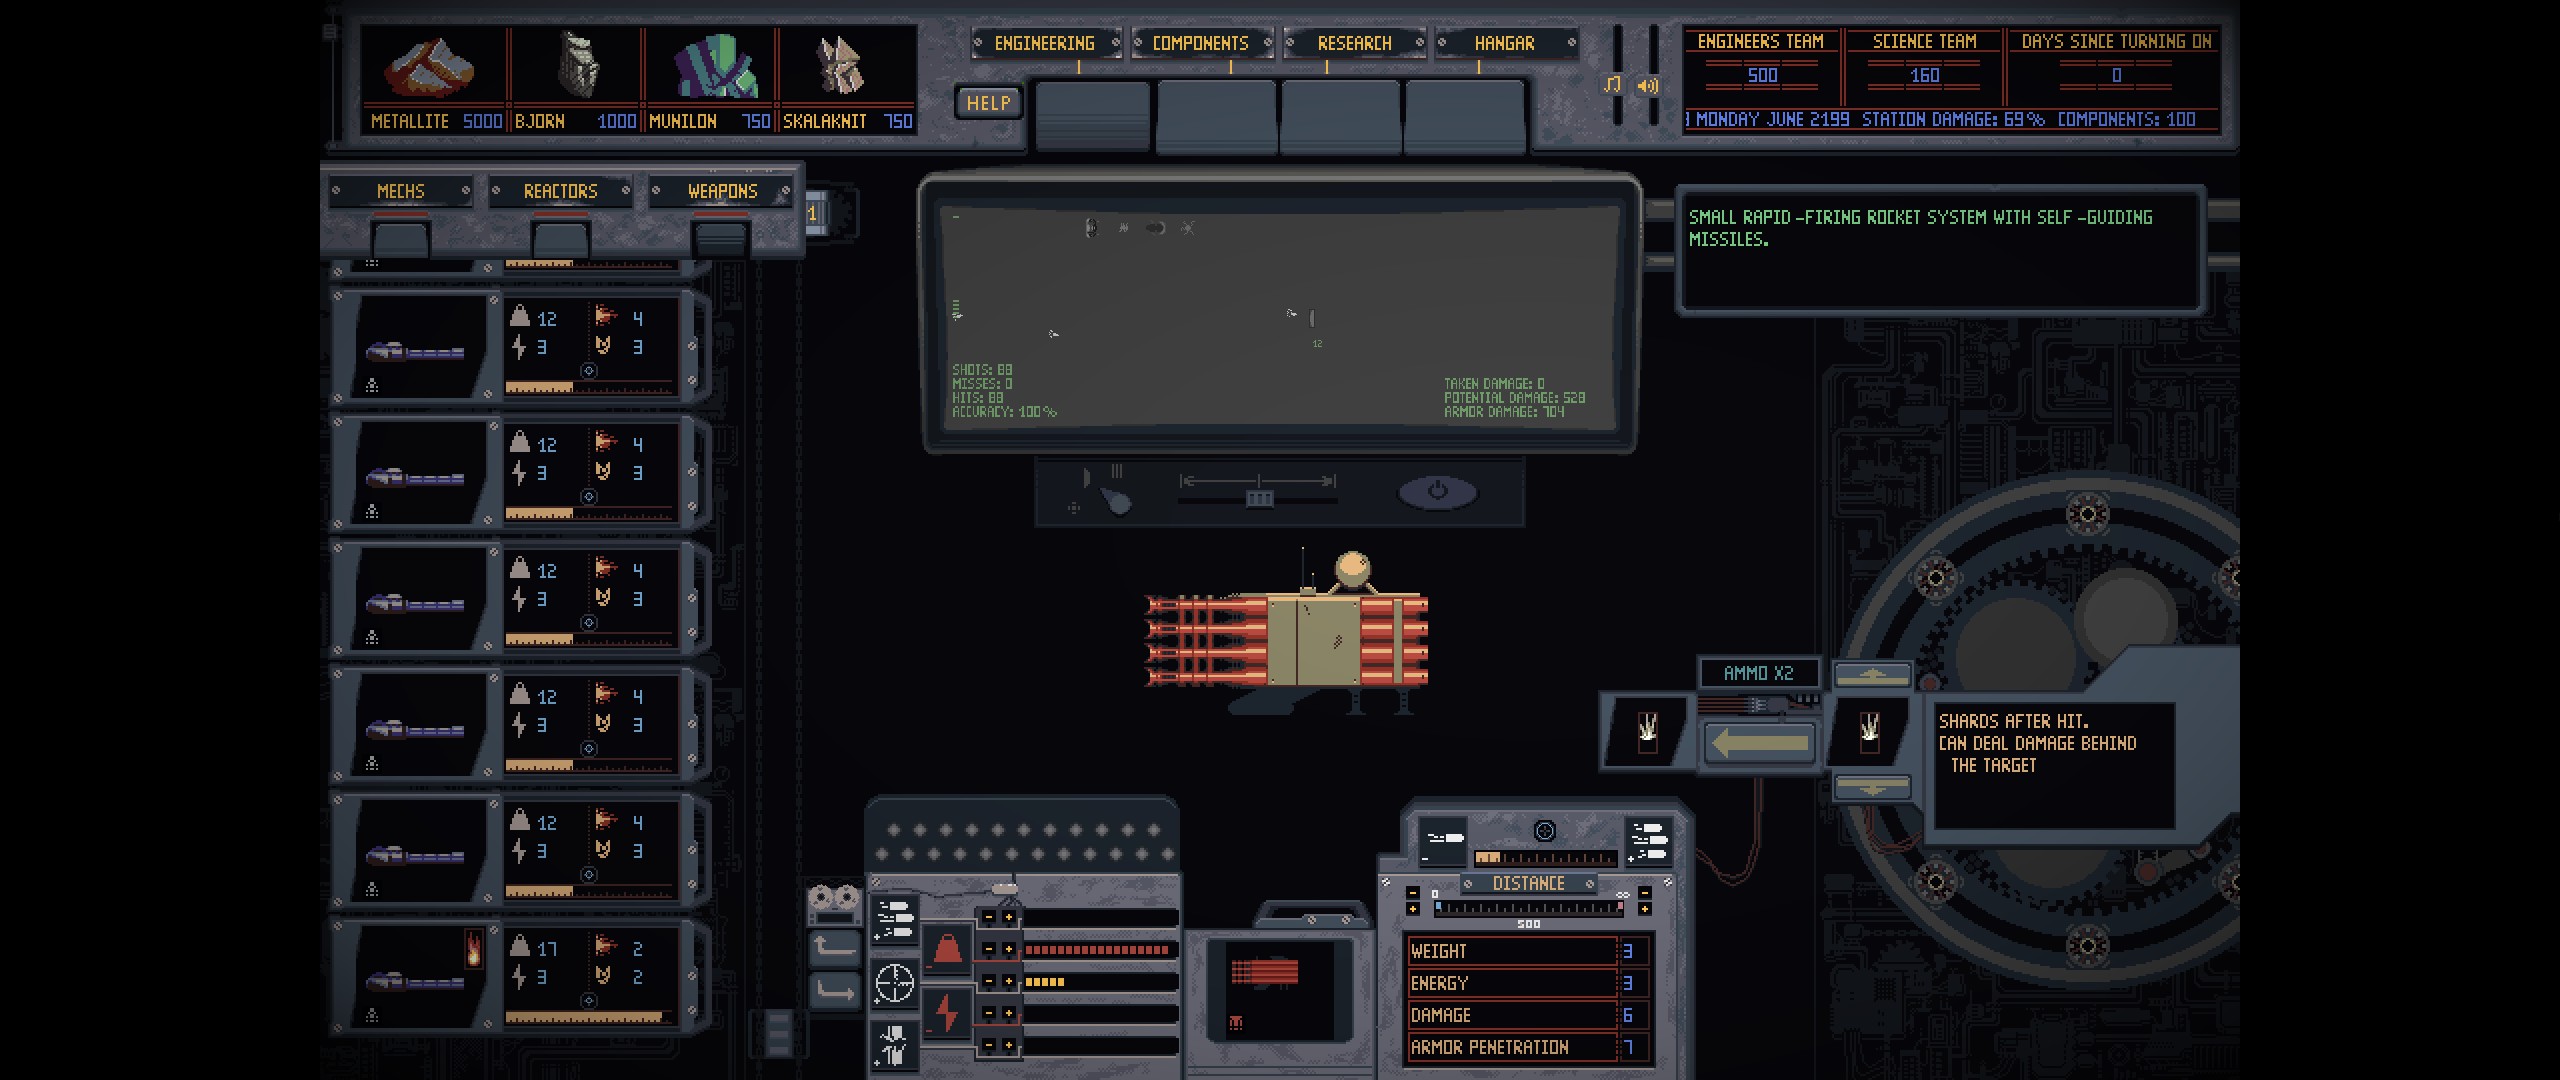
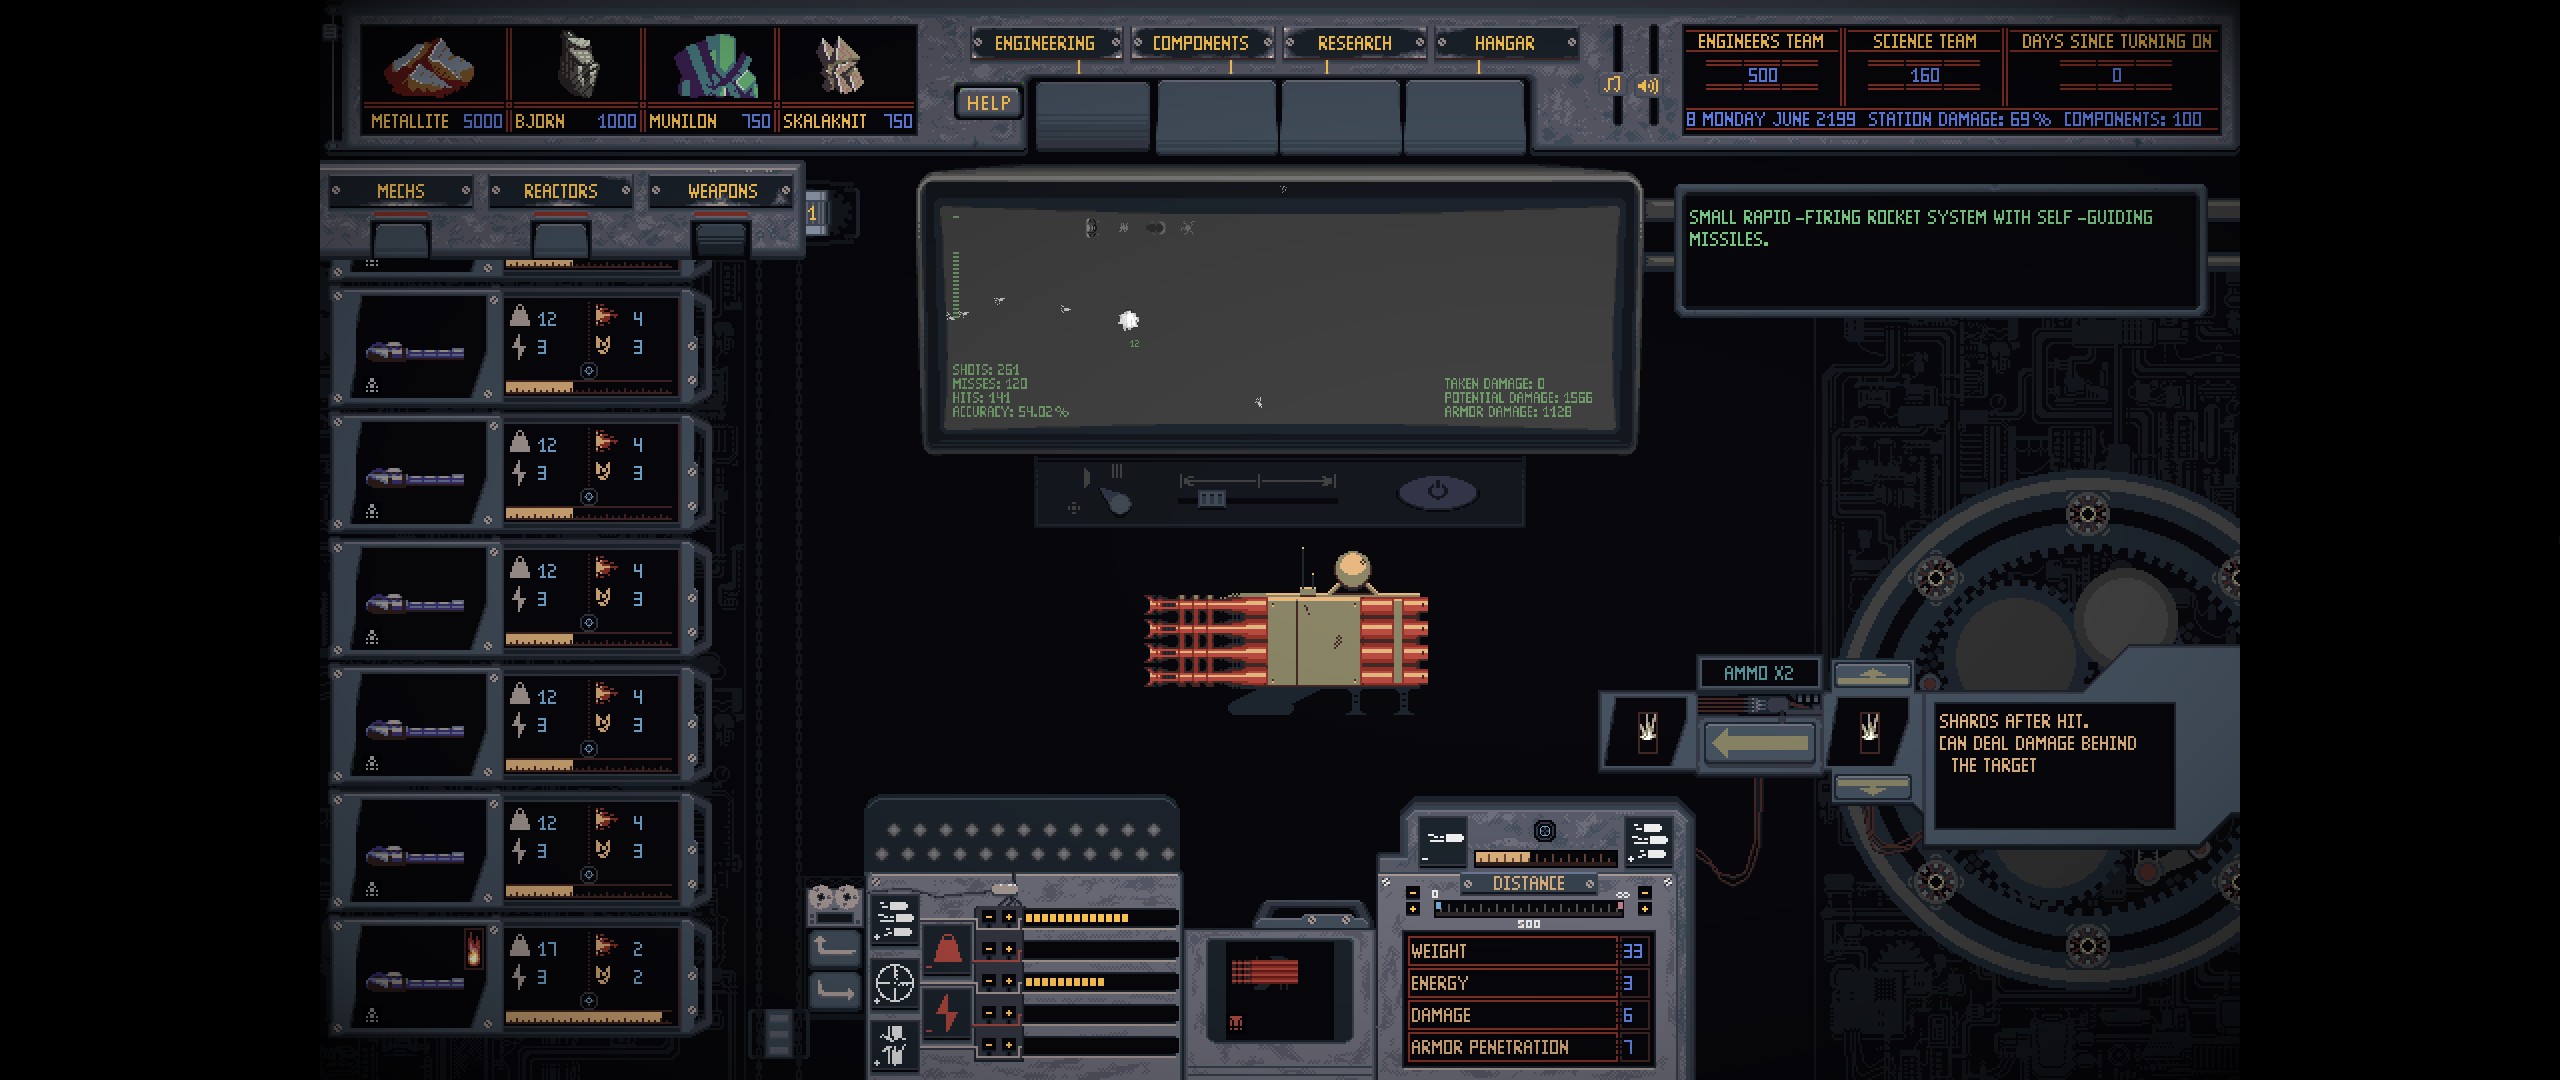
Because the missile system is so heavy, you’ll need to put most your customization points into reducing its weight until you unlock stronger motors. Once you have stronger motors, you can move all the customization points to rate of fire and accuracy.
Here’s an example of a early game missile system:
And an example of a missile system once you have stronger motors:
Enemies
Turrets
Turrets are present in every mission, regardless of the listed enemy types for the mission. You can’t tell what type of turrets are going to be in a mission, but in general, you’ll only see bullet turrets for the first dozen or so missions, and then see the other turret types start to show up in later missions.
You can’t tell your mechs to prioritize targeting either bullet or energy turrets at the moment, since they’re not selectable in the enemy types.
So the only way to deal with these turrets is to sit just outside their range, and then wait for your mechs to decide to target and destroy the turret so you can continue on. There is currently no way to tell your mechs to target the turret, they’ll just do it when they feel like it.
Bullet Turrets
Bullet turrets have a large attack range, and do a lot of damage. If you have a mech sitting in range of a bullet turret, it will take a lot of damage very quickly. Your starting mechs can be killed in just 2-3 seconds of being in range of a bullet turret.
If there’s a turret behind a wall that you’re having trouble hitting from outside its range, use artillery to clear the wall so you can take it out. If you can’t use artillery, you’ll need to wait until the enemy spawn rate lowers to its minimum, then rush the turret with your mechs to take it out as fast as you can to minimize damage to your mechs.
These turrets are one of the most difficult regular enemy types in the game to deal with, and for some insane reason the develop decided it was a great idea to put them in every mission from the start of the game. This has caused every mission to completely devolve into an extremely tedious exercise of slowly walking to just outside a turret’s range, then doing nothing for a couple of minutes until your mechs finally decide to target and destroy the turret, and then moving on to the next turret to do the same thing again. I really hope the developer addresses the issues with turrets soon.
It’s not clear what the stats are for this turret, since they’re not shown in-game.
Armor: ?
Health: ?
Damage: ?
Resistance: ?
Missile Turrets
Moderately difficult to deal with, but not too bad. You can select them as an enemy type to prioritize, and you can counter their rockets with active armor. As long as you have some reactive armor, and you don’t let them take too many shots at you, you shouldn’t have too much trouble with them.
Armor: 10
Health: 550
Damage: 7
Resistance: Missiles
Energy Turrets
This seems to be the easiest turret type to deal with. Energy Shields seem to completely shut down their attacks. I’m not sure if there’s a way for them to bypass your energy shields – I haven’t seen it happen yet. You only need a single energy shield on your mechs, as long as all your mechs are in the radius of the energy shield.
It’s not clear what the stats are for this turret, since they’re not shown in-game.
Armor: ?
Health: ?
Damage: ?
Resistance: ?
Regular Enemies
If there’s actual names for these guys, just let me know.
Spiderlings
The basic enemy type, you’ll find thousands of them in every mission. They’re very easy to kill, and mostly just act as a check to make sure you have a high rate of fire. If your mechs have a high enough rate of fire, these shouldn’t cause you any problems. If you’re having trouble with spiderlings, reconfigure your weapons to increase their rate of fire.
Armor: 4
Health: 9
Damage: 5
Resistance: Laser
Ram
When these enemies see one of your mechs, they will charge up for a couple of seconds and then rush at one of your mechs at a very high speed to cause a large amount of damage.
Rams are completely shut down by slow mod weapons. Make sure you have a couple of Mechs with slow mod weapons set to target the Ram enemies if you’re going into a mission with Rams.
Armor: 12
Health: 800
Damage: 13
Resistance: Ballistic
Lasso
These enemies don’t really do much damage, but have an extremely dangerous special ability.
They will get to within a medium range of your mechs and then latch onto on of your mechs and pull them away. This will disable your mech, and will allow the regular spiderlings to attack it. Regular spiderlings will do a massive amount of damage to a disabled mech very quickly, making this ability extremely dangerous.
The best way to deal with this enemy is to only move when the enemy spawn rate is low. Find a place with long sight lines to wait in when enemy spawn rate increases. With long sight lines, you can take out the lasso enemies before they get into range to use their ability on your mechs.
If you are in a tight area with a high spawn rate and lassos present, you are probably going to lose your mechs.
Armor: 6
Health: 700
Damage: 13
Resistance: Fire
Bullet Shooter
Long, Shoots Bullets.
Armor: 9
Health: 950
Damage: 0.5
Resistance: Missiles
Big Bullet Shooter
Armor: 14
Health: 1450
Damage: 10
Resistance: Missiles
Energy Attacks
This is the only enemy that energy shields affect.
Armor: 14
Health: 2700
Damage: 24
Resistance: Laser
Mech Eater
Armor: 14
Health: 3700
Damage: 34
Resistance: Fire
I hope you enjoy the Guide we share about Mech Engineer – Gameplay Guide + Location Walkthrough; if you think we forget to add or we should add more information, please let us know via commenting below! See you soon!
- All Mech Engineer Posts List


Leave a Reply