
Introduction
There are several topics you need to be familiar with to make a mod for Last Evil. Namely, you’ll need to:
- Be able to create a C# project that builds a DLL (probably with an IDE like Visual Studio or VS Code);
- Reference some of the DLLs Last Evil ships with in the C# project;
- Look up the C# programming code used by Last Evil (ex: with ILSpy);
- Adjust or avoid the code used by Last Evil with a Harmony Postfix or Prefix function; and
- Have a basic understanding of the Unity game engine.
Depending on what you want to do, you may also need to:
- Extract the Last Evil resource bundles;
- Unencrypt the Last Evil data tables;
- Read Unity YAML serialization files; and,
- Package your assets as a resource bundle.
Making a C# .NET Project with Visual Studio
Get Access to an IDE
For this section, I will be using Visual Studio Community 2019. Visual Studio Community is an integrated development environment (IDE) that, among other things, will allow you to make C# projects that can target the .NET framework. It is probably free for you to use, but see Microsoft’s documentation to make sure.
Create a New C# Project/Solution
Depending on how you set the IDE up, Visual Studio may open to a project screen first or it may open to a blank workspace. In the second case, you should click File -> New -> Project…
Once you’re on the Create a new project screen, select “Class Library ( .NET Framework)”.
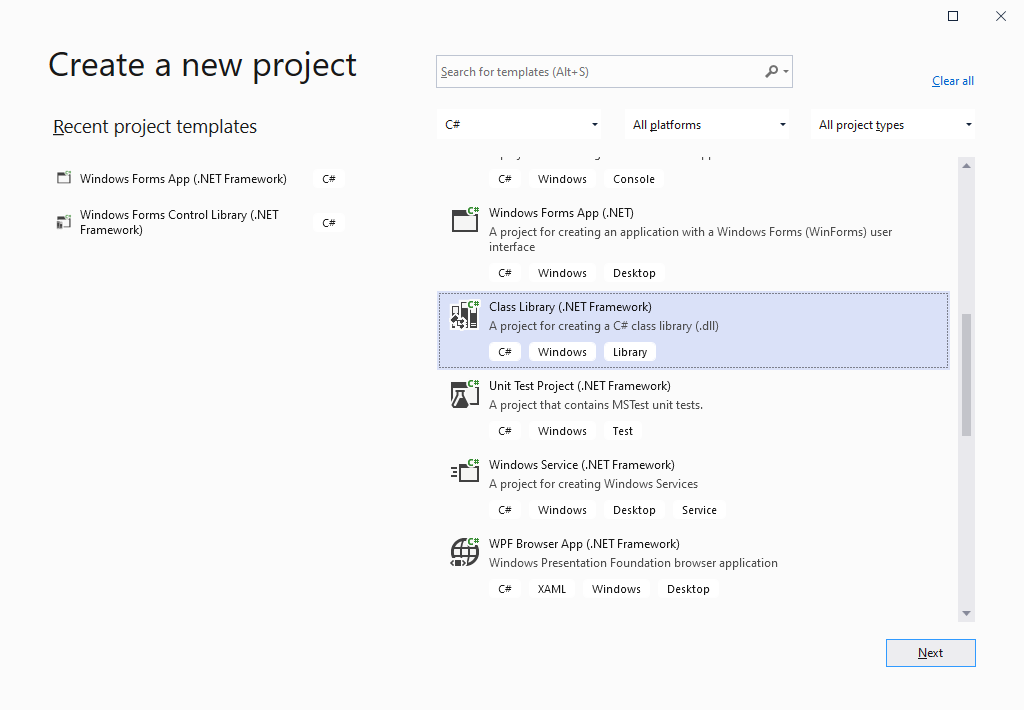
Click Next.
On the Configure your new project screen:
- Name the mod something instructive.
- Pick the location you want to store the project/solution in (NOTE: a new folder will be created automatically with the solution and/or the project’s name at that location).
- Optionally, check Place solution and project in the same directory.
- Make sure you target a framework release (like .NET Framework 4.7.2) rather than any of the .NET Standard/Core variants.
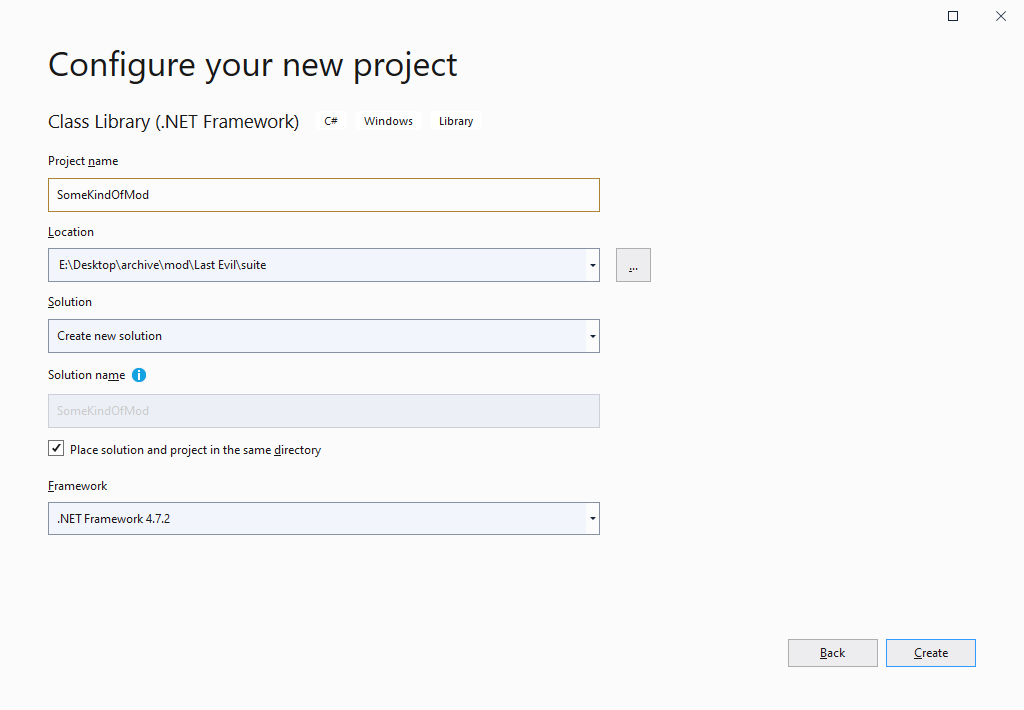
Click Create.
You should now have a blank project that can build a dynamic linked library (DLL). That DLL is the Class Library the project type builds. It is also what will be referred to as an “assembly” elsewhere in this guide.
Project Arrangement Suggestions
Because of your end goal of making a mod, there are some things that will make development easier to do here but are ultimately completely optional.
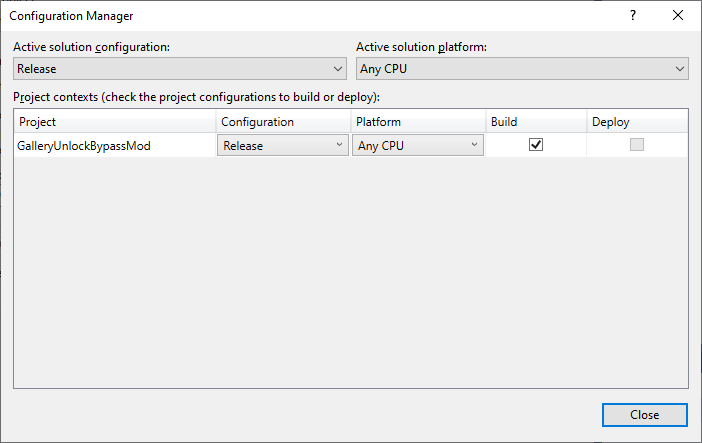
- Delete the Debug build configurations so that only Release configurations remain, since you probably won’t be debugging the class library by attaching a debugger.
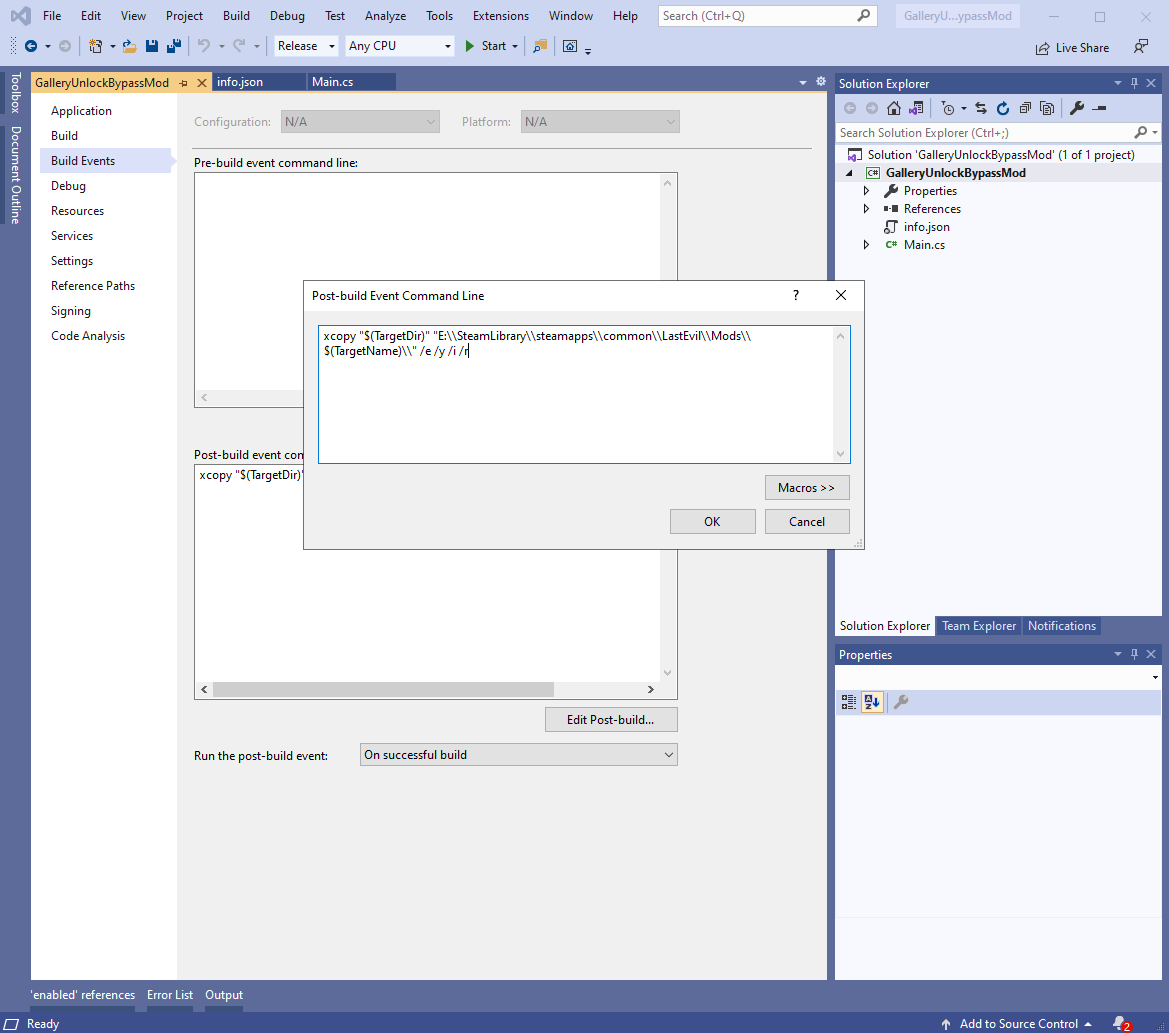
- Add a post-build event to copy the build directly to the Last Evil Mods folder. Post-build events are on the Build section of your project’s settings (which can be accessed via right-clicking the C# project in the Solution Explorer then picking Properties). Replace the directory used with where your copy of Last Evil is:
xcopy “$(TargetDir)” “E:\\SteamLibrary\\steamapps\\common\\LastEvil\\Mods\\$(TargetName)\\” /e /y /i /r
This step working as-is depends on you naming the project/solution what the mod’s “Id” will be (see next section). If you named it something else, you will need to replace “$(TargetName)” with the value you use for “Id”.
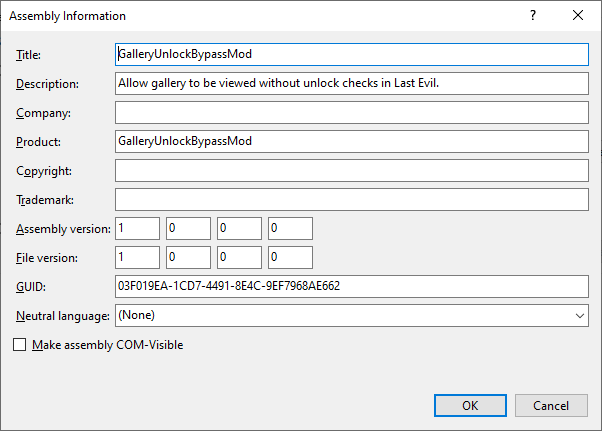
- Edit the Assembly Information to be accurate. It’s accessed from a button on the Application section of the project’s settings.
- Have the IDE show whitespace via Edit -> Advanced -> View White Space.
Adding Mod-Specific Things to the Project
Add The Mod Package File (info.json) to the C# Project
The Unity Mod Manager program that will eventually run this mod looks for a file called “info.json”. This file will contain the following items:
- Id
- DisplayName
- Author
- Version
- ManagerVersion
- GameVersion
- AssemblyName
- EntryMethod
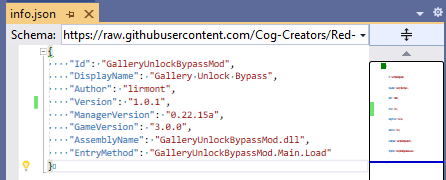
Id
This should probably be the name of the C# project. It also needs to be the name of the folder where this mod will reside within the Mods folder of Last Evil.
Display Name
How will it show up in-game if someone clicks the Mod Manager button.
Author
Some name.
Version
The version number for the mod. Probably in the format major version, period, minor version, period, revision.
ManagerVersion
When you open the Unity Mod Manager, this is the version number displayed. It can probably always be: “0.22.15a”
GameVersion
The first game version of Last Evil where this mod will work. The game version is located at the lower-left of the game’s main screen. It can probably always be: “3.0.0”
AssemblyName
The name of the DLL from the build process.
EntryMethod
The static function to call when the Unity Mod Manager tries to run the mod. See further down for templates.
Referencing Unity Mod Manager, Harmony, and Last Evil
In the Solution Explorer, there is an option called References. Right-click that and Add Reference.
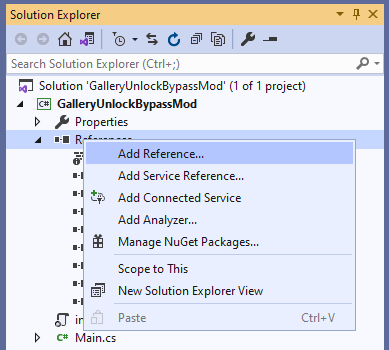
You need to select Browse… from the bottom buttons, then navigate to Last Evil’s directory, then LastEvil_Data, then Managed, then finally UnityModManager. You want to double-click UnityModManager.dll here to add it as a reference to the project. Repeat this for 0Harmony.dll, which is the patching library.
Continue adding references, but go back to Managed. This folder contains Last Evil and the Unity game engine libraries. Last Evil is Assembly-CSharp.dll and Assembly-CSharp-firstpass.dll, so add those. Add Unity game engine libraries as you need them (or add them all if you don’t know what you need and don’t mind the complexity).
At the end, you should have something similar to this:
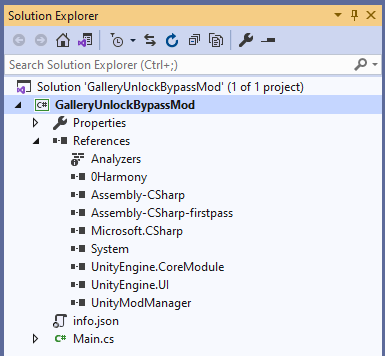
Configuring the References
Select the references you just loaded, and go to the Properties tab. Copy Local needs to be set to “False” to prevent these DLLs from being copied into the build folder (which, if you’re following my suggestions, would in turn copy them into the mod’s directory). They don’t need to be re-included by your build; Last Evil loads them already.
Adding theLoadEntry Point andOnToggleHandler
Now that the Unity Mod Manager and the patching library (re: Harmony) have been referenced by your project, you can use this template after replacing the namespace with your project’s namespace (remember, the namespace is important to the entry method you specified in the info.json file earlier):
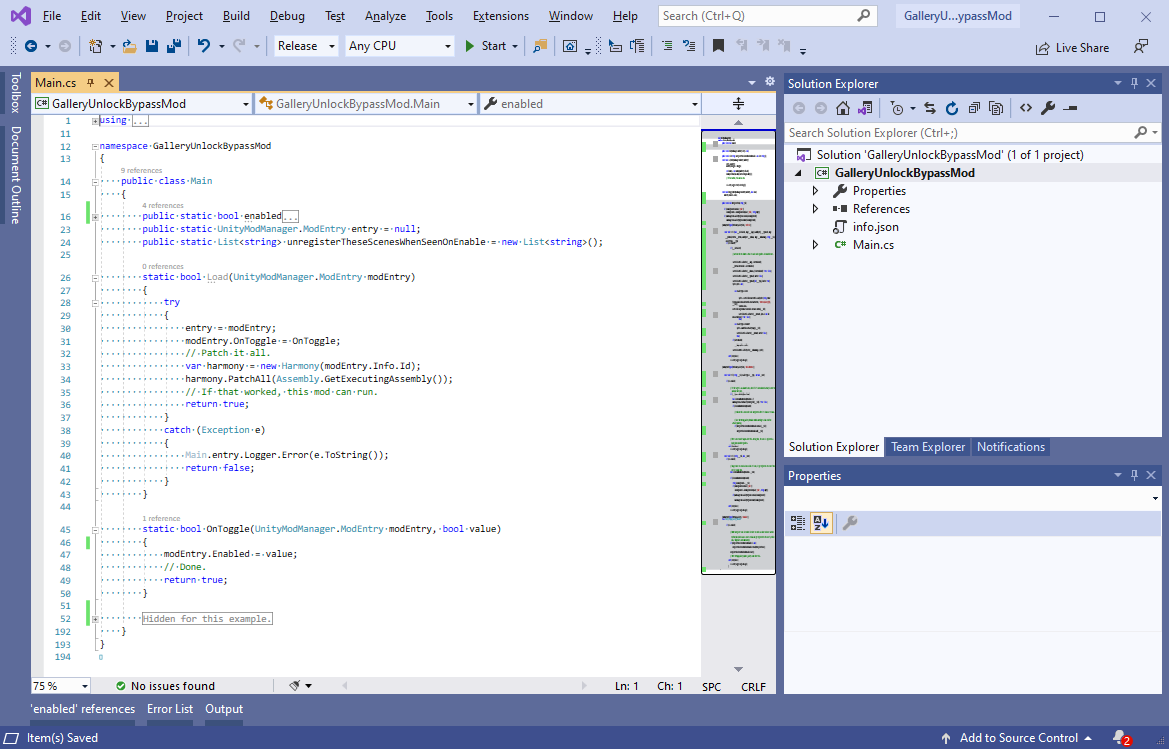
Finding Functions to Patch
Using ILSpy to Read Code
The DLLs your project referenced in the previous section contain readable programming code, provided you use the right tool. Visual Studio on its own will only let you browse certain information. A program like ILSpy on the other hand will reconstitute programming code if it’s there (re: if the compilation process didn’t obfuscate it or further virtualize it to prevent you from reading it). ILSpy is available on the internet or as an extension for Visual Studio.
However you do it, open ILSpy to the main Last Evil DLL: Assembly-CSharp.dll.
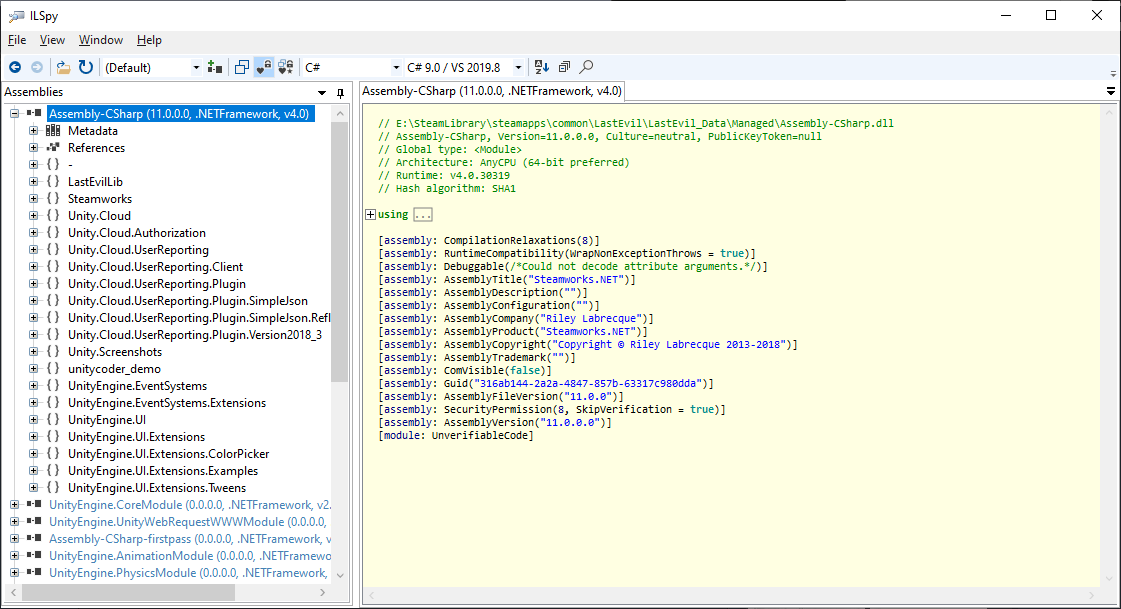
Finding What You Want
The two sections you should be interested in looking through are “-” and “LastEvilLib”, but anything is fair game.
Generally, I search (Ctrl+Shift+F) for a partial name and hope for the best. Your other option is to expand the trees and start reading.
For example, if I was interested in the gallery, I’d search for that, like:
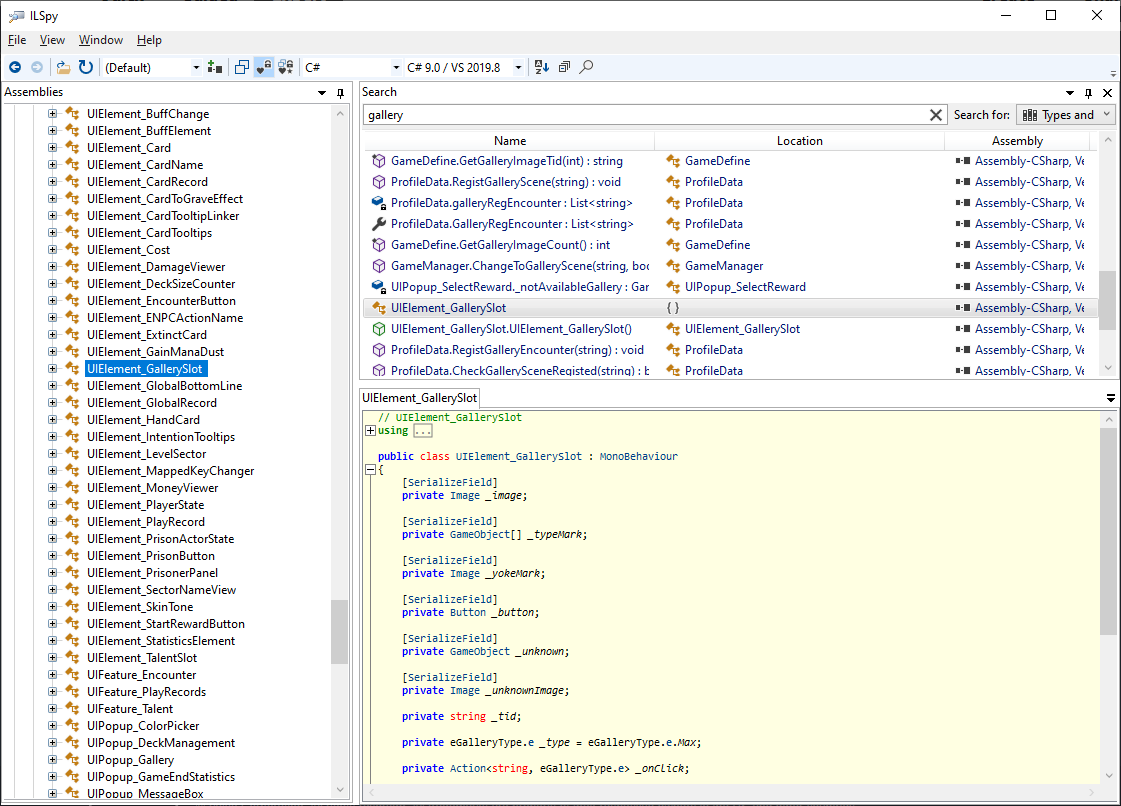
Then I start clicking through things. Maybe I find what I’m looking for. For the next step, I need to know:
- For the patch header attribute declaration:
- The class name,
- The function or method name, and
- The types of the arguments the function/method takes (in order).
- The names and types of any private variables I want/need access to.
In the next section, examples will be walked through.
Example: Patching the Gallery (as seen in GalleryUnlockBypassMod)
PatchingUIElement_GallerySlot‘sRefreshMethod
To reference the method, we need to pass its signature to the patching library. This is done via an attribute above a class definition. In this case, it looks like this:
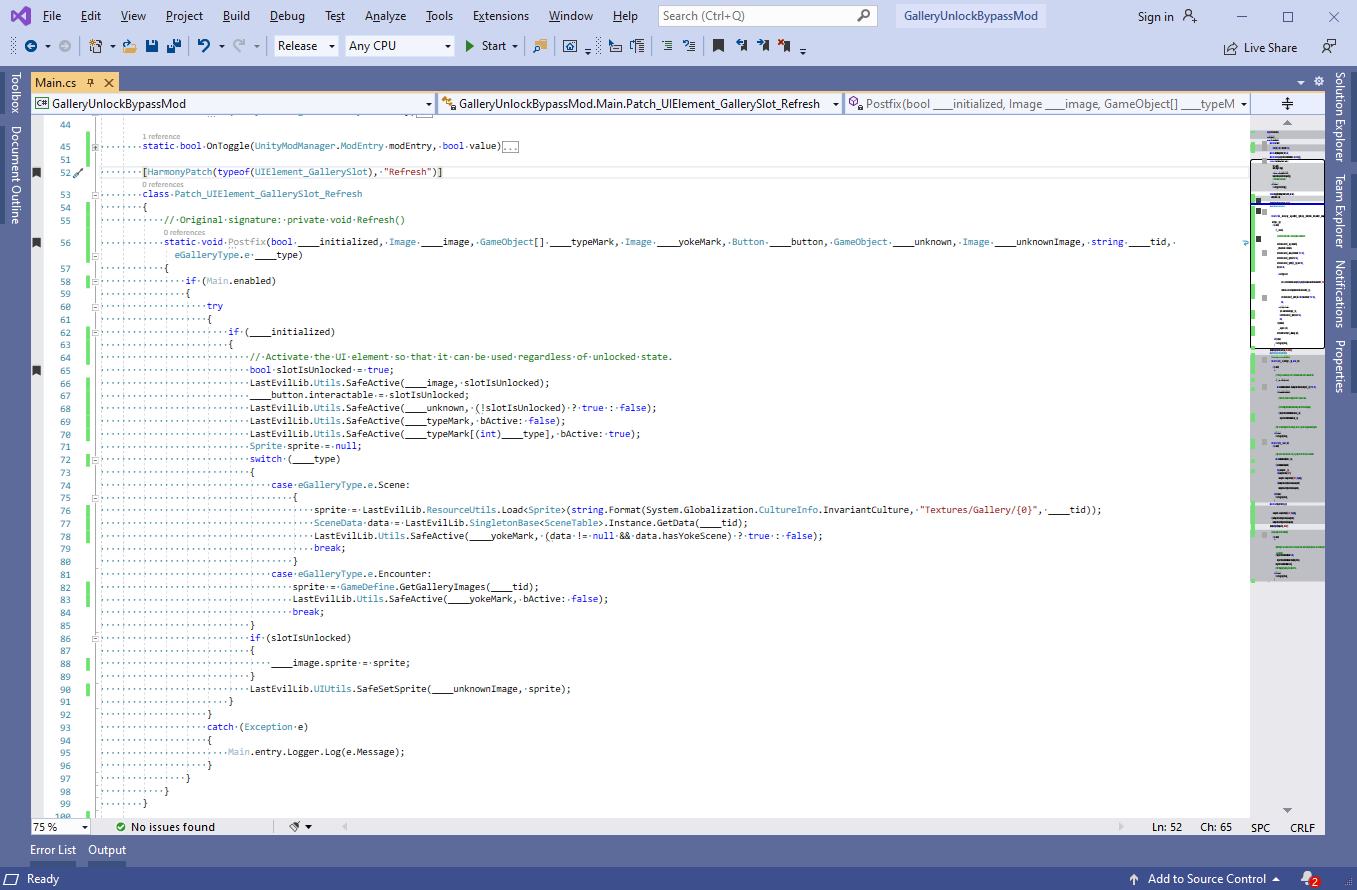
Now, the original code for that method looks like this:
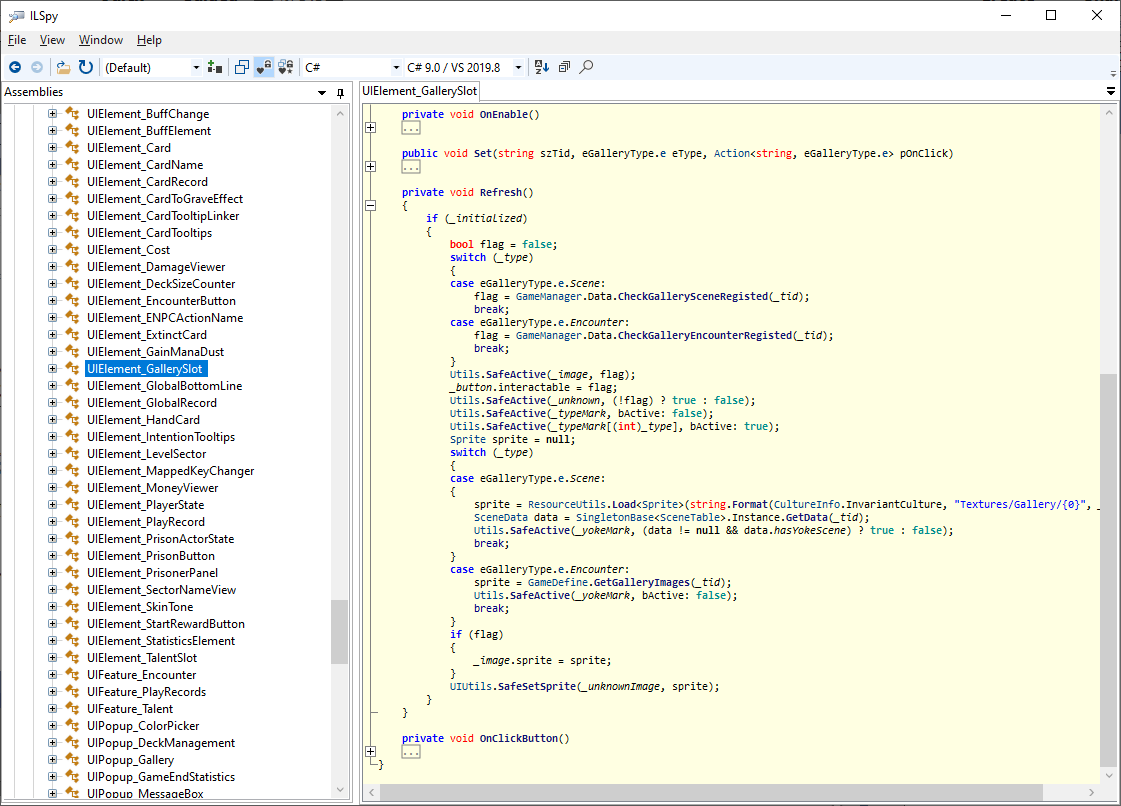
Having read through it, I can see that it begins by checking if the scene/encounter is unlocked by the player. If not, the UI element is disabled. Well, the point of this mod is to have everything like this enabled. I think I can have it do what I want without skipping what it already does, so the type of static function I’ll use will occur after the game’s method runs (re: a Postfix function).
So, I create a static Postfix function. Then, I copy the game’s code, wrapping it in an block that checks if the mod is enabled. I now have to account for the variables used by the game’s code. To do that, I prefix all the private variables referenced by the game code with three underscores (re: ___) and put them in as arguments for my Postfix function. Now, I remove the parts of the game’s code I don’t want (ex: the check for registration). I also enforce the choices I do want (ex: always enabled/unlocked).
Now, I build the mod’s DLL via Build -> Build Solution (or F6). Since I set up a post-build event to copy the result to the appropriate directory within Last Evil’s installation, I can run the game to check that this worked. And, when I did this, it did work, however there was a side effect. Clicking the element changed the scene, and changing the scene is apparently where the registration happens. I didn’t want that, so how I handled that is covered further down.
PatchingUIElement_GallerySlot‘sOnClickButtonMethod
So I see I can hook into when a slot is clicked. When that happens, I want to know ahead of time so I can find out if the player already has the scene unlocked or not. If they don’t, I want to make sure they don’t after everything happens. That looks like this:
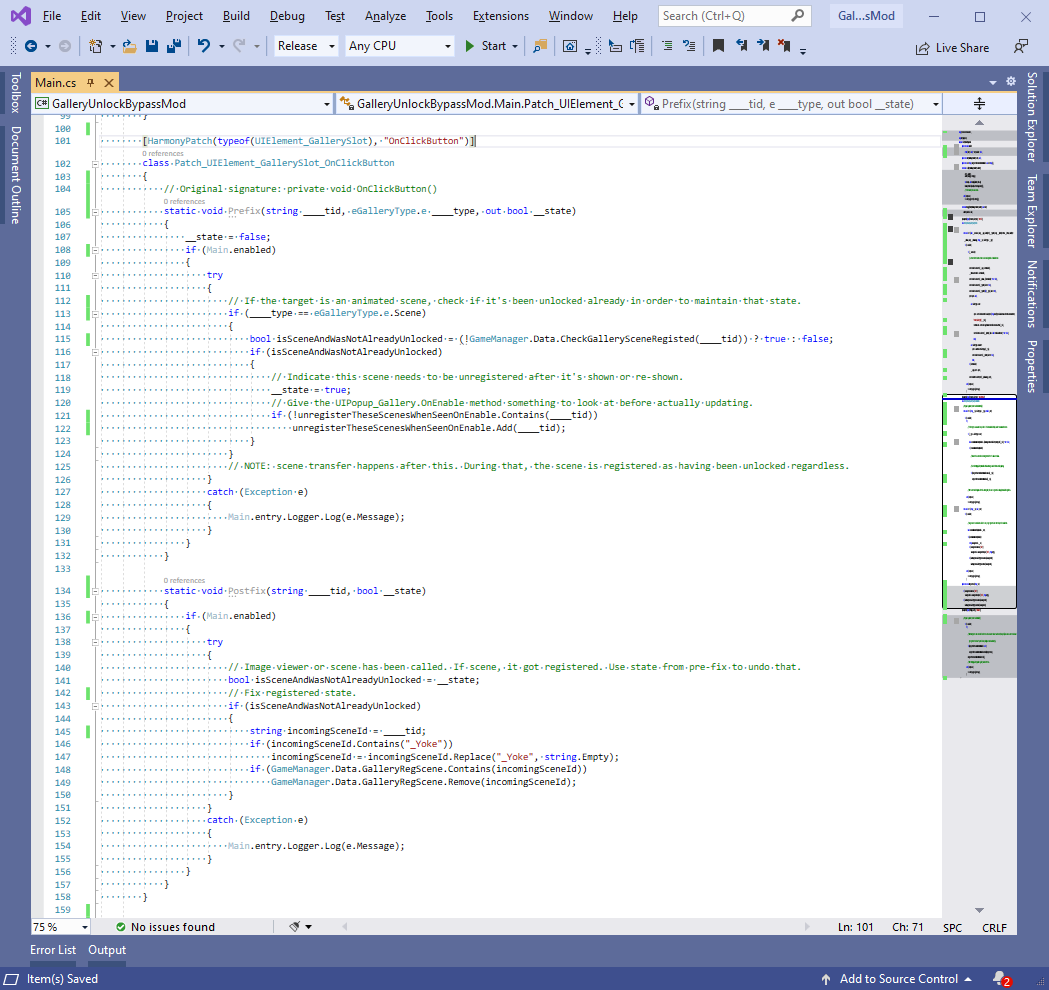
So I start keeping track of scene IDs with the intent of unregistering the ones the player didn’t already have unlocked. I do this at the local level, which catches most cases. However, when testing, I found out that the scene would still register if I picked the yoke option from within the scene. So, that had to be undone somehow too (covered further down).
PatchingUIPopup_Gallery‘sOnEnableMethod
Since I know that we’re only interested in the transition from the popup gallery to scenes and back again, I know I can hook into the point where the popup gallery is shown again. So, before anything happens, I want to undo the unwanted registrations. That looks like this:
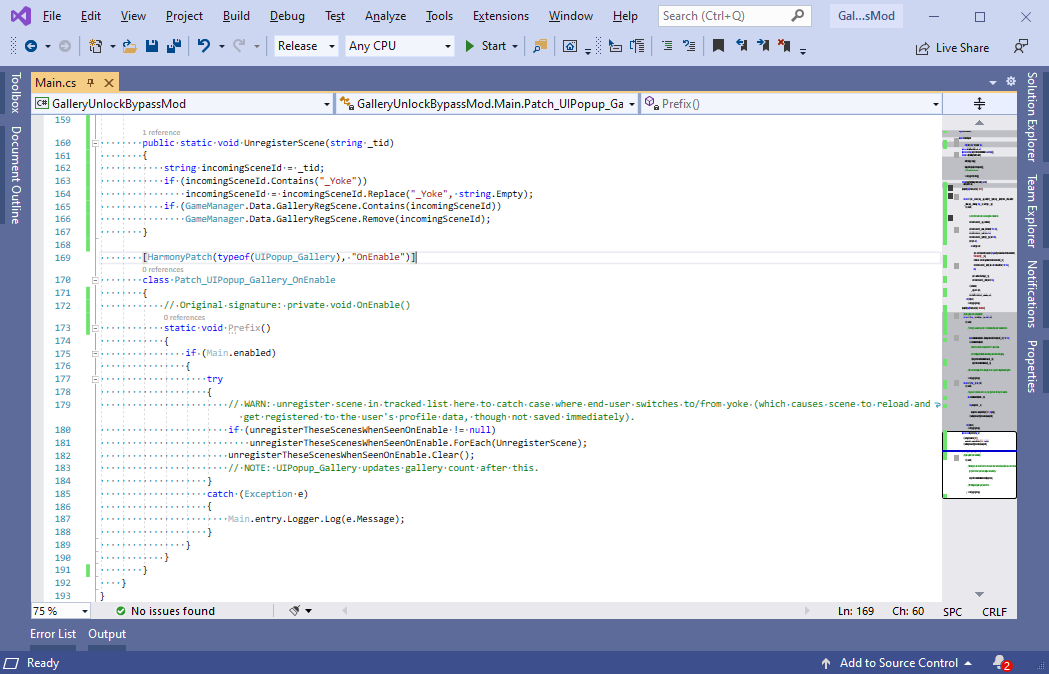
And now, after testing, I see it does what I want.
Wrap-Up
The process took me several hours from the point I figured out that I wanted to make this mod. I abandoned several failed approaches within that timeframe before eventually settling on this.
Hope you enjoy the Guide about Last Evil – How to create a Mod Guide, if you think we should add extra information or forget something, please let us know via comment below, and we will do our best to fix or update as soon as possible!
- All Last Evil Posts List


Thank you, this was a very useful guide. I just have a suggestion though, your function might be more readable if you changed the code in Patch_UIPopup_Gallery_OnEnable to the code below instead of chucking everything in an if block, less nesting ftw 🙂
class Patch_UIPopup_Gallery_OnEnable {
static void Prefix {
if (!Main.enabled)
{
return
}
try {
etc etc