Introduction
Well hello there, my name is Nashtyx and you probably clicked on this guide either out of curiosity, boredom or that you actually want to start playing or improve at CD.
The reason I’m making this guide is because of the current state of CD community – there’s lack of newer players, players I see in CD-like pubs seem to be very stagnant in terms of skill and have a very VERY unhealthy mindset about the game, so I figured I’d do my part in trying to save the CD community, since I believe it is very underrated.
I took part in many “records“ which can be seen in my screenshots of KF2 and also some video examples later in the guide, I hope I can teach you something now, despite my playtime not being very huge.
Having said that, I hope this guide will help guide you through various parts of more serious CD.
What CD actually is and why should I play it?
What even CD is?
If you are not familiar at all with the term CD, it stands for Controlled Difficulty, meaning it allows you to edit certain parts (difficulty) of the game. It makes the game way less random and is used to make the game harder for the most part.
Why should I play CD?
I personally think it elevates KF2’s potential as a coop game, you remove a lot of frustrating randomness of the vanilla game, such as zed teleports and irregular zed spawns, it’s the only way I play KF2 for the past half a year, since it feels so much better. CD is a gamemode that feels really rewarding when you get the victory, be it on your first try on your third, fifth, etc. It really requires a lot of team coordination, mechanics and other similar stuff when playing harder settings and as I said, the satisfaction from winning is incomparable to winning a vanilla HoE game. You don’t have to play super tryhard settings either, just making the game a bit harder for your team’s abilities feels like a very good idea to me.
Different commands
Here are the commands to simply play, not customize
- !cdr (!cdready) – tags you as ready, once everyone is ready, the trader countdown resumes
- !cdot (!cdopentrader) – opens trader remotely, saving you the hassle of travelling
- !cdinfo – shows the basic information of the game (more on that soon enough)
- !cdinfo full – prints out all the information to the game console (open with tilde)
- !cdwho – shows who is ready and isn’t and also spectator users
- !cdms – shows you your stats (please don’t be cringe and overuse it)
- !cdstats damagetaken (larges, damagedealt, etc.) – prints out certain game stat and shows each player’s “score“
Note: I highly advise to bind !cdr and !cdot to a certain key, you will be typing it very often.
Example:
SetBind Y “say !cdot”
SetBind X “say !cdr”
Here are some basic difficulty commands and fast explanation how to edit them:
- !cdmm 32 (!cdmaxmonsters) – sets how many zeds can be alive on the map at one time, in this case 32
- !cdsc basic_heavy (!cdspawncycle) – these are spawn presets that make the game less random in a way that there is set amount of each zed type to spawn each individual wave, only random thing is the location (lane) they spawn at (basic_heavy, ts_mig_v1, osffi_v1, ts_mig_v3, dtf_v1, etc.)
- !cdsp 1 (!cdspawnpoll) – sets the interval in which spawns (replacements) take place, the higher the number, the slower the game feels
- !cdcs 7 (!cdcohortsize) – this is the amount of zeds that spawn in a group (interval)
- !cdzt vanilla (!cdzedtype) – shows if the zeds are either vanilla, harder or nightcore, tremendously changing the difficulty, however vanilla is used 99% of the time except some EU constructed games.
These are the basic settings that are most influential on the game itself, to find more settings, simply print out the whole settings with “!cdinfo full” and find a thing you want to change
Example
If I want to change DoshKill = 1 to 0.8, all I need to do is type !cddoshkill 0.8 (or just !cddk 0.8)
There are obviously many more commands, these are just some fundamental and elementary ones to understand to properly play CD, you will find more commands yourself over time.
Where to play and find games
You can fairly easily find servers such as HoE++ and Easy CD, which are both fairly active but are only very roughly comparable to actual constructed CD games. Those servers are fine for some chill gaming session (however you might get triggered by your teammates, trust me) and to learn the basics of higher difficulty.
If you really want to play CD, you should join either (or both) of these servers:
CD Hub (mostly EU)
Tamari’s Discord (mostly NA)
(Link TBD)
Note: CD Hub was recently created by my friend Terry and for that reason is still very scarce in players, YOU could change that ;)))
Common mistakes and their fixes
To me, by far the most obnoxious thing of playing pub CD games is the lack of healthy mindset. Maybe you don’t understand what I mean but if you actually play more constructed games, you will find out. People seem to be very self centered in a way, let me explain.
Here are things you should watch out for and change immediately if you happen to do either of those:
Stats are your priority
Okay, don’t get me wrong, even I like to have nice headshot percentage, high damage output etc. However you should never put your stats to the foreground, what is most important is your team and doing your job before milking your stats. I see so many players judging how every player performed just by stats, constantly checking damage dealt and so on. So remember, always try to hold your lane and do your job, helping others if your lane is empty. Headshot percentage won’t hold the lane for you and damage dealt witll not substitute you raging 4 FPs or having wrong target priority.
You are sensitive to advice and constructive criticism.
Once again, no one likes being told what exactly to do but if your team struggles in a certain way and a more experienced player (you can usually tell who is and isn’t) gives you advice – stand closer to this point, freeze more often, etc. you should definitely at the very least consider their advice, it can make a world of a difference. Next time you play you can implement their tips and see the game more clearly yourself and help you understand the game mechanics and strategies better.
Giving up after a loss
This goes hand in hand with the previous point, most of the experienced players or “higher tier“ players wouldn’t get mad at you for failing because of clumsy mechanical skill due to inexperience and similar issues. That is assuming you aren’t an egoistic meanie and have terrible mindset, watch out for that. Improving comes at a cost of trying (failing), so don’t feel discouraged and feel free to ask for advice if need be.
You bodyblock other’s shots
Okay I won’t lie, this is what a lot players seem to do for whatever reason and it’s really annoying when people do that (significantly more for sharpshooter players). Typical situation, newbie gunslinger duo lanes with sharpshooter and facehugs everything, walks in front of sharpshooter. It’s very important to have good positioning to maximize your DPS, you should not however render your teammate useless like that. Next section is all about positioning, so you can learn from there.
Not being considerate of other’s economy
You should always look at team’s dosh, not only yours. When playing games with harder dosh per kill (overall), some perks can be very hurt (mostly SS) in their economy after first wave. Why you might ask? Well SS is stuck with winchester that is used for killing 1st wave larges, potentionally mediums and their 9mm, making it fairly hard to get enough kills. They also need M14 on the 2nd wave, which is about 1300 dosh atleast required. Commando, GS and even Medic don’t really need anything else than a 2 tier weapon – commando can get a bullpup or just stick with AR15, GS buys an SPX, maybe single deagle and medic can stick with their 101 if the team is good enough or upgrade to whatever seems convenient. Having said that, PLEASE share your money with SS after 1st wave so he can get his M14, he will return the favor later in the game, trust me. Judging the situations when to share your dosh can vary by the lane you’re holding and the overall economy, with experience you will realises when to share and when to upgrade yourself.
Being a meanie
Okay I’m often a meanie (and a pretty huge one) myself but I like to believe it is justified, since I do not mind mechanical skill mistakes, as I explained above but if someone is being toxic, inconsiderate or simply refuses to communicate, I classify them as certified meanies and stop being very friendly around them. So please, try to be a friendly person and everyone will have an amazing time – you don’t have to talk much if you don’t feel like it, that’s entirely okay but focus on making important call-outs.
Proper positioning
Here I will explain how to do it correctly in my own opinion:
Solo lane
Regardless of perk you play, you have the entire lane for yourself, so you can pretty much position however it is convenient for you, usually staying in the middle of the lane and trying to let medic have clear sight of you. Solo lanes are mostly gunslinger lanes, occassionally sharpshooter. Gunslinger is easier to manage due to your zedtime power, melting larges without having to worry about trash and being able to recover from mistakes easier. As sharpshooter, you get heavily punished for mistakes since you lack Fan Fire, have M14 with 20 bullets and 10 burst bullets of SPX, more on that in SS section.
Note: Commandos rarely solo lane, especially without vanilla FAL – they can assist in takedowns etc. but there are very few lanes on harder settings you could solo.
As gunslinger with SS
You should stand a bit more to the front so that you get (or most of) the aggro, making it easier for you to connect shots more effectively due to your shots coming from two places (left and right pistol) and also your lower effective DPS range, compared to SS.
As gunslinger with Commando
Similar to holding with SS, you should stay in the foreground a bit to have the aggro of larges. A good commando will clean trash zeds off of you, so you will focus larges all the time, sometimes trash clearing if there is way too much trash or commando needs to reload their guns. Your duty is to prepare zedtime extensions on bloats, weakening scrakes and if possible letting headless FPs survive for them to extend of too – requires good comms and will be explained a bit more in detail later in GS section.
Note: Don’t kill trash, if commando is clearly saving it for zedtime extensions, it’s very easy to tell by their behaviour or comms.
As sharpshooter with gunslinger
You should stand a bit more to the back so GS gets the aggro, you have way easier time shooting off-aggro (requires adjusting your aim) due to shots only coming from one place, unlike gunslingers akimbo pistols and having a very high effective DPS range.
As commando with GS/SS or both
Stay behind your DPS perks while having clear view of the lane, feel free to push forward a bit during zedtime to extend. Your duty is to ensure extends and clear trash off of DPS perks so they can do their job better. If possible assist with large takedowns, especially when duo laning with gunslinger, however extends and clearing trash is your absolute priority, since zedtime usually decides the outcome of games.
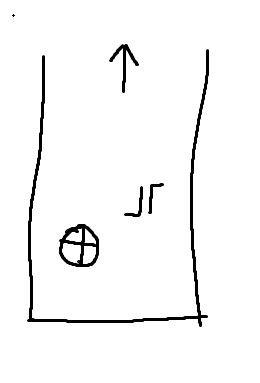
Here is a simple scheme to show a GS and SS duo lane positioning:
GS stays a bit in the front but in their half of lane, SS behind them but in their respective half too. You can also admire my patience drawing such scheme (yes I really am impatient)
General mechanical skills to learn and improve
Here are some mechanical skills you can (and should try to) constantly improve on:
Aim
Woah, what a surprise, afterall KF2 is an FPS game and therefore requires aiming. I can’t really give much advice but to refer you to many general aiming tips, putting in the time and practicing. What I do myself is play aim trainers from time to time, stick with same sensitivity across multiple games and being patient. In KF2 respectively, you can always launch KF-Corridor by Fat Cat or similar “lane“ maps and practice basic_heavy spawn cycle and increasing maxmonsters each time you beat it, overall improving your accuracy, learning zed movements and taking down larges while under pressure of trash or target switching in the process.
Here is a basic command line into console with Fanta’s CD Chokepoints edition:
open kf-corridor?Game=Controlled_Difficulty.CD_Survival?maxmonsters=36?spawncycle=basic_heavy?gamelength=2
After loading into the game, type ”solomode”, get your equipment and hurray to slay some zeds!
Practicing large zed takedowns
Really important to kill FPs, what you need to do is learn the FP rage animation and shoot their head with almost maximum accuracy during it. It’s very easy to do, hop in any CD custom game you create, even the one I mentioned above, go into solomode again and type:
mutate spawnai fp/nmfp/hhzfp/sc/nmsc/hhzsc 500
50. is the distance, feel free to accustom it to whatever you want to practice, I also gave you the commands for harder zeds FP and nightcore zeds FP (scrakes too) and you can practice against them if that’s what you want (harder zeds are very similar and won’t make much of a difference during succesful takedown).
Weapon bashing
Can be used and understood in multiple ways, you should learn and master all of those:
”Headshotting” a trash zed with bash will one-shot them (gorefast requires 2), saving ammo and looking stylish in the process.
Making room I refer to as bashing a larger zed to interrupt their attack, letting you move past them without any harm or atleast at greatly reduced risk. Most effective when done against scrakes, bloats and potentionally husks, FPs can be very tricky and random. How to do it? Just bash when moving past a zed around the time you are close enough to hit them and they are able to attack you, it is very easy to judge when to do so. Doing so also pushes the zed a little, so be careful when doing this tactic when kiting through tight corridors, since you could make your teammate trapped.
Reload cancelling
A very important mechanic, lets you cut down reload time by a significant amount. How to? Just bash when the ammo (magazine) counter changes to full and you can start shooting way faster than waiting for the animation to play. Can take some time to memorize the timings but shouldn’t take very long to learn and eventually it feels like muscle memory.
Fun fact: I was suspected of using a macro since I reload cancelled deagles way too ideally in a solo game.
Proper grenade usage
Most imporant for SS players, since freezes are by far the most important grenade in the game (medic grenade is comparable but not really) and a good rule of thumb I would give is to freeze whenever you have a gut feeling – it’s better to freeze than not to freeze, you have 6 grenades and you should ideally use them all in the later waves. It feels bad to kind of waste a freeze but better save than sorry. DO NOT however freeze during zedtime, freeze after zedtime afterwards, focus on dealing damage or stunning scrakes during ZT.
As GS, you should nailbomb when needing to reload in a solo lane or duo lane with SS. But a very underutilized but really awesome way to use nail bombs is to stun scrakes, potentionally FPs. Just throw the nailbomb under them and they will either get stunned immediatelly or be very vulnerable to getting stunned, especially handy when laning with SS – M14 has insanely high stun power. Whenever an SS freezes, you can nail bomb afterwards, extending the stuns, atleast on scrakes.
DO NOT throw nailbombs when a group of larges is coming, after nailbomb explodes, they are immune to being frozen for a certain period of time and can waste SS freeze grenade very easily – use them wisely.
Medic can use their grenade to support a lane if it gets heavy spawns, during a kite or to chug a nade to the main lane and run off to heal some sidelane player that got injured. I’m personally not a medic player much but I hope you get the gist.
Commando can use their grenades to buy time to reload, killing trash zeds and hurting mediums in the process, watchout when larges are around, you don’t want to rage FPs or scrakes with your misplaced grenade throw.
FP juking
A very niche mechanic compared to other tactics mentioned above despite being insanely fun to pull off and potentionally saving your life. It does not unfortunately work everytime, since there is one or two attacks that you can’t dodge this way, so use it as a last resort – Keetoxx is the master of ankle breaking, the main idea is to run a circle around a raged FP, abusing their slow AI and making the miss their target by running a close 360 circle around them.
Here is a collection of his FP jukes so you can see them in action:
https://docs.google.com/spreadsheets/d/1u-79nxjNDrIfJO4NREdh9h0gq_R6iwzDR_ysWqu-4YA/edit#gid=0
Getting into perk specific things
Keep in mind, this is just very briefly explained, might make future guides for respective perks if there is enough interest.
Classic team composition consists of:
1 Commando
2 Sharpshooters
2 Gunslingers
1 Medic
This can change a bit, in maps that don’t require a medic, you typically take 3rd SS and in maps like Nausea, you take 3 GS and only 1 SS because of 2 solo lanes and one main lane, all requiring Fan Fire to manage properly.
Having said that, let’s take the perks one by one and explain their role and loadout.
Commando
Strenghts:
Best trash killing potential
Not that mechanically hard in terms of accuracy
A lot of bullets in magazines
Weaknesses:
Dealing with large zeds
No movement speed bonus
Your priority:
Extend ZT as much as you can
Kill trash
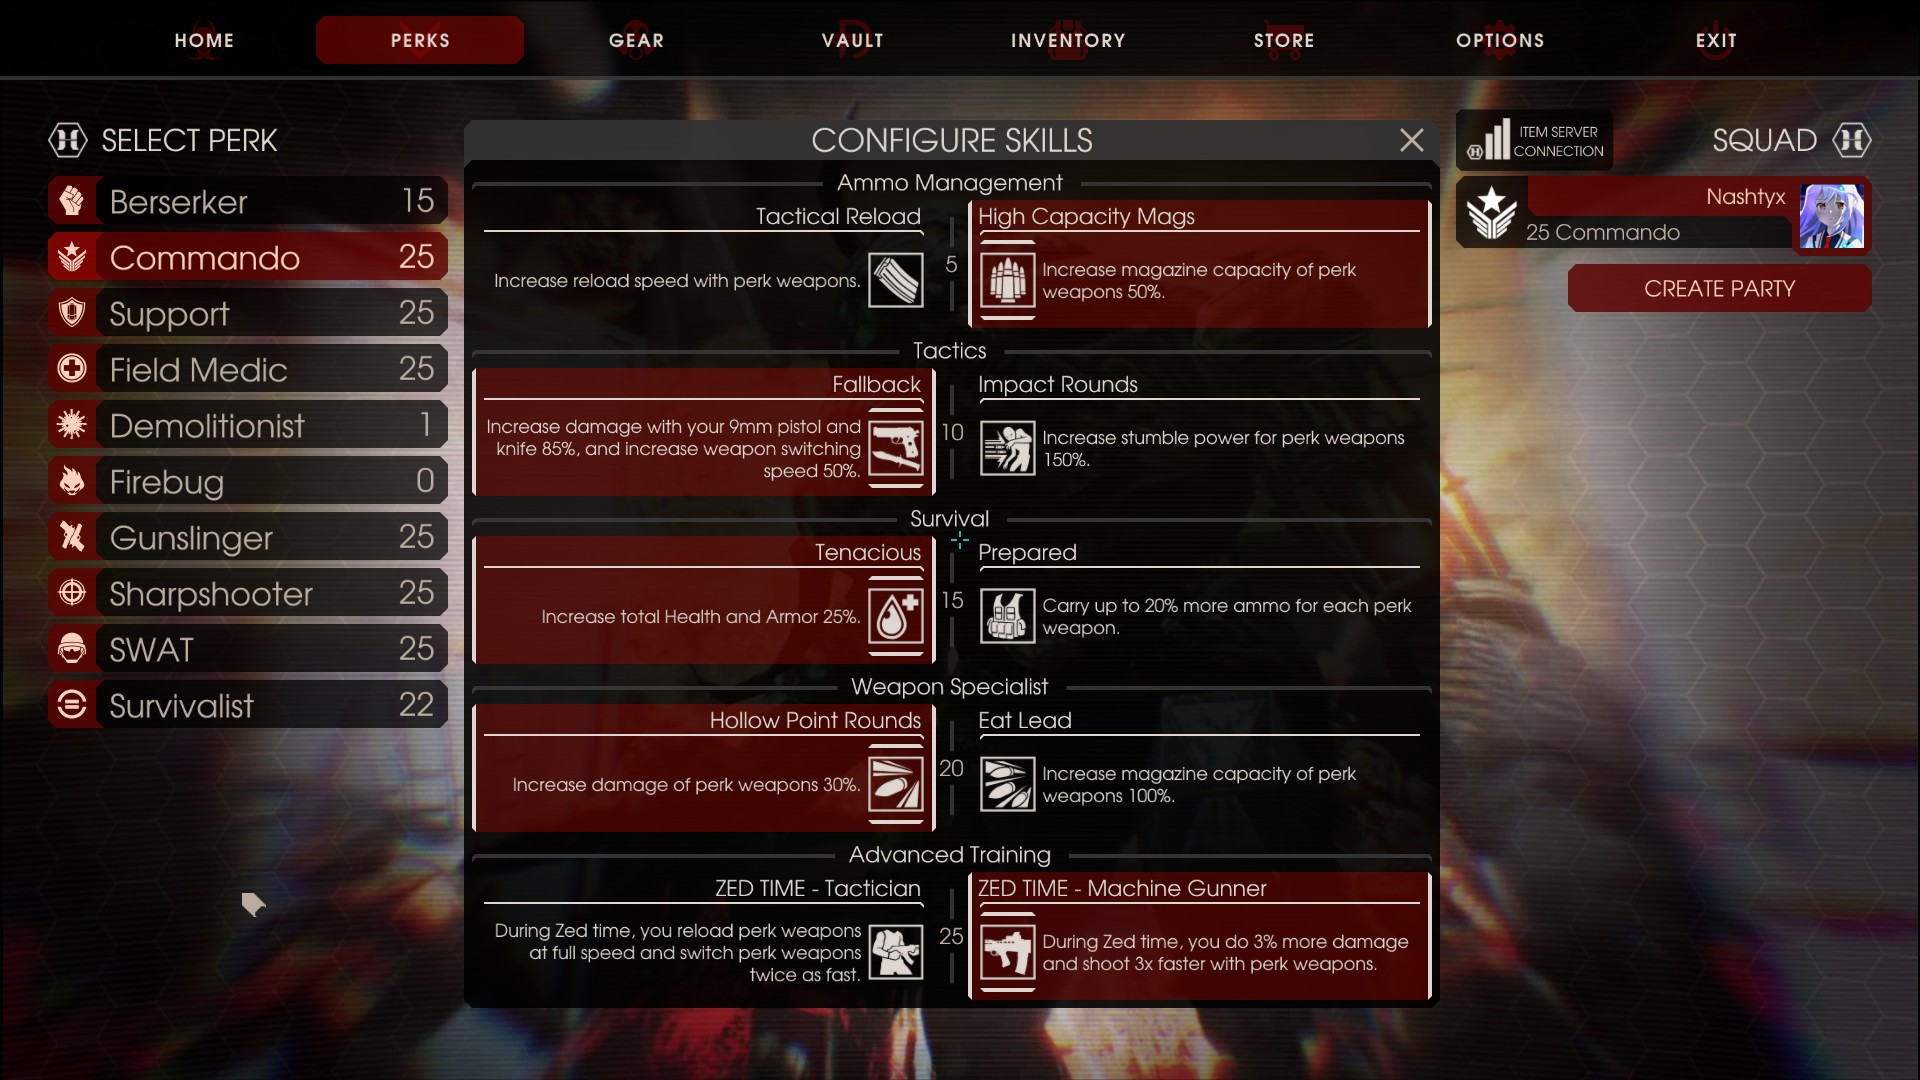
Okay, Commando is probably the most responsible player for the outcome of a harder game – one dropped zedtime can sometimes decide the match in later waves, don’t be discouraged to play it though, your teammates will love you once you get better.
Skills:
This is how your skillset should always look like. If you want, you could overcap your weapons by swapping certain skills, however that is fixed in a lot of CD versions now (atleast on EU CD) and so I encourage you to not do it, since it technically is an exploit.
Weapons:
Very high sortiment of useful weapons in one way or another.
Most common loadout is using 401 and FAL (vanilla), being able to one clip FPs with FAL and kill most of the trash with 401. In harder CD games and with custom weapons (not vanilla), it’s usually better to use AK12 and Scar, FAL. 401 is best when playing without medic (containment station) but other than that, I wouldn’t really recommend it, use AK12 instead (if you burst fire, you have much larger firing speed, use that to take down scrakes).
Gunslinger
Strenghts:
Highest potential DPS output
Strong close range and zedtime DPS, SPX for mid to long range.
Fan Fire – melting larges during zedtime
Deagles, probably the strongest weapon in the game
Fairly easy to learn, pretty hard to actually master
Extension preparing
Weaknesses:
No real utility except DPS and occasional nailbomb
Can be dependant on commando extending zedtime
Recoil – Fan Fire requires practice
Your priority:
Deal damage to larges
Nailbomb when need be to prolong the freeze or to support your duo lane
As GS, you don’t have much responsibility except dealing damage and throwing the occassional nailbomb. BUT if laning with commando, it is very likely that you will need to prep extensions, it’s best done with SPX, requires comms or experience otherwise.
4 headshots on scrake and if you can, 1 in the body
1 bloat headshot and 2 body shots
Headless FP body (should happen naturally)
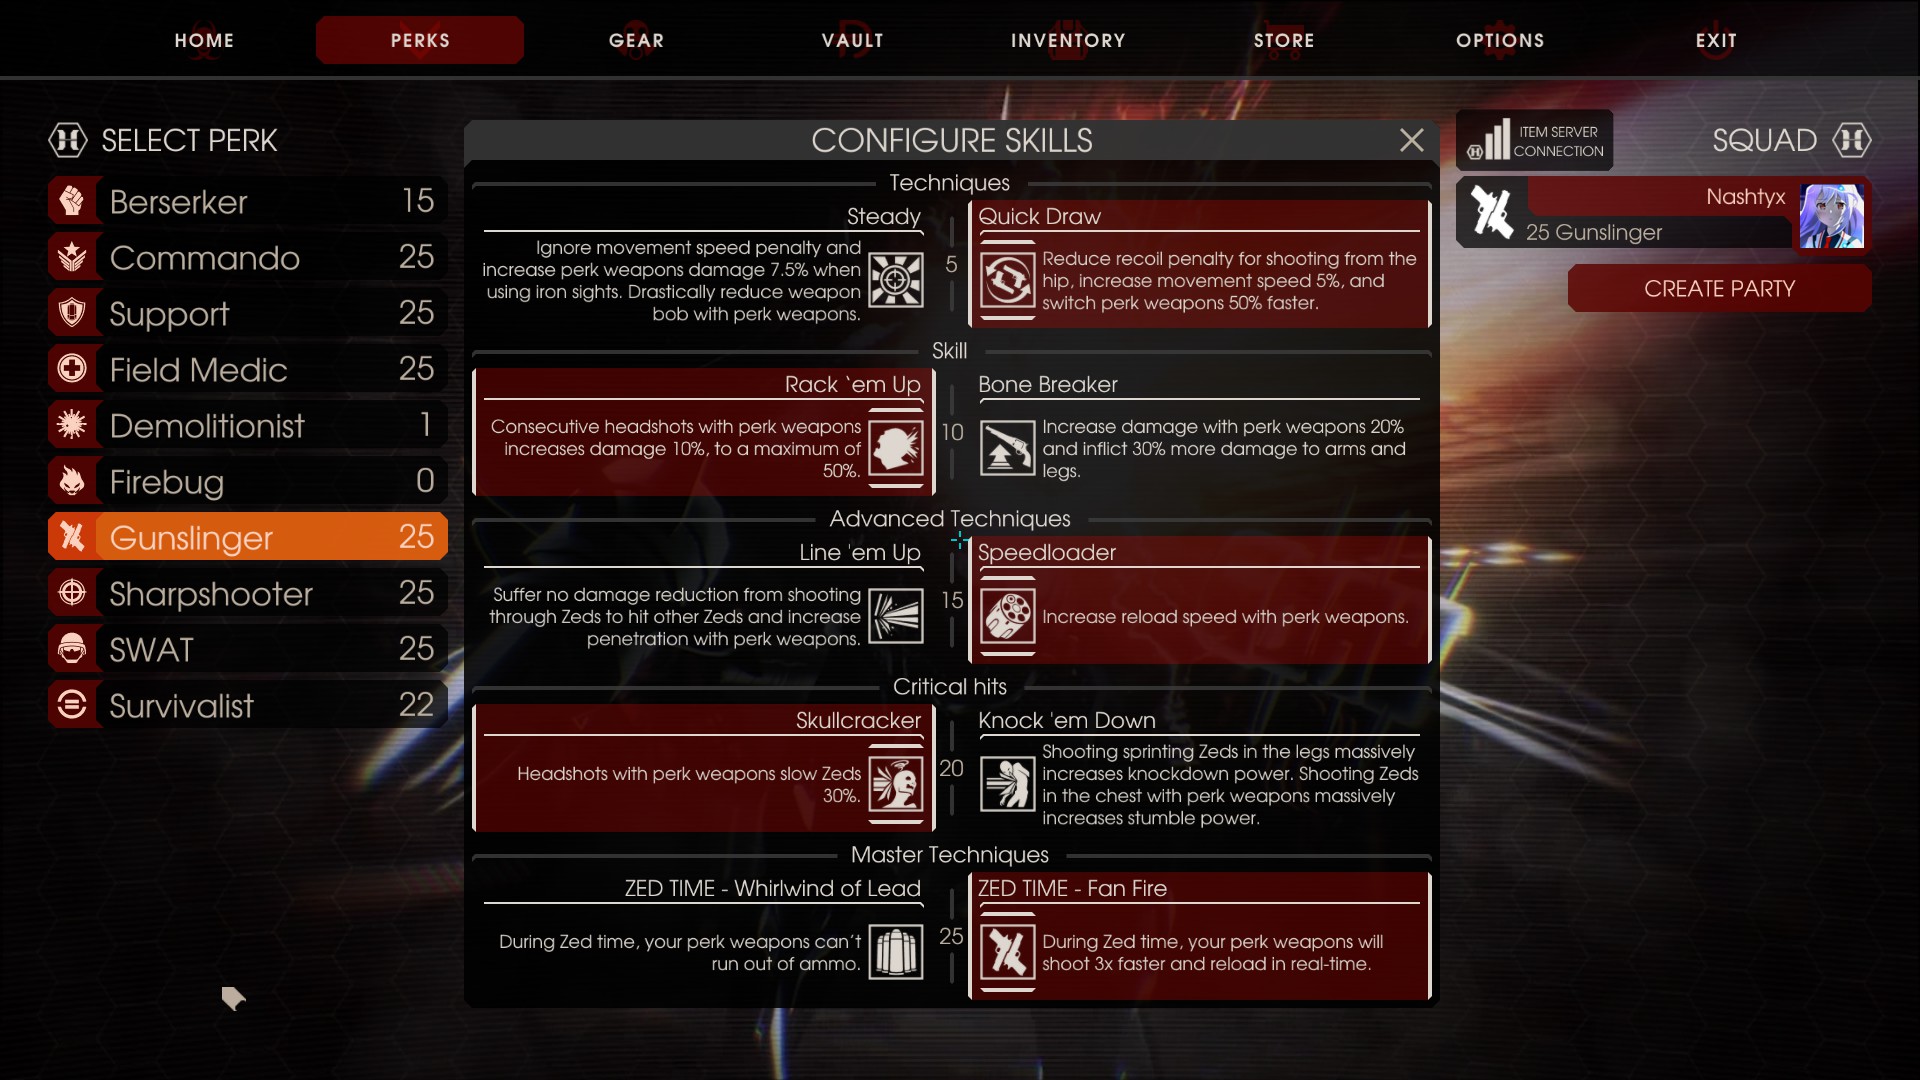
Skills:
Once again, this should always be your build, other skills are bad compared to the ones selected here.
Weapons:
“Best“ loadout is using Deagles, AFs or Magnums and SPX. You use Deagles for most of the trash and larges if you need to apply high DPS, AFs or Magnums are very strong at close range DPS and SPX is your long to mid range option, also the easiest Fan Fire recoil of them all. Sometimes you could hold a solo lane where you can’t reload your SPX enough, keep in mind, DON’T overuse your SPX. Most newbie GS player do that and it slows them down so much. SPX is a great weapon but is very slow compared to your pistols, even in ZT with Fan Fire, try to learn the pistol recoil a bit and use that when you’re closer to zeds, many GS players just SPX all the time, reducing their DPS.
Sharpshooter
Strenghts:
Highest long range DPS and very high DPS overall
Freeze grenades, insanely useful utility
Can kill both trash and larges fairly comfortably
Generates zedtime (10 second cooldown)
Stun scrakes during zedtime
Weaknesses:
Very hard to learn and master
M14 or FAL recoil can be hard to maintain at longer distances
Gets punished pretty hard for mistakes and freezes are a huge responsibility
Usually shooting off-aggro, requires good aim
Your priority:
Deal damage
Stun scrakes during zedtime
Take out husks
Freeze larges to avoid getting pushed
Sharpshooter is a tricky perk to play and master, requires a lot of game sense and mechanical skill, and is often underappreciated by our fellow meanie GS pub players. It is probably my favourite perk to play as of lately.
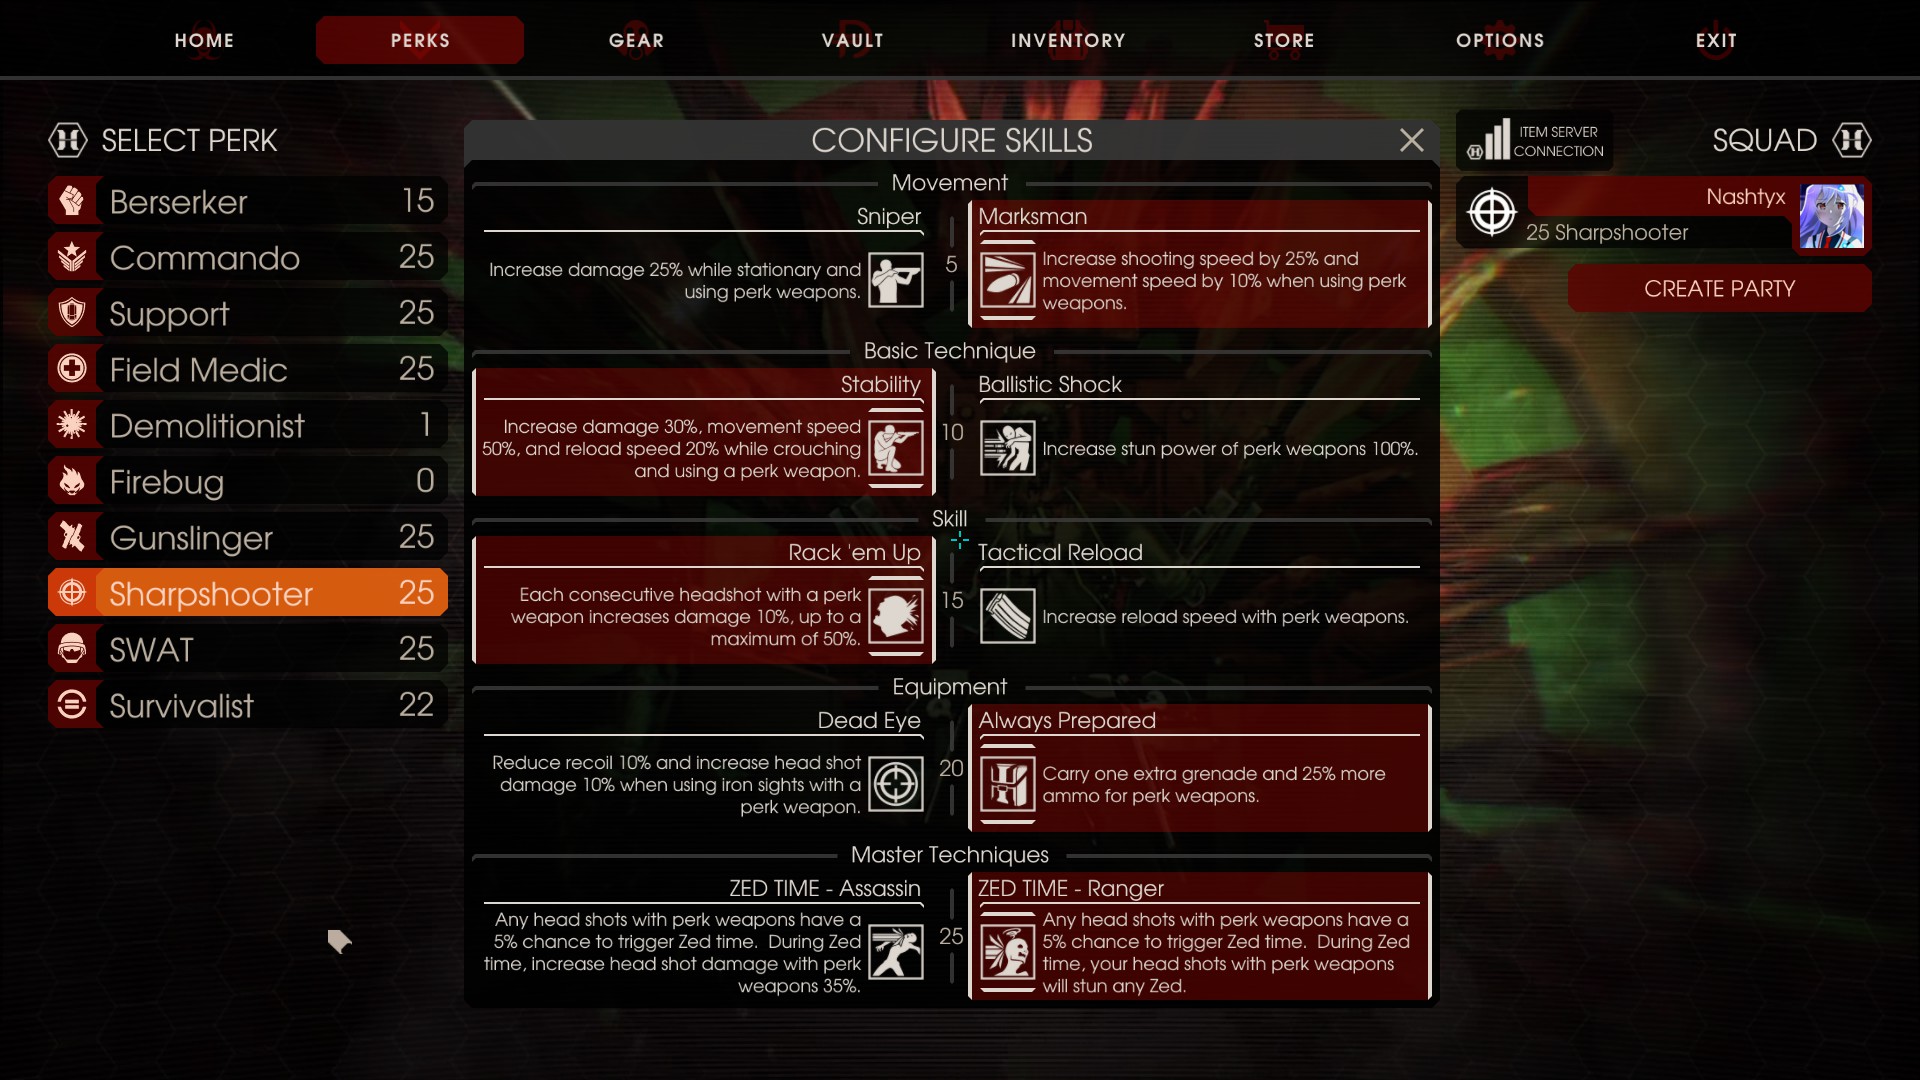
Skills:
And sadly once again, this is your skillset you should use, you could also overcap, but as I explained in the commando section, I don’t think it’s worth it.
Weapons:
Pretty small sortiment of useful CD weapons compared to GS, you either use M14 or FAL, accompanied by SPX, in games without medic with a greater healing weapon. M14 deals continuous damage, has high stun power and penetration, can be used to deal with every zed type very easily. FAL is pretty good too, I’m not much of a FAL player myself but can be used in closer ranges if you can handle the recoil well. SPX is the burst damage tool, you very rarely can reload your SPX, so use the 10 bullets to finish off wounded larges, no need to buy spares. Remember to crouch whenever possible to increase your reload speed, damage output.
Medic
Strenghts:
Healing
Buffing
Doesn’t really require aim
Very durable
Weaknesses:
Can’t deal with larges
Can feel underappreciated by other players
Your priority:
Heal and buff your teammates
Assist your non-commando lanes by killing trash or sniping husks if need be, they will appreciate it
As said before, I don’t play medic much so no in-depth guide will probably be made unless assisted by my friends, just keep in mind to heal and buff your teammates whenever possible and use your grenades wisely.
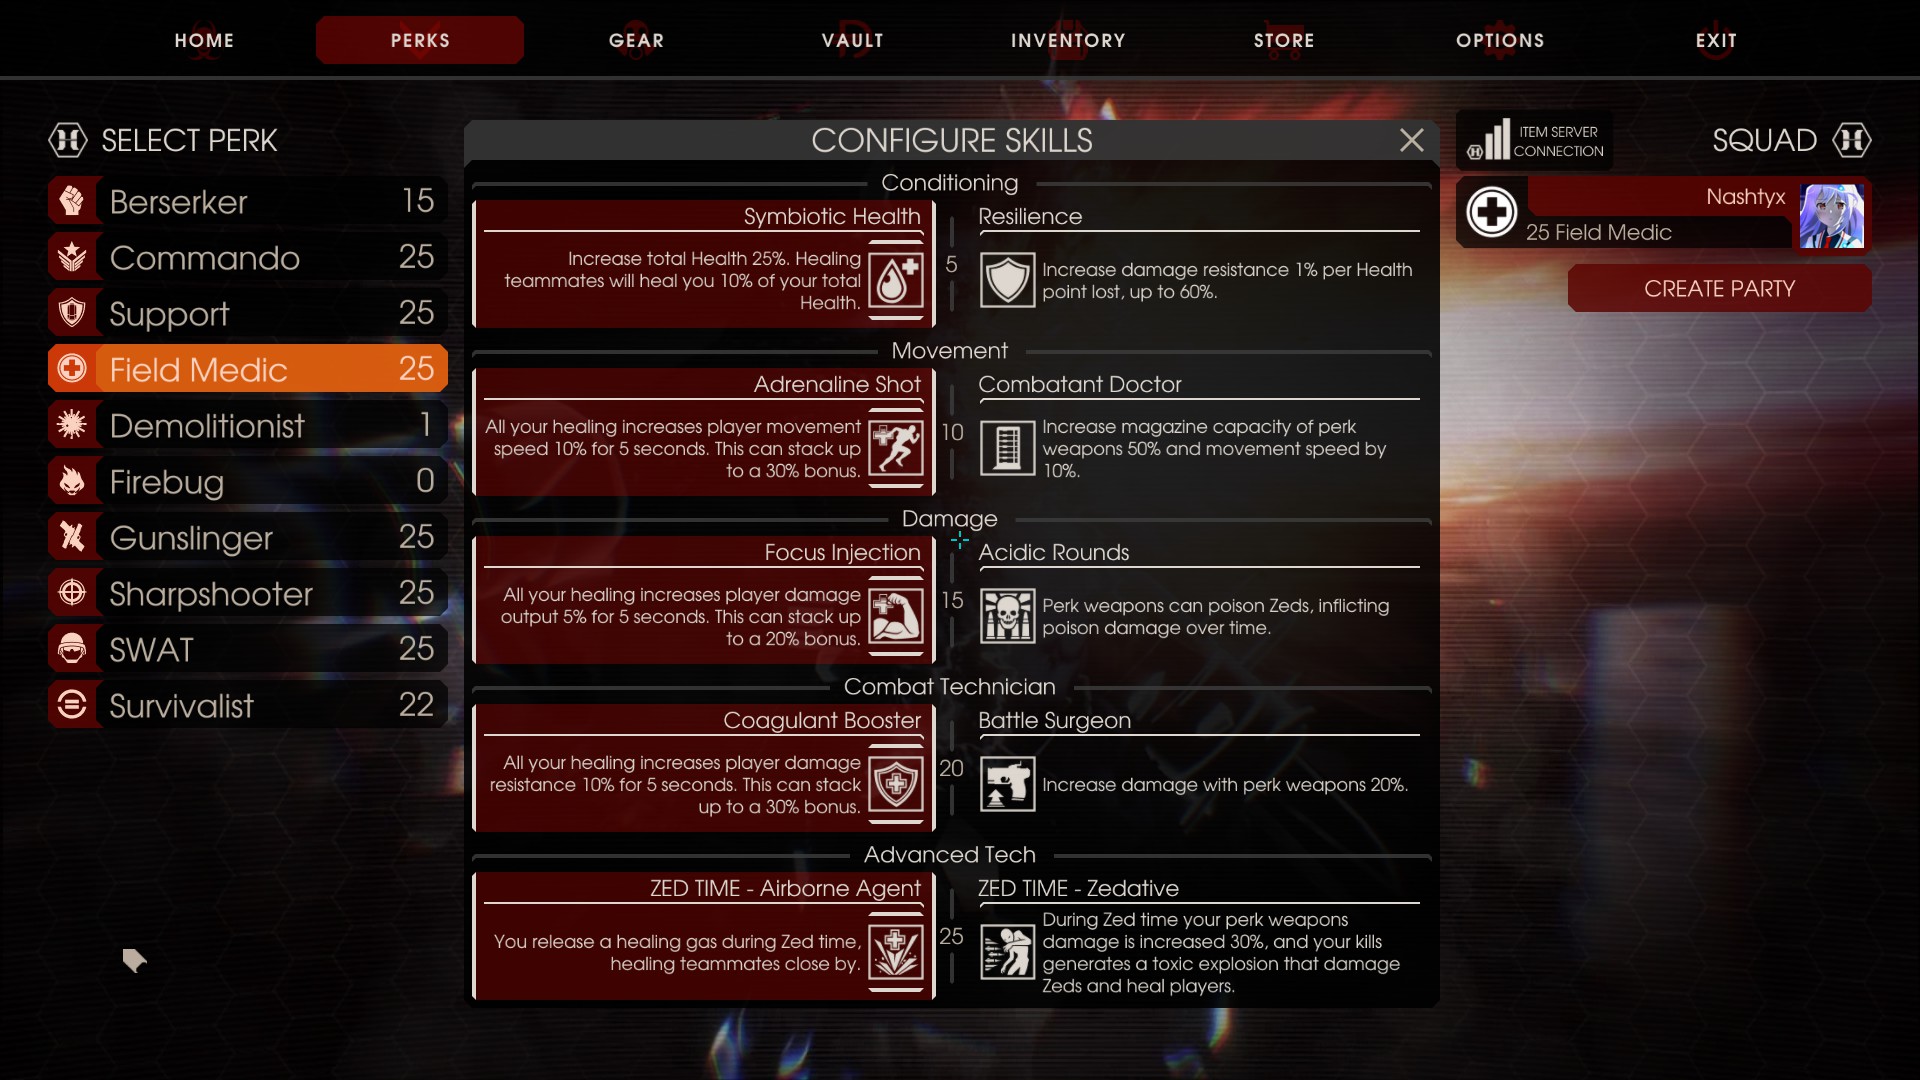
Skills:
Skillset of team oriented medic, please don’t use the other skills in team games.
Weapons:
The most broken weapon is Healthrower, since it both allows you to heal with darts and buff and heal tremendous amounts close range – it’s usually banned and isn’t feature at all in custom weapons because of how broken it feels. Same goes for 501, having so many healing grenades is pretty unbalanced too, however you sacrifice darts, so it’s not that bad I suppose. Common weapon choices my friends use is combination of 401, 301, Hemogoblin and if possible, HRG Crossbow (custom weapon). 401 for healing potential and some killing, 301 for best trash clear, Hemogoblin to slow down zeds and snipe husks, Crossbow likewise.
Final words
I hopefully explained some fundamental stuff to start playing and improve at CD, if you have any further questions or ideas for improvement or stuff I should cover, don’t hesitate to mention it on comments or message me on Discord.
Thanks for reading~uwu
Update log
17.6.2021 – finished the guide and published
20.6.2021 – added “What CD actually is and why should I play it” and “Different Commands” sections
I hope you enjoy the Guide we share about Killing Floor 2 – Guide for Controlled Difficulty Info – Gameplay Tips – Walkthrough; if you think we forget to add or we should add more information, please let us know via commenting below! See you soon!
- All Killing Floor 2 Posts List


Leave a Reply