This is the official Erannorth Chronicles manual for casual reading outside the game. Enjoy!
Preface – What is Erannorth?
Erannorth is a Card/RPG game system inspired by tabletop RPGs and Card Games but designed as a digital/single-player experience.
It’s also the name of the world where our stories take place: an alternate Earth, where every myth and legend is real, and set in a post-medieval era ready to transition to an age of enlightenment and steampunk wonders.
Erannorth combines RPG character progression with trading card game mechanics, but unlike traditional Card Games your Cards grow in power as you gain additional skill ranks, attributes and perks. And unlike traditional RPGs you fight your battles using your custom Deck of Cards.
There are two games here on Steam that use this system:
- Erannorth Reborn which uses the first edition of this system.
- Erannorth Chronicles which uses the second edition of this system.
Compared together, they are both Erannorth. In the same sense that whatever the digital interpretation is, or how the Chessboard looks: a Chess game is a Chess game.
Not that Erannorth has anything to do with Chess, but you get the point. Aside their looks and feel, in our case, these two Erannorth games also use a slightly different ruleset.
This guide will be focusing on Erannorth Chronicles and the 2nd Edition of the Erannorth ruleset.
Shortcuts and Basic Gameplay
Basic Controls
Scrolling: You can use your Mouse Wheel to scroll or click and drag towards the direction you want to scroll.
Panning: You can hold click your left mouse button to pan the World Map.
Using ‘Self’ Cards: Click the card, then point the Arrow to your Avatar. Click to confirm casting or right-click to cancel. Alternatively right-click the card to auto-cast it.
Using ‘Enemy’ cards: Click the card, then point the Arrow to your Target. Click to confirm casting or right-click to cancel. To auto-target the first Enemy just right-click the card.
Some card Effects are color-coded in Cyan ie. Defend, Heal, Concealment etc. These effects always apply to your Character automatically when you Target an Enemy.
Summoning an ‘Ally’: Click the card, then point the Arrow to your Avatar or the Ally zone. Click to confirm casting or right-click to cancel. Alternatively right-click the Summoning card to auto-cast it.
Using ‘Ally’ specific cards: a) Click the card, then point the Arrow to your Ally. Click to confirm casting or right-click to cancel. To auto-Target the first Ally just right-click the card.
Order a Summoned Ally to Attack: Click on your Ally, then point their Arrow on the Target. Click again to confirm or right-click to cancel.
Activate your Ally’s Special Ability: Click on your Ally, then point their Arrow on your Avatar. Click again to confirm or right-click to cancel. Alternatively just right-click your Ally.
Ending your Turn: If you have no more cards to play, or are ready to move to the next node: Click the ‘End Turn/Continue’ button or just press ‘Space’.
Discarding Unwanted cards: Cards normally stay in your hand till you play them. But you can Discard any unwanted cards. Click on the card, the point the Arrow to the Specter in the far right. Click to discard the card or right-click to cancel.
Some cards have alternative effects that trigger when you discard them this way. Such cards also have a discard button. You can click on it to Discard them and play their additional effect.
Learning the Ruleset:
a) Alt+Click on any card will display their Detailed card rules and any associated cards mentioned in their text.
b) Hovering over cards, Enemies, Allies, Skills, Status Effects etc. will give you more info on them.Clicking on the Questionmark buttons can provide more detailed explanations of other game aspects like what your Attributes do etc.
c) You can search for Keywords, card names, perk names etc in the Terms Codex (that’s the Input field located on top of your Combat Log), will display additional information about what you just researched.
Useful Shortcuts
- F1: Open the Rulebook.
- Esc: Open / Close the Main Menu.
- M: Open / Close Exploration options
- J: Open / Close your Journal
- T: Open / Close the local Town
- L: Expand/Collapse the Combat Log.
- Num +: Combat Log displays more or less info during Combat.
- C: Open / Close your Character Sheet.
- B: Open / Switch to Deck Builder.
- P,S,E,D,B: Open/Switch your Character Sheet in the corresponding Tab (P:Perks, S:Skills, E:Equipment, D:Deck & B:Deck Builder).
- X: Close UI elements (Character Sheet, Town) etc.
- Space: End Turn/Continue.
Presets and Pregenerated Characters
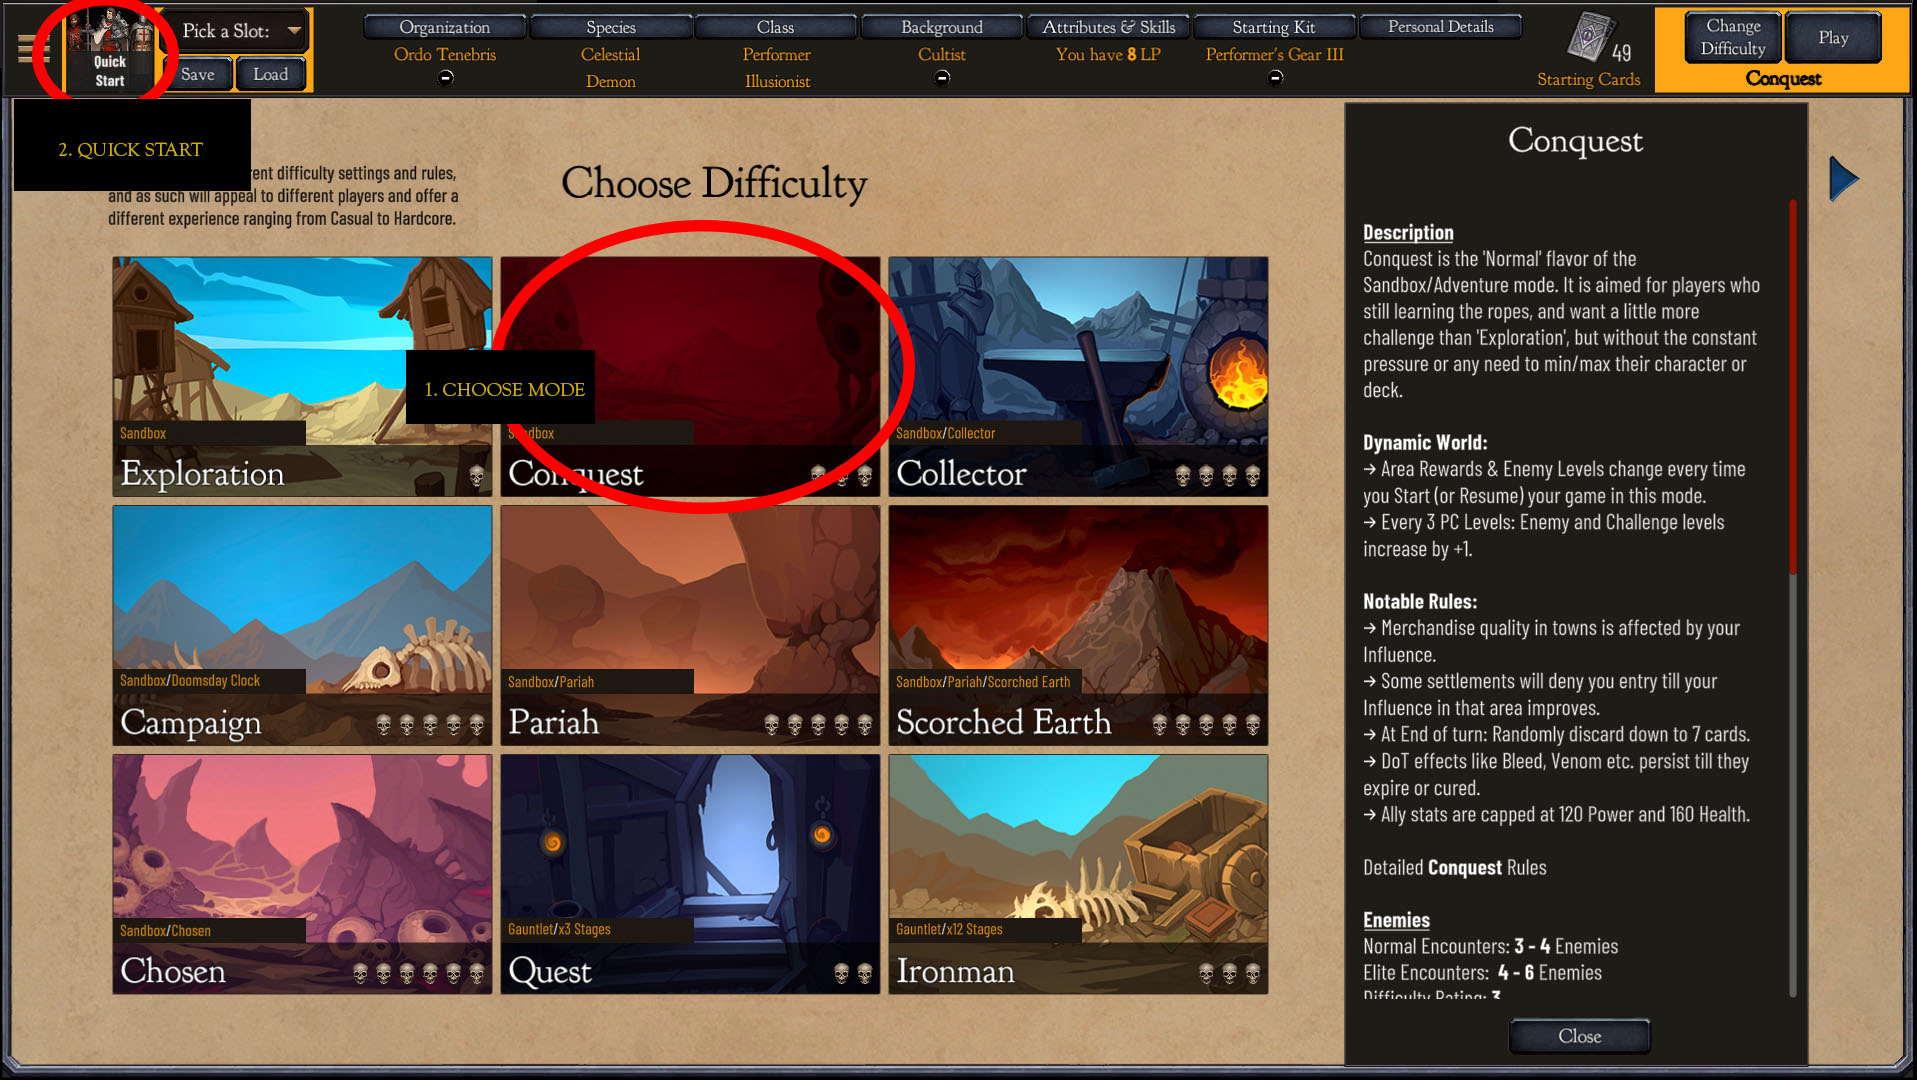
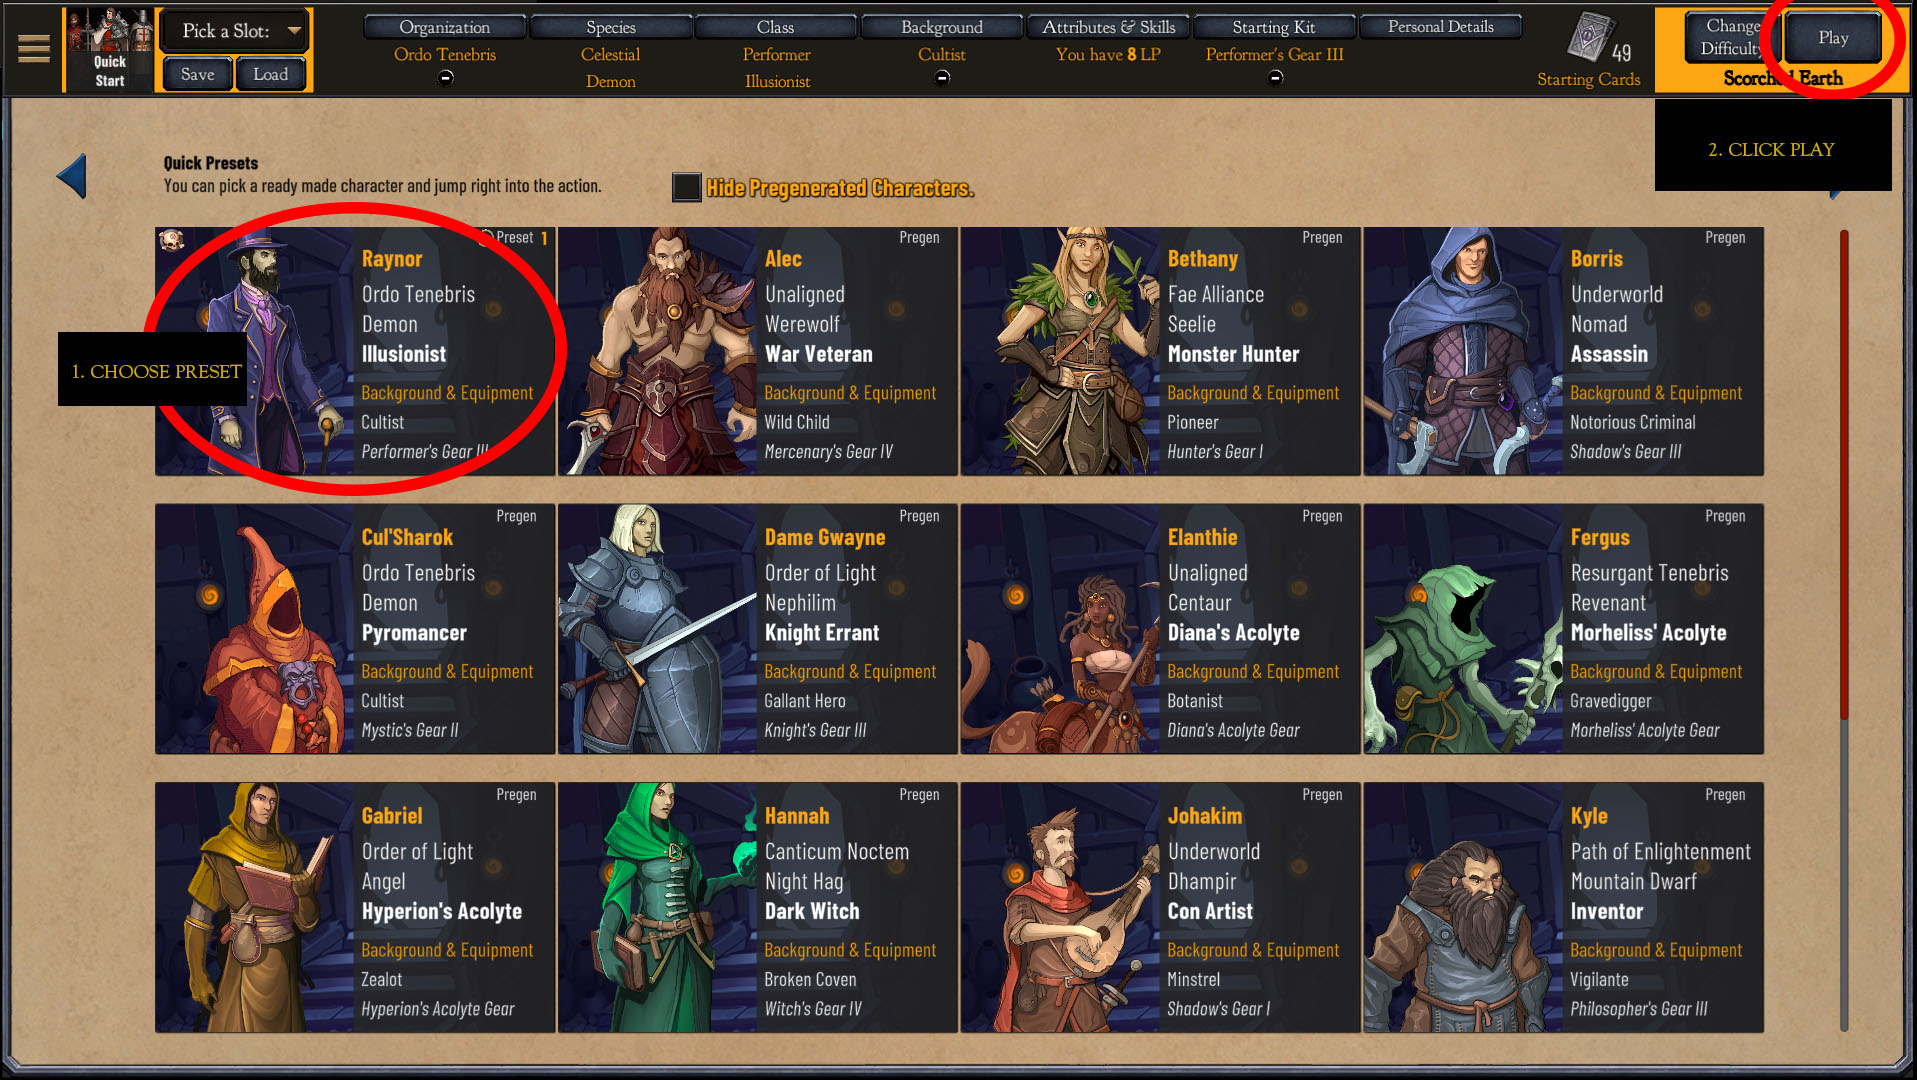
If this is your first time around, you may want to skip the character creation and start with a Pregenerated character from the ‘Quick Play’ menu.
Start with Exploration or Conquest till you get your bearings.
Yes, they are both are excruciatingly easy.
But learning the basic rules is that important. Once you do know the game basics, feel free to pick your poison from any of the 4-6 Skull modes. Or better yet, create your custom difficulties.
If you saved any presets you’ll also be able to choose them from the Quick Play menu.
Then click on the preset or the pregenerate character and finally click Play.
Creating your first Character
Creating a character is a multi-step process, that we’ll be analyzing more in the next chapter. For now let’s create our first character!
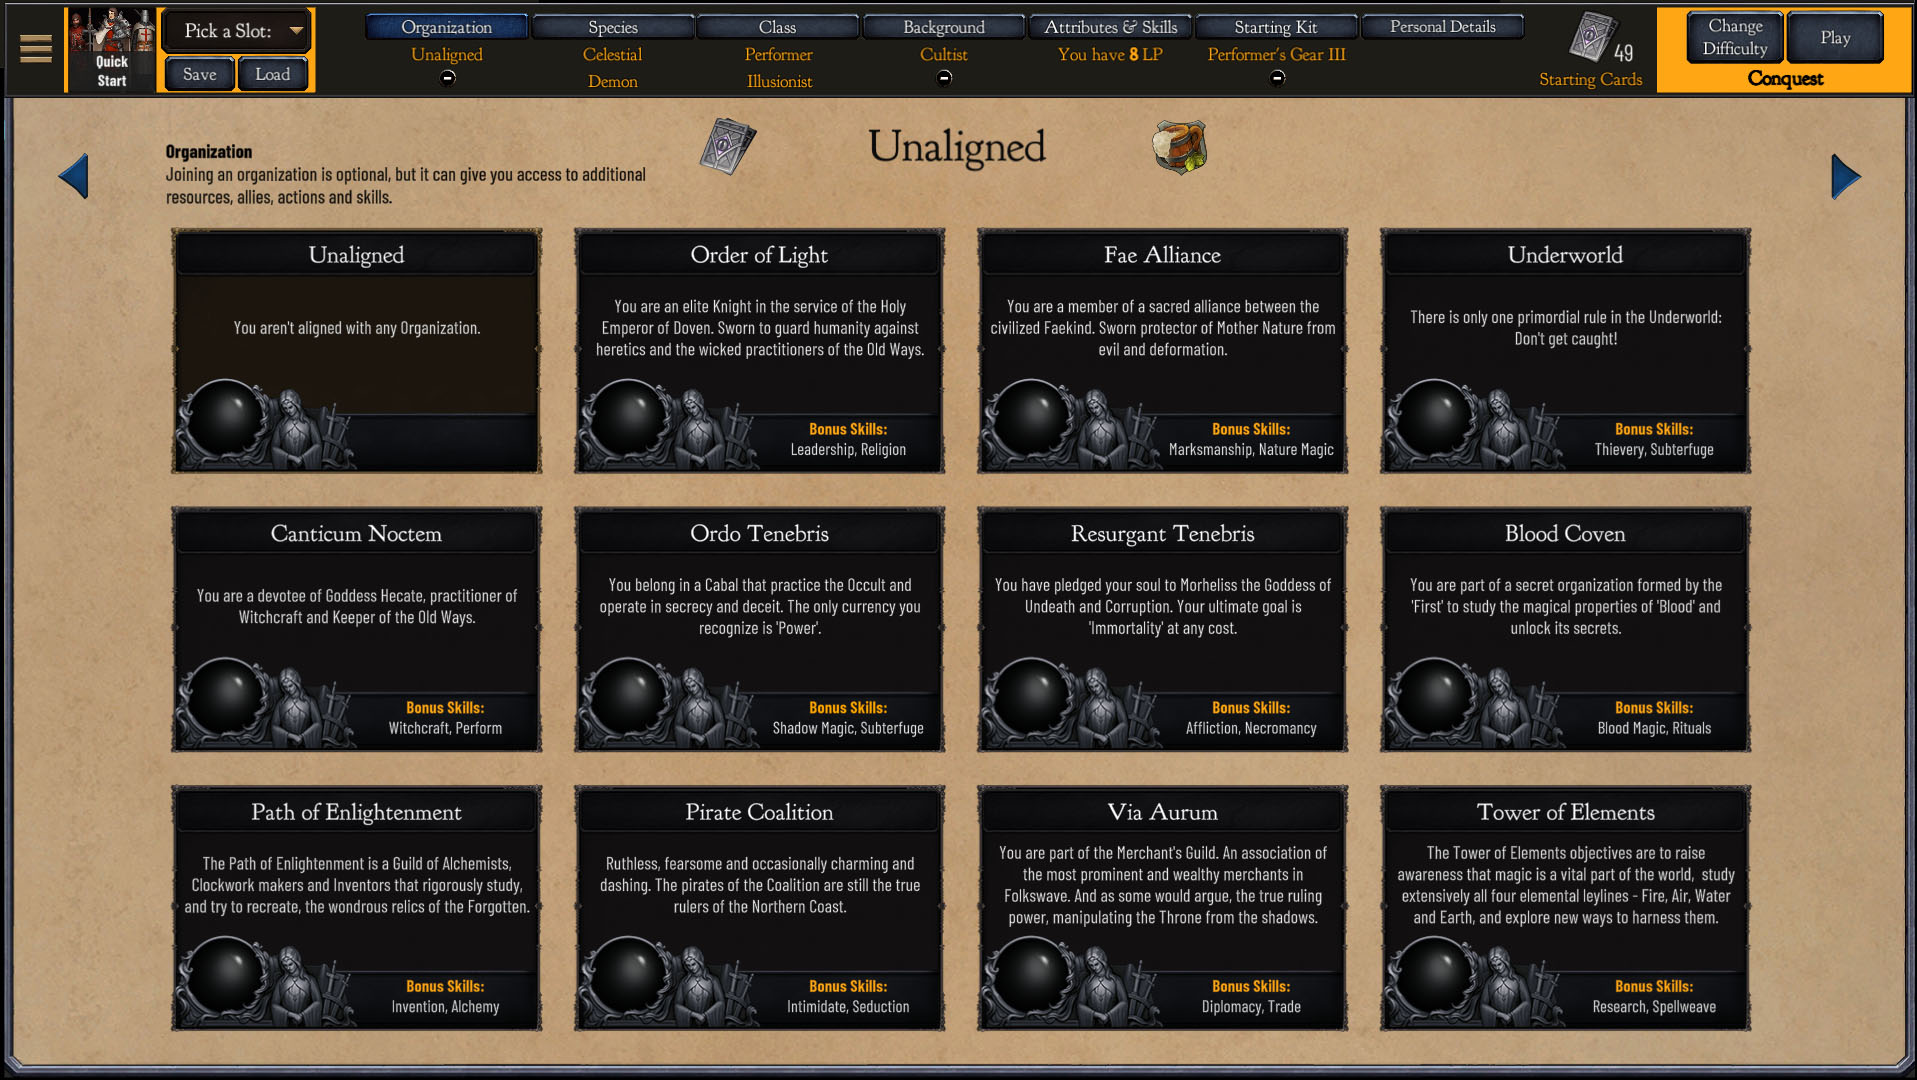
Organization
Organization is optional. If you pick one, it will give you access to two additional card sets and a assortment of perks that enhance their related cards. For now we’ll just choose Unaligned.
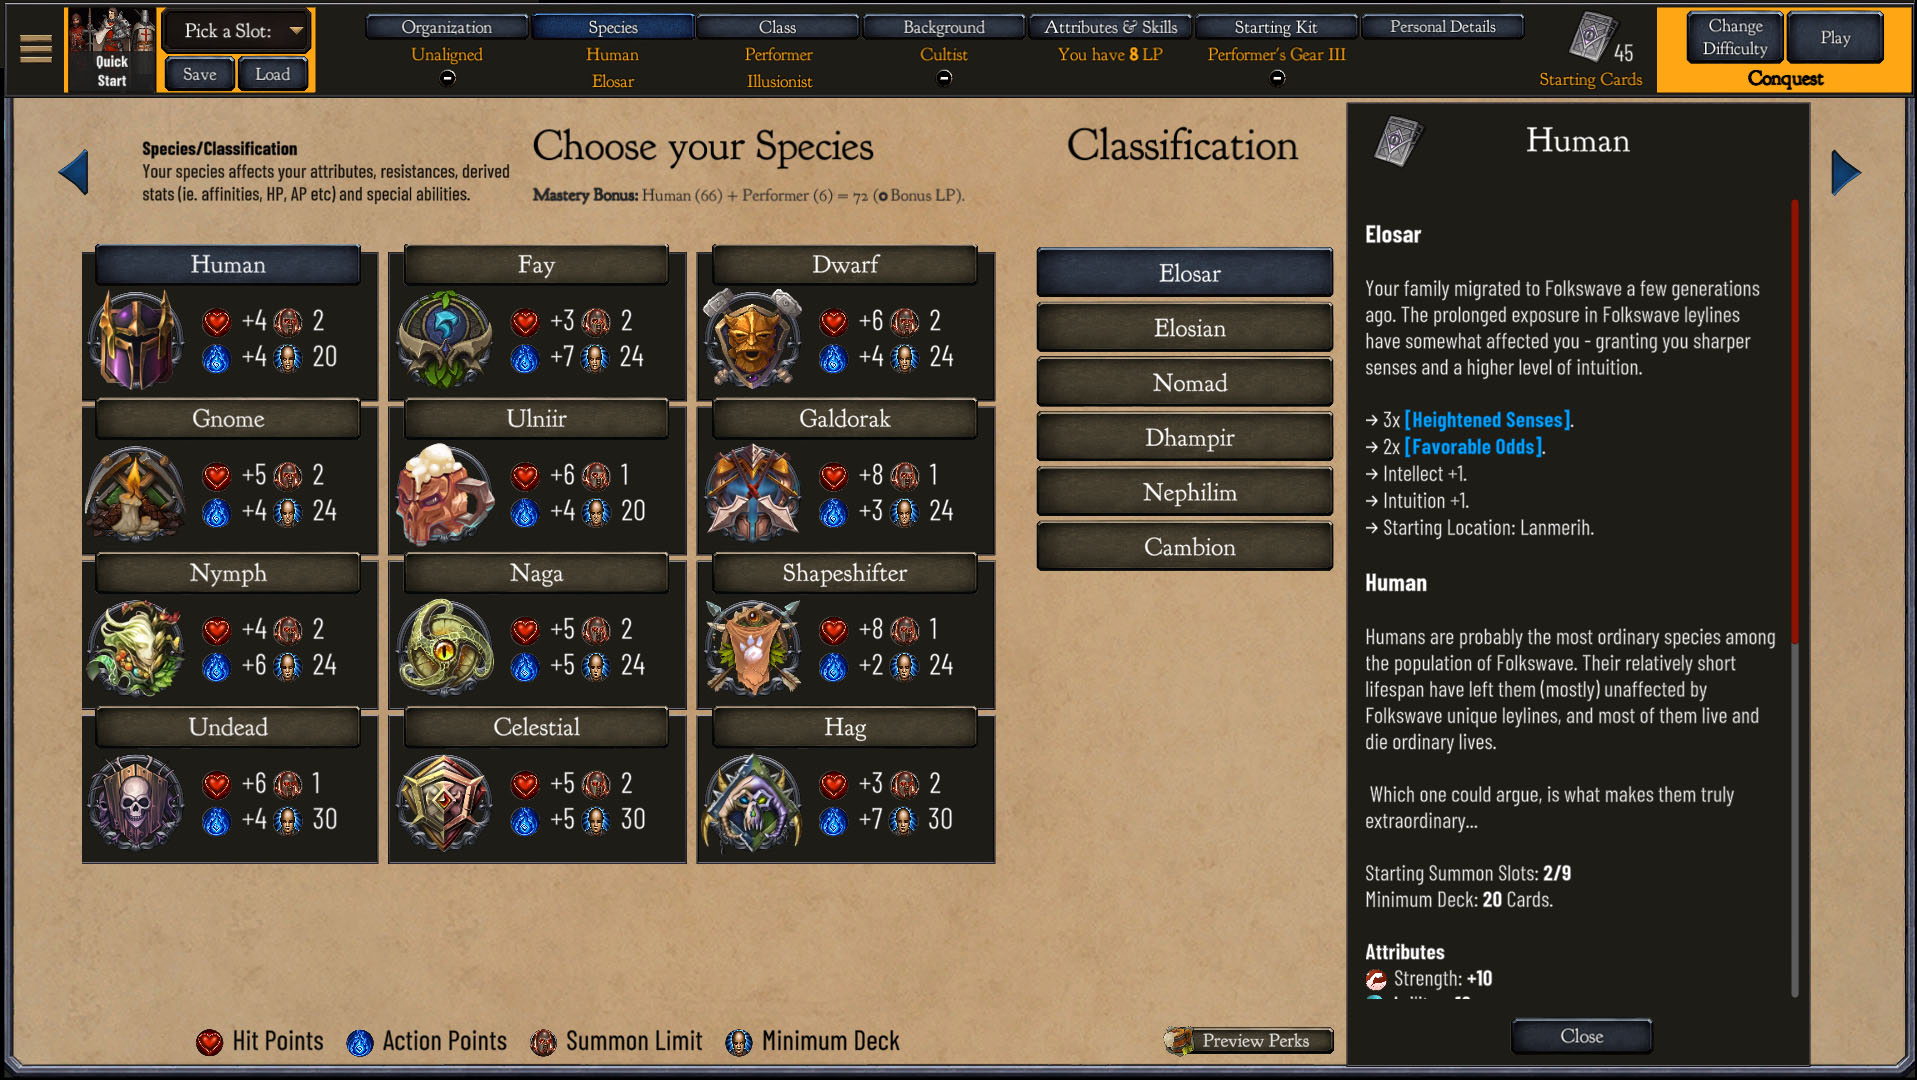
Species
Your species and subspecies, affect your starting attributes, the perks you can get, your starting cards and more. For now we’ll pick here Human/Elosar.
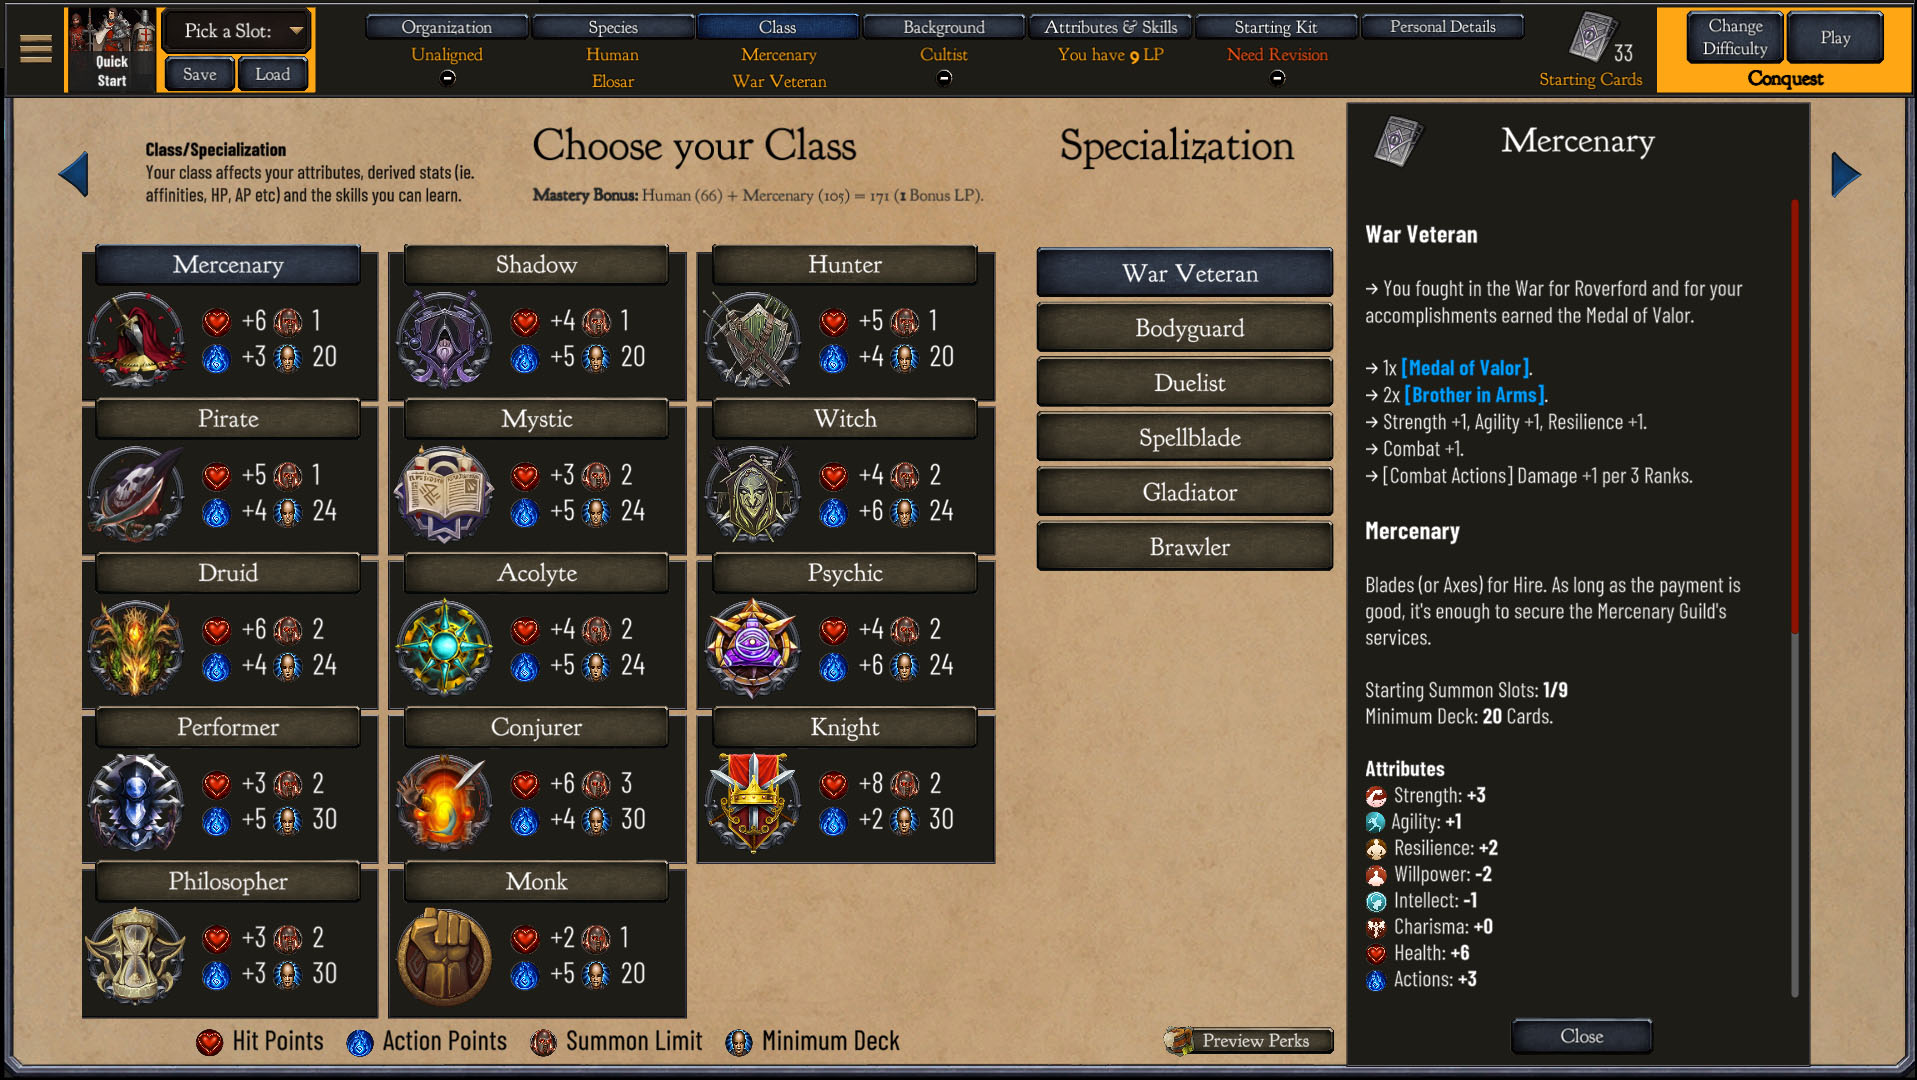
Class
Your class and specialization, affect too your starting attributes, the perks you can get, your starting cards and more. Combine it with a different species and you get a different character variation.
For now let’s pick Mercenary/War Veteran.
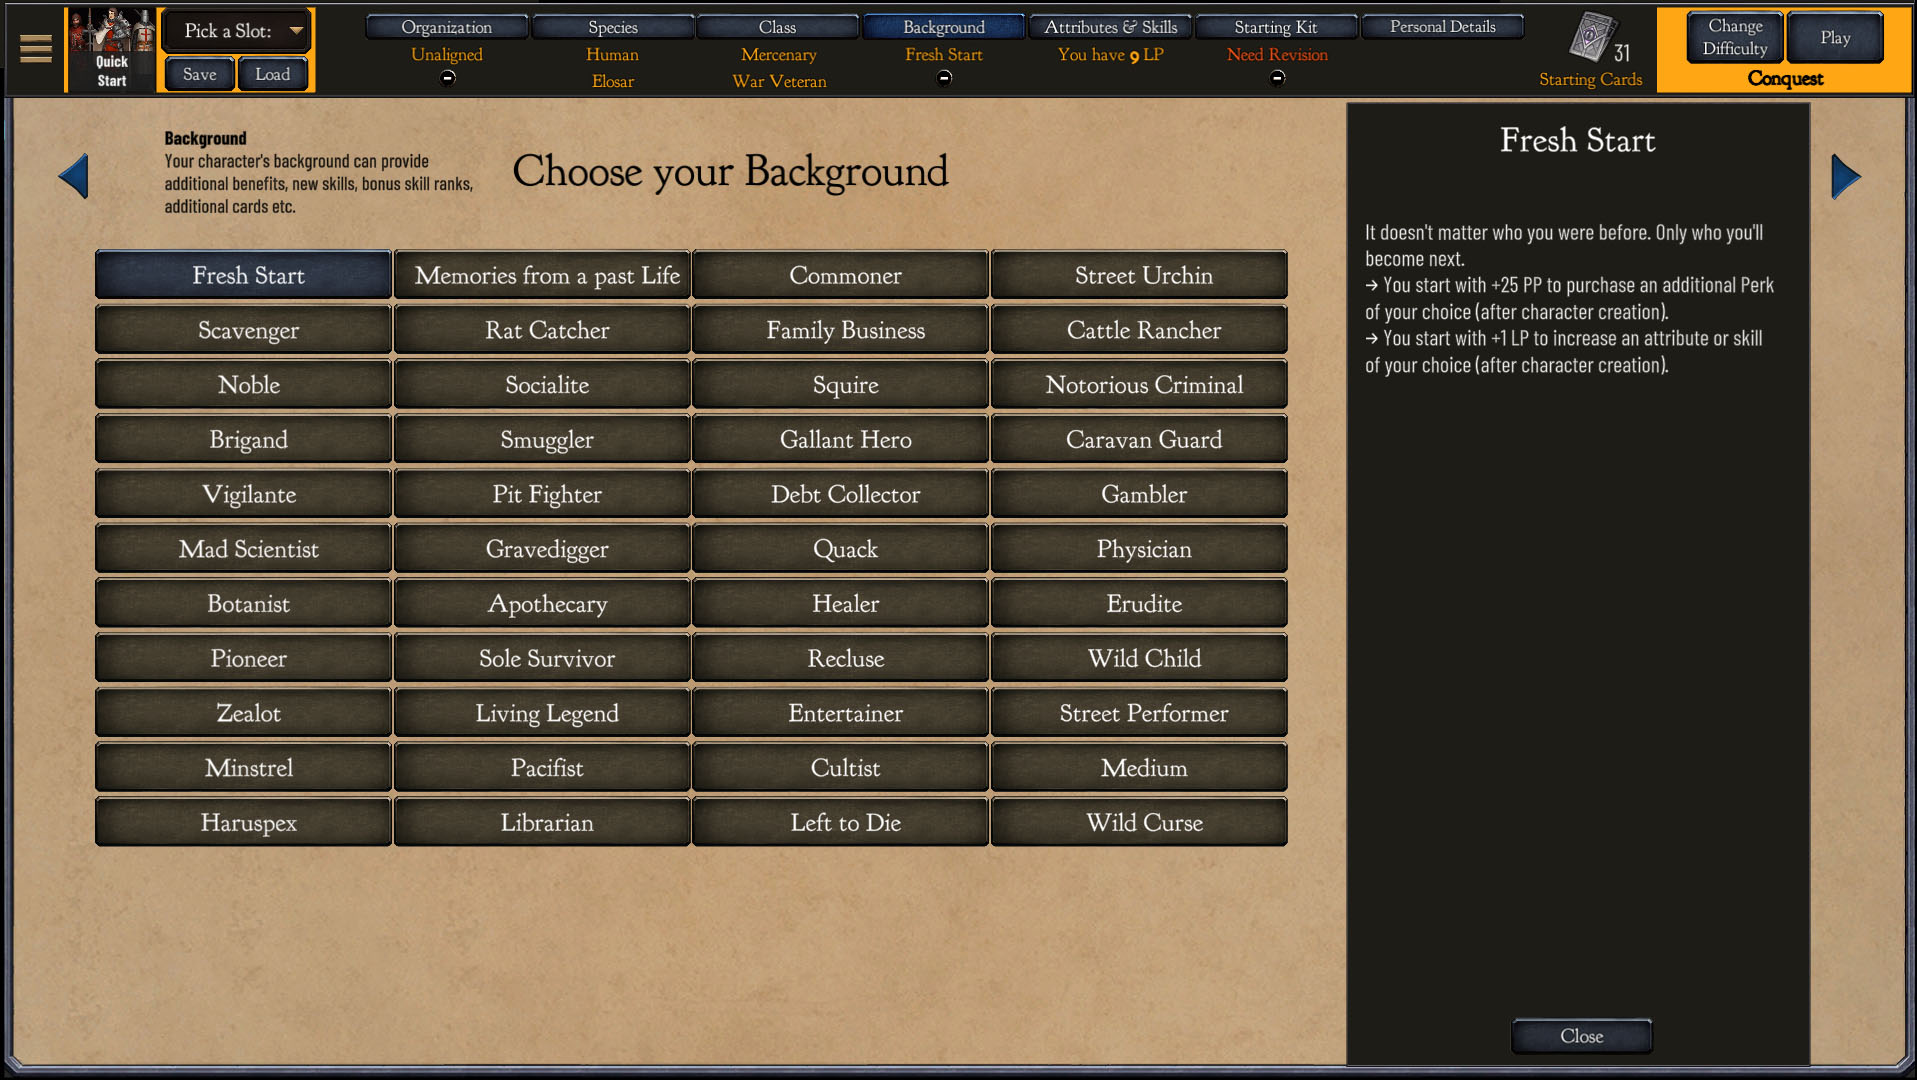
Background
Background can further diversify your character, give you bonuses and penalties, ripple effects and RP purpose etc. For now we’ll go with Fresh Start.
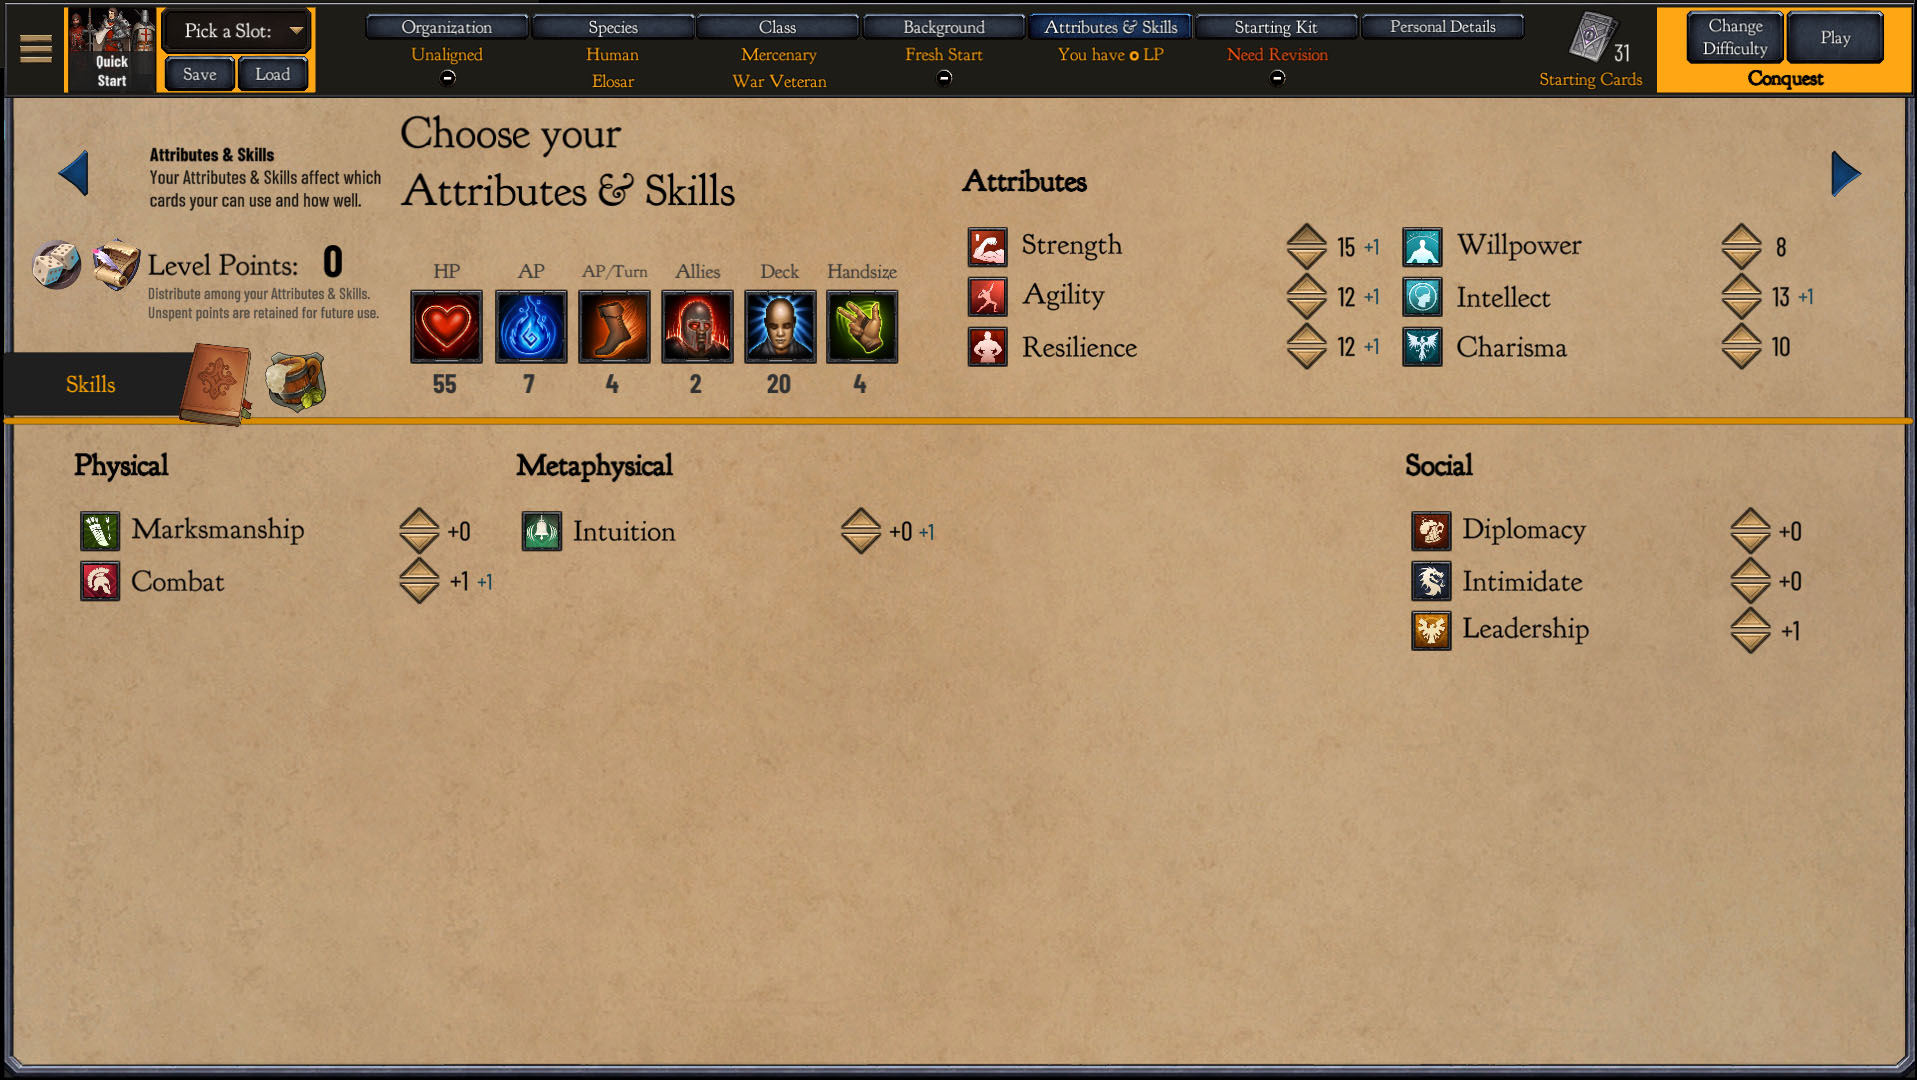
Attributes and Skills
Your attributes and skills will affect what card sets you can access and how efficient will be their numerical values. For now go with the following adjustments. You’ll probably have 1 less point, as my example character here has a +1 point from their Mastery bonus.
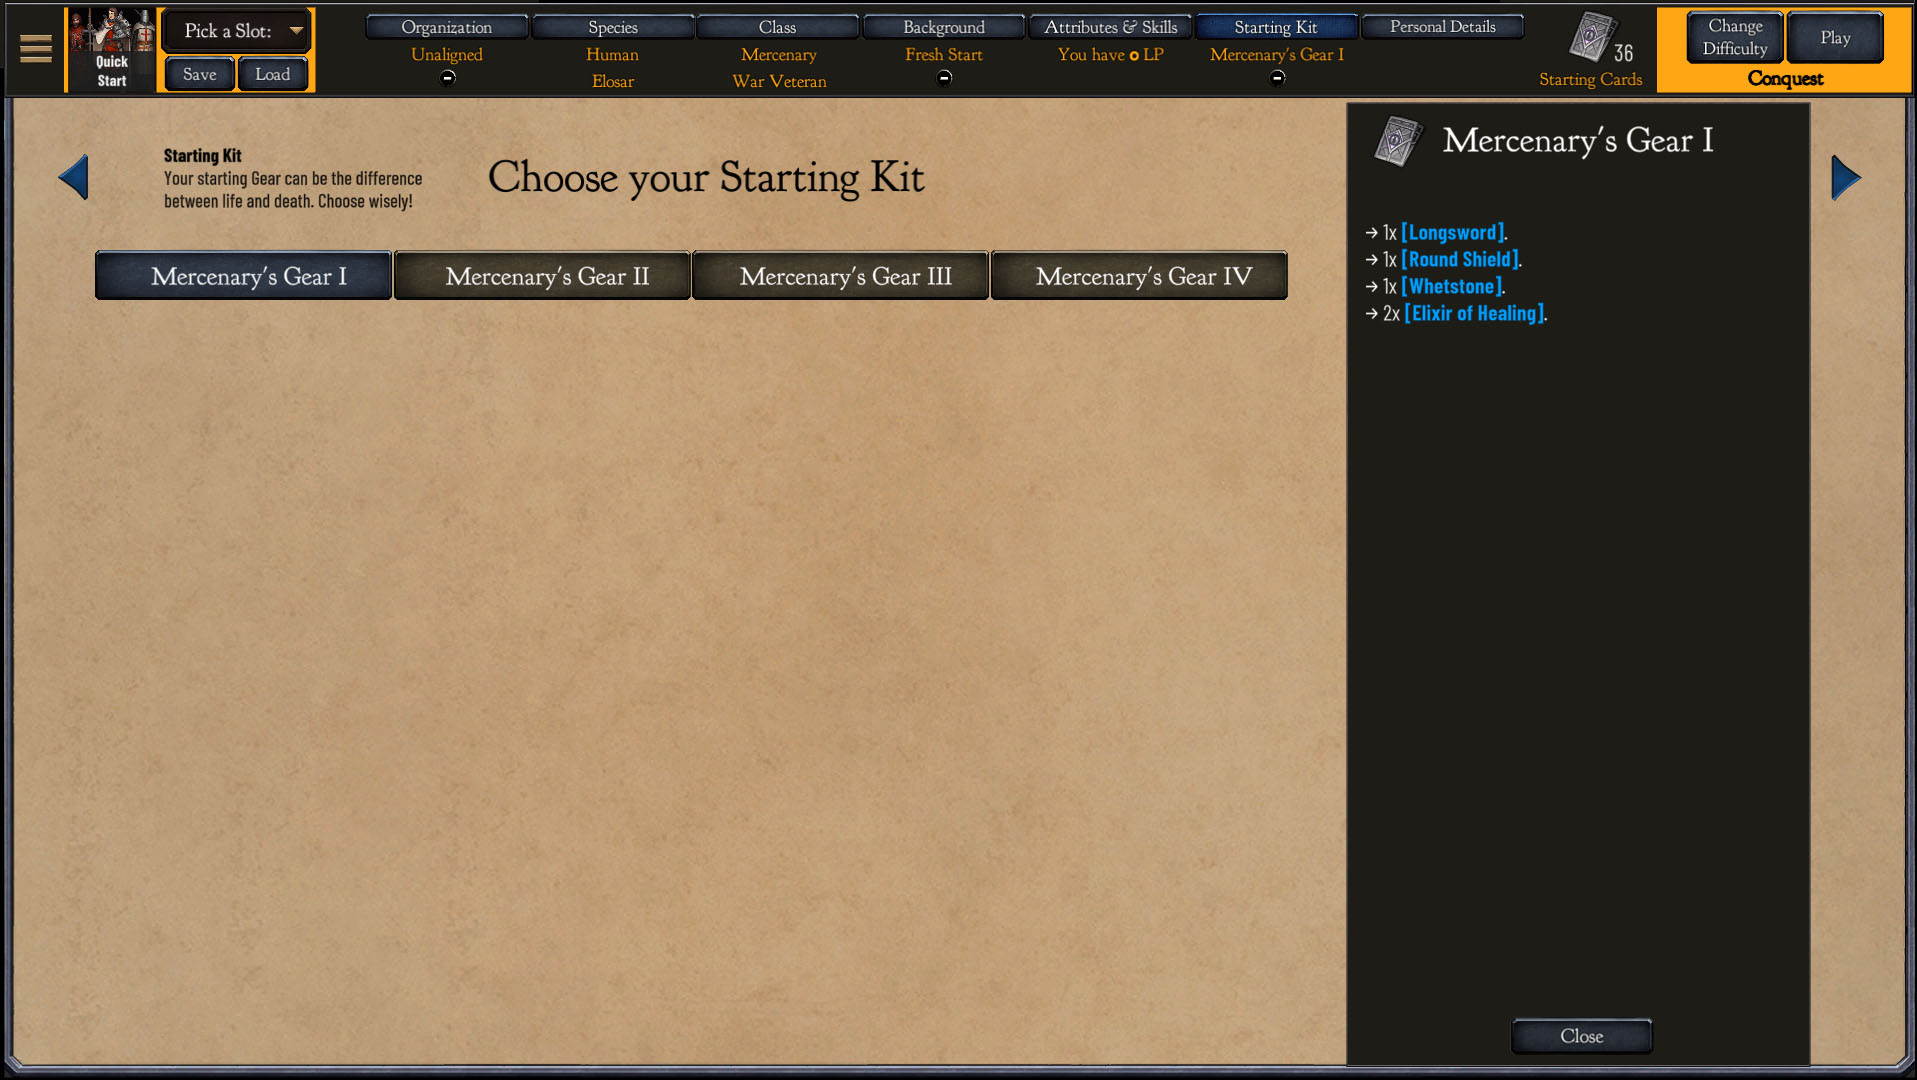
Starting Kit
Your starting equipment. Let’s go with the first Mercenary Kit.
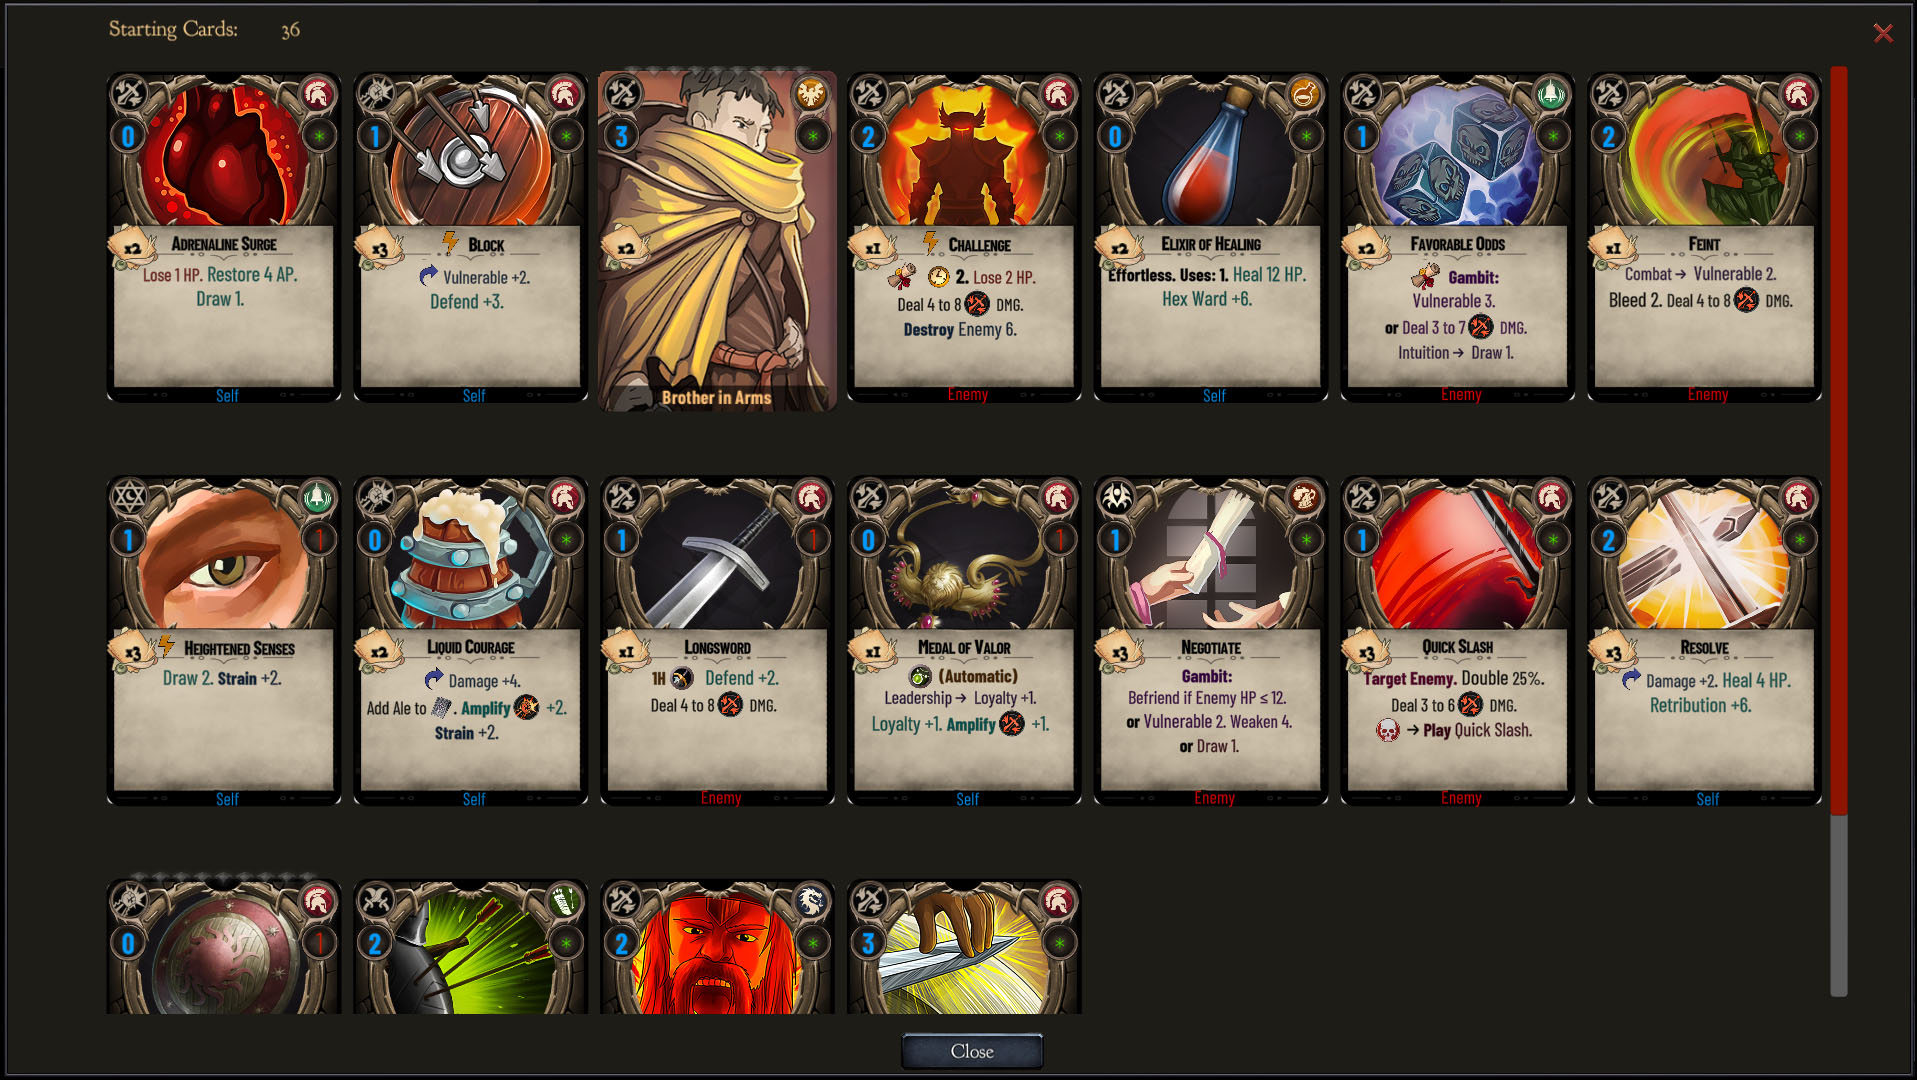
Our starting Collection
All these choices we made defined our starting Collection. These will be the cards that we’ll be building our deck with.
Character Creation Basics
A character in Erannorth is the sum of their parts which are defined by your Organization, Species, Subspecies, Class, Specialization, Background, Starting Kit.
These are all important decisions as they will define:
Your starting Attributes
Your starting attributes are the sum of your Species base attributes & Class attribute modifiers. You can further increase or reduce them by spending points up to 18 and down to 8 before you start playing, and during your level up after you start playing.
Your starting Card Collection
Your starting card collection changes based on your choices. You can use your starting collection to build and fine tune your deck.
Advanced and expert classes have a higher min Deck requirement but may offer you more powerful cards or more starting ally slots in return etc. But different Game modes may force a different Deck Limit.
The main problem you will face at this point, is that you don’t have access to any additional cards or skills. So your starting collection cards will make your life easier or harder.
Your starting Skills
Your starting skills or expertises will define which card sets you’ll be able to find and use.
Your starting Equipment
Equipment are special cards that you can consistently use once per turn. All Equipment slots are optional. Equipment is divided in active and passive. i.e You choose when to use your Main and Offhand and they keep coming back each turn. Whereas there are Armor and Accessories that always trigger automatically at the start of your turn.
Your Perks
Your Species & Class each has access to a different set of perks you can learn by spending Perk Points. Having a class & species fully compatible with each other can enhance your strengths, but it will also not mitigate any of your weakness and may offer you similar choices in terms of growth.
In addition to those some perks are Universal and all characters can pick them up to diversify their strategies.
Resistances & Affinities
There are 11 damage sources in ER. Having a positive resistance of +x means that you receive x less damage from that damage source. While -x means that you are vulnerable and receive x more damage from that damage source.
Resistances can only be acquired from your Archetypes, Perks & temporarily from Cards you play or have equipped.
Affinity is how effectively you can use a damage source. +x means that your cards of that damage source deal +x max damage. While -x that they deal -x max damage. Your damage range is then always max/2 to max.
For instance if you go to the Card Collection without having any class or race ie. at game boot. You’ll notice that x card deals 0 to 1 Piercing damage, and another y card 2-4 Astral etc.
This means that your affinity will make these cards stronger or less powerful. In the first example if my character has +3 Piercing that x card now deals 2 to 4 damage. But if they have -2 Astral that same y card will now deal 1 to 2 damage.
Main and Derived Attributes
Attributes are really important as they determine your damage source affinities and also other secondary attributes. Like initial HP, AP and Handsize.
Physical & Mental Attributes affect how well your character performs in situations and perhaps event skill checksra that require them.
Attribute Factors in Derived Attributes
Strength:
Grants bonus to Slashing [xx], Bludgeoning [xx] & Piercing [x] Damage.
Agility:
Grants bonus to Slashing [x] & Piercing, Poison [xx] Damage and to your Initial actions [x].
Resilience:
Grants bonus to Bludgeoning [x] Damage and to your Initial Health [xxx].
Willpower:
Grants bonus to Fire, Water, Earth & Air [x], Light & Dark [xx] Damage and to your Initial Actions [x].
Intellect:
Grants bonus to Fire, Water, Earth & Air [xx], Astral, Poison [x] Damage and to the Initial Hand Size [xxx]. (Hand size can never exceed 7 regardless of Intellect bonus or Perk Benefits.)
Charisma: Grants bonus to Astral [xx], Light & Dark [x] Damage.
Overall xx means that value is multiplied 2, x means that is multiplied by 1, then the result is added and divided by 3. This gives the value to get the bonus from. xxx doesn’t mean what you think 😛 it means that this attribute is the only one governing this affinity or secondary attribute.
That’s all nice and cool, but it’s not what you needed this guide. Let’s talk formulas 😉
Derived Attribute Formulas
Slashing Affinity
= (2x Strength + Agility) / 3
Piercing Affinity
= (Strength + 2xAgility) / 3
Bludgeoning Affinity
= (2x Strength + Resilience) / 3
Poison Affinity
= (Intellect + 2xAgility) / 3
Elemental Affinity (Fire, Air, Earth, Water)
= (2x Intellect + Willpower) / 3
Karma Affinity (Light & Dark)
= (Charisma + 2xWillpower) / 3
Astral Affinity
= (2x Charisma + Intellect) / 3
‘Initial HP’
= Base Species HP + Base Class HP + Retroactive Resilience Bonus (see below)
‘Initial AP’
= Base Species AP + Base Class AP + Retroactive Perk Bonuses + Retroactive Attribute Bonus of (Agility) + Retroactive Attribute Bonus of (Willpower)
Retroactive means, that if in any level your attribute increases ie. if in Level 3 your Agility increases, so will your Initial AP.
Pro Tip:Even if you have a penalty instead of a bonus ie. due to negative attributes, your Initial AP won’t drop below [Base Species AP + Base Class AP].
AP Pool
= ‘Initial AP’ + ((Level – 1) x 3)
These are the total AP you have at your current level.
AP/Turn
= (Initial AP / 2) + (Level * Mult) + 1;
Mult= 0.25 or 0.5 (usually). Each Game Mode can have their own setting.
Hand size
= 4 + (Intellect Bonus – 1) + Perk Bonus/Penalty
* Intellect Bonus – 1 can go only down to 0
* This result is capped at 7
We then take this result to calculate the bonus
i.e Piercing Affinity Bonus is then = BONUS OF(Piercing Affinity)
Let’s say Piercing Affinity = (Strength + 2xAgility) / 3 returned 24, then the Piercing Affinity Bonus according the table below is +5.
Result =
- 0,1,2,3,4,5 -> Penalty -5
- 6 -> Penalty -4
- 7 -> Penalty -3
- 8 -> Penalty -2
- 9 -> Penalty -1
- 10 -> No Bonus/Penalty
- 11,12,13 -> +1
- 14,15,16 -> +2
- 17,18,19 -> +3
- 20,21,22 -> +4
- 23,24,25 -> +5
- 26,27,28 -> +6
- 29,30,31 -> +7
- 32,33,34 -> +8
- 35,36,37 -> +9
- 38,39,40 -> +10
- 41,42,43 -> +11
- 44,45,46 -> +12
- 47,48,49 -> +13
- 50+ -> +15
Pro Tip: To see exactly how much your Species & Class combination affects your Affinities, set all your Attributes to 10. Then adjust your attributes from there.
Examples
Let’s I have 10 Charisma & 12 Intellect, I can then find my Astral Affinity: 32/3 ~ 10 which translate to no bonus or penalty. While a 12 Charisma & 10 Intellect would be 34/3 ~ 11 which is a +1 bonus.
Now that we calculated the attribute effect in Astral Damage, we add any racial or perk modifiers to finally reach at the value displayed in the character sheet.
The value you then see in there is what is added to or subtracted from the card base (Max) damage, to finally come up as the Max/2 to Max range.
So if you wonder why or how Primary & Secondary attributes being primary and secondary have an impact. Let’s find out.
Question. how much I need to increase my Charisma to get an Astral bonus of +2 from +1?
To find out you’ll have to reverse the equation like so. As long as you have 1 unknown x you are good to go:
Astral Affinity = (2x Charisma + Intellect) / 3
3xAF = 2x Cha + Int
(3xAF – Int) / 2 = Cha
Let’s say you have Intellect 13.
You need Astral Affinity of at least 14 for the +2 Bonus so (3 x 14) – 13 = 29 / 2 = 14.5 (Floor up)
So the minimum possible Charisma value that can get you to +2 is 15.
Let’s see if that’s true: 2 x CHA (15) + INT (13) = 30 + 13 = 43 / 3 = 14.3 (Floor Down)
Yup. If you have Intellect 13, you need Charisma of 14+ to reach the +2 bonus.
So Intellect 13 and Charisma 14 = +2 Astral Affinity Bonus
And what about +3? You need AF of at least 17 for the +3 Bonus. So let’s say we now have 16 intellect. so 3×17 – 16 = 35 / 2 = 17.5
(Decimals are floored down in the original formula so we need to floor them up as we are reversing the equation. But either way make sure to verify your results. )
So 16 Intellect & 18 Charisma = +3 Astral Affinity Bonus
Let’s see if that’s true: 2 x CHA (18) + INT (16) = 36 + 16 = 52 / 3 = 17.3 (Floor Down) which gets to +3.
Let’s do the reverse example:
Astral Affinity = (2x Charisma + Intellect) / 3
3xAF = 2x Cha + Int
3xAF – 2xCha = Int
You need AF of at least 17, and you have 16 Charisma.
3 x 17 – 2 x 16 = INT = 51 – 32 = 19
So Intellect 19 & Charisma 16 will get you to +3 Astral Affinity.
With 16 Charisma we need 19 Intellect. But with 16 Intellect you need 18 Charisma. This because Charisma has a slightly higher contribution to the equation.
The bottom line here is that I have this math to satisfy your academic curiosity or in case anyone wants to make a level up tool. YOU DON’T NEED to know these math to play the game. Our character sheet knows them for us. But the take away should be that you need both your primary and secondary attributes.
Sure give priority to the primary, but don’t ignore the secondary. 😉
Increasing Attributes
You can further increase your Initial Attributes by spending LP (Level up Points). You gain a variable amount of LP based on the Mode difficulty in each Level up, and you can reserve & spend them whenever you wish. Increasing Attributes lower than 16 costs 1 LP/point, while increasing Attributes higher than 16 costs 2 LP/point.
Increasing Affinities
You can increase your Affinities by increasing your attributes or unlocking relevant perks. The higher an affinity the deadlier that damage source will be.
Perks
Perks are passive bonuses and abilities your character can choose to learn by spending earned PP. Perks that improve effect values, improve them if they are already in a card. They won’t add new effects to cards.
All Perk benefits become immediately visible on Action cards, so the final value is what the Card says it is.
If a card effect drops to 0 through a perk, it will disappear from the card and no longer provide a benefit or a penalty till a different perk modify it further.
The PP you earn depend on the Mode. For example in ‘Conquest’ at every level you get +(25 x Level) PP. These points stack, and you can spend them whenever you like.
However in most modes your character can gain a limited amount of PP during their adventures, so choose wisely when and how you’ll invest them!
Skills/Expertise
Your fields of Expertise represent the various passive skills your character has and can use during certain events or stories.
For instance to pick a lock (or a pocket) your character needs the Thievery expertise. To gather herbs the Herbalism expertise. To survive in a hostile environment they’ll need Survival etc.
Your Expertise rank determines if you can do something or not. No dice rolls involved. If for example a choice involve picking a lock and it requires Thievery 3+, but you have only 2 then you can’t pick it, no matter how hard you try and the choice won’t appear.
A negative expertise can’t be used and can represent your character’s struggle to learn or acquire a particular Expertise.
Expertises also determine which cards you can find and use.
Increasing/Learning Expertises
You can upgrade your Expertises by spending LP in your character sheet. Expertises that exceed your level can’t be improved till your level increases to match their rank. Finally you can only improve the expertises you start the game with – unless a perk or an Event unlocks a new one down the road.
Level up Benefits
In most game modes you need [Current Level] * 50 XP to gain a new Level. Once you do your XP are back to 0. So starting from 0 XP:
- To reach Level 2 I need +50xp
- To reach Level 3 I need +100xp
- To reach Level 4 I need +150xp
- To reach Level 5 I need +200xp
etc.
Level Up Benefits
- Your HP increase and they become:
‘Initial HP’ + (Level – 1) x (4 + Resilience Bonus).
Additionally you restore half this much HP. - Your Max AP increase and they become:
Initial AP + ((Level -1) x 3)
Additionally you replenish half this much AP. - You get +x LP to spend increasing an attribute or skill of your choice. This amount can change on a mode by mode basis.
- You get +x per Level PP to spend in Perks. This amount can change on a mode by mode basis.
- You can further increase your Skill ranks up to your level, You get access to new Perks & Equipment.
Game Phases and Turn Flow
End of Turn
a) Discard Phase
If the game mode has the discard phase active you randomly cards down to X. Equipment cards are discarded first. Discard effects don’t trigger if a card is discarded this way (only when you manually discard it during your turn).
X is specified by the Game Mode. Some Vanilla modes don’t use this phase.
b1) Negative Statuses apply on Player
DoTs like Bleeding, Feeblemind, Burning etc. are applied on the player. Hex Ward will mitigate as many (damage) points of these effects as it can and you will suffer the effects of any unmitigated DoTs.
b2) Debuff Phase A – non-Defensive Bonuses (Resources/Offense)
Resources and non-defensive bonuses like Loyalty, Blood Surge, Amplify & Empower etc. Debuff.
c) Echo Phase
All Echo Actions in effect are casted all over, as if you had them in your hand targeting the same targets (if they exist) and in the exact same order you played them. If they don’t Ignore Synergies they absorb / trigger any Active synergies, that are active, or became active by a previous Echo action, forming ‘Echo Chains’.
d) Aura Effects trigger (Aura of Light (Consecrate) or Aura of Darkness (Desecrate) )
e) Enemies Main Phase
Enemies attack or use an AI response in the order they appear. You can re-order them by dragging their avatars around.
f) Reinforcement Phase.
If reinforcement rules are active, enemy reinforcements will appear now. All vanilla modes have this rule active and all have a restriction on how many waves of Enemies can appear. This could differ in your Custom modes.
g) Debuff Phase B – Defensive Bonuses
Resistance, Concealment & Retribution bonuses Debuff.
Your new turn starts
a) Fleeting, Cursed, Mutate & Unravel effects trigger
b) Refresh Equipment Phase
You discard all unused equipment.
c) Draw phase
You draw cards up to your handsize. You draw x additional cards for each card you already drawn through echoing actions. If a custom Draw Phase is active, instead you Draw x cards. Activable Equipment and your Main/Offhand items are added to your hand.
d) Passive/Activable equipment trigger
Your passive equipment triggers in this order Armor=>Accessory=>Ring=>Amulet=>Cloak & Any Activable equipment is added to your hand. As each piece triggers it will absorb/trigger any Active Synergies. This can turn otherwise harmless Actions into harmful.
If you are the Target, and any of these could harm you, instead they are ignored but you also lose their positive benefits. That can happen whenever you advance to a new node, as Enemies aren’t there yet.
Otherwise harmful Actions are directed automatically to the first enemy or to the Enemy you set as the preferred Target with their ‘Crossed Swords’ button.
e) Your allies Reactivate.
f) Main Phase
You can cast spells, attack with allies, and generally do anything you like. Only allies with ‘Counter Attack’ can act during this phase and only if you target them with a non-Ranged Action or a non-Ranged morale Ability. Clicking ‘End of Turn’ starts this cycle anew.
Notes
Some of these phases are optional (ie. can be turned on/off in the Game Mode rules or altered by the Game Mode Rules. During your Turn, you can press the ‘+’ key to activate/toggle the Verbose mode in the Combat Log. This will also show you the various Phases as they unfold along with additional/more detailed output on your Actions.
Mastering Echo, Synergy & Multicast
(Or how they play awesome together)
Perhaps the most versatile and powerful effects in the game, and probably quite complex to grasp for anyone unfamiliar with how exactly they work.
Let’s amend that, by start by explaining a bit more how each effect works. 😉
Echo
An action with Echo x lasts for x Turns. So if we are the target we reap the action benefits for x turns without paying the cost again or losing concentration. If the enemy is the target they also reap their damage or negative stati, as long as they are alive.
What happens in reality is that during every EoT, before your enemies act, you get to re-cast (for free) a copy of all Echo Actions in their original order to the original target, till the target dies, or an Echo counter becomes 0.
Multicast
An action with Multicast x or all, affects the first x or all enemies. (You can and should, drag and drop to reposition and reorder the enemies to maximize the benefits of Multicast cards.)
What happens in reality is that your Multicast Action stops processing after it activates any synergies in it, and splits into x copies that are cast in succession in each of its targets.
Synergy
An action with Synergy [Effect]: x, injects the effect into your next action. X is the base value. Which is affected by the next card’s upgrades, affinity, empower etc. It inherits the next cards level, damage type etc.
Why this is cool?
Case Study 1: Bypassing Resistances
Let’s say your enemy is total immune to Dark. But weak to Fire. And damn! You have several Dark cards but one of them gives Damage Synergy and a Fire Card that doesn’t deal any damage at all. Solution: Give Damage Synergy to the Fire Card. And use it on your Enemy instead of your Self. Watch them go down in a Blaze of Fire. (Well not literally, you should know by know I despise the time wasting vfx, even if they do look cool let’s say the first two times)
Case Study 2: Taking advantage of Higher Affinities, Amplify & Leyline bonuses
Synergizing Damage into cards you have higher affinty or amplify bonuses, will increase your damage output.
Let’s say we have +3 Damage Synergy card.
I also have a card that Deals 2-4 Dark Damage. And another one that doesn’t deal any damage but I have Astral affinity +8 and it happens to be a Tier 5/Level 3 Astral card. Hmm. Guess which one I should use on my enemy 😉
Precisely. Synergy will add 3 Base damage to my Astral Card. Which my Astral Affinity will boost by +8, and its 3 levels by +3. Let’s count:
The Dark card will end up dealing 4 +3 = 7 (3 to 7) Dark Damage
The Astral card the one without any damage before? will end up dealing 3 + 8 + 3 = 14 (7 to 14) Astral Damage. Cool huh.
Case Study 3: Having fun with Multicast
So what do you think will happen if you add an Amplify +2, Damage +2 Synergy in a Level 0 Fire Card with Multicast 3 that all it does is giving Vulnerable 2? (I have +2 Fire Affinity)
Those who said that all the enemies will get Vulnerable 2, and take 3-6 fire damage are wrong.
Remember I am casting 3 copies in succession.
1st Copy / 1st Enemy:Vulnerable 2, I get +2 Fire Damage, Card Deals 3-6 (+ 2 vulnerable) fire damage
2nd Copy/ 2nd Enemy: Vulnerable 2, I get +2 Fire Damage (+4 Total), Card Deals 4 -8 (+2 vulnerable) fire damage. Fire Damage bonus drops by 25% (-1 rounded down)
3rd Copy/ 3rd Enemy:Vulnerable 2, I get +2 Fire Damage (+5 Total, lost 1 before), Card Deals 4 – 9 (+2 vulnerable) fire damage. Fire Damage bonus drops by 25%.
What about a Mass Stun? By adding Synergy Stun to the exact same card?
Or fill the battlefield with fireworks by Synergizing an AoE effect in each of our copies etc.
Case Study 4: Having fun with Echo
When you synergize an effect to an Echo card, it will resolves at the time of the casting. Then will keep echoing as the original copy. But if an Action has both Echo & Synergy, Synergy passes to the next card, which can be another Echo Card, or your Armor or your Accessory.
Trigger Order is Echo=>Armor=>Accessory=>Ring=>Amulet=>Cloak.
For example I am back in the corner. Without much AP to use Actions. I have an Echo in effect that gives +7 Healing synergy for 3 more Turns. But several expensive cards and an Echo card that deals 1-2 Slashing Damage to an enemy for 3 Turns. What you think is my play?
I use the 1-2 Damage dealing card on *Me*. True for the next 3 turns, I get 1-2 Slashing Damage, but the previous Action in the stack will keep passing on that precious +7 Healing effect.
Unless there is a beefy enemy of course that won’t die on me while my combo lasts. In that case we can put the card on them, and damage them, while our health is restored. (Heal is in Cyan, which means that it will affect you, even if you target an Enemy. And an Ally if you target an Ally.)
So in a sense I got myself a free 3-turn regeneration system, that will keep me alive while replenishing my AP and hoping for better draws.
That’s just some possibilities of what you can do by combining these effects together.
Infused Cards and how to recharge them
Infused are cards with limited uses, charges or durability, which unlike normal consumables aren’t destroyed once fully used up. You can use such Infused cards only as long as they have at least 1 Use, Charge or Durability remaining.
Once their uses drop to 0, Infused cards remain in your possession but are unusable till you refill, recharge or repair them.
Essence
Infused items with fully depleted Uses, Charges or Durability can be recharged (while out of Combat) from the Player’s Collection by spending ‘Essence’ cards. The backpack icon changes to the ‘Essence’ icon when refilling an item is possible.
You can’t refill partially depleted items, but only once they reach 0 uses.
The cost to refill an item is the minimum of 1 and Item Tier + 1 ie. Tier -1 & Tier 0 items will cost 1 Essence, while a Tier 3 item will cost 4 Essence.
You can purchase ‘Essence’ cards in Towns. The PC can carry up to 12 Essence cards, and they cost 75 Farthing to purchase.
Infuse cards
Infuse is a card effect that once used restores (up to) x Uses, Charges or Durability in all ‘Infused’ cards in your hand. Certain cards like Dreamshaper’s Dream cards, that infuse cards upon discarding them, will also infuse themselves.
Recoup cards
Some cards have the Recoup effect. Once triggers you Remove the top x Infused Card(s) from your Drawpile. Choose & Draw one, then Discard the rest. The Chosen card restores (up to) 1 Uses, Charges or Durability. (Recoup effect doesn’t trigger a Deck resuffle.)
Recharge Cards
Some cards have the ability to Recharge certain other cards. When you play a card with Recharge [Cardname] x, Cardname restores (up to) x Uses, Charges or Durability. If x is missing it implies by 1.
Ripple Effects
Ripple effect associates two effects together and ‘Whenever you play a card with [Effect1], you also create and play a bonus card with [Effect2].
Let’s see a few examples:
→ [Ripple Effect Draw] Whenever you Draw a card, gain +3 Defend.
→ [Ripple Effect Defend] Whenever you gain Defend, deal 4 Damage.
If you play a card with Draw then you also gain 3 Defend. This ‘Defend 3’ is granted by playing a bonus effect card (so you play a card with Defend), meaning that the second Ripple effect kicks in and you also deal 4 Damage.
Ripple effects are permanent modifiers and are attached to your character, but each Keyword can have only one Ripple effect associated with it.
ie. if I have ‘[Ripple Effect Draw] Whenever you Draw a card, gain +3 Defend’ and then get a perk that says ‘[Ripple Effect Draw] Whenever you Draw a card, lose 1 life.’
I am going to lose my first Ripple effect that is associated with Draw, and instead gain the second. Meaning that Drawing cards would cost me life, instead of giving me Defend.
Surviving against the Odds
One of the game core concepts is Survival.
You may think that when presented with a certain encounter that optimal choice is to kill everyone, or failing that as many of them as you can. Or that if you can’t use ‘Defend’ to block Enemy attacks you are dead. But in most cases both assumptions will turn out bad for your long term survival.
Let’s go through some of the tools of your survival.
Manage your AP well
Managing your AP is more crucial than managing your HP, especially early on.
But Raven, if I run out of HP I’ll die! Yes, in most cases the same is true if you run out of AP. Remember your AP refill at a fixed rate. And if you have Passive Equipment like accessories or armors, they may too take up some of these precious AP.
Just because you can, doesn’t mean you should
Perhaps you have both the cards and AP to clean the area. But just because you can doesn’t mean it’s always a good choice. If the AP you’ll end up spending, are more than the damage you’ll get it’s not worth it. Perhaps the enemy is about to flank you, he is alone, you don’t expect reinforcement, by all means let him!
Even if you have the choice between preserving AP at the cost of receiving 1 or 2 damage and you have the HP to spare go for it!
Know thy Enemy
If you face many tough opponents you can’t kill without spending all your cards and AP, or even worse just can’t kill more than half even after spending all your resources, it’s preferably to kill one and force the remaining 3 to heal, rather than kill 2 and spend all your AP.
This way you have one less opponent to deal, exhausted their healing capacity for a couple of turns, and saved yourself some serious damage.
Enemy Intent
You can reveal the Enemy intent by pressing ‘I’ while Enemies are around. This will reveal the ‘current’ enemy plans (for enemies you have already defeated in the past at least once)
Observe and Learn
Changes in the status of the battlefield or the enemy health will affect dynamically their tactics.
Example 1: Enemy is dying and planning to use the Shield tactic. Before that though, an ally of that enemy, with benefactor Heal acts first. Healing him above the threshold he needs to Shield.
The enemy will now not use the Shield tactic. He doesn’t have to and instead will attack you.
Example 2: Enemy is planning to Flank you. Before that though, an ally of that enemy, with benefactor Flank acts first. Activating all his allies Flank bonus.
The enemy will now not use the Flank tactic. He doesn’t have to and instead will attack you.
Example 3: Enemy is Stunned and helpless. Before that though, your Echo action that deals chaotic damage to a random enemy activates, hits him and breaks his stun.
The enemy is no longer helpless and will use whatever tactic is suitable for his status.
Enemy AI can be broken down into Offense, Defense, Survival and is ‘state based decision making’, not RNG and we (as Human observers) have the ability to deduce what will happen at any given moment. While the Intent hint can’t predict every possible variable in the battlefield.
Changes in Erannorth 2.0 Ruleset
Erannorth Chronicles uses a revised edition of the Erannorth game ruleset.
If you previously played Erannorth Reborn (which uses version 1.0 Ruleset), some of the game rules are slightly different / revised. The following refer to things that existed in 1.0 Ruleset and changed. Things new to this ruleset like Ripple Effects, Infused items etc. aren’t covered here.
Potential/Penetrate
Potential mechanic & Penetrate effect are both deprecated/removed. You don’t need to pass a potential check to dispel or to debuff an enemy.
Equipment
Main & Offhand items are now drawn *after* the Draw step along with the rest ‘Active’ equipment. ie.
- Before: Hand size 4 + Main + Offhand would equal a hand of 4 cards (Main, Offhand & 2 Deck cards)/
- Now: Hand size 4 + Main + Offhand equals a hand of 6 cards (4 Deck cards, Main, Offhand)
Backpack
Backpack rule changed to: “Look at 4 random consumable or trinket cards you own outside your Deck. You may pay 1 AP/card to Draw it while in Combat. Or Draw it for free out of Combat.”
Certain consumable cards can be freely used directly from your Deckbuilder, by clicking on their Backpack icon.
Shapeshifting
Shapeshifted characters no longer Discard the non-Primal actions they draw. They can use all their Deck actions normally.
Shapeshifter PCs assume the form that matches their [Classification] once they use a card with the Shapeshift:1 effect. The matching filename is used to provide the artwork for this transformation. ie. Werewolf.png for the Werewolf etc.
If a Shapeshifter PC is still in their Hybrid Form as they start they turn (have Shapeshift 1) then they play for free the card named ‘[Classification] Form’ ie. Werewolf Form. (if such a card exists.)
Kill effect
Rule changed to “Target (up to 2 levels higher than you) has x% chance per HP they miss to instantly die. Boss characters are immune to this effect regardless their level.
Morale
Morale abilities will no longer trigger if the PC is the last person standing and its harmful.
Draw/Invoke
They can create cards if you have less than 10 cards in hand (up from 7).
Coven
Empower gained from Coven won’t wane, as if the Card also had Empower.
Enemy Healing
Enemy ‘Healing’ tactic will also remove ‘Weaken’ counters from the target (based on the Tactic level). The complete Healing rule changed to: “Healed enemies restore a portion of their Health and remove a small amount of Bleeding, Venom and Weaken stacks (relative to the Healing tactic rank). While enemies have Healing counters, they are unable to use the Healing Tactic themselves and can only be further healed by an Ally.”
Enemy Regenerate
Enemy ‘Regenerate’ tactic will also remove ‘Weaken’, ‘Bleeding’ & ‘Venom’ counters from the target (based on the Tactic level). The complete Regenerate rule changed to: “As long as the Regenerate effect is active, Enemy will restore a small portion of HP every round and lose a small amount of Bleeding, Venom and Weaken stacks (relative to the Regenerate tactic rank).”
The End? Or a new Beginning?
While this manual isn’t meant to replace the in-game rulebook by any means, there are probably more things you’d wish there was here to read too.
If so feel free to comment below on stuff you want me to explain further. Additional things you’d like me to cover etc. I’ll be updating this guide with more sections whenever my time allows it.
Hope you enjoy the Guide about Erannorth Chronicles – Manual Guide – Secrets and Gameplay Tips, if you think we should add extra information or forget something, please let us know via comment below, and we will do our best to fix or update as soon as possible!
- All Erannorth Chronicles Posts List


Leave a Reply