I’ve gathered a few notes for Dinkum.
Introduction
G’day mate!
This manual is a work in progress, which I’ll continue to update.
This guide will not contain:
- How to get rich as fast as possible.
- How to beat or cheese the game.
- Any info about glitches, or cheats.
This guide will contain:
- tips for all aspects of the game.
- Spoilers… lots of spoilers!
- and a whole lotta of text.
Please use the comment area to offer suggestions for how to make this tutorial better. All recommendations will be taken into account.
The official Dinkum Wiki, public conversations in the official Dinkum discord, and/or my own writings were the sources of all the information in this guide.
Advice For New Players
I advise novice players to play the game at their own pace as their first piece of advice.
Money is only scarce when starting out. You can make money in so many fun and different ways in game. In my opinion, you can usually make “enough” money to not have to worry about “what makes the most” money.
Additionally, you should be aware that the game wasn’t intended to be played by concentrating on earning money by performing the same thing repeatedly. For instance, while you can perform some actions every day in-game, others have significant payouts.
Ultimately, you are free to play however you want. Just be careful and make backups frequently.
And last but not least, remember that you can just exit the game without sleeping/saving, so the whole day is deleted or “forgotten.”
Game Options / Settings
You may want to adjust Dinkum game settings to your preferences.
Tab 1
Under the first tab, Display, I find that my PC can handle the “Chunk View Distance” maxed out at 8, this will allow me to see as far as possible.
Although full screen in windowed mode is not a configurable option, you may enable it by unchecking the box, maximizing your screen, then “hiding” the top window title bar by hitting Alt+Enter.
Tab 2
The only item I occasionally turn down under the second option, Sound, is the music so I can listen to my own music if I’m in the mood for anything else. In order to hear crucial queues, such as when a Thunder Egg is nearby, I prefer to keep the “Effect Volume” relatively loud.
Tab 3
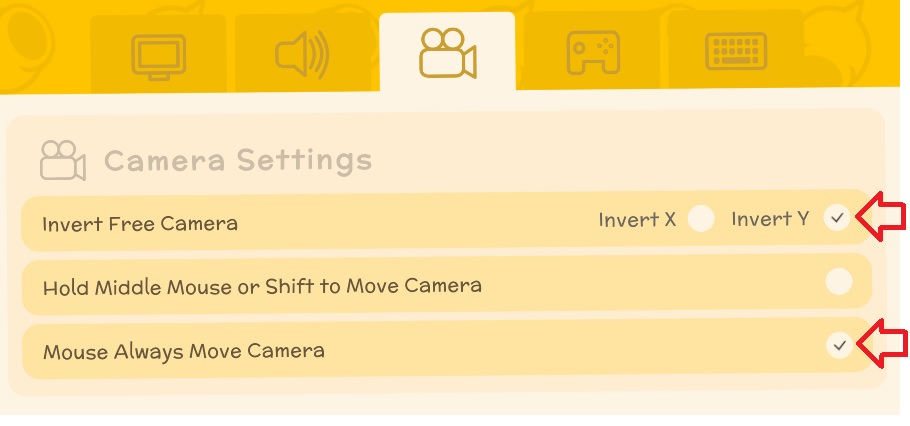
I need to adjust the options under the third page, Camera Settings, so it behaves more like previous games. Invert Y and Mouse Always Move Camera are the only choices I have selected here as ON:
Tab 4
Under the fourth tab, I turn Text Speed to ‘Super’. This helps when I want to skip ahead fast through chat text.
The option “Mini-map Always Faces North” is a must have for some players, I toggle mine on or off depending on what I am doing.
Tip: if you are having trouble navigating in-game, you can set a marker on your map and then click on it, and it will show an indicator on your mini-map that you can follow to it!
Other Options
‘Pause’ is now a feature through the journal (AKA escape menu).
Press “escape” on your keyboard to open it, then select the “Options” tab.
Note that pause is only accessible through the journal currently, but a hotkey button is being considered for it.
Also take notice that while custom keybinds are not now available, they are a frequently requested feature and may be offered in the future.
General FAQs
- Hold shift + click to stack items from one window into another.
- Queen bees have a higher chance of dropping from Hardwood trees (FYI Hardwood trees drop Blackwood seeds, and are not to be confused with pine trees).
- Pre-requisites for Jimmy (the shady visitor): rain and 1,000,000 in the bank. He will then show up on his boat sometimes (20% chance) when it rains and you’ll see a question mark on the map marking his spot.
- Pre-requisites for Ted: Hunting license level 2 and some other conditions. Ted’s location appears to be random.
- You can put a sprinkler on grass to make long grass grow where you want. (Vombats eat long grass!)
- Weigh thunder eggs first to see how much John will give you and if it is under 60k (or whatever John will give you for 4 opals), crack it open instead.
- The Windmill affects: BBQ, Furnace, Grain Mill, Stone Grinder
- Water Can and Hoe: default tool affects 1 square, Copper 3 squares, Iron 6 squares.
- Tractor had 3 modes, dependent upon irrigation vehicle license: harvest, till soil, and fertilize/seed — all done 3 blocks wide.
- Sell bulk (stack of 50) to Jimmy, sell non-bulk (fish, bugs, etc.) to Ted.
- Playing a guitar will make nearby animals and villagers happy.
Q: What is up with these animals?
A: Dinkum offers a charming twist on some animals you may already be familiar with!
Bush Devil = fire spitting Tazmanian Devil
Chook = Chicken
Croco = Crocodile
Jackaroo = Kangaroo
Kidna = Echidna
Mu = Emu
Pleep = Platypus + Sheep hybrid
Vombat = Wombat
Wary Mu = Cassowary
Getting Started
Choose your character’s appearance, name, and island name when creating them. In terms of gameplay, it has no impact.
Each island is randomly generated. While they are similar to one another, the main differences are the river locations, the terrain and biome borders vary greatly. So, each island more or less looks different yet feels familiar!
The Tropical region is consistently in the same approximate vicinity. Ocean will always be ocean. The East side is always where the dock is. At the island’s northern, eastern, southern, and western ends, towers are always present.
Once you’ve watched the introductory cut scene, use escape to bypass it on subsequent plays through.
If you are playing the experimental version of the game, you can halt the single-player mode in the game options.
The time of day breaks down as follows:
Morning 7am – 11am.
Afternoon 11am – 6pm.
Evening 6pm – midnight.
LATE at/after midnight, until save or exit.
The only true restriction is that your stamina is significantly reduced when it gets late, making it extremely expensive to perform acts that require stamina. I like to work on tasks that don’t demand a lot of energy during this time of day, including cooking, operating the table saw and furnace, etc.
Best Location for Base Camp
It doesn’t much matter where you set up your tents and build your village, except some spots will be more challenging than others. Islands that you have to swim out to at the start make for a pretty challenging start, but just about anything can work!
Many players appear to prefer to begin in the middle of the map or close to a tower for convenience in movement after the towers have been repaired.
You can always move your buildings later on if you wish, with a couple caveats:
1. You cannot move the base tent or the player tent until you upgrade them.
2. It costs 25k dinks every time you want to move a building.
Ending The Day (AKA Auto-Save)
Through your dialogue on the first day, Fletch will offer you a sleeping bag while in the base tent. You can place it on the ground or carry it with you, and you can have more than one. These sleeping bags are simply a way for you to auto-save the game by ending the day, which you can do any time you like.
It is crucial to remember that if you quit the game without resting or saving, you will lose all of the advancement you have achieved so far. If you run into a bug or glitch, get stuck, or simply want to undo something, you can use this option to resume your day. This also enables you to cheat your way through the game, though I wouldn’t suggest it.
Bestiary
See: wiki entry – [fandom.com]
| Name | Habitat | Temperament |
|---|---|---|
| Alpha Bush Devil | Pine Forest/Cold Biome | Aggressive |
| Alpha Croco | Plains/Billabongs | Aggressive |
| Alpha Jackaroo | Bushland | Aggressive |
| Baby Chook | N/A | Passive |
| Bug | All but Ocean | Passive |
| Bush Devil | Pine Forest/Cold Biome | Aggressive |
| Cave Bat | Deep Mines | Aggressive |
| Chook | N/A | Passive |
| Cockatoo | All but Deep Mine | Passive |
| Croco | Rivers, Billabong, Mangrove | Aggressive |
| Diggo | Desert | Neutral |
| Fish | Rivers, Ocean, Billabong | Passive |
| Glowing Croco | Deep Mines | Aggressive |
| Jackaroo | Bushlands, Plains | Passive |
| Jellyfish | Ocean | Aggressive |
| Kidna | Desert | Neutral |
| Magpie | All but Deep Mine | Passive |
| Mu | Plains | Passive |
| Pet Diggo | ||
| Pleep | N/A | Passive |
| Scrub Turkey | Plains, Tropics | Passive |
| Shark | Ocean | Aggressive |
| Toad | Only when raining | Passive |
| Underwater Creatures | Rivers, Ocean, Billabong | Passive |
| Vombat | N/A | Passive |
| Vombat Joey | N/A | Passive |
| Wary Mu | Plains, Tropics | Aggressive |
Brewing
Ahhh brewing…
It seems to takes 1-2 days to brew something.
A popular method of brewing is something like, craft 3 kegs and try to keep them going 24/7, each brewing something depending upon your needs.
Jelly can be obtained from jellyfish, on beaches.
Wattle can be found in the bush lands.
Bottle can be found in the pine forest.
Wattle brew = energy
Bottled brush = health
Jellybrew = fishing buff
Deep Mine
There are already some good guides and videos out there on how to do the Deep Mines, so I’ll leave it to them to explain the details for now. Plus, I don’t have that much experience in the mines yet, so I will leave you with a few solid tips I have learned from others.
You do not need to do much combat in the mines currently, you can run passed all of the mobs and take cover in the treasure rooms — they shouldn’t follow you into the treasure rooms.
There are often mobs in the treasure room, and you will need to deal with those in one way or another while trying to loot chests.
What to Bring and Why
- Wattle Brew
- 2 jackhammers (or a small handful of pickaxes if don’t have a jackhammer)
- Old keys (unlocks treasure rooms)
- food for health and stamina.
- Candle hat (or miner hat from John’s store if you don’t have the candle hat yet).
- Consider bringing lots of torches if you are directionally challenged so you can drop them and follow the path back.
- a weapon to kill stuff (usually all you need to kill is the mobs in treasure room, they mobs outside don’t follow you in currently).
- and maybe a campfire if you want to kill stuff and get food/cook down there.
When you get down into the deep mine, mark the exit on your map and select the marker, this should highlight its location and direction on your minimap.
You may also want to consider placing two storage boxes outside the entrance to the Deep Mines — one to unload before you go in (everything including dinks!) and another box to load supplies from taking only what you need.
Farm Animals
Chooks: similar to chickens, requires a bird coop for housing and a feeder to eat. Produces eggs to use by cooking or selling.
Requires Handling Licence Level 1
Vombats: similar to cows, requires an animal stall to for housing and a feeder to eat. Produces milk when they are old enough. Collecting milk requires a milk bucket which can be purchased from Irwin.
Requires Handling Licence Level 2
Pleeps: are a hybrid of sheep and platypus. Will eat tall grass for food. Produces wool which can be turned into clothes and sold at John’s shop. Collecting wool requires sheers which can be purchased from Irwin.
Requires Handling Licence Level 3
Pet food can be purchased from Irwin, or created in a grain mill using seeds or wheat.
You can obtain them buy purchase from Irwin if you have the required license and rank.
Vombats and Pleeps become available after Irwin’s Barn is built.
Farm animals can be kept safe by surrounding their living space with fences places on same level on the ground. Currently, if you place them on different levels of blocks, the fences may not be effective in keeping both pets in and predators out.
You can find a diggo collar and a mu saddle in the mines.
To use the saddle, first put it on your hotbar. Walk up to the mu and press the corresponding hotbar key, then right click the mu to “drive.” Press ‘E’ to stop driving.
Use the diggo collar in similar fashion, and you get the option to “tame” it.
Farming
Farming is a late blooming skill, and by that I mean you will want to earn an income from other sources such as fishing, selling bugs and flowers, or whatever you prefer!
Fertilizer is used to make crops grow faster. And this is good because the faster your crops grow, the faster you get their yield.
At level 10 Farming, you unlock the recipe for a compost bin, which can be used to make fertilizer.
You can use waste like 4 roo poo, 2 vombat poo, 8 bones, or 25 sea shells to make 1 fertilizer. It takes 1 full day to turn compost into fertilizer.
The process for planting seeds is:
- Till with a hoe
- Fertilize with compost, level 10 farming
- Plant seed buy or collect
- Water bucket or sprinkler
Crop Layouts
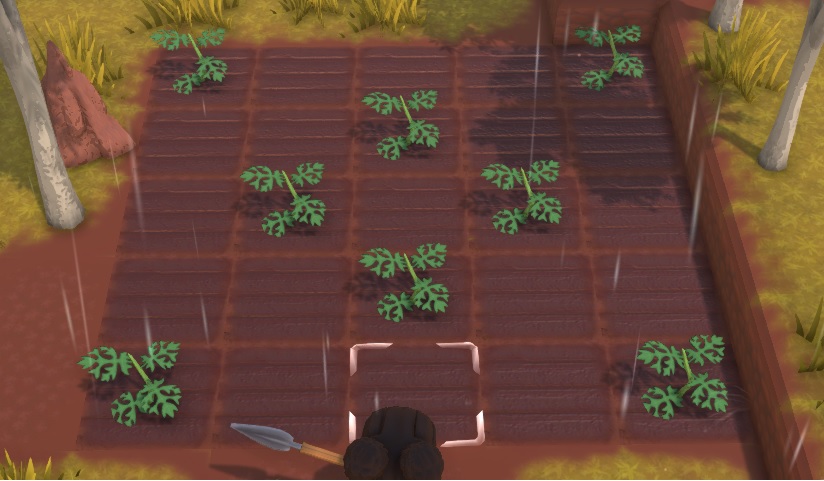
A player in discord who makes lovely diagrams recommended this layout for watermelons (thanks Duvinn!), which is a happy medium to maximize yield and space:
Leveling up the farming skill takes no short amount of time.
Farming experience is earned through:
- Harvesting
- Composting
- Processing harvest crops (i.e., turn wheat into flour)
- Watering
Other tools that can be used on your farm include:
The silo will restock all good bins in an 8×8 square around it, once per day.
The Windmill area is: 26 x 26 including the windmill.
The water tank provides water 10 tiles out in each direction.
Fishing
The hardest part of catching fish is “hooking” them.
When you simultaneously see the splash and hear the loud sploosh, quickly left click on the screen to hook the fish.
If you succeed, you can just spam left click to reel it in (you can stop clicking when the fish is fighting and splashing if you want but it won’t hurt if you don’t).
If you fail to hook the fish, you can tap left click to try draw the attention of other fish, or just right click to cancel the cast, then left click again to re-cast it near another fish (if you try to re-cast it on the same fish you just failed on, you will want to wait for 4-5 seconds or that fish will likely ignore your bobber).
If you cast your line and don’t draw the attention of any fish, you can try reel it in passed any fish in its path, but they will often ignore you if they are swimming away from your bobber when it passes.
Before you release to cast your line, you can still turn your character while “charging” your fishing rod — this is handy if a fish changes swimming direction and you want to land the bobber a few feet in front of their path to draw its attention.
Licenses
See: wiki entry – [fandom.com]
| License | Ranks | Requirements |
|---|---|---|
| Agriculture Vehicle | 1/2/3 | Farming Licence 3, Vehicle, and Irrigation Licence 2 |
| Building | 1/2/3 | Logging licence 1 |
| Cargo | 1/2/3 | Toolbelt licence 1 |
| Commerce | 1/2/3 | Fishing, Hunting, Logging, and Mining licence 2 |
| Deep Mining | 1 | Mining license 2 |
| Excavation | 1 | N/A |
| Farming | 1/2/3 | Farming skill 0/10/20 |
| Fishing | 1/2/3 | Fishing skill 0/5/?? |
| Handling | 1/2/3 | Farming licence 1 |
| Hunting | 1/2/3 | Hunting skill 0/5/?? |
| Irrigation | 1/2 | Farming licence 3 |
| Landscaping | 1/2 | Logging licence 1 |
| Logging | 1/2/3 | Foraging skill 0/10/?? |
| Metal Detecting | 1/2 | Excavation licence 1 |
| Mining | 1/2/3 | Mining skill 0/10/20 |
| Toolbelt | 1/2/3 | Fishing, Hunting, Logging, and Mining Licence 1 |
| Trapping | 1/2 | Hunting licence 1 |
| Vehicle | 1/2/3 | N/A |
List of Buildings / Sizes
Listed below is the block space used by each building.
6×5
Theodore’s Museum
Post Office (future content)
5×5
Player tent / house
Base tent / Town Hall
5×4
Irwin’s Barn
5×3
Rayne’s Greenhouse
4×5
John’s Goods
Clover’s Threadspace
4×4
Milburn’s Bank
Franklyn’s Lab
Melvin’s Furniture
Villager’s House
Visitor’s Site
3×3
Deep Mine
2×0.5
Bulletin Board
People
Franklyn
Franklyn loves discs! The more discs you turn in, the more commissions will be available.
Commissions
0 Discs: Bomb, Repair Table, Weather Station
1 Disc: Lawn Mower
3 Discs: Jet Ski, Motor Bike
7 Discs: Gacha Machine, Quarry
10 Discs: Compactor
13 Discs: Chainsaw, Jack Hammer
20 Discs: Tractor
28 Discs: Helicopter
Not sure when ‘Charging Station’ unlocks? (all I know is it’s under 40)
Recipes (randomly available):
- Palm Wood Bench
- Repair Kit
Relationships
If you chat with NPC’s, do requests for them and spend money at their tent, you will increase your relationship with them.
As your relationship with them increases, you can have them move in to the village and hang out together on their day off.
If you press escape and click on ‘Pedia’, then select ‘People’, and click on someone; you will see your relationship level with them.
All you can see in game is a certain amount of hearts filled up on the page, with a total of 5 hearts.
To understand the loss and gain of points, it helps to know that there are a total of 100 relationship points, and each heart represents 20 points.
When a heart increase and decreases in game are only seen 5 points at a time, as the ‘heart points’ increase or decrease.
1/4 heart = 5. A full heart is 20 points.
This is why you don’t always ‘see‘ an increase or decrease in heart points, since you only see changes in 5 point increments.
—–
Now that we understand how relationship points work versus hearts, we can explore more details.
To start, you should know that the NPC total relationship level is added to the towns happiness level. So you will eventually want to max out your relationships!
Each villager has a favorite food, and some dislikes. Those details can be found on the wiki.
The amount of heart points needed to move most NPC’s into the village is ‘greater than’ 15. It is a little different in some cases but you should know that there are 3 NPC’s that will not currently move in: the hair stylist (Sally) and the 2 rare/traders (Jimmy, Ted Selly).
Other relationship FAQs:
- To hang out with an NPC, you need a relationship level of 45+.
- Talking to an NPC adds 1 relationship point, available once per day.
- Bulletin Board mission rewards 4 – 7 relationship points or mail.
- Complete Request (>45) = (+3 to +5)
- Complete Request (<45) = (+1 to +3)
- Fail a chat request = -1
- Hang Out = +2
- Hated Food = -1
—–
NPC INFO
Clover:
Deed: Threadspace
Work Location: Threadspace
spendBeforeMoveIn > 10,000
relationshipBeforeMove > 18 (1 Heart – 0.2)
Favourite Food: Apple
Hated Food: Cooked Drumstick
Hates Animal Products
Hates Vegitable
Franklyn:
Deed: Franklyn’s Lab
Work Location: Franklyn’s Lab
spendBeforeMoveIn > 190,000
relationshipBeforeMove > 15 (3/4 Heart)
Favourite Food: Cooked Giant Drumstick
Hated Food: Bush Lime
Hates Vegitables
Fletch:
Deed: Base Tent
Work Location: Post Office
spendBeforeMoveIn > 5,000
relationshipBeforeMove > 15 (3/4 Heart)
Favourite Food: Bush Lime
Hated Food: Cooked Croc Meat
Hates Meat
Ghost:
Deed: None
Work Location: Bank
spendBeforeMoveIn 0
relationshipBeforeMove 0
Favourite Food: None
Hated Food: None
Irwin:
Deed: Irwin’s Barn
Work Location: Irwin’s Barn
spendBeforeMoveIn > 25,000
relationshipBeforeMove > 10 (1/2 Heart)
Favourite Food: Banana
Hated Food: Cooked Croc Meat
Hates Animal Products
Hates Meat
Jimmy: (Special)
Deed: Museum Deed
Work Location: Jimmys Boat
spendBeforeMoveIn > 50,000
relationshipBeforeMove > 205 (Impossible)
Favourite Food: None
Hated Food: None
John:
Deed: John’s Goods
Work Location: John’s Goods
spendBeforeMoveIn > 15,000
relationshipBeforeMove > 15 (3/4 Heart)
Favourite Food: Cooked Croc Meat
Hated Food: Potato
Hates Animal Products
Hates Fruit
Melvin:
Deed: Melvin Furniture
Work Location: Melvin Furniture
spendBeforeMoveIn > 800
relationshipBeforeMove > 20 (1 Heart)
Favourite Food: Cooked Meat
Hated Food: Chicken Egg
Hates Animal Products
Milburn:
Deed: Museum Deed
Work Location: Bank
spendBeforeMoveIn 0
relationshipBeforeMove 0
Favourite Food: High Quality Cheese
Hated Food: Cheese
Hates Fruits
Rayne:
Deed: Rayne’s Greenhouse
Work Location: Rayne’s Greenhouse
spendBeforeMoveIn > 18,000
relationshipBeforeMove > 10 (1/2 Heart)
Favourite Food: Corn
Hated Food: Pumpkin
Hates Animal Products
Hates Meat
Sally:
Deed: None
Work Location: Hair Dresser
spendBeforeMoveIn > 305,000
relationshipBeforeMove > 205 (Impossible?)
Favourite Food: Mushroom
Hated Food: Cabbage
Hates Animal Products
Ted Selly:
Deed: None
Work Location: Weapon Shop
spendBeforeMoveIn > 2,147,483,647
relationshipBeforeMove > 401 (Impossible?)
Favourite Food: Cooked Drumstick
Hated Food: Kale
Hates Animal Products
Hates Fruits
Hates Vegitables
Theodore:
Deed: Museum
Work Location: Museum
spendBeforeMoveIn 0
relationshipBeforeMove 0
Favourite Food: Cooked Cactus Fig
Hated Food: Cactus Fig
Save, Backup, & Cloud Sync
Dinkum does not yet support Steam Cloud synchronization, therefore for the time being, generating backups and moving game saves across devices must be done manually.
The Dinkum folder is where game saves are kept. This location in contains this folder;
Windows:
%userprofile%\AppData\LocalLow\James Bendon\
Steam deck / Linux:
~/.local/share/Steam/steamapps/compatdata/1062520/pfx/drive_c/users/steamuser/AppData/LocalLow/James Bendon/
To build a backup of all of your games, just copy and paste the Dinkum folder to a safe area in a different location, such your desktop.
If you wish to play the same game save(s) across several platforms, all you have to do is move the Dinkum folder from one device to another. This process can be automated by using the auto-sync settings of an online file/folder syncing service
Be sure to make backup copies!
There are online tools to help sync folders between devices, should you wish to automate this process.
Dinkum Links
Dinkum official site – [playdinkum.com]
Dinkum Discord – [discord.com]
Dinkum Steam – [steampowered.com]
Dinkum Twitter – [twitter.com]
Dinkum YouTube – [youtube.com]
Thank You!
Thank you to the Dinkum discord community for sharing your knowledge.
Thank you to the Dinkum wiki contributors for all your hard work.
Thank you James Bendon for making such a wonderful, enjoyable game!
Thank you, dear reader, for leaving comments to help improve this guide.
See you in Dinkum, and have a lot of fun!
Aiona
Hope you enjoy the Guide about Dinkum – Official Guide + Notes & Overview, if you think we should add extra information or forget something, please let us know via comment below, and we will do our best to fix or update as soon as possible!
- All Dinkum Posts List


Leave a Reply