Intro
This is a quick guide that will take you through your subclass, weapons, armor and inventory.
We will go through everything you see on the character and inventory screen, one by one.
Character screen
Press F1 to see the following screen, this is the character screen
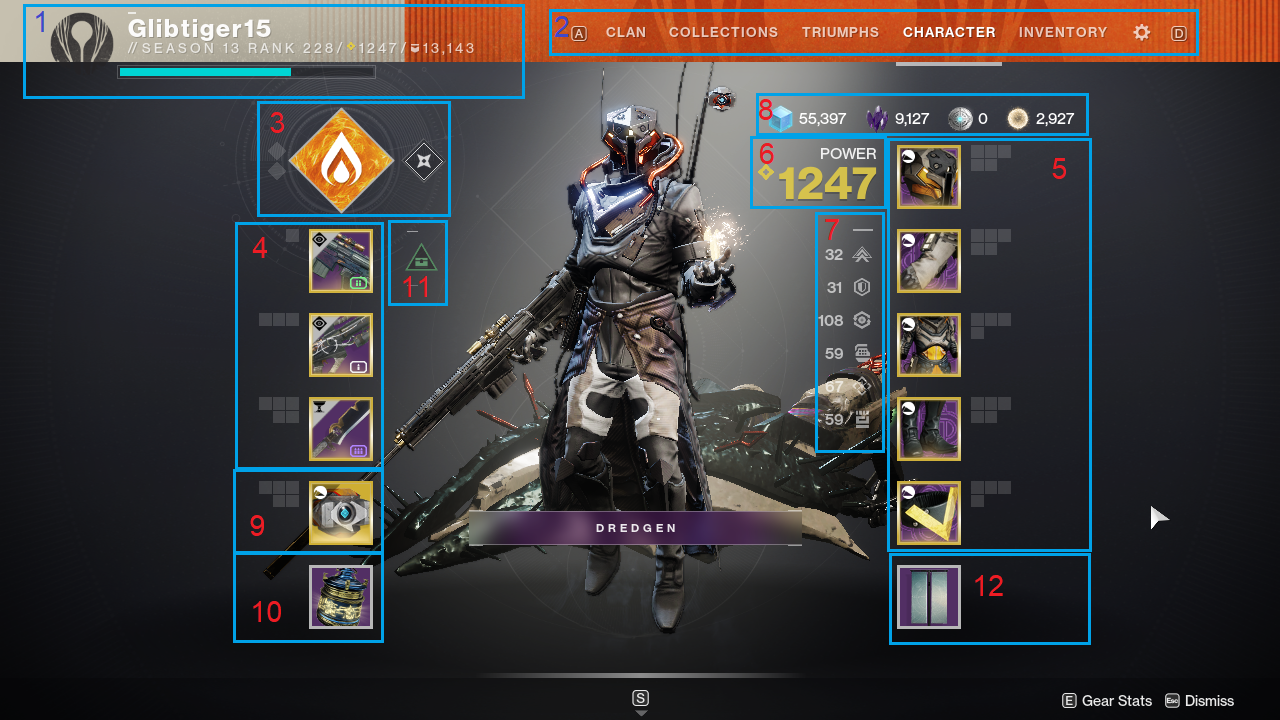
1. Shows you your username, your current rank on you season pass, your progression to the next rank. And your triumph score.
2. Shows you the options bar, these are the different menus you can go through. We will now only look at character and inventory.
3. Shows you your currently equipped subclass.
Let’s hover our mouse hover over it, so we will get more options
Subclass
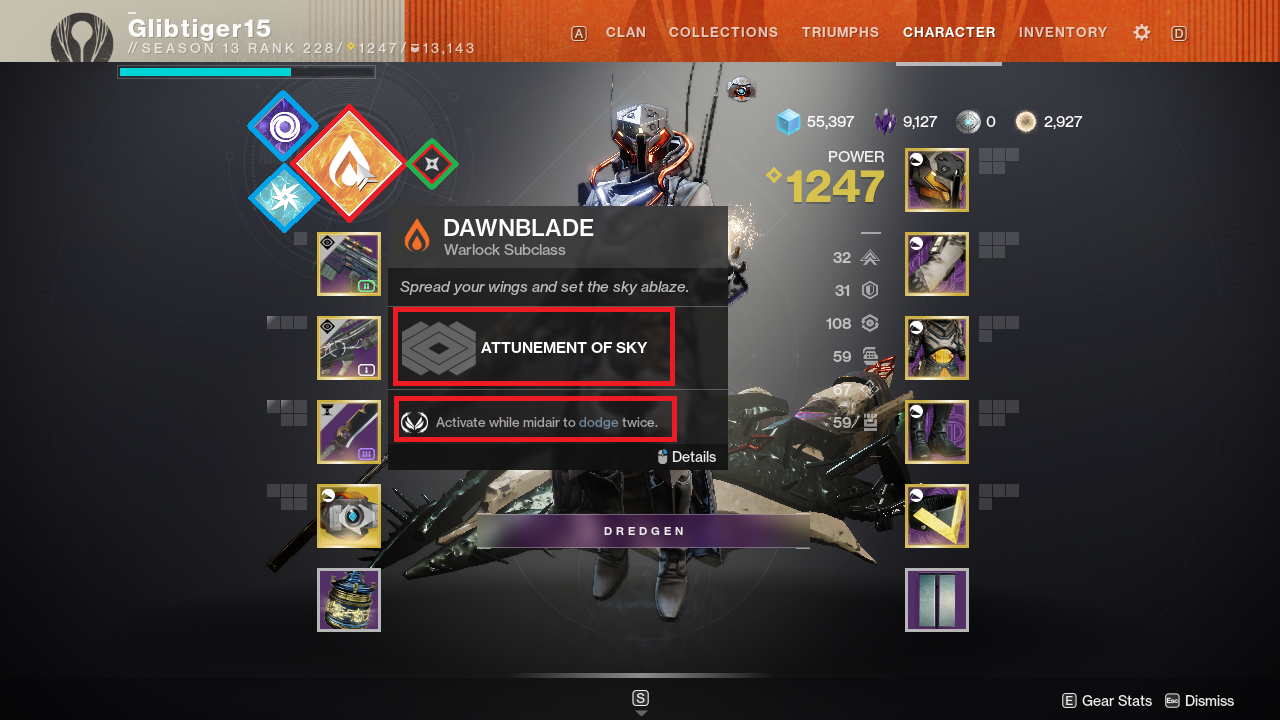
When you hover over your class it will show you what attunement (tree) you have selected, and a bit more information (red squares). You have the option to left click a light class (the blue lined diamonds), or the stasis subclass (green lined diamond) to switch to that subclass.
You can also right click any of the diamonds for more information on that class. But for now we want more information on our currently equipped class. So we will right click it to go to the following menu
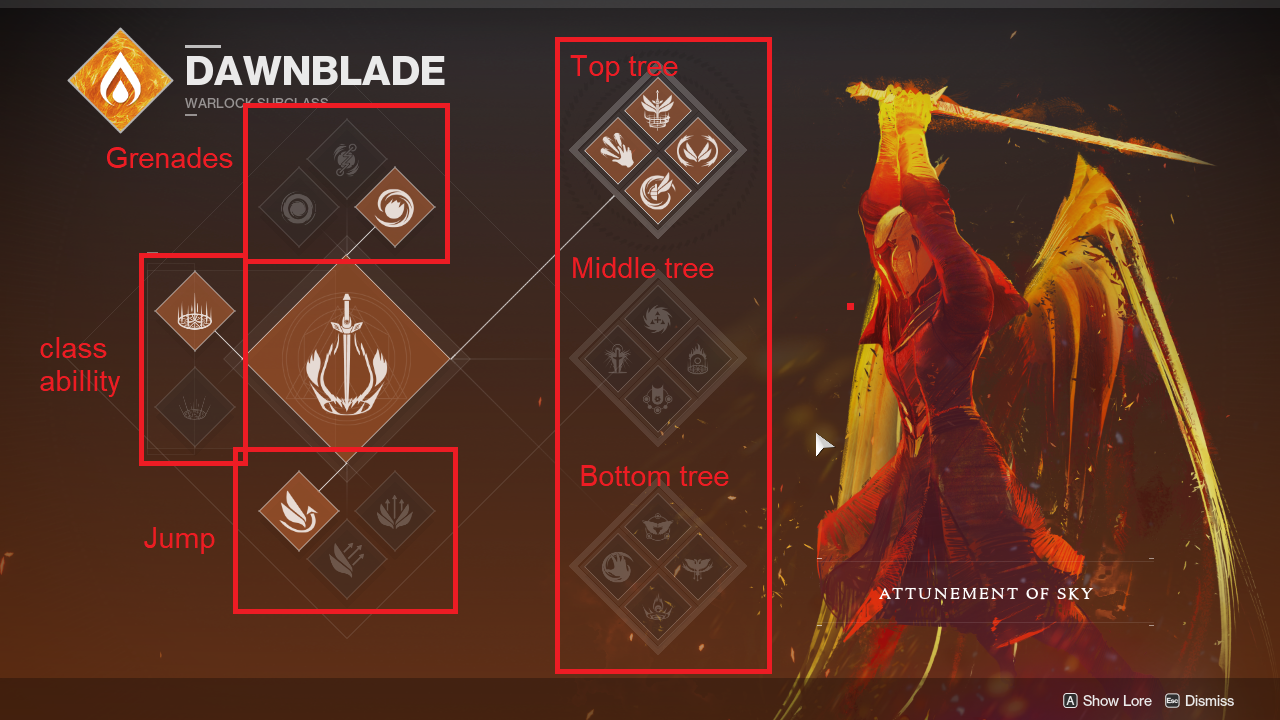
In this screen you can modify your class.
GRENADES: Shows the 3 type of grenades you can choose from. Each class has 3 kinds of grenades, try out all 3 to see which one you like.
CLASS ABILITY: Shows the choice you have in class ability. This changes the effect of the class ability, not the ability itself.
Warlocks can choose between a healing rift or power rift.
Titans can choose between a lower barricade or a wall barricade.
Hunters can choose if their dodge reloads their weapon or give them melee energy.
JUMP: Shows the 3 type of jumps you can choose from. Each class has 3 kinds of jumps, try out all 3 to see which one you like
CLASS TREES: We also have the 3 trees we can choose from, top, middle and bottom. This will make the biggest impact. Each subclass (excluding stasis) has 3 trees, I will not go into what all these are. But they each give your subclass different advantages, try out different subclasses with different trees to see which one suit you.
Press escape to go back to the character screen.
Weapons

4. Shows the slots with your currently equipped weapons. If you go from top to bottom, the first weapon is your kinetic weapon, the second is your energy weapon, and the third one is your heavy weapon. Hover with your mouse over the weapon to see more information, and other weapons of that type that you are carrying with you.
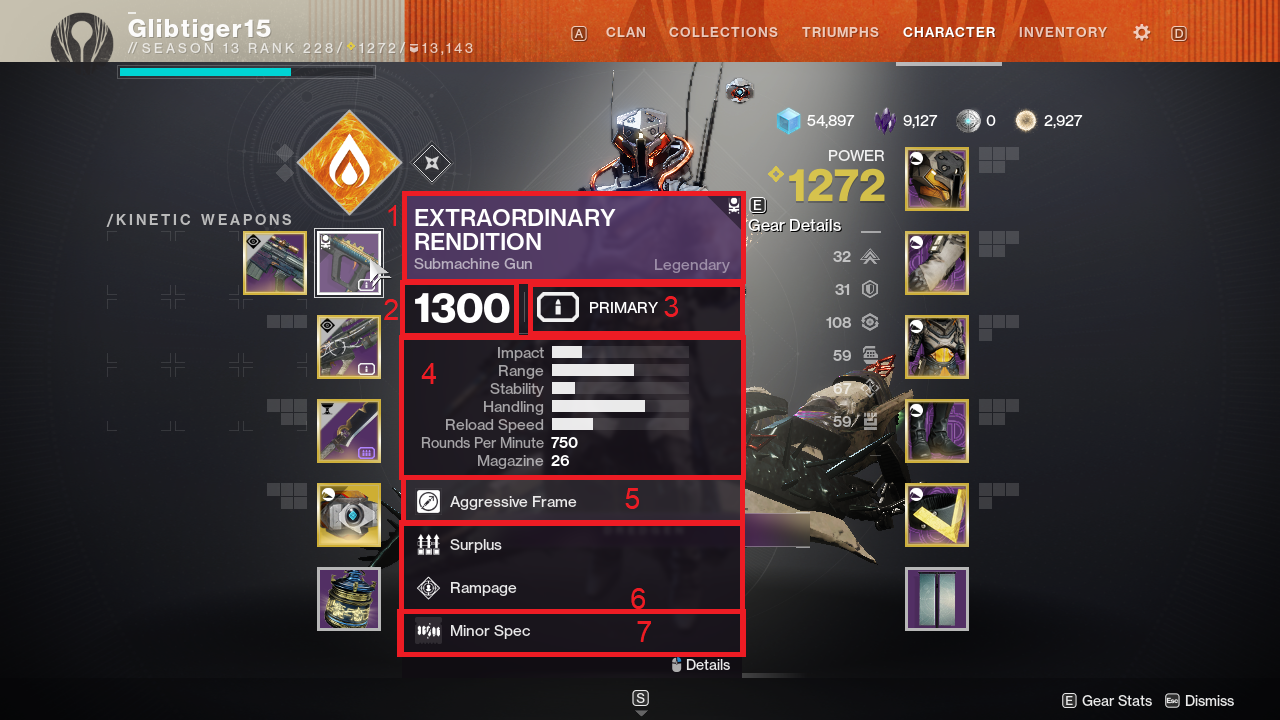
1. Shows the name, kind and rarity of the weapon
2. Shows the power level and damage type of the weapon
3. Shows what kind of ammo type the weapon is.
4. Shows the weapons stats
5. Shows what kind of frame the weapon has
6. Shows the perks the weapon has
7. Shows the mod that is currently equipped on the weapon
Press right click to see more information about the weapon.
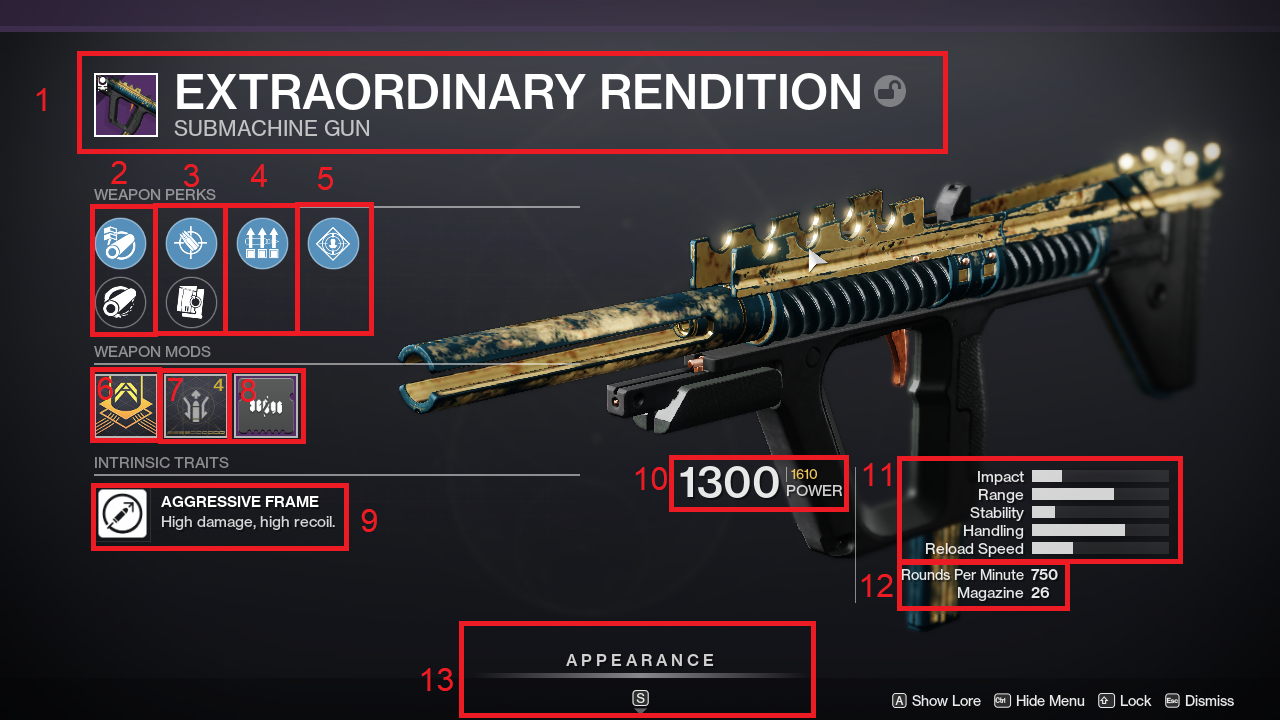
1. Shows the name, also if you click on the lock, you will lock the weapon so you can’t accidentally delete it.
2-5. Shows all the perks, perks are random traits a weapon can have, if you find the same weapon, it can have different perks on it as the weapon you found before it.
2. Shows the first column of perks, mostly these are barrels or sights.
3. Shows the second column of perks, mostly these are ammunition or bullets.
4 & 5. Shows the third and fourth column, these are the most important perks and can be things from damage, to more ability energy.
6. Shows the infusion icon, hover over the icon to see the weapons you could infuse into this weapon. When you infuse another weapon with a higher light level into this weapon, You will make this weapon the light level of the weapon you infused into it.
7. Shows the master work stat of the weapon. When you find a weapon you can upgrade it here. (this will cost materials). It will upgrade one of the stats of your weapon, here it shows which stat of the weapon it will increase. If you find the same weapon it can have different master work stat on it as the weapon you found before it.
8. Shows the mod slot on the weapon, here you can insert a weapon mod to equip on the weapon.
9. Shows the intrinsic trait of the weapon. In this case it is a frame. Each frame has its own up and downsides. Here you can see what kind of frame the current weapon is.
10. Shows you the current power level of this weapon
11. Shows you the stats of the weapon
12. Shows you the round per minutes and the magazine size.
13. If you press s you will go to a different menu, there you can apply shaders to your guns giving them a different colour.
Press escape to go back to the character screen.
Armor

5. Shows the slots with your currently equipped armour. If you go from top to bottom, the first armour is your helm, the second is your arms, and the third one is your chest. The fourth is your legs, and the fifth is your class item. Hover with your mouse over the armour piece to see more information, and other armour pieces that go in that slot and that you are carrying with you.
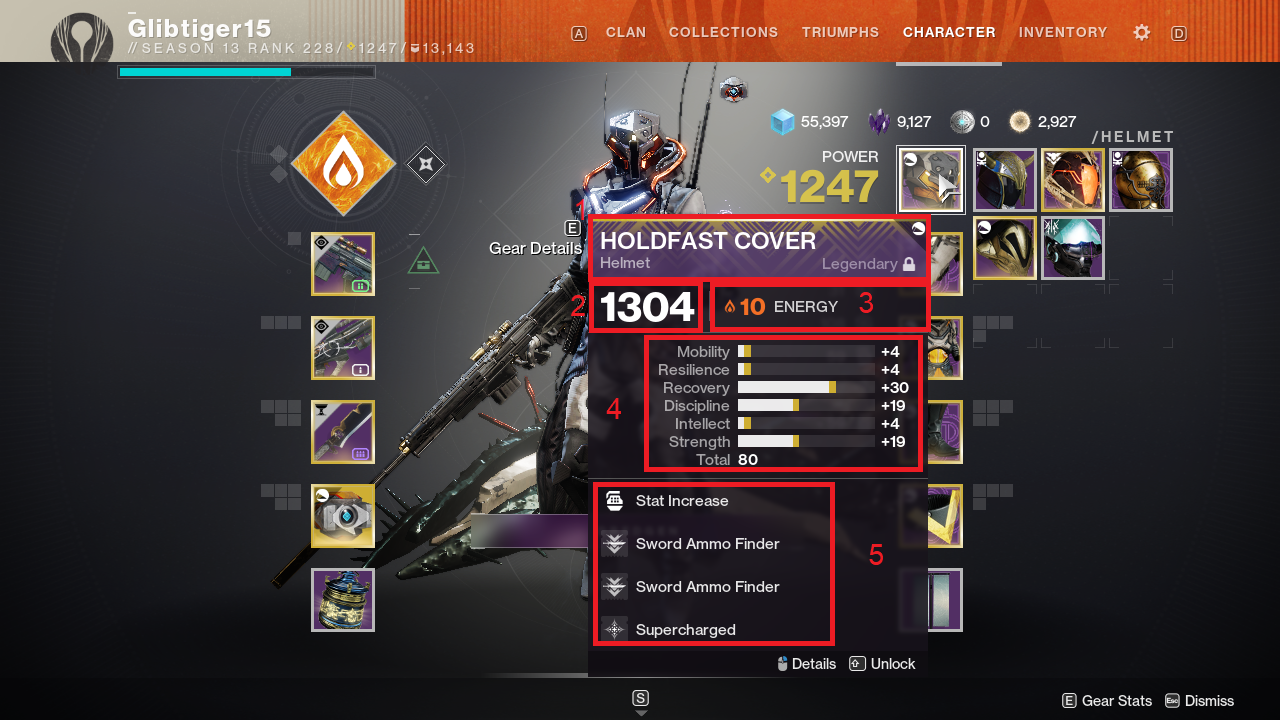
1. Shows the name, kind and rarity of the armour.
2. Shows the power level of the armour.
3. Shows what kind energy type and level the armour has.
4. Shows the armour stats.
5. Shows the mods that is currently equipped on the armour.
Press right click to see more information about the armour.
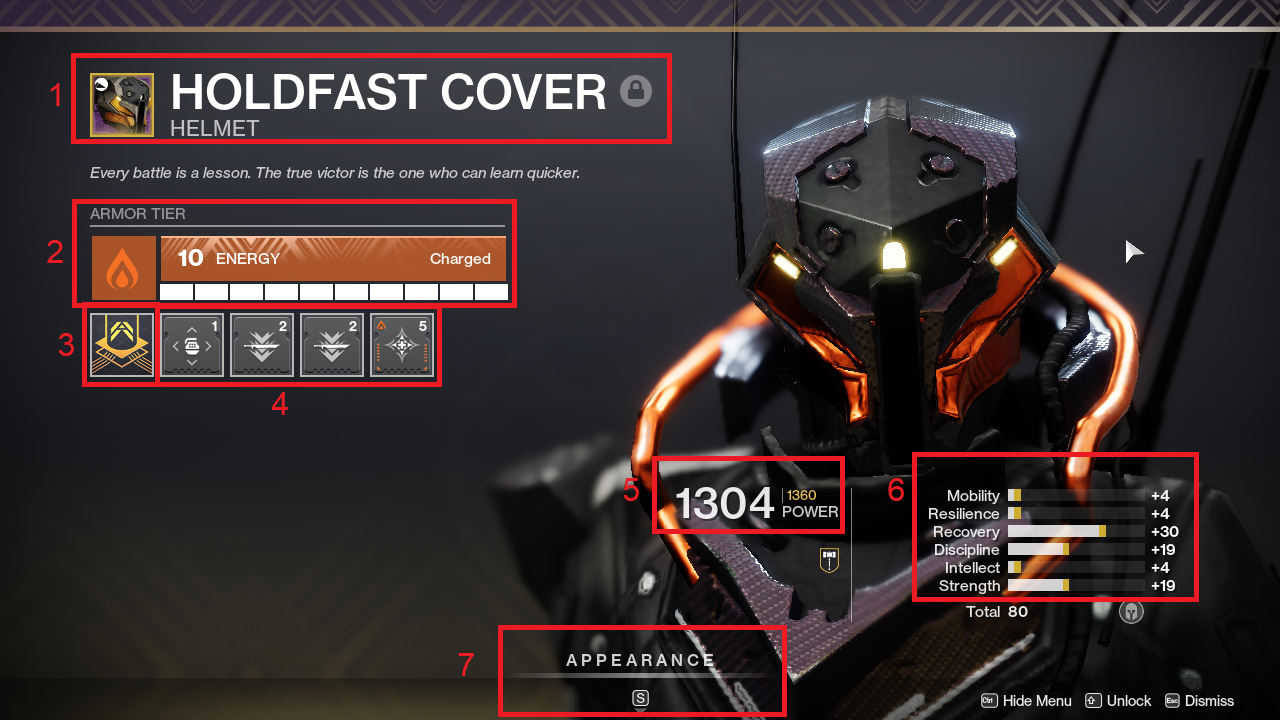
1. Shows the name, also if you click on the lock, you will lock the armour so you can’t accidentally delete it.
2. Shows the level of the armour, here you can change the energy type by hovering over the energy icon, and selecting a new one (this will cost materials). Also if you hover over the word energy you can upgrade the armour by holding left mouse button (this will cost materials). You upgrade your armour to give it more energy so it can hold more mods.
3. Shows the infusion icon, hover over the icon to see the armour you could infuse into this armour. When you infuse another armour with a higher light level into this armour, you will make this armour the light level of the armour you infused into it.
4. Shows the mod slots on the armour. You can insert armour mods to equip on the armour.
5. Shows you the current power level of this armour
6. Shows you the stats of the armour
7. If you press s you will go to a different menu, there you can apply shaders to your armour giving it a different colour.
Press escape to go back to the character screen.
Powerlevel

6. shows you your total power level, this number determines your general damage output and resistance. It consist out of a gear score (an average of your weapons and armour combined), and a bonus power level gained from your seasonal artifact (I will explain the seasonal artifact later)
Hover your mouse over your power level to see more information.
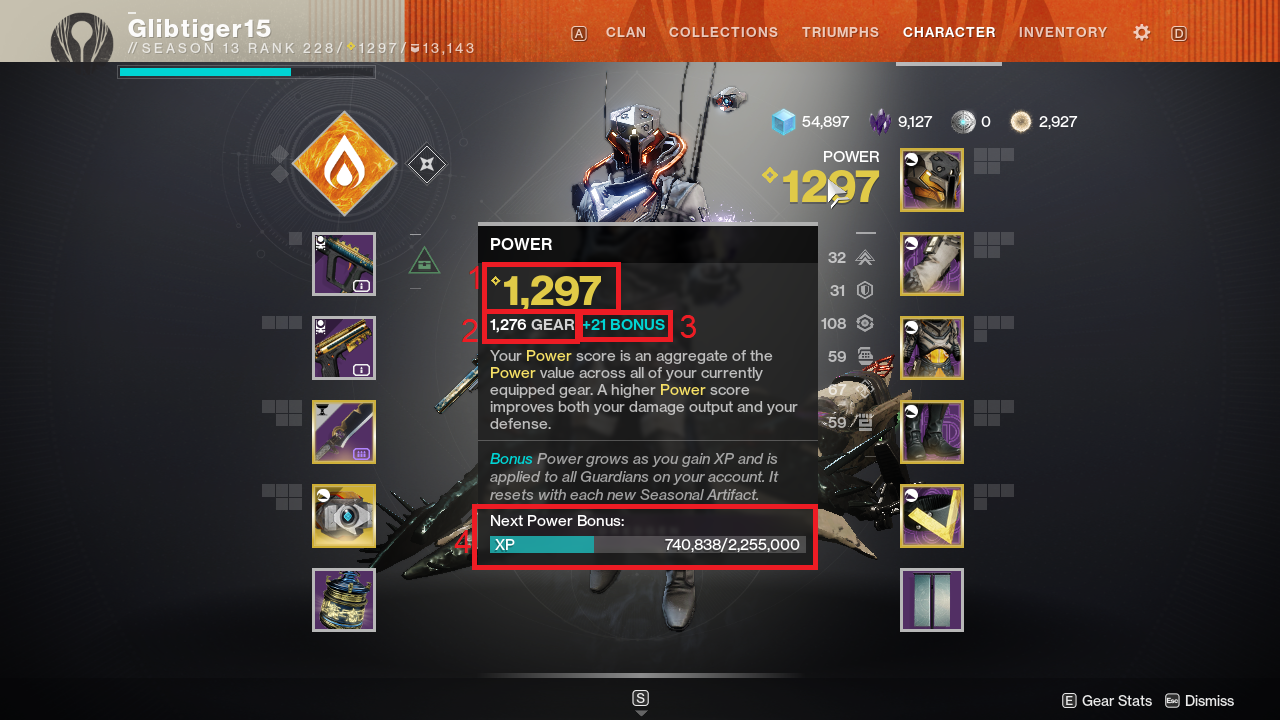
1. Shows your total power level
2. Shows your gear level
3. Shows your artifact level
4. Shows your progression to next bonus power level
Press escape to go back to the character screen.
Atributes/Stats

7. Shows your character stats, these determine different attributes of your character. There are 6 stats in total, I will go through them from top to bottom.
Mobility
(determines your speed and jump height)(for the hunter it also determines your class ability cool down time)
Resilience
(determines your shield capacity)(for the titan it also determines your class ability cool down time)
Recovery
(determines your speed with which you recover your health)(for the warlock it also determines your class ability cool down time)
Discipline
(determines the cool down time of your grenade ability)
Intellect
(determines the cool down time of your super ability)
Strength
(determines the cool down time of your melee ability)
If you hover over one of them, you will get more information about that stat.
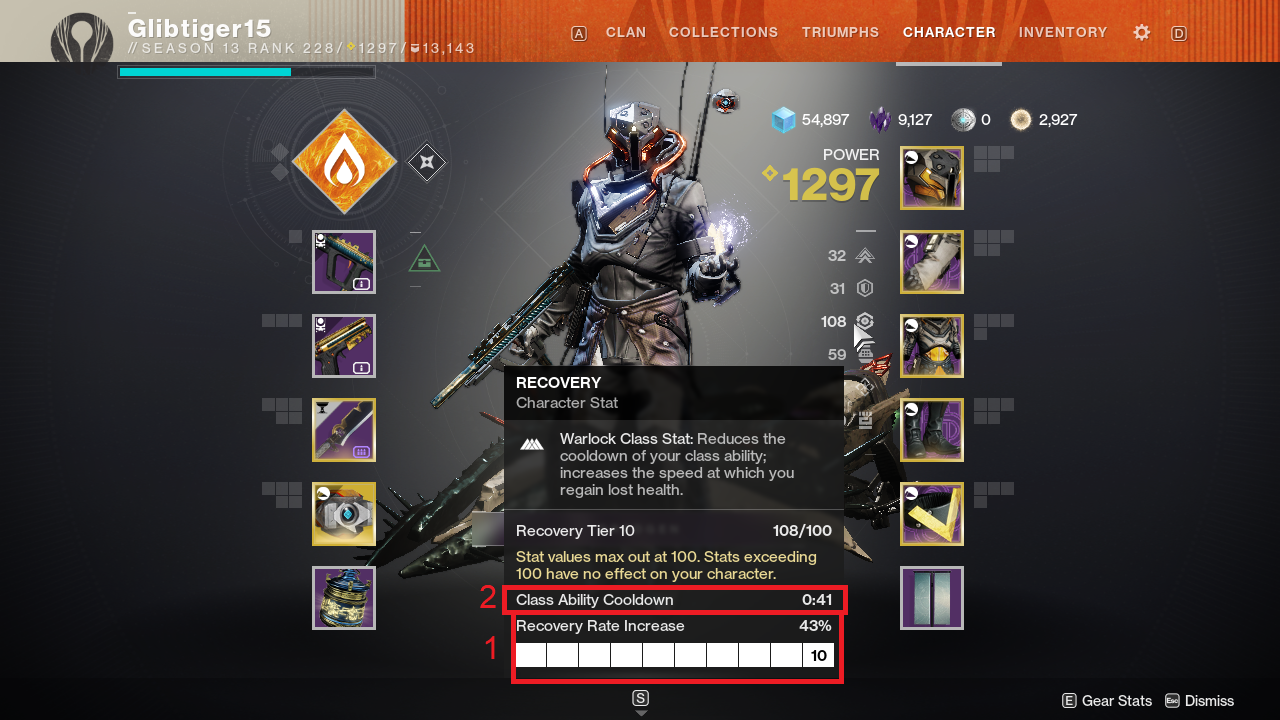
1. Shows you the tier that you have reached and the effect it has.
2. Shows the cooldown time of my class ability. We see this now because we are looking at the recovery stat, and I am on my warlock.
Press escape to go back to the character screen.
Resources

8. Shows you the resources you have, from left to right they are the following. Glimmer, legendary shards, silver and bright dust.
Glimmer is the most common, and you will spend this the most (buying bounties, upgrading gear).
Legendary shards you will gain from dismantling legendary gear. You will use this in a same fashion as you do glimmer.
Silver is the premium currency where you can buy things from the store, this currency cannot be obtained by playing the game.
Bright dust can be gained from doing weekly challenges, bounties or bright engrams. This can be used in the store to buy the weekly bright dust offers.
Press escape to go back to the character screen.
Ghost

9. shows the slot with your currently equipped ghost, these can give you small bonuses.
Hover with your mouse over the ghost to see more information, and other ghosts that you are carrying with you.
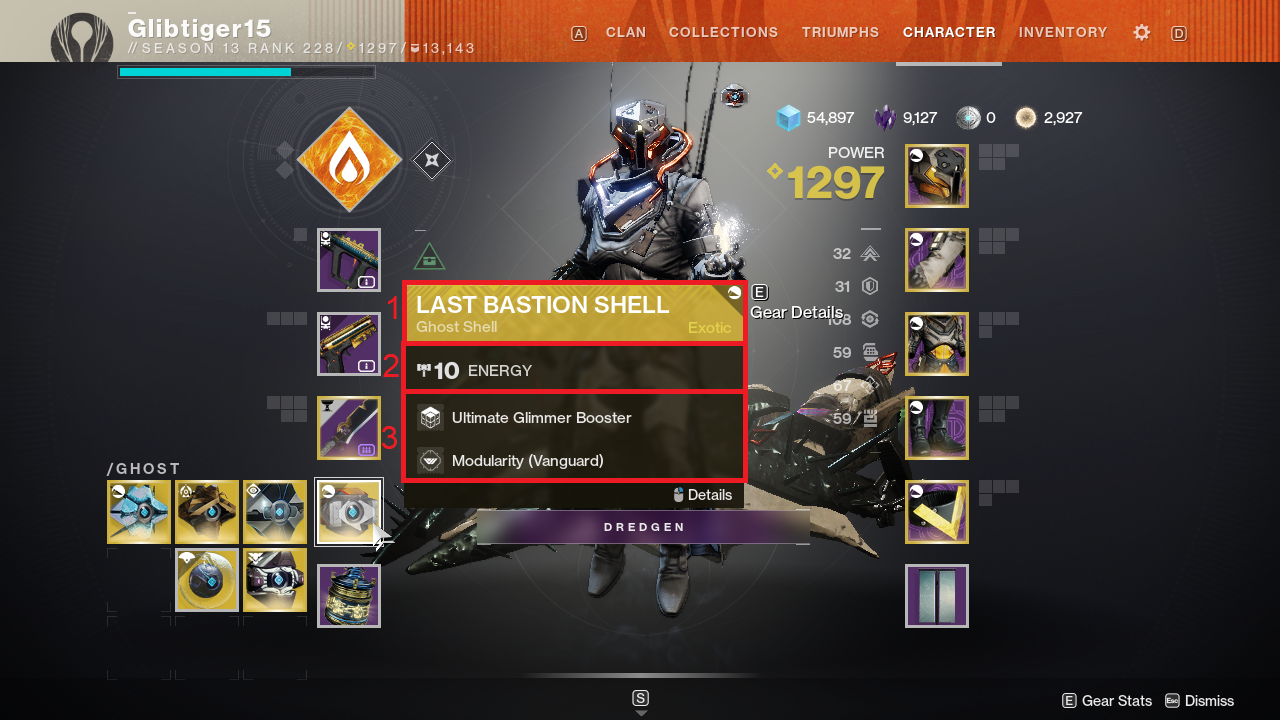
1. Shows the name of the ghost,
2. Shows the level of the ghost,
3. Shows the currently equipped mods on the ghost.
Right click the ghost to see more information on the ghost.
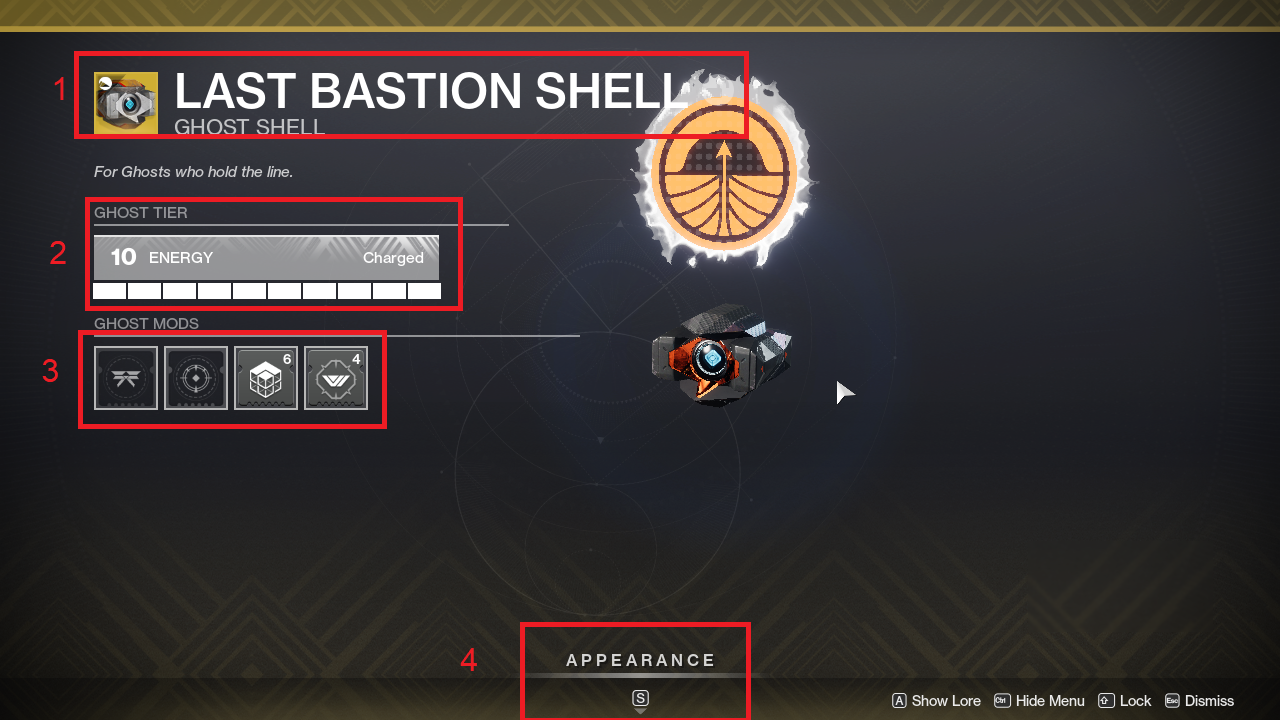
1. Shows the name of the ghost, also if you click on the lock, you will lock the ghost so you can’t accidentally delete it.
2. Shows the level of the ghost, if you hover over the word energy you can upgrade the ghost by holding left mouse button (this will cost materials) but it will give it more energy so it can hold more mods.
3. Shows the mod slots on the ghost. Here you can insert ghost mods to equip on the ghost.
4. If you press s you will go to a different menu, there you can apply shaders to your ghost giving them a different colour.
Press escape to go back to the character screen.
Seasonal Artifact

10. shows you the seasonal artefact, hover over it to see more information.
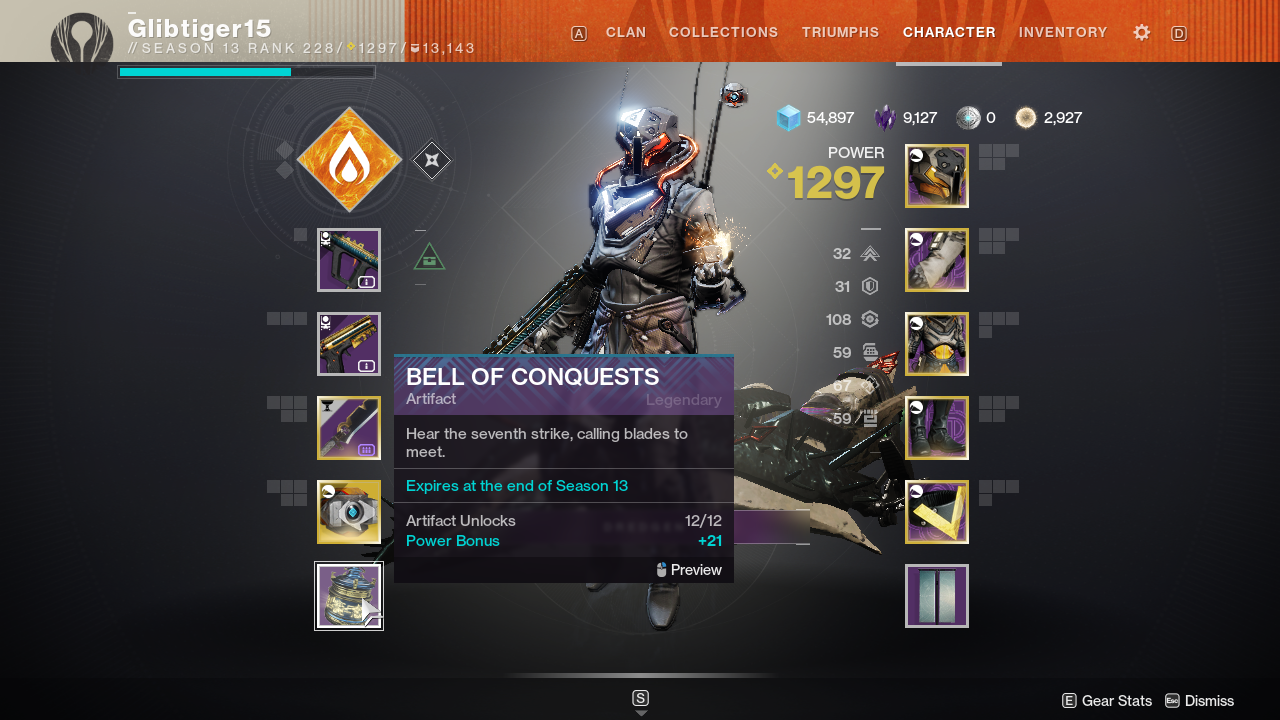
The menu shows you how many artifact unlocks you have, and what your current power bonus is.
Right click to see more information.
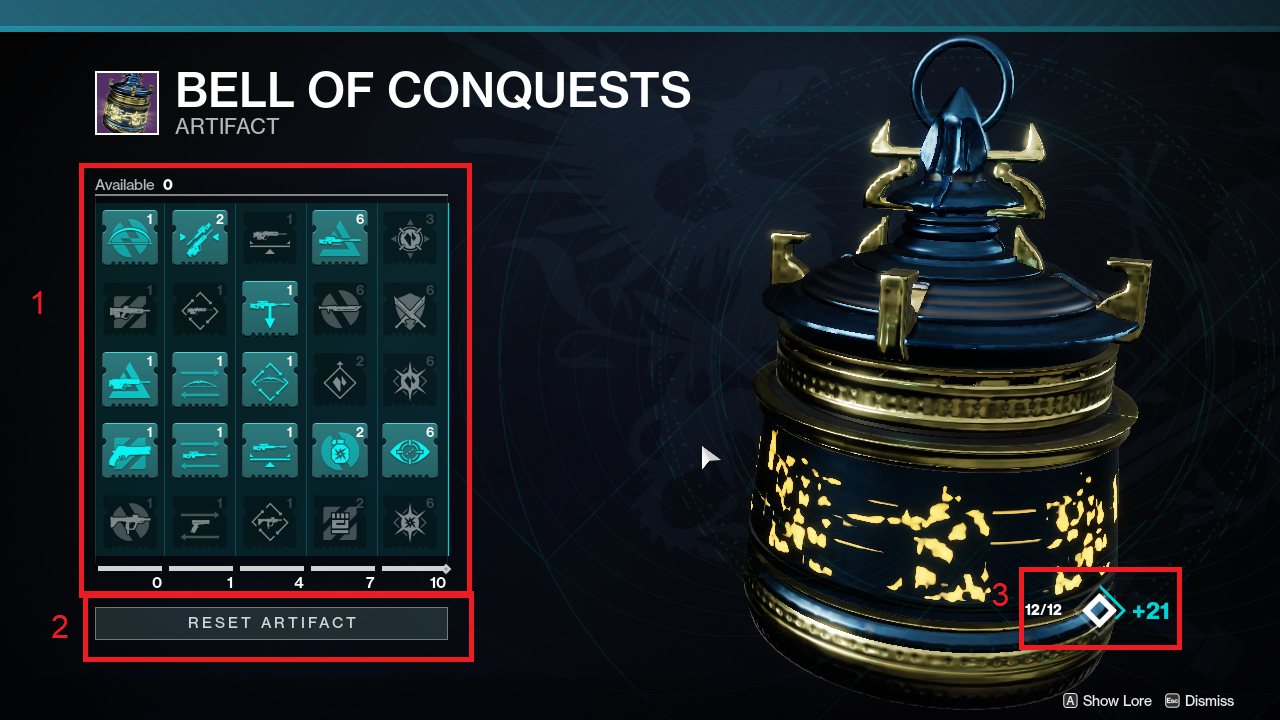
1. Shows the seasonal mods. Each season has its own mods, every time you level up your season pass, you will also unlock the ability to choose a mod from this roster.
2. Shows the reset artifact button. If you want to re-spec and choose other mods, you can do that here by clicking and holding reset artifact. This will cost you glimmer, and more glimmer on subsequent resets.
3. Shows you your current artifacts unlocks, and power bonus. If you hover over this with your mouse, it shows you the progression of each.
Press escape to go back to the character screen.
Active Effects

11. Shows active effects, these are effects like extra experience, or more glimmer drops, or other effects. Some of these effects may come from items that you use, others come if you are in a group of guardians
you can hover over a symbol to see more info about that effect
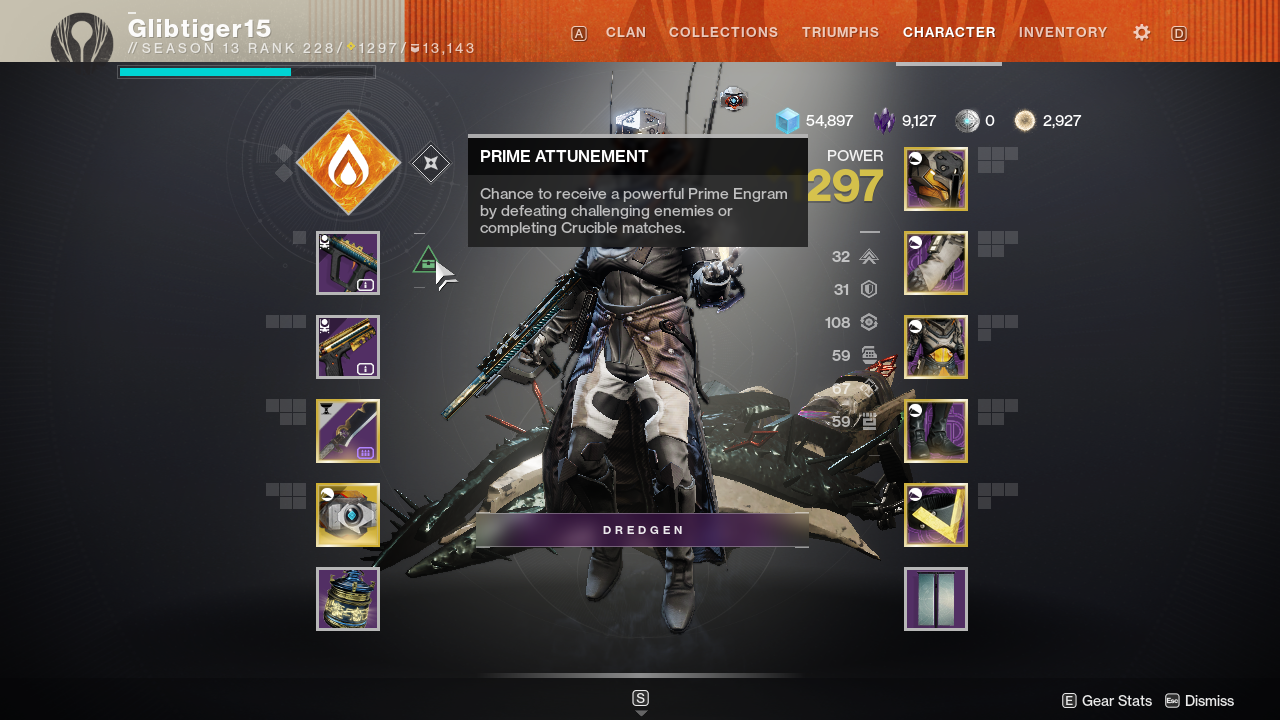
Press escape to back to the character screen.
Clan Banner

12. Shows the clan banner, if you hover over the clan banner its shows you the currently active clan perks that you and your clan have unlocked.
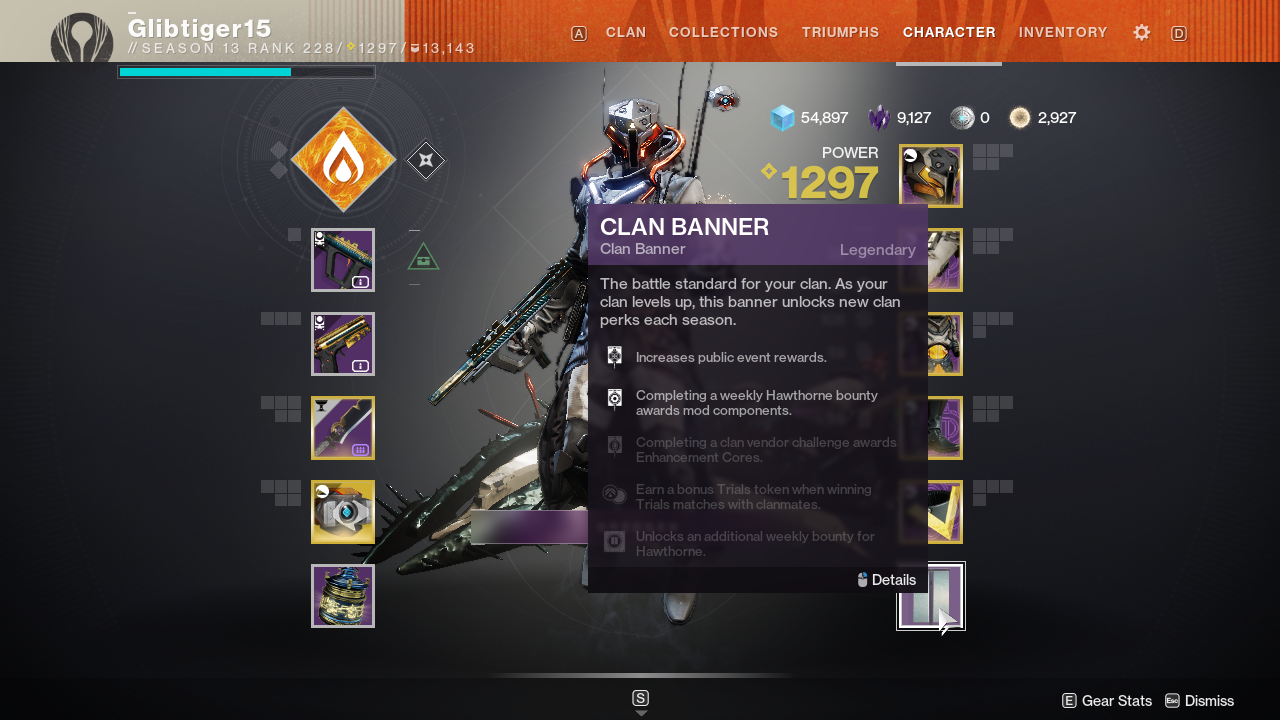
This menu shows you more details about the perks that you and your clan can unlock or already have unlocked. if you unlocked a clan perk, the text will be fully coloured in.
Right click for more information
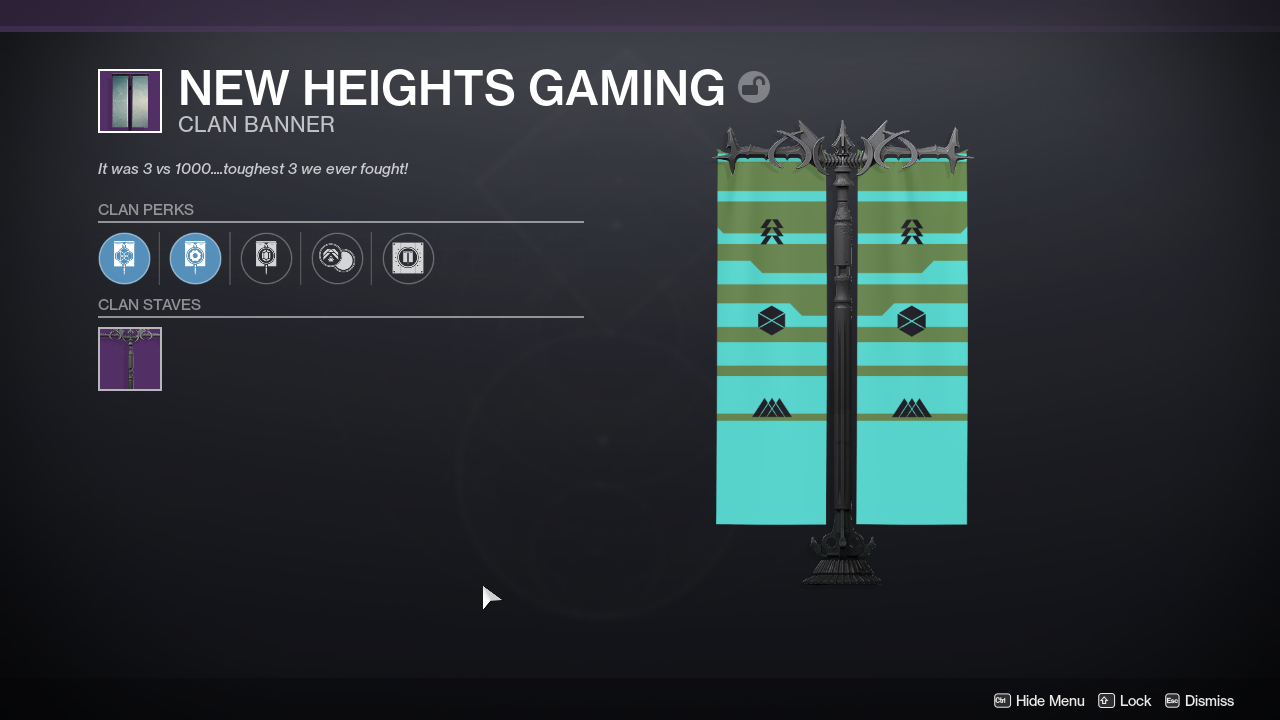
Here can change the clan staves that you have, you can do this by hovering over it with your mouse and select the stave that you want. Also you can see the perks that you and your clan can unlock or already have unlocked.
Press escape to go back to the character screen
Inventory

If you look in options. (2.) you will see inventory, click on that to see the following screen.
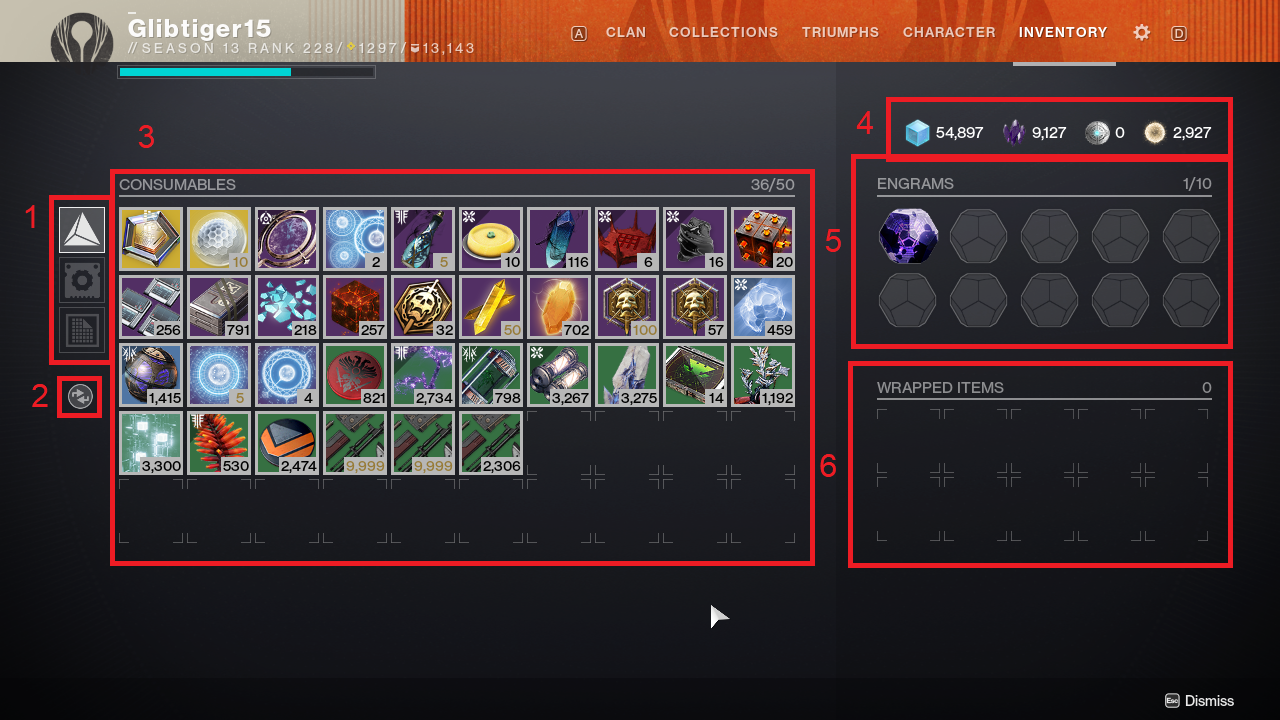
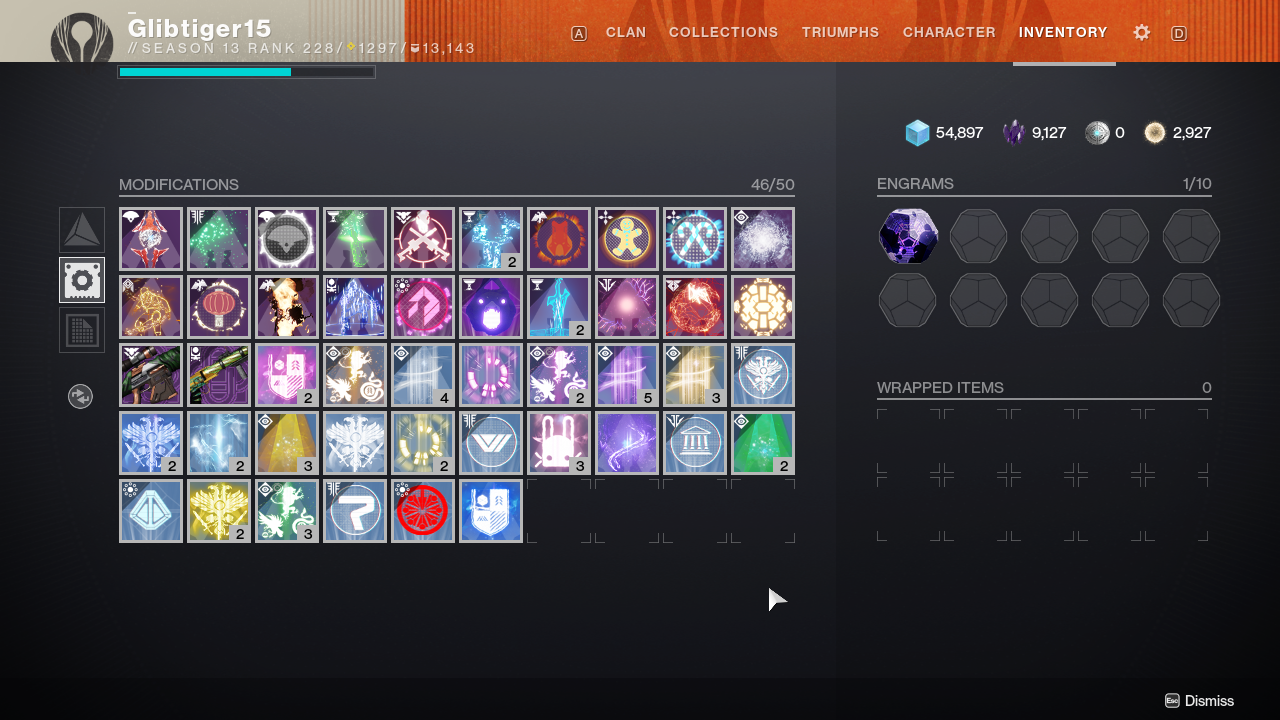
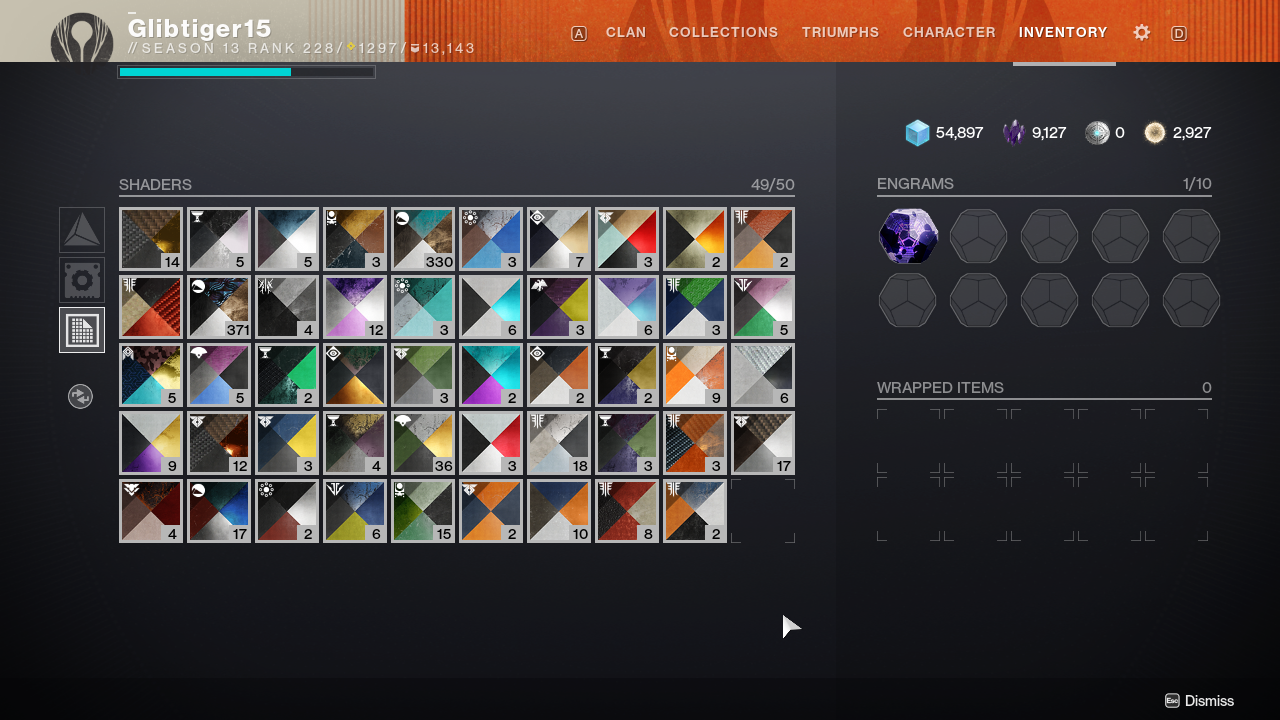
1. Shows you the different items you can choose too see, it is now set to materials, but you also have modifications and shaders.
2. Shows you the sorting options
3. Shows you the consumables and materials you have collected, hover over them to see more information.
4. Shows you the resources you have.
5. Shows you the engrams that you have collected but not yet decrypted
6. Shows you your wrapped items. Items you buy from the store will be stored here.
Modifications
Shaders
This is all about Destiny 2 – Character screen; I hope you enjoy reading the Guide! If you feel like we should add more information or we forget/mistake, please let us know via commenting below, and thanks! See you soon!
- All Destiny 2 Posts List


Leave a Reply