
Purpose of this guide
In this guide is a detailed method for “unlocking” certain items that are in the game, but unusable (such as the Frank and Chuck outfits), as well as a method to regain access to outfits that suddenly and inexplicably glitch out of your Closet (like the Battle-Hardened Nick or Ken Masters outfits).
Important Notes and Disclaimers
IMPORTANT GENERAL INFO
1. Following this guide means you are altering some of your game files. Carelessly fooling around with a game’s files can have devastating consequences on your game if you aren’t careful! I have no idea what will happen if you alter files in any way other than what’s specifically listed in this guide, so please use your best judgement.
2. As you should always, always do, make a backup of any original game files you intend to alter/replace and save them to a different location on your computer.
3. I didn’t discover this method so I deserve no credit for it.
SMALL BUT IMPORTANT DETAILS REGARDING THE REPLACEMENT PROCESS
1. This guide details replacing CLOTHING, not bodies/skeletons/rigs/etc. It’s only intended to swap around clothing, not completely change characters into other people.
2. This will not ADD missing items to Nick’s closet. It will REPLACE Clothing items with other Clothing items of your choosing. You are sacrificing Clothes to get other clothes. Assuming you back up the original files, you can always re-replace an item back to its original form with this same method detailed in this guide.
3. Most clothing is separated into any number of the following categories: Chest, Face, “Feeto”, “Feetu”, Hat, Head, & Legs. Most should be self-explanatory. I don’t recall the difference between “Feeto” and “Feetu” or if I ever bothered with them. The “Head” files are also something I have never altered, as I believe they represent Nick’s actual, physical head and not clothing worn on it. So I would personally suggest not changing anything labelled “Head”, “Feeto” or “Feetu” unless you know what you’re doing.
Also keep in mind that, while most outfits come piecemeal (separate entries for each part of the body) and can be mixed-and-matched together in-game, a few outfits (like the Bathrobe) include only 1 category that, when worn, will cover multiple areas on Nick’s body. For example, I believe the Bathrobe “Chest” file also automatically affects Nick’s “Legs” despite having no “Legs” file.
So when following this guide, If you can’t find a “Legs” item that matches a “Chest” item, for example, that’s often why.
4. Clothing items must replace other Clothing items of the SAME CATEGORY — replace a “Chest” item with a “Chest” item, a “Legs” item with another “Legs” item, etc.. I have no idea what will happen if you try to overwrite the data for a Jacket with the data for Pants, but it will likely mess up your game and/or make your parents stop loving you.
How To Replace Clothing
STEP 1:
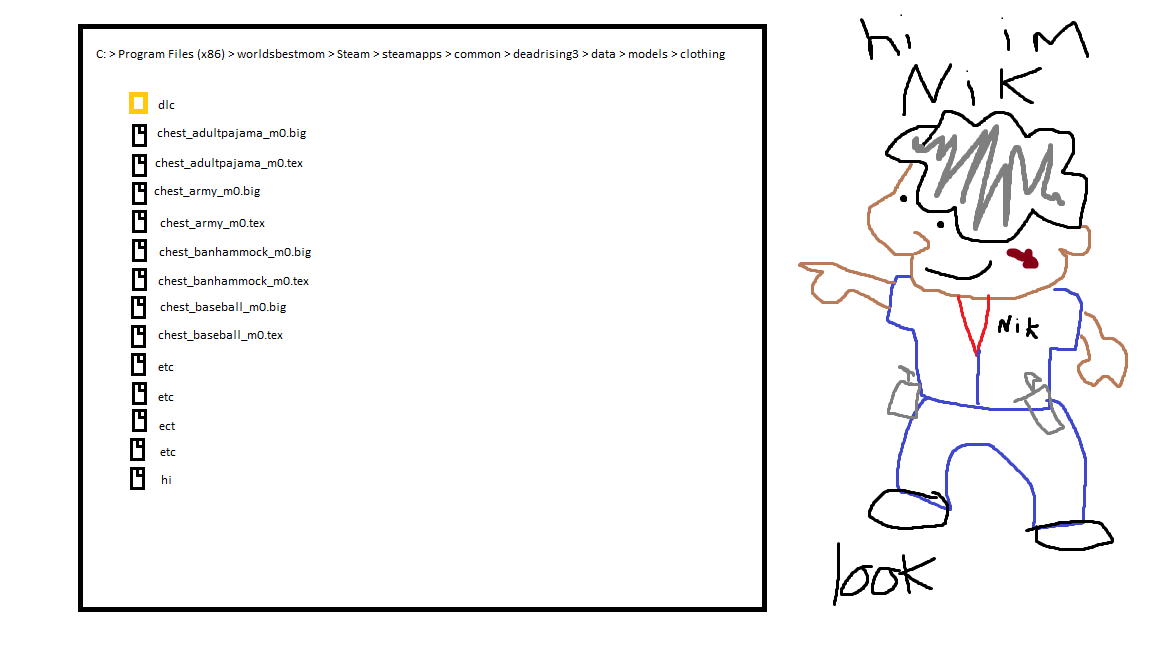
Locate your Dead Rising 3 Steam files, which can vary depending on where you installed Steam but are easily found by going to your Library in Steam -> Dead Rising 3 -> Manage -> “Browse Local Files”.
From wherever that puts you, navigate through “Steam > steamapps > common > deadrising3 > data > models > clothing”. “Clothing” is the location we want.
STEP 2:
Here in the Dead Rising 3 “clothing” folder, we find many “BIG” and “TEX” files that represent what Nick can wear. As mentioned before, they are separated and clearly labeled by the part of Nick’s body they fit onto. Each piece of clothing will have both a “BIG” and a “TEX” file, and you will be using both files for whatever clothing you’re replacing.
STEP 3 (or TAKING A MOMENT TO BACKUP FILES):
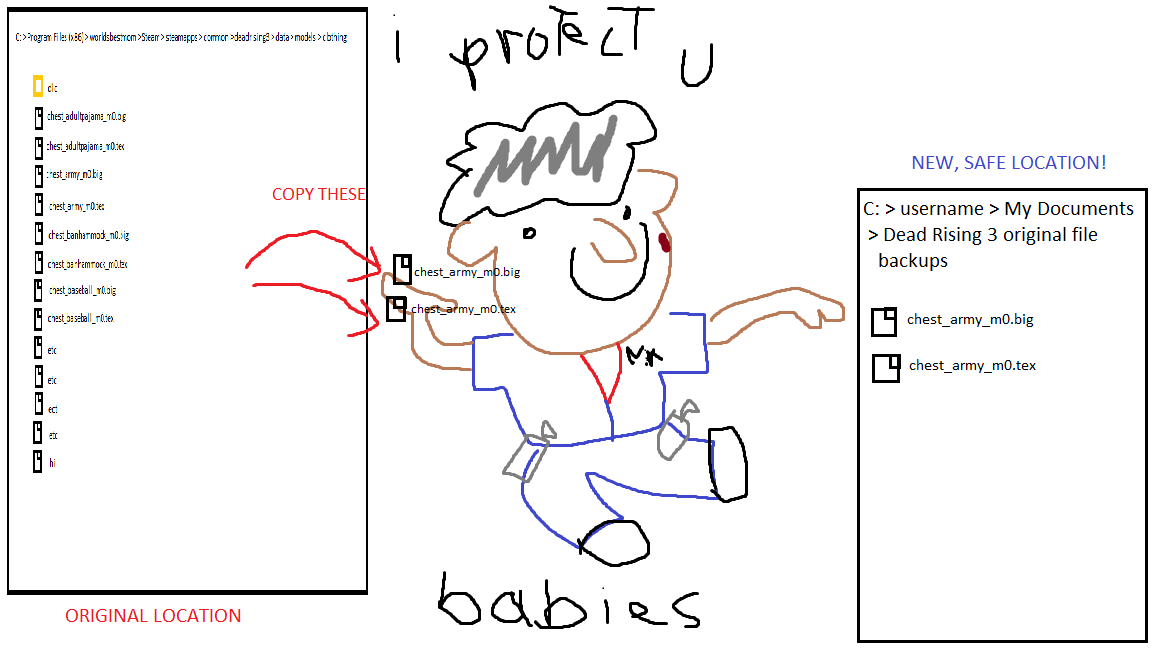
Copy any files you intend to replace (or every file if you want to be extra safe) in this folder, and save them somewhere else on your computer. This is your backup in case A) you make a mistake, or B) you want the original Clothing item back. Remember, you want to back up both “BIG” and “TEX” files, not just one or the other. To avoid confusion, save them in a completely different location from your Steam folder like “My Documents” or “Morgan Freeman Foot Pics”.
STEP 4:
Now that you’ve backed up the original files, let’s return to the “clothing” folder location we were at before (see Step 1). This next part sounds tricky at first, but it’s really not complicated once you’ve done it.
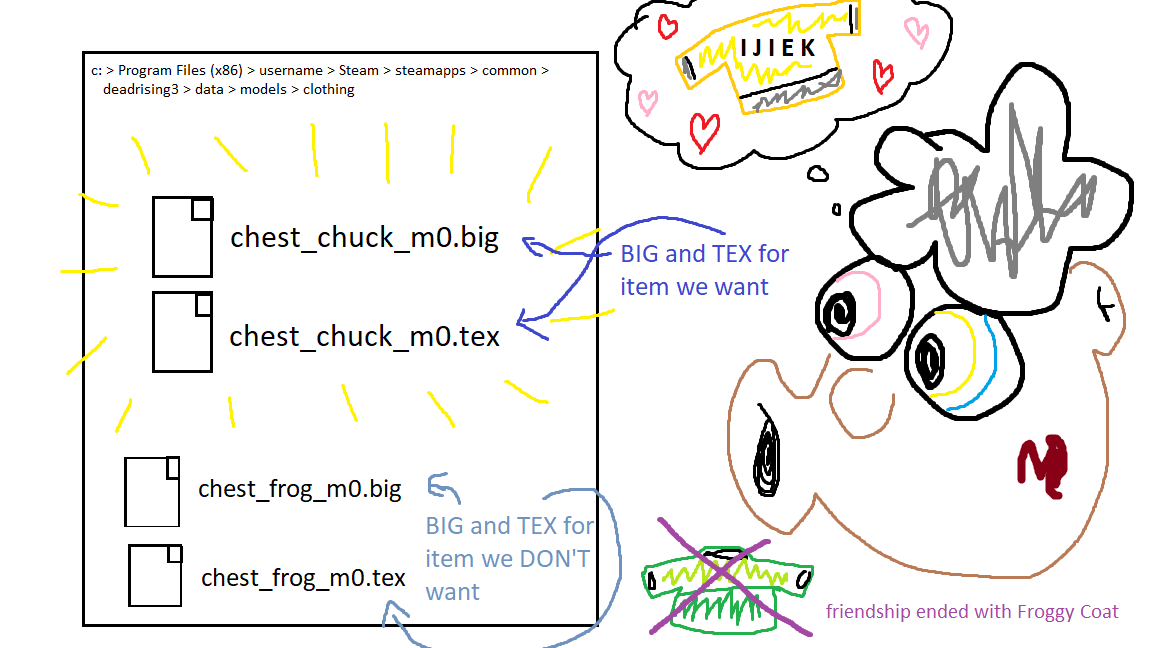
We need to locate the files for both a Clothing item we want, AND a Clothing item we don’t mind losing access to. Fortunately, most files are named in a way that makes it fairly obvious what the Clothing item is (though not all of them are).
EXAMPLE:
(“CLOTHING WE WANT”)
Let’s say we don’t have access to Chuck’s Jacket in-game, but we want it. The jacket is a Chest item, so we find it as the files “chest_chuck_m0.big” and “chest_chuck_m0.tex”. So now we found the BIG and TEX files for the Clothing item we WANT. In a moment, we’re going to copy these files.
(“CLOTHING WE WILL REPLACE WITH THE CLOTHING WE WANT”)
Let’s say we don’t mind losing the Frog Raincoat. The data for this item, also a Chest item, is located in the files “chest_frog_m0.big” and “chest_frog_m0.tex”. Now we found the BIG and TEX files of the Clothing item we will REPLACE/LOSE. We’re NOT going to copy these files, BUT we’re going to remember their exact filenames.
STEP 5:
I recommend doing this next part outside of the current folder you’re in, as it’s easy to accidentally overwrite something you didn’t intend to. For this guide, we’ll just say you’ll use the Desktop.
Copy the BIG and TEX files of the Clothing item you WANT and paste them onto your Desktop — in this example, we want Chuck’s Jacket, so we’ll copy “chest_chuck_m0.big” and “chest_chuck_m0.tex” and paste these 2 files onto the Desktop.
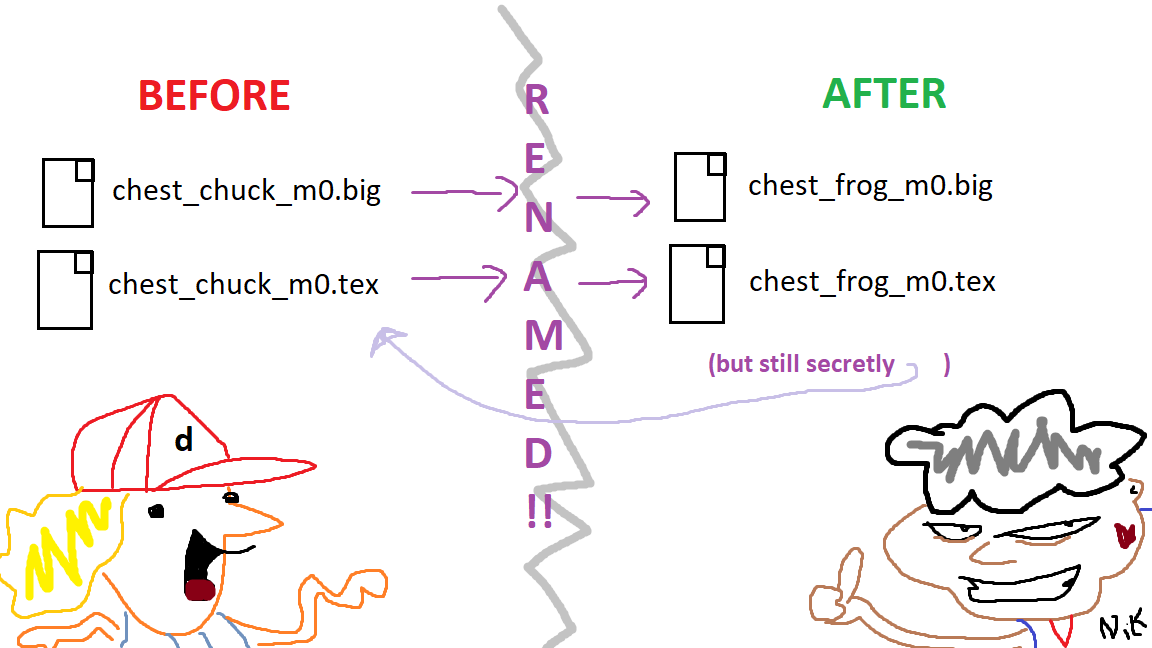
Now, RENAME these same copied files you just pasted to your Desktop with the names of the files you will LOSE/REPLACE. In this example, we are going to sacrifice the Frog Raincoat, so we RENAME the files we just pasted to the Desktop from “chest_chuck_m0.big” and “chest_chuck_m0.tex”, to “chest_frog_m0.big” and “chest_frog_m0.tex”.
Now the 2 Desktop files should have the same exact filename as the 2 files in “clothing” we will replace, even though they actually contain different data. Our 2 pasted Desktop files are STILL the data for Chuck’s Jacket, just with the same filename as the files for the Frog Raincoat.
Now we take these “new” files from the desktop (that have the DATA of Chuck’s Jacket, but the NAME of the files for the Frog Raincoat) and move them back into the Dead Rising 3 “clothing” folder to overwrite the files contained there (overwriting the ACTUAL Frog Raincoat).
So just to be 100% clear, we copied the BIG and TEX files of the item we WANT (“chest_chuck_m0.big” & “chest_chuck_m0.tex”) to the Desktop, and RENAMED them to the same names as the BIG and TEX files of the item we will REPLACE (“chest_frog_m0.big” & “chest_frog_m0.tex”).
This whole time, the BIG and TEX files for the item we are REPLACING were STILL in the original “clothing” folder, and were then overwritten by the RENAMED files we previously moved to the Desktop.
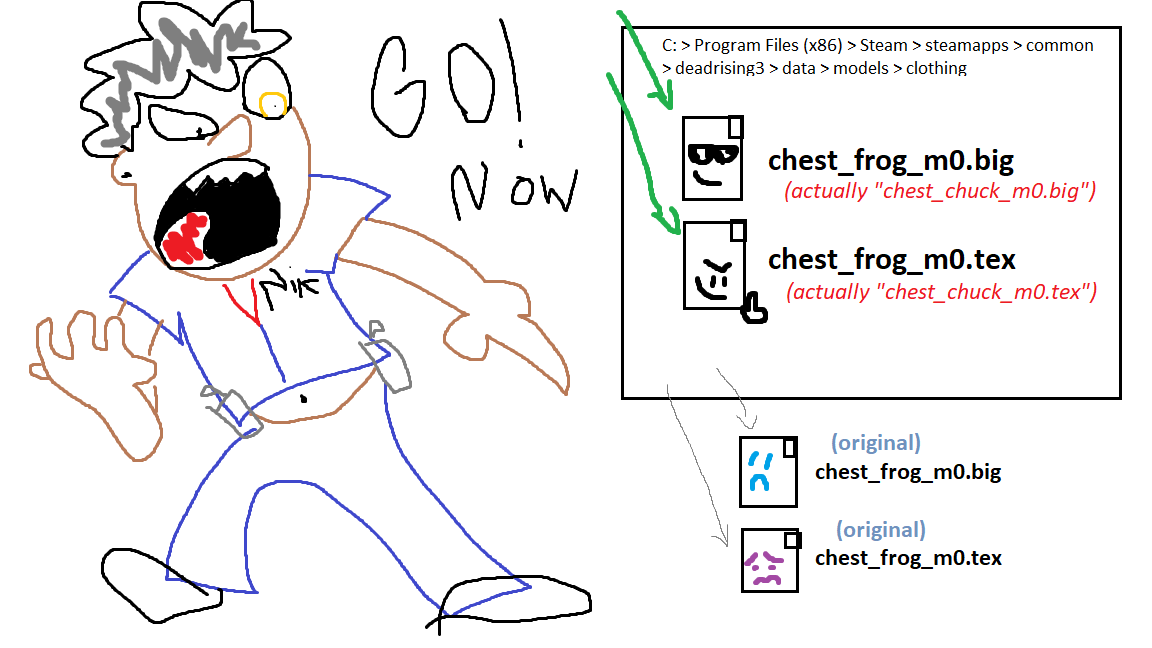
Now if you did everything correctly, whenever you try to put on the Frog Raincoat in-game, the game will load the data for Chuck’s Jacket, instead.
SO, IN SUMMARY (and again using Desktop as the “other location” for brevity):
-Find the Dead Rising 3 “clothing” folder (“Browse Local Files” from Dead Rising 3’s page in your Steam Library, ending up at “Steam > steamapps > common > deadrising3 > data > models > clothing”).
-Locate the BIG and TEX files for the item you want access to, and copy them to another location like the Desktop.
-Back in the “clothing” folder, locate the names of the BIG and TEX files for the item you are going to lose. Just take note of their names.
-Back on the Desktop, rename the BIG and TEX files you copied here so they have the same name as the BIG and TEX files of the item you want to lose in the “clothing” folder.
-Move the renamed BIG and TEX files you copied to the Desktop back into the “clothing” folder, and overwrite the original BIG and TEX files of the item you want to lose with these newly-renamed BIG and TEX files of the item you want to gain access to.
Finale
It sounds really complicated when written out but once you understand what you’re doing, you’ll see how simple it really is.
Use this method to replace a Clothing item with another Clothing item of the same category, keeping in mind the info I put in the section IMPORTANT NOTES AND DISCLAIMERS. If you accidentally replaced an item with something you didn’t mean to, go to wherever you backed up these files, and use them for copying the original item back.
The worst thing about this process is that after you’ve made alterations, it can be easy to forget what was what originally (since you’re renaming files), so try to pay attention to what you’re doing or keep notes to track what changes you’ve made. Always keep the backups of the original files where they are (copy from them, don’t move them permanently out of your backup location).
“CAN I MAKE FULL-BODY OUTFITS INTO PIECEMEAL OUTFIT PIECES?”
I’ve personally made Hemlock’s Outfit, the Punk Outfit, and Hunter’s Oufit (all of which appear in your closet as a full-body item) into piecemeal through the methods listed in this guide, so it should be possible so long as they are already listed in pieces within the files. The Bathrobe, for example, only has one Chest file, and thus cannot be separated into an “upper” and “lower” bathrobe. So if you find separate body category files (Chest/Legs/etc) for outfits that appear as full-body within the game, you can replace other Clothing items with these to have the pieces of said outfits separately selectable.
“CAN NICK WEAR OTHER CHARACTERS’ OUTFITS?”
Inside the same folder that has all of Nick’s outfits (“deadrising3 > data > models > clothing”), there is another folder labeled “dlc”, which contains the clothing data for the DLC characters. Thus, you can also use this method to swap outfits between Nick and these characters, keeping in mind that whatever you want the DLC characters to wear needs to be put in the “dlc” folder, and whatever of theirs you want Nick to wear must be put outside of this folder and into Nick’s folder (“deadrising3 > data > models > clothing”).
I’ve personally tried replacing their Clothing items with Nick’s (and vice versa), and while it works, these characters are not all the same size and thus can look bizarre. Kane and Nick have mostly the same proportions, so they can swap easily. Brad has a slightly smaller build than Nick, but it’s tolerable with only minor clipping, and Nick looks decent in Brad’s outfit. Hunter, being fairly lanky, looks a bit weird when switching clothing with Nick. Angel will have major inconsistencies for obvious reasons.
Regarding… “Duck” (the 2P), Nick can easily wear his default outfit. Duck’s unique default outfit, as well as his variations of the clothes Nick wears (of which there are very few, as the two characters mostly use the same exact models, it seems) will be named with “m1” (representing Duck) rather than “m0” (which is Nick). So, for instance, Nick’s default Mechanic shirt is labelled “chest_default_m0”, whereas Duck’s default Denim Vest is labelled “chest_default_m1”. I can confirm that Nick can wear Duck’s outfit, but since I have no friends, I haven’t been able to test if Duck’s outfits can be replaced or not (as far as I know, Duck will only ever wear his default outfit in cutscenes, anyway).
I hope this guide has been useful! Enjoy your “new” clothes.
This is all about Dead Rising 3 – Replace Unwanted Clothes in Game Guide; I hope you enjoy reading the Guide! If you feel like we should add more information or we forget/mistake, please let us know via commenting below, and thanks! See you soon!
- All Dead Rising 3 Posts List


Leave a Reply