The best foolproof barricading methods for every hideout, complete with screenshots and annotation. Blocking enemy pathing with the unbreakable, unmovable furniture barricades for those who want to keep their peachy meats intact.
Introduction
There comes a point when you’ve shid the bed enough times when you realise you can’t handle Darkwood at night. So through lots of palpitations, love and bed linen I have devised the most foolproof barricading method for each base.
Complete with crappy annotation because sometimes you just want a nice secure, lit base to come back to after a long day of stepping in bear traps.
Remember with all hideouts, the key is to stay quiet – don’t move, and don’t let any light leak out to the outside. Always keep flares and bear traps in your hot bars at night for safety. Also please test your barricades, keep running and pushing into them at different angles to make sure nothing moves. If you can push the barricades out of the way then so can the monsters.
Also, chairs are your best friend, they catch on door frames and entrances, use them, they are unbreakable like lamps and crates.
I’ve been getting a few comments about missing hideouts or layouts being different – this is not true. Darkwood changes the map on a new game for disorientation purposes/ to keep you on your toes on a second play though. The hideout can be flipped in one of four ways, but other than that, everything else remains the same. Rooms are the same, furniture is the same it’s just a different orientation.
SCROLL SLOWLY AND BEWARE OF THE GUIDE INDEX ON THE RIGHT HAND COLUMN IF YOU DON’T WANT TO GET SPOILED, there are line breaks with every new location.
Dry Meadow Hideout
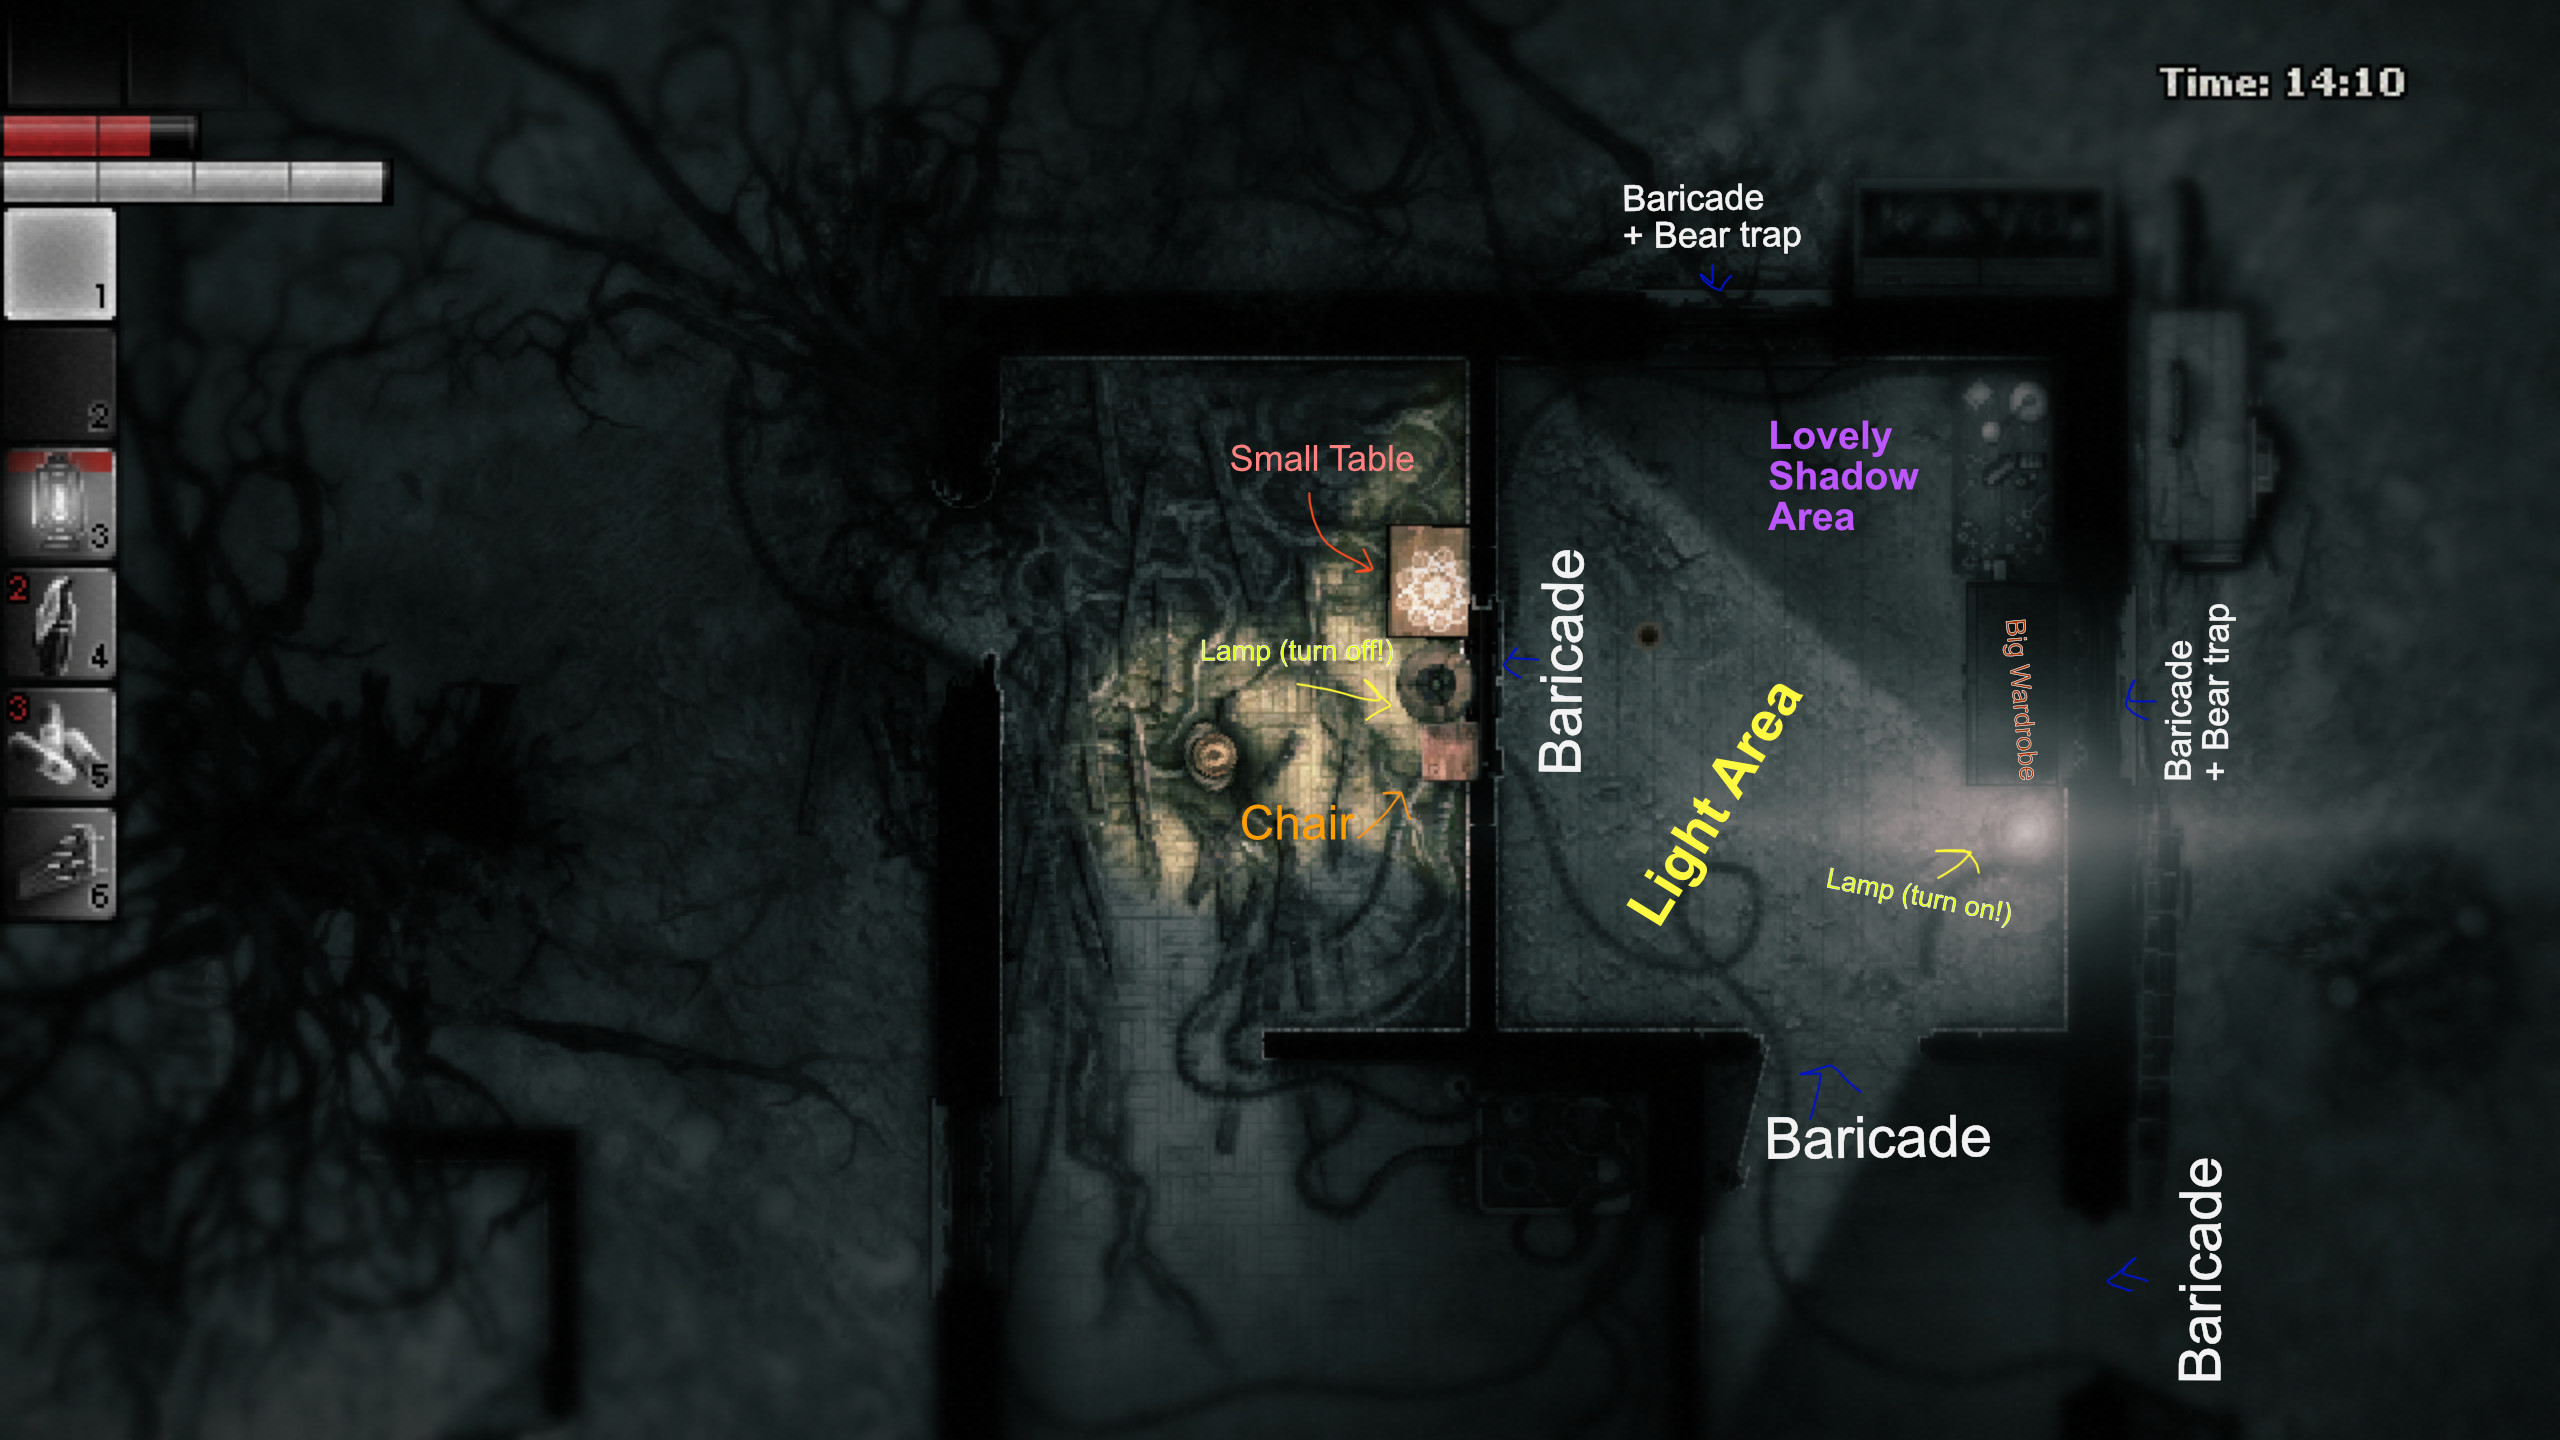
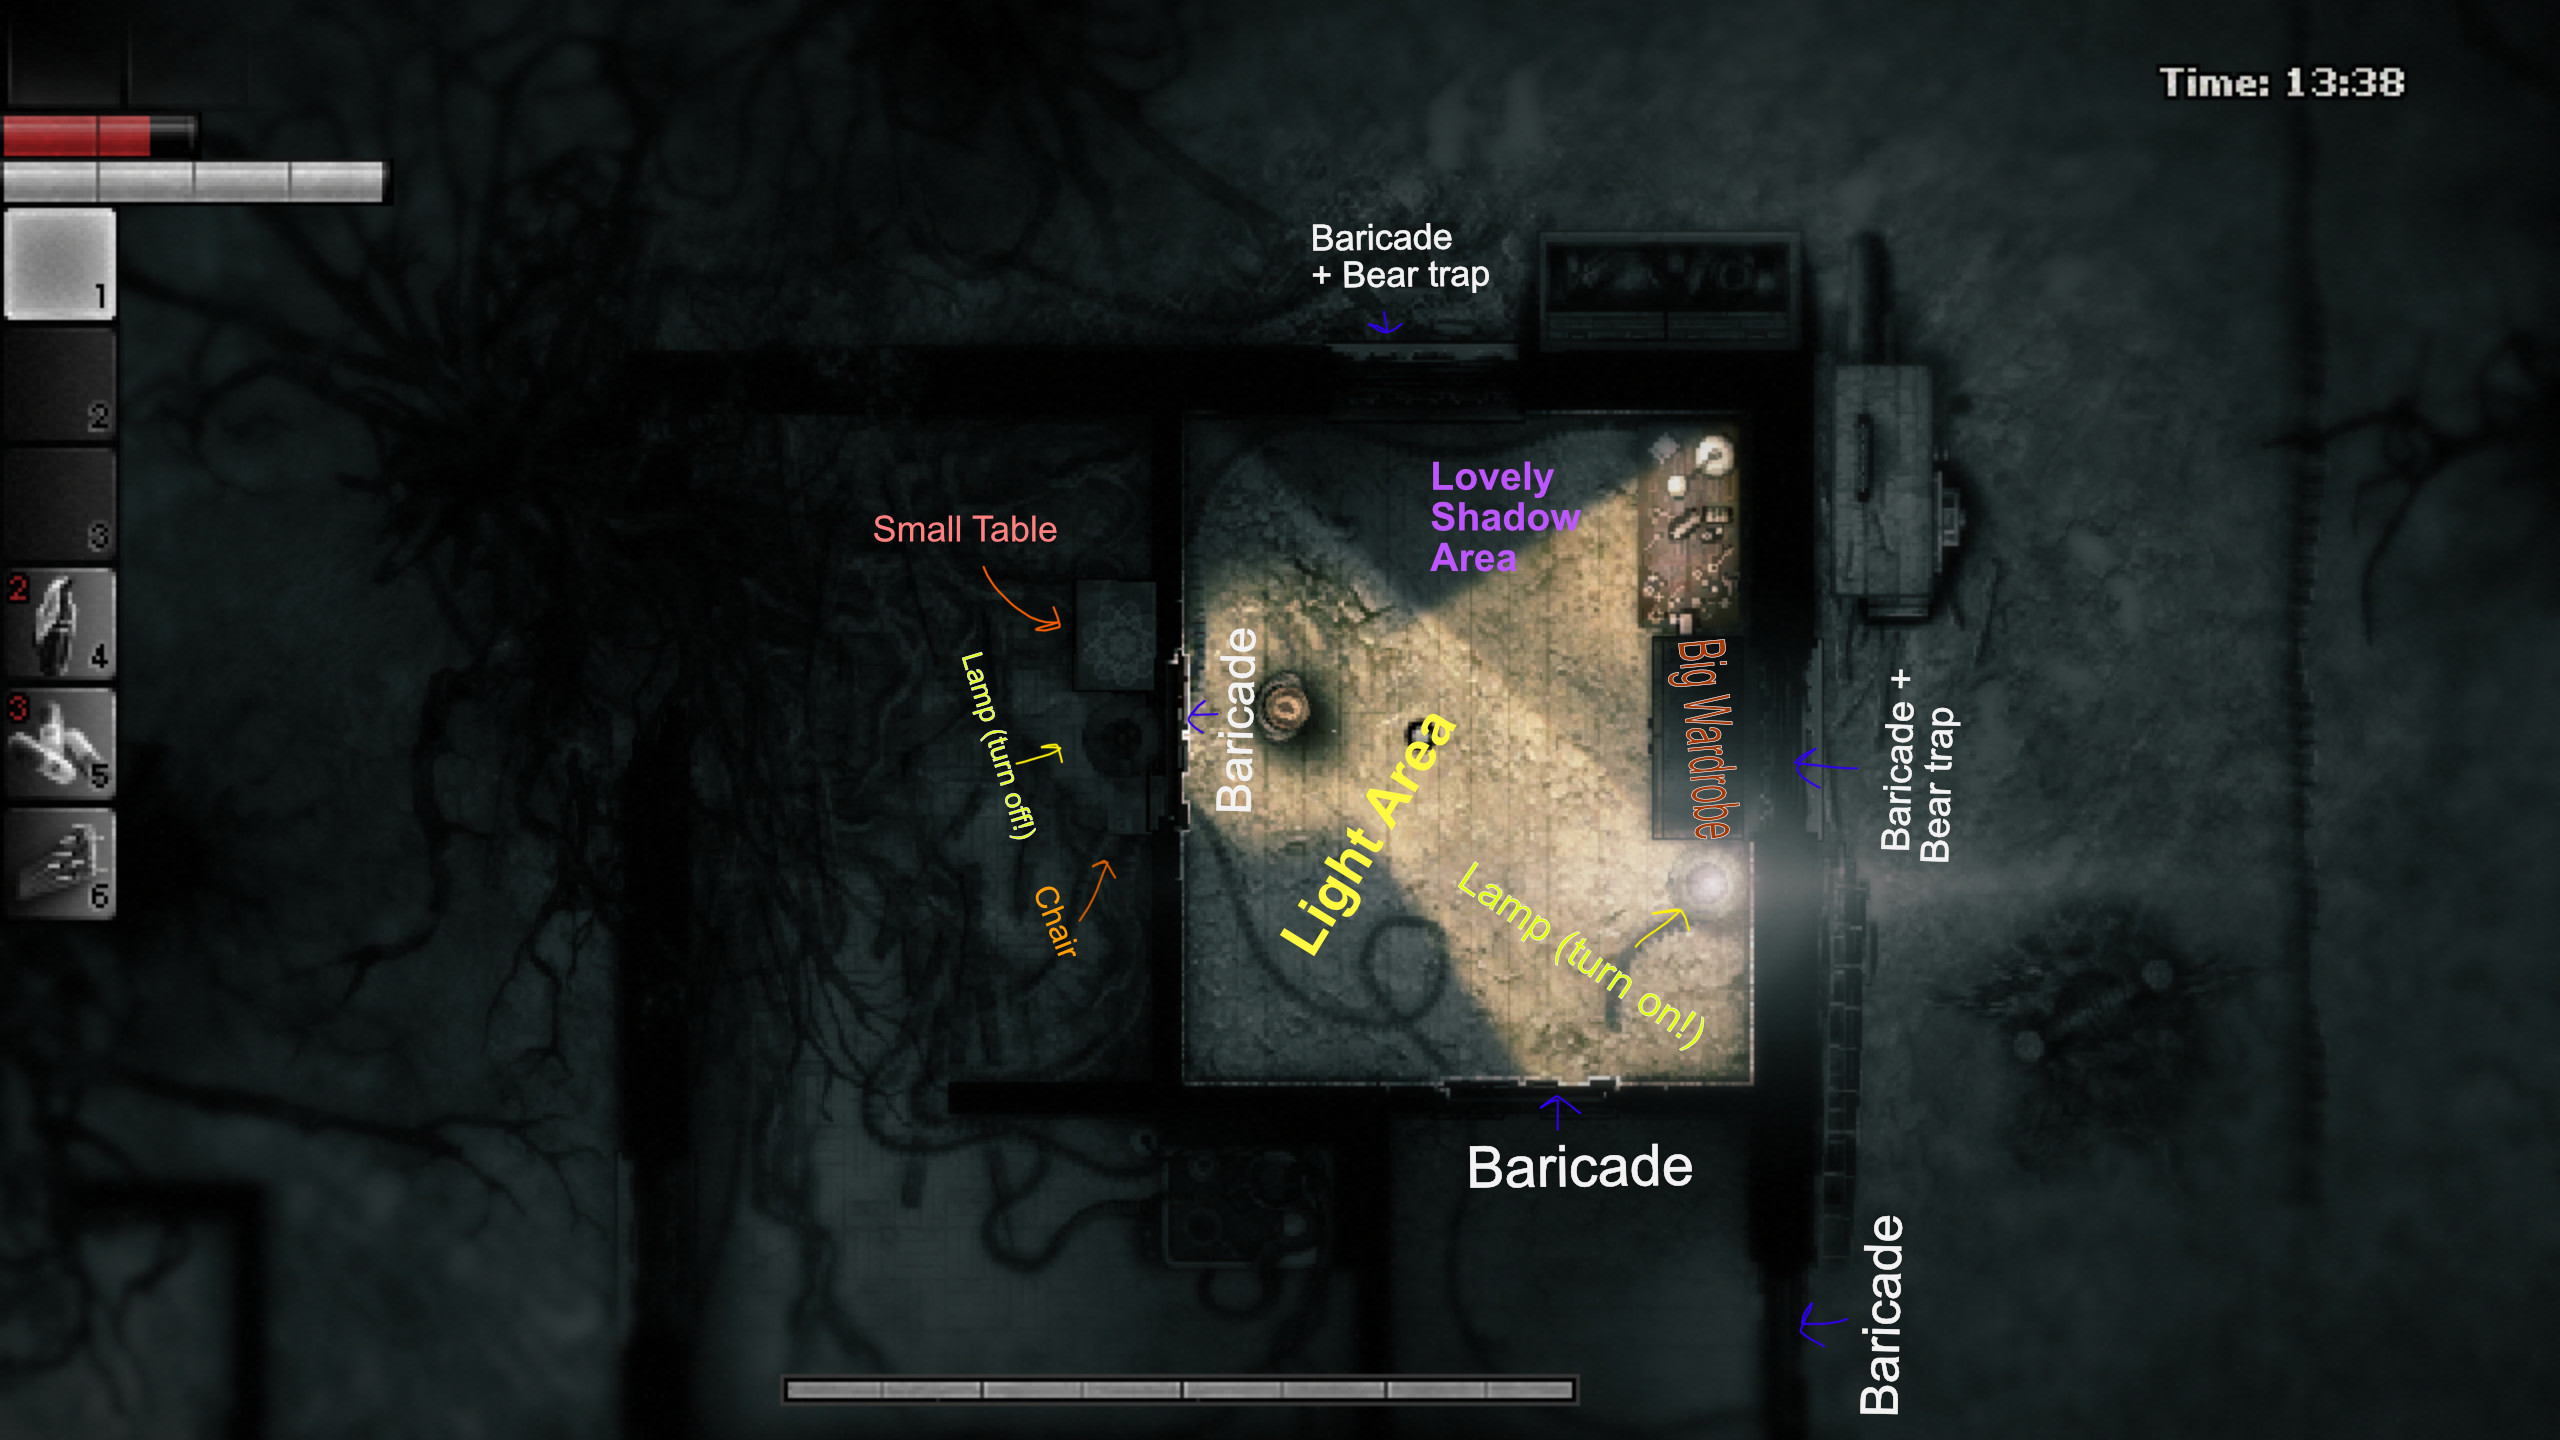
This is probably overkill – but I’m a baby so this is my set up.
You don’t have to barricade all the doors leading out to the well, since you might want to respond quickly to the “knocks” for the Wedding invite and other goodies.
What I do want to point out is that the wardrobe and light placement is pivotal for keeping light from attracting attention. The light wedged up next to the wardrobe casts a shadow over the window on the other side. Keeping it dark 🙂
Silent Forest Hideout
(Lol excuse the mess, I’m a bit of a hoarder, pro tip – just dump extra inventory on the floor!)
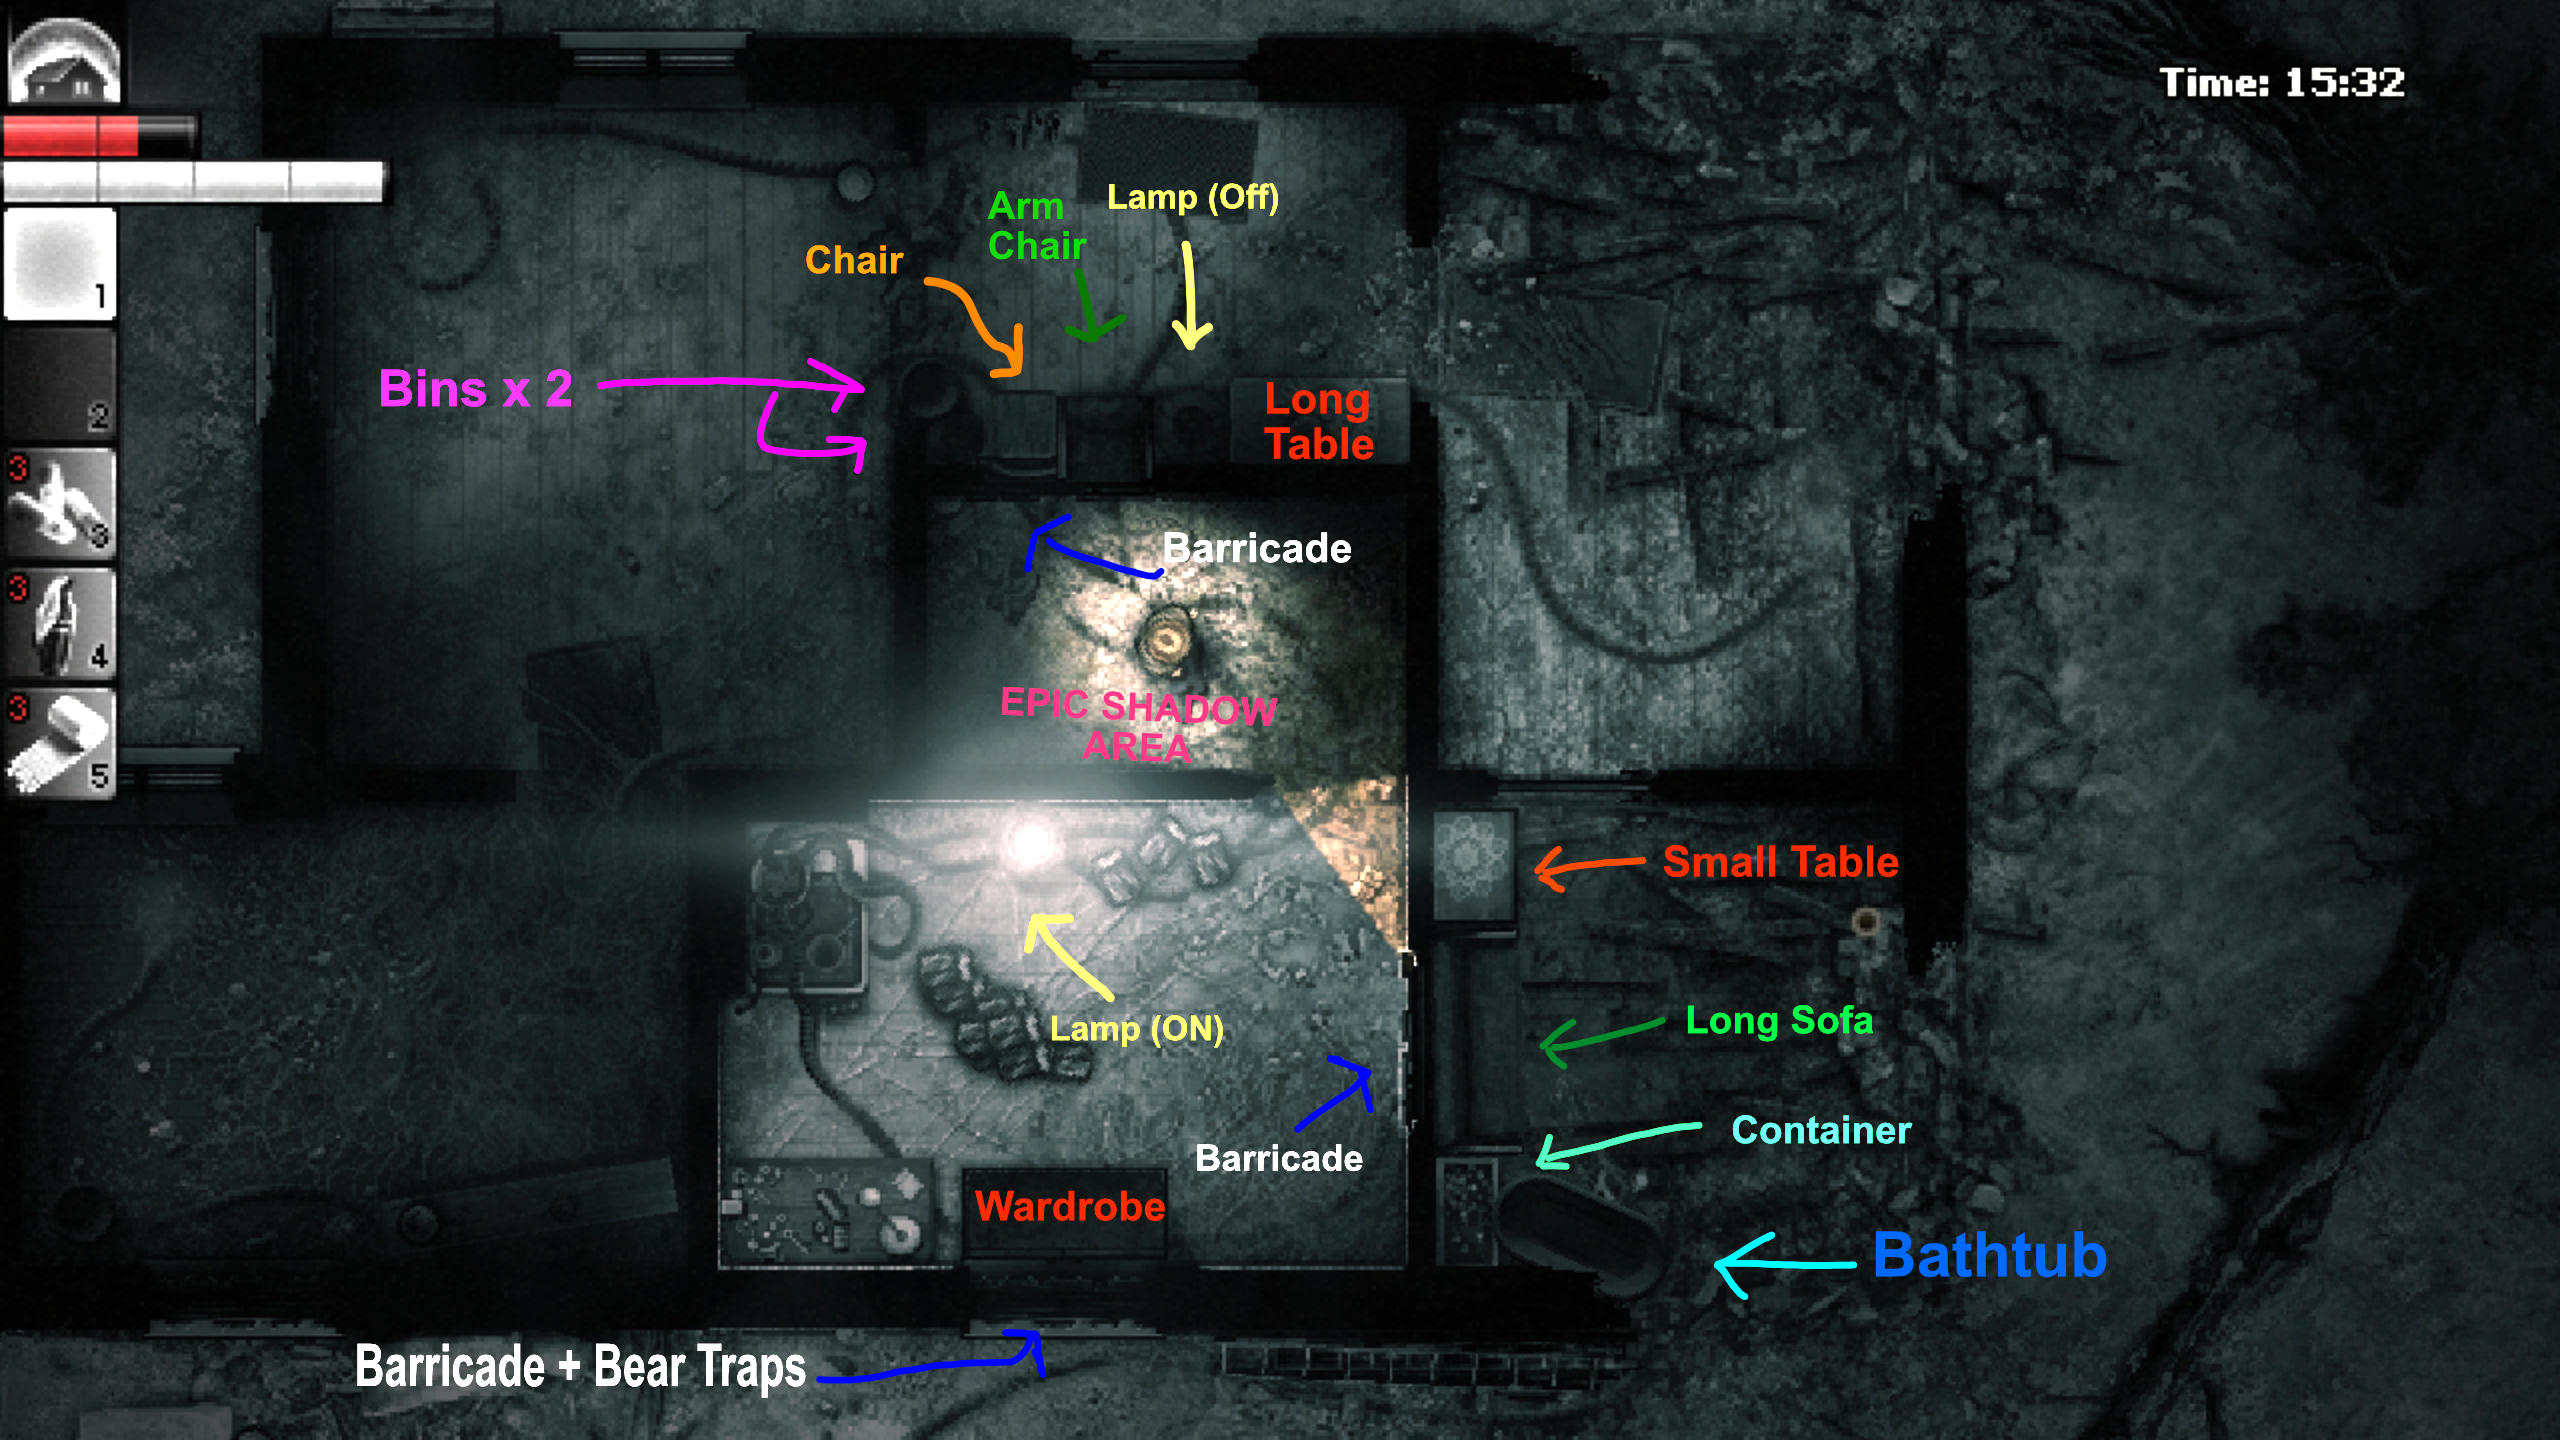
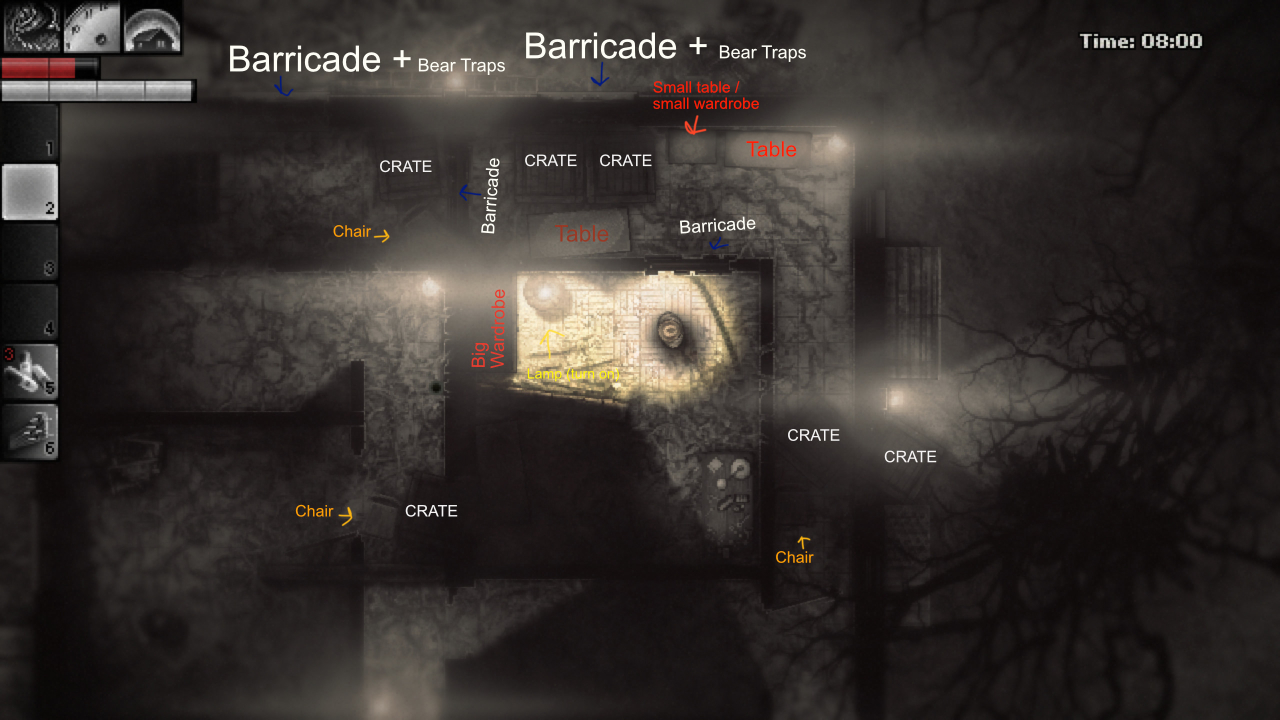
This hideout was the one which really gave me the most grief as I always left one door without any barricading furniture, completely forgetting about the non destructible furniture in the generator area / garage.
Drag the large sofa and the small container from the garage, and along with the other barricade on the other side your doors are now COMPLETELY impenetrable*
*There is a incy wincy bug where the huge dogs occasionally just clip through indestructible furniture and break down the barricaded doors. They are mostly keen on doing this on the side with the long sofa, but what can you do about that?! If you see that BS happening put a bear trap or two in front of the door, you’ll see in the morning the furni are perfectly in place still … I have bug reported this in the hopes for a fix in the 1.4 update.
You might have a few more tremors in the Silent Forest hideout, and the container from the garage is quite light and can go flying off into the night – so I’ve included the bathtub wedged up nicely between the wall and the container to keep it in place, similarly the small table to keep the sofa nice and snug.
If you do get a little ‘shaken up’, there will still be a line of furniture which will slow them beasts down. If you’re feeling extra infant go ahead and repair other doors, and blockade up the windows and remaining doors in the hideout, keep them idle thumbs, paws and claws busy …
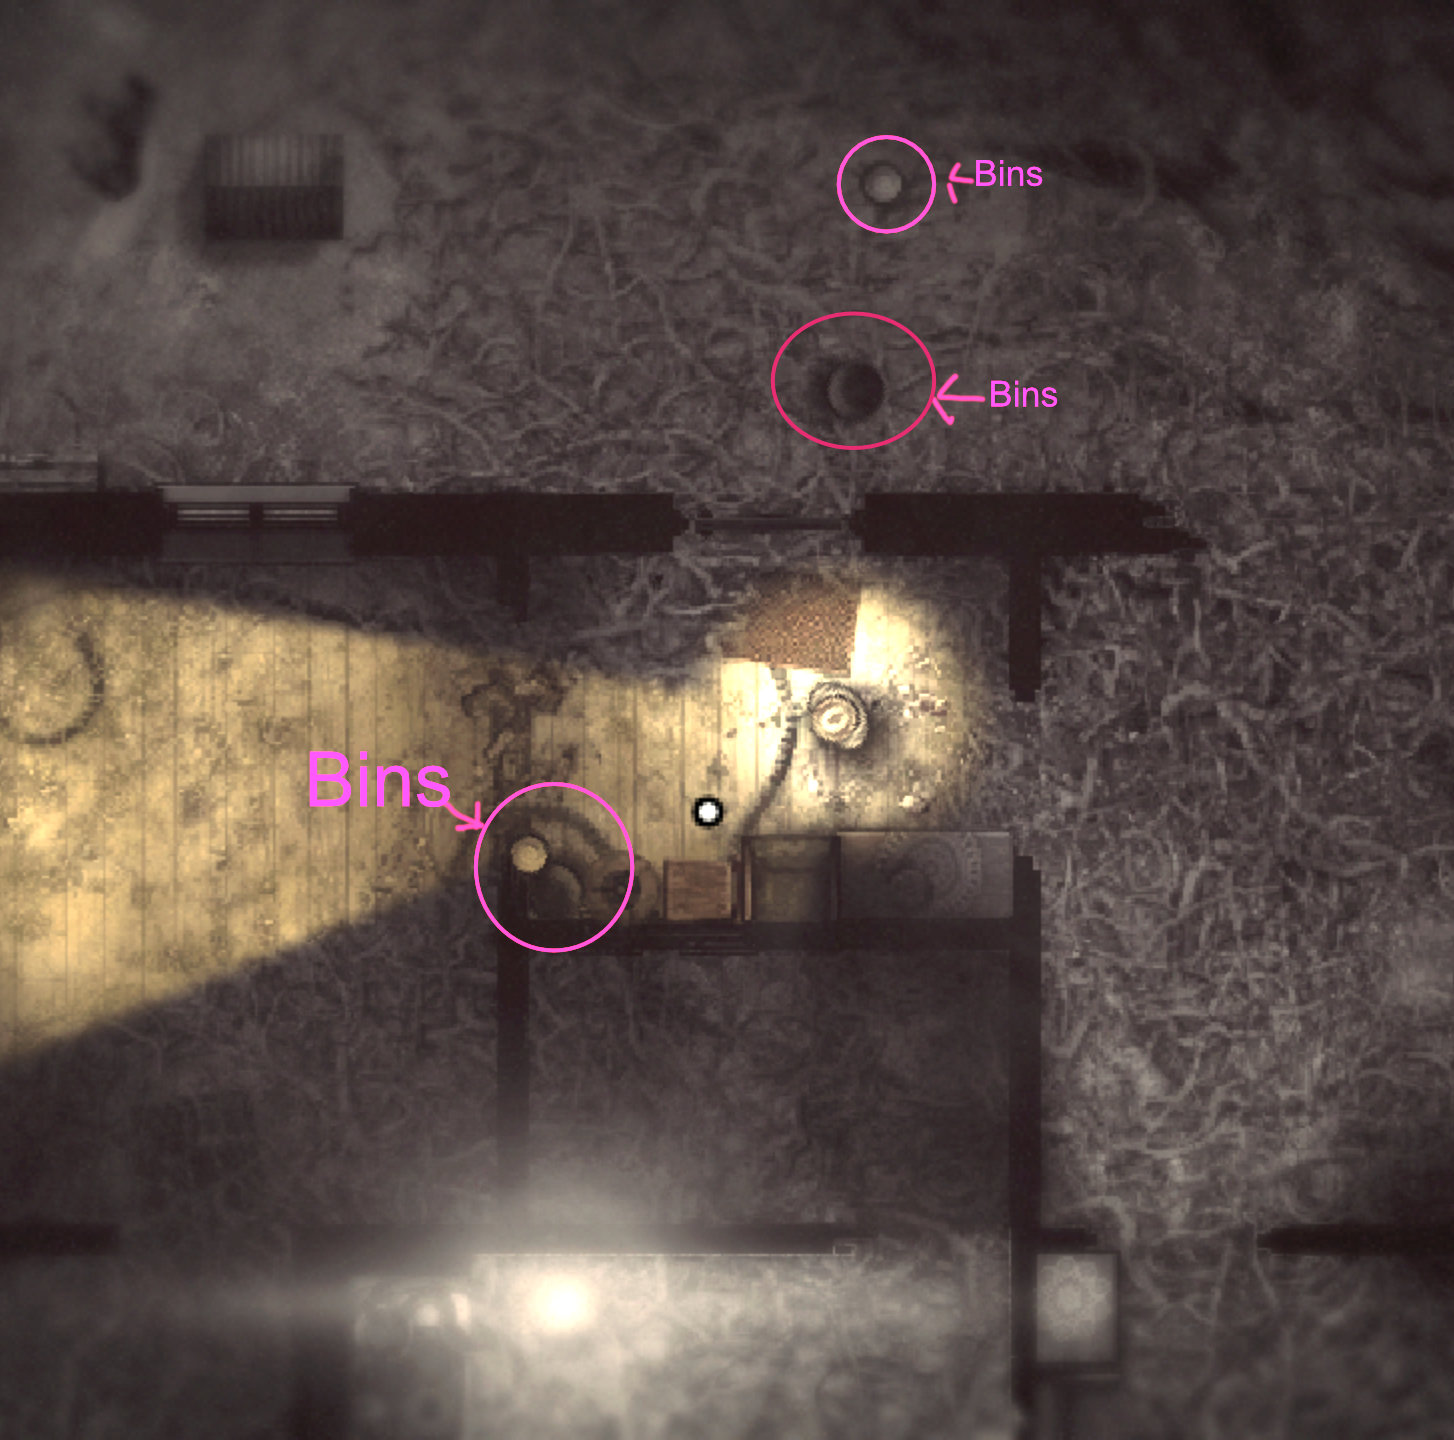
It is neat that you can also kick about these non destructible bins/waste baskets/rubbish bins/trash cans around and stuff them into your barricade areas as I’ve done – I found it helpful to crowd out some gaps and make everything as tight as possible.
To get out of this hideout, unbarricade the door opposite the workbench, and push the sofa away, that’s it, just pull the sofa tight in towards the door on your return for the evening.
One thing I haven’t really gone into, but don’t be afraid of shadowy areas anywhere in your hideout. Remember the gas from the oven keeps you safe, and you can ambush enemies using this to your advantage because they can’t spot you straight away.
If something does break in through the windows from lack of bear traps, hide in the shadows, then pounce!
Old Woods Hideout
Set Up 1 – With Workbench
This is my favourite, I struggled with the hideout for ages until I was reading up on how else to barricade up with furniture dragged from other locations, and found that you can drag SIX crates from the Wolfman’s hideout!
The following guide will show you how you can tease the last three crates out, huge thanks to CumboJumbo on Reddit:
https://imgur.com/gallery/MnmNTtF – [imgur.com]
It’s a bit finicky, and takes a bit of time but in baby’s opinion, totally worth doing – sucks all the fun out of it like all this sort of barricading, but do you want clean sheets in the morning?
Top tip: Set the Old Woods hideout up before you officially move in, takes a few in game days but then you’re not overwhelmed by all the set up.
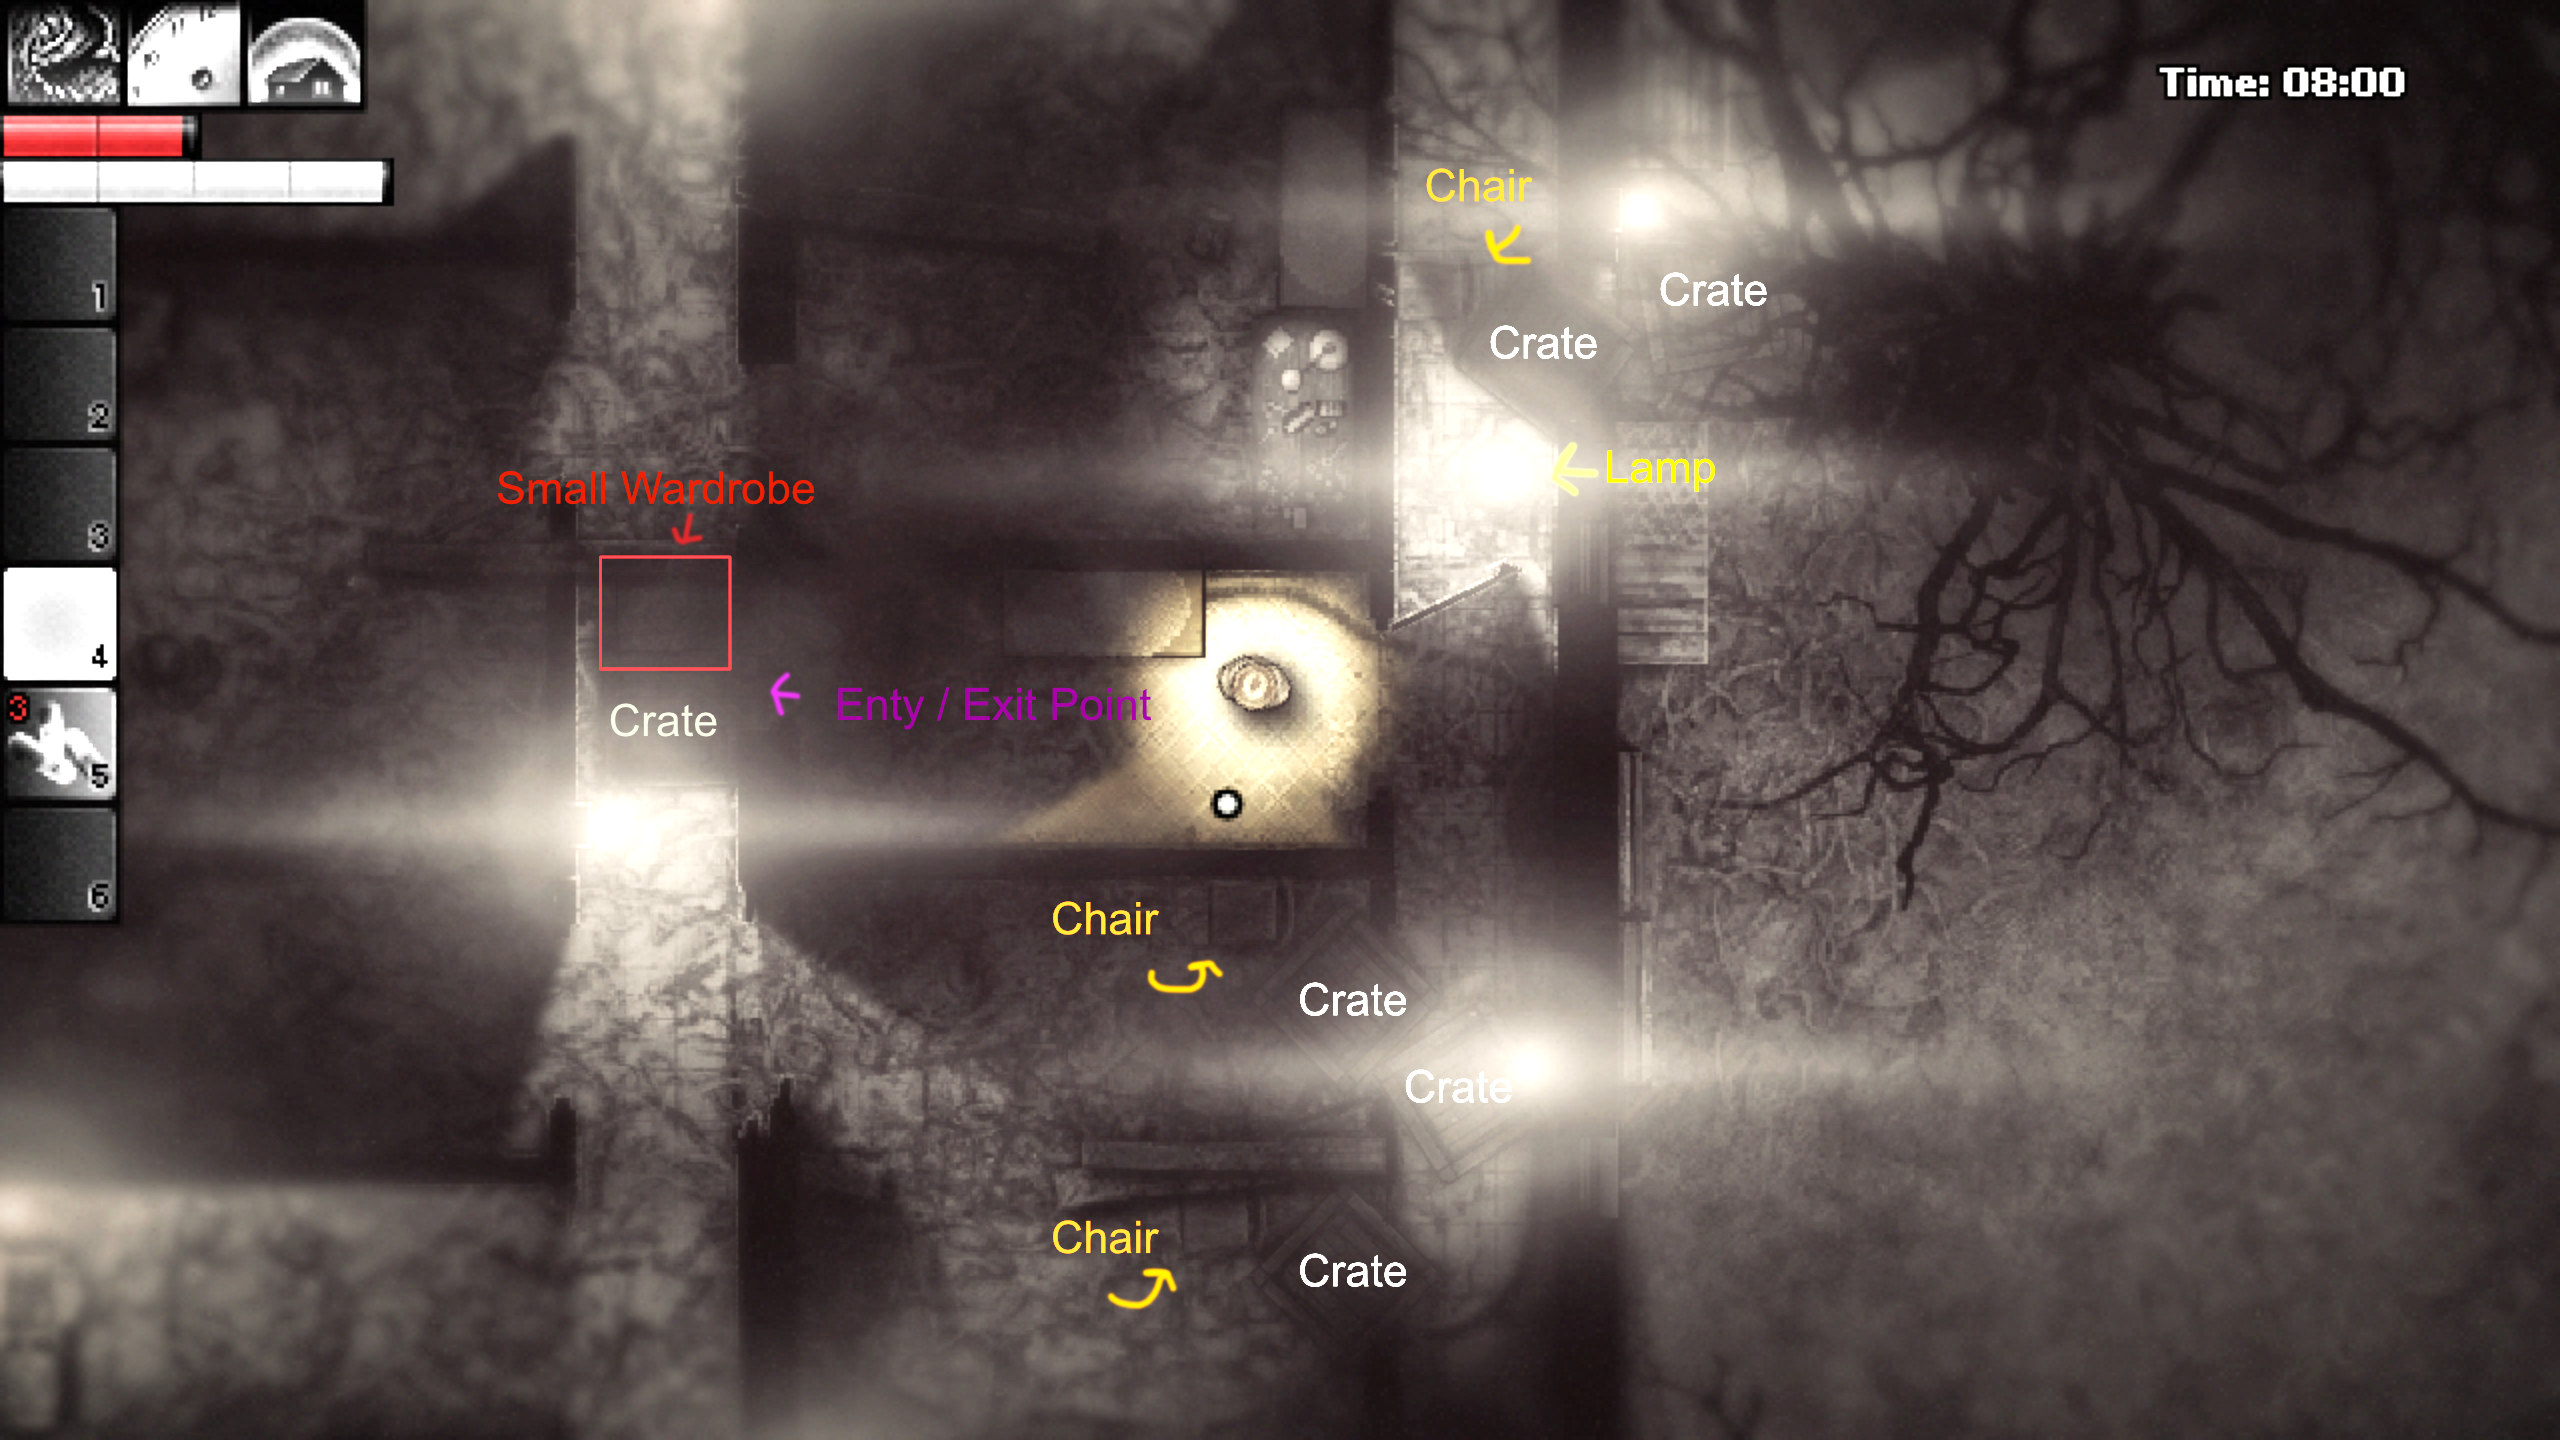
You will be UNTOUCHABLE, the pair of crates in the gap to the outside are a bit of a pain to manoeuvre at an angle, so as to get stuck in the hallway similarly like the crate and chair on the opposite side nearest the destroyed generator/oven room. Chairs are your best friend in this game, they catch on door frames and get stuck NICE.
Lol how do you get out in the morning? Anything you push out your way you have to put back later on, personally I like going down the hallway towards the rug. To get out down the hallway, my preferred way, the door barricaded with the chair and crate you have to jank around with as it only opens outwardly and you have the crate and chair pulled up against it.
Keep your direction held left whilst opening the door and you glitch through the door to the rest of the hallway. Bit nasty I know but works a treat.
If you want to be really crafty – why not? Place a bear trap inside the window closest to your hidey room and then slide the two crates back over the top. IF the monsters manage to get past the first pair of bear traps outside, they’ll fall in through the window, push the crates apart and get stuck in yet another trap, enclosed within the 5 furni obstacle. This gives you more time to prepare if you get really unlucky – but this is highly unlikely, it’s just in case you’re one of those embryos like me who likes to double up your diapers.
I’d aim to get back at around 6pm each day since you probably had to move some furni around to get out, so you’ll need to put them back in position.
Set Up 2 Easier Alternative – Without Workbench
So my preference would be to have access to the workbench so you can craft some stuff whilst enjoying the horrifying soundscape and cutiepie chompers garbling and stomping around in the dark.
But, if you don’t care about the workbench and are low on bear traps or can’t be bothered with them or Set Up 1, then this is for you!
Sorry you still need all the crates from the Wolfman’s hideout.
You can also drag tables and wardrobes into this section if you like in the room with optional barricading. You could also barricade the south window but it’s up to you, I like not to because this is the only hideout set up where you can put two little chubby fingers up at the windows since there are no access points from them.
This set up is far easier than the first one, and the monsters literally will be stuck pushing against unbreakable, impenetrable crate+chairs blockades. Please pay special attention to the chairs and their orientation, you can always test the barricades yourself by running and pushing at them from various angles. I strongly advise you always do this!
There’s also no doors to worry about in this set up as you’ve blocked the door entries with crates. To get out, push the crate away from you and you’re out, you can leave that wardrobe in the corner. Just do the reverse to barricade yourself in at night, untoouuchhaaabblleeee.
I just want to add quickly that if you’re feeling creative and have already dragged the crates from the Wolfman’s hideout, feel free to experiment! You can block up most areas effectively with them.
Swamp Hideout
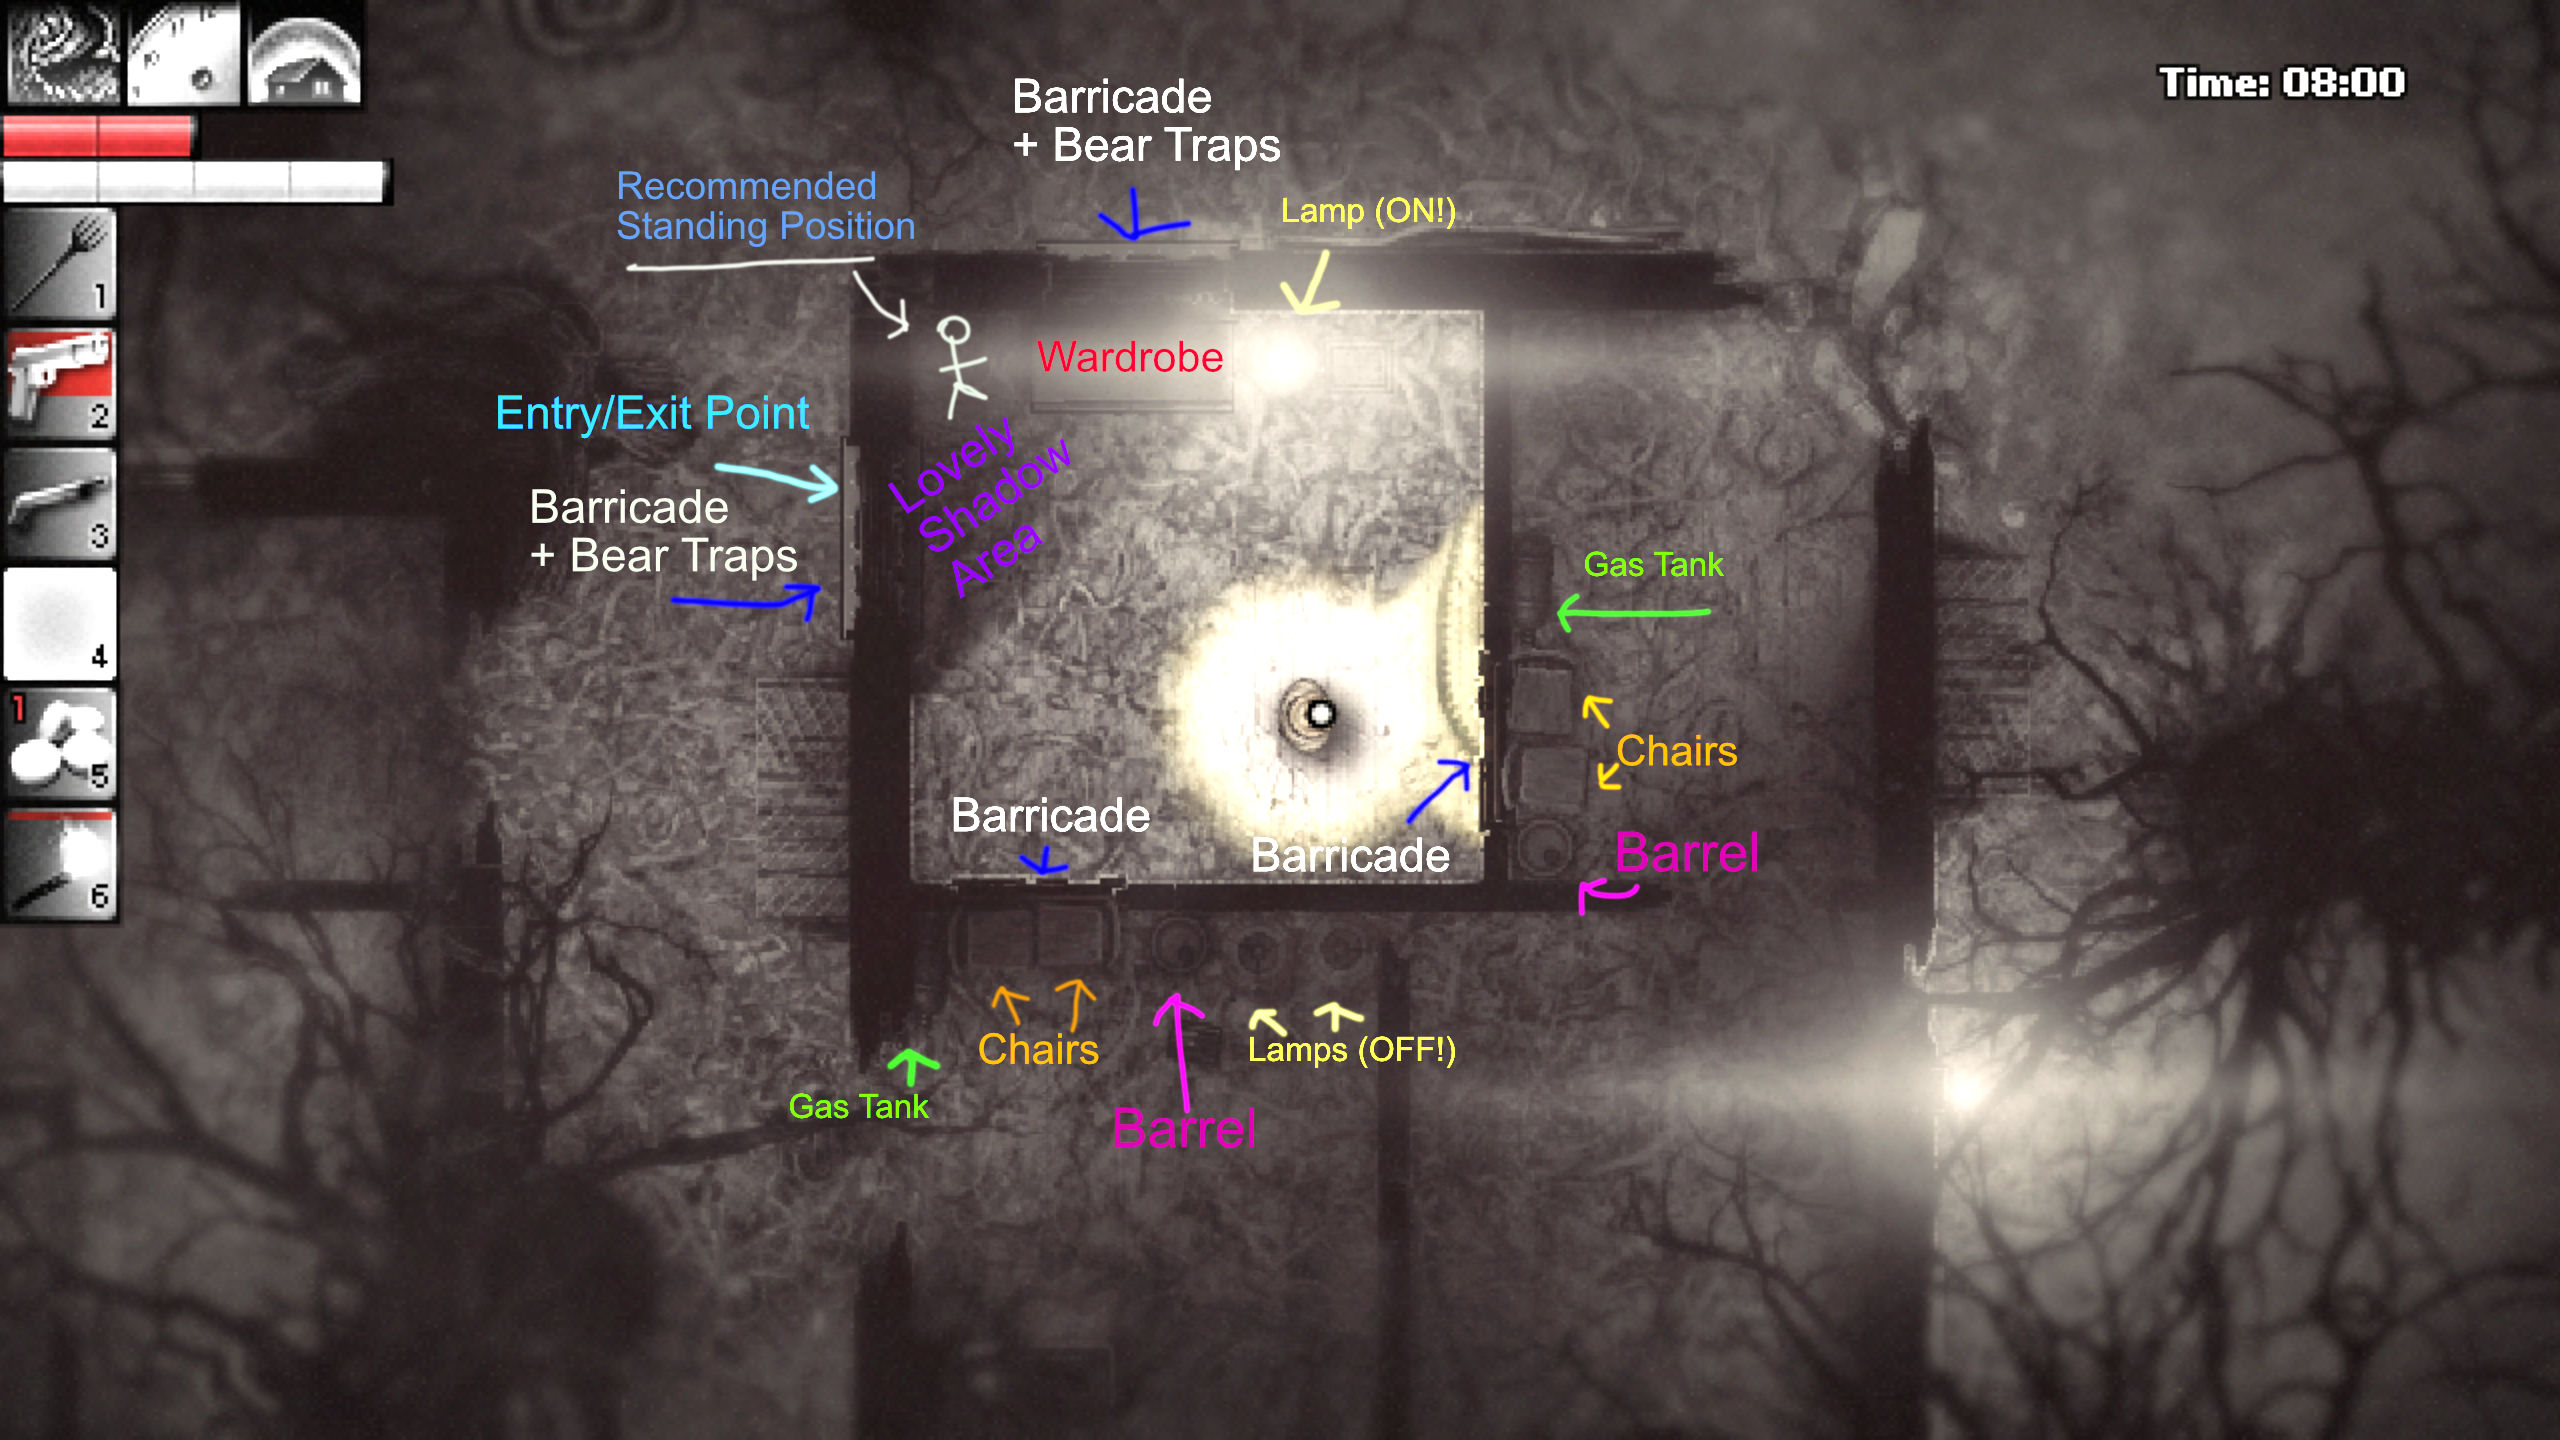
Here we are in the swamp and if you brought some nails and wood (I’d bring 50 nails and 20 wood to be sure) you can achieve this when you come up from the underground tunnel. All you need to do is barricade the two doors and then the entry/exit window and you can make yourself super safe on your very first day.
Thank you to planistorun in the comments who reminded me about the barrels and gas tanks on site. The monsters can and will push them around, but stick em’ in a corner near a barricaded door if the barrels and gas tanks are enclosed by other furniture and/or walls, they’re not going anywhere!
This barricading set up means your only access to and from this room is vaulting out of the window opposite the floor container, close to where the horrible eye (Growths) things are. So just remember to deactivate the bear traps and set them up again when coming and going.
It’s great you can set bear traps on the outside when you’re on the inside! I would use some bear traps around the furniture barricades just in case you get an unlucky early earthquake/poltergeist event which can shake your shiz up a bit.
Since we’ve blocked up the doors nicely, windows are your only point of entry for the enemy so bear traps are very important in this hideout. Always place them outside your windows, I’d say at least two, and keep one either on you or in the big wardrobe for quick access. If you’re feeling full foetus you can barricade other doors and windows to fool the monsters and keep them away.
When you’re established in this hideout and maybe found more barrels or upgraded your workbench enough to craft them, you can then go ahead and place them directly outside the windows to block them up along with gas tanks bought from The Three and bear traps. Once I have reached this point myself in game, I’ll show you how you can seriously block out those windows!
Going back to your hidey room, you REALLY need that big wardrobe and lamp placed just so, you’re counting on the wardrobe throwing that shadow to keep the other window in the dark, so that your movement won’t attract attention and the monsters can’t peep in at you.
Very important: ALWAYS THROW A GLASS BOTTLE DOWN WHERE YOU ARE STANDING, and those centipedes are no bother, they die instantly.
B*tch Baby move (obviously) but I’d stand in the gap between the wardrobe and the wall, in a nice dark corner so you can surprise any mofo’s if they survive your outside bear traps and obstacle courses (ง ͠ಠل͜ ಠ)ง⎯⎯∈
END + Titbits
I think I covered everything, don’t sue! I’ve tried lots of barricading, lamp dummy rooms and base defence combos and this is what I feel works the best at preventing monsters getting at your fresh bubby bum.
Remember that hideout areas are tiered and won’t get more difficult no matter how many days go by, stay in one hideout as long as you want to. Taking this into consideration, I would pre-arrange the barricading furniture before you move into a hideout, taking a few trips to prepare. I know it’s kinda boring but time is REP, so you can bank up a few days with the trader, commuting from your easier hub before you officially make the leap to the Silent Forest & Old Woods.
More general tips from a baby is get back to your hideout in good time, turn on the (always topped up) generator around 6pm, to be fair it can take some time to rebarricade yourself, especially in the Old Woods. Make sure lamps not in your hidey room are turned off, I just lit them in the screenshots so you could see the barricades more clearly. Always have a couple of flares, just in case the ghosts blow out your one hidey room lamp.
Of course with all barricades earthquakes and poltergeist events can dislodge your furniture and throw it about which is a bit annoying ¯\_(ツ)_/¯ but it’s rare and it mostly affects small furni like lamps and chairs inside your hidey room, so don’t fret too much.
I will be keeping this guide updated if I find new and better ways to keep our lil’ chubby cheeks safe at night.
You got this baby!
I hope you enjoy the Guide we share about Darkwood – Barricading Methods for Hideout Tutorial Guide; if you think we forget to add or we should add more information, please let us know via commenting below! See you soon!
- All Darkwood Posts List



This guide was very helpful especially the one on silent forest but only thing i think is should i put both lamps in safe room (silent forest) like whenever a nightly event turn off one light thats in my room ill be able to do nothing against shadows lurking in dark and more