
Comment to the manual
In the manual, the names of the missions may differ from those in the game. All this is just an inaccuracy of my translation of this manual into English, the rest of the information is correct.
Plot tasks
First of all, you should focus on history. The reason is that all actions in the open world will be automatically marked on your map after the plot is completed, and several side storylines are hidden behind the development of the plot. After the story, all side content will be available to you. Of course, you can already start working on side tasks when they become available.
Which starting life path you choose does not matter (Nomad, Streetkid, Corpo). They have only another Prologue and several different options for dialogue, but they all follow the same plot path. Your choice of story is also irrelevant to the ending. After the plot, you will return before the last mission so that you can replay it for different endings. The endings are selected during the dialogue in the final mission “Nocturne Op55N1,” which decides which epilogue you will receive. Your choice in the rest of the story does not affect the ending. So don’t worry, you can’t choose anything wrong.
Each life path also has several unique additional quests, but they do not matter for trophies. In addition, all trophies can be obtained at an easy level of difficulty.
After completing the story, when the loans are over, select “Of course, another gig” to return it to the point of preservation before the final mission. This will bring you back to the latest missions, and you will be able to continue the free exploration of the world and complete any side tasks and events of the NCPD scanner that you have left. From here you can also replay the final mission for different endings.
Side quests/tasks
Excluding Gigs and NCPD Scanner Hustles, Cyberpunk 2077 features a total of 80 Side Quests.
These Side Quests generally feature a high degree of content, and are an important part of the story as well, so be sure to take some time to go and complete them all!
As some Side Quests are extremely short, or are found as part of a larger Side Quest, like the Epistrophy questline, note that the exact number can vary depending on your measurement. Playing the game and completing certain objectives during Main Quests and Side Quests will sometimes unlock new Side Quests for you to complete. You’ll often receive a call or message with details of the Quest.
The following paragraph lists the available tasks in the game.
Available tasks in the game
Act of I.
- Practice is the best master (optionally)
- The last game in rescuers
- City of a dream
- The first rule “Posmertiya”
- Overthrow in Malstryom
- Cherchez la femme
- The admission in the Highest League
- Love as motive
- Eternal rest
Act of II.
- “Eternal rest”
- “Doll house”
- “Secret pleasures”
- “Malfunction”
- “Double life”
- “Paradise Lost”
- “Recognition of images”
- “Human factor”
- “Beauty doesn’t die”
- “At the crossroads”
- “Leaving, you turn off the light”
- “Passenger”
- “Old friends”
- “On soft paws”
- “Audience”
- “Apartment 303”
- “For Whom the Bell Tolls”
Act of III.
- “For Whom the Bell Tolls”
Ending “Devil”.
- “Beginning of the end”
- “Brother and sister”
- far from home
Ending “Star”.
- “The family isn’t chosen”
- “Front line”
- Resident Evil
- “Road on the horizon”
Ending “Moderation”.
- “New Dawn”
- “Like the good old days”
- “Last Tango in Knight City”
- “Looking from a Height”
The ending of “Don’t Fear the Reaper.”
- “Legend Knight City”
- “Look from height”
Story line of Judee Alvares
- “Chain reaction”
- “Doll passions”
- “Conversations about revolution”
- “Palace revolution”
- “Release me, depth”
Story line of Hats Palmer
- “Ridden out a storm”
- “Don’t call Saul”
- “Taming of the Basilisk”
Story line of Kerry Evrodin
- “Surprise”
- “New turn”
- “Music sounds”
- “Storm and impact”
- “Factory of stars”
- “Shadows wander”
- “Theory of a Big Bang”
Story line Rivera Ward
- “Guards of a disorder”
- “Hunting for the hunter”
- “Boy with a gun”
Personal quests of Johnny Silverkhand
- “In the wake of the past”
- “Silverkhenda cocktail”
- “Old drama”
- “New turn”
- “Music sounds”
Automania.
- Watson, fixer Reggina Jones
- Galen G240
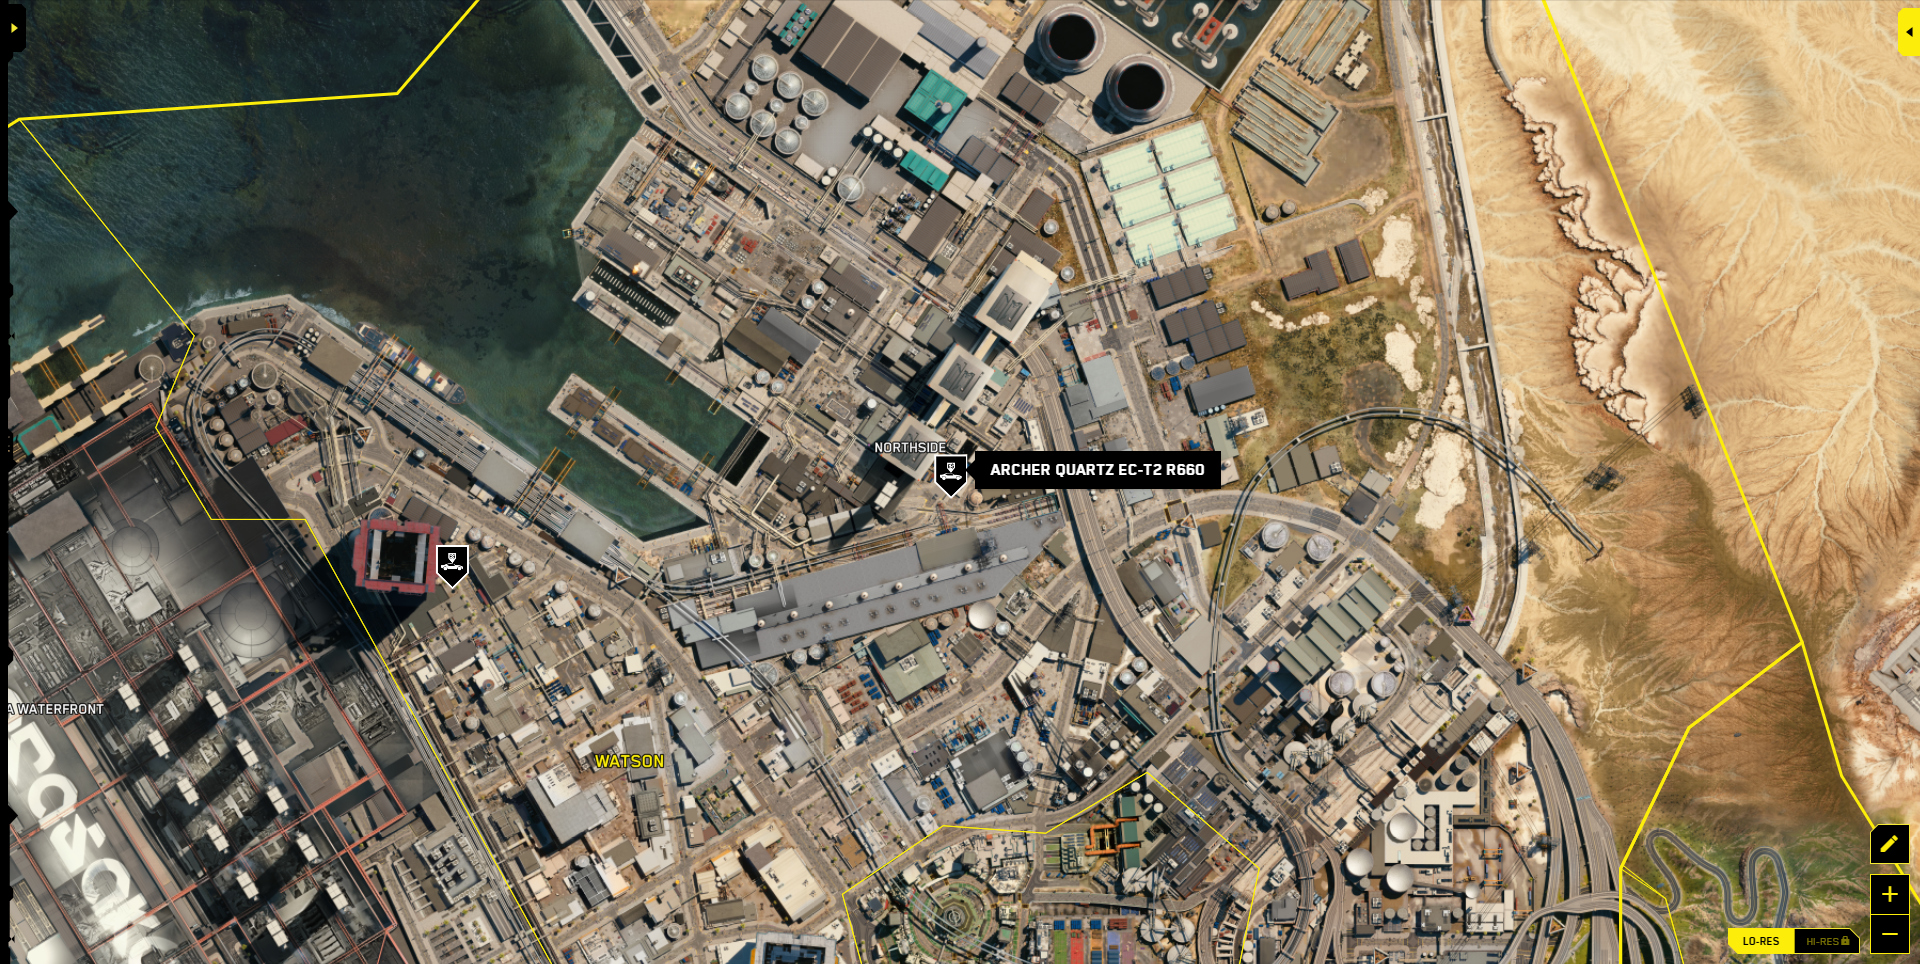
- EC-T2 R660 quartz
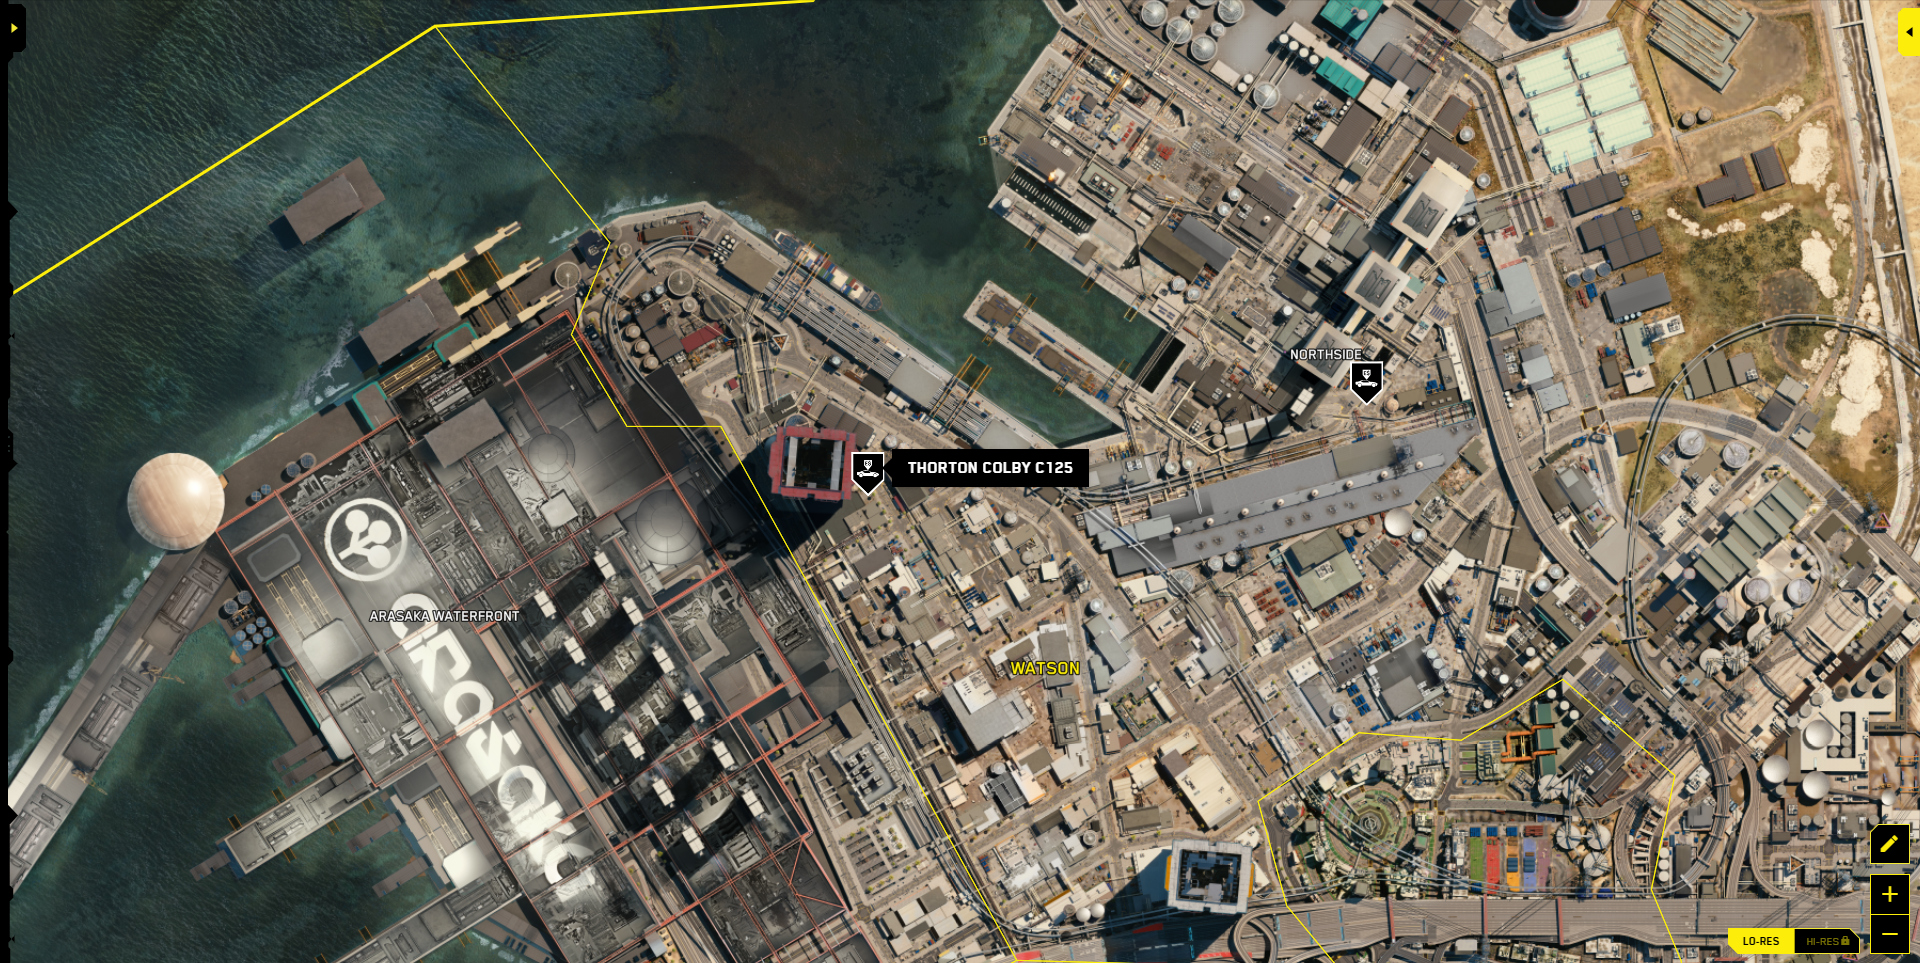
- Colby C125
- Zion MZ2
Westbrook, fixer Vakako Okada - P126 Maimai
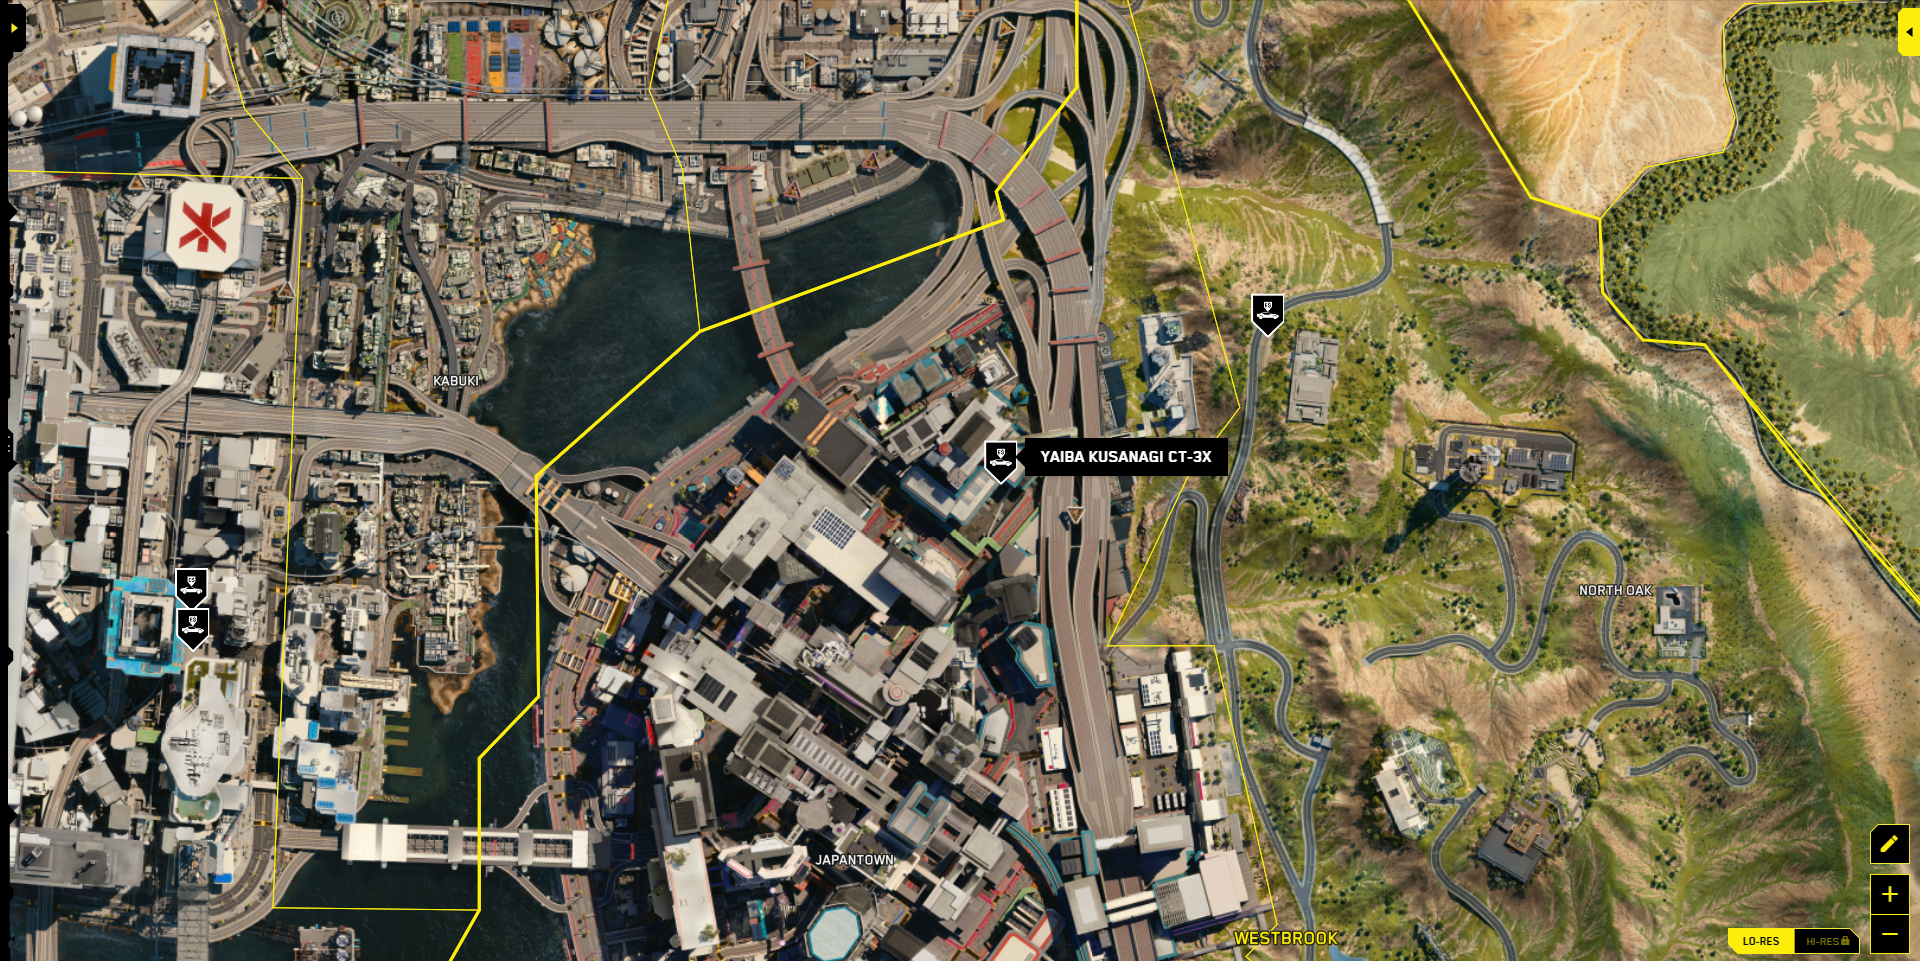
- CT-3X Kusanag
- Turbo-R 740
- Nazar “Racer”
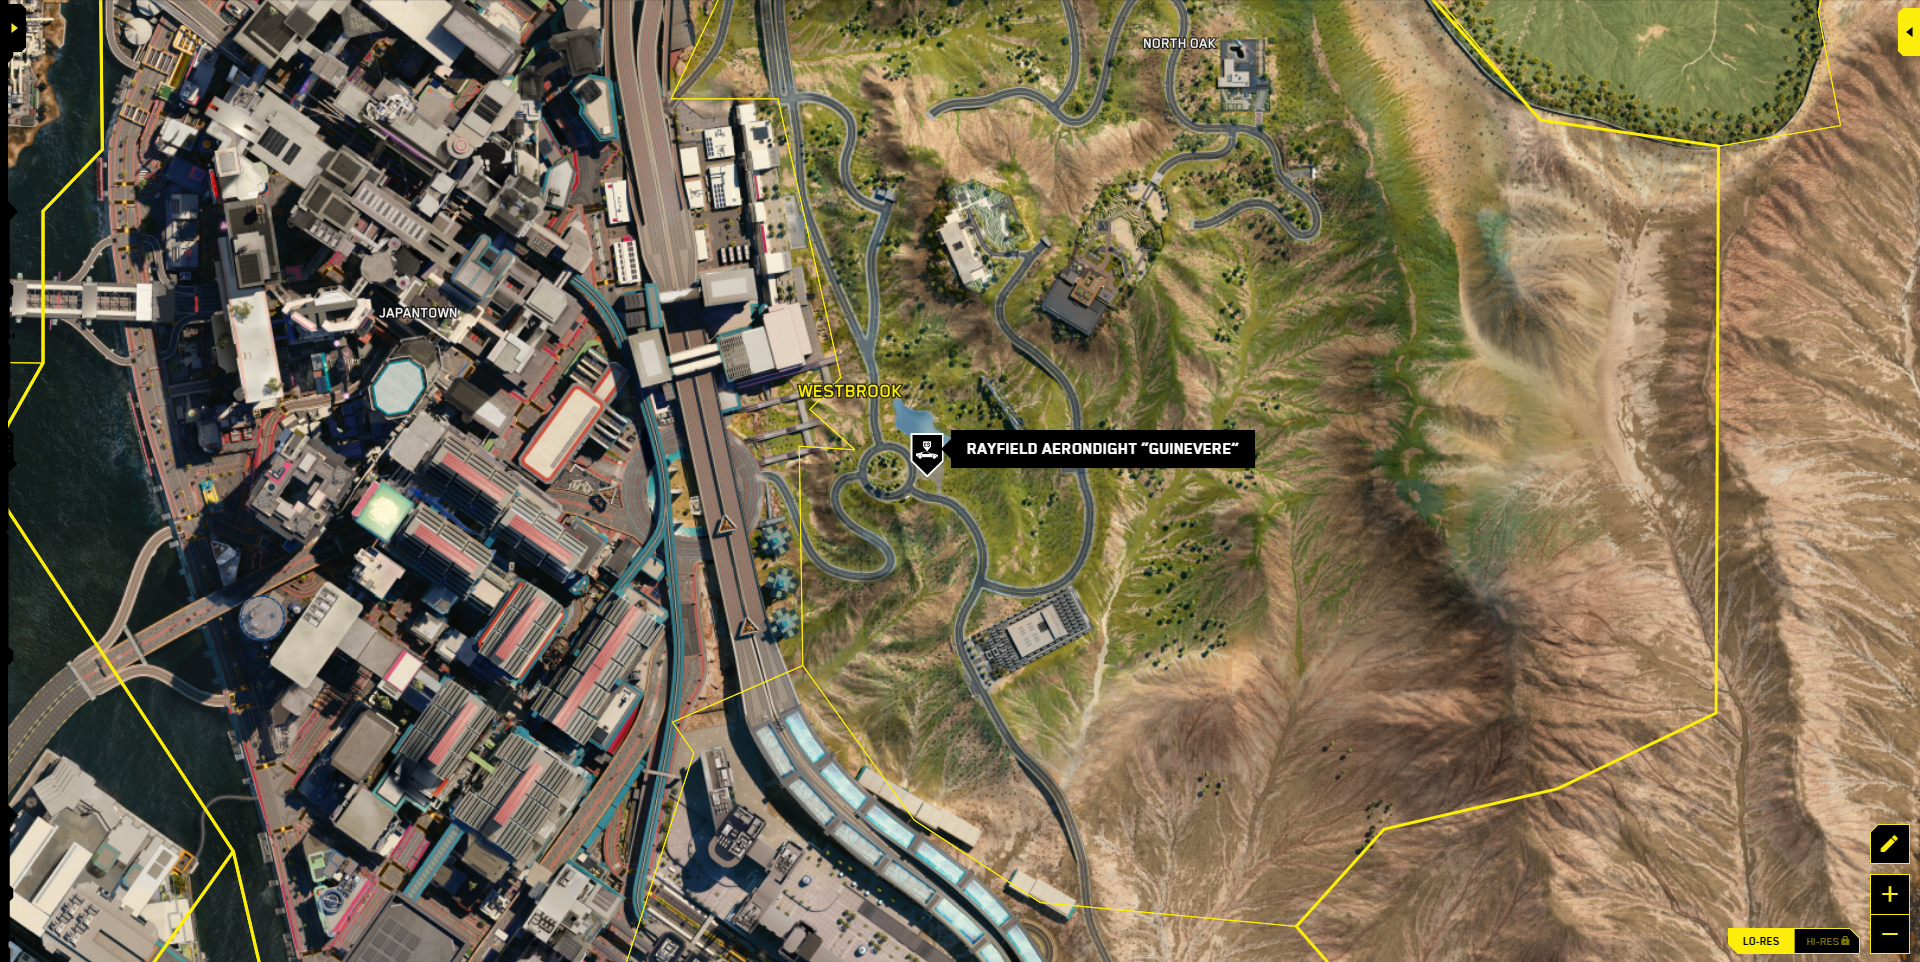
- Ayrondit Gvinevr
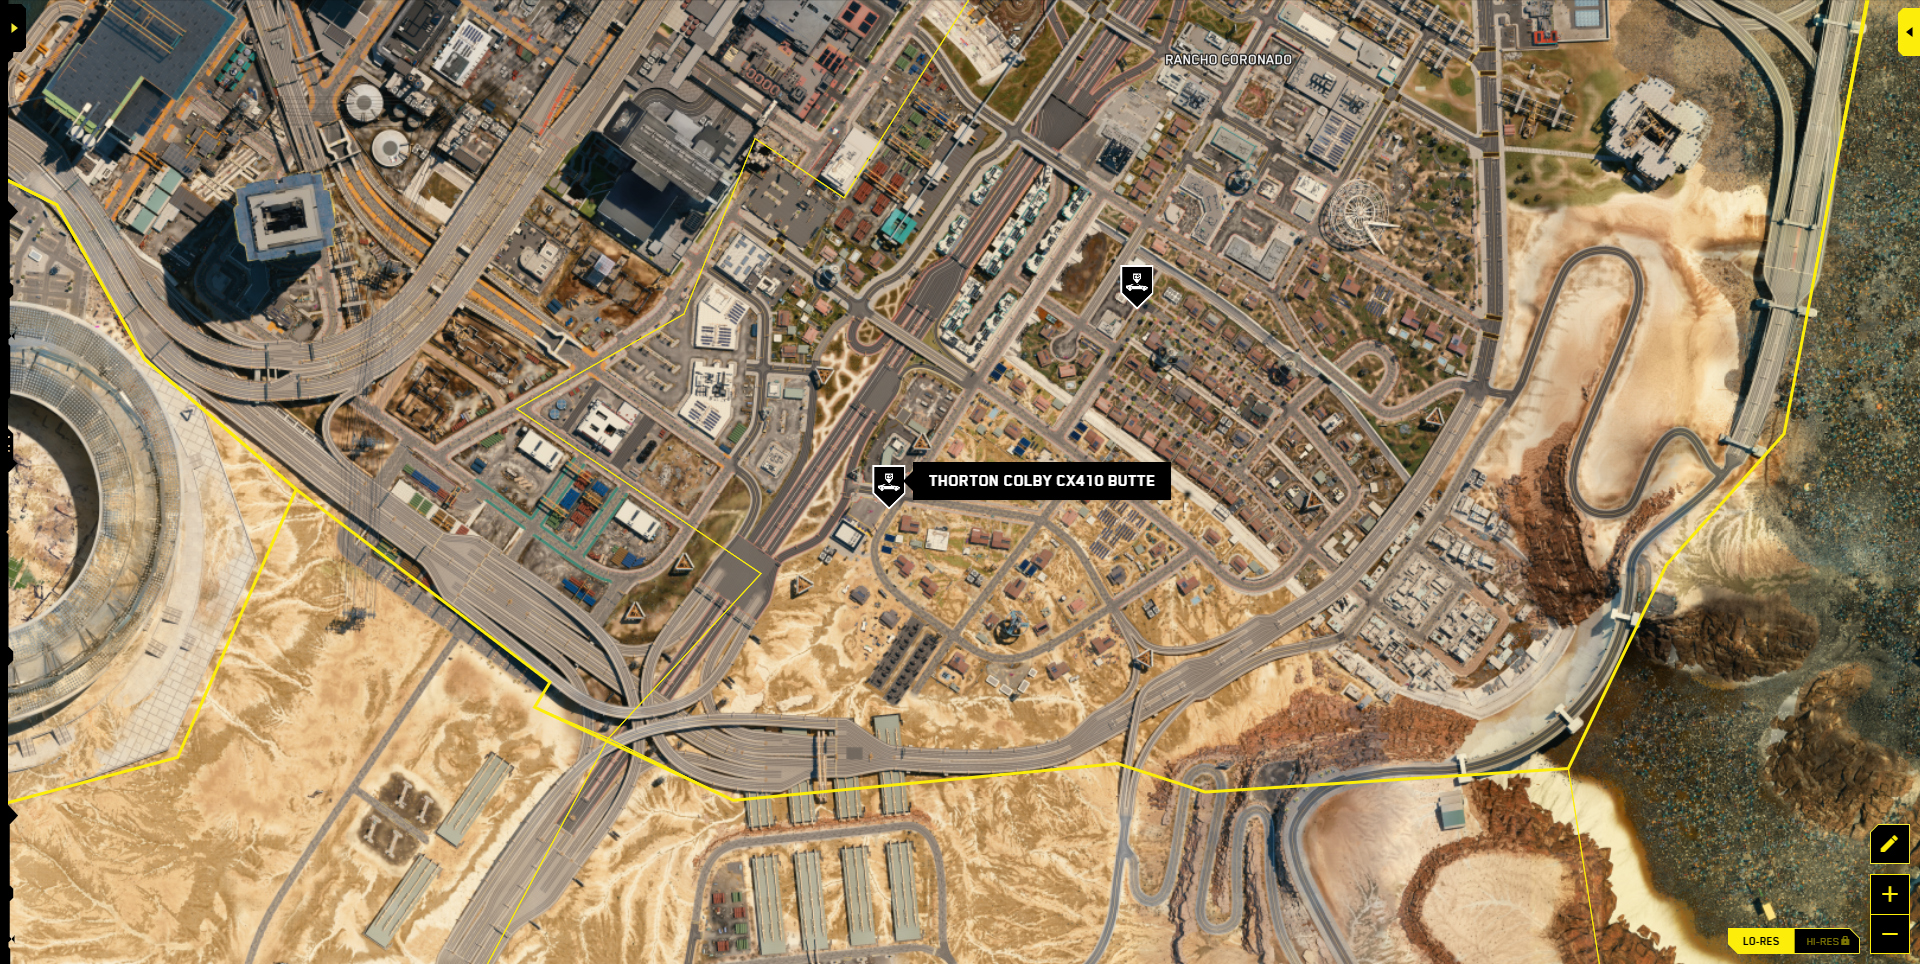
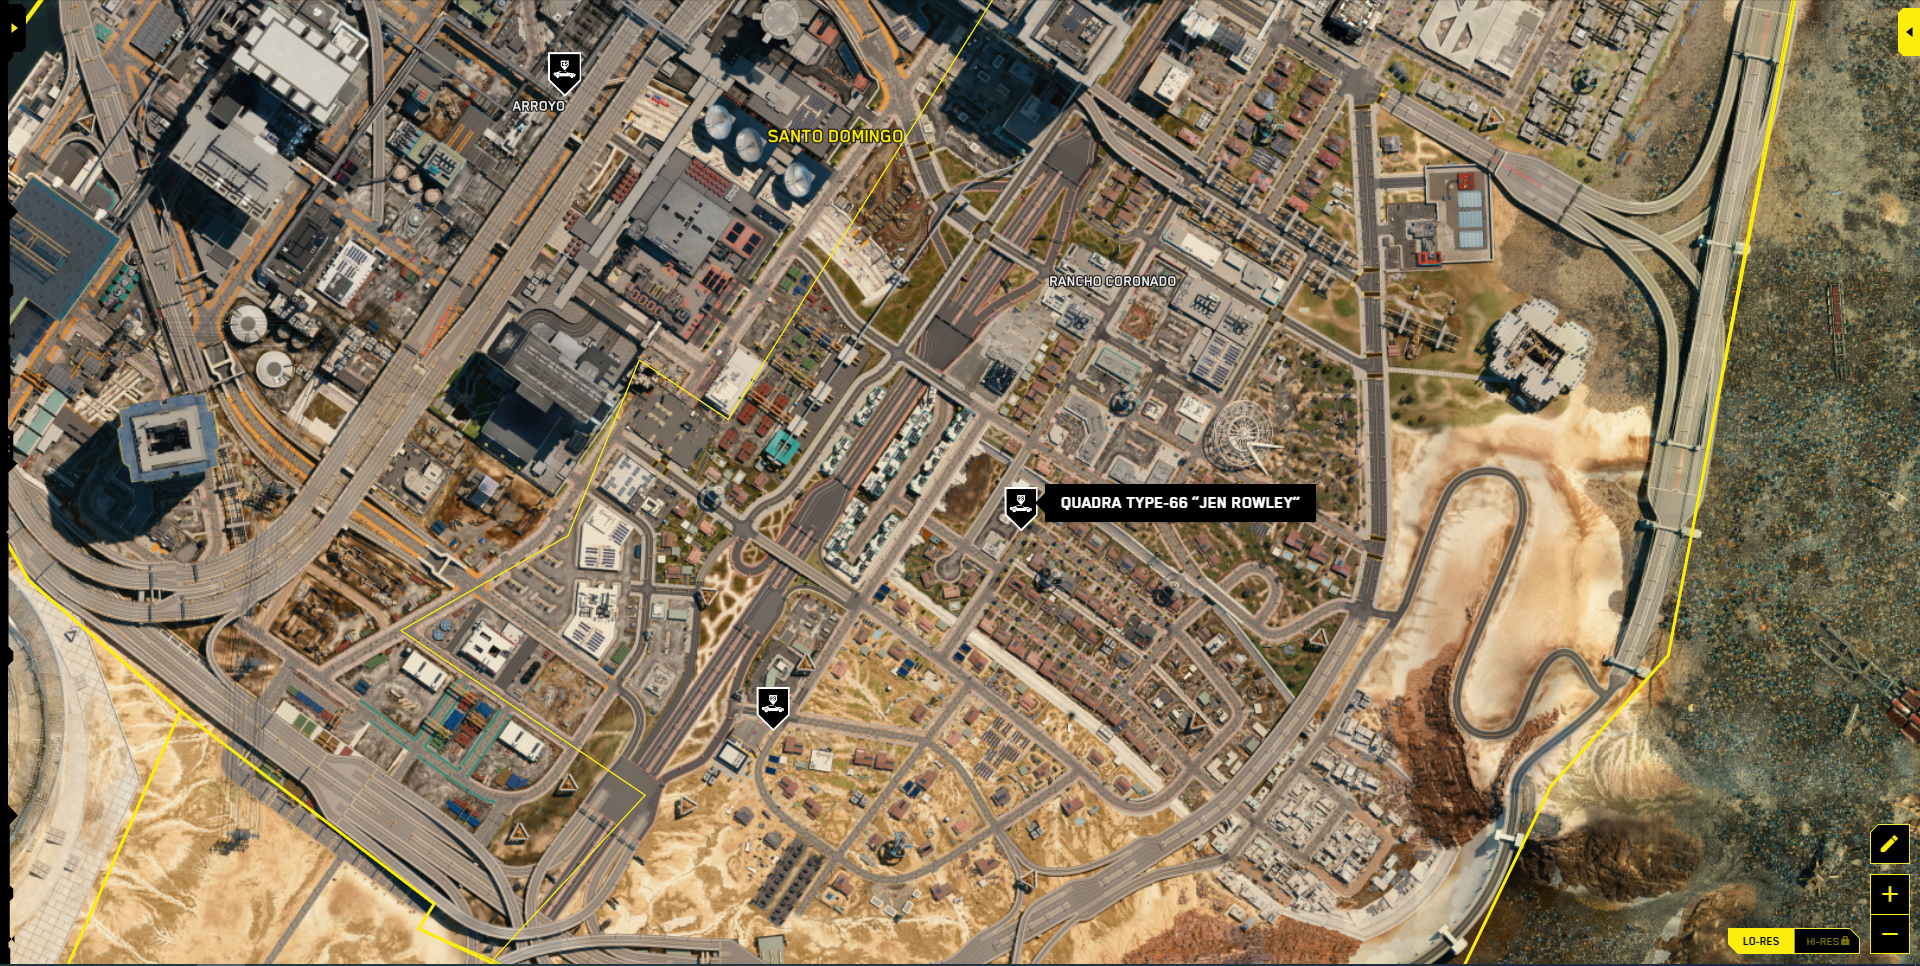
Santo Domingo, fixer Muammar “El Kapitan” Reyes - Colby CX410 “Butte”
- Tayp-66,640 TS
- Makino MTL1
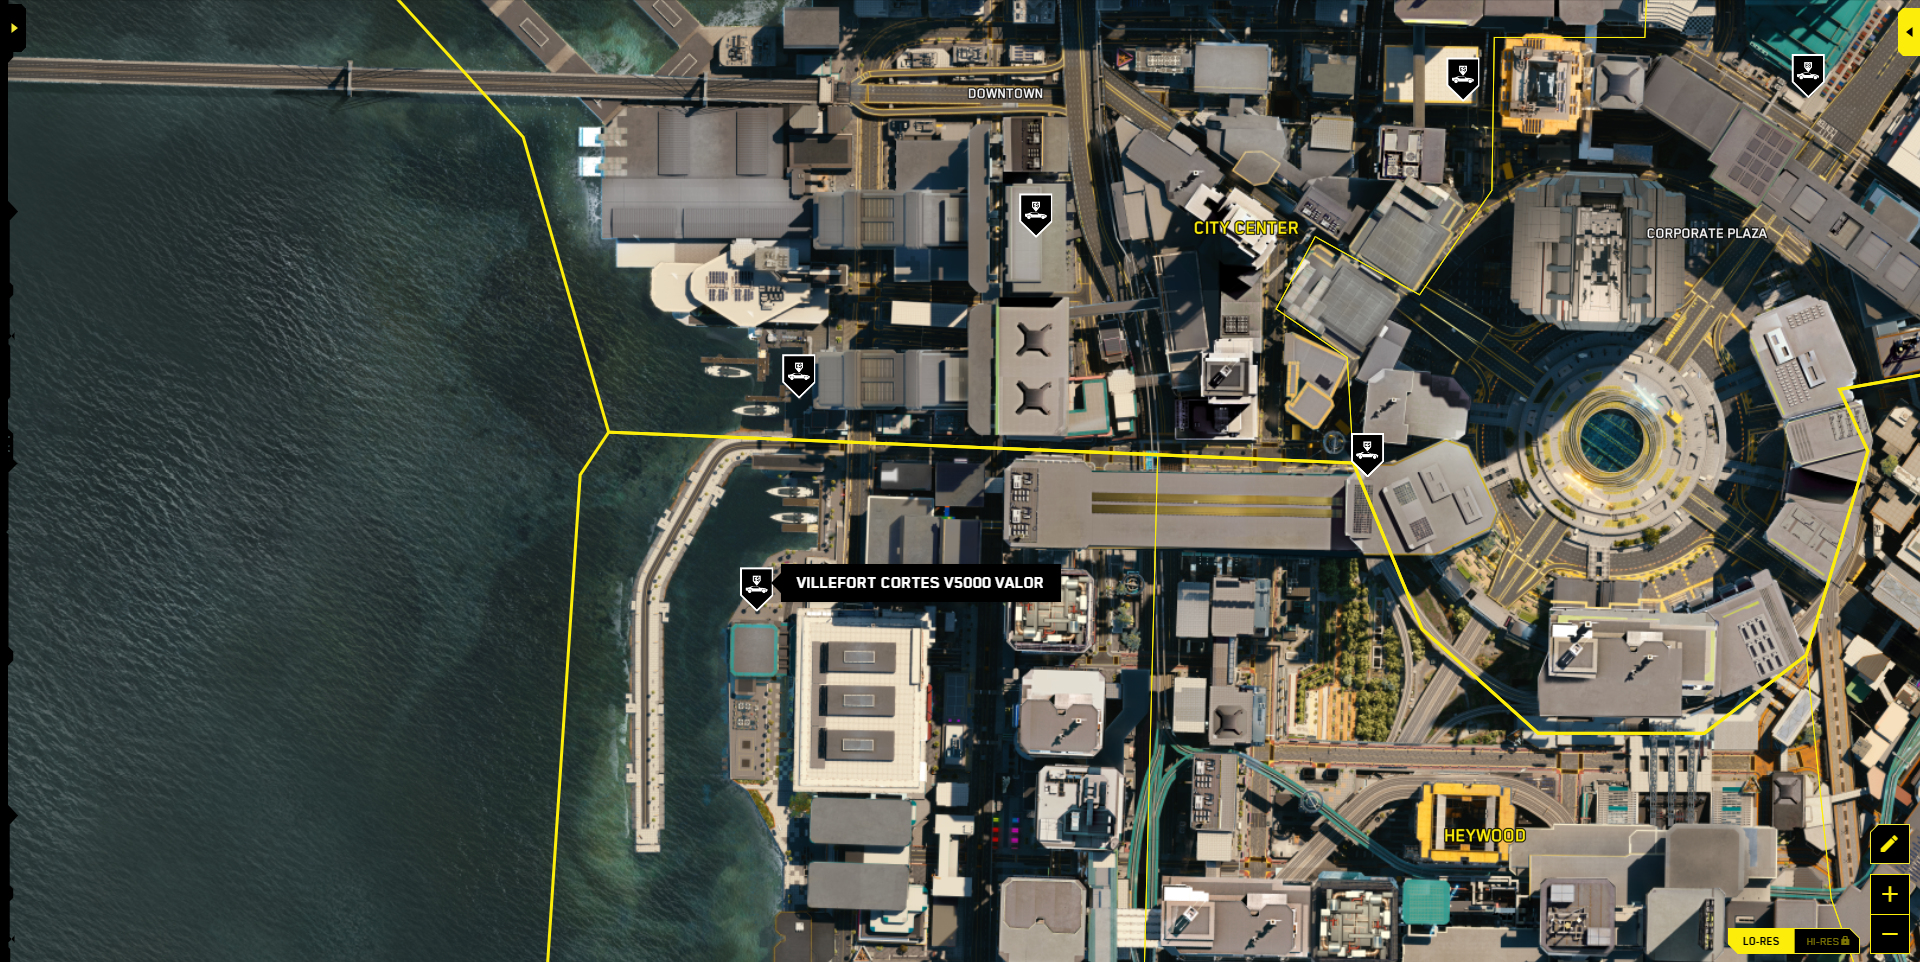
Heywood, fixer Sebastian “Padre” Ibarra - Cortés V5000 “Velor”
- Apolo
- Downtown, fixer Dino Dinovic
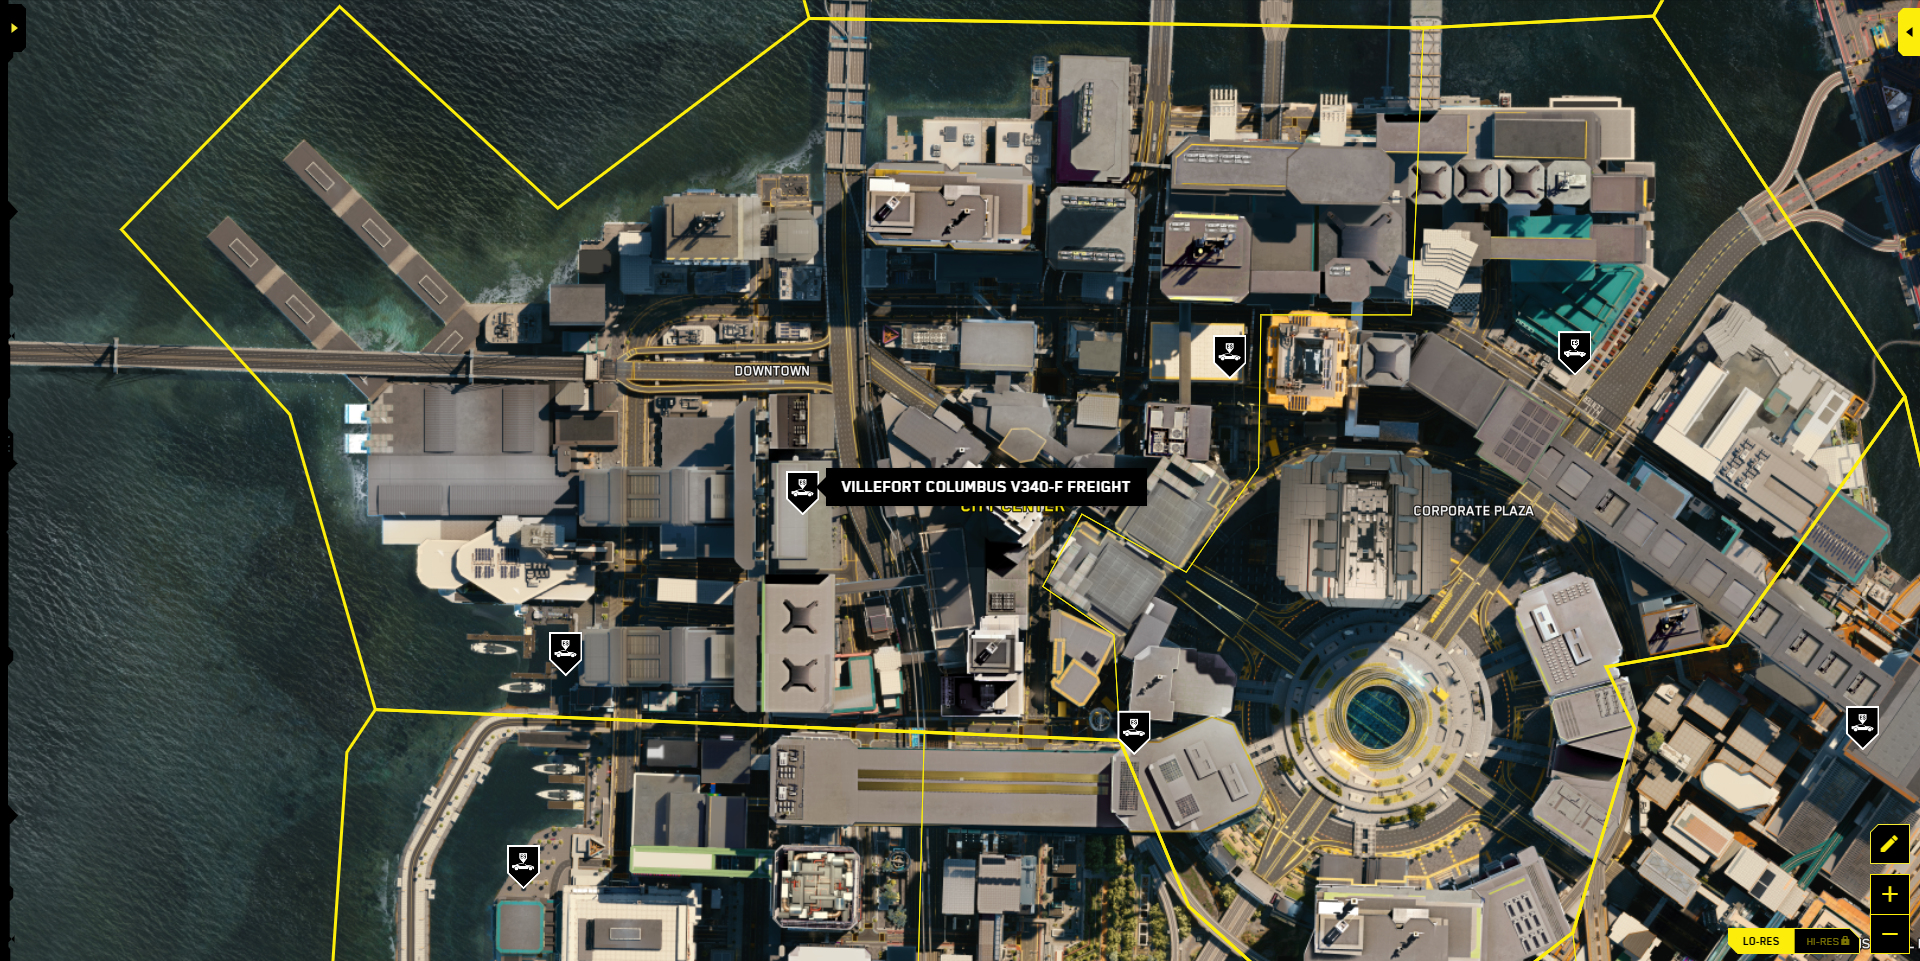
- Columbus of V340-F “Freyt”
- Emperor 620 Ragnar
- Tayp-66 Avenger
- Autlo GTS
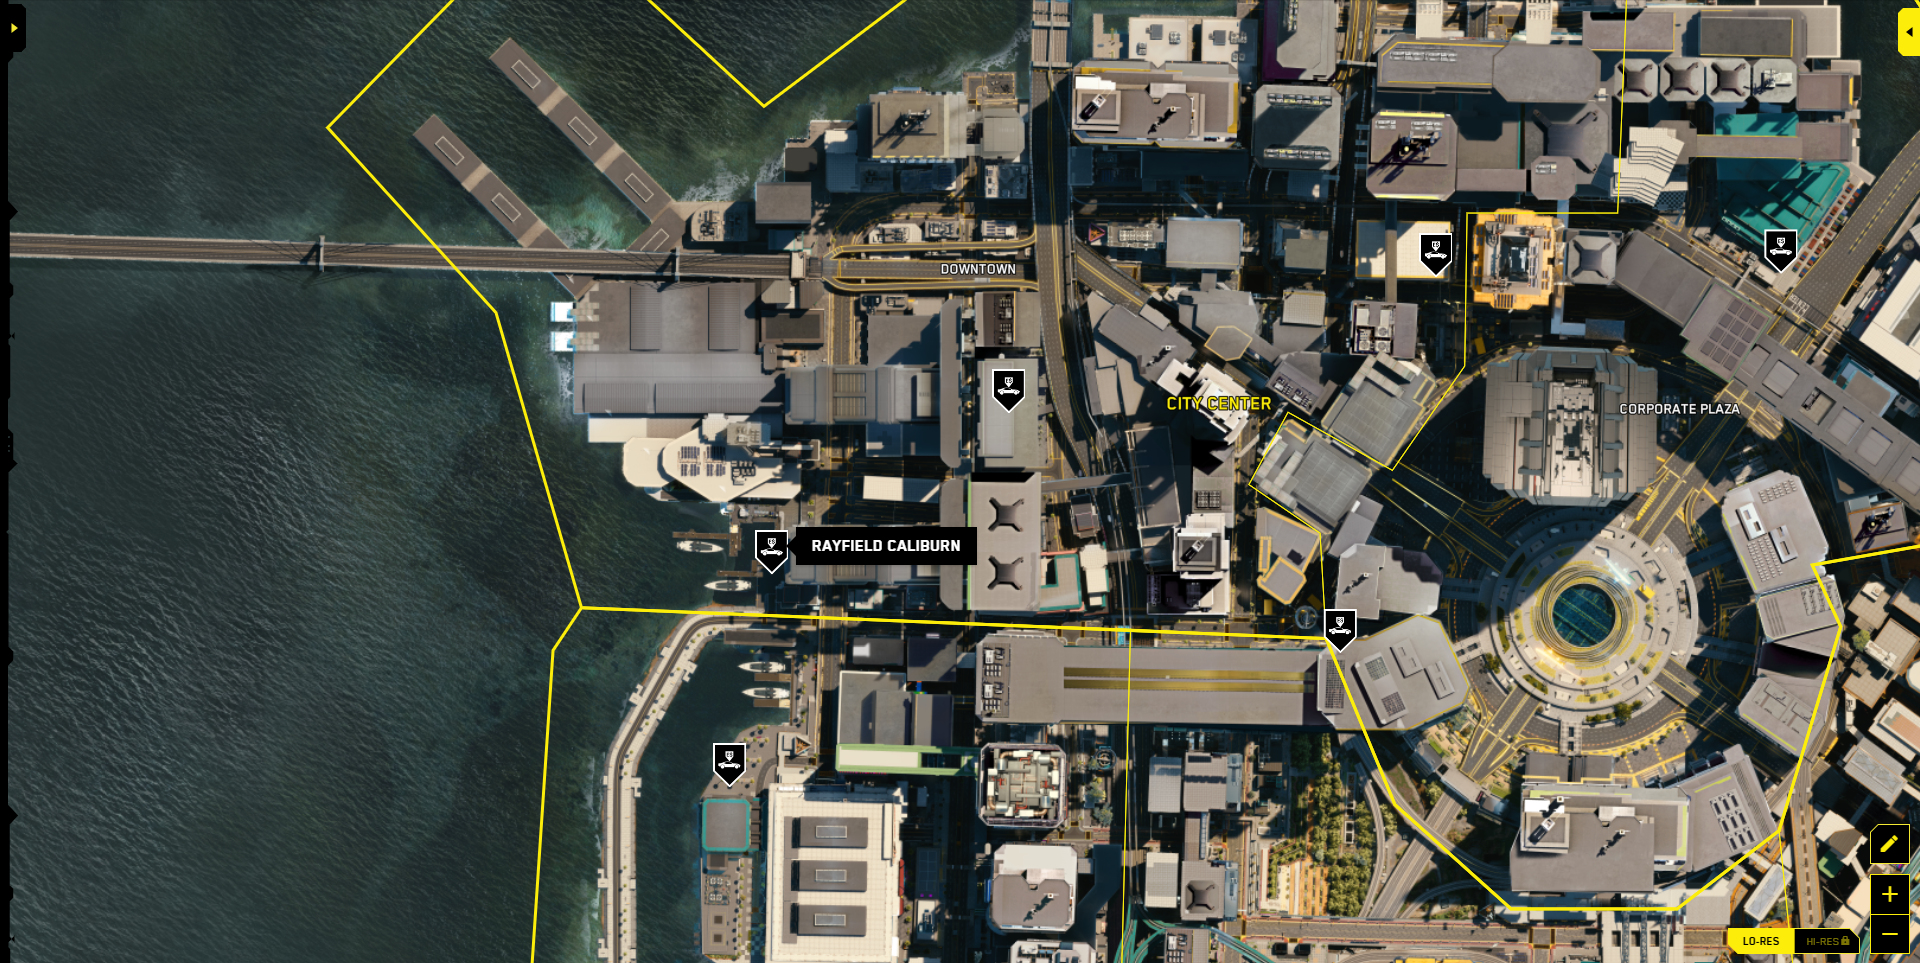
- Kaliburn
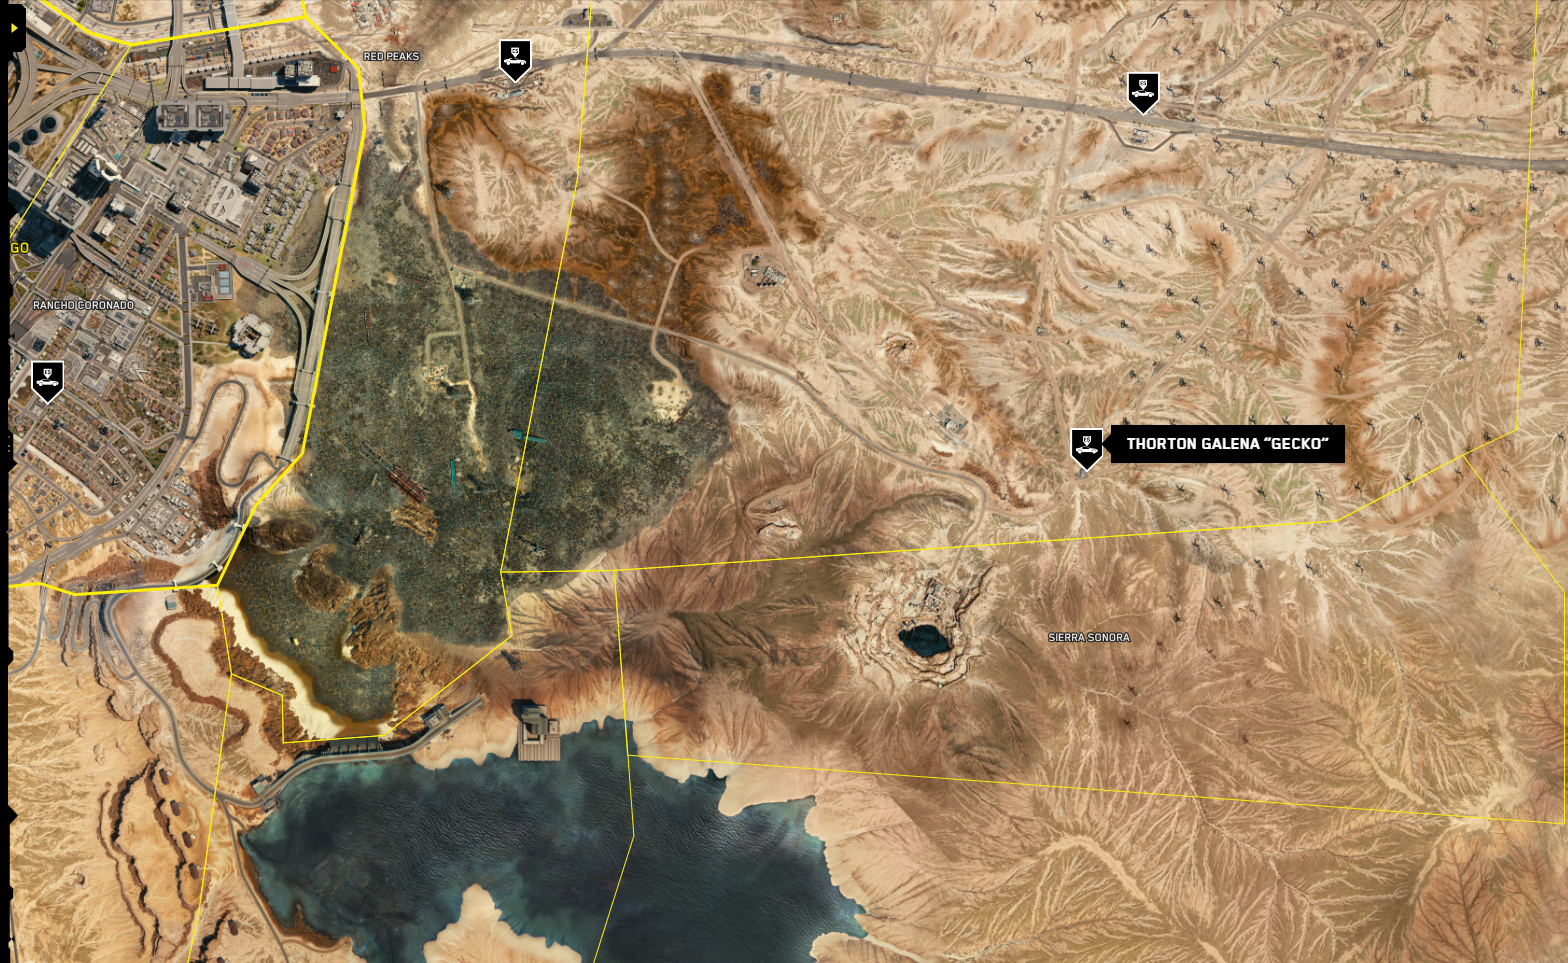
Heathland, fixer Dakota Smith - Galen “Gecko”
- Colby “Mule”
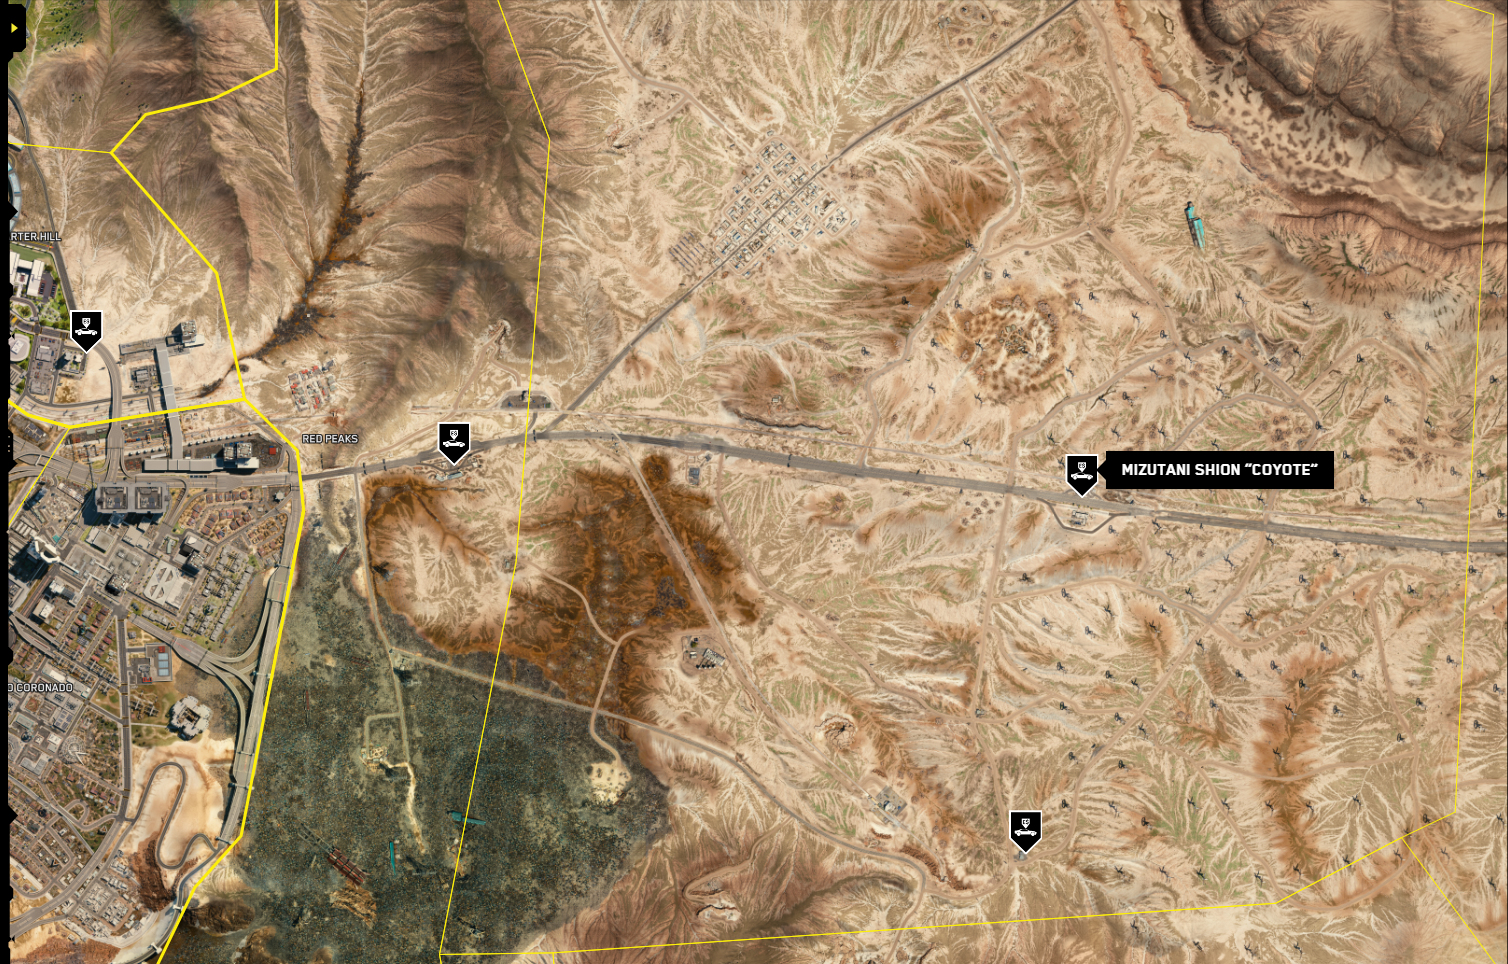
- Zion “Coyote”
- Tayp-66 Havelina
Blood and bone
- Blood and bone
- Blood and bone: Kabuki
- Blood and bone: Arroyo
- Blood and bone: Glen
- Blood and bone: Koronado ranch
- Blood and bone: Pasifika
Delameyn
- Where my wheelbarrow, Chumba
- Compensation
- Reintegration: Glen
- Reintegration: Heathlands
- Reintegration: Nort-Sayd
- Reintegration: Koronado ranch
- Reintegration: Уэллспрингс
- Reintegration: Coast
- Reintegration: Nort-Ouk
- Resuscitation
Story line of elections of the mayor Knight City
- Guards of a disorder
- To Bunrak
- Queen of highways
- Queen of highways
- Queen of highways: City center
- Queen of highways: Heathlands
- Queen of highways: Santo Domingo
- Queen of highways: Big races
Kiberpsikhoz attack
- Kiberpsikhoz attack: Barren land
- Kiberpsikhoz attack: The ticket in the highest league
- Kiberpsikhoz attack: Law letter
- Kiberpsikhoz attack: The second chance
- Kiberpsikhoz attack: Deeply underground
- Kiberpsikhoz attack: Demons of war
- Kiberpsikhoz attack: The house on the hill
- Kiberpsikhoz attack: Smoke over water
- Kiberpsikhoz attack: Health on a discount
- Kiberpsikhoz attack: Shout in emptiness
- Kiberpsikhoz attack: Bloody ritual
- Kiberpsikhoz attack: Lieutenant
- Kiberpsikhoz attack: Under the bridge
- Kiberpsikhoz attack: Ghost Knight City
- Kiberpsikhoz attack: Seaside
- Kiberpsikhoz attack: Sentry dog
- Kiberpsikhoz attack: Talion
Story line of Joshua
- Street justice
- Sign Ions
- Passions
Collateral quests
- The boss died and the boss is well
- Venus in bellows
- Explosive character
- Pleasure guarantee
- Dizziness
- Space gifts
- Two companions
- Prior to a meeting in Posmertiya
- The good is rewarded
- Road to paradise
- How to get a star from the sky
- To everyone Lexington
- Corporate culture
- Beautiful bringing
- Red prophet
- Who not with us
- Easy money
- Oil in fire
- Metamorphoses
- Do no harm
- Number one
- Thaw
- The first meeting with elements
- Hi from the past
- Way of the righteous person
- The romantic from the main road
- With percent
- Sacred and wordly
- Confidential materials
- Network magic
- Hidden truth
- The played role
- Tyomny Lane
- Transcendental experience
- Street justice
- Clever gun
- Bumpy road
- Aim, pl
- Digital bonus
- The clown from Knight City
- The etude in pink tones
- I, automatic machine
Hidden quests
- “Pet”
- “Who guards watchmen”
- “Roller coaster”
Orders
- Without fixer
- Hopelessness
- Easy come, easy go
- Big problems of Big Pete
- To you up or down
- Cheerful farewell
- There’s many a slip ‘twixt cup and lip
- Eye of Omniscience
- Second skin
- Severance pay
- Harpoon for a shark
- Nest of a cuckoo
- Dirty business
- The girl from Lamangchi
- Lifework
- Deficiency of empathy
- Welcome to America, companion
- Greed is punishable
- Hostage
- Game with fire
- From hand to hand
- Profession expenses
- The changed condition of consciousness
- Hippocratic Oath
- Señor Ladrilyo’s collection
- Short chain
- Volatiles
- Trap for tigers
- Favourite Vakako
- Little person, big evil
- Revenge for the son
- Revenge of labor union
- Billion in mind
- Guinea pigs
- Annoying neighbors
- An eye for an eye
- Olive branch
- The profaned temple
- Hunting for a monster
- Mistake 404
- Escape of a cheetah
- Side effects
- Pursuit of the power
- So far death won’t separate us
- Last connection
- Last trip of Trevor
- Bring me Gustavo Horta’s head
- Problem murderer
- Missing person
- Farewell, Knight city
- Psychofan
- Dedication ritual
- Free press
- Family heirloom
- Family circumstances
- Serial suicides
- Sparring partner
- Sport on blood
- Urgent news
- Old acquaintance
- Dances on the minefield
- Warmly, even more warmly
- Tiger and signature stamp
- Fixer, mercenary, soldier, spy
- To hack the hacker
- Chain of deliveries
- Official authority
- The fourth estate
- Pranks of the adviser Cole
Crime
- Needle in a haystack
- One to one
- Sewage
- Don’t forget about the bench hammer
- Treacherous current
- Earthly goods
- Paranoia
- To serve and protect
- Someone loses, someone finds
- New circle of hell
- Collision with reality
- From a lordly table
- Game with fire
- Pay or die
- Smoking kills
- Prison justice
- Destiny smile
- Welcome to Knight City
- Terribly loudly and incredibly close
- Darling I won’t call back
- Picnic on the roadside
- Red trace
- Disastrous winds
- I don’t love sand
Achieve All Endings
One of the first things you’ll want to do after finishing the game is to complete all five endings.
If you rushed through the main game and didn’t spend much time on finished side quests, you probably got The Devil ending. However, there are actually four other endings available. You’ll need to backtrack to complete some specific side quests, but it will be worth it to see all the possible ways Cyberpunk 2077’s story can end.
For players focused on the story, this should be your main priority after finishing the game – you can’t really say you’ve completed the game without it.
Ending No. 1
(bad)
The worst ending of Cyberpunk 2077 according to the editorial office
Vee commits suicide on the balcony where Misty brought him. Talk to Johnny and tell him it could all end right now. Throw out the omega blockers, and then watch the final video.
Ending No. 2
(trust Hanako)
In accordance with this final, you will help Takemura avenge the death of Saburo Arasaki. As a result, Vi will get to the space station, where doctors will conduct all kinds of experiments on him, which is associated with a serious head injury. Then you will be able to subscribe to their medical program to transfer the mind to biochip or return to Earth, but die from injuries over the coming months.
During the task from the epilogue, you will have two additional endings. The doctors had Vee’s surgery and retrieved Johnny’s biochip. Continue to follow the daily routine until Hellman appears in the room. He’ll offer to sign the contract. There are two options – to sign a contract with the words “I want to live” or refuse to sign with the words “I am returning to Earth.” If you subscribe, then agree to transfer your mind to virtual reality. If you refuse, you will leave the space station, return to Earth, realizing that in the coming months you will die from your injuries.
Ending No. 3
(ask Panam for help)
During this final, you will leave Knight City with Aldecaldos and Panam. Aldecaldos is a nomadic gang that includes Panam Palmer (a nomadic girl you will meet on the plot of the game). Aldecaldos will help you in the final confrontation, and the assault on the Arasak tower will begin on the Vasilisk tank. Alt split Johnny and Wee. Deciding what happens next must be Vi. In a conversation with Alt, go to the well and immerse yourself in it to return to the body. Vee will go with Panam and Aldecaldos to Arizona. The girl promises that by leaving Knight City, she will find a man who will save Wee’s life.
So, to begin with, you need to complete the chain of side quests of Panam Palmer in order to conclude an alliance with Aldecaldos (nomads). All this can be done before the point of no return passes. You can also do this after the plot if you choose another try after the final credits, since the game will return you to the point of no return. Below I will describe all the side missions of Panam Palmer:
- Those who settled the storm. ” It will open in the course of the plot, after the main quests of Panam Palmer. The girl will call you and ask for help. This will happen in 1-2 days.
- “Don’t call Saul.” Starts automatically. Leave the camp after the previous mission, wait a day, and then walk around town to get a call from Panam Palmer.
- “Taming Vasilisk.” During this task, you will be able to sleep with Panam Palmer.
After that, in a conversation with Johnny on the roof of Vic’s workshop in the quest “By whom the bell rings,” tell me that you want to call Panam. And then drink omega blockers, saying that contact Panam for help. A completely different chain of quests will begin.
More. Again on the balcony with Misty, talk to Johnny, but call Panam instead of Arasak’s trust. Tell Vee to ask Aldecaldos and Panam for help. Accept omega blockers. After defeating Adam Smasher, interact with AI and enter cyberspace. Talk to Johnny and Alt. Tell me you’d like to live the rest of your life. Return to your body (do not cross the bridge into cyberspace). You’ll see a good ending.
Ending No. 4
This end is connected to the third end. This is an alternative choice
Then you can reboot and agree to enter cyberspace. This choice will lead to V staying with Alt, and Johnny will be in his body. Do the same, just stay in cyberspace. In the epilogue, you will manage Johnny, who will honor Vee’s memory, buy Steve a guitar, and then leave the city.
Ending No. 5
(seek help from Bestia)
In this finale, you become the legend of “Posmertia,” and Johnny forever gets stuck in cyberspace. Follow Bestia’s chain of side tasks to make an alliance with her and Johnny Silverhand. All this must be done before the point of no return passes. Download the manual save or exit the game in a different way and choose another try.
You’ll need to deal with Johnny’s past and then get Bestia on a date. On the balcony with Misty, tell Johnny you should go to Bestia. Then take the pills to hand over control to Johnny. After defeating Adam Smasher, you will find yourself in cyberspace. Johnny will decide who gets the body. To get him back to Vee, go over the bridge to cyberspace. After that, you will see several tasks, and at the very end of Vi will be in outer space, where he will depressurize his spacesuit.
Ending No. 6
(seek help from Bestia)
In this finale, you become the legend of “Posmertia,” and Johnny forever gets stuck in cyberspace. Follow Bestia’s chain of side tasks to make an alliance with her and Johnny Silverhand. All this must be done before the point of no return passes. Download the manual save or exit the game in a different way and choose another try.
You’ll need to deal with Johnny’s past and then get Bestia on a date. On the balcony with Misty, tell Johnny you should go to Bestia. Then take the pills to hand over control to Johnny. After defeating Adam Smasher, you will find yourself in cyberspace. Johnny will decide who gets the body. To get him back to Vee, go over the bridge to cyberspace. After that, you will see several tasks, and at the very end of Vi will be in outer space, where he will depressurize his spacesuit.
How to unblock a confidential ending
During repeated passing of Cyberpunk 2077 I held in the head the official statement of CD Projekt Red that for receiving the hidden final it is necessary to make friends with Johnny, but at the same time to select such phrases that the behavior didn’t seem affected. That is it was necessary to indulge Silverkhand, but at the same time not to put too much sugar. Fortunately, I managed to reach the desirable, and in this management I will tell how to unblock the confidential final.
How to make friends with Johnny Silverkhand
For a start you need to make several important decisions and to say the correct phrases at the concrete moments of a game. We will list them:
1. After the Audience task, you will have to meet Takemura in apartment 303. Go to the specified place and knock four times on the door. After the attack of the Arasaki army, you can get out of the hotel. However, take your time. If you want to save Takemura, go to the nearest corridor and make your way through the hole to the left of the blue cross (resembling a pharmacy sign). This path will lead to a room with enemies and a corridor with a staircase leading upstairs. Johnny will stop, but you can ignore him. In any case, the rescue of Takemura does not matter, but if you still help him, then in the final credits you will hear what he thinks about the decision of Vi. So, having left the hotel after meeting with Hanako, you will re-communicate with Saburo’s daughter at a motel outside Knight City. After this conversation, go outside. Vee will lose consciousness, and Johnny will take the hero to an abandoned building. A new branch of the Metamorphosis quest will begin. It doesn’t matter what you say to Johnny during this quest. Except for one outcome: when you get army tokens from the cache, tell me that you will cover Johnny from the bullet. Then Johnny will be at the exit of the room. And he will ask that Vi hand over control to him and he can deal with Arasaka. Tell him you’ll give him control. Johnny will be grateful.
2. After all the events above, a side task “In the Footprints of the Past” will appear in the log. This is an important quest during which you can unlock the new mission “Old Drama” and, in the end, convince Bestia to go with you to Arasaka Tower. In the quest “In the Footprints of the Past” there are two most important points. First, you’ll be on a ship where you can meet Grayson, Comrade Smasher. In exchange for his life, he will offer some souvenir from Silverhand. Tell him you don’t need anything from him, get the gun and shoot the bastard. Johnny will say that you did the right thing, and now there is one less scum in the world.
3. But do not rush to leave the marina and go to Johnny’s grave. Instead, face the back of the ship, from where you came to Grayson. See the tower on the left? You can climb it straight from the ship down the yellow stairs. Activate the terminal there, which will lower the container down. Be sure to take the key from Grayson’s body, go downstairs and open the container. Remove the case from the machine to get Johnny Silverhand’s “Porsche” (911). It must be, but this car is almost 100 years old. By the way, when you dealt with Grayson, you also found Johnny’s gun, which he shot enemies during the attack on the Arasaka Tower.
4. On Johnny’s “porch” as part of the same quest, “In the Footprints of the Past,” go to Silverhand’s grave. Arriving at the site, you will be able to inspect the metal stove. Scratch Johnny’s initials on her, and then he’ll ask what you would write on his tombstone. Here it is important to choose the correct sequence of phrases! So tell me what they would write, “The Man Who Saved My Life.” Then choose the following options: “No, this is you, too,” “What do you want from me?,” “Okay, I give you the last second chance,” “First you were an absolute ♥♥♥♥♥♥♥,” “When you said that you let your friends down…,” “The story with Smasher so upset her,” “Okay. I’ll call Bestia. ”
5. The task “In the footprints of the past” will end, but the mission “Old Drama” starts. I am not sure if the choice you will make during the dialogue with Bestia and the management of Johnny affects, but I will clarify it. When Johnny and Bestia are left alone, tell me that you like Bestia from the 77th, that you would do everything not to lose her. Emphasize that the main thing now is that Johnny returned to her. Finally, kiss the woman. In any case, there will be no bed scene.
6. Don’t stop there! After the task “Old Drama” starts a chain of quests associated with Kerry Eurodin. The first task is called “Surprise!.” Visit Kerry in the mansion to find out that he is going to revive the Samurai for one evening. Further, in the task “New Turn,” I chose Danny (although this may not affect anything), and at the end of the mission, “Sounds of Music” asked Kerry if he would like to speak encore.
So, if you did everything described above, go to the Ugli restaurant to meet Hanako in the quest “By whom the bell rings.” Listen to her, and then get out of the tower, as a result of which Vi will lose consciousness. Talk to Victor, take the pills and go to Misty’s. Together with the girl, climb to the roof of the building. When she leaves, talk to Johnny and stop at the future choice (depending on the additional missions that have been completed, you will need to choose between the options “trust Hanako,” “Johnny and Bestia go together” and “call Panam”). Don’t squeeze anything, just wait about 5-6 minutes. After all, Johnny’s gonna talk. You can also tell Johnny that they are ready to let him go with Bestia. If you do this, do not confirm the decision, and again just wait 5-6 minutes. If you have made friends with Johnny, he will certainly say that he understands why Vi cannot make decisions.
All other options will lead to the death of different characters. And the ending with the confidence of Hanako, to put it mildly, is far from ideal. So, instead, Johnny will offer to go to Arasaka Tower alone and offer to go to Arasaka Tower alone without taking any pills. So that both he and Vi are conscious. Ask him if he has a plan and then agree to attack.
Collectibles
Collectibles (Fast Move terminals, Tarot maps, cyberpsychological observations). After passing through the story, you can quickly pick up collectibles that you have not yet received. At this stage you should select:
- Buy all available vehicles
Don’t spend money on anything but trophies. Do not spend money on weapons, armor or high-end cyber software until you buy all the cars. If you spend too much money on other things, it can complicate this trophy. Save all your money.
- Find all Quick Move Terminals
Terminals appear as purple markers on the map when within a few meters of them. Having all the Quick Move points available right now will save you time on additional tasks.
Tarot cards
Tarot cards are a type of collectible in Cyberpunk 2077. Tarot cards are automatically marked on your card in the course of history. All of them will be marked on your radar. Go to them and scan for graffiti (use scanner). After scanning Graffiti Tarot you will be rewarded with a Tarot card.
Once you find your first Tarot card, you will automatically receive an additional “Jester from Knight City” task added to your diary (this may take a few minutes). After you find all 20 Tarot cards, talk to Misty, the girl from Victor the Ripper’s office. You can track a quest from your journal.
None of these collectibles can be skipped. After the plot, you will return to the point of no return, and you will still be able to find them in free vagrancy. In this guide, they are presented in areas from north to south.
Tarot card # 1: Hanged. On the side of the water tower.

Tarot card #2

Tarot card #3

Tarot card #4

Tarot card #5

Tarot card #6

Tarot card #7

Tarot card #8

Tarot card #9

Tarot card #10

Tarot card #11

Tarot card #12

Tarot card #13

Tarot card #14

Tarot card #15

Tarot card #16
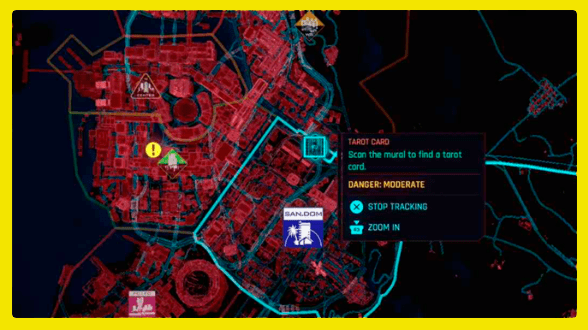
Tarot card #17
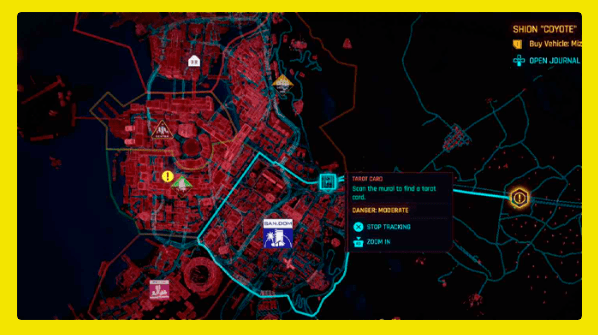
Tarot card #18

Tarot card #19
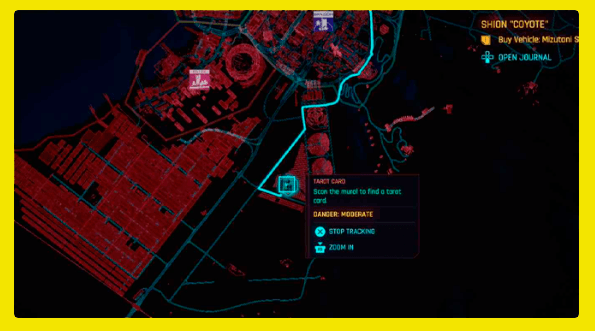
Tarot card #20
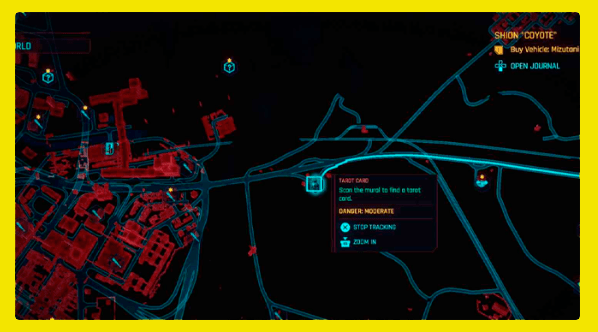
This is all Tarot graffiti in Cyberpunk 2077 (CP77). Do not forget to track the side mission “Jester from Knight City” in your diary to deliver them to Misty (the girl you will meet during the plot in the office of Victor the Ripper). After completing this quest, you will receive a trophy or achievement of the “Stray Jester.”
Things to Johnny Silverhand
Johnny Silverhend is not in vain considered a legend in the Cyberpunk 2077 universe. His fame survived him himself, his group is still remembered, and his clothes are still admiring among people. Here’s about the latter and we’ll talk.
In total, Cyberpunk 2077 has seven things that belonged to Silverhand – this is the Malorian Arms 3516 pistol, glasses, jacket, shirt, pants with boots and a Porsche 911 Turbo car. Finding them is not so difficult, but you will have to run a little through Knight City. But as a reward, you will get a good car, a good set of armor and a good pistol (unfortunately, it is unlikely that you will be able to take everyone with it, as Johnny himself did).
All Silverhand equipment belongs to the category of “cult,” which means that you can improve it by bringing the armor to the status of legendary (the gun is immediately given legendary). Resources, however, will simply take an indecent lot.
T-shirt Johnny
The first item in the collection you’ll receive. Given automatically after the task “Metamorphosis” (Tapeworm).
Johnny’s aviators, jacket and gun
After completing the Metamorphosis story task, you will receive a side quest, Chippin “In. During its passage, you will receive several items belonging to Silverhand at once, namely, his glasses, a copy of a “samurai” jacket and a gun. The first two things you get just like this, you have to take the gun away from the target of the task – a man named Grayson.
Porsche 911 Turbo
At the end of the Trail of the Past quest, there is a choice of sparing Grayson or killing him. Sparing you will get the key to the container, which is also in the port. Lower it and open it – inside there will be a car on which Johnny once drove.
Johnny’s Boots
You will receive Johnny’s boots during the extra quest “Order: Family Relic” (Gig: Family Heirloom). This quest requires a 35 reputation level and a completed plot task “Ghost Town.” After entering the garage, from where you are asked to steal a car, go to the boxes – in one of them are the shoes you are looking for.
Johnny’s pants
You can get during the side task “Order: Psychofan” (Gig: Psychofan), which is located in Heywood, Glen district. You do not need a certain level of reputation to receive this task, you can get it at least immediately after the prologue ends. In this quest, you will be asked to steal the guitar of Kerry Eurodin, one of Johnny’s Samurai comrades. In the penthouse you want, find the door that leads to the vault with the guitar. There will be a door to your right, just behind which is a suitcase. Pants will be waiting for you in it.
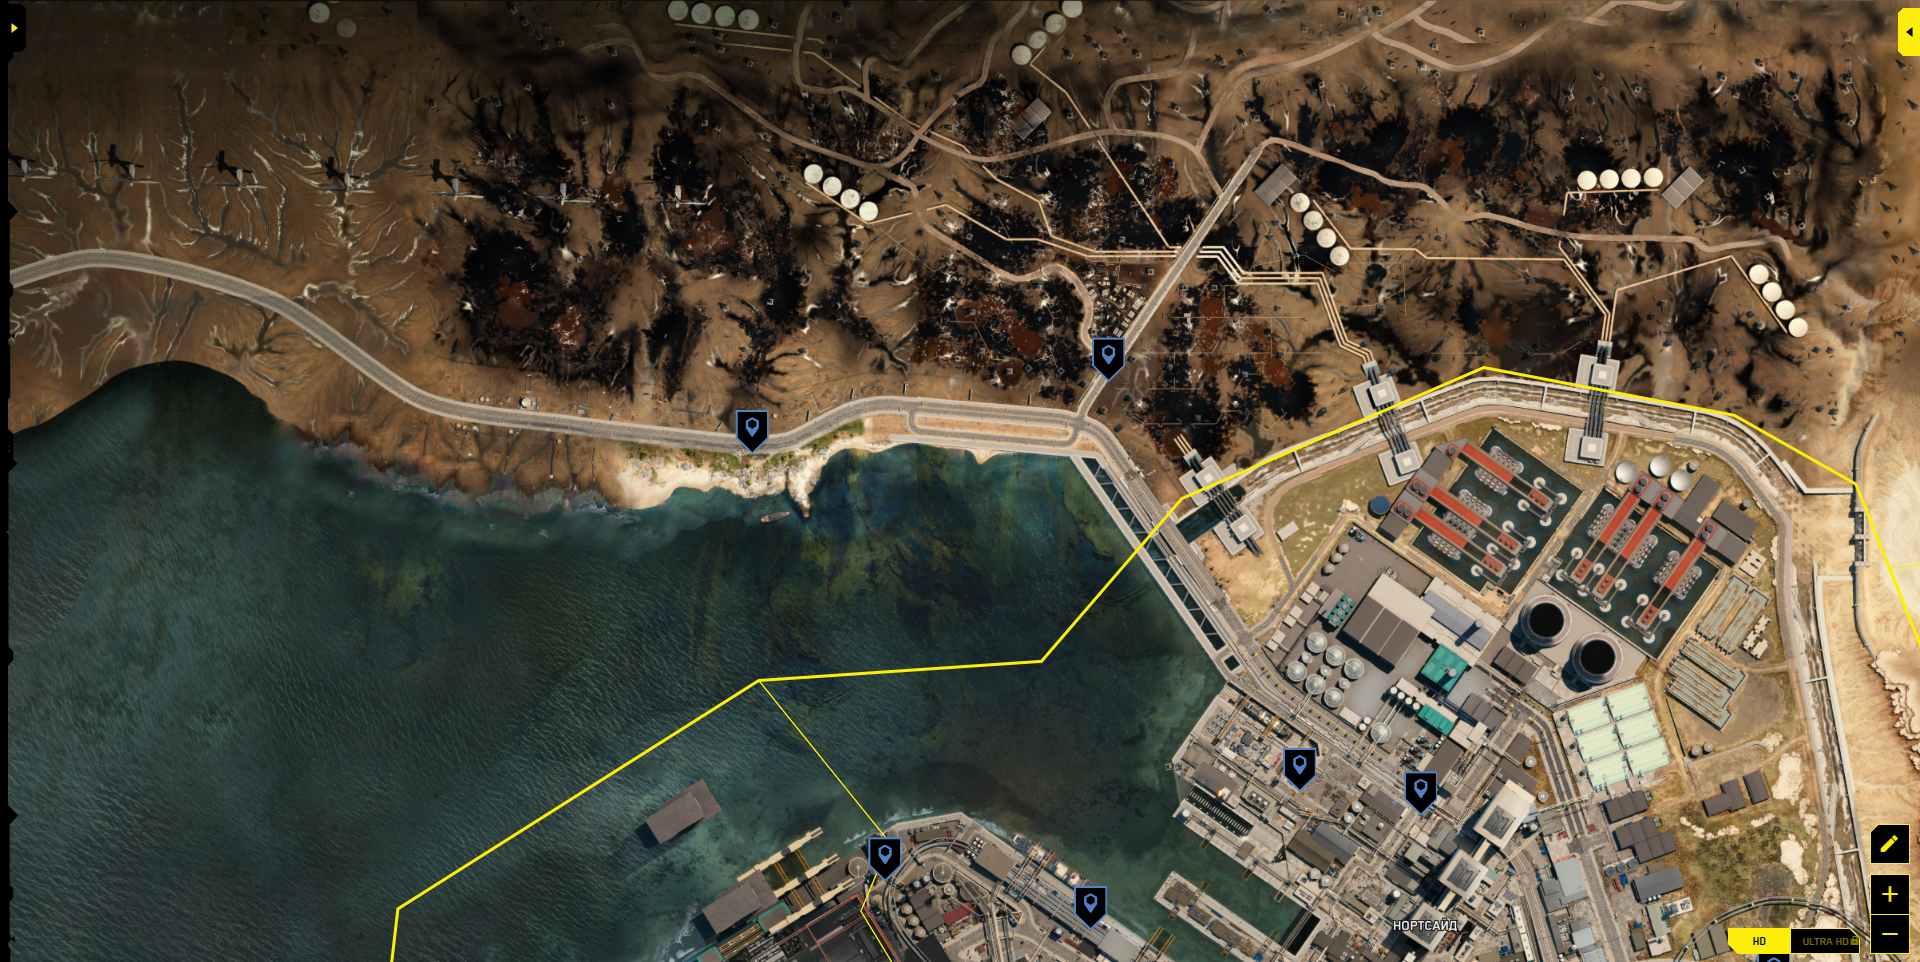
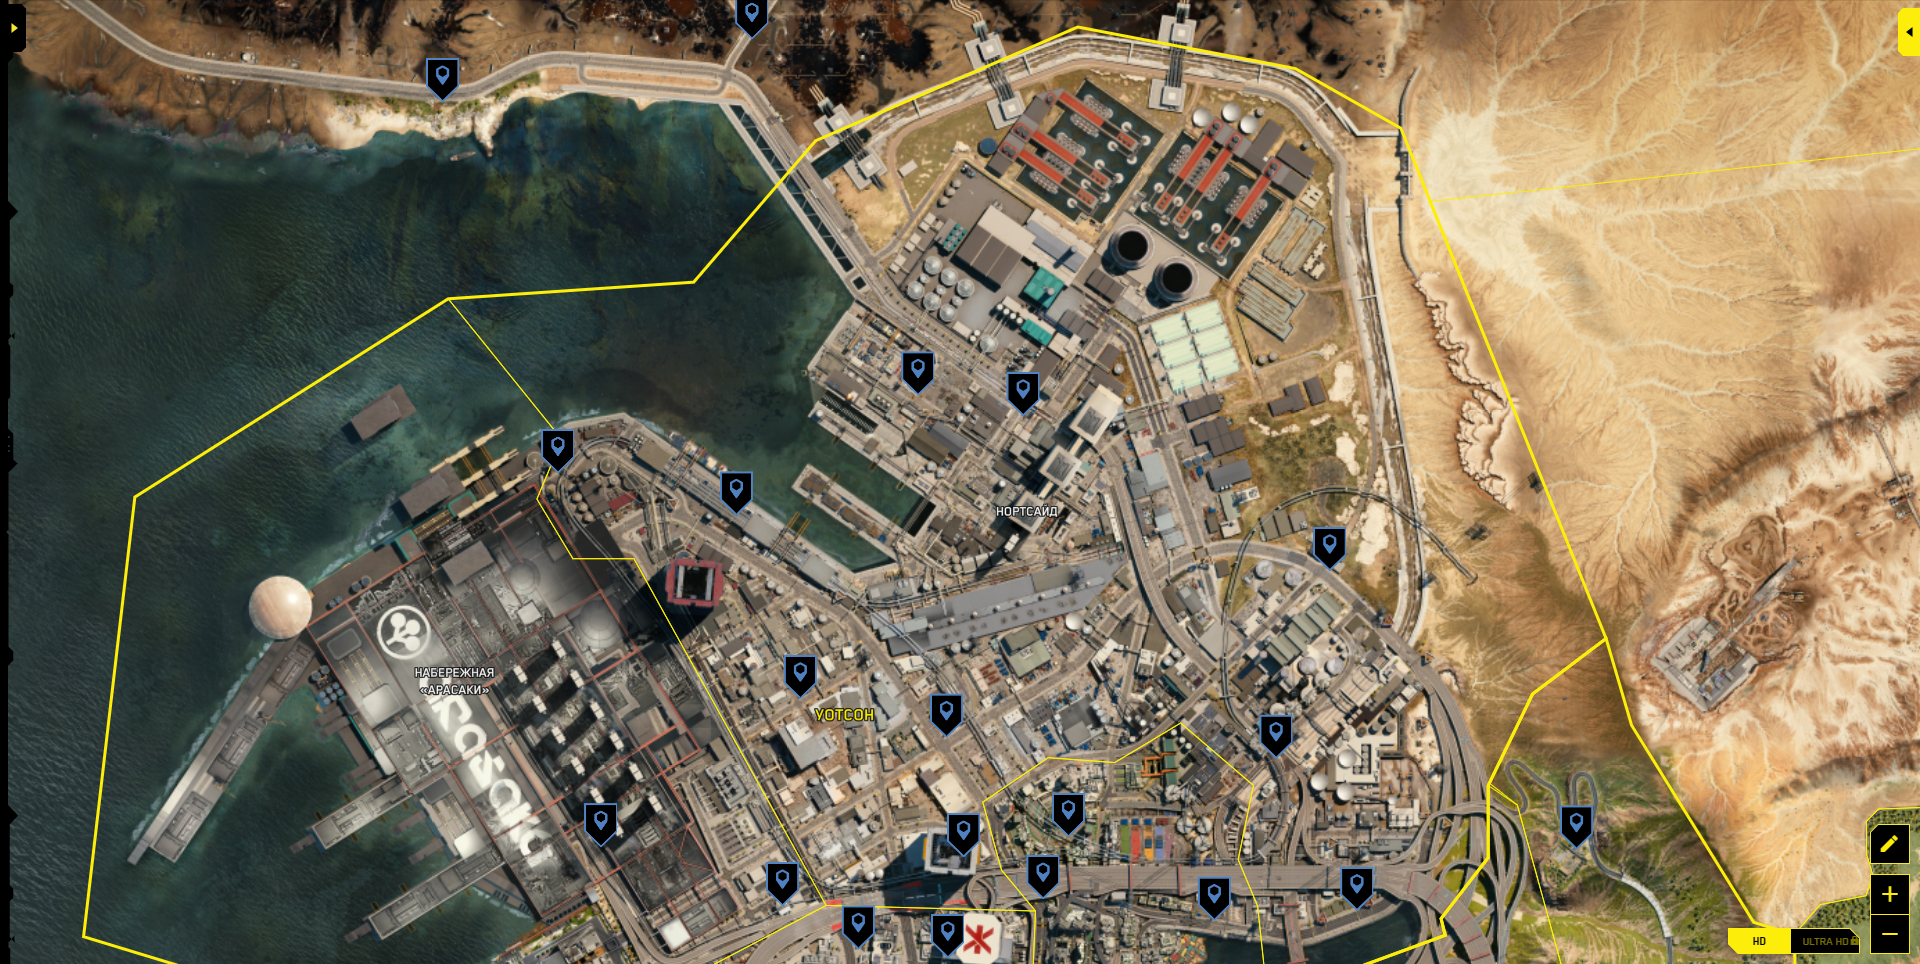
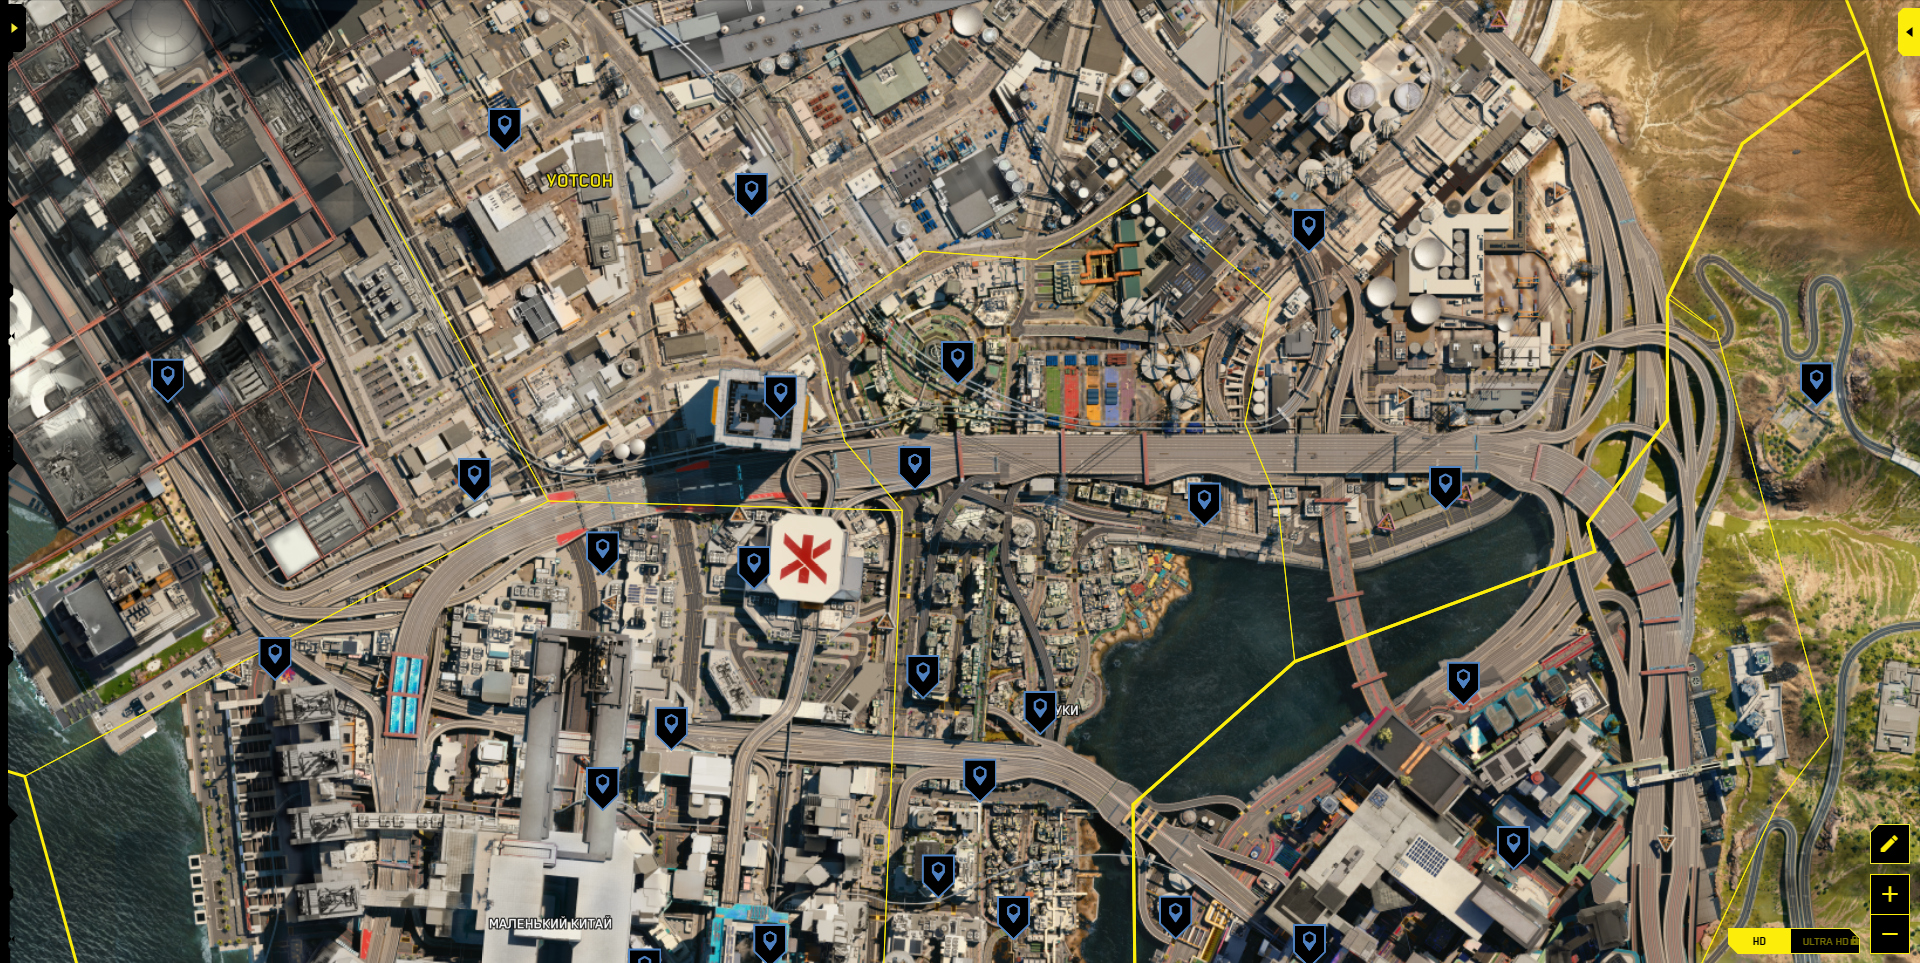
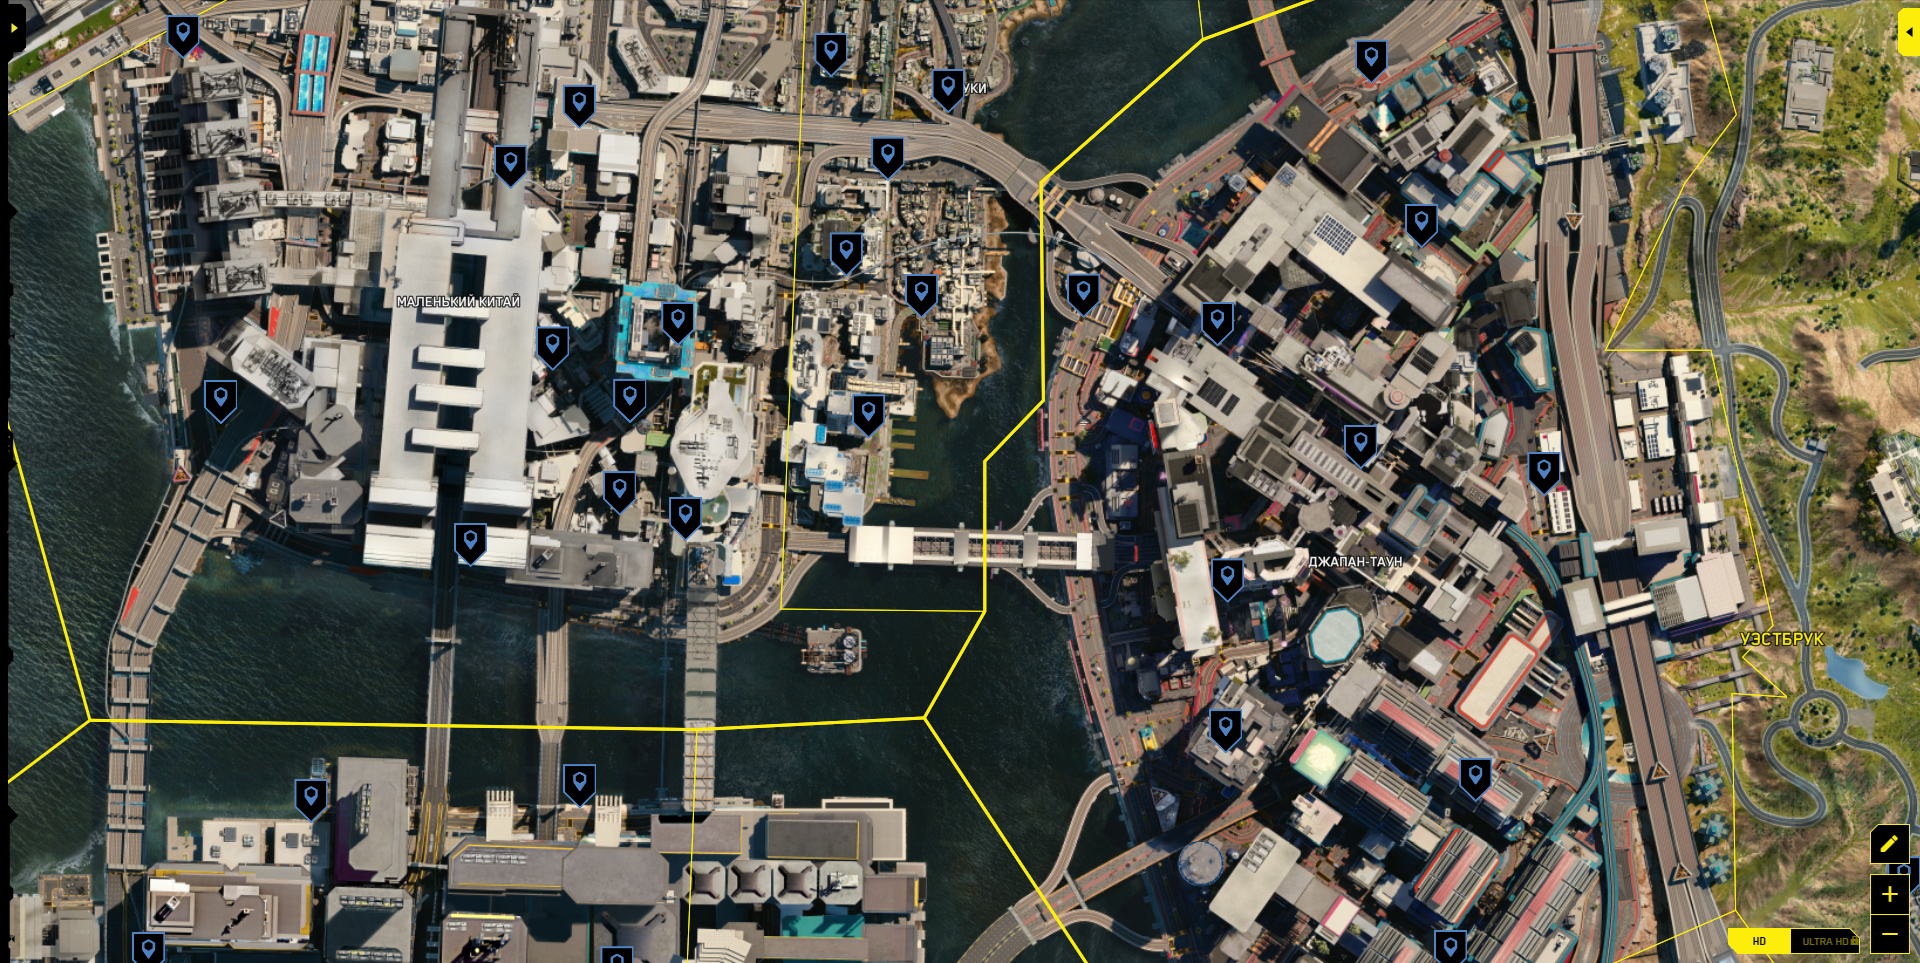
All Quick Move Terminals
Terminals appear as purple markers on the map when within a few meters of them. Having all the Quick Move points available right now will save you time on additional tasks.
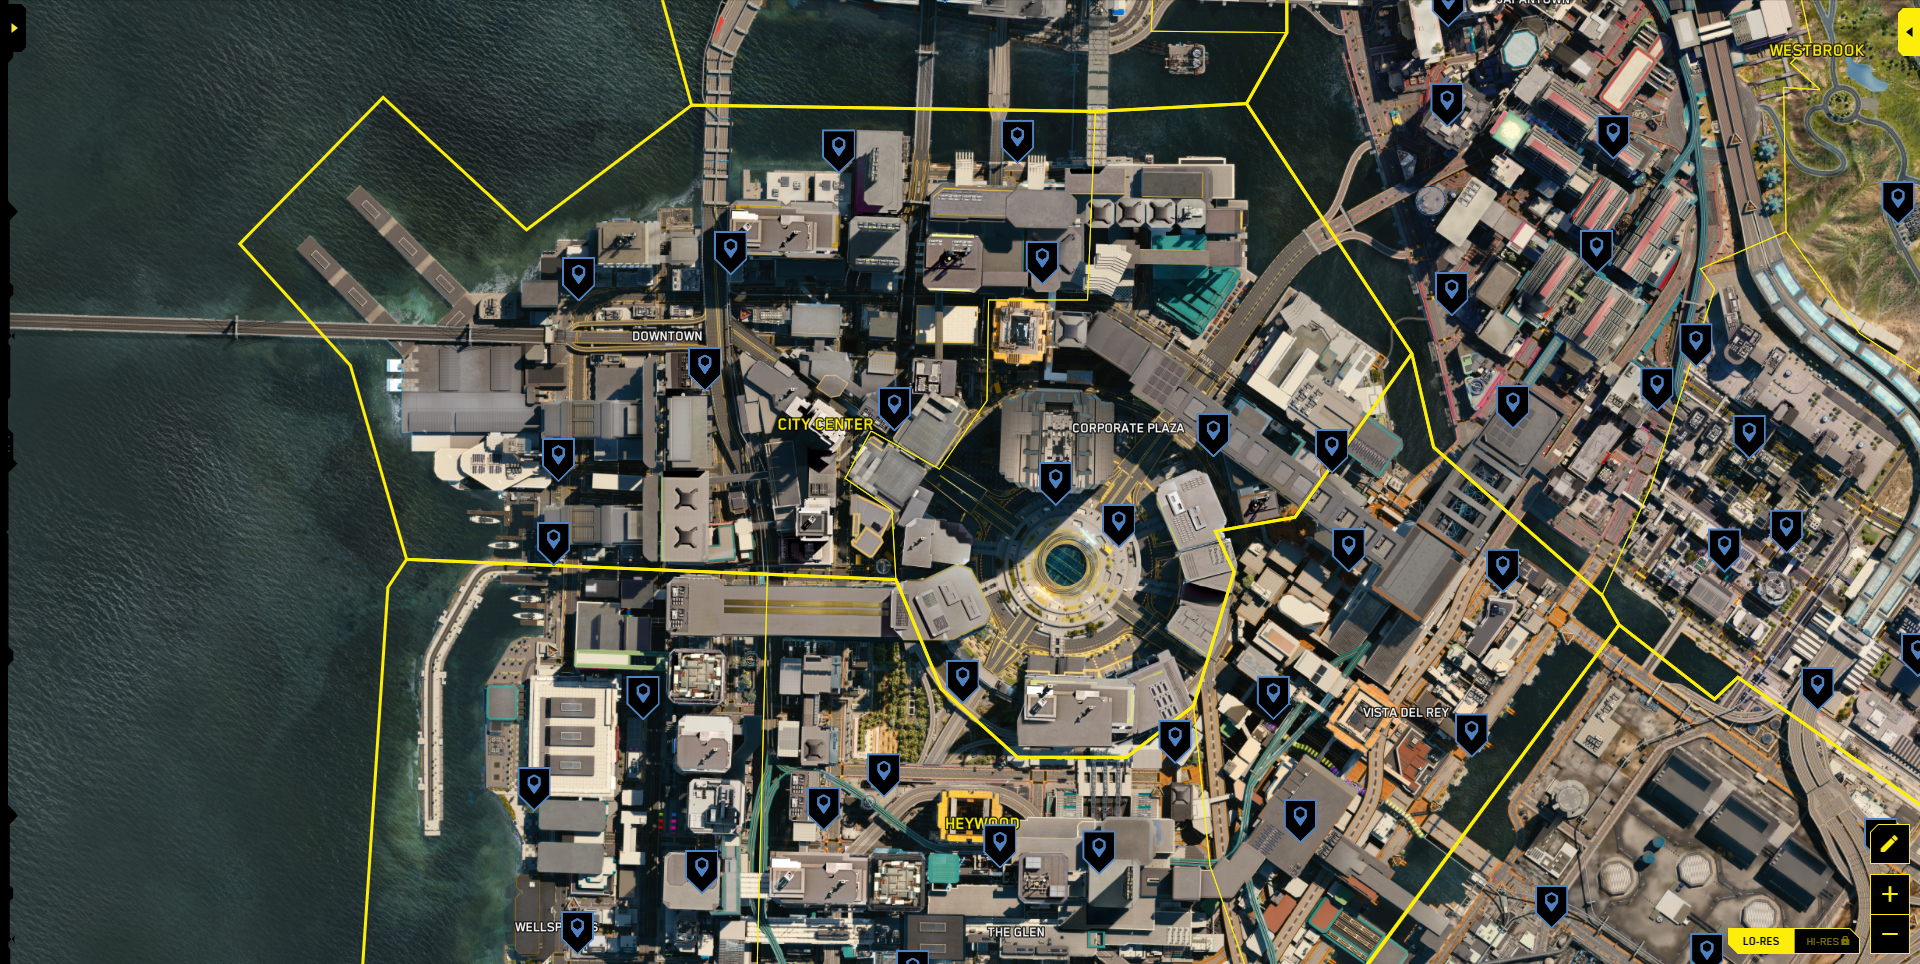
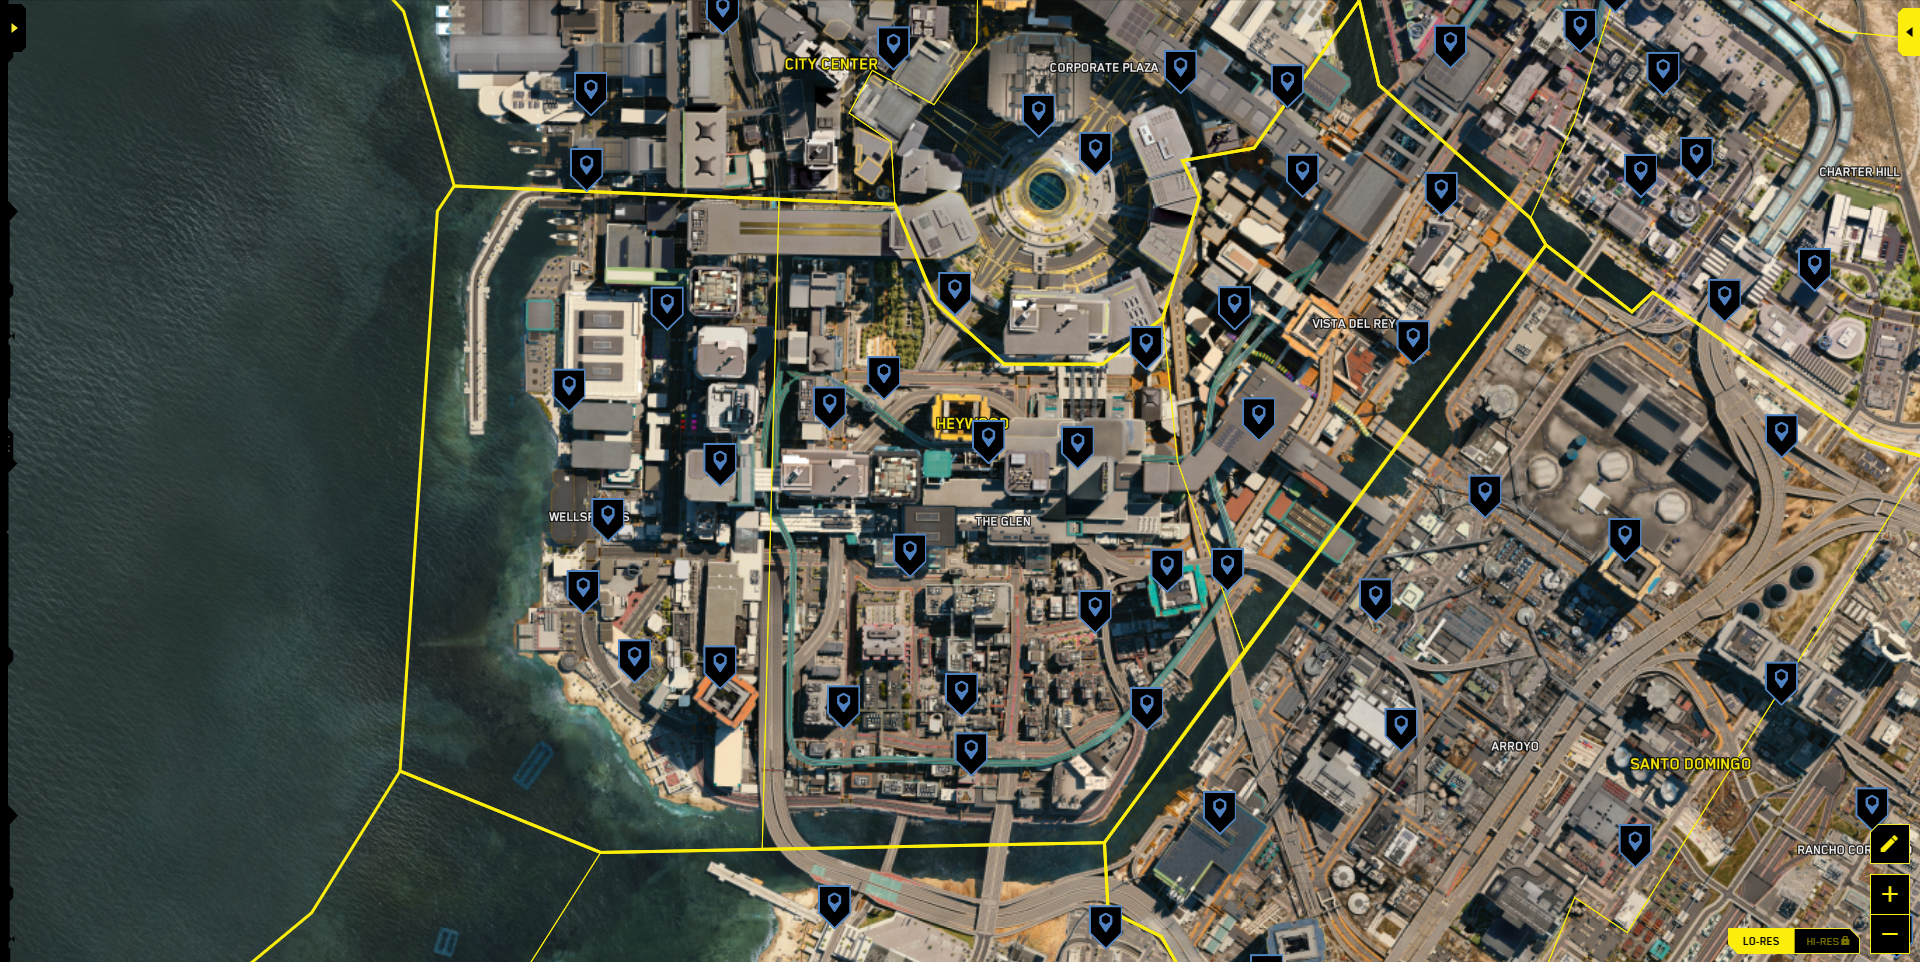
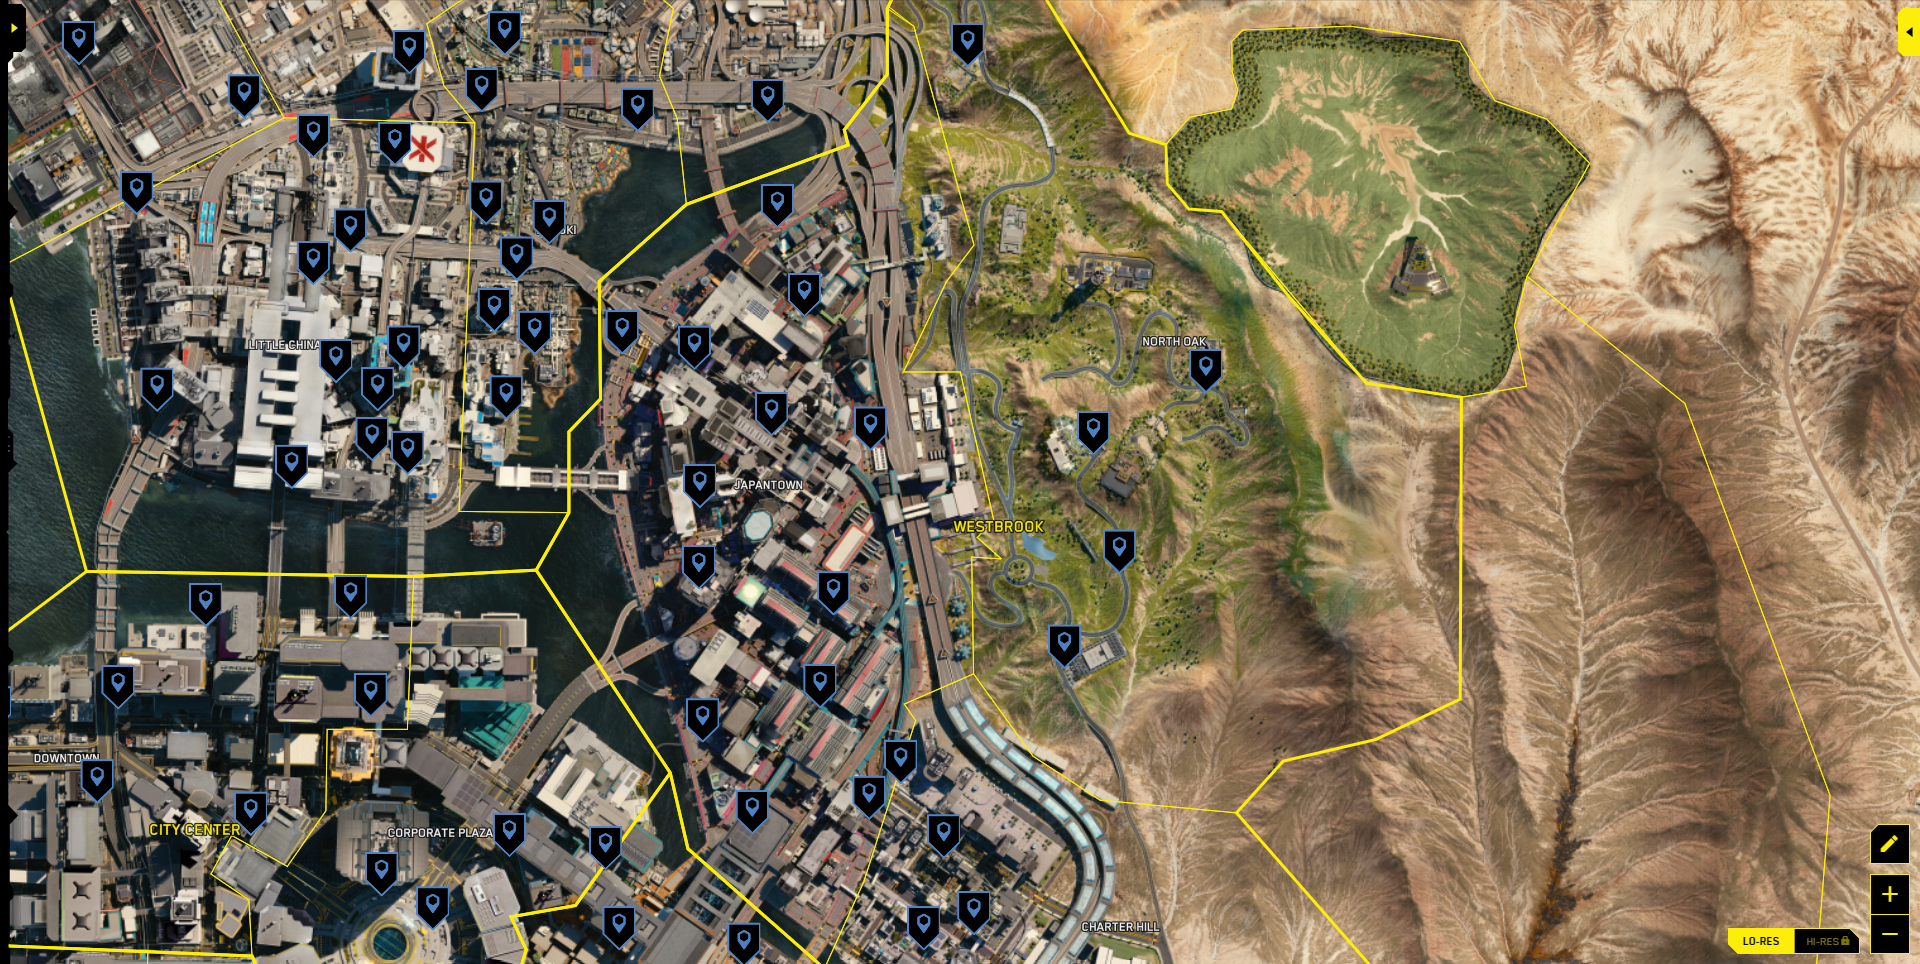
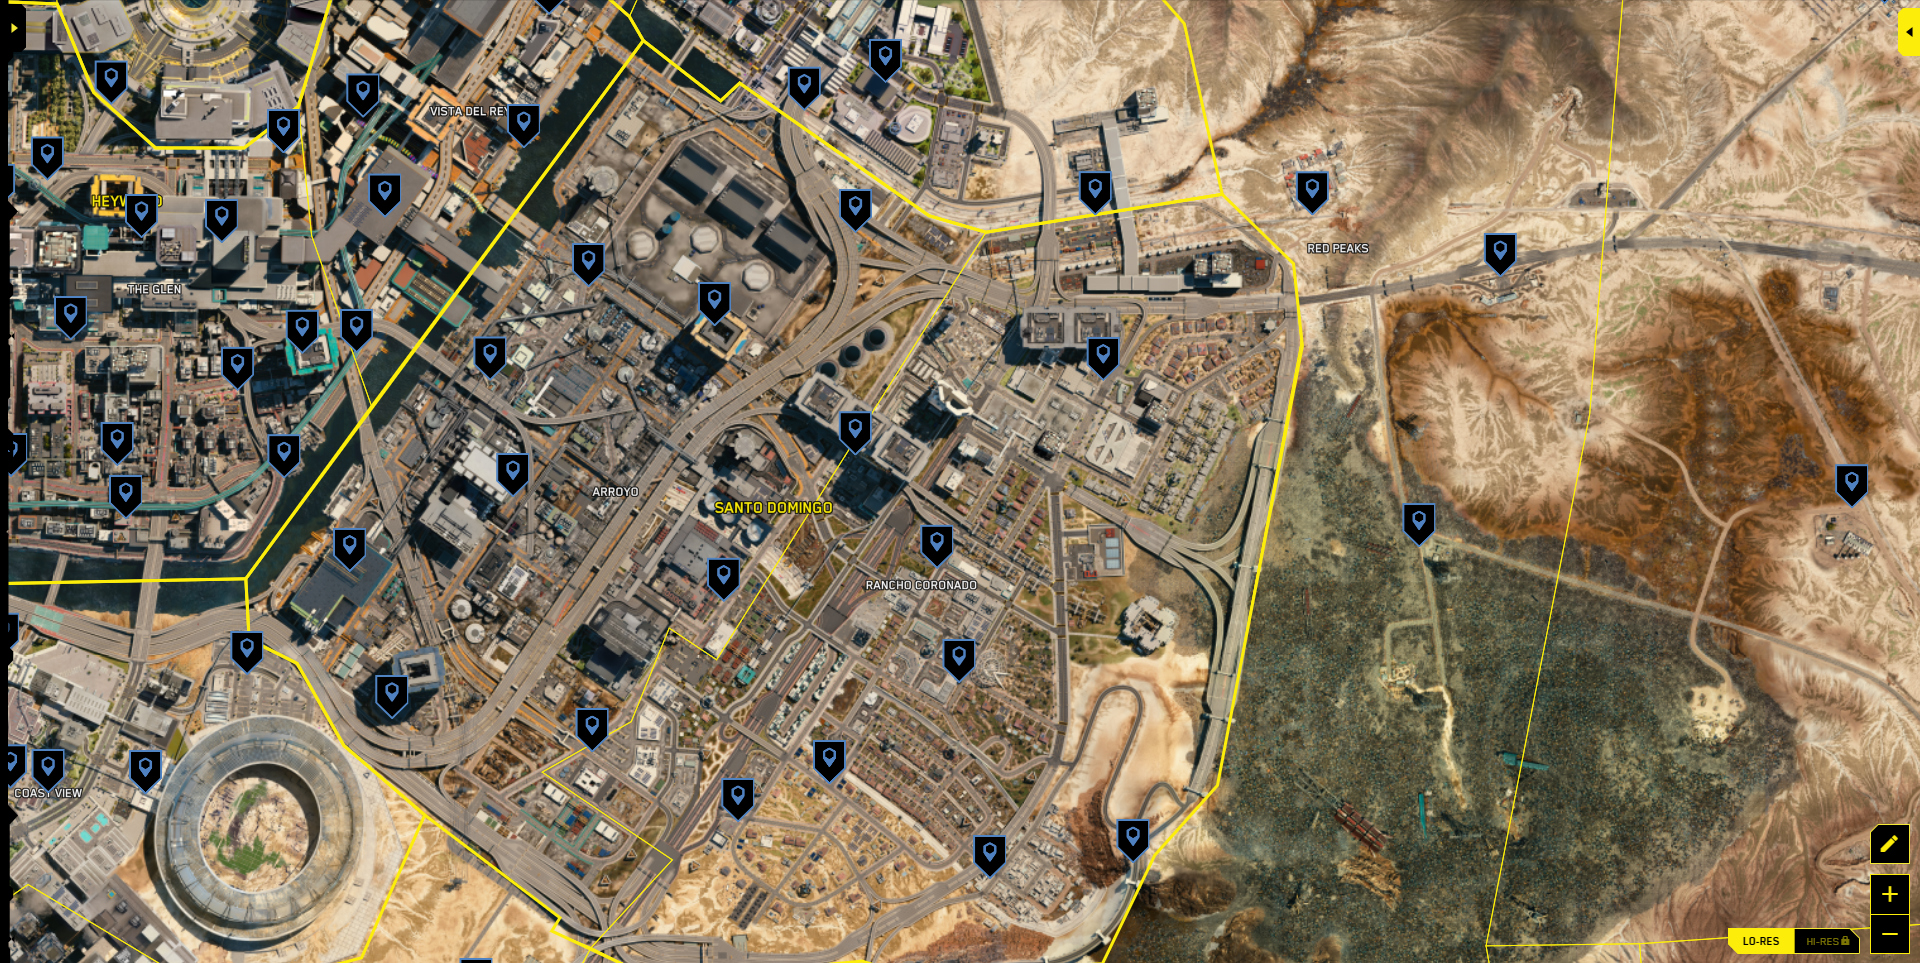
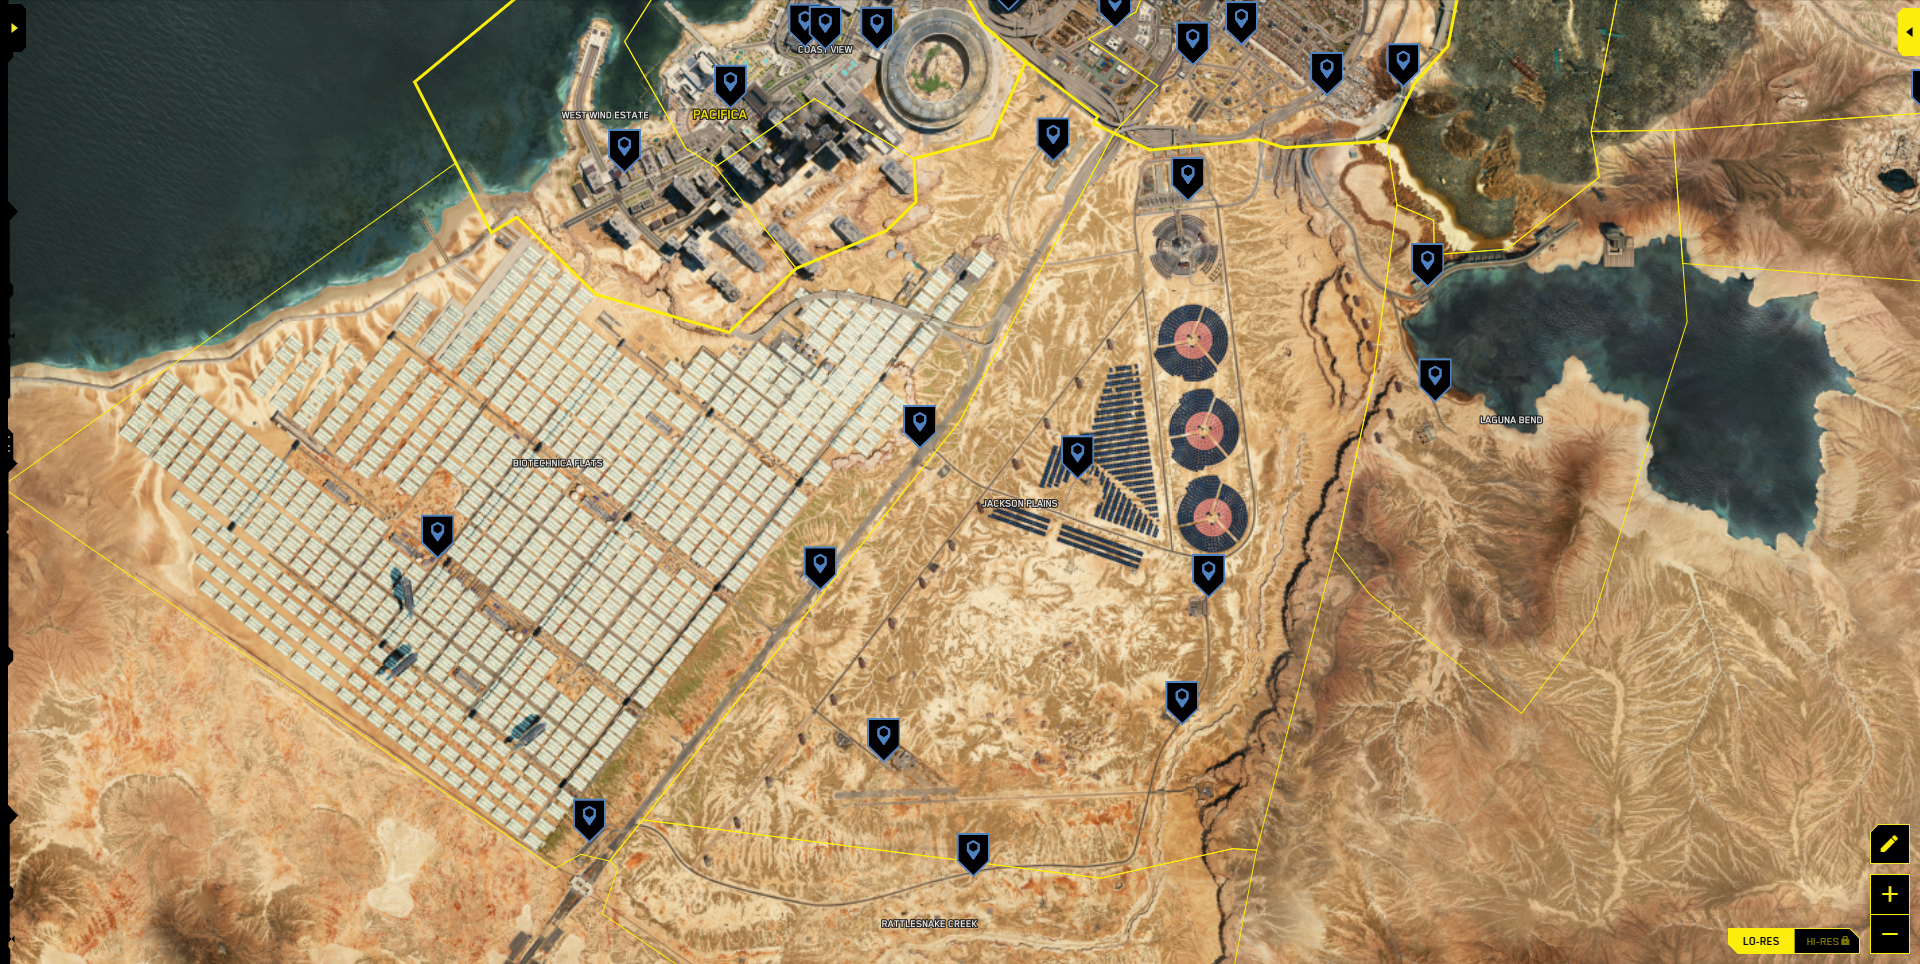
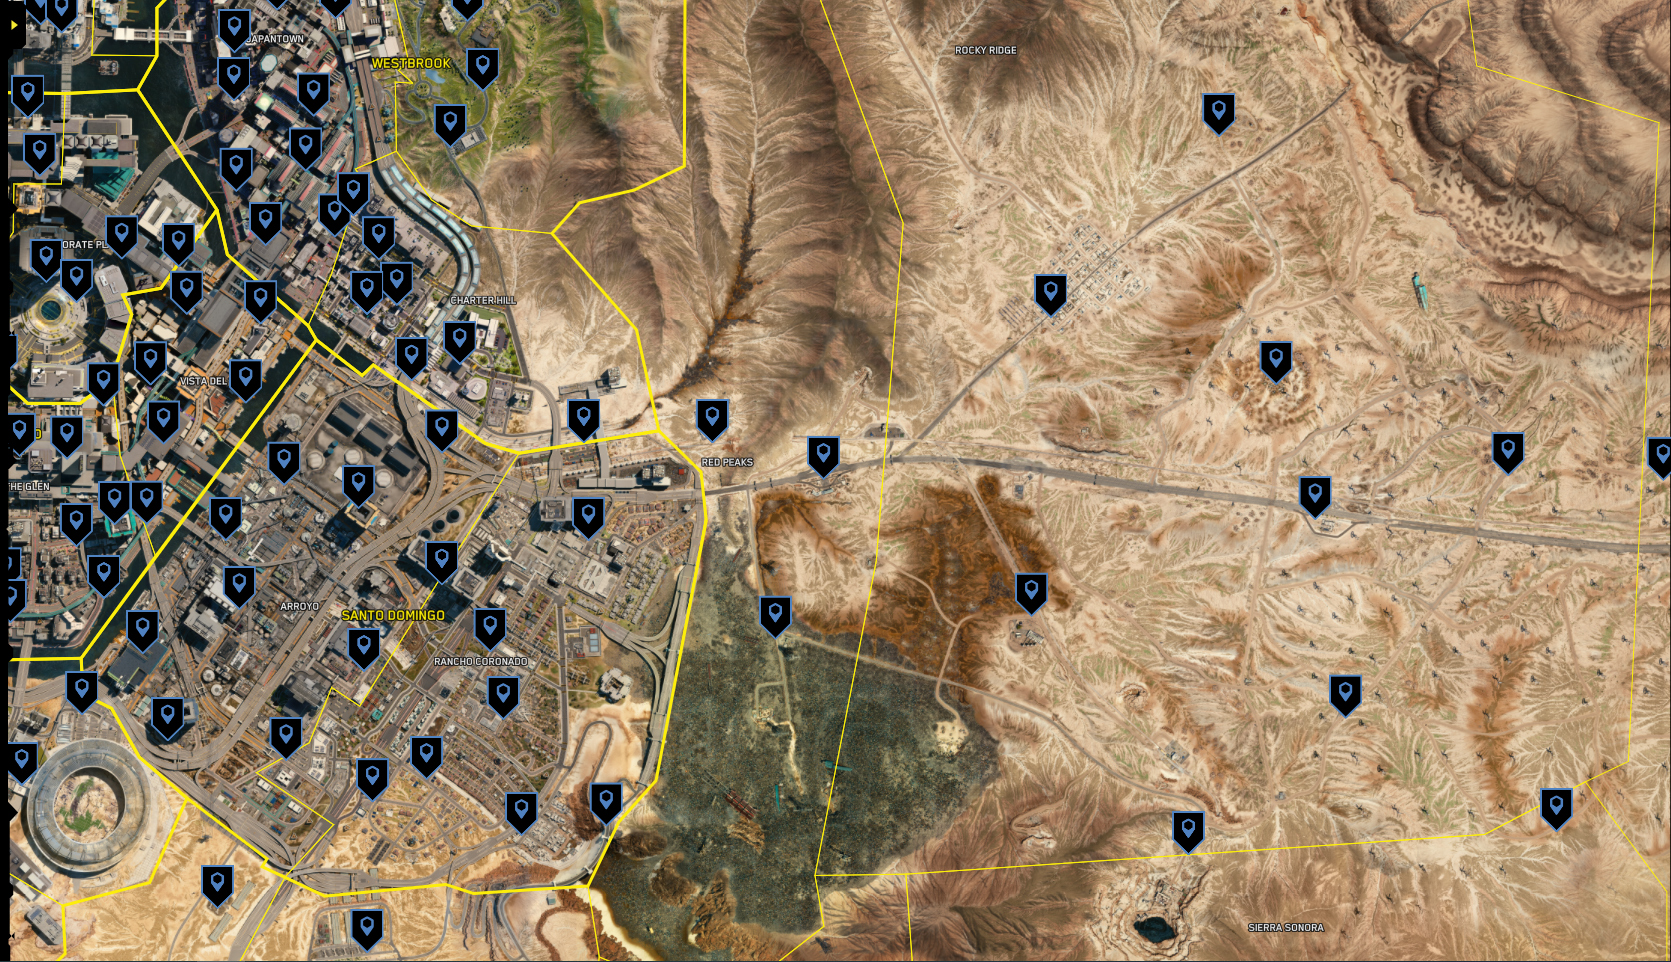
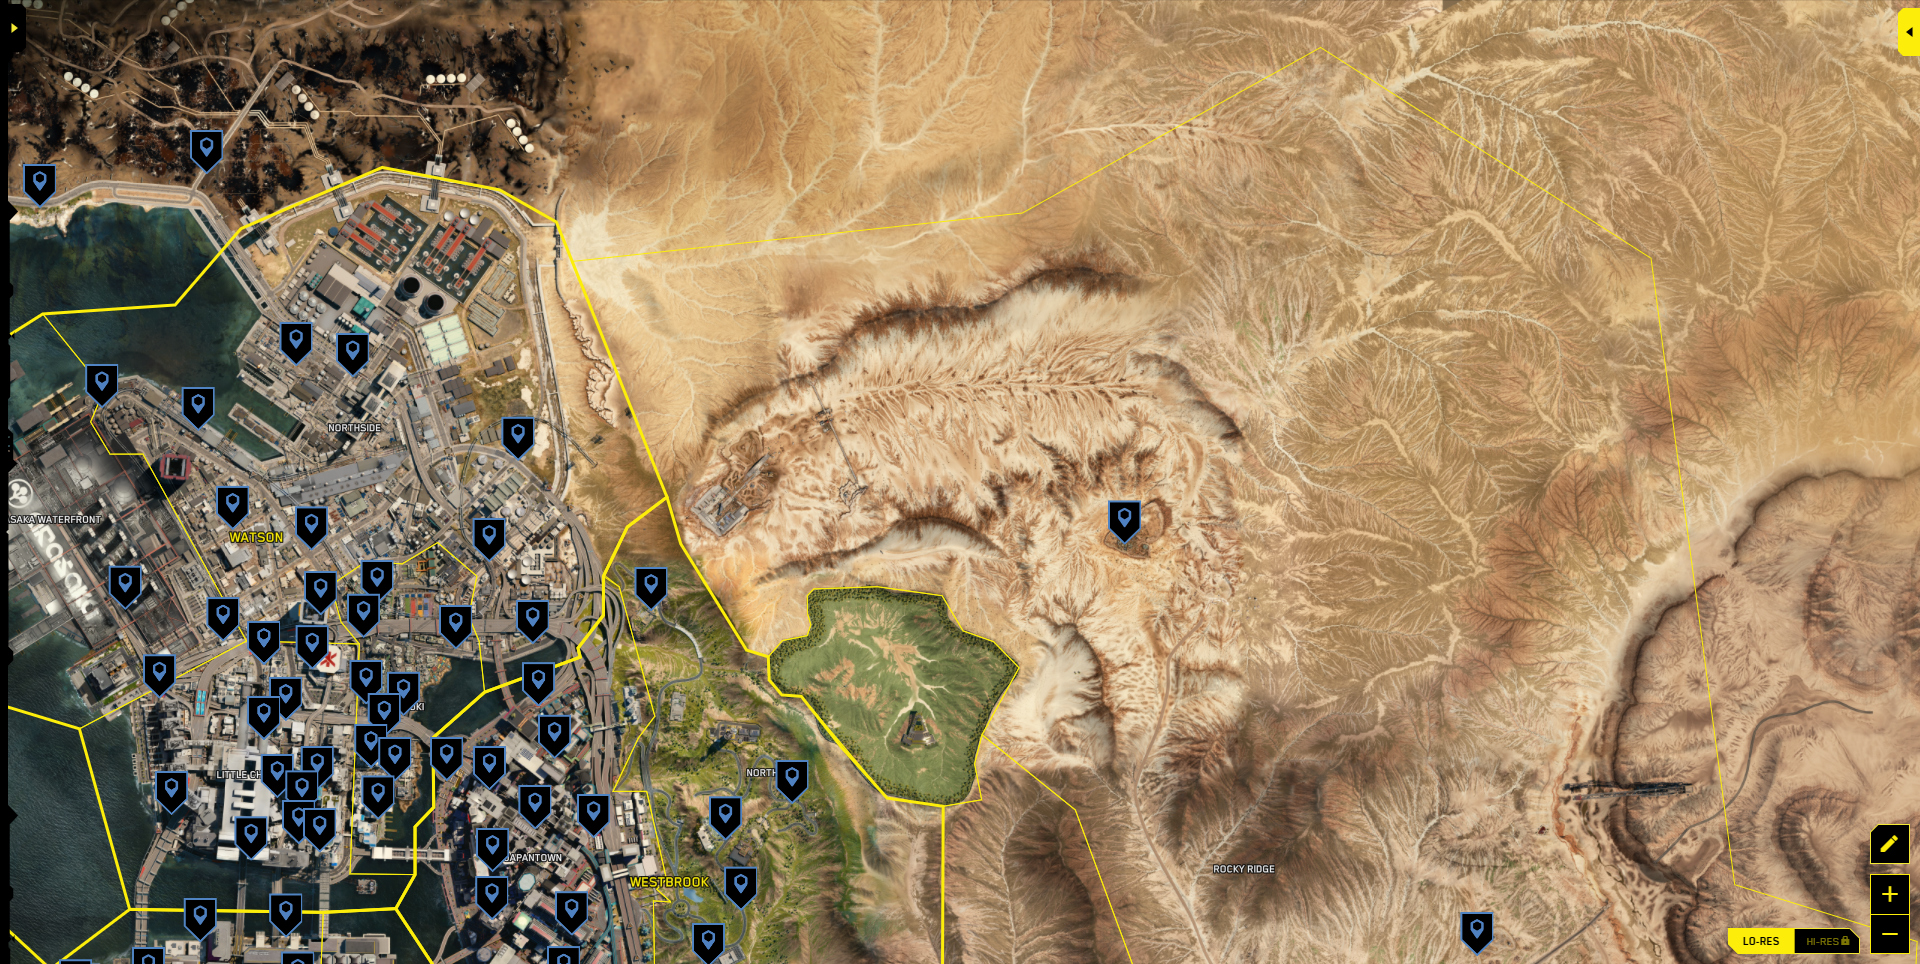
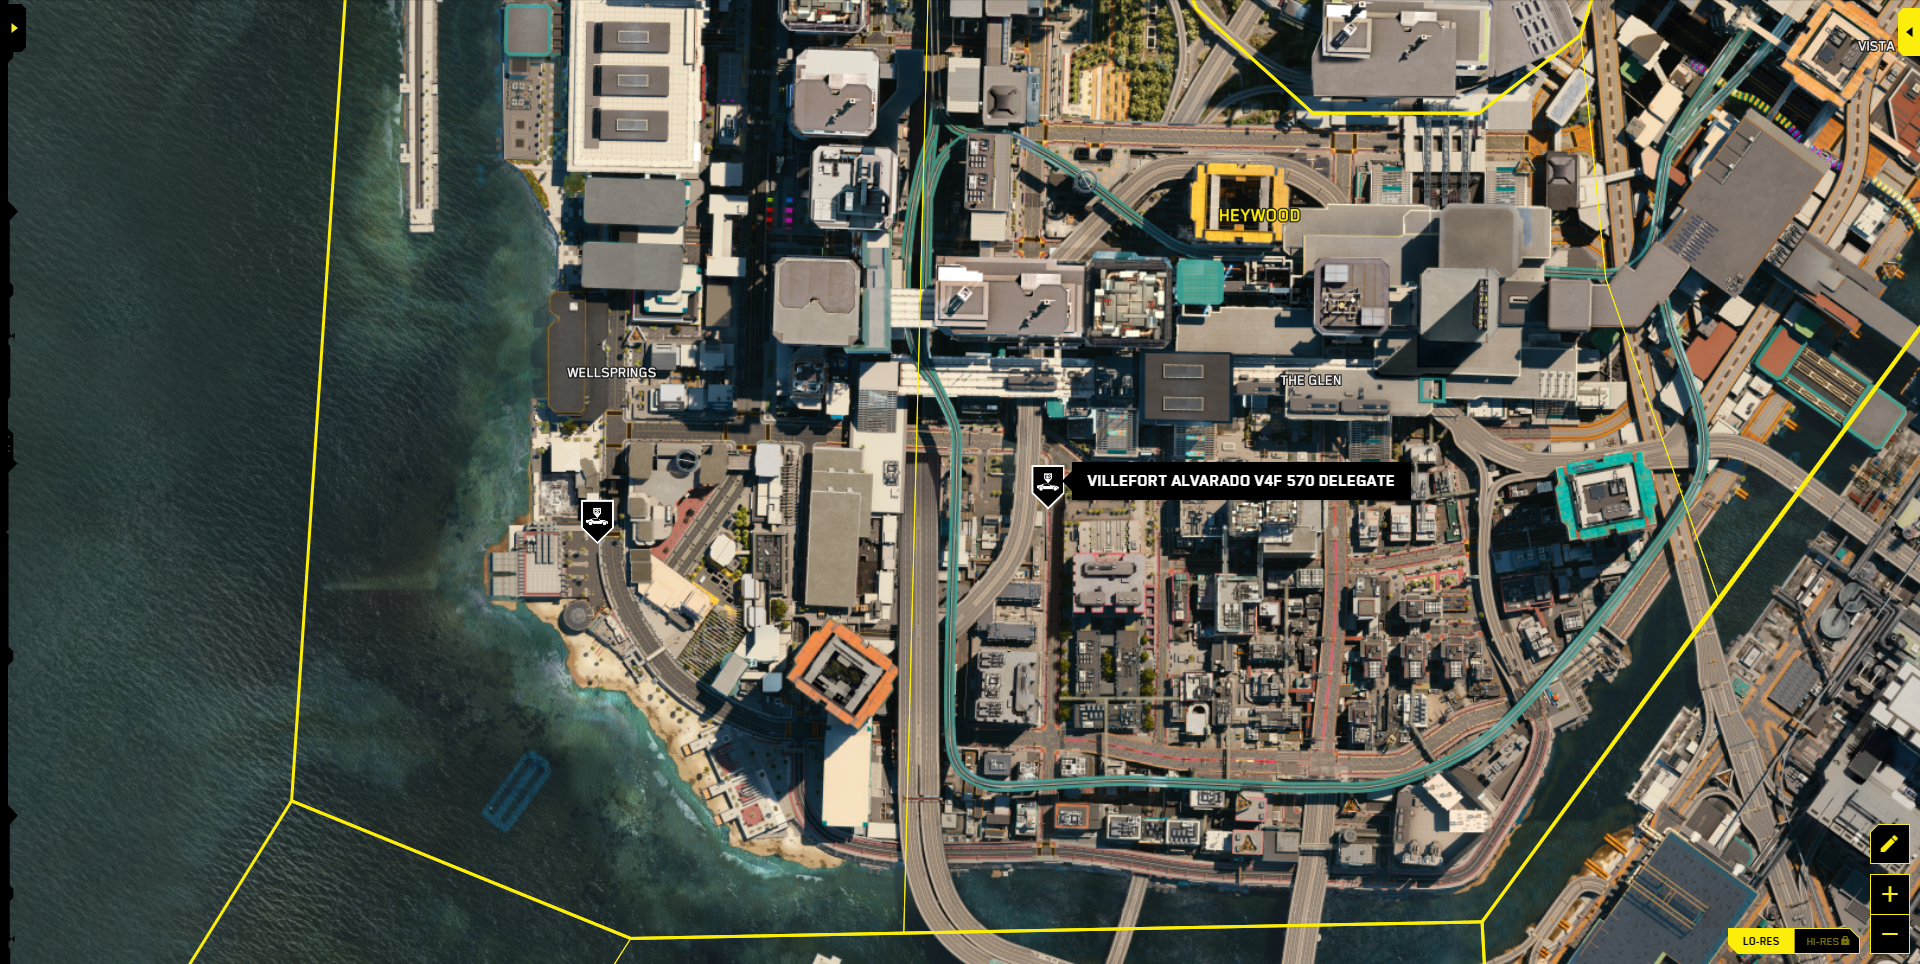
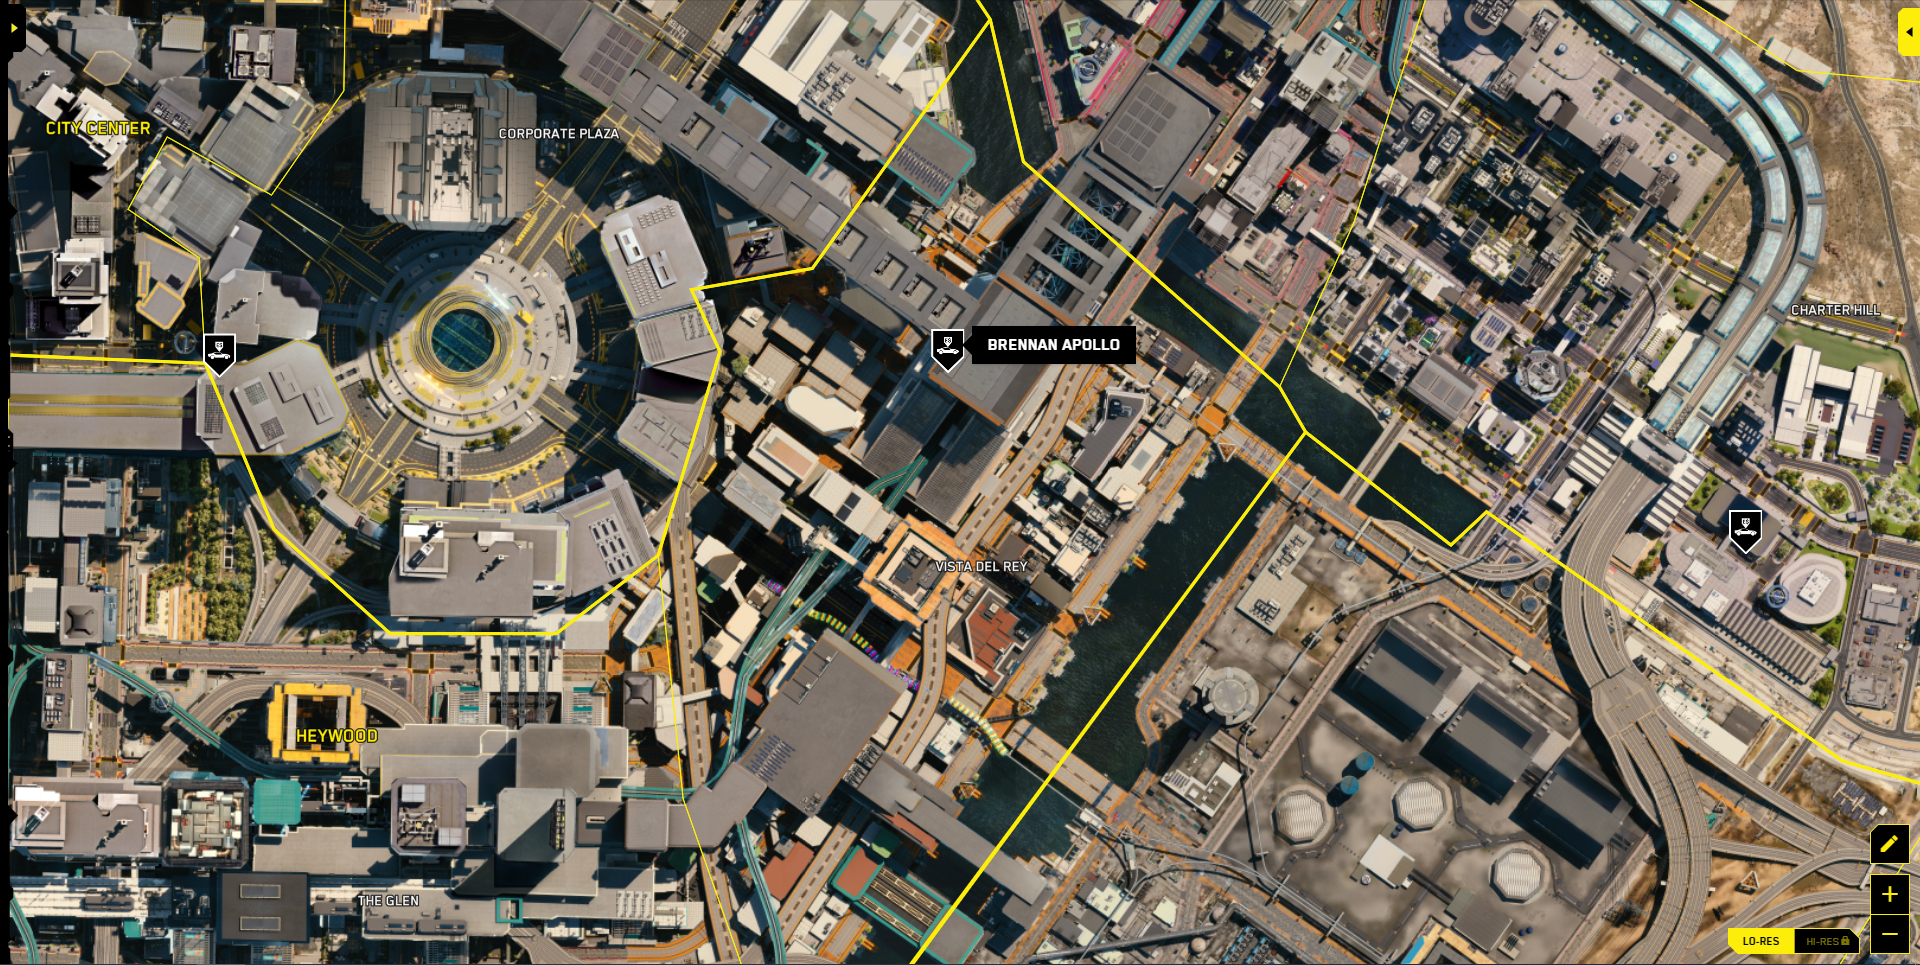
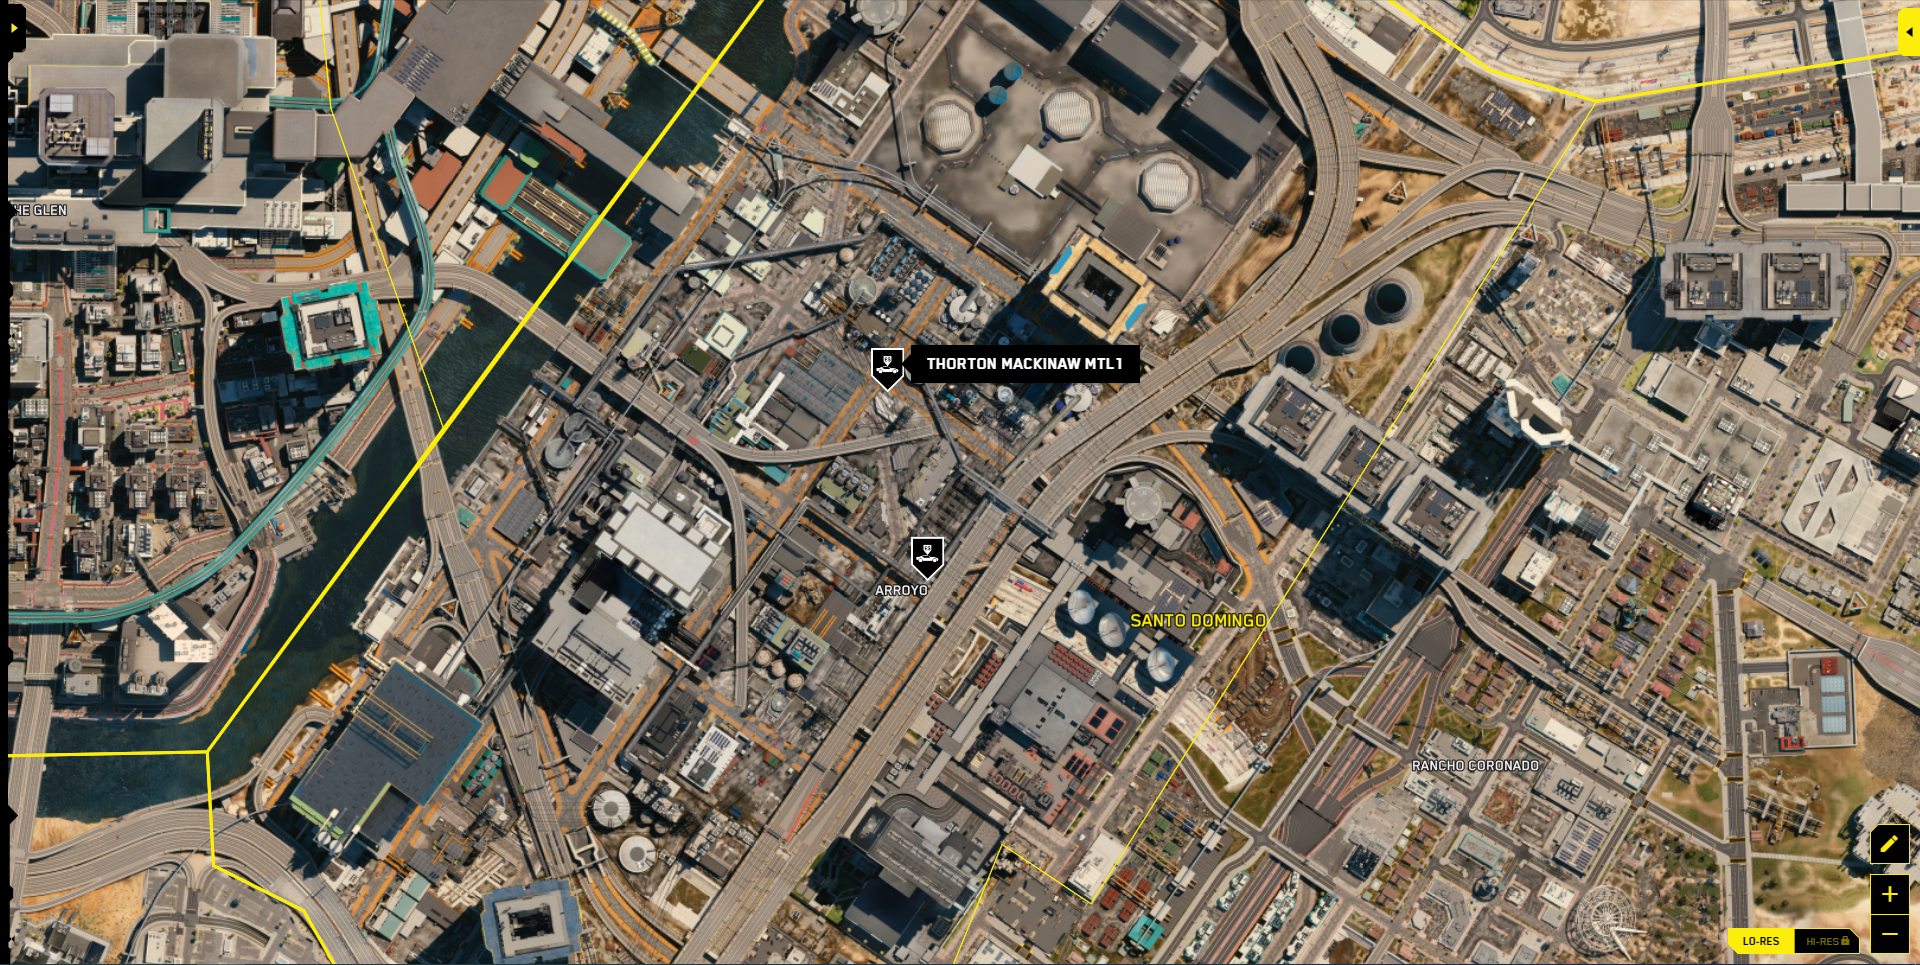
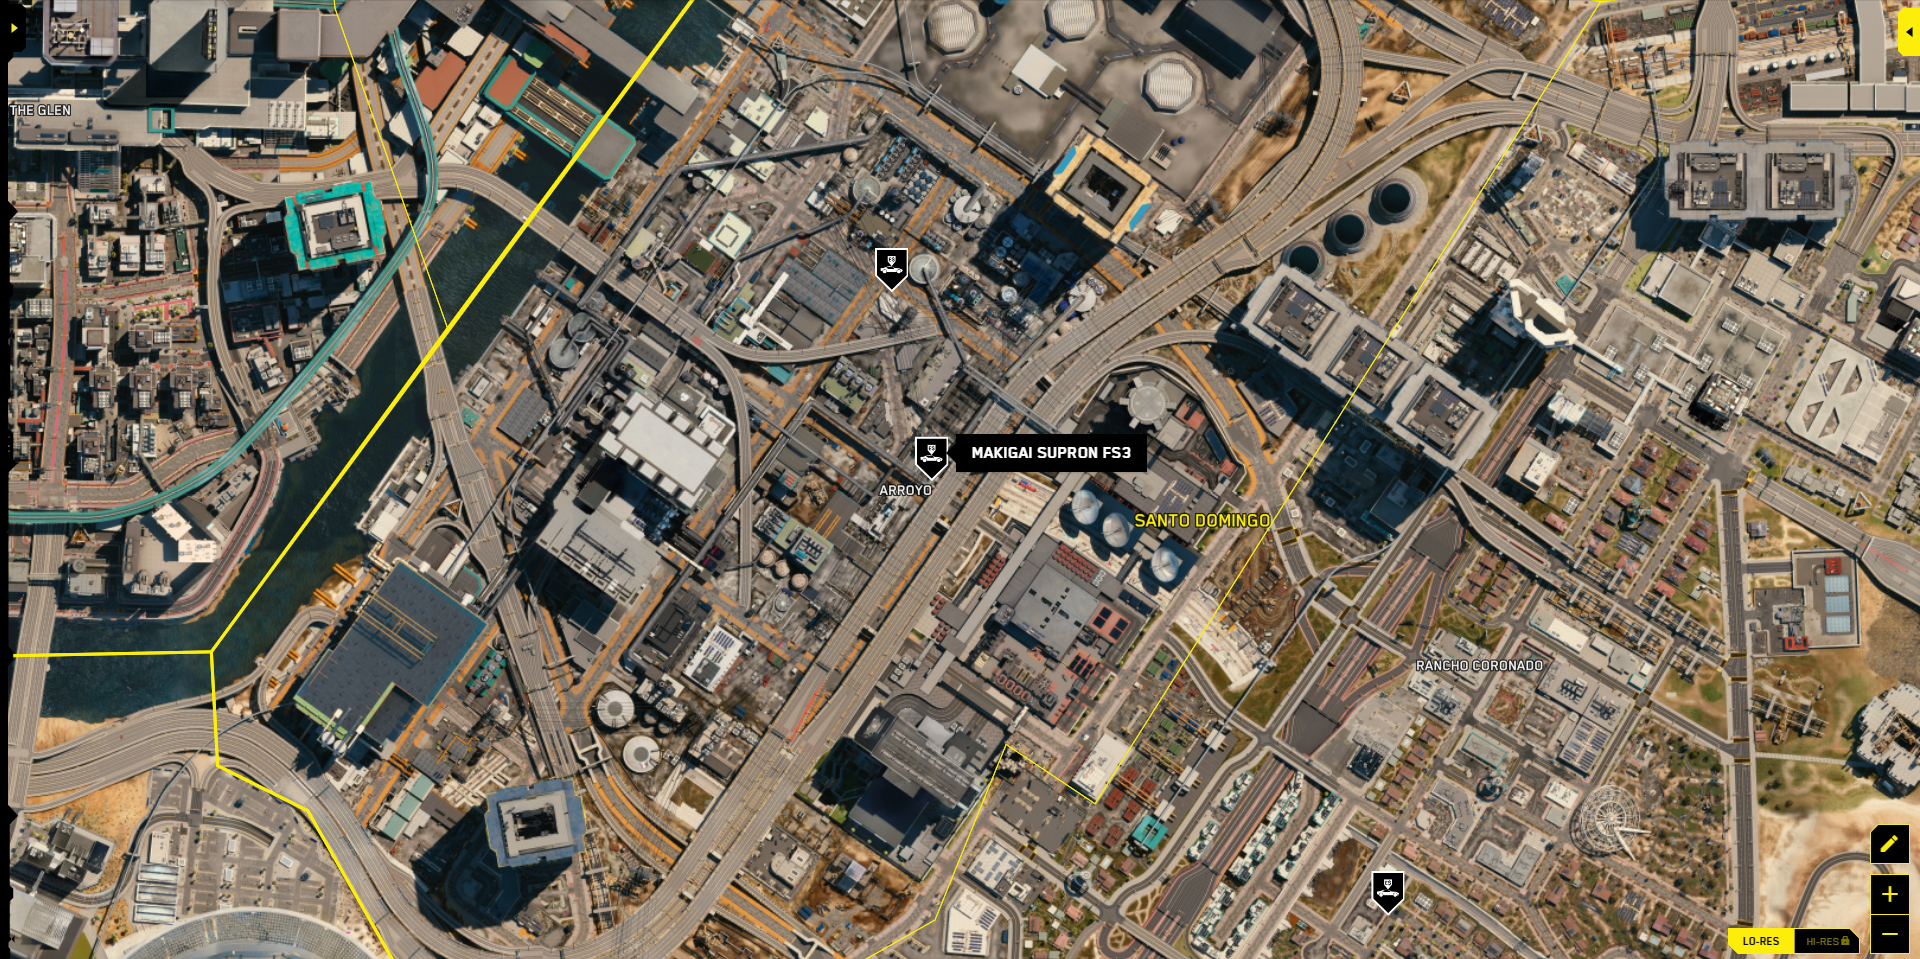
Purchase of all cars
As part of your map research, you will receive more and more such messages to your mailbox. To purchase all cars offered by the game, you need to have ~ 1,900,000 eddies.
- Log in to the task log and go to the Cars category.
- Select the “mission” associated with this vehicle.
- Follow the marker and buy a car.
Here is a list of vehicles you should purchase:
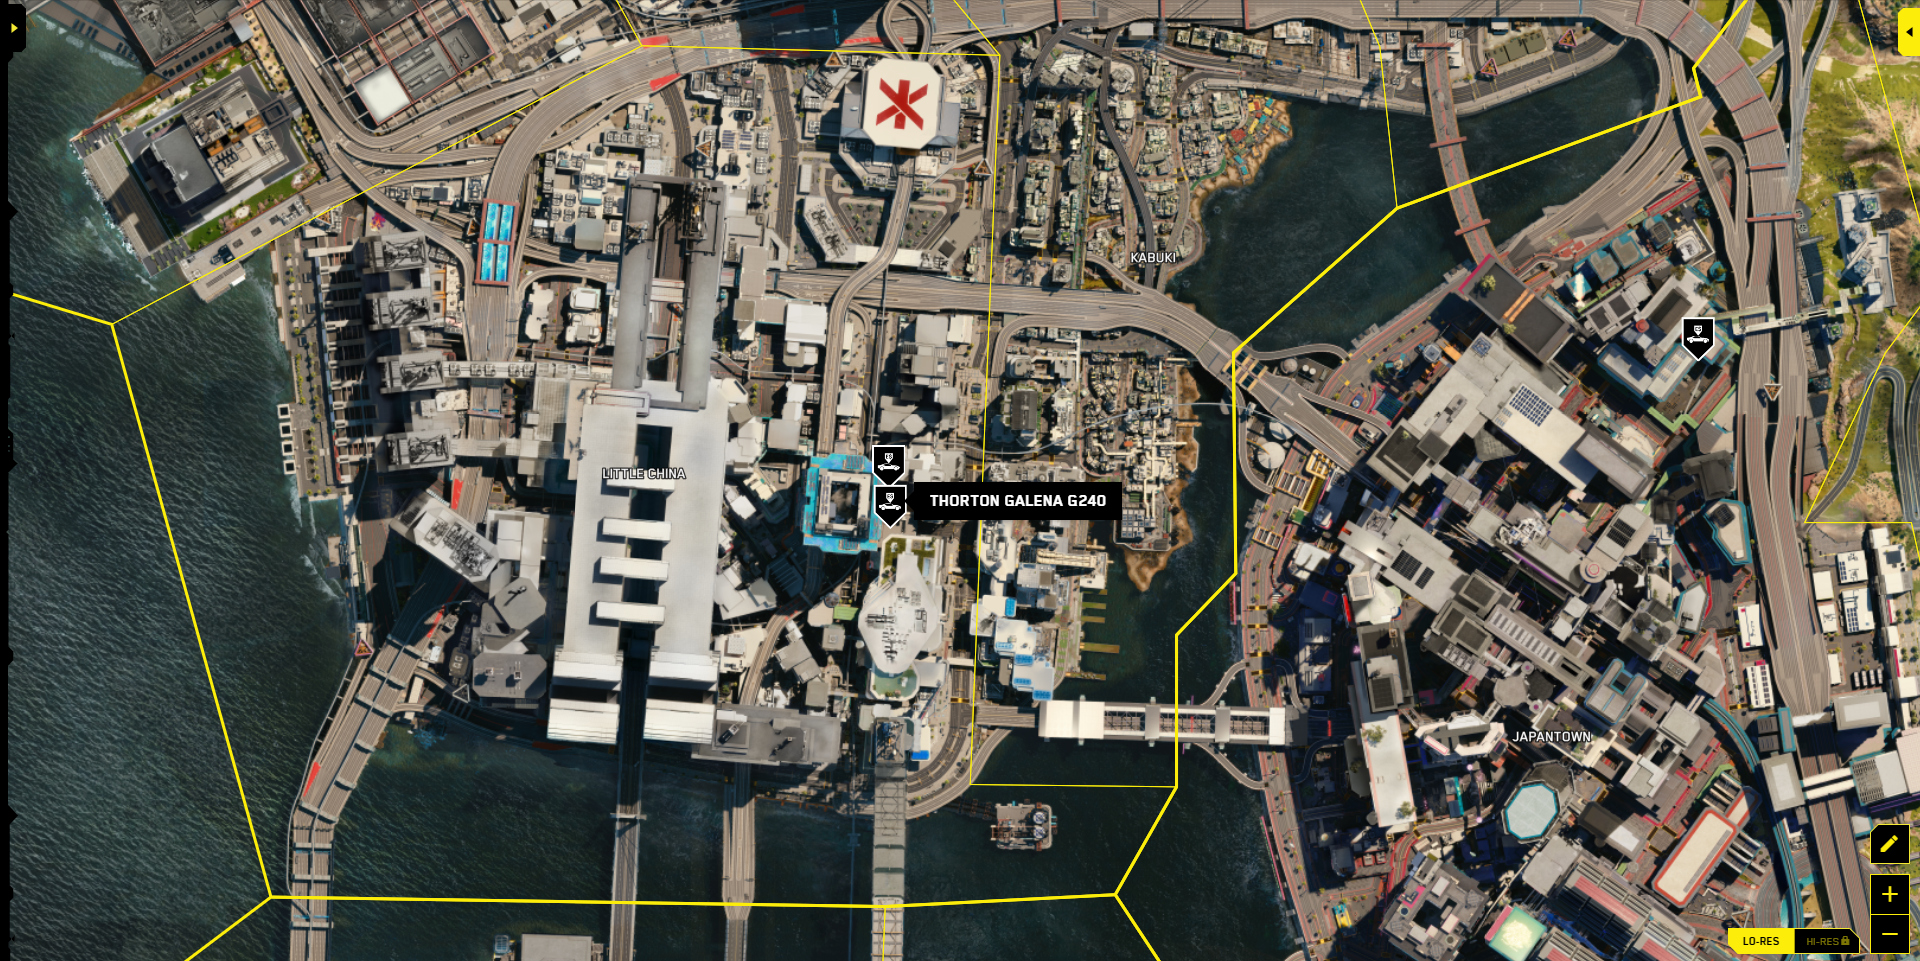
- Galen G240
- EC-T2 R660 quartz
- Colby C125
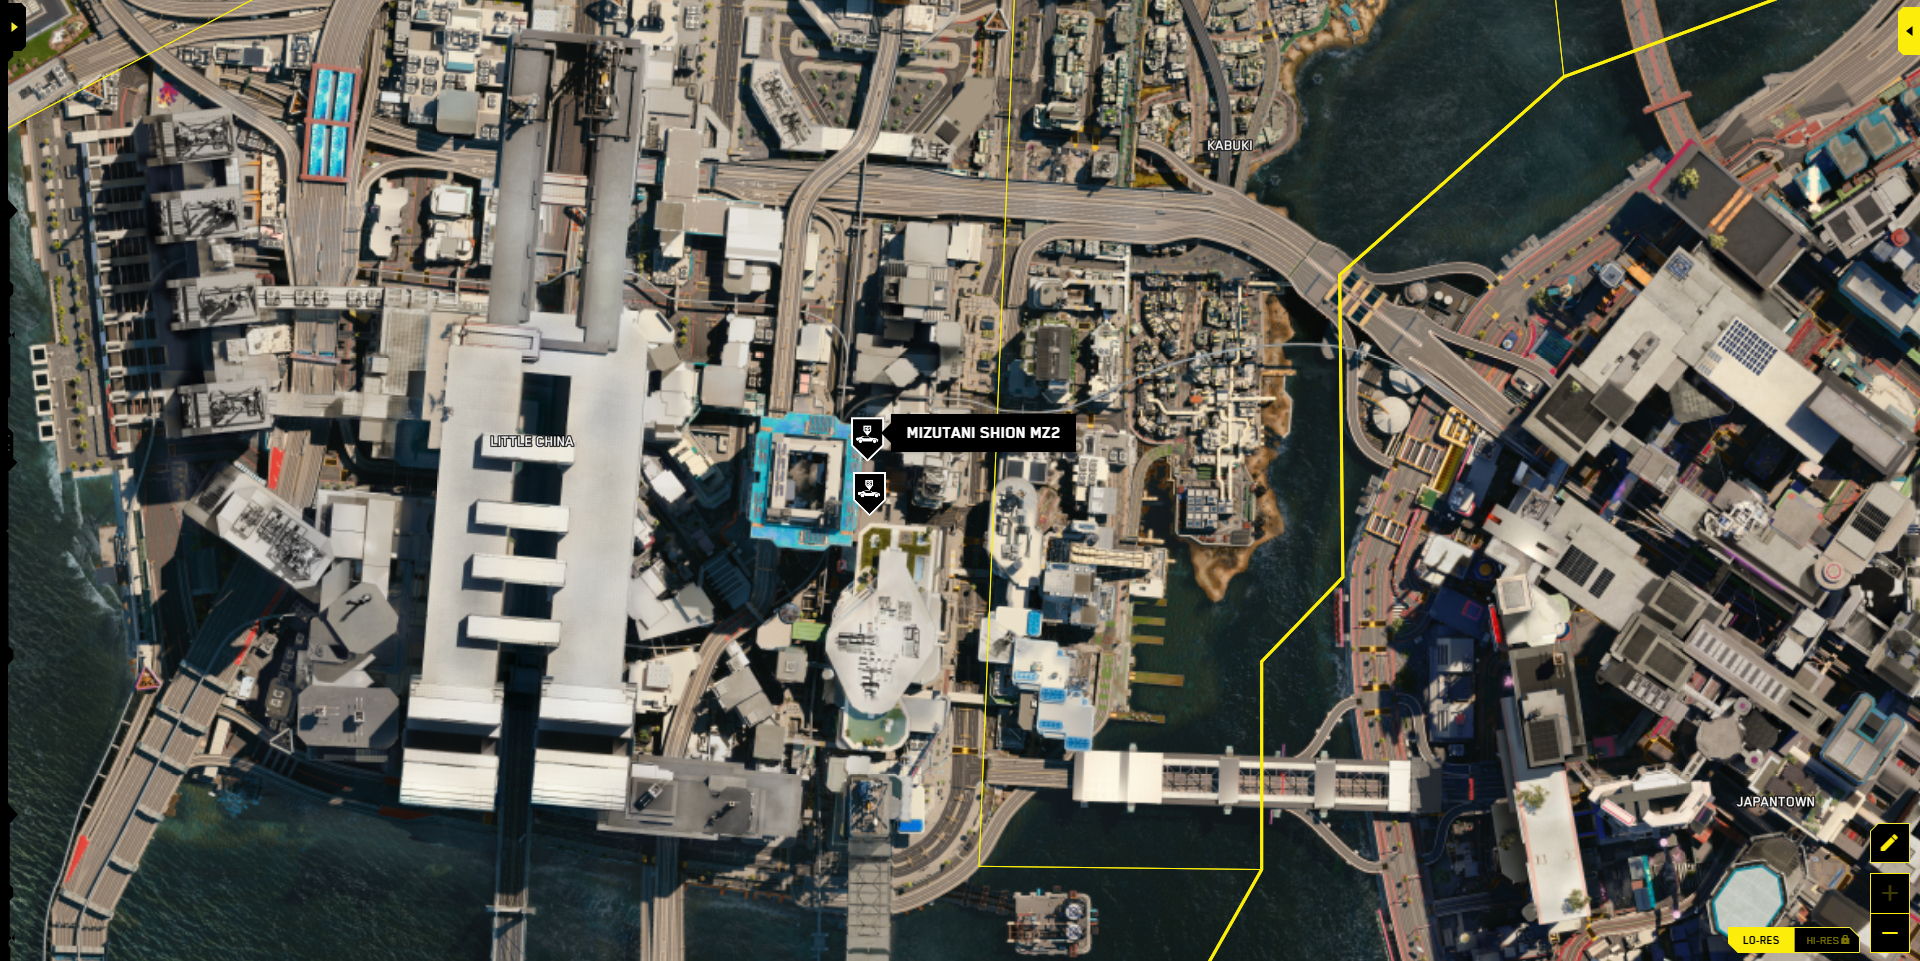
- Zion MZ2
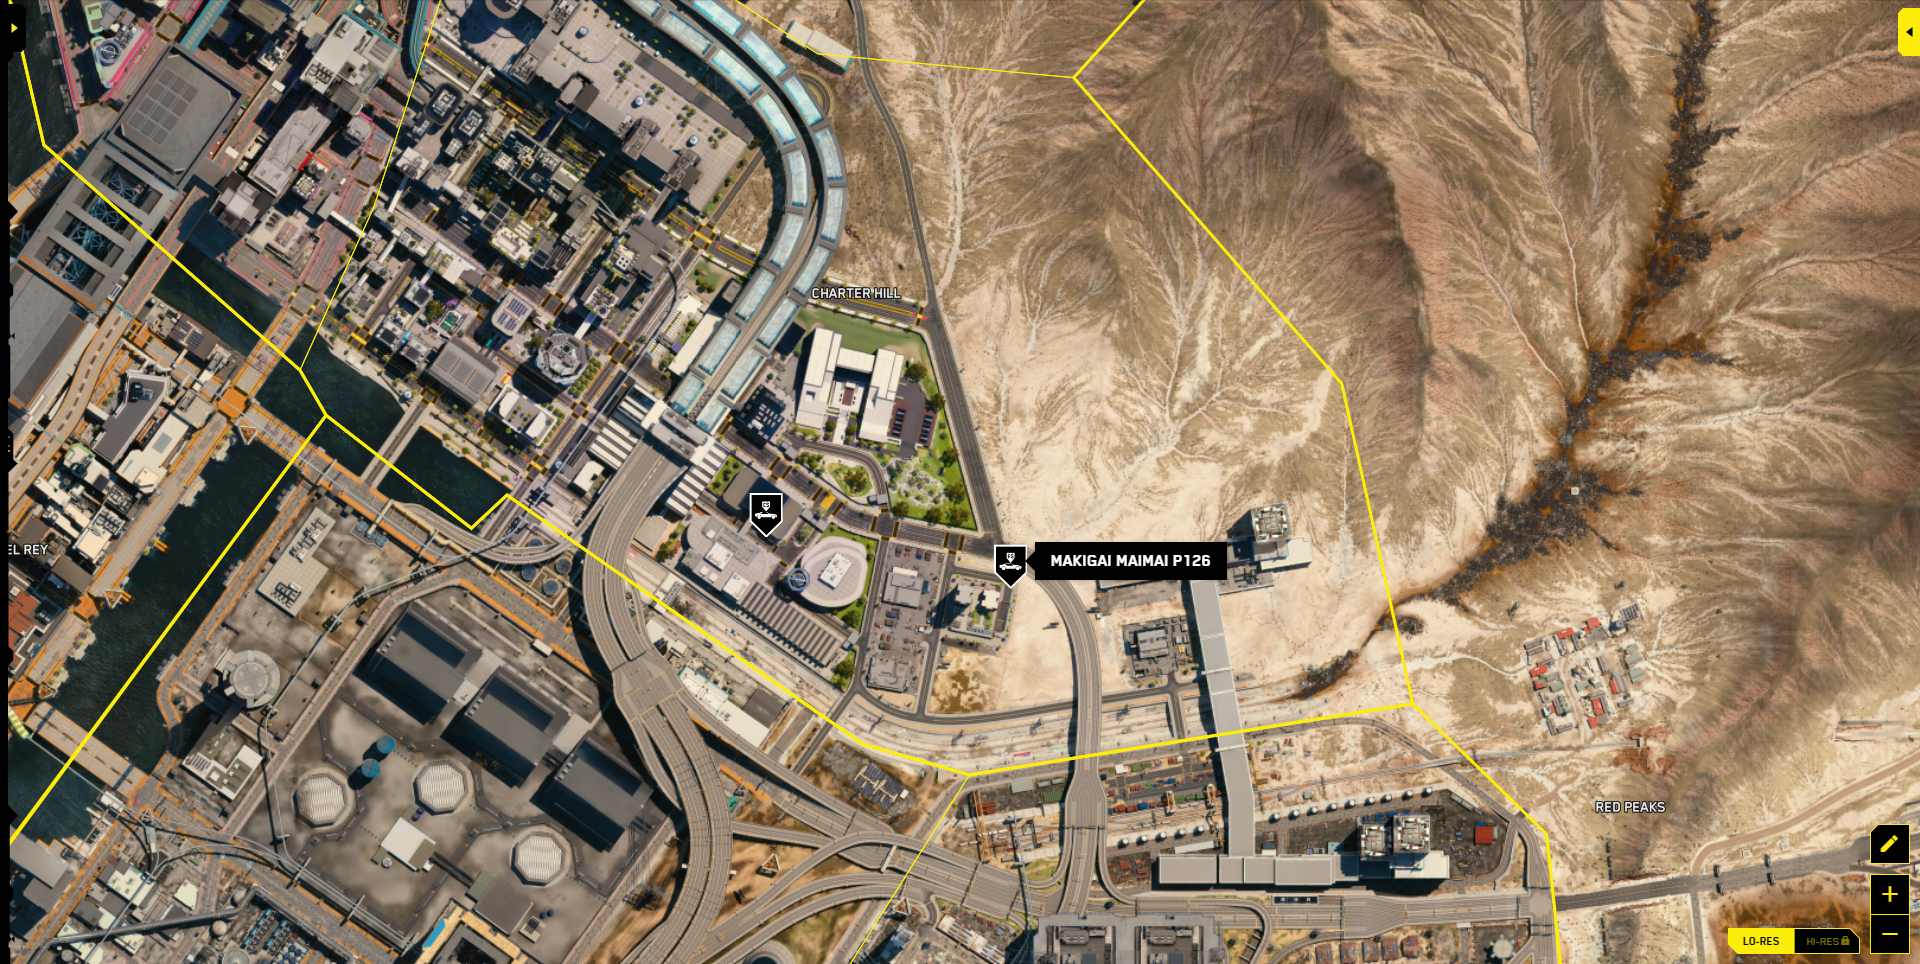
- P126 Maimai
- CT-3X Kusanag
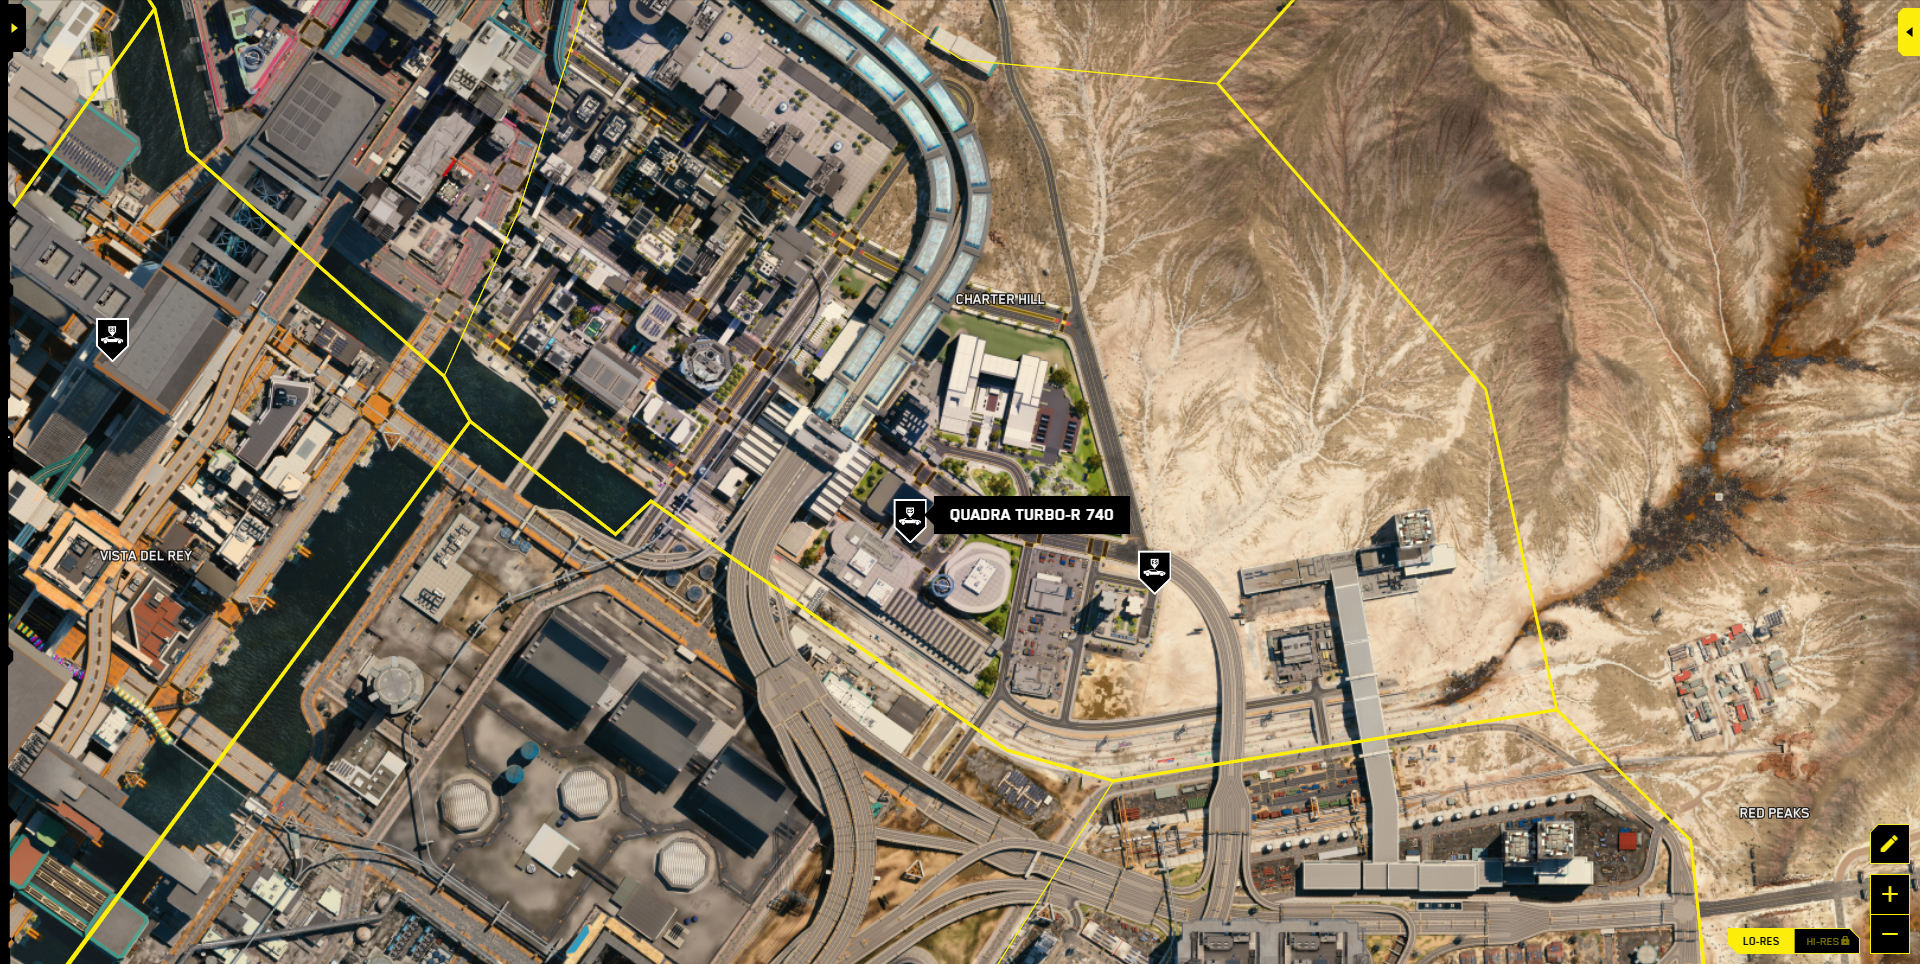
- Turbo-R 740
- Nazar “Racer”
- Ayrondit Gvinevr
- Colby CX410 “Butte”
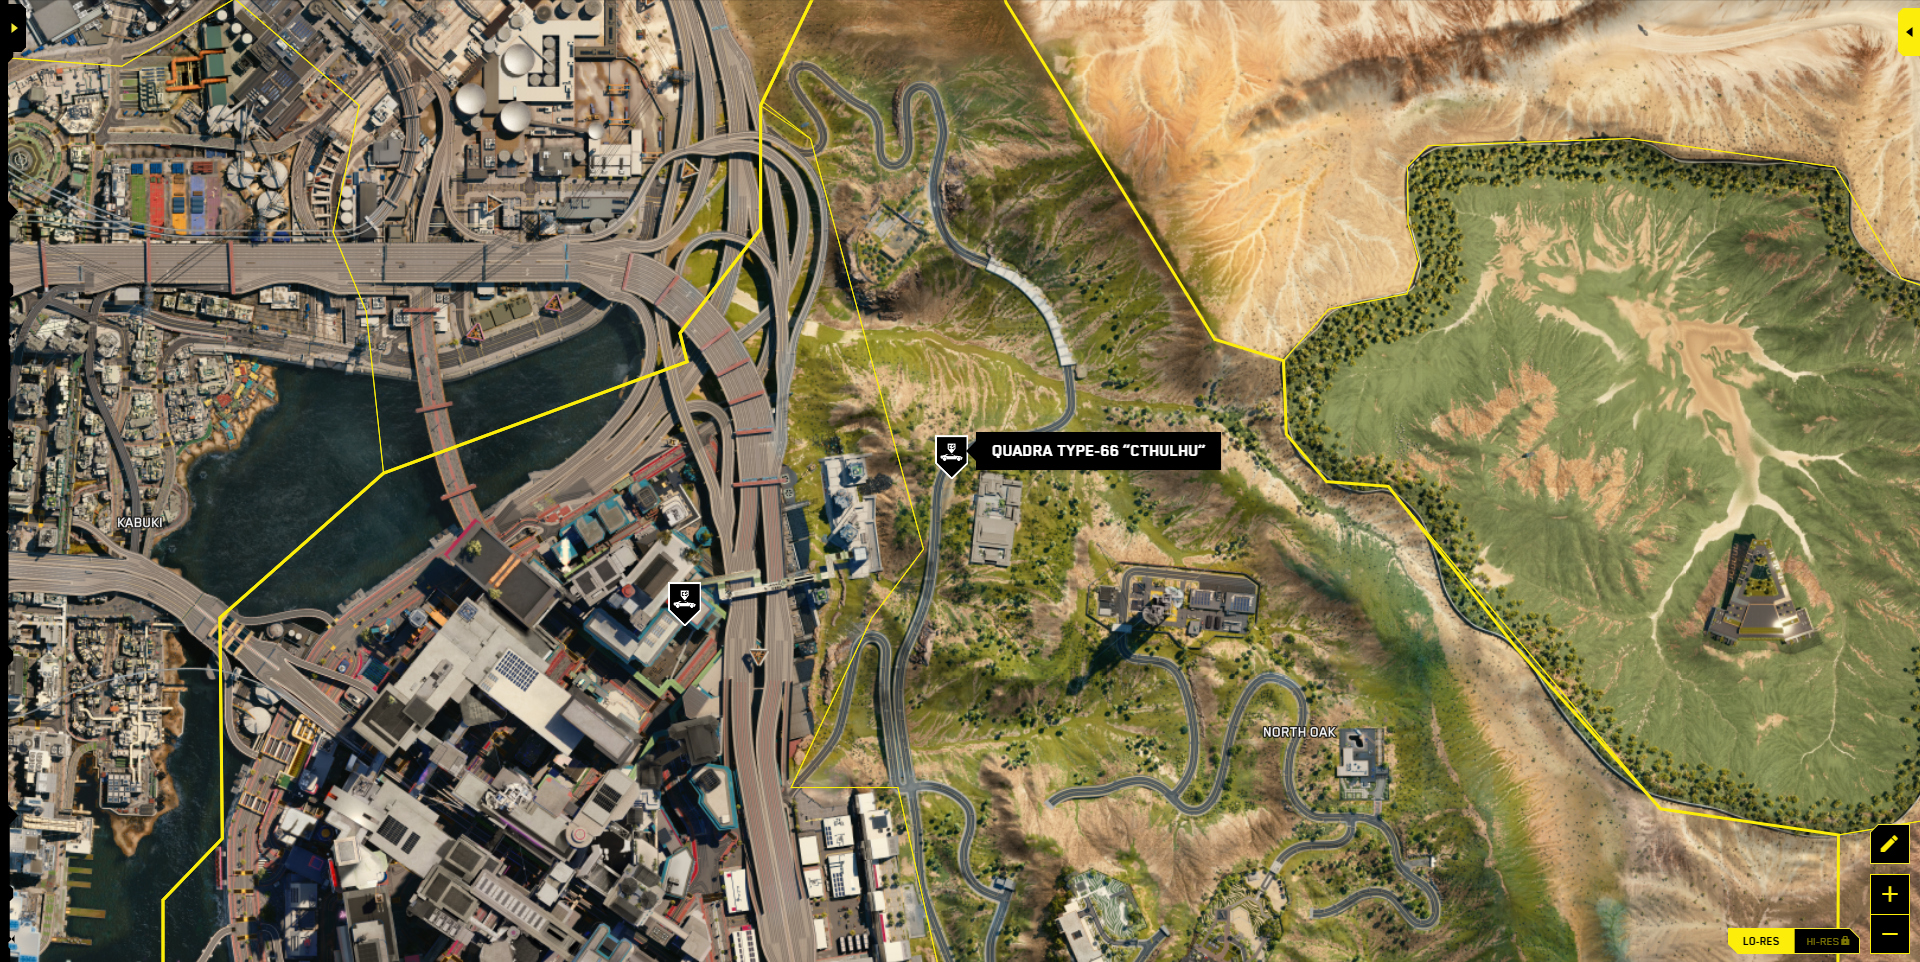
- Tayp-66,640 TS
- Makino MTL1
- Cortés V5000 “Velor”
- Apolo
- Columbus of V340-F “Freyt”
- Emperor 620 Ragnar
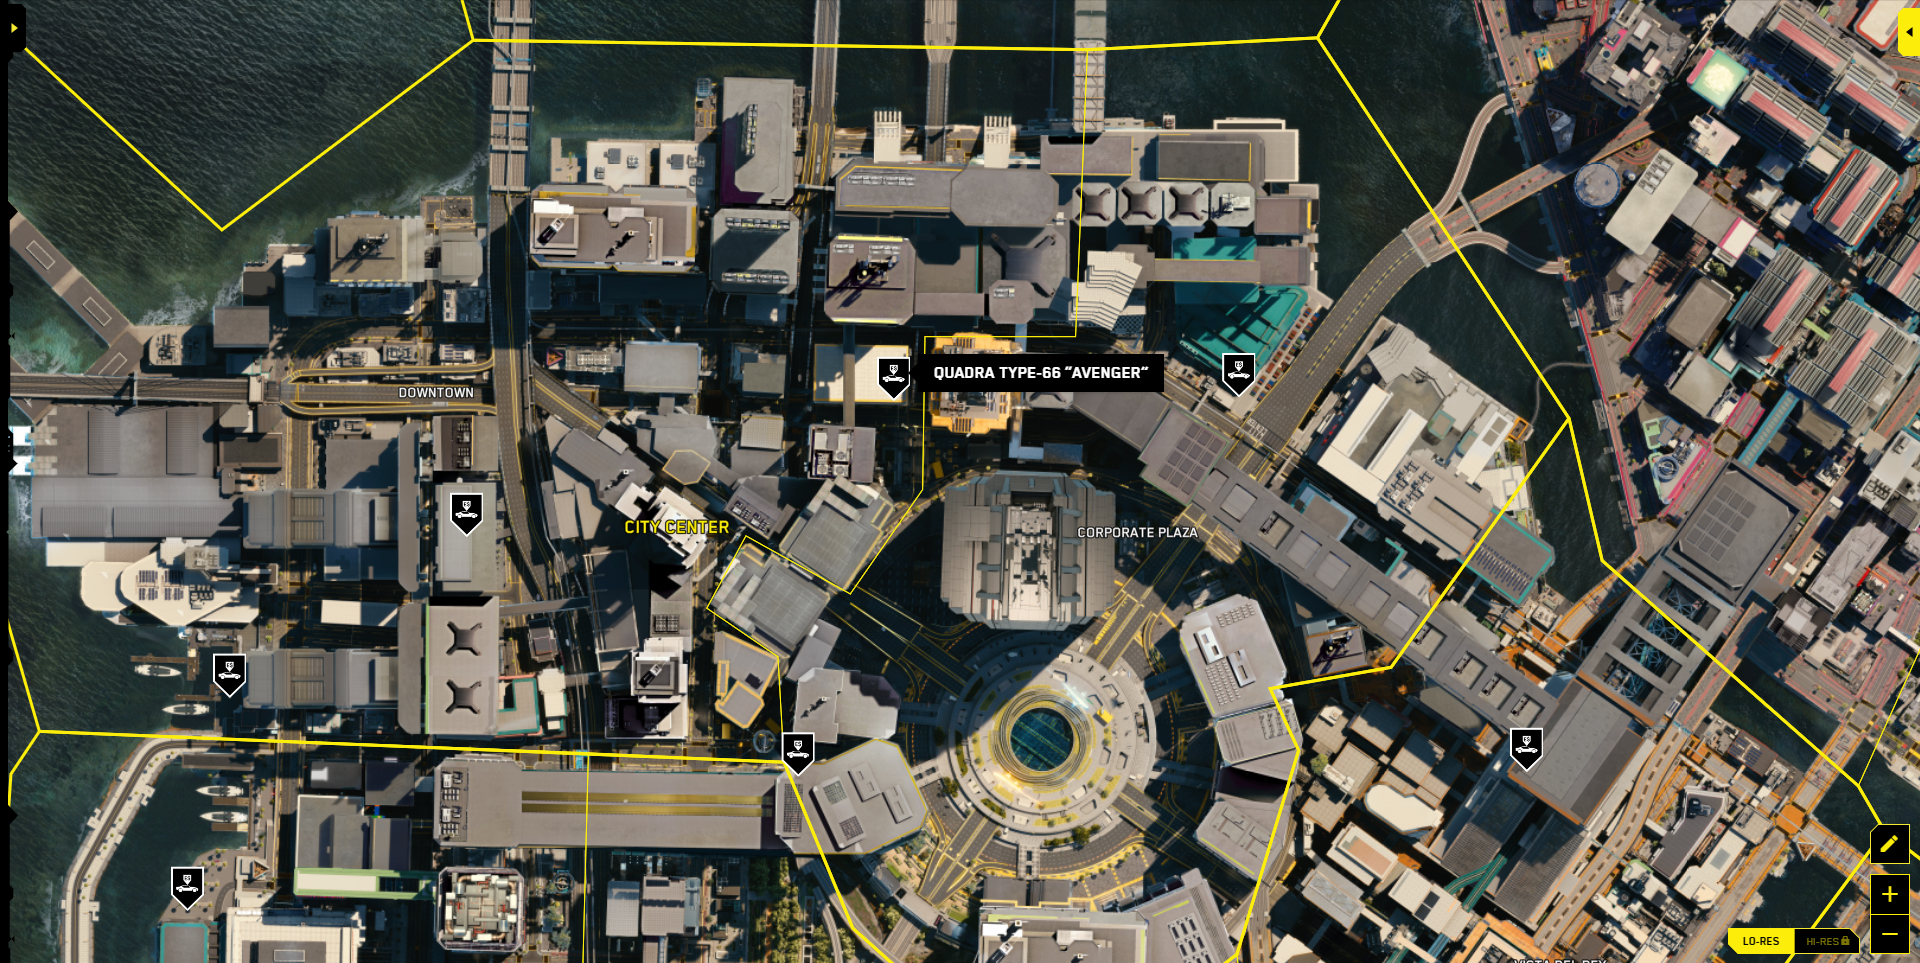
- Tayp-66 Avenger
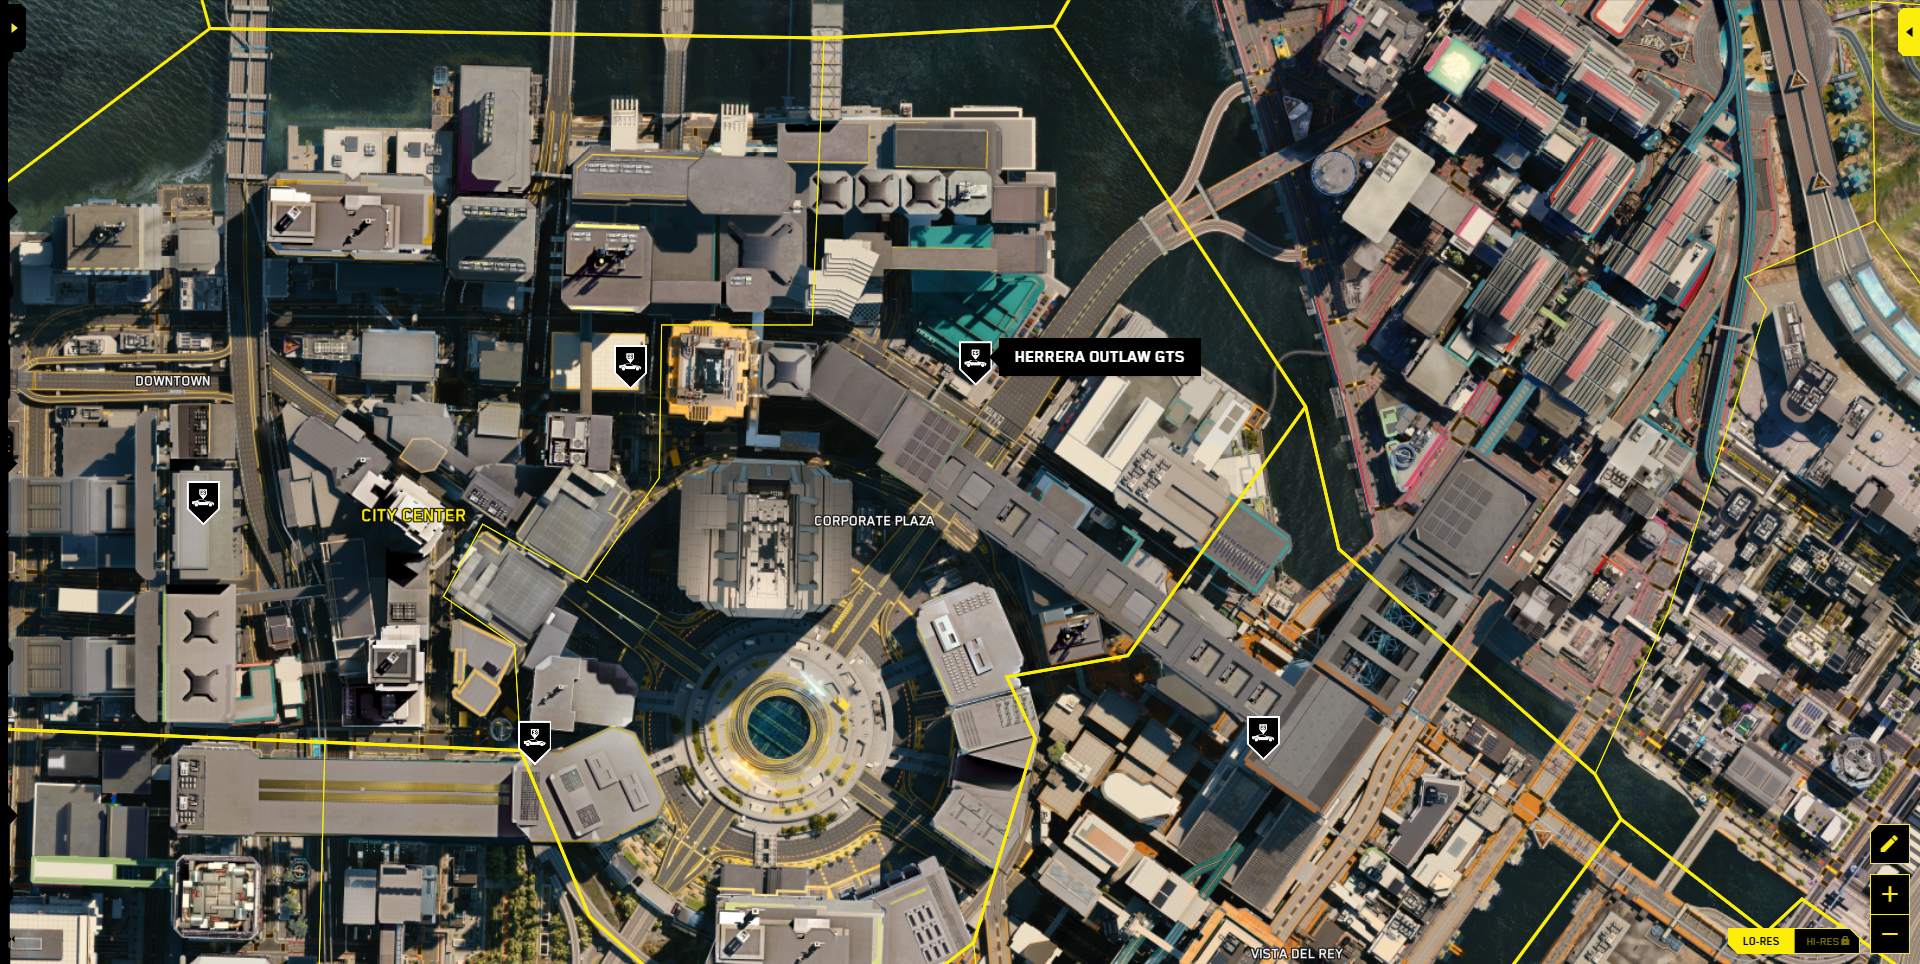
- Autlo GTS
- Kaliburn
- Galen “Gecko”
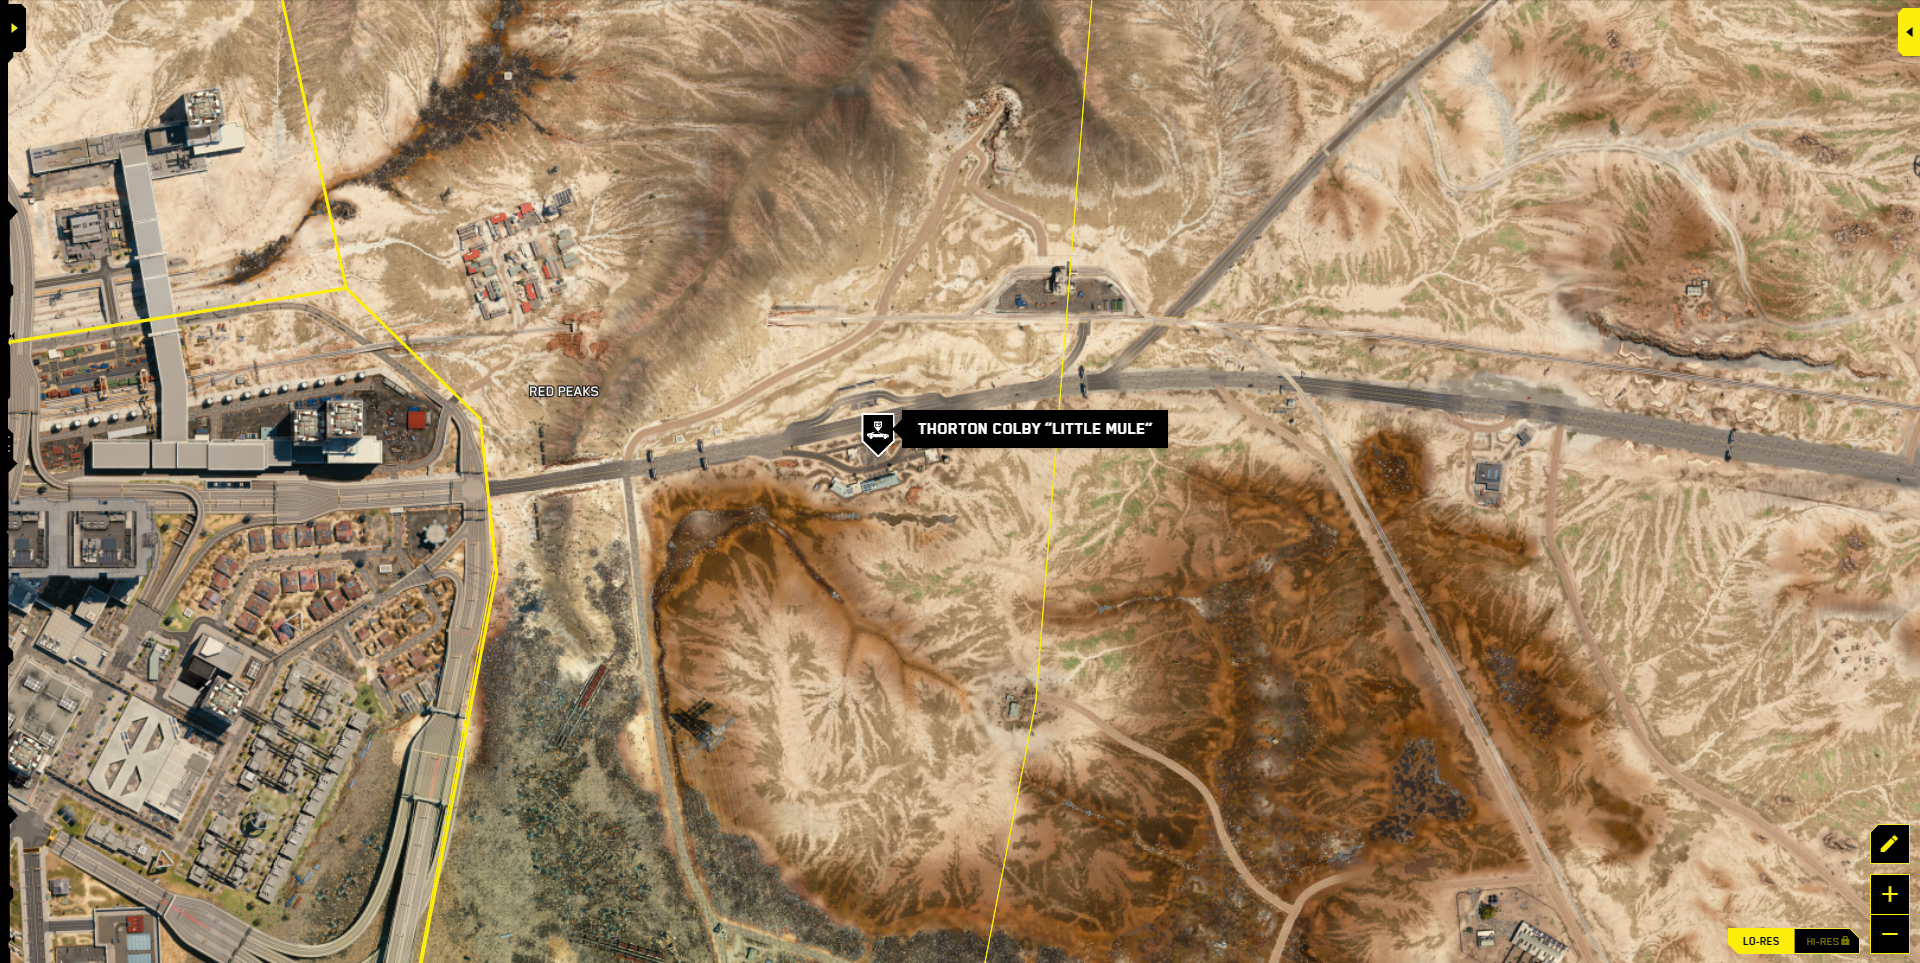
- Colby “Mule”
- Zion “Coyote”
- Tayp-66 Havelina
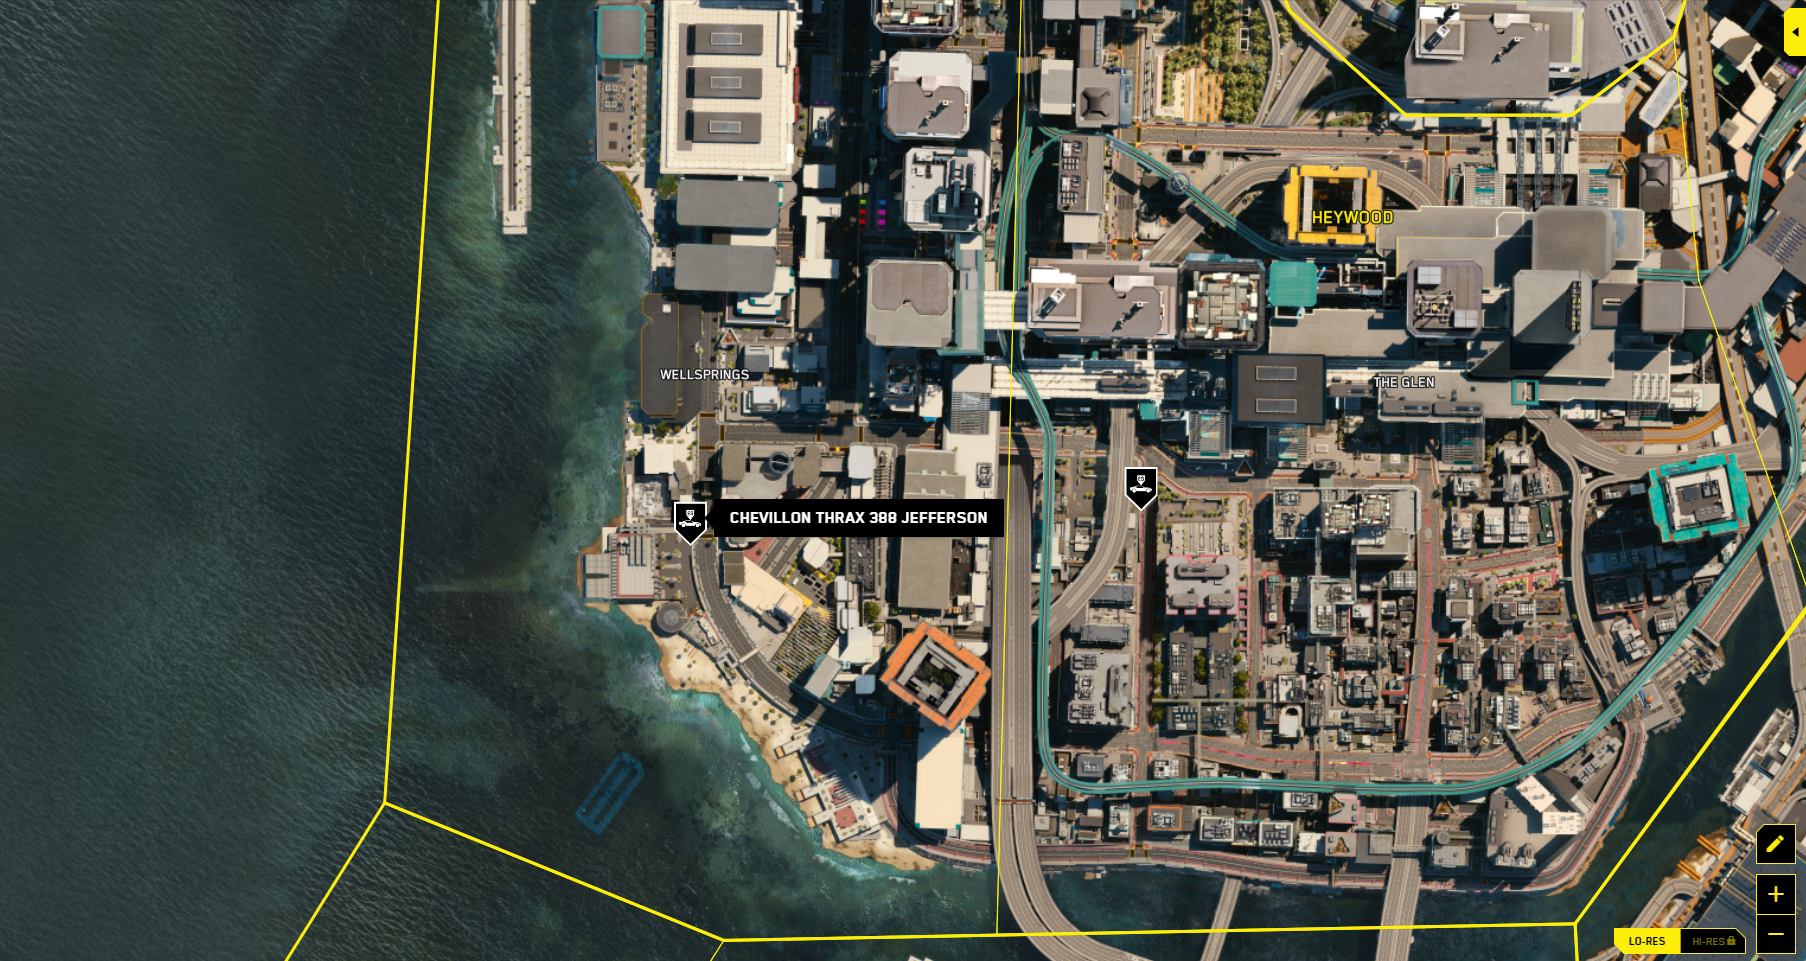
Or use my pictures of the location of every car available for purchase.

Result
That’s all. After completing these tasks, Cyberpunk 2077 will be 100% completed.
This is all about Cyberpunk 2077 – 100% Completion Guide; I hope you enjoy reading the Guide! If you feel like we should add more information or we forget/mistake, please let us know via commenting below, and thanks! See you soon!
- All Cyberpunk 2077 Posts List


Leave a Reply