Hey there, welcome to this post, This Counter-Strike: Global Offensive – How to Air Strafing & Bunn hopping Guide was written to be helpful to you, and we genuinely hope that you do.
Bunnyhopping, commonly referred to as bhopping for short, is an exploit of a very popular bug found in games like Quake III Arena, Half-Life, and Counter-Strike that allows a player to exceed the game-defined speed limit and generate new methods of play and fast emergent gameplay. Players enjoy competing against themselves with this skill-based mechanic as it requires practice to master. Thus it may be useful for game developers looking to incorporate bunnyhopping into their games. The purpose of this article is to define what bunnyhopping is and why game developers need to consider it when creating their FPS movement code using open source code examples provided as examples throughout – everything used herein can be downloaded or reused freely available here
What is Air Strafing?
The principle of Air Strafing is the most crucial aspect of bunnyhopping. You can see the player fast wiggle his mouse left and right in the video above. He syncs his mouse movement with his movement keys when he does this. That is, he holds the a (left movement) key when moving the mouse to the left, and the d (right movement) key when moving the mouse to the right. From the player’s point of view, this results in a quick rise in speed. This helps to explain why bunnyhopping is a skill-based mechanic. To precisely sync your mouse movement to your movement keys, you must have a high level of expertise and accuracy.
Explaining Air Strafing Mathematically
Air Strafing works because of the way movement acceleration is handled in the Quake Engine. It is possible in any game that is based off of the Quake engine, such as Source. If you would like you can check out the Quake III movement code – [github.com] or the Half Life 2 movement code – [github.com] on GitHub. Remember that both codebases contain engine-specific code so they aren’t as easy to integrate as the code in this article. Nevertheless it is still interesting to see the origins of the mechanic.
In the Quake III acceleration code, movement speed is limited in an exciting and nonobvious way. Instead of limiting velocity directly, only the projection of the current velocity onto acceleration is limited. To explain this further, I need first to explain what vector projection is.
Vector Projection
The projection of a vector a onto a vector b (also known as the component of a onto b) is “The orthagonal projection of a onto a straight line parallel to b” (To quote Wikipedia – [wikipedia.org] ).This concept is illustrated below.
Vector projection can be represented by the equation:
Vproj = |a| * cos( Θ ) = a • b̂
Above, • represents a dot product – [wikipedia.org] and b̂ is the unit vector of b (that is, a vector in the direction of b and a length of 1). The dot product notation works because a dot product is equal to
|a| * |b| * cos(Θ)
. This is preferable because it is faster to perform than a cosine calculation.
Limiting the Projection
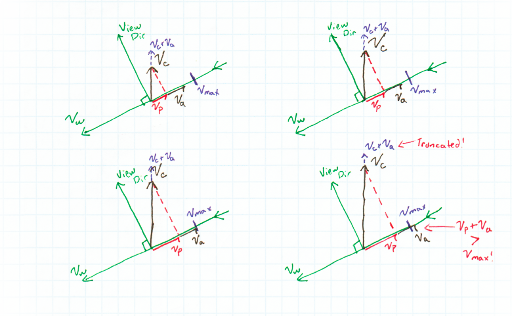
I’ll repeat here what I said before: Instead of limiting velocity directly, only the projection of the current velocity onto acceleration is limited. This allows the player to exceed the maximum velocity in certain situations. Recall that to airstrafe you must sync your movement keys with your mouse movement. Let’s model this mathematically:
Using projection to limit speed. “Time 0” is on the top left, Time 1 is on the top right, etc. Here is the key to this diagram:
- Vc = The current velocity before any calculations
- Vw = The direction that the player wants to move in (the so-called wish direction).
- Vp = Vc projected onto Vw. Keep in mind that we are only considering magnitude in this calculation, so the direction of the projection doesn’t matter.
- Va = The acceleration to be added to Vp. The magnitude of this acceleration is server-defined.
- Vmax = The server-defined maximum velocity. If Vp + Va exceeds this, then Va is truncated.
In the above example, the player is both moving and turning left. After 4 physics ticks, Vp passes the server-defined speed limit Vmax and Va is truncated to account for this. Note, however, that Vc still substantially exceeds Vmax!
In Code
Here is my implementation of the above concepts in code:
 private Vector3 Accelerate(Vector3 accelDir, Vector3 prevVelocity, float accelerate, float max_velocity)
{
 float projVel = Vector3.Dot(prevVelocity, accelDir); // Vector projection of Current velocity onto accelDir.
 float accelVel = accelerate * Time.fixedDeltaTime; // Accelerated velocity in direction of movment

 // If necessary, truncate the accelerated velocity so the vector projection does not exceed max_velocity
 if(projVel + accelVel > max_velocity)
 accelVel = max_velocity - projVel;

 return prevVelocity + accelDir * accelVel;
}
Friction
Friction also plays an important role in bunnyhopping as well as Quake-style movment in general. Bunnyhopping earned its name because the player literally has to hop in order to gain speed. This is because if players didn’t do this friction would reduce their speed.
Why, then, is it possible to bunnyhop at all? Wouldn’t you always hit the ground and thus lose speed? This actually is not true in the Quake or Source engines because there is a 1-frame window where friction is not applied when the player hits the ground. This means that the player has a single frame to input the jump command without losing speed – another reason why bunnyhopping is so hard! If you want to retain the skill-based nature of bunnyhopping then be sure to add this delay into your physics calculations. If you want bhopping to be accessible to new players, you can add auto-bhopping where the player can simply hold space to automatically jump frame-perfectly.
The actual friction calculation is very simple, and looks like this in code:
 float speed = prevVelocity.magnitude;
if (speed != 0) // To avoid divide by zero errors
{
 float drop = speed * friction * Time.fixedDeltaTime;
 prevVelocity *= Mathf.Max(speed - drop, 0) / speed; // Scale the velocity based on friction.
}
Of course, friction is only applied when the player is grounded. friction is a server-defined variable of the approximate range 1-5. The higher friction is, the less slippery surfaces become. If you are familiar with console commands in the Source engine, you may recognize this variable as sv_friction.
Putting it All Together
Here is what all of this looks like in code:
 // accelDir: normalized direction that the player has requested to move (taking into account the movement keys and look direction)
// prevVelocity: The current velocity of the player, before any additional calculations
// accelerate: The server-defined player acceleration value
// max_velocity: The server-defined maximum player velocity (this is not strictly adhered to due to strafejumping)
private Vector3 Accelerate(Vector3 accelDir, Vector3 prevVelocity, float accelerate, float max_velocity)
{
 float projVel = Vector3.Dot(prevVelocity, accelDir); // Vector projection of Current velocity onto accelDir.
 float accelVel = accelerate * Time.fixedDeltaTime; // Accelerated velocity in direction of movment

 // If necessary, truncate the accelerated velocity so the vector projection does not exceed max_velocity
 if(projVel + accelVel > max_velocity)
 accelVel = max_velocity - projVel;

 return prevVelocity + accelDir * accelVel;
}

private Vector3 MoveGround(Vector3 accelDir, Vector3 prevVelocity)
{
 // Apply Friction
 float speed = prevVelocity.magnitude;
 if (speed != 0) // To avoid divide by zero errors
 {
 float drop = speed * friction * Time.fixedDeltaTime;
 prevVelocity *= Mathf.Max(speed - drop, 0) / speed; // Scale the velocity based on friction.
 }

 // ground_accelerate and max_velocity_ground are server-defined movement variables
 return Accelerate(accelDir, prevVelocity, ground_accelerate, max_velocity_ground);
}

private Vector3 MoveAir(Vector3 accelDir, Vector3 prevVelocity)
{
 // air_accelerate and max_velocity_air are server-defined movement variables
 return Accelerate(accelDir, prevVelocity, air_accelerate, max_velocity_air);
}
Those of you who are familiar with the Source engine may once again recognize the sv_accelerate, sv_airaccelerate, and sv_friction convars in this code. Take some time to tweak these server-defined variables to your liking as they determine the feel of your game’s movement.
That’s it! This should be all you need to implement bunnyhopping into your game. If you have any questions or comments please feel free to post in the comments section below. Thank you for reading!
It was a pleasure for us to walk you through the Counter-Strike: Global Offensive – How to Air Strafing & Bunn hopping, and we sincerely hope that you found the information beneficial. Please let us know in the comments section below if you see any mistakes in this piece or if you have any suggestions for how we can improve it. A tremendous amount of gratitude is for your time and effort, and I hope you have a good day today! BHOPLIFE, the author and originator of this post, is to thank for the inspiration. If you liked this post, you should check back regularly because we publish new information every day.
- All Counter-Strike: Global Offensive Posts List


Leave a Reply