A easy and simple to follow guide that explains how to import Source maps into Blender.
Introduction
While there are many ways to import Source maps to blender; I believe I have found one of, if not, the best way to import source maps into blender.
This will import everything from brushes, textures and materials, lights, overlays and more, and will remove anything else that shouldn’t be imported.
Resources
Needed resources
You’ll need:
- Java [Required for BSPSrc] – https://www.java.com/en/ – [java.com]
- BSPSrc – https://github.com/ata4/bspsrc/releases – [github.com]
- Blender Source Tools – http://steamreview.org/BlenderSourceTools/ – [steamreview.org]
- IO VMF Importer – https://github.com/lasa01/io_import_vmf/releases – [github.com]
Download the latest release of BSPSrc, Blender Source Tools and IO VMF Importer
Using these resources
Java:
Download the latest version of Java and launch the installer and
download Java. This is all you need for Java.
BSPSrc:
Download the .zip file from the Github link, uncompress it
and make sure that Java is installed before use.
Blender Source Tools and IO VMF Importer:
Download the .zip files from the Github links, and DO NOT UNCOMPRESS THEM,
and open Blender. Once on blender, go to: Edit > Preferences > Add-ons > Install | And select the the .zip files
Converting the maps
Preparing the Source maps for Blender
Let’s say we are importing the maps from Half-Life 2. You’d first need to locate the maps you want.
Locate the ‘maps’ folder; it should be at
[(Drive):\Steam (Or name
 of the library)\steamapps\common\[(Game)\(Game {Like 'hl2' or 'garrysmod'})\maps]
. This folder location is the same for most Source games. Once in this folder, locate the map you wish to import, let’s say that the map is ‘d1_canals_06’; locate the .bsp file in the maps folder, this will be ‘[mapname].bsp’. For our map, it will be called
‘d1_canals_06.bsp’. Once you have located the map, remember where it is.
Converting the maps to VMF
Due to ‘.bsp’ files not being able to be read by anything but the Source engine, they will not work as they are right now.
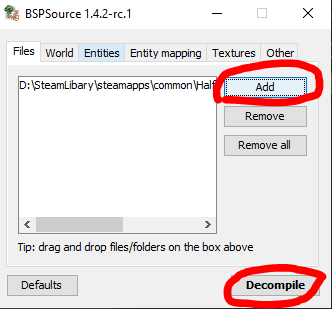
Because of this, we want to convert them into ‘.vmf’ files; this is where BSPSrc comes in handy. Open the BSPSrc folder
[if you uncompressed the ‘.zip’] and launch the file called ‘bspsrc.jar’ or ‘bspsrc.bat’. One opened, click on the button called ‘Add’ and
locate the ‘.bsp’ file we found earlier, for our map we would go to where ‘d1_canals_06.bsp’ and add it. Next, click the decompile button and let BSPSrc do it’s work. It will create a ‘.vmf’ version of the map, and it will be located in the same folder as your
‘.bsp’ file
[(Drive):\Steam (Or name of the library)\steamapps\common\[(Game)\(Game {Like 'hl2' or 'garrysmod'})\maps]
.Now the map is ready to be imported to blender.
Preparing Blender for the import
Preparing Blender for the maps
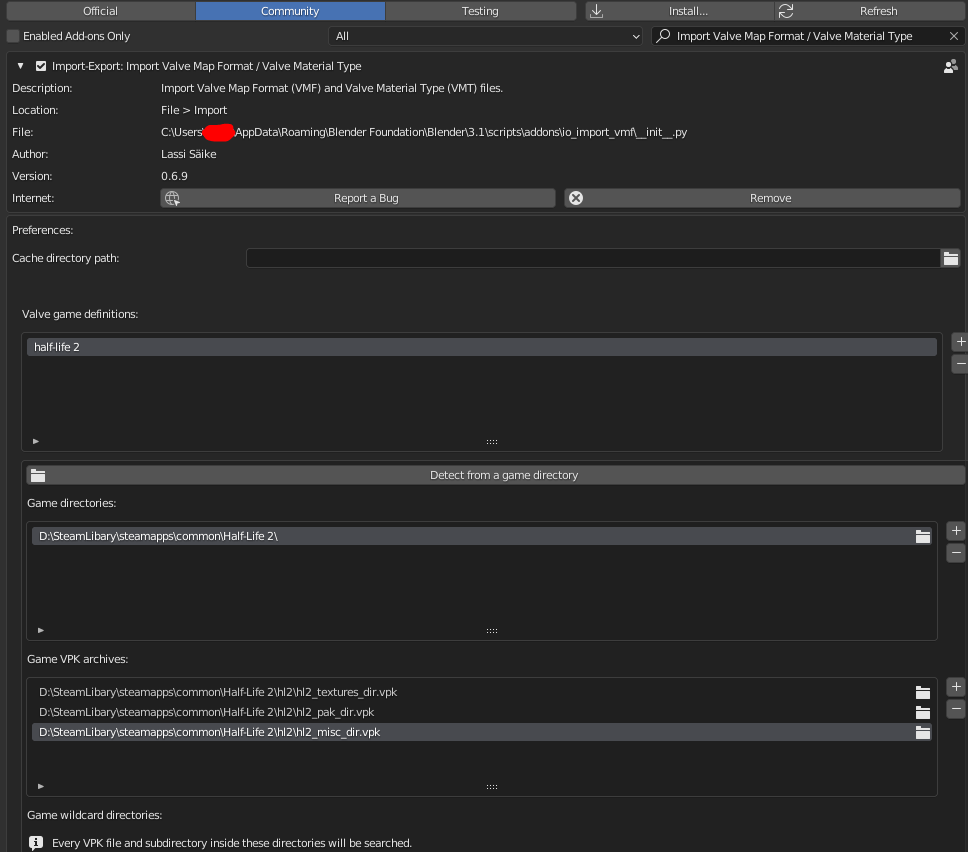
Make sure that you have the Blender Source Tools and IO VMF Importer addons enabled in Blender [If you have not, read “Using these resources”]. Go to: Edit > Preferences > Add-ons and search for
Import Valve Map Format / Valve Material Type
. Click the triangle icon next to the addon’s name, this will open the details and preferences for the addon.
Setting up the addon for the ‘.vmf’ file
- Create a cache folder somewhere on your computer [name it something like ‘Cache’], and add it to ‘Cache Directory’.
- Create a game definition at ‘Valve game definitions’, name it whatever your want. For our map, we will name it ‘Half-Life 2’.
- For ‘Game directories’, add the game folder from
[(Drive):\Steam (Or name of the library)\steamapps\common\]
- For Game VPK archives, add the ‘.vpk’ file with ‘_dir’ [Like ‘pak01_dir.vpk’] on the end. it should be in
[(Drive):\Steam (Or name of the library)\steamapps\common\[(Game)\(Game {Like 'hl2' or 'garrysmod'})\maps]
. For older games like Half-Life 2, you will
need to add two more ‘.vpk’ files, they should be called ‘[Game Name]_textures_dir.vpk’ and ‘[Game name]_sound_misc_dir.vpk’. - You do not need to add anything for ‘Game wildcard directories
Importing the maps into blender
Go to: File > Import > Valve Map Format [.vmf] and import the ‘.vmf’ from the folder it was decompiled to.
Leave everything checked unless you want to only add certain things, and click import, but if you are going to add the map into a software like Unity, MAKE SURE YOU ENABLE “Simple Materials” IN THE MATERIALS SECTION.
Once everything here is what you want, click ‘Import vmf’ and wait for it to import, this may take a little while.
It should eventually import with the textures already applied [Make sure you are in viewport shading], but this will take a while
until all texture are applied. I’m pretty sure the textures will be in the cache folder you set.
End
That’s all
That’s all you need to do for this, you should now have the Source map you want in Blender. You can also do this with maps
that are not from any base Source game, although I don’t recommend this.
Import Source 2 maps into Blender: [Guide Soon]
Thanks for reading the guide, I hope it helped.
I hope you enjoy the Guide we share about Blender – How to Import Maps in Game Guide; if you think we forget to add or we should add more information, please let us know via commenting below! See you soon!
- All Blender Posts List


Leave a Reply