a look at the 5 classes in Fireteam: Elite and basic tips to keep you and your team alive
Intro
This guide will be broken into three basic parts: general tips that apply to all classes, the roles of each individual class in a fireteam, and the skill trees themselves. As a general disclaimer:
What I’m telling you here is not the 100% do it or you will never succeed at life or anything else gospel truth. My play style is not necessarily your play style and vice versa, but there are still some basic rules that govern how we work together to get the job done. Something that becomes especially important on the higher difficulties.
General tips for all classes:
The most important rule that supersedes all: work with and protect your fireteam!!
Even in standard difficulty, trying to Rambo your way through everything will just end with your death and quite possibly everyone else’s for a mission failure, and is guaranteed even by the time you start intense difficulty. That is not to say the difficulty is dark souls level (though it might be reaching that in insane) but the game very much has a Killing Floor quality to it. What I mean is unlike L4D (which is why people keep comparing Fireteam to that is confusing to me) you can’t just sprint through and ditch those not fast enough and think you can complete the mission just fine. You HAVE to work together, covering each other, not leaving people behind to go running off on your own to get the job done.
There are some easy ways to go about this:
a) don’t run off on your own. there are multiple places in corridors or rooms where when a player passes a certain point, you spawn anywhere from three to twenty xenomorphs as well as elite morphs (numbers vary on difficulty). keep your teammates insight.
b) if a character says, “watch for an ambush”, or, “quiet do you hear that?” it means there’s a Prowler nearby. Prowlers, like in Aliens, will be curled up in wait for a character to come nearby, then pounce and hold them down while doing damage. They can be shot off the downed player, but if you can see them before that, you can instead surprise strike them, killing them before they’re a threat.
c) always go for the head. they take more damage, and weapon mods have weak point (headshot) damage modifiers so you can take things down even faster. Elite xenomorphs stagger easier as well if you’re constantly popping them in the head.
d) watch your motion tracker. Remember when I said there are places xenomorphs spawn when you pass? Sometimes they wait until everyone has crossed and attempt to ambush you from behind. If you’re not careful and just rush ahead, they will pincer attack you while you’re dealing with something else, and that can easily wipe you later on. Also, your tracker will show blue pings for elite xenomorphs, and orange for the heavy-duty elite xenomorphs.
e) your best loadout is something at range and something for ‘close encounters’. While this doesn’t always mean a rile/shotgun combo, realize that when you’re holding against the horde there are a good chance xenomorphs are going to get into melee range with you. Have something to deal with that issue as well as something to thin them out as much as possible from as far away as you can.
f) watch your fire lanes. Starting as early as intense difficulty, friendly fire is activated, so you need to watch yourself from running in front of other people’s lanes of fire and vice versa. Ideally, your team will keep a general center/front/right formation to try to stay out of each other’s line of fire. However, when sh** hits the fan formation usually isn’t a top priority so you still have to check your fire. Having a general fallback plan, however, will save you a lot of health and trouble.
g) dodge roll can really save your life. It will take practice to learn the tells, but each xenomorph, from the basic runners, to every elite morph, has a tell for when it’s about to attack. If it’s a more obvious tell by an elite, then they’re probably about to do a grapple attack which on the highest difficulties is an instant kill. Watch for when they coil up, then roll to aside to avoid the attack. Usually, when missing there is a brief recovery window where you can light them up or make some space.
h) weapons level for all classes, regardless of who uses it. While this is not a make or break deal, as you take weapons on missions, they gain experience as well, and they gain a star when they ‘level up’. Each weapon maxes at 4 stars. You can see what each star/level does when you select the weapon on the bottom left of your screen. While the individual benefits are not profound, every little bit can help on the field of battle. As an added bonus, if you level the pulse rifle to 4 stars with a Gunner, Doc, who can also use rifles, will be able to use the pulse rifle at 4 stars.
Gunner: Middle of the Road
The Gunner class is the basic Grunt: he doesn’t specialize in anything so he doesn’t have any particular strengths, but at the same time he doesn’t have any particular weaknesses either.
Gunner’s two skills are:
Overclock: Increases fire rate for you and nearby allies, increases your own reload speed.
Frag Grenade: A thrown grenade that detonates on impact.
And it’s passive is:
Stay on Target: Dealing damage grants you bonus damage stacks, which caps at 10. When you stop dealing damage these stacks decay.
The Gunner gets a rifle slot and a CQW (close-quarters weapon) slot.
Gunner is great at filling the gaps and adapting to multiple situations. Overclock helps the team shoot faster while Frag grenades can deal with a group of runners. Later on, there are skill upgrades for overclocking to increase and add new benefits for teammates, and large increases in benefits for yourself.
On a fireteam, a Gunner will not take care of CC (crowd control) or supply overwhelming firepower, but they can still do a little of both. By having both a rifle and shotgun, not only do they have all ranges covered, but they can use one weapon to thin the numbers and have another to kill that big one charging in.
Demolisher: I like guns…
Demolisher is exactly what you’d expect from its class name: it’s the heavy that brings in the overwhelming firepower to the situation. While with one notable exception, the Demolisher does not really have any weapons designed for close range, instead Demolishers are equipped to destroy everything before they get close to the fireteam.
The Demolisher’s two skills are:
Micro Rockets: Launcher 3 rockets in a spread that detonate on impact, doing damage to the area and staggering anything that survives.
Blastwave: Release a concussion blast around you, knocking enemies away and doing damage.
Demolisher’s passive is:
Clear the Room: activating an ability grants 1 stack, and every enemy hit increases the stack by 1. For every stack of Clear the Room, gain 2.5% gun damage that lasts for 15 seconds. Gaining a new stack makes previous ones expire.
The Demolisher has a rifle slot and a Heavy weapon slot.
There is not much more to say about this class that hasn’t already been said. Demolisher’s use overwhelming ranged firepower to destroy everything approaching the fireteam. Later skill tree unlocks give the Demolisher extra stagger power (and/or resist) as well as ways to debilitate enemies hit by skills so they take even more damage. There are two major downsides to Demolisher, however. One is that they have no weapon designed for CQC, so point-blank can cause issues for a Demolisher that does not have Blastwave ready. Another is that their heavy weapon can easily chew through ammo, meaning on higher difficulties where your max ammo is reduced, you may be needing to rely quite a bit on your sidearm…
Technician: A Man and his Turret
Technician’s firepower on their own is, compared to the other classes, fairly weak, however, the Technician’s kit is set purely on support and with a proper application of this kit, can turn a tough horde fight into target practice.
Technician’s two skills are:
Sentry Turret: Place a 360 turret in front of you that will automatically fire at enemies. After placing it you can pick it up to redeploy.
Charged Coils: Throw a device that lodges into the target, zapping everything in the area (as well as the xenomorph it’s lodged in), damaging enemies and reducing movement. This ability can also be thrown on any surface (walls, ceilings, floors).
Technician’s passive is:
Cross-Platform Synergy: Allies near your turret take 10% less damage, and when you stand near it, it regenerates 5% health/sec.
The Technician gets a Hand Gun slot, and a CQW slot.
The Technician is the only class with true CC abilities. Charged coils in particular is especially good at CC since it slows anything touched by it’s electrical radius while also giving it an electrified effect, which has the extra benefit of making it easier to spot and can also be mod’d later in the skill tree to reduce the damage of any enemy under it’s effect. This makes it easier to keep enemies away from you and easier to cluster for other members to use aoe skills to take out large groups all at once. Coils has 3 ‘charges’ that can be used separately and recharge one at a time.
Technician’s other skill, the Sentry Turret is less useful while on the go, however for any horde section or any time a larger number of xenomorphs are incoming, the turret is free additional firepower while also giving a damage reduction aura. The turrets damage can be increased, and unlike turrets used via consumables, have infinite ammo and duration until it is either picked up, or destroyed. Approaching any turret you place gives you the option to “reclaim” it, picking it up and putting it on a 2s cooldown before it can be reset. If you hit the skill button again or if damaged enough by xenomorphs, it will be destroyed and put on it’s full cooldown timer.
Doc: Feel-good Man
Mostly self-explanitory, the Doc class has an additional healing method that does not involve aid kits, as well as a team buff skill. Doc also benefits the most from the group staying together through his passive.
The Doc’s skills are:
Trauma Station: Places a small kit on the ground which projects and aura. Standing in the aura will heal anyone injured within it over time, however it’s supply is limited. Can be picked up and redeployed at will.
Combat Stims: Increases your accuracy and stability by 50%, your stamina regen by 30%, and all nearby allies will gain 15% movement speed.
Doc’s passive is:
For each nearby ally, your ability recharge rate increases by 15%. Picking up an aid kit will restore a portion of your Trauma Station’s energy.
The Doc has a Rifle slot, and Hand Gun slot.
While the Doc’s firepower is average, like the Technician, that isn’t his role. While the Technician assists the team by disrupting xenomorphs, the Doc assists the team by making them faster and keeping them healthy. Trauma Station works by, as the skill states, laying down a device on the ground and projecting and aura. Any injured fireteam member who steps within it will have their health quickly regenerated, while depleting energy from the station. Only members who are injured will be healed and drain energy from the station, so you do not need to worry about wasting energy or keeping track of when the station is deployed.
Doc’s skill upgrades can make combat stims stronger, or make the Doc himself more resilient. He also has other skill upgrades that makes his passive stronger, or gives the group additional benefits by sticking together.
Recon: The Specialist
Recon is the class you unlock by completing the campaign, as well as the extreme and insane difficulty levels. Recon’s skill set is very unique, allowing him to focus more on self buffing or squad enhancement. His skills also do a mixture of both.
Recon’s skills are:
PUPS: a small drone flies out, marking enemies for you and your fireteam by giving them a red outline, as well as reducing their damage by 20%.
Support Drone: Place a drone, which then creates an aura. Inside the aura, allies and the Recon will be given a clip of ammo periodically, have their accuracy and stability increased by 20%, and gain 10 health per kill while inside the aura.
Recon’s passive is:
Focus: Getting 2 headshot kills within 10 seconds gives a stack of Focus. Each stack of Focus gives 10% accuracy and stability.
Recon gets a rifle slot, and CQW slot.
Recon is a uniquely specialized class in that his skills help designate targets for the fireteam while also allowing them to fight for longer. Recon has some of the highest cooldown times for all of the classes, but they are highly potent and specialized for what they do. An important note about the PUPS skill: it will mark nearby xenomorphs through all terrain. It is a GREAT way to spot prowlers without having to risk yourself, and it marks enemies in a full 360 degree area.
Most of Recon’s skill tree is aimed at enhancing his weapon output through bonus’ to accuracy, stability, and reload. However he also has a few skills that center around bonus’ for helping allies who are in trouble.
Skill Trees
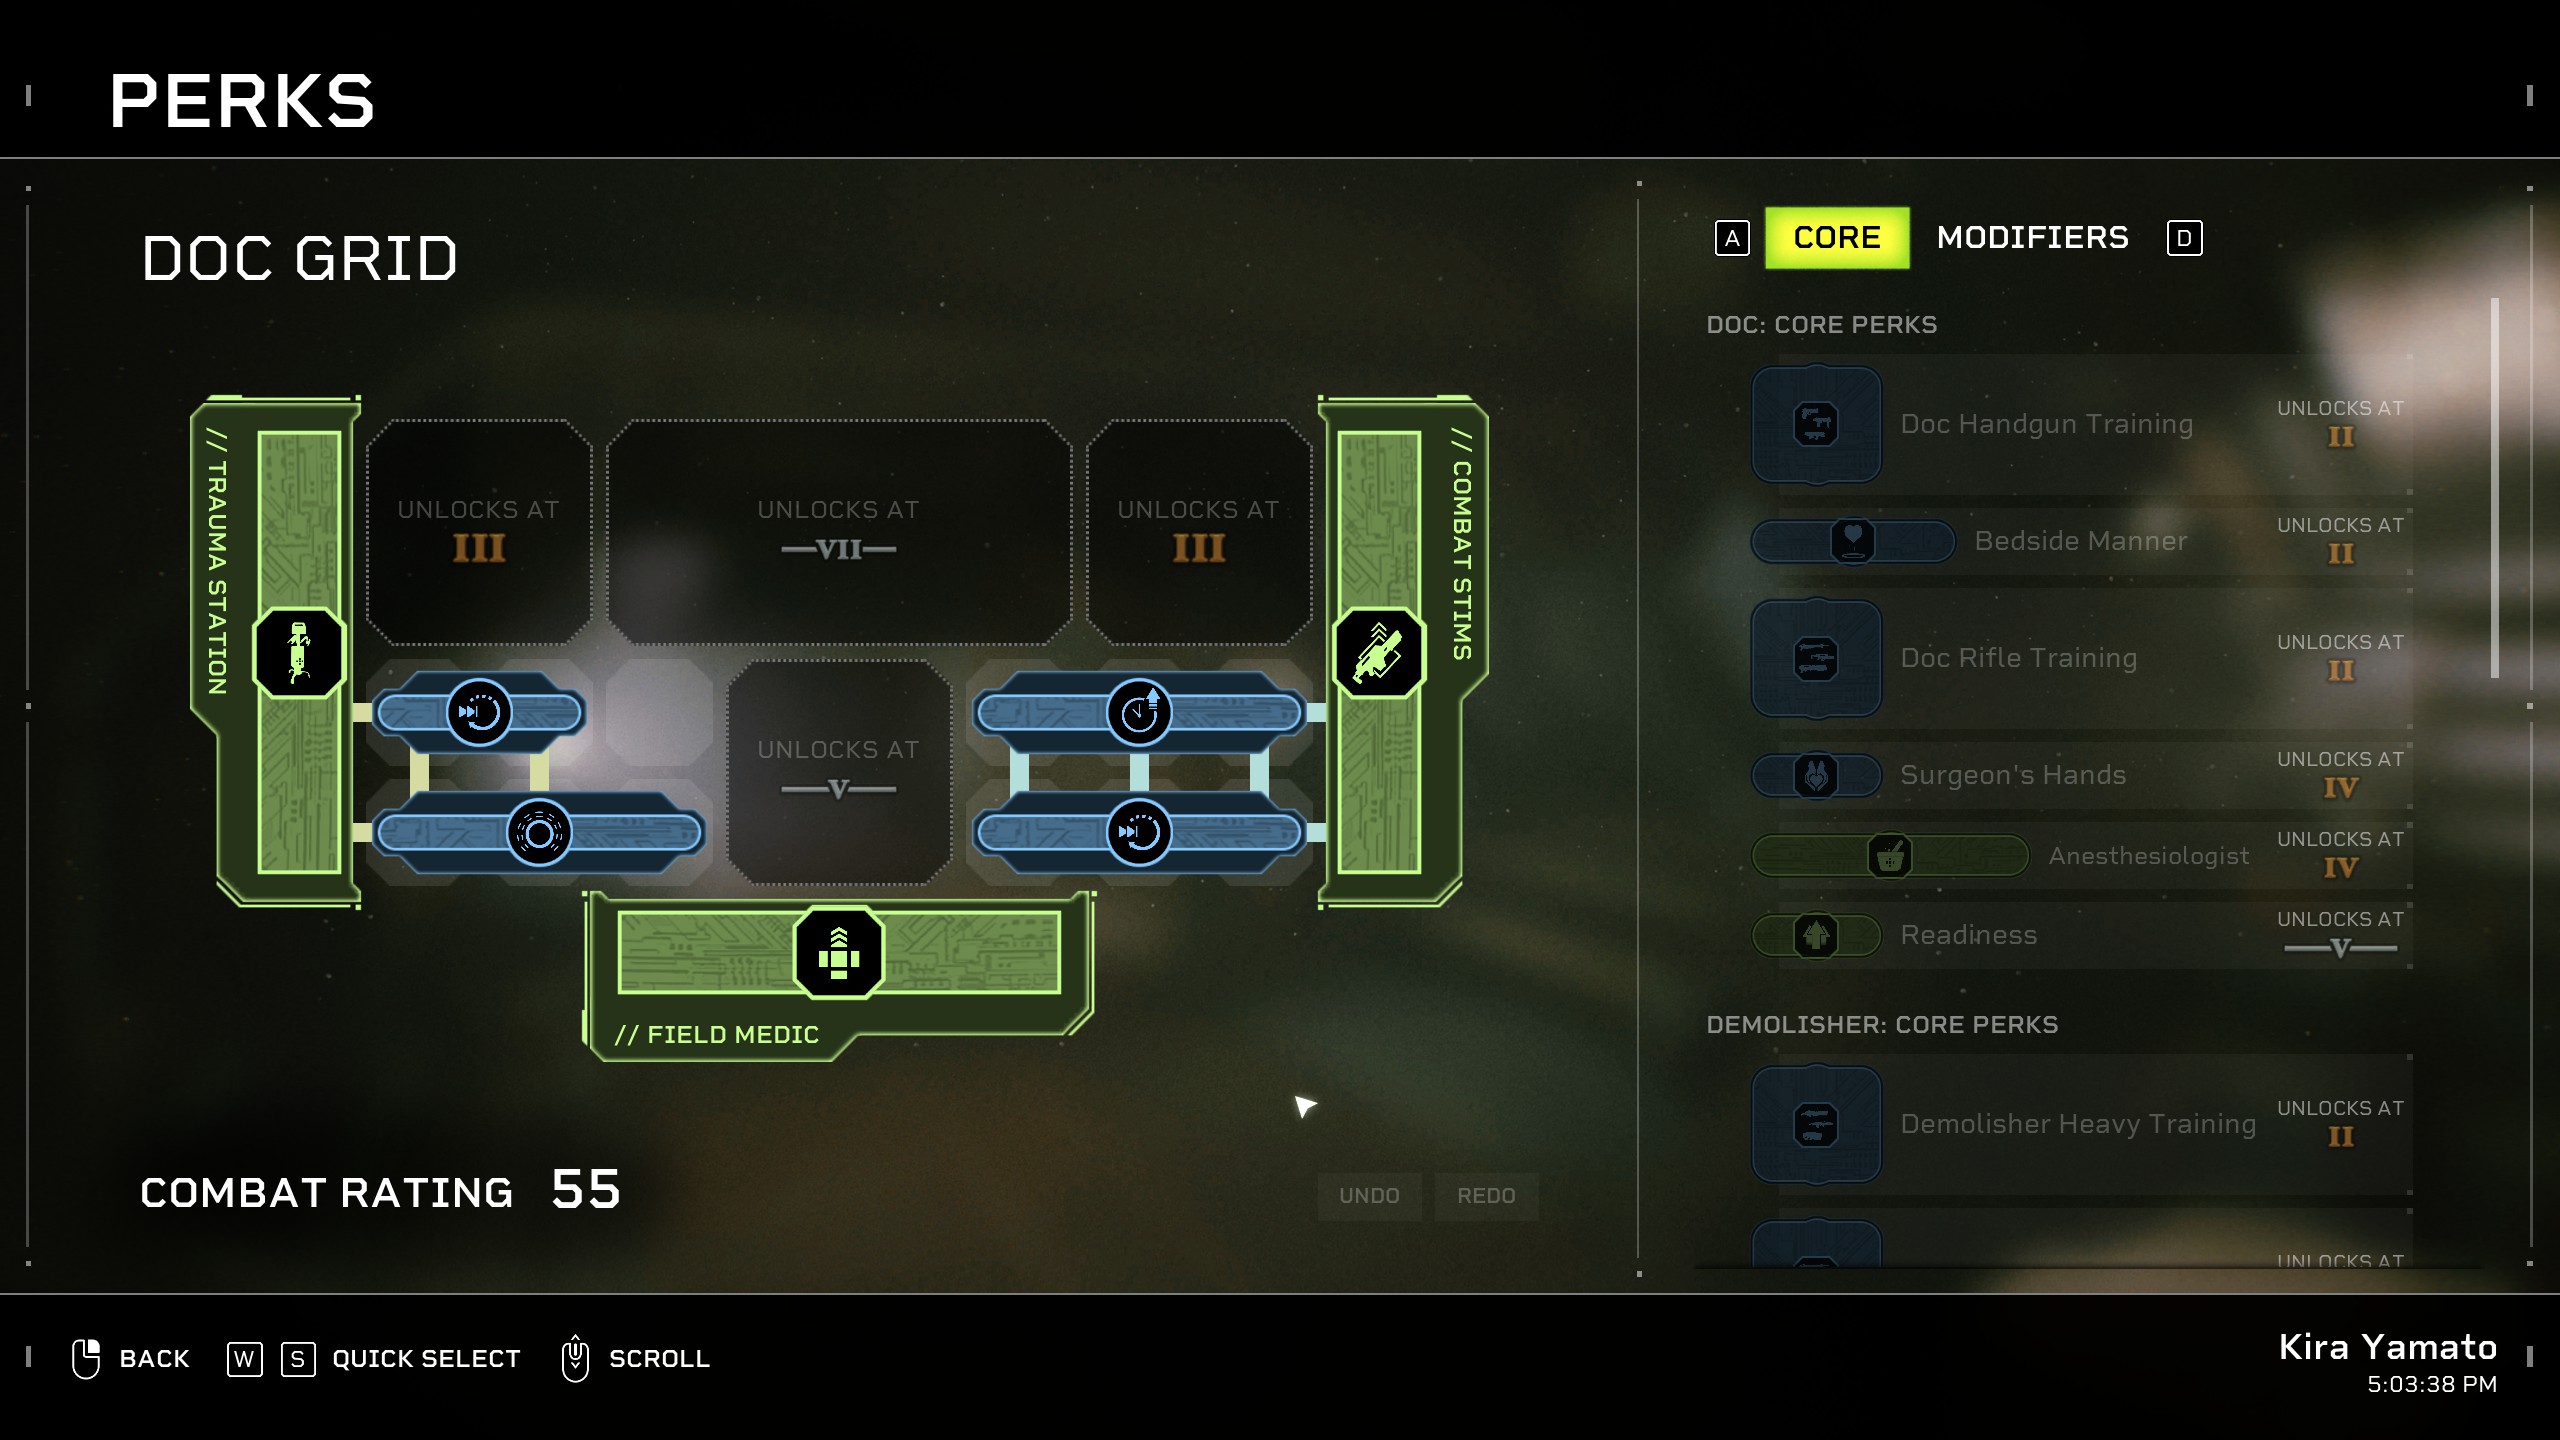
Skill tree’s add additional modifiers to your skills and/or passive, or provide specific weapon type bonus’ for your character. When you first use a character, your perk tree will look something like this:
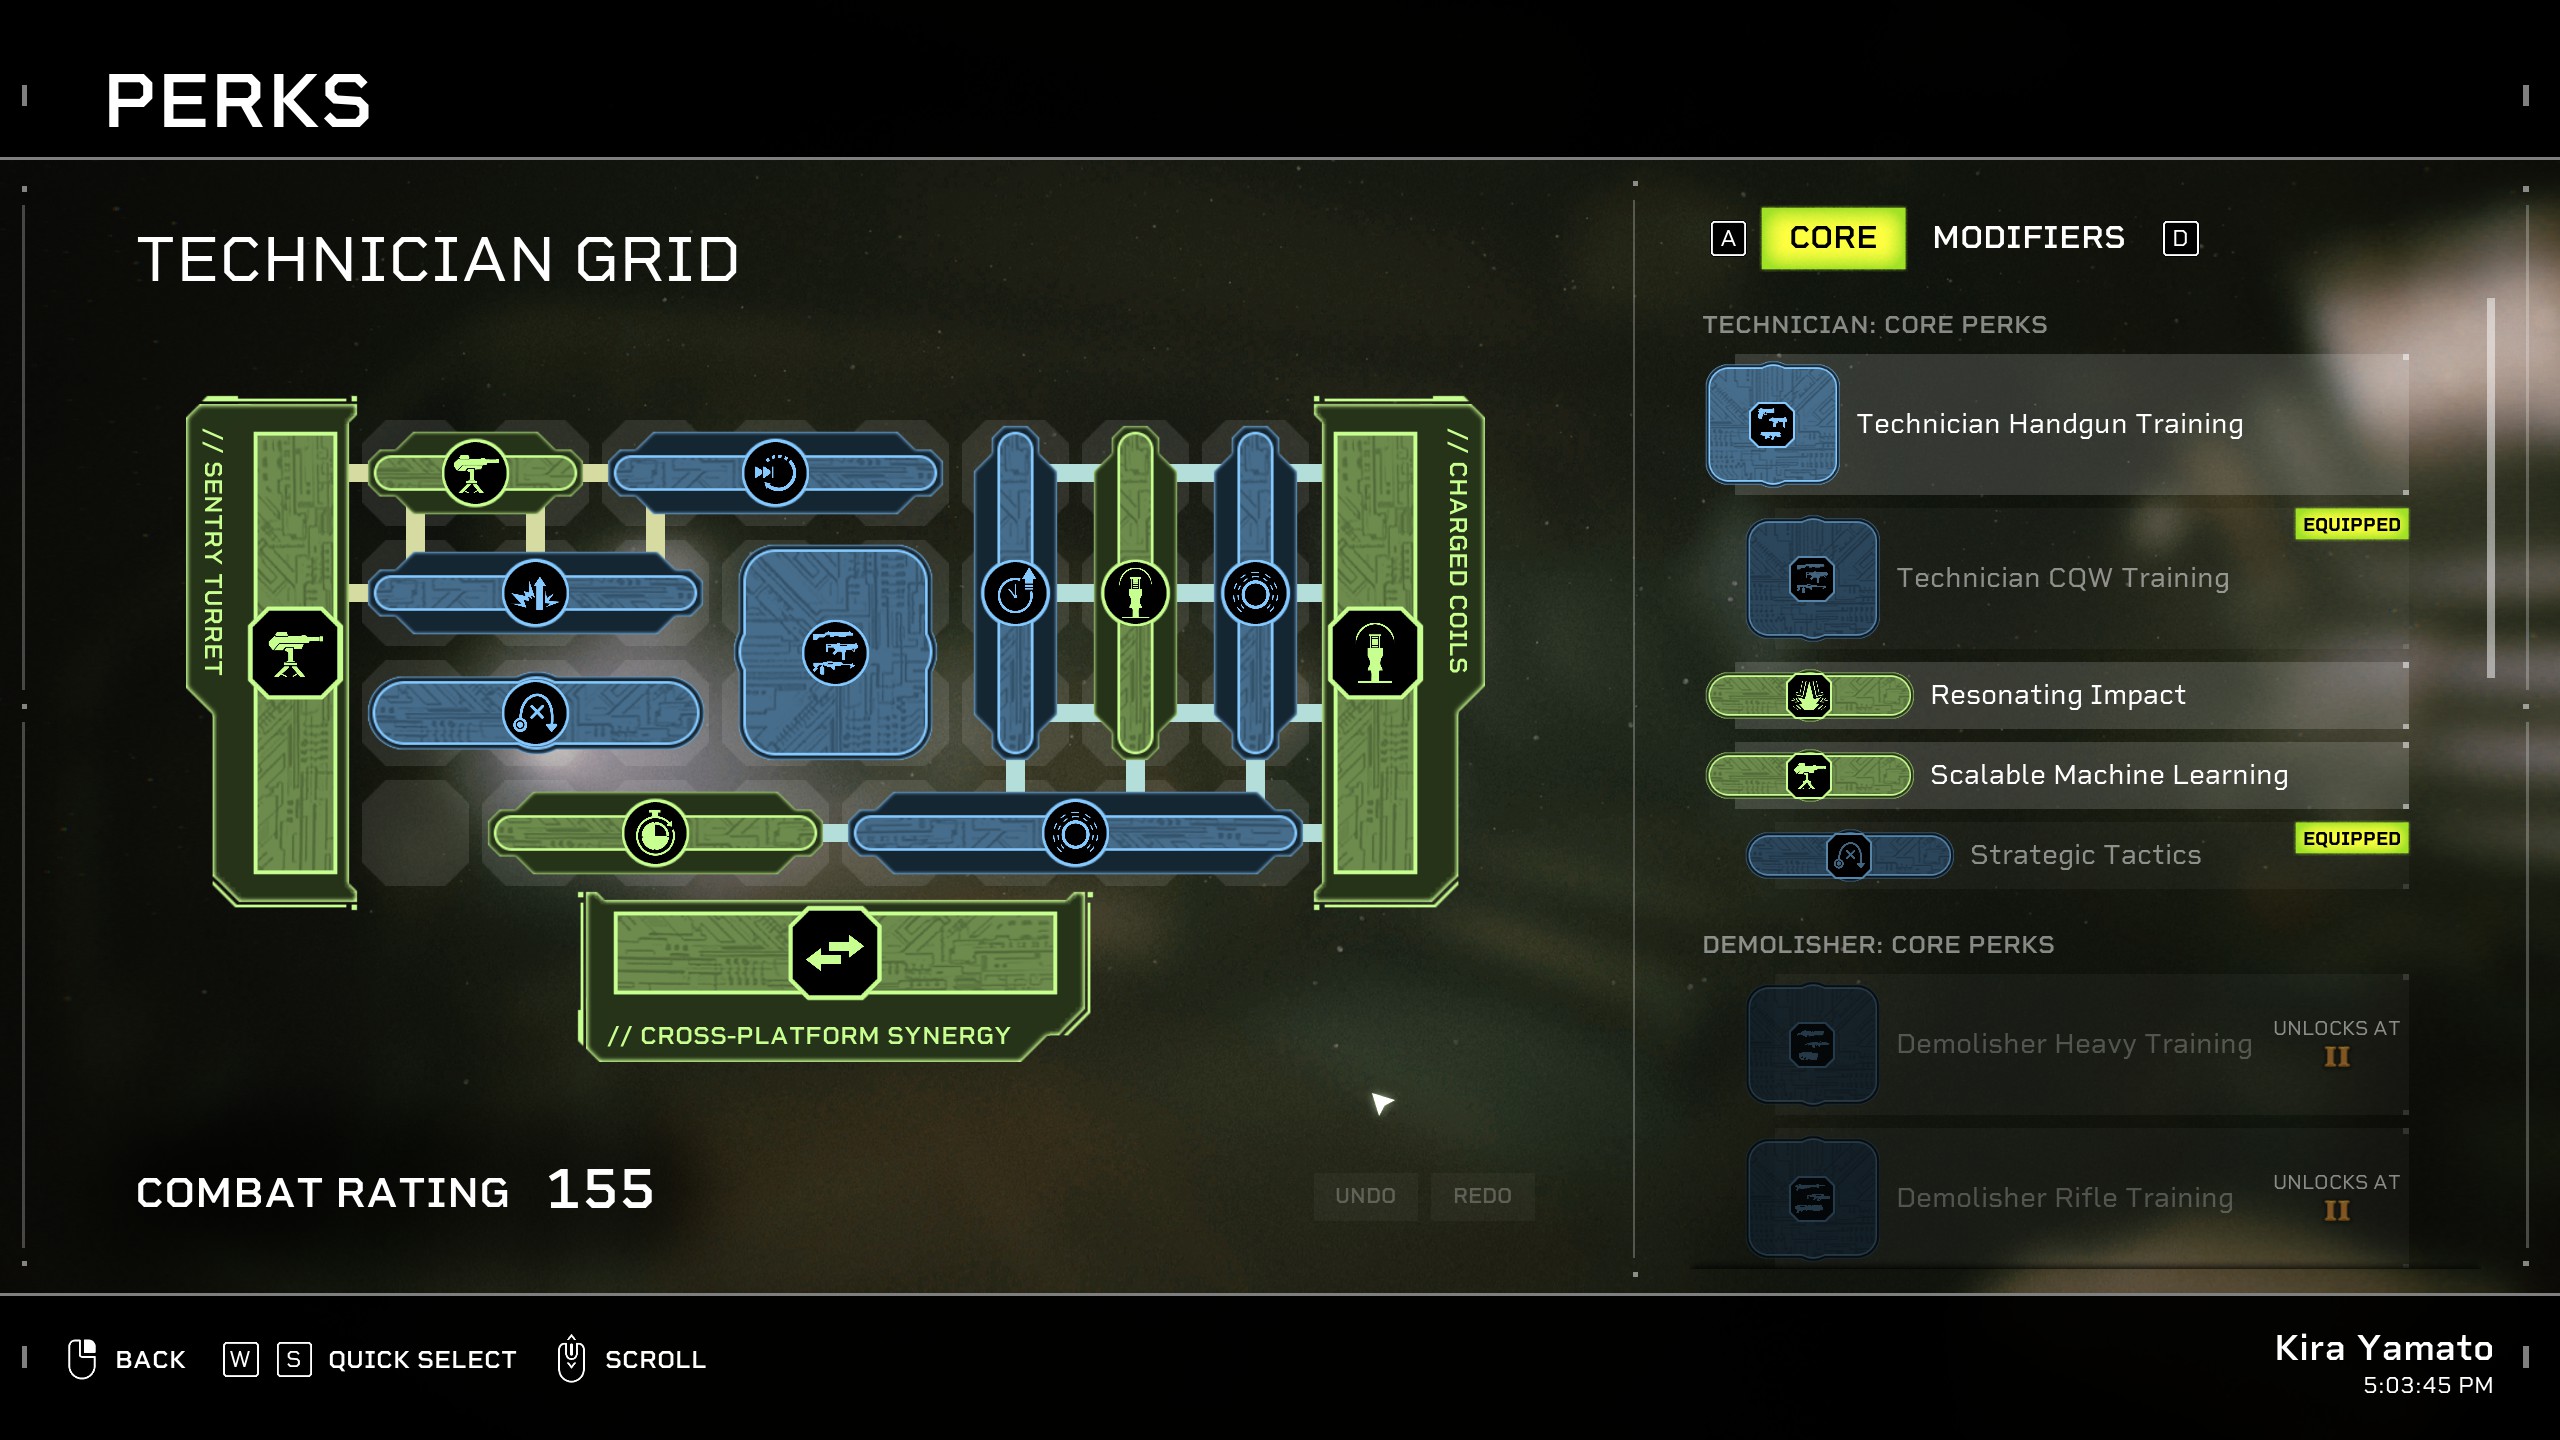
You will begin with two 3×2 blocks, one on each side, with additional area locked by the class’ level. As you increase your level (the cap is 8), your skill tree will eventually look something like this:
The modifiers as you can see come in different shapes and sizes, however you do have the option to rotate them to fit as much possible in your available area. Abilities/modifiers linked to a skill are designated by the grey connecting lines and as you can see, you can create multiple connections to a skill. If there is a modifier that can affect both skills you can not connect it to both, the game will ask you to clarify which skill you wish for the modifier to solely affect.
Lastly, blue perks are considered “universal”. They are general modifiers that when unlocked, can also be used on other classes. Green modifiers are class specific, and have more detailed explanations on what they do or how they alter/enhance a specific skill.
This is all about Aliens: Fireteam Elite – Classes Guide – Roles and the Basic Tips; I hope you enjoy reading the Guide! If you feel like we should add more information or we forget/mistake, please let us know via commenting below, and thanks! See you soon!
- All Aliens: Fireteam Elite Posts List


Leave a Reply